To connect successfully to an external running SIS using the Management API, properties such as username and password must be set.

VIA keeps these properties per project, as part of the project configuration data. You enter these settings when creating a project. To change them later:

1

Click the project root entry in the SIS View, and select Properties from the popup menu.

ViewProjectProps

A Property dialog displays.
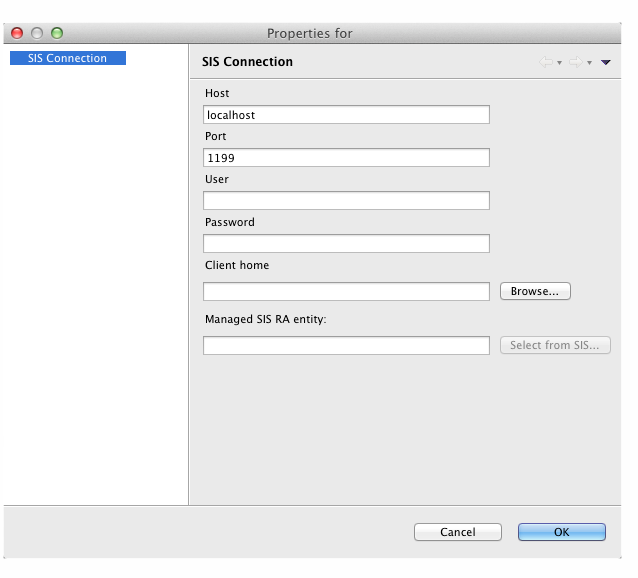
ProjectProps

2

You can change any of the following connection settings:

  • Host — IP address or name of the host on which the SIS is running

  • Port — port number for the JMX management connection (normally 1199)

  • User — username for management login (if blank, VIA uses the username setting from the client.properties file in the Client home directory)

  • Password — password for the User (if blank, VIA uses the password setting from the client.properties file in the Client home directory)

  • Client home — (local!) path to the client sub-directory of the running SIS. If the SIS is running on a remote host, the client sub-directory of the SIS’s Rhino installation must first be copied to the machine on which the VIA is running — and you must make sure that the remote Rhino-SIS is set up to accept JMX management connections from the VIA machine — see Logging into the Command Console

  • Managed SIS RA entity —  name of the SIS-RA entity for VIA to connect to.

Warning

SIS components can "belong" to multiple SIS-RA entities at once (by sharing configuration profiles). In VIA, however, this is not supported. VIA assumes that a certain SIS component only belongs to exactly one SIS-RA entity. This might create problems in cases where in existing deployments, for example, triggers are associated with multiple RA entities — when trying to undeploy such a trigger, which is active on both entities, through VIA, the undeploy operation will fail (as the VIA will only deactivate the trigger on one of the RA entity before trying to do the undeployment). In this case, as a workaround, you need to:

  1. Manually deactivate the trigger first on one RA entity.

  2. Change the name of the Managed SIS RA entity in the properties.

  3. Deactivate the trigger on the second RA entity,

  4. Change the RA entity name back

  5. Undeploy the trigger.

Previous page Next page