This section describes configuration of the Diameter Sh stack instance(s) inside the Rhino EM Web Application.
|
|
Architecture reference
For background on the architecture related to the instructions below, please read the XCAP Support page. |
Diameter Sh stack configuration
As seen in XCAP Support, the Diameter Sh stack is used by the XCAP Server and Rhino EM’s Web User interface.
Instances of the Diameter Sh stack are configured through two ‘locations’:
|
|
Both ‘locations’ are required to configure an instance. |
Configuring an Sh stack instance with REM
To configure an Sh stack with the REM:
1 |
Navigate to Sentinel ▶ HSS Configuration. 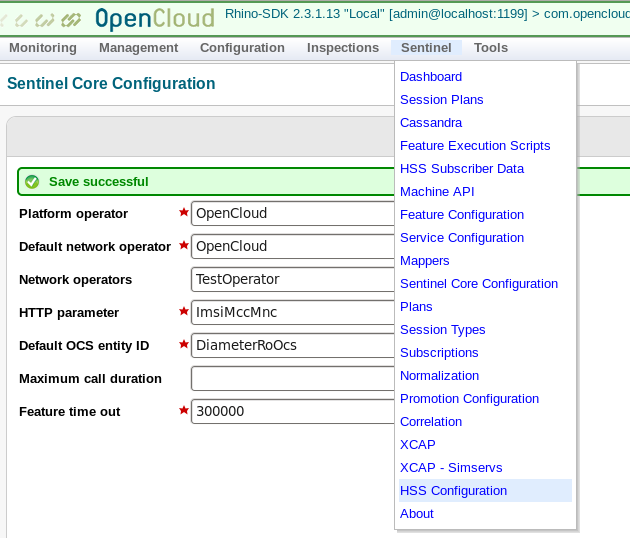
The Diameter Instance Configuration page displays. 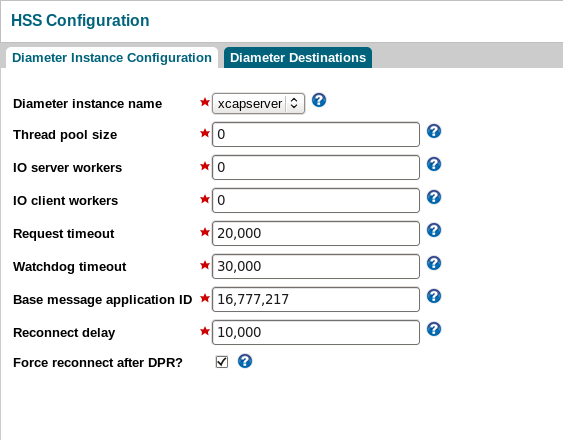
|
||
|---|---|---|---|
2 |
The Diameter instance name field identifies each instance of the Diameter Sh stack. Select an Sh stack instance, and specify entries in the other fields to configure key parameters.
|
|
|
Use a unique Sh stack instance per cluster
Selecting the name of the Diameter Sh stack instance in this panel links it with the Rhino cluster that your REM session is logged into. This means that when an administrator uses the HSS Transparent Data Editor, since they’ve logged into a Rhino cluster, the associated Diameter Sh stack instance in REM will be selected. Also, when processing an XCAP request, the XCAP Server will find the Rhino cluster to use, as it queries this for some settings. The Diameter Sh stack instance is then selected by the Rhino cluster’s linked Diameter Sh stack instance. In the case where REM is connected to only one Rhino cluster, there only needs to be one Diameter Sh stack instance. *We strongly recommend that you configure each Rhino cluster to use a unique Diameter Sh stack instance!_ |
Configuring an Sh stack instance with a file
When REM starts, it reads a configuration file. This file is formatted according to a Rhino Profile Export format.
|
|
Although REM uses this file format for a profile export; but this information is not stored in JSLEE profiles. The file itself is read and parsed as REM initialises. |
The file name is VolteHssDiameterConfig.xml, in the rem_home directory.
(With the Tomcat HTTP Servlet container, this directory is a subdirectory of the Tomcat home directory.)
Diameter Sh stack instance name and attributes
In the configuration file, each Diameter Sh stack instance is declared using a <profile> element. The <profile> element must have a name (the name of the Diameter Sh Stack instance) and an action attribute.
The action attribute should be set to create. For example:
<profile name="xcapserver" action="create">
In this case, the Diameter Sh stack instance is named xcapserver. This name is the core link between the XML configuration file and the REM configuration screen.
The following attributes are also required:
| Attribute name | What it specifies |
|---|---|
productVendorId |
used for the Vendor-Id AVP of the CER and CEA messages |
applicationVendorId |
Vendor ID; must be |
host |
host to use in all Origin-Host AVPs; must be resolvable |
applicationId |
Diameter Application ID |
realm |
realm to use in all Origin-Realm AVPs |
peerTable |
a diameter peer table XML encoded as Character Data See the Diameter documentation |
realmTable |
a diameter realm table XML encoded as Character Data See the Diameter documentation |
product |
product name to use in Product-Name AVPs generated by the stack |
version |
version number to use in all Firmware-Revision AVPs generated by the stack; must be a positive integer |
Example configuration file
This example shows a single Diameter Sh stack instance, with the name xcapserver.
<exported-profile-data table="VolteHssDiameterConfiguration">
    <attributes>
        <attribute-desc name="productVendorId" type="long" serialised="false"/>
        <attribute-desc name="applicationVendorId" type="long" serialised="false"/>
        <attribute-desc name="host" type="java.lang.String" serialised="false"/>
        <attribute-desc name="applicationId" type="long" serialised="false"/>
        <attribute-desc name="realm" type="java.lang.String" serialised="false"/>
        <attribute-desc name="peerTable" type="java.lang.String" serialised="false"/>
        <attribute-desc name="realmTable" type="java.lang.String" serialised="false"/>
        <attribute-desc name="product" type="java.lang.String" serialised="false"/>
        <attribute-desc name="version" type="int" serialised="false"/>
        <attribute-desc name="enableMultiNodeConfig" type="boolean" serialised="false"/>
        <attribute-desc name="nodeIDs" type="int[]" serialised="false"/>
        <attribute-desc name="perNodeHosts" type="java.lang.String[]" serialised="false"/>
        <attribute-desc name="perNodeListenAddresses" type="java.lang.String[]" serialised="false"/>
        <attribute-desc name="perNodePorts" type="int[]" serialised="false"/>
        <attribute-desc name="perNodeSecondaryAddresses" type="java.lang.String[]" serialised="false"/>
    </attributes>
    <profile name="xcapserver" action="create">
        <attribute-value name="productVendorId">19808</attribute-value>
        <attribute-value name="applicationVendorId">10415</attribute-value>
        <attribute-value name="host">xcapserver</attribute-value>
        <attribute-value name="applicationId">16777217</attribute-value>
        <attribute-value name="realm">ims.mncXXX.mccYYY.3gppnetwork.org</attribute-value>
        <attribute-value name="peerTable">
            <![CDATA[<?xml version="1.0" encoding="UTF-8"?>
                     <!DOCTYPE peer-table PUBLIC "-//Open Cloud Ltd.//DTD Diameter Peer Table Configuration 1.1.0//EN"
                     "http://www.opencloud.com/dtd/diameter-peer-table-1.1.0.dtd">
                     <peer-table>
                        <default-options>
                            <option>
                                <option-name>TCP_NODELAY</option-name>
                                <option-type>java.lang.Boolean</option-type>
                                <option-value>true</option-value>
                            </option>
                        </default-options>
                        <peer connectAtStartup="true">
                            <!--
                              Note that the XXX and YYY portions mncXXX and mccYYY
                               are expected to change to your network's
                               MNC and MCC value respectively
                             -->
                            <uri>aaa://hss1.ims.mncXXX.mccYYY.3gppnetwork.org:3888;transport=tcp</uri>
                            <!-- address only needed if the URI does not resolve -->
                            <address>192.168.1.111</address>
                            <option>
                                <option-name>TCP_NODELAY</option-name>
                                <option-type>java.lang.Boolean</option-type>
                                <option-value>false</option-value>
                            </option>
                        </peer>
                        <peer connectAtStartup="true">
                            <uri>aaa://hss2.ims.mncXXX.mccYYY.3gppnetwork.org:3888;transport=tcp</uri>
                            <address>192.168.1.222</address>
                            <option>
                                <option-name>TCP_NODELAY</option-name>
                                <option-type>java.lang.Boolean</option-type>
                                <option-value>false</option-value>
                            </option>
                         </peer>
                     </peer-table>]]>
        </attribute-value>
        <attribute-value name="realmTable">
        <![CDATA[<?xml version="1.0" encoding="UTF-8"?>
                 <!DOCTYPE realm-table PUBLIC "-//Open Cloud Ltd.//DTD Diameter Realm Table Configuration 1.0//EN"
                 "http://www.opencloud.com/dtd/diameter-realm-table-1.0.dtd">
                 <realm-table>

                     <realm>
                         <realm-name>ims.mncXXX.mccYYY.3gppnetwork.org</realm-name>
                             <application-route>
                                 <application>
                                     <application-id>16777217</application-id> <!-- Diameter Sh -->
                                     <vendor-id>10415</vendor-id> <!-- optional, default is zero
                                                                       3GPP is 10415 -->
                                 </application>
                                 <action>LOCAL</action>
                                 <peer-ref>
                                     <hostname>hss1.ims.mncXXX.mccYYY.3gppnetwork.org</hostname>
                                     <metric>1</metric>
                                 </peer-ref>
                                 <peer-ref>
                                     <hostname>hss2.ims.mncXXX.mccYYY.3gppnetwork.org</hostname>
                                     <metric>1</metric>
                                 </peer-ref>

                             </application-route>
                     </realm>
                 </realm-table>]]>
        </attribute-value>
        <attribute-value name="product">OpenCloud Diameter</attribute-value>
        <attribute-value name="version">1</attribute-value>
        <attribute-value name="enableMultiNodeConfig">false</attribute-value>
        <attribute-value name="nodeIDs" content-type="null"/>
        <attribute-value name="perNodeHosts" content-type="null"/>
        <attribute-value name="perNodeListenAddresses" content-type="null"/>
        <attribute-value name="perNodePorts" content-type="null"/>
        <attribute-value name="perNodeSecondaryAddresses" content-type="null"/>
    </profile>
</exported-profile-data>
Configuring the Sentinel network operator’s destination HSS
Now that we have a test operator, the HSS configuration can be added for this operator:
1 |
In REM, navigate to Sentinel ▶ HSS Configuration.
|
||
|---|---|---|---|
2 |
Select the Diameter Destinations tab. 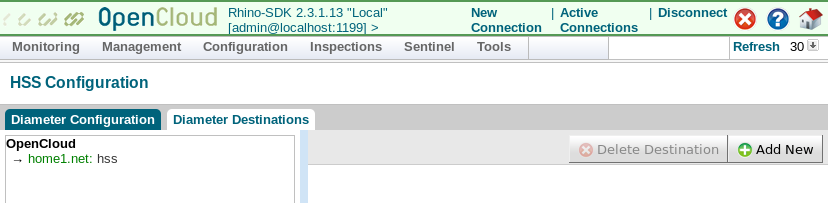
The screen above shows a network operator named |
||
3 |
Click the + Add New button. |
||
4 |
Enter these parameters:
|
||
5 |
Click the Save button. Once saved, the panel will display a green-coloured success message, and the REM log will have a green-coloured log message. 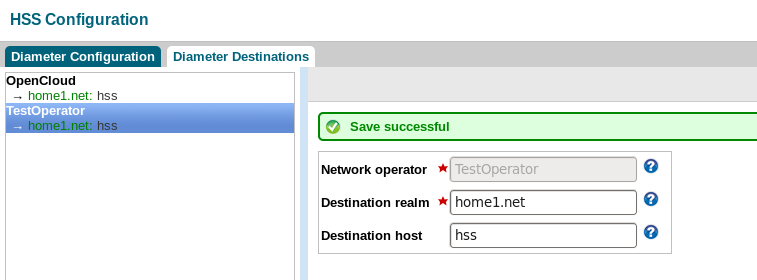
|
