This manual describes the installation, configuration, and upgrade of custom Rhino application VMs.
Introduction to the custom Rhino application product
The custom Rhino application solution is designed to allow you to create and deploy virtual machines that run custom-developed applications based on the Rhino Telecoms Application Server platform. Starting from an export or package of your application, you can create VM images with the VM Build Container (VMBC) tool, and deploy them to an OpenStack, VMware vSphere, or VMware vCloud host.
In addition, accompanying REM and SGC VMs are available that provide monitoring and SS7 functionality.
Installation
Installation is the process of deploying VMs onto your host. The custom Rhino application VMs must be installed using the SIMPL VM, which you will need to deploy manually first, using instructions from the SIMPL VM Documentation.
The SIMPL VM allows you to deploy VMs in an automated way. By writing a Solution Definition File (SDF), you describe to the SIMPL VM the number of VMs in your deployment and their properties such as hostnames and IP addresses. Software on the SIMPL VM then communicates with your VM host to create and power on the VMs.
The SIMPL VM deploys images from packages known as CSARs (Cloud Service Archives),
which contain a VM image in the format the host would recognize, such as .ova for VMware vSphere,
as well as ancillary tools and data files.
The VMBC tool creates CSARs suitable for the platform(s) you specify when invoking it.
See the Installation and upgrades overview page for detailed installation instructions.
Note that all nodes in a deployment must be configured before any of them will start to serve live traffic.
Upgrades
The custom Rhino application nodes are designed to allow rolling upgrades with little or no service outage time. One at a time, each downlevel node is destroyed and replaced by an uplevel node. This is repeated until all nodes have been upgraded.
Configuration for the uplevel node is uploaded in advance. As nodes are recreated, they immediately pick up the uplevel configuration and resume service application.
If an upgrade goes wrong, rollback to the previous version is also supported.
As with installation, upgrades and rollbacks use the SIMPL VM.
See the Installation and upgrades overview page for detailed instructions on how to perform an upgrade.
CSAR EFIX patches
CSAR EFIX patches, also known as VM patches, are based on the SIMPL VM’s csar efix command. The command is used to combine a CSAR EFIX file (a tar file containing some metadata and files to update), and an existing unpacked CSAR on the SIMPL. This creates a new, patched CSAR on the SIMPL VM. It does not patch any VMs in-place, but instead patches the CSAR itself offline on the SIMPL VM. A normal rolling upgrade is then used to migrate to the patched version.
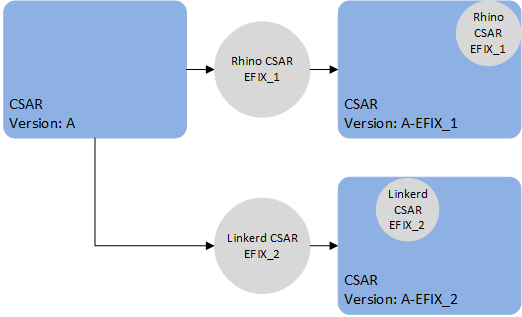
Once a CSAR has been patched, the newly created CSAR is entirely separate, with no linkage between them. Applying patch EFIX_1 to the original CSAR creates a new CSAR with the changes from patch EFIX_1.
In general:
-
Applying patch EFIX_2 to the original CSAR will yield a new CSAR without the changes from EFIX_1.

-
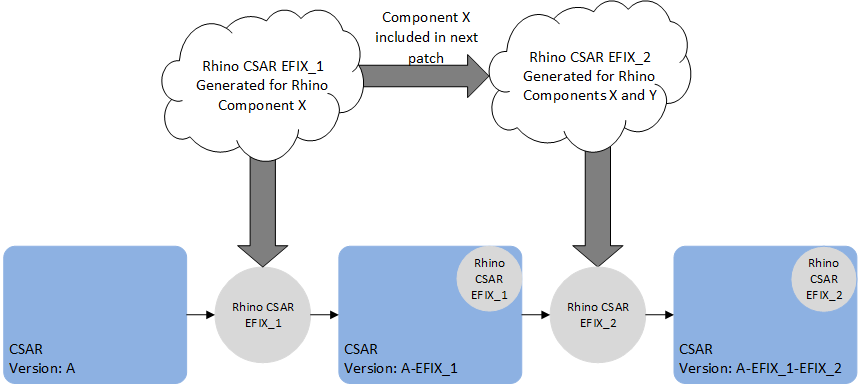
Applying EFIX_2 to the already patched CSAR will yield a new CSAR with the changes from both EFIX_1 and EFIX_2.

VM patches which target SLEE components (e.g. a service or feature change) contain the full deployment state of Rhino, including all SLEE components. As such, if applying multiple patches of this type, only the last such patch will take effect, because the last patch contains all the SLEE components. In other words, a patch to SLEE components should contain all the desired SLEE component changes, relative to the original release of the VM. For example, patch EFIX_1 contains a fix for the HTTP RA SLEE component X and patch EFIX_2 contains an fix for a SLEE Service component Y. When EFIX_2 is generated it will contain the component X and Y fixes for the VM.

However, it is possible to apply a specific patch with a generic CSAR EFIX patch that only contains files to update. For example, patch EFIX_1 contains a specific patch that contains a fix for the HTTP RA SLEE component, and patch EFIX_2 contains an update to the linkerd config file. We can apply patch EFIX_1 to the original CSAR, then patch EFIX_2 to the patched CSAR.

We can also apply EFIX_2 first then EFIX_1.

|
|
When a CSAR EFIX patch is applied, a new CSAR is created with the versions of the target CSAR and the CSAR EFIX version. |
Configuration
The configuration model is "declarative" - to change the configuration, you upload a complete set of files containing the entire configuration for all nodes, and the VMs will attempt to alter their configuration ("converge") to match. This allows for integration with GitOps (keeping configuration in a source control system), as well as ease of generating configuration via scripts.
Configuration is stored in a database called CDS, which is a set of tables in a Cassandra database. These tables contain version information, so that you can upload configuration in preparation for an upgrade without affecting the live system.
For the custom Rhino application, the CDS database must be provided by the customer. See Setting up CDS for a guide on how to create the required tables.
Configuration files are written in YAML format. Using the rvtconfig tool, their contents can be syntax-checked and verified for validity and self-consistency before uploading them to CDS.
See VM configuration for detailed information about writing configuration files and the (re)configuration process.
