This manual is a guide for configuring and upgrading the TSN, ShCM, MAG, MMT GSM, and SMO nodes as virtual machines on OpenStack or VMware vSphere.
- Notices
- Changelogs
- Introduction
- VM types
- Installation and upgrades
- Installation and upgrades overview
- Installation or upgrades on OpenStack
- Installation on OpenStack
- Automatic rolling upgrades and patches with SIMPL VM on OpenStack
- Rolling upgrades with SIMPL VM
- Rolling upgrades using CSAR EFIX patch with SIMPL VM
- Setting up for a rolling upgrade using CSAR EFIX patch
- Rolling CSAR EFIX patch TSN nodes on OpenStack
- Rolling CSAR EFIX patch ShCM nodes on OpenStack
- Rolling CSAR EFIX patch MAG nodes on OpenStack
- Rolling CSAR EFIX patch MMT GSM nodes on OpenStack
- Rolling CSAR EFIX patch SMO nodes on OpenStack
- Post rolling upgrade using CSAR EFIX patch steps
- Installation or upgrades on VMware vSphere
- Installation on VMware vSphere
- Automatic rolling upgrades and patches with SIMPL VM on VMware vSphere
- Rolling upgrades with SIMPL VM
- Rolling upgrades using CSAR EFIX patch with SIMPL VM
- Setting up for a rolling upgrade using CSAR EFIX patch
- Rolling CSAR EFIX patch TSN nodes on VMware vSphere
- Rolling CSAR EFIX patch ShCM nodes on VMware vSphere
- Rolling CSAR EFIX patch MAG nodes on VMware vSphere
- Rolling CSAR EFIX patch MMT GSM nodes on VMware vSphere
- Rolling CSAR EFIX patch SMO nodes on VMware vSphere
- Post rolling upgrade using CSAR EFIX patch steps
- Verify the state of the nodes and processes
- VM configuration
- Declarative Configuration
- rvtconfig
- Writing an SDF
- Bootstrap parameters
- Bootstrap and configuration
- REM, XCAP and BSF certificates
- SAS configuration
- Services and components
- Configuration YANG schema
- tsn-vm-pool.yang
- snmp-configuration.yang
- routing-configuration.yang
- system-configuration.yang
- traffic-type-configuration.yang
- common-configuration.yang
- shcm-service-configuration.yang
- shcm-vm-pool.yang
- sas-configuration.yang
- mag-vm-pool.yang
- bsf-configuration.yang
- naf-filter-configuration.yang
- home-network-configuration.yang
- number-analysis-configuration.yang
- mmt-gsm-vm-pool.yang
- sentinel-volte-configuration.yang
- hlr-configuration.yang
- icscf-configuration.yang
- smo-vm-pool.yang
- sgc-configuration.yang
- sentinel-ipsmgw-configuration.yang
- vm-types.yang
- Example configuration YAML files
- Example for tsn-vmpool-config.yaml
- Example for snmp-config.yaml
- Example for routing-config.yaml
- Example for system-config.yaml
- Example for shcm-vmpool-config.yaml
- Example for shcm-service-config.yaml
- Example for common-config.yaml
- Example for sas-config.yaml
- Example for mag-vmpool-config.yaml
- Example for bsf-config.yaml
- Example for naf-filter-config.yaml
- Example for home-network-config.yaml
- Example for number-analysis-config.yaml
- Example for mmt-gsm-vmpool-config.yaml
- Example for sentinel-volte-gsm-config.yaml
- Example for hlr-config.yaml
- Example for icscf-config.yaml
- Example for smo-vmpool-config.yaml
- Example for sgc-config.yaml
- Example for sentinel-ipsmgw-config.yaml
- Example for shcm-overrides.yaml
- Example for mag-overrides.yaml
- Example for mmt-gsm-overrides.yaml
- Example for smo-overrides.yaml
- Changing Cassandra data
- Connecting to MetaView Server
- SGC configuration tools
- Troubleshooting node installation
- Glossary
Notices
Copyright © 2014-2022 Metaswitch Networks. All rights reserved
This manual is issued on a controlled basis to a specific person on the understanding that no part of the Metaswitch Networks product code or documentation (including this manual) will be copied or distributed without prior agreement in writing from Metaswitch Networks.
Metaswitch Networks reserves the right to, without notice, modify or revise all or part of this document and/or change product features or specifications and shall not be responsible for any loss, cost, or damage, including consequential damage, caused by reliance on these materials.
Metaswitch and the Metaswitch logo are trademarks of Metaswitch Networks. Other brands and products referenced herein are the trademarks or registered trademarks of their respective holders.
Changelogs
4.0.0-36-1.0.0
-
rvtconfig has been updated so that it ignores specific files that may be in the rvt-config directory unnecessarily. (#386665)
-
Fully qualified table names in cqlsh queries and replaced prepared statements with parameterised simple statements. (#340635)
-
An error message is now output when incorrectly formatted override yaml files are inputted rather than a lengthy stack trace. (#381281)
-
Update MAG nginx config to add X-Ua-OpenSSL-Cipher-Suite header to XCAP server requests containing UE-nginx SSL connection cipher. (#340633)
-
Disabled reverse-DNS lookups for SSH logins on the VM. (#398999)
-
The
override.yamlfiles formmt-gsmandmmt-cdmanode types are now imcluded in thecompare-configandupload-configcomparisons. (#371373) -
The
--vm-version-sourceargument now takes the optionsdf-versionthat uses the version in the SDF for a given node. There is now a check that the inputted version matches the SDF version and an optional argument--skip-version-checkthat skips this check. (#380063)
4.0.0-34-1.0.0
-
Updated system package versions of
rsyncandopen-vm-toolsto address security vulnerabilities. -
Updated system package versions of
bpftool,kernel,perf,pythonandxzto address security vulnerabilities. -
Fixed an issue where VMs would send DNS queries for the
localhosthostname. (#206220) -
Fixed issue that meant
rvtconfig upload-configwould fail when running in an environment where the input device is not a TTY. When this case is detectedupload-configwill default to non-interactive confirmation-y. This preserves 4.0.0-26-1.0.0 (and earlier versions) in environments where an appropriate input device is not available. (#258542) -
Fixed an issue where scheduled tasks could incorrectly trigger on a reconfiguration of their schedules. (#167317)
-
Added
rvtconfig compare-configcommand and madervtconfig upload-configcheck config differences and request confirmation before upload. There is a new-fflag that can be used withupload-configto bypass the configuration comparison.-yflag can now be used withupload-configto provide non-interactive confirmation in the case that the comparison shows differences. (OPT-4517)
-
Added the rvt-gather_diags script to all node types. (#94043)
-
Increased bootstrap timeout from 5 to 15 minutes to allow time (10 minutes) to establish connectivity to NTP servers. (OPT-4917)
-
Make
rvtconfig validatenot fail if fields are present in the SDF it does not recognize. (OPT-4699) -
Added 3 new traffic schemes: "all signaling together except SIP", "all signaling together except HTTP", and "all traffic types separated". (#60997)
-
Fixed an issue where updated routing rules with the same target were not correctly applied. (#169195)
-
Scheduled tasks can now be configured to run more than once per day, week or month; and at different frequencies on different nodes. (OPT-4373)
-
Updated subnet validation to be done per-site rather than across the entire SDF deployment. (OPT-4412)
-
Fixed an issue where unwanted notification categories can be sent to SNMP targets. (OPT-4543)
-
Hardened linkerd by closing the prometheus stats port and changing the proxy port to listen on localhost only. (OPT-4840)
-
Added an optional node types field in the routing rules YAML configuration. This ensures the routing rule is only attempted to apply to VMs that are of the specified node types. (OPT-4079)
-
initconfwill not exit on invalid configuration. VM will be allowed to quiesce or upload new configuration. (OPT-4389) -
rvtconfignow only uploads a single group’s configuration to that group’s entry in CDS. This means that initconf no longer fails if some other node type has invalid configuration. (OPT-4392) -
Fixed a race condition that could result in the quiescence tasks failing to run. (OPT-4468)
-
The
rvtconfig upload-configcommand now displays leader seed information as part of the printed config version summary. (OPT-3962) -
Added
rvtconfig print-leader-seedcommand to display the current leader seed for a deployment and group. (OPT-3962) -
Enum types stored in CDS cross-level refactored to string types to enable backwards compatibility. (OPT-4072)
-
Updated system package versions of
bind,dhclient,dhcp,bpftool,libX11,linux-firmware,kernel,nspr,nss,openjdkandperfto address security vulnerabilities. (OPT-4332) -
Made
ip-address.ipfield optional during validation for non-RVT VNFCs. RVT and Custom VNFCs will still require the field. (OPT-4532) -
Fix SSH daemon configuration to reduce system log sizes due to error messages. (OPT-4538)
-
Allowed the primary user’s password to be configured in the product options in the SDF. (OPT-4448)
-
Updated system package version of
glib2to address security vulnerabilities. (OPT-4198) -
Updated NTP services to ensure the system time is set correctly on system boot. (OPT-4204)
-
Include deletion of leader-node state in rvtconfig delete-node-type, resolving an issue where the first node deployed after running that command wouldn’t deploy until the leader was re-deployed. (OPT-4213)
-
Rolled back SIMPL support to 6.6.3. (OPT-43176)
-
Disk and service monitor notification targets that use SNMPv3 are now configured correctly if both SNMPv2c and SNMPv3 are enabled. (OPT-4054)
-
Fixed issue where initconf would exit (and restart 15 minutes later) if it received a 400 response from the MDM. (OPT-4106)
-
The Sentinel GAA Cassandra keyspace is now created with a replication factor of 3. (OPT-4080)
-
snmptrapdis now enabled even if no targets are configured for system monitor notifications, in order to log any notifications that would have been sent. (OPT-4102) -
Fixed bug where the SNMPv3 user’s authentication and/or privacy keys could not be changed. (OPT-4102)
-
Making SNMPv3 queries to the VMs now requires encryption. (OPT-4102)
-
Fixed bug where system monitor notification traps would not be sent if SNMPv3 is enabled but v2c is not. Note that these traps are still sent as v2c only, even when v2c is not otherwise in use. (OPT-4102)
-
Removed support for the
signalingandsignaling2traffic type names. All traffic types should now be specified using the more granular names, such asss7. Refer to the pageTraffic types and traffic schemesin the Install Guide for a list of available traffic types. (OPT-3820) -
Ensured
ntpdis in slew mode, but always step the time on boot before Cassandra, Rhino and OCSS7 start. (OPT-4131, OPT-4143)
4.0.0-14-1.0.0
-
Changed the
rvtconfig delete-node-typecommand to also delete OID mappings as well as all virtual machine events for the specified version from cross-level group state. (OPT-3745) -
Fixed systemd units so that
systemddoes not restart Java applications after asystemctl kill. (OPT-3938) -
Added additional validation rules for traffic types in the SDF. (OPT-3834)
-
Increased the severity of SNMP alarms raised by the disk monitor. (OPT-3987)
-
Added
--cds-addressand--cds-addressesaliases for the-cparameter inrvtconfig. (OPT-3785)
4.0.0-13-1.0.0
-
Added support for separation of traffic types onto different network interfaces. (OPT-3818)
-
Improved the validation of SDF and YAML configuration files, and the errors reported when validation fails. (OPT-3656)
-
Added logging of the instance ID of the leader while waiting during initconf. (OPT-3558)
-
Do not use YAML anchors/aliases in the example SDFs. (OPT-3606)
-
Fixed a race condition that could cause initconf to hang indefinitely. (OPT-3742)
-
Improved error reporting in
rvtconfig. -
Updated SIMPL VM dependency to 6.6.1. (OPT-3857)
-
Adjusted linkerd OOM score so it will no longer be terminated by the OOM killer (OPT-3780)
-
Disabled all yum repositories. (OPT-3781)
-
Disabled the TLSv1 and TLSv1.1 algorithms for Java. (OPT-3781)
-
Changed initconf to treat the reload-resource-adaptors flag passed to rvtconfig as an intrinsic part of the configuration, when determining if the configuration has been updated. (OPT-3766)
-
Updated system package versions of
bind,bpftool,kernel,nettle,perfandscreento address security vulnerabilities. (OPT-3874) -
Added an option to
rvtconfig dump-configto dump the config to a specified directory. (OPT-3876) -
Fixed the confirmation prompt for
rvtconfig delete-node-typeandrvtconfig delete-deploymentcommands when run on the SIMPL VM. (OPT-3707) -
Corrected a regression and a race condition that prevented configuration being reapplied after a leader seed change. (OPT-3862)
4.0.0-9-1.0.0
-
All SDFs are now combined into a single SDF named
sdf-rvt.yaml. (OPT-2286) -
Added the ability to set certain OS-level (kernel) parameters via YAML configuration. (OPT-3403)
-
Updated to SIMPL 6.5.0. (OPT-3358, OPT-3545)
-
Make the default gateway optional for the clustering interface. (OPT-3417)
-
initconfwill no longer block startup of a configured VM if MDM is unavailable. (OPT-3206) -
Enforce a single secrets-private-key in the SDF. (OPT-3441)
-
Made the message logged when waiting for config be more detailed about which parameters are being used to determine which config to retrieve. (OPT-3418)
-
Removed image name from example SDFs, as this is derived automatically by SIMPL. (OPT-3485)
-
Make
systemctl statusoutput for containerised services not print benign errors. (OPT-3407) -
Added a command
delete-node-typeto facilitate re-deploying a node type after a failed deployment. (OPT-3406) -
Updated system package versions of
glibc,iwl1000-firmware,net-snmpandperlto address security vulnerabilities. (OPT-3620)
4.0.0-8-1.0.0
-
Fix bug (affecting 4.0.0-7-1.0.0 only) where rvtconfig was not reporting the public version string, but rather the internal build version (OPT-3268).
-
Update sudo package for CVE-2021-3156 vulnerability (OPT-3497)
-
Validate the product-options for each node type in the SDF. (OPT-3321)
-
Clustered MDM installations are now supported. Initconf will failover across multiple configured MDMs. (OPT-3181)
4.0.0-7-1.0.0
-
If YAML validation fails, print the filename where an error was found alongside the error. (OPT-3108)
-
Improved support for backwards compatibility with future CDS changes. (OPT-3274)
-
Change the
report-initconfscript to check for convergence since the last time config was received. (OPT-3341) -
Improved exception handling when CDS is not available. (OPT-3288)
-
Change rvtconfig upload-config and rvtconfig initial-configure to read the deployment ID from the SDFs and not a command line argument. (OPT-3111)
-
Publish imageless CSARs for all node types. (OPT-3410)
-
Added message to initconf.log explaining some Cassandra errors are expected. (OPT-3081)
-
Updated system package versions of
bpftool,dbus,kernel,nss,opensslandperfto address security vulnerabilities.
4.0.0-6-1.0.0
-
Updated to SIMPL 6.4.3. (OPT-3254)
-
When using a release version of
rvtconfig, the correctthis-rvtconfigversion is now used. (OPT-3268) -
All REM setup is now completed before restarting REM, to avoid unnecessary restarts. (OPT-3189)
-
Updated system package versions of
bind-*,curl,kernel,perfandpython-*to address security vulnerabilities. (OPT-3208) -
Added support for routing rules on the Signaling2 interface. (OPT-3191)
-
Configured routing rules are now ignored if a VM does not have that interface. (OPT-3191)
-
Added support for absolute paths in
rvtconfigCSAR container. (OPT-3077) -
The existing Rhino OIDs are now always imported for the current version. (OPT-3158)
-
Changed behaviour of
initconfto not restart resource adaptors by default, to avoid an unexpected outage. A restart can be requested using the--reload-resource-adaptorsparameter torvtconfig upload-config. (OPT-2906) -
Changed the SAS resource identifier to match the provided SAS resource bundles. (OPT-3322)
-
Added information about MDM and SIMPL to the documentation. (OPT-3074)
4.0.0-4-1.0.0
-
Added
list-configanddescribe-configoperations torvtconfigto list configurations already in CDS and describe the meaning of the specialthis-vmandthis-rvtconfigvalues. (OPT-3064) -
Renamed
rvtconfig initial-configuretorvtconfig upload-config, with the old command remaining as a synonym. (OPT-3064) -
Fixed
rvtconfig pre-upgrade-init-cdsto create a necessary table for upgrades from 3.1.0. (OPT-3048) -
Fixed crash due to missing Cassandra tables when using
rvtconfig pre-upgrade-init-cds. (OPT-3094) -
rvtconfig pre-upgrade-init-cdsandrvtconfig push-pre-upgrade-statenow supports absolute paths in arguments. (OPT-3094) -
Reduced timeout for DNS server failover. (OPT-2934)
-
Updated
rhino-node-idmax to 32767. (OPT-3153) -
Diagnostics at the top of
initconf.lognow include system version and CDS group ID. (OPT-3056) -
Random passwords for the Rhino client and server keystores are now generated and stored in CDS. (OPT-2636)
-
Updated to SIMPL 6.4.0. (OPT-3179)
-
Increased the healthcheck and decommision timeouts to 20 minutes and 15 minutes respectively. (OPT-3143)
-
Updated example SDFs to work with MDM 2.28.0, which is now the supported MDM version. (OPT-3028)
-
Added support to
report-initconffor handling rolled overinitconf-json.logfiles. The script can now read historic log files when building a report if necessary. (OPT-1440) -
Fixed potential data loss in Cassandra when doing an upgrade or rollback. (OPT-3004)
Introduction
This manual describes the configuration and upgrade of Rhino VoLTE TAS VMs.
Introduction to the Rhino VoLTE TAS product
The Rhino VoLTE TAS solution consists of a number of types of VMs that perform various IMS TAS functions. These nodes are deployed to an OpenStack or VMware vSphere host.
Most nodes' software is based on the Rhino Telecoms Application Server platform. Each VM type runs in a cluster for redundancy, and understands that it is part of the overall solution, so will configure itself with relevant settings from other VMs where appropriate.
Installation
Installation is the process of deploying VMs onto your host. The Rhino VoLTE TAS VMs must be installed using the SIMPL VM, which you will need to deploy manually first, using instructions from the SIMPL VM Documentation.
The SIMPL VM allows you to deploy VMs in an automated way. By writing a Solution Definition File (SDF), you describe to the SIMPL VM the number of VMs in your deployment and their properties such as hostnames and IP addresses. Software on the SIMPL VM then communicates with your VM host to create and power on the VMs.
The SIMPL VM deploys images from packages known as CSARs (Cloud Service Archives), which contain a VM image in the format the host would recognize, such as .ova for VMware vSphere, as well as ancillary tools and data files.
Your Metaswitch Customer Care Representative can provide you with links to CSARs suitable for your choice of appliance version and VM platform.
They can also assist you with writing the SDF.
See the Installation and upgrades overview page for detailed installation instructions.
Note that all nodes in a deployment must be configured before any of them will start to serve live traffic.
Upgrades
The Rhino VoLTE TAS nodes are designed to allow rolling upgrades with little or no service outage time. One at a time, each downlevel node is destroyed and replaced by an uplevel node. This is repeated until all nodes have been upgraded.
Configuration for the uplevel node is uploaded in advance. As nodes are recreated, they immediately pick up the uplevel configuration and resume service application.
If an upgrade goes wrong, rollback to the previous version is also supported.
As with installation, upgrades and rollbacks use the SIMPL VM.
See the Installation and upgrades overview page for detailed instructions on how to perform an upgrade.
CSAR EFIX patches
CSAR EFIX patches, also known as VM patches, are based on the SIMPL VM’s csar efix command. The command is used to combine a CSAR EFIX file (a tar file containing some metadata and files to update), and an existing unpacked CSAR on the SIMPL. This creates a new, patched CSAR on the SIMPL VM. It does not patch any VMs in-place, but instead patches the CSAR itself offline on the SIMPL VM. A normal rolling upgrade is then used to migrate to the patched version.
Once a CSAR has been patched, the newly created CSAR is entirely separate, with no linkage between them. Applying patch EFIX_1 to the original CSAR creates a new CSAR with the changes from patch EFIX_1.
In general:
-
Applying patch EFIX_2 to the original CSAR will yield a new CSAR without the changes from EFIX_1.
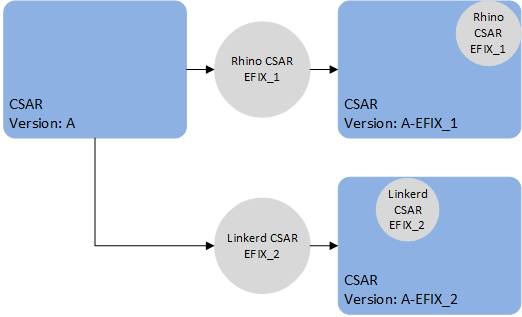
-
Applying EFIX_2 to the already patched CSAR will yield a new CSAR with the changes from both EFIX_1 and EFIX_2.

VM patches which target SLEE components (e.g. a service or feature change) contain the full deployment state of Rhino, including all SLEE components. As such, if applying multiple patches of this type, only the last such patch will take effect, because the last patch contains all the SLEE components. In other words, a patch to SLEE components should contain all the desired SLEE component changes, relative to the original release of the VM. For example, patch EFIX_1 contains a fix for the HTTP RA SLEE component X and patch EFIX_2 contains an fix for a SLEE Service component Y. When EFIX_2 is generated it will contain the component X and Y fixes for the VM.
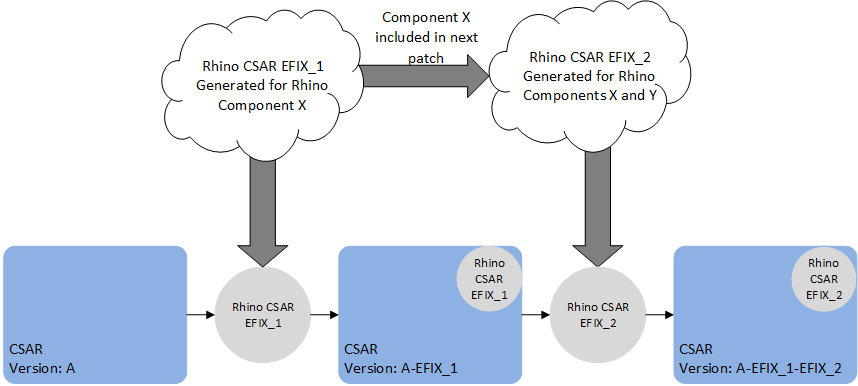
However, it is possible to apply a specific patch with a generic CSAR EFIX patch that only contains files to update. For example, patch EFIX_1 contains a specific patch that contains a fix for the HTTP RA SLEE component, and patch EFIX_2 contains an update to the linkerd config file. We can apply patch EFIX_1 to the original CSAR, then patch EFIX_2 to the patched CSAR.
We can also apply EFIX_2 first then EFIX_1.

| |
When a CSAR EFIX patch is applied, a new CSAR is created with the versions of the target CSAR and the CSAR EFIX version. |
Configuration
The configuration model is "declarative" - to change the configuration, you upload a complete set of files containing the entire configuration for all nodes, and the VMs will attempt to alter their configuration ("converge") to match. This allows for integration with GitOps (keeping configuration in a source control system), as well as ease of generating configuration via scripts.
Configuration is stored in a database called CDS, which is a set of tables in a Cassandra database. These tables contain version information, so that you can upload configuration in preparation for an upgrade without affecting the live system.
The TSN nodes provide the CDS database. The tables are created automatically when the TSN nodes start for the first time; no manual installation or configuration of Cassandra is required.
Configuration files are written in YAML format. Using the rvtconfig tool, their contents can be syntax-checked and verified for validity and self-consistency before uploading them to CDS.
See VM configuration for detailed information about writing configuration files and the (re)configuration process.
VM types
This page describes the different Rhino VoLTE TAS VM type(s) documented in this manual.
It also describes the ancillary nodes used to deploy and manage those VMs.
Node types
TSN
A TAS Storage Node (TSN) is a VM that runs two Cassandra databases and provides these databases' services to the other node types in a Rhino VoLTE TAS deployment. TSNs run in a cluster with between 3 and 30 nodes per cluster depending on deployment size; load-balancing is performed automatically.
ShCM
An Sh Cache Microservice node provides HTTP access to the HSS via Diameter Sh, as well as caching some of that data to reduce round trips to the HSS.
MAG
A Management and Authentication Gateway (MAG) node is a node that runs the XCAP server (part of Sentinel VoLTE), and Sentinel AGW, Metaswitch’s implementation of the 3GPP Generic Authentication Architecture (GAA) framework, consisting of the NAF Authentication Filter and BSF components. It also runs the Rhino Element Manager management and monitoring software. The BSF runs in Rhino, all the other components run in Apache Tomcat.
MMT GSM
An MMTel (MMT) node is a VM that runs the Sentinel VoLTE application on Rhino. It provides both SCC and MMTel functionality. It is available in both a GSM and CDMA version.
| |
This book documents the GSM version of the MMT node. If you are installing a CDMA deployment, please refer to the RVT VM Install Guide (CDMA). |
VM sizes
Refer to the Flavors section for information on the VMs' sizing: number of vCPUs, RAM, and virtual disk.
Ancillary node types
The SIMPL VM
The SIMPL Virtual Appliance provides orchestration software to create, verify, configure, destroy and upgrade RVT instances. Following the initial deployment, you will only need the SIMPL VM to perform configuration changes, patching or upgrades - it is not required for normal operation of the RVT deployment.
Installation
SIMPL supports VM orchestration for numerous Metaswitch products, including MDM (see below). SIMPL is normally deployed as a single VM instance, though deployments involving a large number of products may require two or three SIMPL instances to hold all the VM images.
Virtual hardware requirements for the SIMPL VM can be found in the "VM specification" section of the SIMPL VM Documentation.
Metaswitch Deployment Manager (MDM)
Rhino VoLTE TAS deployments use Metaswitch Deployment Manager (MDM) to co-ordinate installation, upgrades, scale and healing (replacement of failed instances). MDM is a virtual appliance that provides state monitoring, DNS and NTP services to the deployment. It is deployed as a pool of at least three virtual machines, and can also manage other Metaswitch products that might be present in your deployment such as Service Assurance Server (SAS) and Clearwater. A single pool of VMs can manage all instances of compatible Metaswitch products you are using.
Upgrade
If you are upgrading from a deployment which already has MDM, ensure all MDM instances are upgraded before starting the upgrade of the RVT nodes. Your Customer Care Representative can provide guidance on upgrading MDM.
If you are upgrading from a deployment which does not have MDM, you must deploy MDM before upgrading any RVT nodes.
Minimum number of nodes required
For a production deployment, all the node types required are listed in the following table, along with the minimum number of nodes of each type. The exact number of nodes of each type required will depend on your projected traffic capacity and profile.
For a lab deployment, we recommend that you install all node types. However, it is possible to omit MMT, ShCM, SMO, or MAG nodes if those node types are not a concern for your lab testing.
| |
The TSNs must be included for all lab deployments, as they are required for successful configuration of other node types. |
| |
A single site can have a maximum of 7 SMO nodes. |
| Node type | Minimum nodes for production deployment | Recommended minimum nodes for lab deployment |
|---|---|---|
TSN |
3 per site |
3 for the whole deployment |
ShCM |
2 per site |
1 for the whole deployment |
MAG |
3 per site |
1 per site |
MMT GSM |
3 per site |
1 per site |
SMO |
3 per site |
1 per site |
SIMPL |
1 for the whole deployment |
1 for the whole deployment |
MDM |
3 per site |
1 per site |
Flavors
Each node type has a set of specifications that defines RAM, storage, and CPU requirements for different deployment sizes, known as flavors. Refer to the pages of the individual node types for flavor specifications.
| |
The term |
TSN
The TSN nodes can be installed using the following flavors. This option has to be selected in the SDF. The selected option determines the values for RAM, hard disk space and virtual CPU count.
| |
The |
| Spec | Use case | Resources |
|---|---|---|
|
Lab trials and small-size production environments |
|
|
Mid-size production environments |
|
|
Large-size production environments |
|
ShCM
The ShCM nodes can be installed using the following flavors. This option has to be selected in the SDF. The selected option determines the values for RAM, hard disk space and virtual CPU count.
| Spec | Use case | Resources |
|---|---|---|
|
All deployments - this is the only supported deployment size |
|
MAG
The MAG nodes can be installed using the following flavors. This option has to be selected in the SDF. The selected option determines the values for RAM, hard disk space and virtual CPU count.
| |
The |
| Spec | Use case | Resources |
|---|---|---|
|
Lab and small-size production environments |
|
|
Mid and large-size production environments |
|
MMT GSM
The MMT GSM nodes can be installed using the following flavors. This option has to be selected in the SDF. The selected option determines the values for RAM, hard disk space and virtual CPU count.
| |
The |
| Spec | Use case | Resources |
|---|---|---|
|
Lab and small-size production environments |
|
|
Mid and large-size production environments |
|
SMO
The SMO nodes can be installed using the following flavors. This option has to be selected in the SDF. The selected option determines the values for RAM, hard disk space and virtual CPU count.
| |
The |
| Spec | Use case | Resources |
|---|---|---|
|
Lab and small-size production environments |
|
|
Mid and large-size production environments |
|
Installation and upgrades
- Installation and upgrades overview
- Installation or upgrades on OpenStack
- Installation on OpenStack
- Automatic rolling upgrades and patches with SIMPL VM on OpenStack
- Rolling upgrades with SIMPL VM
- Rolling upgrades using CSAR EFIX patch with SIMPL VM
- Setting up for a rolling upgrade using CSAR EFIX patch
- Rolling CSAR EFIX patch TSN nodes on OpenStack
- Rolling CSAR EFIX patch ShCM nodes on OpenStack
- Rolling CSAR EFIX patch MAG nodes on OpenStack
- Rolling CSAR EFIX patch MMT GSM nodes on OpenStack
- Rolling CSAR EFIX patch SMO nodes on OpenStack
- Post rolling upgrade using CSAR EFIX patch steps
- Installation or upgrades on VMware vSphere
- Installation on VMware vSphere
- Automatic rolling upgrades and patches with SIMPL VM on VMware vSphere
- Rolling upgrades with SIMPL VM
- Rolling upgrades using CSAR EFIX patch with SIMPL VM
- Setting up for a rolling upgrade using CSAR EFIX patch
- Rolling CSAR EFIX patch TSN nodes on VMware vSphere
- Rolling CSAR EFIX patch ShCM nodes on VMware vSphere
- Rolling CSAR EFIX patch MAG nodes on VMware vSphere
- Rolling CSAR EFIX patch MMT GSM nodes on VMware vSphere
- Rolling CSAR EFIX patch SMO nodes on VMware vSphere
- Post rolling upgrade using CSAR EFIX patch steps
Installation and upgrades overview
The steps below describe how to upgrade the nodes that make up your deployment. Select the steps that are appropriate for your VM host: OpenStack or VMware vSphere.
The supported versions for the platforms are listed below:
| Platform | Supported versions |
|---|---|
OpenStack |
Newton to Wallaby |
VMware vSphere |
6.7 and 7.0 |
Live migration of a node to a new VMware vSphere host or a new OpenStack compute node is not supported. To move such a node to a new host, remove it from the old host and add it again to the new host.
Preparing for an upgrade
| Task | More information |
|---|---|
Set up and/or verify your OpenStack or VMware vSphere deployment |
The installation procedures assume that you are upgrading VMs on an existing OpenStack or VMware vSphere host(s). Ensure the host(s) have sufficient vCPU, RAM and disk space capacity for the VMs. Note that for upgrades, you will temporarily need approximately one more VM’s worth of vCPU and RAM, and potentially more than double the disk space, than your existing deployment currently uses. You can later clean up older images to save disk space once you are happy that the upgrade was successful. Perform health checks on your host(s), such as checking for active alarms, to ensure they are in a suitable state to perform VM lifecycle operations. Ensure the VM host credentials that you will use in your SDF are valid and have sufficient permission to create/destroy VMs, power them on and off, change their properties, and access a VM’s terminal via the console. |
Prepare service configuration |
VM configuration information can be found at VM Configuration. |
Installation
The following table sets out the steps you need to take to install and commission your VM deployment.
Be sure you know the number of VMs you need in your deployment. At present it is not possible to change the size of your deployment after it has been created.
| Step | Task | Link |
|---|---|---|
Installation (on OpenStack) |
Prepare the SDF for the deployment |
|
Deploy SIMPL VM into OpenStack |
||
Prepare configuration files for the deployment |
||
Create the OpenStack flavors |
||
Install MDM |
||
Prepare SIMPL VM for deployment |
||
Deploy TSN nodes on OpenStack |
||
Deploy ShCM nodes on OpenStack |
||
Deploy MAG nodes on OpenStack |
||
Deploy MMT GSM nodes on OpenStack |
||
Deploy SMO nodes on OpenStack |
||
Installation (on VMware vSphere) |
Prepare the SDF for the deployment |
|
Deploy SIMPL VM into VMware vSphere |
||
Prepare configuration files for the deployment |
||
Install MDM |
||
Prepare SIMPL VM for deployment |
||
Deploy TSN nodes on VMware vSphere |
||
Deploy ShCM nodes on VMware vSphere |
||
Deploy MAG nodes on VMware vSphere |
||
Deploy MMT GSM nodes on VMware vSphere |
||
Deploy SMO nodes on VMware vSphere |
||
Verification |
Run some simple tests to verify that your VMs are working as expected |
Upgrades
The following table sets out the steps you need to execute a rolling upgrade of an existing VM deployment.
| Step | Task | Link |
|---|---|---|
Rolling upgrade (on OpenStack) |
Setting up for a rolling upgrade |
|
Rolling upgrade TSN nodes on OpenStack |
||
Rolling upgrade ShCM nodes on OpenStack |
||
Rolling upgrade MAG nodes on OpenStack |
||
Rolling upgrade MMT GSM nodes on OpenStack |
||
Rolling upgrade SMO nodes on OpenStack |
||
Rolling upgrade (on OpenStack) |
Post rolling upgrade steps |
|
Rolling upgrade (on VMware vSphere) |
Setting up for a rolling upgrade |
|
Rolling upgrade TSN nodes on VMware vSphere |
||
Rolling upgrade ShCM nodes on VMware vSphere |
||
Rolling upgrade MAG nodes on VMware vSphere |
||
Rolling upgrade MMT GSM nodes on VMware vSphere |
||
Rolling upgrade SMO nodes on VMware vSphere |
||
Rolling upgrade (on VMware vSphere) |
Post rolling upgrade steps |
|
Verification |
Run some simple tests to verify that your VMs are working as expected |
Patches
The following table sets out the steps you need to execute a patch of an existing VM deployment.
| Step | Task | Link |
|---|---|---|
Rolling upgrade using CSAR EFIX patch (on OpenStack) |
Setting up for a rolling upgrade using CSAR EFIX patch |
|
Rolling CSAR EFIX patch TSN nodes on OpenStack |
||
Rolling CSAR EFIX patch ShCM nodes on OpenStack |
||
Rolling CSAR EFIX patch MAG nodes on OpenStack |
||
Rolling CSAR EFIX patch MMT GSM nodes on OpenStack |
||
Rolling CSAR EFIX patch SMO nodes on OpenStack |
||
Rolling upgrade using CSAR EFIX patch (on OpenStack) |
Post rolling upgrade using CSAR EFIX patch steps |
|
Rolling upgrade using CSAR EFIX patch (on VMware vSphere) |
Setting up for a rolling upgrade using CSAR EFIX patch |
|
Rolling CSAR EFIX patch TSN nodes on VMware vSphere |
||
Rolling CSAR EFIX patch ShCM nodes on VMware vSphere |
||
Rolling CSAR EFIX patch MAG nodes on VMware vSphere |
||
Rolling CSAR EFIX patch MMT GSM nodes on VMware vSphere |
||
Rolling CSAR EFIX patch SMO nodes on VMware vSphere |
||
Rolling upgrade using CSAR EFIX patch (on VMware vSphere) |
Post rolling upgrade using CSAR EFIX patch steps |
|
Installation or upgrades on OpenStack
These pages describe how to install or upgrade the RVT nodes on OpenStack.
- Installation on OpenStack
- Automatic rolling upgrades and patches with SIMPL VM on OpenStack
- Rolling upgrades with SIMPL VM
- Rolling upgrades using CSAR EFIX patch with SIMPL VM
- Setting up for a rolling upgrade using CSAR EFIX patch
- Rolling CSAR EFIX patch TSN nodes on OpenStack
- Rolling CSAR EFIX patch ShCM nodes on OpenStack
- Rolling CSAR EFIX patch MAG nodes on OpenStack
- Rolling CSAR EFIX patch MMT GSM nodes on OpenStack
- Rolling CSAR EFIX patch SMO nodes on OpenStack
- Post rolling upgrade using CSAR EFIX patch steps
Installation on OpenStack
These pages describe how to install the nodes on OpenStack.
Prepare the SDF for the deployment
Planning for the procedure
Background knowledge
This procedure assumes that:
-
you are installing into an existing OpenStack deployment
-
you are using an OpenStack version from Icehouse through to Train inclusive
-
you are thoroughly familiar with working with OpenStack machines and know how to set up tenants, users, roles, client environment scripts, and so on
(For more information, refer to the appropriate OpenStack installation guide for the version that you are using here.)
-
you have read the installation guidelines at Installation and upgrades overview and have everything you need to carry out the installation.
Reserve maintenance period
This procedure does not require a maintenance period. However, if you are integrating into a live network, we recommend that you implement measures to mitigate any unforeseen events.
Tools and access
This page references an external document: SIMPL VM Documentation. Ensure you have a copy available before proceeding.
Installation Questions
| Question | More information |
|---|---|
Do you have the correct CSARs? |
All virtual appliances use the naming convention - |
Do you have a list of the IP addresses that you intend to give to each node of each node type? |
Each node requires an IP address for each interface. You can find a list of the VM’s interfaces on the Network Interfaces page. |
Do you have DNS and NTP Server information? |
It is expected that the deployed nodes will integrate with the IMS Core NTP and DNS servers. |
Method of procedure
Step 1 - Extract the CSAR
This can either be done on your local Linux machine or on a SIMPL VM.
Option A - Running on a local machine
| |
If you plan to do all operations from your local Linux machine instead of SIMPL, Docker must be installed to run the rvtconfig tool in a later step. |
To extract the CSAR, run the command: unzip <path to CSAR> -d <new directory to extract CSAR to>.
Option B - Running on an existing SIMPL VM
For this step, the SIMPL VM does not need to be running on the Openstack deployment where the deployment takes place. It is sufficient to use a SIMPL VM on a lab system to prepare for a production deployment.
Transfer the CSAR onto the SIMPL VM and run csar unpack <path to CSAR>, where <path to CSAR> is the full path to the transferred CSAR.
This will unpack the CSAR to ~/.local/share/csar/.
Step 2 - Write the SDF
The Solution Definition File (SDF) contains all the information required to set up your cluster. It is therefore crucial to ensure all information in the SDF is correct before beginning the deployment. One SDF should be written per deployment.
It is recommended that the SDF is written before starting the deployment. The SDF must be named sdf-rvt.yaml.
See Writing an SDF for more detailed information.
| |
Each deployment needs a unique |
Example SDFs are included in every CSAR and can also be found at Example SDFs. We recommend that you start from a template SDF and edit it as desired instead of writing an SDF from scratch.
Deploy SIMPL VM into OpenStack
| |
Note that one SIMPL VM can be used to deploy multiple node types. Thus, this step only needs to be performed once for all node types. |
| |
The supported version of the SIMPL VM is |
Planning for the procedure
Background knowledge
This procedure assumes that:
-
you are installing into an existing OpenStack deployment
-
you are using a supported OpenStack version, as described in the 'OpenStack requirements' section of the SIMPL VM Documentation
-
you are thoroughly familiar with working with OpenStack machines and know how to set up tenants, users, roles, client environment scripts, and so on
(For more information, refer to the appropriate OpenStack installation guide for the version that you are using here.)
-
you know the IP networking information (IP address, subnet mask in CIDR notation, and default gateway) for the SIMPL VM.
Reserve maintenance period
This procedure does not require a maintenance period. However, if you are integrating into a live network, we recommend that you implement measures to mitigate any unforeseen events.
Tools and access
You must have:
-
access to a local computer with a network connection and browser access to the OpenStack Dashboard
-
administrative access to the OpenStack host machine
-
the OpenStack privileges required to deploy VMs from an image (see OpenStack documentation for specific details).
This page references an external document: the SIMPL VM Documentation. Ensure you have a copy available before proceeding.
Installation Questions
| Question | More information |
|---|---|
Do you have the correct SIMPL VM QCOW2? |
All SIMPL VM virtual appliances use the naming convention - |
Do you know the IP address that you intend to give to the SIMPL VM? |
The SIMPL VM requires one IP address, for management traffic. |
Have you created and do you know the names of the networks and security group for the nodes? |
The SIMPL VM requires a management network with an unrestricted security group. |
Method of procedure
Deploy and configure the SIMPL VM
Follow the SIMPL VM Documentation on how to deploy the SIMPL VM and set up the configuration.
Prepare configuration files for the deployment
To deploy nodes, you need to prepare configuration files that would be uploaded to the VMs.
Method of procedure
Step 1 - Create configuration YAML files
Create configuration YAML files relevant for your node type on the SIMPL VM. Store these files in the same directory as your prepared SDF.
See Example configuration YAML files for example configuration files.
Create the OpenStack flavors
About this task
This task creates the node flavor(s) that you will need when installing your deployment on OpenStack virtual machines.
| |
You must complete this procedure before you begin the installation of the first node on OpenStack, but will not need to carry it out again for subsequent node installations. |
Create your node flavor(s)
Detailed procedure
-
Run the following command to create the OpenStack flavor, replacing
<flavor name>with a name that will help you identify the flavor in future.nova flavor-create <flavor name> auto <ram_mb> <disk_gb> <vcpu_count>where:
-
<ram_mb>is the amount of RAM, in megabytes -
<disk_gb>is the amount of hard disk space, in gigabytes -
<vpu_count>is the number of virtual CPUs.Specify the parameters as pure numbers without units.
-
You can find the possible flavors in the Flavors section, and it is recommended to use the same flavor name as described there.
Some node types share flavors. If the same flavor is to be used for multiple node types, only create it once.
-
Make note of the flavor ID value provided in the command output because you will need it when installing your OpenStack deployment.
-
To check that the flavor you have just created has the correct values, run the command:
nova flavor-list -
If you need to remove an incorrectly-configured flavor (replacing <flavor name> with the name of the flavor), run the command:
nova flavor-delete <flavor name>
Install MDM
Before deploying any nodes, you will need to first install Metaswitch Deployment Manager (MDM).
Prerequisites
-
The MDM CSAR
-
A deployed and powered-on SIMPL virtual machine
-
The MDM deployment parameters (hostnames; management and signaling IP addresses)
-
Addresses for NTP, DNS and SNMP servers that the MDM instances will use
| |
The minimum supported version of MDM is |
Method of procedure
Your Customer Care Representative can provide guidance on using the SIMPL VM to deploy MDM. Follow the instructions in the SIMPL VM Documentation.
As part of the installation, you will add MDM to the Solution Definition File (SDF) with the following data:
-
certificates and keys
-
custom topology
Generation of certificates and keys
MDM requires the following certificates and keys. Refer to the MDM documentation for more details.
-
An SSH key pair (for logging into all instances in the deployment, including MDM, which does not allow SSH access using passwords)
-
A CA (certificate authority) certificate and private key (used for the server authentication side of mutual TLS)
-
A "static", also called "client", certificate and private key (used for the client authentication side of mutual TLS)
The CA private key is unused, but should be kept safe in order to generate a new static certificate and private key in the future. Add the other credentials to the SDF sdf-rvt.yaml as described in MDM service group.
Prepare SIMPL VM for deployment
Before deploying the VMs, the following files must be uploaded onto the SIMPL VM.
Upload the CSARs to the SIMPL VM
If not already done, transfer the CSARs onto the SIMPL VM. For each CSAR, run csar unpack <path to CSAR>, where <path to CSAR> is the full path to the transferred CSAR.
This will unpack the CSARs to ~/.local/share/csar/.
Upload the SDF to SIMPL VM
If the CSAR SDF was not created on the SIMPL VM, transfer the previously written CSAR SDF onto the SIMPL VM.
| |
Ensure that each version in the vnfcs section of the SDF matches each node type’s CSAR version. |
Deploy the nodes on OpenStack
To install all node types, refer to the following pages in the order below.
Deploy TSN nodes on OpenStack
Planning for the procedure
Background knowledge
This procedure assumes that:
-
you are installing into an existing OpenStack deployment
-
The OpenStack deployment must be set up with support for Heat templates.
-
-
you are using an OpenStack version from Icehouse through to Train inclusive
-
you are thoroughly familiar with working with OpenStack machines and know how to set up tenants, users, roles, client environment scripts, and so on.
(For more information, refer to the appropriate OpenStack installation guide for the version that you are using here.)
-
you have deployed a SIMPL VM, unpacked the CSAR, and prepared an SDF.
Method of procedure
| |
Refer to the SIMPL VM Documentation for details on the commands mentioned in the procedure. |
Step 1 - Check OpenStack quotas
The SIMPL VM creates one server group per VM, and one security group per interface on each VM. OpenStack sets limits on the number of server groups and security groups through quotas.
View the quota by running openstack quota show <project id> on OpenStack Controller node. This shows the maximum number of various resources.
You can view the existing server groups by running openstack server group list. Similarly, you can find the security groups by running openstack security group list
If the quota is too small to accommodate the new VMs that will be deployed, increase it by running
openstack quota set --<quota field to increase> <new quota value> <project ID>. For example:
openstack quota set --server-groups 100 125610b8bf424e61ad2aa5be27ad73bb
Step 2 - Deploy the OVA
Run csar deploy --vnf tsn --sdf <path to SDF>.
This will validate the SDF, and generate the heat template. After successful validation, this will upload the image, and deploy the number of TSN nodes specified in the SDF.
| |
Only one node type should be deployed at the same time. I.e. when deploying these TSN nodes, don’t deploy other node types at the same time in parallel. |
Step 3 - Validate TSN RVT configuration
Validate the configuration for the TSN nodes to ensure that each TSN node can properly self-configure.
To validate the configuration after creating the YAML files, run
rvtconfig validate -t tsn -i <yaml-config-file-directory>
on the SIMPL VM from the resources subdirectory of the TSN CSAR.
Step 4 - Upload TSN RVT configuration
Upload the configuration for the TSN nodes to the CDS. This will enable each TSN node to self-configure.
To upload configuration after creating the YAML files and validating them as described above, run
rvtconfig upload-config -c <tsn-mgmt-addresses> -t tsn -i <yaml-config-file-directory> (--vm-version-source this-rvtconfig | --vm-version <version>)
on the SIMPL VM from the resources subdirectory of the TSN CSAR.
See Example configuration YAML files for example configuration files.
An in-depth description of RVT YAML configuration can be found in the Rhino VoLTE TAS Configuration and Management Guide.
Backout procedure
To delete the deployed VMs, run csar delete --vnf tsn --sdf <path to SDF>.
You must also delete the MDM state for each VM. To do this, you must first SSH into one of the MDM VMs. Get the instance IDs by running: mdmhelper --deployment-id <deployment ID> instance list. Then for each TSN VM, run the following command:
curl -X DELETE -k \
     --cert /etc/certs-agent/upload/mdm-cert.crt \
     --cacert /etc/certs-agent/upload/mdm-cas.crt \
     --key /etc/certs-agent/upload/mdm-key.key \
     https://127.0.0.1:4000/api/v1/deployments/<deployment ID>/instances/<instance ID>
Verify that the deletion worked by running mdmhelper --deployment-id <deployment ID> instance list again. You may now log out of the MDM VM.
Next Step
If you are upgrading a full set of VMs, go to Deploy ShCM nodes on OpenStack, otherwise follow the verification instructions here: Verify the state of the nodes and processes
Deploy ShCM nodes on OpenStack
Planning for the procedure
Background knowledge
This procedure assumes that:
-
you are installing into an existing OpenStack deployment
-
The OpenStack deployment must be set up with support for Heat templates.
-
-
you are using an OpenStack version from Icehouse through to Train inclusive
-
you are thoroughly familiar with working with OpenStack machines and know how to set up tenants, users, roles, client environment scripts, and so on.
(For more information, refer to the appropriate OpenStack installation guide for the version that you are using here.)
-
you have deployed a SIMPL VM, unpacked the CSAR, and prepared an SDF.
Method of procedure
| |
Refer to the SIMPL VM Documentation for details on the commands mentioned in the procedure. |
Step 1 - Check OpenStack quotas
The SIMPL VM creates one server group per VM, and one security group per interface on each VM. OpenStack sets limits on the number of server groups and security groups through quotas.
View the quota by running openstack quota show <project id> on OpenStack Controller node. This shows the maximum number of various resources.
You can view the existing server groups by running openstack server group list. Similarly, you can find the security groups by running openstack security group list
If the quota is too small to accommodate the new VMs that will be deployed, increase it by running
openstack quota set --<quota field to increase> <new quota value> <project ID>. For example:
openstack quota set --server-groups 100 125610b8bf424e61ad2aa5be27ad73bb
Step 2 - Validate ShCM RVT configuration
Validate the configuration for the ShCM nodes to ensure that each ShCM node can properly self-configure.
To validate the configuration after creating the YAML files, run
rvtconfig validate -t shcm -i <yaml-config-file-directory>
on the SIMPL VM from the resources subdirectory of the ShCM CSAR.
Step 3 - Upload ShCM RVT configuration
Upload the configuration for the ShCM nodes to the CDS. This will enable each ShCM node to self-configure when they are deployed in the next step.
To upload configuration after creating the YAML files and validating them as described above, run
rvtconfig upload-config -c <tsn-mgmt-addresses> -t shcm -i <yaml-config-file-directory> (--vm-version-source this-rvtconfig | --vm-version <version>)
on the SIMPL VM from the resources subdirectory of the ShCM CSAR.
See Example configuration YAML files for example configuration files.
An in-depth description of RVT YAML configuration can be found in the Rhino VoLTE TAS Configuration and Management Guide.
Step 4 - Deploy the OVA
Run csar deploy --vnf shcm --sdf <path to SDF>.
This will validate the SDF, and generate the heat template. After successful validation, this will upload the image, and deploy the number of ShCM nodes specified in the SDF.
| |
Only one node type should be deployed at the same time. I.e. when deploying these ShCM nodes, don’t deploy other node types at the same time in parallel. |
Backout procedure
To delete the deployed VMs, run csar delete --vnf shcm --sdf <path to SDF>.
You must also delete the MDM state for each VM. To do this, you must first SSH into one of the MDM VMs. Get the instance IDs by running: mdmhelper --deployment-id <deployment ID> instance list. Then for each ShCM VM, run the following command:
curl -X DELETE -k \
     --cert /etc/certs-agent/upload/mdm-cert.crt \
     --cacert /etc/certs-agent/upload/mdm-cas.crt \
     --key /etc/certs-agent/upload/mdm-key.key \
     https://127.0.0.1:4000/api/v1/deployments/<deployment ID>/instances/<instance ID>
Verify that the deletion worked by running mdmhelper --deployment-id <deployment ID> instance list again. You may now log out of the MDM VM.
You must also delete state for this node type and version from the CDS prior to re-deploying the VMs. To delete the state, run rvtconfig delete-node-type --cassandra-contact-point <any TSN IP> --deployment-id <deployment ID>.
--site-id <site ID> --node-type shcm
(--vm-version-source [this-vm | this-rvtconfig] | --vm-version <vm_version>)
Next Step
If you are upgrading a full set of VMs, go to Deploy MAG nodes on OpenStack, otherwise follow the verification instructions here: Verify the state of the nodes and processes
Deploy MAG nodes on OpenStack
Planning for the procedure
Background knowledge
This procedure assumes that:
-
you are installing into an existing OpenStack deployment
-
The OpenStack deployment must be set up with support for Heat templates.
-
-
you are using an OpenStack version from Icehouse through to Train inclusive
-
you are thoroughly familiar with working with OpenStack machines and know how to set up tenants, users, roles, client environment scripts, and so on.
(For more information, refer to the appropriate OpenStack installation guide for the version that you are using here.)
-
you have deployed a SIMPL VM, unpacked the CSAR, and prepared an SDF.
Method of procedure
| |
Refer to the SIMPL VM Documentation for details on the commands mentioned in the procedure. |
Step 1 - Check OpenStack quotas
The SIMPL VM creates one server group per VM, and one security group per interface on each VM. OpenStack sets limits on the number of server groups and security groups through quotas.
View the quota by running openstack quota show <project id> on OpenStack Controller node. This shows the maximum number of various resources.
You can view the existing server groups by running openstack server group list. Similarly, you can find the security groups by running openstack security group list
If the quota is too small to accommodate the new VMs that will be deployed, increase it by running
openstack quota set --<quota field to increase> <new quota value> <project ID>. For example:
openstack quota set --server-groups 100 125610b8bf424e61ad2aa5be27ad73bb
Step 2 - Validate MAG RVT configuration
Validate the configuration for the MAG nodes to ensure that each MAG node can properly self-configure.
To validate the configuration after creating the YAML files, run
rvtconfig validate -t mag -i <yaml-config-file-directory>
on the SIMPL VM from the resources subdirectory of the MAG CSAR.
Step 3 - Upload MAG RVT configuration
Upload the configuration for the MAG nodes to the CDS. This will enable each MAG node to self-configure when they are deployed in the next step.
To upload configuration after creating the YAML files and validating them as described above, run
rvtconfig upload-config -c <tsn-mgmt-addresses> -t mag -i <yaml-config-file-directory> (--vm-version-source this-rvtconfig | --vm-version <version>)
on the SIMPL VM from the resources subdirectory of the MAG CSAR.
See Example configuration YAML files for example configuration files.
An in-depth description of RVT YAML configuration can be found in the Rhino VoLTE TAS Configuration and Management Guide.
Step 4 - Deploy the OVA
Run csar deploy --vnf mag --sdf <path to SDF>.
This will validate the SDF, and generate the heat template. After successful validation, this will upload the image, and deploy the number of MAG nodes specified in the SDF.
| |
Only one node type should be deployed at the same time. I.e. when deploying these MAG nodes, don’t deploy other node types at the same time in parallel. |
Backout procedure
To delete the deployed VMs, run csar delete --vnf mag --sdf <path to SDF>.
You must also delete the MDM state for each VM. To do this, you must first SSH into one of the MDM VMs. Get the instance IDs by running: mdmhelper --deployment-id <deployment ID> instance list. Then for each MAG VM, run the following command:
curl -X DELETE -k \
     --cert /etc/certs-agent/upload/mdm-cert.crt \
     --cacert /etc/certs-agent/upload/mdm-cas.crt \
     --key /etc/certs-agent/upload/mdm-key.key \
     https://127.0.0.1:4000/api/v1/deployments/<deployment ID>/instances/<instance ID>
Verify that the deletion worked by running mdmhelper --deployment-id <deployment ID> instance list again. You may now log out of the MDM VM.
You must also delete state for this node type and version from the CDS prior to re-deploying the VMs. To delete the state, run rvtconfig delete-node-type --cassandra-contact-point <any TSN IP> --deployment-id <deployment ID>.
--site-id <site ID> --node-type mag
(--vm-version-source [this-vm | this-rvtconfig] | --vm-version <vm_version>)
Next Step
If you are upgrading a full set of VMs, go to Deploy MMT GSM nodes on OpenStack, otherwise follow the verification instructions here: Verify the state of the nodes and processes
Deploy MMT GSM nodes on OpenStack
Planning for the procedure
Background knowledge
This procedure assumes that:
-
you are installing into an existing OpenStack deployment
-
The OpenStack deployment must be set up with support for Heat templates.
-
-
you are using an OpenStack version from Icehouse through to Train inclusive
-
you are thoroughly familiar with working with OpenStack machines and know how to set up tenants, users, roles, client environment scripts, and so on.
(For more information, refer to the appropriate OpenStack installation guide for the version that you are using here.)
-
you have deployed a SIMPL VM, unpacked the CSAR, and prepared an SDF.
Method of procedure
| |
Refer to the SIMPL VM Documentation for details on the commands mentioned in the procedure. |
Step 1 - Check OpenStack quotas
The SIMPL VM creates one server group per VM, and one security group per interface on each VM. OpenStack sets limits on the number of server groups and security groups through quotas.
View the quota by running openstack quota show <project id> on OpenStack Controller node. This shows the maximum number of various resources.
You can view the existing server groups by running openstack server group list. Similarly, you can find the security groups by running openstack security group list
If the quota is too small to accommodate the new VMs that will be deployed, increase it by running
openstack quota set --<quota field to increase> <new quota value> <project ID>. For example:
openstack quota set --server-groups 100 125610b8bf424e61ad2aa5be27ad73bb
Step 2 - Validate MMT GSM RVT configuration
Validate the configuration for the MMT GSM nodes to ensure that each MMT GSM node can properly self-configure.
To validate the configuration after creating the YAML files, run
rvtconfig validate -t mmt-gsm -i <yaml-config-file-directory>
on the SIMPL VM from the resources subdirectory of the MMT GSM CSAR.
Step 3 - Upload MMT GSM RVT configuration
Upload the configuration for the MMT GSM nodes to the CDS. This will enable each MMT GSM node to self-configure when they are deployed in the next step.
To upload configuration after creating the YAML files and validating them as described above, run
rvtconfig upload-config -c <tsn-mgmt-addresses> -t mmt-gsm -i <yaml-config-file-directory> (--vm-version-source this-rvtconfig | --vm-version <version>)
on the SIMPL VM from the resources subdirectory of the MMT GSM CSAR.
See Example configuration YAML files for example configuration files.
An in-depth description of RVT YAML configuration can be found in the Rhino VoLTE TAS Configuration and Management Guide.
Step 4 - Deploy the OVA
Run csar deploy --vnf mmt-gsm --sdf <path to SDF>.
This will validate the SDF, and generate the heat template. After successful validation, this will upload the image, and deploy the number of MMT GSM nodes specified in the SDF.
| |
Only one node type should be deployed at the same time. I.e. when deploying these MMT GSM nodes, don’t deploy other node types at the same time in parallel. |
Backout procedure
To delete the deployed VMs, run csar delete --vnf mmt-gsm --sdf <path to SDF>.
You must also delete the MDM state for each VM. To do this, you must first SSH into one of the MDM VMs. Get the instance IDs by running: mdmhelper --deployment-id <deployment ID> instance list. Then for each MMT GSM VM, run the following command:
curl -X DELETE -k \
     --cert /etc/certs-agent/upload/mdm-cert.crt \
     --cacert /etc/certs-agent/upload/mdm-cas.crt \
     --key /etc/certs-agent/upload/mdm-key.key \
     https://127.0.0.1:4000/api/v1/deployments/<deployment ID>/instances/<instance ID>
Verify that the deletion worked by running mdmhelper --deployment-id <deployment ID> instance list again. You may now log out of the MDM VM.
You must also delete state for this node type and version from the CDS prior to re-deploying the VMs. To delete the state, run rvtconfig delete-node-type --cassandra-contact-point <any TSN IP> --deployment-id <deployment ID>.
--site-id <site ID> --node-type mmt-gsm
(--vm-version-source [this-vm | this-rvtconfig] | --vm-version <vm_version>)
Next Step
If you are upgrading a full set of VMs, go to Deploy SMO nodes on OpenStack, otherwise follow the verification instructions here: Verify the state of the nodes and processes
Deploy SMO nodes on OpenStack
Planning for the procedure
Background knowledge
This procedure assumes that:
-
you are installing into an existing OpenStack deployment
-
The OpenStack deployment must be set up with support for Heat templates.
-
-
you are using an OpenStack version from Icehouse through to Train inclusive
-
you are thoroughly familiar with working with OpenStack machines and know how to set up tenants, users, roles, client environment scripts, and so on.
(For more information, refer to the appropriate OpenStack installation guide for the version that you are using here.)
-
you have deployed a SIMPL VM, unpacked the CSAR, and prepared an SDF.
Method of procedure
| |
Refer to the SIMPL VM Documentation for details on the commands mentioned in the procedure. |
Step 1 - Check OpenStack quotas
The SIMPL VM creates one server group per VM, and one security group per interface on each VM. OpenStack sets limits on the number of server groups and security groups through quotas.
View the quota by running openstack quota show <project id> on OpenStack Controller node. This shows the maximum number of various resources.
You can view the existing server groups by running openstack server group list. Similarly, you can find the security groups by running openstack security group list
If the quota is too small to accommodate the new VMs that will be deployed, increase it by running
openstack quota set --<quota field to increase> <new quota value> <project ID>. For example:
openstack quota set --server-groups 100 125610b8bf424e61ad2aa5be27ad73bb
Step 2 - Validate SMO RVT configuration
Validate the configuration for the SMO nodes to ensure that each SMO node can properly self-configure.
To validate the configuration after creating the YAML files, run
rvtconfig validate -t smo -i <yaml-config-file-directory>
on the SIMPL VM from the resources subdirectory of the SMO CSAR.
Step 3 - Upload SMO RVT configuration
Upload the configuration for the SMO nodes to the CDS. This will enable each SMO node to self-configure when they are deployed in the next step.
To upload configuration after creating the YAML files and validating them as described above, run
rvtconfig upload-config -c <tsn-mgmt-addresses> -t smo -i <yaml-config-file-directory> (--vm-version-source this-rvtconfig | --vm-version <version>)
on the SIMPL VM from the resources subdirectory of the SMO CSAR.
See Example configuration YAML files for example configuration files.
An in-depth description of RVT YAML configuration can be found in the Rhino VoLTE TAS Configuration and Management Guide.
Step 4 - Deploy the OVA
Run csar deploy --vnf smo --sdf <path to SDF>.
This will validate the SDF, and generate the heat template. After successful validation, this will upload the image, and deploy the number of SMO nodes specified in the SDF.
| |
Only one node type should be deployed at the same time. I.e. when deploying these SMO nodes, don’t deploy other node types at the same time in parallel. |
Backout procedure
To delete the deployed VMs, run csar delete --vnf smo --sdf <path to SDF>.
You must also delete the MDM state for each VM. To do this, you must first SSH into one of the MDM VMs. Get the instance IDs by running: mdmhelper --deployment-id <deployment ID> instance list. Then for each SMO VM, run the following command:
curl -X DELETE -k \
     --cert /etc/certs-agent/upload/mdm-cert.crt \
     --cacert /etc/certs-agent/upload/mdm-cas.crt \
     --key /etc/certs-agent/upload/mdm-key.key \
     https://127.0.0.1:4000/api/v1/deployments/<deployment ID>/instances/<instance ID>
Verify that the deletion worked by running mdmhelper --deployment-id <deployment ID> instance list again. You may now log out of the MDM VM.
You must also delete state for this node type and version from the CDS prior to re-deploying the VMs. To delete the state, run rvtconfig delete-node-type --cassandra-contact-point <any TSN IP> --deployment-id <deployment ID>.
--site-id <site ID> --node-type smo
(--vm-version-source [this-vm | this-rvtconfig] | --vm-version <vm_version>)
Next Step
Follow the verification instructions here: Verify the state of the nodes and processes
Automatic rolling upgrades and patches with SIMPL VM on OpenStack
This section provides information on Upgrades and CSAR EFIX patches.
Before running a rolling upgrade or patch, ensure that all node types in the deployment pass validation. See Verify the state of the nodes and processes for instructions on how to do this.
All uplevel CSARs or CSAR EFIX patches must be uploaded to SIMPL for all upgraded node types before installation. In addition, the uplevel SDF must contain the uplevel CSAR versions for all upgraded node types.
- Rolling upgrades with SIMPL VM
- Rolling upgrades using CSAR EFIX patch with SIMPL VM
- Setting up for a rolling upgrade using CSAR EFIX patch
- Rolling CSAR EFIX patch TSN nodes on OpenStack
- Rolling CSAR EFIX patch ShCM nodes on OpenStack
- Rolling CSAR EFIX patch MAG nodes on OpenStack
- Rolling CSAR EFIX patch MMT GSM nodes on OpenStack
- Rolling CSAR EFIX patch SMO nodes on OpenStack
- Post rolling upgrade using CSAR EFIX patch steps
Rolling upgrades with SIMPL VM
To upgrade all node types, refer to the following pages in the order below.
Setting up for a rolling upgrade
Before running a rolling upgrade, some steps must be completed first.
Verify that Rhino has no duplicate OIDs
This can be done prior to the maintenance window. For each node type with Rhino, SSH into one of the VMs.
Run the following command:
last_seen=0; rhino-console listsnmpoidmappings | while read line;do array=($line); if [ "${array[0]}" == "$last_seen" ]; then
echo "Duplicate ${array[0]}"; fi; last_seen=${array[0]}; done
If there are any duplicates, please contact your Metaswitch Customer Care representative.
Disable scheduled Rhino restarts
If you have configured scheduled Rhino restarts, then these should be disabled before running an upgrade. This can be done by commenting out the scheduled-rhino-restarts section in the VM pool YAML config files. An example is shown below.
  virtual-machines:
    - vm-id: vm01
      rhino-node-id: 101
#      scheduled-rhino-restarts:
#        day-of-week: Saturday
#        time-of-day: 03:00
    - vm-id: vm02
      rhino-node-id: 102
#      scheduled-rhino-restarts:
#        day-of-week: Saturday
#        time-of-day: 04:00
Then to update the VMs with the disabled scheduled restarts, use rvtconfig upload-config.
Verify that HTTPS certificates are valid
The HTTPS certificates on the VMs must be valid for more than 30 days, and must remain valid during the upgrade for the whole deployment. For example, your upgrade will fail if your certificate is valid for 32 days and it takes more than 1 day to upgrade all of the VMs for all node types.
Using your own certificates
If using your own generated certificates, check its expiry date using:
openssl x509 -in <certificate file> -enddate -nooutIf the certificates are expiring, you must first upload the new certificates using rvtconfig upload-config before upgrading.
Using VM generated certificates
If you did not provide certificates to the VMs, the VM will generate its own certificates which are valid for 5 years. So if the current VMs have been deployed less than 5 years ago then there is nothing further to do. If it has been over 5 years, then please contact your Metaswitch Customer Care representative.
Verify all VMs are healthy
All the VMs in the deployment need to be healthy. To check this, run the common health checks for the VMs by following: Verify the state of the nodes and processes. The per-node checks should also be run by following each page under: Per-node checks.
Collect diagnostics from all of the VMs
The diagnostics from all the VMs should be collected. To do this, follow instructions from RVT Diagnostics Gatherer. After generating the diagnostics, transfer it from the VMs to a local machine.
Disable TSN Housekeeping Tasks
Before upgrading TSN VMs, do the following on all downlevel TSN VMs:
sudo systemctl list-timersIf cassandra-repair-daily.timer is present, do the following:
sudo systemctl disable cassandra-repair-daily.timer
sudo systemctl stop cassandra-repair-daily.timer
Run the following command to verify that the cassandra-repair-daily.timer is not present:
sudo systemctl list-timersDisable SNMP on SMO VMs if SNMPv3 is enabled
| |
Omitting this step on the SMO VMs when SNMPv3 is configured will result in Initconf failing to converge on the uplevel VMs. |
SNMP is only required to be disabled on the SMO VMs when:
-
Performing a rolling upgrade or rollback of the SMO; and
-
SNMPv3 is enabled (even if SGC notifications are disabled); and
-
the downlevel VM version is 4.0.0-23-1.0.0 or older; and
-
the uplevel VM version is 4.0.0-24-1.0.0 or newer.
The complete process for doing this is documented in Reconfiguring the SGC’s SNMP subsystem.
Download CDRs from all VMs
If your deployment is configured to generate CDRs on the Rhino VMs, these CDRs are stored on the local disk of the VMs and will be lost when the VMs are upgraded.
Therefore, if you need to keep a record of all CDRs generated the platform, you must download any CDRs not yet downloaded before the upgrade. Any CDRs not downloaded from a VM before that VM is upgraded will be permanently lost.
Upload the uplevel CSARs to the SIMPL VM
If not already done, transfer the uplevel CSARs onto the SIMPL VM. For each CSAR, run csar unpack <path to CSAR>, where <path to CSAR> is the full path to the transferred uplevel CSAR.
This will unpack the uplevel CSARs to ~/.local/share/csar/.
Upload the uplevel SDF to SIMPL VM
If the CSAR uplevel SDF was not created on the SIMPL VM, transfer the previously written CSAR uplevel SDF onto the SIMPL VM.
| |
Ensure that each version in the vnfcs section of the uplevel SDF matches each node type’s CSAR version. |
Upload uplevel RVT configuration
Upload the uplevel configuration for all of the node types to the CDS. This is required for the rolling upgrade to complete.
| |
As configuration is stored against a specific version, you need to re-upload, the uplevel configuration even if it is identical to the downlevel configuration. |
When performing a rolling upgrade some elements of the uplevel configuration must remain identical to those in the downlevel configuration. These elements (and the remedy if that configuration change was made and the cluster upgrade process started) are described in the following table:
Node Type |
Disallowed Configuration Change |
Remedy |
All |
The |
Rollback the affected VM(s) to restore the original configuration, then correct the uplevel configuration and re-run the upgrade. |
All |
The ordering of the VM instances in the SDF may not be altered. |
Rollback the affected VM(s) to restore the original configuration, then correct the uplevel configuration and re-run the upgrade. |
See Example configuration YAML files for example configuration files.
An in-depth description of RVT YAML configuration can be found in the Rhino VoLTE TAS Configuration and Management Guide.
Rolling upgrade TSN nodes on OpenStack
Cassandra Upgrade and Rollback
Planning for the procedure
Background knowledge
This procedure assumes that:
-
you are installing into an existing OpenStack deployment
-
The OpenStack deployment must be set up with support for Heat templates.
-
-
you are using an OpenStack version from Icehouse through to Train inclusive
-
you are thoroughly familiar with working with OpenStack machines and know how to set up tenants, users, roles, client environment scripts, and so on.
(For more information, refer to the appropriate OpenStack installation guide for the version that you are using here.) -
you are upgrading an existing downlevel deployment for TSN.
Method of procedure
| |
Refer to the SIMPL VM Documentation for details on the commands mentioned in the procedure. |
Step 1 - Upgrade the downlevel TSN VMs
Run csar update --vnf tsn --sdf <path to SDF>.
| |
To perform a canary upgrade, run csar update --vnf tsn --sites <site> --service-group <service_group> --index-range <range> --sdf <path to SDF>. The indexes start from 0, therefore 0 is the first VM. The range accepts ranges as well as comma separated indexes (e.g. 1-3,7,9). Only the nodes specified in the index will be upgraded. |
This will validate the uplevel SDF, generate the uplevel Terraform template, upload the uplevel image, and then it will start the upgrade.
The following will occur one TSN node at a time:
-
The downlevel node will be quiesced.
-
The uplevel node will be created and boot up.
-
The VM will automatically start applying configuration from the files you uploaded to CDS in the above steps. During this phase, the status of the VM in MDM will be Orange.
-
Once configuration is complete, the status will change to Green, and the node will be ready for service. At this point the
csar updatecommand will move on to the next TSN VM, or report that the upgrade of the TSN was successful if all nodes have now been upgraded. -
Once the upgrade is complete, place calls and run any additional validation tests to verify the uplevel VMs are working as expected.
Backout procedure
If the upgrade has brought up uplevel VMs to replace the downlevel VMs, then the uplevel VMs can be rolled back to the downlevel VMs. To rollback, repeat the steps above with the downlevel TSN CSAR and downlevel SDF.
You may need to use the --skip pre-update-checks flag as part of the csar update command. The --skip pre-update-checks flag allows rollbacks when a node is unhealthy.
If the upgrade has failed to bring up the uplevel VMs or the rollback has failed to bring up the downlevel VMs, then you must redeploy the downlevel VMs. run csar redeploy --vnf tsn --sites <site> --sdf <path to SDF>.
Next Step
If you are upgrading a full set of VMs, go to Rolling upgrade ShCM nodes on OpenStack, otherwise follow the post upgrade instructions here: Post rolling upgrade steps
Rolling upgrade ShCM nodes on OpenStack
Planning for the procedure
Background knowledge
This procedure assumes that:
-
you are installing into an existing OpenStack deployment
-
The OpenStack deployment must be set up with support for Heat templates.
-
-
you are using an OpenStack version from Icehouse through to Train inclusive
-
you are thoroughly familiar with working with OpenStack machines and know how to set up tenants, users, roles, client environment scripts, and so on.
(For more information, refer to the appropriate OpenStack installation guide for the version that you are using here.) -
you are upgrading an existing downlevel deployment for ShCM.
Method of procedure
| |
Refer to the SIMPL VM Documentation for details on the commands mentioned in the procedure. |
Step 1 - Upgrade the downlevel ShCM VMs
Run csar update --vnf shcm --sdf <path to SDF>.
| |
To perform a canary upgrade, run csar update --vnf shcm --sites <site> --service-group <service_group> --index-range <range> --sdf <path to SDF>. The indexes start from 0, therefore 0 is the first VM. The range accepts ranges as well as comma separated indexes (e.g. 1-3,7,9). Only the nodes specified in the index will be upgraded. |
This will validate the uplevel SDF, generate the uplevel Terraform template, upload the uplevel image, and then it will start the upgrade.
The following will occur one ShCM node at a time:
-
The downlevel node will be quiesced.
-
The uplevel node will be created and boot up.
-
The VM will automatically start applying configuration from the files you uploaded to CDS in the above steps. During this phase, the status of the VM in MDM will be Orange.
-
Once configuration is complete, the status will change to Green, and the node will be ready for service. At this point the
csar updatecommand will move on to the next ShCM VM, or report that the upgrade of the ShCM was successful if all nodes have now been upgraded. -
Once the upgrade is complete, place calls and run any additional validation tests to verify the uplevel VMs are working as expected.
Backout procedure
If the upgrade has brought up uplevel VMs to replace the downlevel VMs, then the uplevel VMs can be rolled back to the downlevel VMs. To rollback, repeat the steps above with the downlevel ShCM CSAR and downlevel SDF.
You may need to use the --skip pre-update-checks flag as part of the csar update command. The --skip pre-update-checks flag allows rollbacks when a node is unhealthy.
If the upgrade has failed to bring up the uplevel VMs or the rollback has failed to bring up the downlevel VMs, then you must redeploy the downlevel VMs. run csar redeploy --vnf shcm --sites <site> --sdf <path to SDF>.
Next Step
If you are upgrading a full set of VMs, go to Rolling upgrade MAG nodes on OpenStack, otherwise follow the post upgrade instructions here: Post rolling upgrade steps
Rolling upgrade MAG nodes on OpenStack
Planning for the procedure
Background knowledge
This procedure assumes that:
-
you are installing into an existing OpenStack deployment
-
The OpenStack deployment must be set up with support for Heat templates.
-
-
you are using an OpenStack version from Icehouse through to Train inclusive
-
you are thoroughly familiar with working with OpenStack machines and know how to set up tenants, users, roles, client environment scripts, and so on.
(For more information, refer to the appropriate OpenStack installation guide for the version that you are using here.) -
you are upgrading an existing downlevel deployment for MAG.
Method of procedure
| |
Refer to the SIMPL VM Documentation for details on the commands mentioned in the procedure. |
Step 1 - Upgrade the initial downlevel MAG VMs
The VM with the Rhino node that has the lowest ID must be upgraded last.
Upgrade all of the other VMs using the following command: csar update --vnf mag --sites <site> --service-group <service_group> --index-range <range> --sdf <path to SDF>.
The indexes start from 0, therefore 0 is the first VM. The --index-range accepts ranges as well as comma separated indexes (e.g. 1-3,7,9). To upgrade the VMs in stages, run the command multiple times using the appropriate --index-range values.
The following will occur one MAG node at a time:
-
The downlevel node will be quiesced.
-
The uplevel node will be created and boot up.
-
The VM will automatically start applying configuration from the files you uploaded to CDS in the above steps. During this phase, the status of the VM in MDM will be Orange.
-
Once configuration is complete, the status will change to Green, and the node will be ready for service. At this point the
csar updatecommand will move on to the next MAG VM, or report that the upgrade of the MAG was successful if all nodes have now been upgraded. -
Once the upgrade is complete, place calls and run any additional validation tests to verify the uplevel VMs are working as expected.
Backout procedure
If the upgrade has brought up uplevel VMs to replace the downlevel VMs, then the uplevel VMs can be rolled back to the downlevel VMs. To rollback, repeat the steps above with the downlevel MAG CSAR and downlevel SDF. The lowest uplevel VM must be rolled back last. For example, if VMs 2-5 are in the uplevel, you must rollback VMs 3-5 then rollback VM 2.
You may need to use the --skip pre-update-checks flag as part of the csar update command. The --skip pre-update-checks flag allows rollbacks when a node is unhealthy.
If the upgrade has failed to bring up the uplevel VMs or the rollback has failed to bring up the downlevel VMs, then you must redeploy the downlevel VMs. run csar redeploy --vnf mag --sites <site> --sdf <path to SDF>.
Next Step
If you are upgrading a full set of VMs, go to Rolling upgrade MMT GSM nodes on OpenStack, otherwise follow the post upgrade instructions here: Post rolling upgrade steps
Rolling upgrade MMT GSM nodes on OpenStack
Planning for the procedure
Background knowledge
This procedure assumes that:
-
you are installing into an existing OpenStack deployment
-
The OpenStack deployment must be set up with support for Heat templates.
-
-
you are using an OpenStack version from Icehouse through to Train inclusive
-
you are thoroughly familiar with working with OpenStack machines and know how to set up tenants, users, roles, client environment scripts, and so on.
(For more information, refer to the appropriate OpenStack installation guide for the version that you are using here.) -
you are upgrading an existing downlevel deployment for MMT GSM.
Method of procedure
| |
Refer to the SIMPL VM Documentation for details on the commands mentioned in the procedure. |
Step 1 - Upgrade the initial downlevel MMT GSM VMs
The VM with the Rhino node that has the lowest ID must be upgraded last.
Upgrade all of the other VMs using the following command: csar update --vnf mmt-gsm --sites <site> --service-group <service_group> --index-range <range> --sdf <path to SDF>.
The indexes start from 0, therefore 0 is the first VM. The --index-range accepts ranges as well as comma separated indexes (e.g. 1-3,7,9). To upgrade the VMs in stages, run the command multiple times using the appropriate --index-range values.
The following will occur one MMT GSM node at a time:
-
The downlevel node will be quiesced.
-
The uplevel node will be created and boot up.
-
The VM will automatically start applying configuration from the files you uploaded to CDS in the above steps. During this phase, the status of the VM in MDM will be Orange.
-
Once configuration is complete, the status will change to Green, and the node will be ready for service. At this point the
csar updatecommand will move on to the next MMT GSM VM, or report that the upgrade of the MMT GSM was successful if all nodes have now been upgraded. -
Once the upgrade is complete, place calls and run any additional validation tests to verify the uplevel VMs are working as expected.
Backout procedure
If the upgrade has brought up uplevel VMs to replace the downlevel VMs, then the uplevel VMs can be rolled back to the downlevel VMs. To rollback, repeat the steps above with the downlevel MMT GSM CSAR and downlevel SDF. The lowest uplevel VM must be rolled back last. For example, if VMs 2-5 are in the uplevel, you must rollback VMs 3-5 then rollback VM 2.
You may need to use the --skip pre-update-checks flag as part of the csar update command. The --skip pre-update-checks flag allows rollbacks when a node is unhealthy.
If the upgrade has failed to bring up the uplevel VMs or the rollback has failed to bring up the downlevel VMs, then you must redeploy the downlevel VMs. run csar redeploy --vnf mmt-gsm --sites <site> --sdf <path to SDF>.
Next Step
If you are upgrading a full set of VMs, go to Rolling upgrade SMO nodes on OpenStack, otherwise follow the post upgrade instructions here: Post rolling upgrade steps
Rolling upgrade SMO nodes on OpenStack
Planning for the procedure
Background knowledge
This procedure assumes that:
-
you are installing into an existing OpenStack deployment
-
The OpenStack deployment must be set up with support for Heat templates.
-
-
you are using an OpenStack version from Icehouse through to Train inclusive
-
you are thoroughly familiar with working with OpenStack machines and know how to set up tenants, users, roles, client environment scripts, and so on.
(For more information, refer to the appropriate OpenStack installation guide for the version that you are using here.) -
you are upgrading an existing downlevel deployment for SMO.
Method of procedure
| |
Refer to the SIMPL VM Documentation for details on the commands mentioned in the procedure. |
Step 1 - Upgrade the initial downlevel SMO VMs
The VM with the Rhino node that has the lowest ID must be upgraded last.
Upgrade all of the other VMs using the following command: csar update --vnf smo --sites <site> --service-group <service_group> --index-range <range> --sdf <path to SDF>.
The indexes start from 0, therefore 0 is the first VM. The --index-range accepts ranges as well as comma separated indexes (e.g. 1-3,7,9). To upgrade the VMs in stages, run the command multiple times using the appropriate --index-range values.
The following will occur one SMO node at a time:
-
The downlevel node will be quiesced.
-
The uplevel node will be created and boot up.
-
The VM will automatically start applying configuration from the files you uploaded to CDS in the above steps. During this phase, the status of the VM in MDM will be Orange.
-
Once configuration is complete, the status will change to Green, and the node will be ready for service. At this point the
csar updatecommand will move on to the next SMO VM, or report that the upgrade of the SMO was successful if all nodes have now been upgraded. -
Once the upgrade is complete, place calls and run any additional validation tests to verify the uplevel VMs are working as expected.
Backout procedure
If the upgrade has brought up uplevel VMs to replace the downlevel VMs, then the uplevel VMs can be rolled back to the downlevel VMs. To rollback, repeat the steps above with the downlevel SMO CSAR and downlevel SDF. The lowest uplevel VM must be rolled back last. For example, if VMs 2-5 are in the uplevel, you must rollback VMs 3-5 then rollback VM 2.
You may need to use the --skip pre-update-checks flag as part of the csar update command. The --skip pre-update-checks flag allows rollbacks when a node is unhealthy.
If the upgrade has failed to bring up the uplevel VMs or the rollback has failed to bring up the downlevel VMs, then you must redeploy the downlevel VMs. run csar redeploy --vnf smo --sites <site> --sdf <path to SDF>.
Next Step
Follow the post upgrade instructions here: Post rolling upgrade steps
Post rolling upgrade steps
After a rolling upgrade, some steps must be completed.
Verify all VMs are healthy
All the VMs in the deployment need to be healthy. To check this, run the common health checks for the VMs by following: Verify the state of the nodes and processes. The per-node checks should also be run by following each page under: Per-node checks.
Enable scheduled Rhino restarts
If you have disabled the scheduled Rhino restarts before the upgrades, then it can now be enabled. This can be done by uncommenting out the scheduled-rhino-restarts section in the VM pool YAML config files. Then to update the VMs with the scheduled restarts, use rvtconfig upload-config.
Rolling upgrades using CSAR EFIX patch with SIMPL VM
To patch all node types, refer to the following pages in the order below.
- Setting up for a rolling upgrade using CSAR EFIX patch
- Rolling CSAR EFIX patch TSN nodes on OpenStack
- Rolling CSAR EFIX patch ShCM nodes on OpenStack
- Rolling CSAR EFIX patch MAG nodes on OpenStack
- Rolling CSAR EFIX patch MMT GSM nodes on OpenStack
- Rolling CSAR EFIX patch SMO nodes on OpenStack
- Post rolling upgrade using CSAR EFIX patch steps
Setting up for a rolling upgrade using CSAR EFIX patch
Before running a rolling upgrade, some steps must be completed first.
Verify that Rhino has no duplicate OIDs
This can be done prior to the maintenance window. For each node type with Rhino, SSH into one of the VMs.
Run the following command:
last_seen=0; rhino-console listsnmpoidmappings | while read line;do array=($line); if [ "${array[0]}" == "$last_seen" ]; then
echo "Duplicate ${array[0]}"; fi; last_seen=${array[0]}; done
If there are any duplicates, please contact your Metaswitch Customer Care representative.
Disable scheduled Rhino restarts
If you have configured scheduled Rhino restarts, then these should be disabled before running an upgrade. This can be done by commenting out the scheduled-rhino-restarts section in the VM pool YAML config files. An example is shown below.
  virtual-machines:
    - vm-id: vm01
      rhino-node-id: 101
#      scheduled-rhino-restarts:
#        day-of-week: Saturday
#        time-of-day: 03:00
    - vm-id: vm02
      rhino-node-id: 102
#      scheduled-rhino-restarts:
#        day-of-week: Saturday
#        time-of-day: 04:00
Then to update the VMs with the disabled scheduled restarts, use rvtconfig upload-config.
Verify that HTTPS certificates are valid
The HTTPS certificates on the VMs must be valid for more than 30 days, and must remain valid during the upgrade for the whole deployment. For example, your upgrade will fail if your certificate is valid for 32 days and it takes more than 1 day to upgrade all of the VMs for all node types.
Using your own certificates
If using your own generated certificates, check its expiry date using:
openssl x509 -in <certificate file> -enddate -nooutIf the certificates are expiring, you must first upload the new certificates using rvtconfig upload-config before upgrading.
Using VM generated certificates
If you did not provide certificates to the VMs, the VM will generate its own certificates which are valid for 5 years. So if the current VMs have been deployed less than 5 years ago then there is nothing further to do. If it has been over 5 years, then please contact your Metaswitch Customer Care representative.
Verify all VMs are healthy
All the VMs in the deployment need to be healthy. To check this, run the common health checks for the VMs by following: Verify the state of the nodes and processes. The per-node checks should also be run by following each page under: Per-node checks.
Collect diagnostics from all of the VMs
The diagnostics from all the VMs should be collected. To do this, follow instructions from RVT Diagnostics Gatherer. After generating the diagnostics, transfer it from the VMs to a local machine.
Disable TSN Housekeeping Tasks
Before upgrading TSN VMs, do the following on all downlevel TSN VMs:
sudo systemctl list-timersIf cassandra-repair-daily.timer is present, do the following:
sudo systemctl disable cassandra-repair-daily.timer
sudo systemctl stop cassandra-repair-daily.timer
Run the following command to verify that the cassandra-repair-daily.timer is not present:
sudo systemctl list-timersDisable SNMP on SMO VMs if SNMPv3 is enabled
| |
Omitting this step on the SMO VMs when SNMPv3 is configured will result in Initconf failing to converge on the uplevel VMs. |
SNMP is only required to be disabled on the SMO VMs when:
-
Performing a rolling upgrade or rollback of the SMO; and
-
SNMPv3 is enabled (even if SGC notifications are disabled); and
-
the downlevel VM version is 4.0.0-23-1.0.0 or older; and
-
the uplevel VM version is 4.0.0-24-1.0.0 or newer.
The complete process for doing this is documented in Reconfiguring the SGC’s SNMP subsystem.
Download CDRs from all VMs
If your deployment is configured to generate CDRs on the Rhino VMs, these CDRs are stored on the local disk of the VMs and will be lost when the VMs are upgraded.
Therefore, if you need to keep a record of all CDRs generated the platform, you must download any CDRs not yet downloaded before the upgrade. Any CDRs not downloaded from a VM before that VM is upgraded will be permanently lost.
Upload the CSAR EFIX patches to the SIMPL VM
If not already done, transfer the CSAR EFIX patches onto the SIMPL VM. For each CSAR EFIX patch, run:
csar efix <node type>/<version> <path to CSAR EFIX><path to CSAR EFIX> is the full path to the CSAR EFIX patch. <node type>/<version> is the downlevel unpacked CSAR located at ~/.local/share/csar/.
| |
If you are not sure of the exact version string to use, run csar list to view the list of installed CSARs. |
This will apply the efix patch to the the downlevel CSAR.
| |
The new patched CSAR is now the uplevel CSAR referenced in the following steps. |
| |
Don’t apply the same CSAR EFIX patch to the same CSAR target more than once. If a previous attempt to run the csar efix command failed, be sure to remove the created CSAR before re-attempting, as the csar efix command requires a clean target directory to work with. |
Upload the uplevel SDF to SIMPL VM
If the CSAR EFIX patch uplevel SDF was not created on the SIMPL VM, transfer the previously written CSAR EFIX patch uplevel SDF onto the SIMPL VM.
| |
Ensure the version in the each node type’s vnfcs section of the uplevel SDF is set to <downlevel-version>-<patch-version>. For example: 4.0.0-14-1.0.0-patch123, where 4.0.0-14-1.0.0 is the downlevel version and patch123 is the patch version. |
Upload uplevel RVT configuration
Upload the uplevel configuration for all of the node types to the CDS. This is required for the rolling upgrade using CSAR EFIX patch to complete.
| |
As configuration is stored against a specific version, you need to re-upload the uplevel configuration even if it is identical to the downlevel configuration. |
The uplevel version for a CSAR EFIX patch is the format <downlevel-version>-<patch-version>. For example: 4.0.0-14-1.0.0-patch123, where 4.0.0-14-1.0.0 is the downlevel version and patch123 is the patch version.
When performing a rolling upgrade some elements of the uplevel configuration must remain identical to those in the downlevel configuration. These elements (and the remedy if that configuration change was made and the cluster upgrade process started) are described in the following table:
Node Type |
Disallowed Configuration Change |
Remedy |
All |
The |
Rollback the affected VM(s) to restore the original configuration, then correct the uplevel configuration and re-run the upgrade. |
All |
The ordering of the VM instances in the SDF may not be altered. |
Rollback the affected VM(s) to restore the original configuration, then correct the uplevel configuration and re-run the upgrade. |
See Example configuration YAML files for example configuration files.
An in-depth description of RVT YAML configuration can be found in the Rhino VoLTE TAS Configuration and Management Guide.
Rolling CSAR EFIX patch TSN nodes on OpenStack
Cassandra Upgrade and Rollback
Planning for the procedure
Background knowledge
This procedure assumes that:
-
you are installing into an existing OpenStack deployment
-
The OpenStack deployment must be set up with support for Heat templates.
-
-
you are using an OpenStack version from Icehouse through to Train inclusive
-
you are thoroughly familiar with working with OpenStack machines and know how to set up tenants, users, roles, client environment scripts, and so on.
(For more information, refer to the appropriate OpenStack installation guide for the version that you are using here.) -
you are upgrading an existing downlevel deployment for TSN.
Method of procedure
| |
Refer to the SIMPL VM Documentation for details on the commands mentioned in the procedure. |
Step 1 - Check OpenStack quotas
The SIMPL VM creates one server group per VM, and one security group per interface on each VM. OpenStack sets limits on the number of server groups and security groups through quotas.
View the quota by running openstack quota show <project id> on OpenStack Controller node. This shows the maximum number of various resources.
You can view the existing server groups by running openstack server group list. Similarly, you can find the security groups by running openstack security group list
If the quota is too small to accommodate the new VMs that will be deployed, increase it by running
openstack quota set --<quota field to increase> <new quota value> <project ID>. For example:
openstack quota set --server-groups 100 125610b8bf424e61ad2aa5be27ad73bb
See CSAR EFIX patches to learn more on the CSAR EFIX patching process.
Step 2 - Upgrade the downlevel TSN VMs
Run csar update --vnf tsn --sdf <path to SDF>.
| |
To perform a canary upgrade, run csar update --vnf tsn --sites <site> --service-group <service_group> --index-range <range> --sdf <path to SDF>. The indexes start from 0, therefore 0 is the first VM. The range accepts ranges as well as comma separated indexes (e.g. 1-3,7,9). Only the nodes specified in the index will be upgraded. |
This will validate the uplevel SDF, generate the uplevel Terraform template, upload the uplevel image, and then it will start the upgrade.
The following will occur one TSN node at a time:
-
The downlevel node will be quiesced.
-
The uplevel node will be created and boot up.
-
The VM will automatically start applying configuration from the files you uploaded to CDS in the above steps. During this phase, the status of the VM in MDM will be Orange.
-
Once configuration is complete, the status will change to Green, and the node will be ready for service. At this point the
csar updatecommand will move on to the next TSN VM, or report that the upgrade of the TSN was successful if all nodes have now been upgraded. -
Once the upgrade is complete, place calls and run any additional validation tests to verify the uplevel VMs are working as expected.
Backout procedure
If the upgrade has brought up uplevel VMs to replace the downlevel VMs, then the uplevel VMs can be rolled back to the downlevel VMs. To rollback, repeat the steps above with the downlevel TSN CSAR and downlevel SDF.
You may need to use the --skip pre-update-checks flag as part of the csar update command. The --skip pre-update-checks flag allows rollbacks when a node is unhealthy.
If the upgrade has failed to bring up the uplevel VMs or the rollback has failed to bring up the downlevel VMs, then you must redeploy the downlevel VMs. run csar redeploy --vnf tsn --sites <site> --sdf <path to SDF>.
Next Step
If you are upgrading a full set of VMs, go to Rolling CSAR EFIX patch ShCM nodes on OpenStack, otherwise follow the post upgrade instructions here: Post rolling upgrade using CSAR EFIX patch steps
Rolling CSAR EFIX patch ShCM nodes on OpenStack
Planning for the procedure
Background knowledge
This procedure assumes that:
-
you are installing into an existing OpenStack deployment
-
The OpenStack deployment must be set up with support for Heat templates.
-
-
you are using an OpenStack version from Icehouse through to Train inclusive
-
you are thoroughly familiar with working with OpenStack machines and know how to set up tenants, users, roles, client environment scripts, and so on.
(For more information, refer to the appropriate OpenStack installation guide for the version that you are using here.) -
you are upgrading an existing downlevel deployment for ShCM.
Method of procedure
| |
Refer to the SIMPL VM Documentation for details on the commands mentioned in the procedure. |
Step 1 - Check OpenStack quotas
The SIMPL VM creates one server group per VM, and one security group per interface on each VM. OpenStack sets limits on the number of server groups and security groups through quotas.
View the quota by running openstack quota show <project id> on OpenStack Controller node. This shows the maximum number of various resources.
You can view the existing server groups by running openstack server group list. Similarly, you can find the security groups by running openstack security group list
If the quota is too small to accommodate the new VMs that will be deployed, increase it by running
openstack quota set --<quota field to increase> <new quota value> <project ID>. For example:
openstack quota set --server-groups 100 125610b8bf424e61ad2aa5be27ad73bb
See CSAR EFIX patches to learn more on the CSAR EFIX patching process.
Step 2 - Upgrade the downlevel ShCM VMs
Run csar update --vnf shcm --sdf <path to SDF>.
| |
To perform a canary upgrade, run csar update --vnf shcm --sites <site> --service-group <service_group> --index-range <range> --sdf <path to SDF>. The indexes start from 0, therefore 0 is the first VM. The range accepts ranges as well as comma separated indexes (e.g. 1-3,7,9). Only the nodes specified in the index will be upgraded. |
This will validate the uplevel SDF, generate the uplevel Terraform template, upload the uplevel image, and then it will start the upgrade.
The following will occur one ShCM node at a time:
-
The downlevel node will be quiesced.
-
The uplevel node will be created and boot up.
-
The VM will automatically start applying configuration from the files you uploaded to CDS in the above steps. During this phase, the status of the VM in MDM will be Orange.
-
Once configuration is complete, the status will change to Green, and the node will be ready for service. At this point the
csar updatecommand will move on to the next ShCM VM, or report that the upgrade of the ShCM was successful if all nodes have now been upgraded. -
Once the upgrade is complete, place calls and run any additional validation tests to verify the uplevel VMs are working as expected.
Backout procedure
If the upgrade has brought up uplevel VMs to replace the downlevel VMs, then the uplevel VMs can be rolled back to the downlevel VMs. To rollback, repeat the steps above with the downlevel ShCM CSAR and downlevel SDF.
You may need to use the --skip pre-update-checks flag as part of the csar update command. The --skip pre-update-checks flag allows rollbacks when a node is unhealthy.
If the upgrade has failed to bring up the uplevel VMs or the rollback has failed to bring up the downlevel VMs, then you must redeploy the downlevel VMs. run csar redeploy --vnf shcm --sites <site> --sdf <path to SDF>.
Next Step
If you are upgrading a full set of VMs, go to Rolling CSAR EFIX patch MAG nodes on OpenStack, otherwise follow the post upgrade instructions here: Post rolling upgrade using CSAR EFIX patch steps
Rolling CSAR EFIX patch MAG nodes on OpenStack
Planning for the procedure
Background knowledge
This procedure assumes that:
-
you are installing into an existing OpenStack deployment
-
The OpenStack deployment must be set up with support for Heat templates.
-
-
you are using an OpenStack version from Icehouse through to Train inclusive
-
you are thoroughly familiar with working with OpenStack machines and know how to set up tenants, users, roles, client environment scripts, and so on.
(For more information, refer to the appropriate OpenStack installation guide for the version that you are using here.) -
you are upgrading an existing downlevel deployment for MAG.
Method of procedure
| |
Refer to the SIMPL VM Documentation for details on the commands mentioned in the procedure. |
Step 1 - Check OpenStack quotas
The SIMPL VM creates one server group per VM, and one security group per interface on each VM. OpenStack sets limits on the number of server groups and security groups through quotas.
View the quota by running openstack quota show <project id> on OpenStack Controller node. This shows the maximum number of various resources.
You can view the existing server groups by running openstack server group list. Similarly, you can find the security groups by running openstack security group list
If the quota is too small to accommodate the new VMs that will be deployed, increase it by running
openstack quota set --<quota field to increase> <new quota value> <project ID>. For example:
openstack quota set --server-groups 100 125610b8bf424e61ad2aa5be27ad73bb
See CSAR EFIX patches to learn more on the CSAR EFIX patching process.
Step 2 - Upgrade the downlevel MAG VMs
The VM with the Rhino node that has the lowest ID must be upgraded last.
Upgrade all of the other VMs using the following command: csar update --vnf mag --sites <site> --service-group <service_group> --index-range <range> --sdf <path to SDF>.
The indexes start from 0, therefore 0 is the first VM. The --index-range accepts ranges as well as comma separated indexes (e.g. 1-3,7,9). To upgrade the VMs in stages, run the command multiple times using the appropriate --index-range values.
The following will occur one MAG node at a time:
-
The downlevel node will be quiesced.
-
The uplevel node will be created and boot up.
-
The VM will automatically start applying configuration from the files you uploaded to CDS in the above steps. During this phase, the status of the VM in MDM will be Orange.
-
Once configuration is complete, the status will change to Green, and the node will be ready for service. At this point the
csar updatecommand will move on to the next MAG VM, or report that the upgrade of the MAG was successful if all nodes have now been upgraded. -
Once the upgrade is complete, place calls and run any additional validation tests to verify the uplevel VMs are working as expected.
Backout procedure
If the upgrade has brought up uplevel VMs to replace the downlevel VMs, then the uplevel VMs can be rolled back to the downlevel VMs. To rollback, repeat the steps above with the downlevel MAG CSAR and downlevel SDF. The lowest uplevel VM must be rolled back last. For example, if VMs 2-5 are in the uplevel, you must rollback VMs 3-5 then rollback VM 2.
You may need to use the --skip pre-update-checks flag as part of the csar update command. The --skip pre-update-checks flag allows rollbacks when a node is unhealthy.
If the upgrade has failed to bring up the uplevel VMs or the rollback has failed to bring up the downlevel VMs, then you must redeploy the downlevel VMs. run csar redeploy --vnf mag --sites <site> --sdf <path to SDF>.
Next Step
If you are upgrading a full set of VMs, go to Rolling CSAR EFIX patch MMT GSM nodes on OpenStack, otherwise follow the post upgrade instructions here: Post rolling upgrade using CSAR EFIX patch steps
Rolling CSAR EFIX patch MMT GSM nodes on OpenStack
Planning for the procedure
Background knowledge
This procedure assumes that:
-
you are installing into an existing OpenStack deployment
-
The OpenStack deployment must be set up with support for Heat templates.
-
-
you are using an OpenStack version from Icehouse through to Train inclusive
-
you are thoroughly familiar with working with OpenStack machines and know how to set up tenants, users, roles, client environment scripts, and so on.
(For more information, refer to the appropriate OpenStack installation guide for the version that you are using here.) -
you are upgrading an existing downlevel deployment for MMT GSM.
Method of procedure
| |
Refer to the SIMPL VM Documentation for details on the commands mentioned in the procedure. |
Step 1 - Check OpenStack quotas
The SIMPL VM creates one server group per VM, and one security group per interface on each VM. OpenStack sets limits on the number of server groups and security groups through quotas.
View the quota by running openstack quota show <project id> on OpenStack Controller node. This shows the maximum number of various resources.
You can view the existing server groups by running openstack server group list. Similarly, you can find the security groups by running openstack security group list
If the quota is too small to accommodate the new VMs that will be deployed, increase it by running
openstack quota set --<quota field to increase> <new quota value> <project ID>. For example:
openstack quota set --server-groups 100 125610b8bf424e61ad2aa5be27ad73bb
See CSAR EFIX patches to learn more on the CSAR EFIX patching process.
Step 2 - Upgrade the downlevel MMT GSM VMs
The VM with the Rhino node that has the lowest ID must be upgraded last.
Upgrade all of the other VMs using the following command: csar update --vnf mmt-gsm --sites <site> --service-group <service_group> --index-range <range> --sdf <path to SDF>.
The indexes start from 0, therefore 0 is the first VM. The --index-range accepts ranges as well as comma separated indexes (e.g. 1-3,7,9). To upgrade the VMs in stages, run the command multiple times using the appropriate --index-range values.
The following will occur one MMT GSM node at a time:
-
The downlevel node will be quiesced.
-
The uplevel node will be created and boot up.
-
The VM will automatically start applying configuration from the files you uploaded to CDS in the above steps. During this phase, the status of the VM in MDM will be Orange.
-
Once configuration is complete, the status will change to Green, and the node will be ready for service. At this point the
csar updatecommand will move on to the next MMT GSM VM, or report that the upgrade of the MMT GSM was successful if all nodes have now been upgraded. -
Once the upgrade is complete, place calls and run any additional validation tests to verify the uplevel VMs are working as expected.
Backout procedure
If the upgrade has brought up uplevel VMs to replace the downlevel VMs, then the uplevel VMs can be rolled back to the downlevel VMs. To rollback, repeat the steps above with the downlevel MMT GSM CSAR and downlevel SDF. The lowest uplevel VM must be rolled back last. For example, if VMs 2-5 are in the uplevel, you must rollback VMs 3-5 then rollback VM 2.
You may need to use the --skip pre-update-checks flag as part of the csar update command. The --skip pre-update-checks flag allows rollbacks when a node is unhealthy.
If the upgrade has failed to bring up the uplevel VMs or the rollback has failed to bring up the downlevel VMs, then you must redeploy the downlevel VMs. run csar redeploy --vnf mmt-gsm --sites <site> --sdf <path to SDF>.
Next Step
If you are upgrading a full set of VMs, go to Rolling CSAR EFIX patch SMO nodes on OpenStack, otherwise follow the post upgrade instructions here: Post rolling upgrade using CSAR EFIX patch steps
Rolling CSAR EFIX patch SMO nodes on OpenStack
Planning for the procedure
Background knowledge
This procedure assumes that:
-
you are installing into an existing OpenStack deployment
-
The OpenStack deployment must be set up with support for Heat templates.
-
-
you are using an OpenStack version from Icehouse through to Train inclusive
-
you are thoroughly familiar with working with OpenStack machines and know how to set up tenants, users, roles, client environment scripts, and so on.
(For more information, refer to the appropriate OpenStack installation guide for the version that you are using here.) -
you are upgrading an existing downlevel deployment for SMO.
Method of procedure
| |
Refer to the SIMPL VM Documentation for details on the commands mentioned in the procedure. |
Step 1 - Check OpenStack quotas
The SIMPL VM creates one server group per VM, and one security group per interface on each VM. OpenStack sets limits on the number of server groups and security groups through quotas.
View the quota by running openstack quota show <project id> on OpenStack Controller node. This shows the maximum number of various resources.
You can view the existing server groups by running openstack server group list. Similarly, you can find the security groups by running openstack security group list
If the quota is too small to accommodate the new VMs that will be deployed, increase it by running
openstack quota set --<quota field to increase> <new quota value> <project ID>. For example:
openstack quota set --server-groups 100 125610b8bf424e61ad2aa5be27ad73bb
See CSAR EFIX patches to learn more on the CSAR EFIX patching process.
Step 2 - Upgrade the downlevel SMO VMs
The VM with the Rhino node that has the lowest ID must be upgraded last.
Upgrade all of the other VMs using the following command: csar update --vnf smo --sites <site> --service-group <service_group> --index-range <range> --sdf <path to SDF>.
The indexes start from 0, therefore 0 is the first VM. The --index-range accepts ranges as well as comma separated indexes (e.g. 1-3,7,9). To upgrade the VMs in stages, run the command multiple times using the appropriate --index-range values.
The following will occur one SMO node at a time:
-
The downlevel node will be quiesced.
-
The uplevel node will be created and boot up.
-
The VM will automatically start applying configuration from the files you uploaded to CDS in the above steps. During this phase, the status of the VM in MDM will be Orange.
-
Once configuration is complete, the status will change to Green, and the node will be ready for service. At this point the
csar updatecommand will move on to the next SMO VM, or report that the upgrade of the SMO was successful if all nodes have now been upgraded. -
Once the upgrade is complete, place calls and run any additional validation tests to verify the uplevel VMs are working as expected.
Backout procedure
If the upgrade has brought up uplevel VMs to replace the downlevel VMs, then the uplevel VMs can be rolled back to the downlevel VMs. To rollback, repeat the steps above with the downlevel SMO CSAR and downlevel SDF. The lowest uplevel VM must be rolled back last. For example, if VMs 2-5 are in the uplevel, you must rollback VMs 3-5 then rollback VM 2.
You may need to use the --skip pre-update-checks flag as part of the csar update command. The --skip pre-update-checks flag allows rollbacks when a node is unhealthy.
If the upgrade has failed to bring up the uplevel VMs or the rollback has failed to bring up the downlevel VMs, then you must redeploy the downlevel VMs. run csar redeploy --vnf smo --sites <site> --sdf <path to SDF>.
Next Step
Follow the post upgrade instructions here: Post rolling upgrade using CSAR EFIX patch steps
Post rolling upgrade using CSAR EFIX patch steps
After a rolling upgrade using CSAR EFIX patch, some steps must be completed.
Verify all VMs are healthy
All the VMs in the deployment need to be healthy. To check this, run the common health checks for the VMs by following: Verify the state of the nodes and processes. The per-node checks should also be run by following each page under: Per-node checks.
Enable scheduled Rhino restarts
If you have disabled the scheduled Rhino restarts before the upgrades, then it can now be enabled. This can be done by uncommenting out the scheduled-rhino-restarts section in the VM pool YAML config files. Then to update the VMs with the scheduled restarts, use rvtconfig upload-config.
Installation or upgrades on VMware vSphere
These pages describe how to install or upgrade the RVT nodes on VMware vSphere.
- Installation on VMware vSphere
- Automatic rolling upgrades and patches with SIMPL VM on VMware vSphere
- Rolling upgrades with SIMPL VM
- Rolling upgrades using CSAR EFIX patch with SIMPL VM
- Setting up for a rolling upgrade using CSAR EFIX patch
- Rolling CSAR EFIX patch TSN nodes on VMware vSphere
- Rolling CSAR EFIX patch ShCM nodes on VMware vSphere
- Rolling CSAR EFIX patch MAG nodes on VMware vSphere
- Rolling CSAR EFIX patch MMT GSM nodes on VMware vSphere
- Rolling CSAR EFIX patch SMO nodes on VMware vSphere
- Post rolling upgrade using CSAR EFIX patch steps
Installation on VMware vSphere
These pages describe how to install the nodes on VMware vSphere.
Prepare the SDF for the deployment
Planning for the procedure
Background knowledge
This procedure assumes that:
-
you are installing into an existing VMware vSphere deployment which has pre-configured networks and VLANs; this procedure does not cover setting up a VMware vSphere deployment from scratch
-
you know the IP networking information (IP address, subnet mask in CIDR notation, and default gateway) for the nodes.
-
you have read the installation guidelines at Installation and upgrades overview and have everything you need to carry out the installation.
Reserve maintenance period
This procedure does not require a maintenance period. However, if you are integrating into a live network, we recommend that you implement measures to mitigate any unforeseen events.
Tools and access
This page references an external document: SIMPL VM Documentation. Ensure you have a copy available before proceeding.
Installation Questions
| Question | More information |
|---|---|
Do you have the correct CSARs? |
All virtual appliances use the naming convention - |
Do you have a list of the IP addresses that you intend to give to each node of each node type? |
Each node requires an IP address for each interface. You can find a list of the VM’s interfaces on the Network Interfaces page. |
Do you have DNS and NTP Server information? |
It is expected that the deployed nodes will integrate with the IMS Core NTP and DNS servers. |
Method of procedure
Step 1 - Extract the CSAR
This can either be done on your local Linux machine or on a SIMPL VM.
Option A - Running on a local machine
| |
If you plan to do all operations from your local Linux machine instead of SIMPL, Docker must be installed to run the rvtconfig tool in a later step. |
To extract the CSAR, run the command: unzip <path to CSAR> -d <new directory to extract CSAR to>
Option B - Running on an existing SIMPL VM
For this step, the SIMPL VM does not need to be running on the VMware vSphere where the deployment takes place. It is sufficient to use a SIMPL VM on a lab system to prepare for a production deployment.
Transfer the CSAR onto the SIMPL VM and run csar unpack <path to CSAR>, where <path to CSAR> is the full path to the transferred CSAR.
This will unpack the CSAR to ~/.local/share/csar/.
Step 2 - Write the SDF
The Solution Definition File (SDF) contains all the information required to set up your cluster. It is therefore crucial to ensure all information in the SDF is correct before beginning the deployment. One SDF should be written per deployment.
It is recommended that the SDF is written before starting the deployment. The SDF must be named sdf-rvt.yaml.
See Writing an SDF for more detailed information.
| |
Each deployment needs a unique |
Example SDFs are included in every CSAR and can also be found at Example SDFs. We recommend that you start from a template SDF and edit it as desired instead of writing an SDF from scratch.
Deploy SIMPL VM into VMware vSphere
| |
Note that one SIMPL VM can be used to deploy multiple node types. Thus, this step only needs to be performed once for all node types. |
| |
The supported versions of the SIMPL VM are |
Planning for the procedure
Background knowledge
This procedure assumes that:
-
you are using a supported VMware vSphere version, as described in the 'VMware requirements' section of the SIMPL VM Documentation
-
you are installing into an existing VMware vSphere deployment which has pre-configured networks and VLANs; this procedure does not cover setting up a VMware vSphere deployment from scratch
-
you know the IP networking information (IP address, subnet mask in CIDR notation, and default gateway) for the SIMPL VM.
Reserve maintenance period
This procedure does not require a maintenance period. However, if you are integrating into a live network, we recommend that you implement measures to mitigate any unforeseen events.
Tools and access
You must have access to a local computer (referred to in this procedure as the local computer) with a network connection and access to the vSphere client.
This page references an external document: the SIMPL VM Documentation. Ensure you have a copy available before proceeding.
Installation Questions
| Question | More information |
|---|---|
Do you have the correct SIMPL VM OVA? |
All SIMPL VM virtual appliances use the naming convention - |
Do you know the IP address that you intend to give to the SIMPL VM? |
The SIMPL VM requires one IP address, for management traffic. |
Method of procedure
Deploy and configure the SIMPL VM
Follow the SIMPL VM Documentation on how to deploy the SIMPL VM and set up the configuration.
Prepare configuration files for the deployment
To deploy nodes, you need to prepare configuration files that would be uploaded to the VMs.
Method of procedure
Step 1 - Create configuration YAML files
Create configuration YAML files relevant for your node type on the SIMPL VM. Store these files in the same directory as your prepared SDF.
See Example configuration YAML files for example configuration files.
Install MDM
Before deploying any nodes, you will need to first install Metaswitch Deployment Manager (MDM).
Prerequisites
-
The MDM CSAR
-
A deployed and powered-on SIMPL virtual machine
-
The MDM deployment parameters (hostnames; management and signaling IP addresses)
-
Addresses for NTP, DNS and SNMP servers that the MDM instances will use
| |
The minimum supported version of MDM is |
Method of procedure
Your Customer Care Representative can provide guidance on using the SIMPL VM to deploy MDM. Follow the instructions in the SIMPL VM Documentation.
As part of the installation, you will add MDM to the Solution Definition File (SDF) with the following data:
-
certificates and keys
-
custom topology
Generation of certificates and keys
MDM requires the following certificates and keys. Refer to the MDM documentation for more details.
-
An SSH key pair (for logging into all instances in the deployment, including MDM, which does not allow SSH access using passwords)
-
A CA (certificate authority) certificate and private key (used for the server authentication side of mutual TLS)
-
A "static", also called "client", certificate and private key (used for the client authentication side of mutual TLS)
The CA private key is unused, but should be kept safe in order to generate a new static certificate and private key in the future. Add the other credentials to the SDF sdf-rvt.yaml as described in MDM service group.
Prepare SIMPL VM for deployment
Before deploying the VMs, the following files must be uploaded onto the SIMPL VM.
Upload the CSARs to the SIMPL VM
If not already done, transfer the CSARs onto the SIMPL VM. For each CSAR, run csar unpack <path to CSAR>, where <path to CSAR> is the full path to the transferred CSAR.
This will unpack the CSARs to ~/.local/share/csar/.
Upload the SDF to SIMPL VM
If the CSAR SDF was not created on the SIMPL VM, transfer the previously written CSAR SDF onto the SIMPL VM.
| |
Ensure that each version in the vnfcs section of the SDF matches each node type’s CSAR version. |
Deploy the nodes on VMware vSphere
To install all node types, refer to the following pages in the order below.
Deploy TSN nodes on VMware vSphere
Planning for the procedure
Background knowledge
This procedure assumes that:
-
you are installing into an existing VMware vSphere deployment which has pre-configured networks and VLANs; this procedure does not cover setting up a VMware vSphere deployment from scratch
-
you have deployed a SIMPL VM, unpacked the CSAR, and prepared an SDF.
Method of procedure
| |
Refer to the SIMPL VM Documentation for details on the commands mentioned in the procedure. |
Deployments using SIMPL 6.7.3
Step 1 - Deploy the OVA
Run csar deploy --vnf tsn --sdf <path to SDF>.
This will validate the SDF, and generate the terraform template. After successful validation, this will upload the image, and deploy the number of TSN nodes specified in the SDF.
| |
Only one node type should be deployed at the same time. I.e. when deploying these TSN nodes, don’t deploy other node types at the same time in parallel. |
Step 2 - Validate TSN RVT configuration
Validate the configuration for the TSN nodes to ensure that each TSN node can properly self-configure.
To validate the configuration after creating the YAML files, run
rvtconfig validate -t tsn -i <yaml-config-file-directory>
on the SIMPL VM from the resources subdirectory of the TSN CSAR.
Step 3 - Upload TSN RVT configuration
Upload the configuration for the TSN nodes to the CDS. This will enable each TSN node to self-configure.
To upload configuration after creating the YAML files and validating them as described above, run
rvtconfig upload-config -c <tsn-mgmt-addresses> -t tsn -i <yaml-config-file-directory> (--vm-version-source this-rvtconfig | --vm-version <version>)
on the SIMPL VM from the resources subdirectory of the TSN CSAR.
See Example configuration YAML files for example configuration files.
An in-depth description of RVT YAML configuration can be found in the Rhino VoLTE TAS Configuration and Management Guide.
Backout procedure
To delete the deployed VMs, run csar delete --vnf tsn --sdf <path to SDF>.
You must also delete the MDM state for each VM. To do this, you must first SSH into one of the MDM VMs. Get the instance IDs by running: mdmhelper --deployment-id <deployment ID> instance list. Then for each TSN VM, run the following command:
curl -X DELETE -k \
     --cert /etc/certs-agent/upload/mdm-cert.crt \
     --cacert /etc/certs-agent/upload/mdm-cas.crt \
     --key /etc/certs-agent/upload/mdm-key.key \
     https://127.0.0.1:4000/api/v1/deployments/<deployment ID>/instances/<instance ID>
Verify that the deletion worked by running mdmhelper --deployment-id <deployment ID> instance list again. You may now log out of the MDM VM.
Deployments using SIMPL 6.6.x
Step 1 - Validate the SDF
Run csar validate-vsphere --sdf <path to SDF>.
This will validate the SDF.
Step 2 - Generate the Terraform Template
Run csar generate --vnf tsn --sdf <path to SDF>.
This will generate the terraform template.
Step 3 - Deploy the OVA
Run csar deploy --vnf tsn.
This will upload the image, and deploy the number of TSN nodes specified in the SDF.
| |
Only one node type should be deployed at the same time. I.e. when deploying these TSN nodes, don’t deploy other node types at the same time in parallel. |
Step 4 - Validate TSN RVT configuration
Validate the configuration for the TSN nodes to ensure that each TSN node can properly self-configure.
To validate the configuration after creating the YAML files, run
rvtconfig validate -t tsn -i <yaml-config-file-directory>
on the SIMPL VM from the resources subdirectory of the TSN CSAR.
Step 5 - Upload TSN RVT configuration
Upload the configuration for the TSN nodes to the CDS. This will enable each TSN node to self-configure.
To upload configuration after creating the YAML files and validating them as described above, run
rvtconfig upload-config -c <tsn-mgmt-addresses> -t tsn -i <yaml-config-file-directory> (--vm-version-source this-rvtconfig | --vm-version <version>)
on the SIMPL VM from the resources subdirectory of the TSN CSAR.
See Example configuration YAML files for example configuration files.
An in-depth description of RVT YAML configuration can be found in the Rhino VoLTE TAS Configuration and Management Guide.
Backout procedure
To delete the deployed VMs, run csar deploy --vnf tsn --delete.
You must also delete the MDM state for each VM. To do this, you must first SSH into one of the MDM VMs. Get the instance IDs by running: mdmhelper --deployment-id <deployment ID> instance list. Then for each TSN VM, run the following command:
curl -X DELETE -k \
     --cert /etc/certs-agent/upload/mdm-cert.crt \
     --cacert /etc/certs-agent/upload/mdm-cas.crt \
     --key /etc/certs-agent/upload/mdm-key.key \
     https://127.0.0.1:4000/api/v1/deployments/<deployment ID>/instances/<instance ID>
Verify that the deletion worked by running mdmhelper --deployment-id <deployment ID> instance list again. You may now log out of the MDM VM.
Next Step
If you are upgrading a full set of VMs, go to Deploy ShCM nodes on VMware vSphere, otherwise follow the verification instructions here: Verify the state of the nodes and processes
Deploy ShCM nodes on VMware vSphere
Planning for the procedure
Background knowledge
This procedure assumes that:
-
you are installing into an existing VMware vSphere deployment which has pre-configured networks and VLANs; this procedure does not cover setting up a VMware vSphere deployment from scratch
-
you have deployed a SIMPL VM, unpacked the CSAR, and prepared an SDF.
Method of procedure
| |
Refer to the SIMPL VM Documentation for details on the commands mentioned in the procedure. |
Step 1 - Validate ShCM RVT configuration
Validate the configuration for the ShCM nodes to ensure that each ShCM node can properly self-configure.
To validate the configuration after creating the YAML files, run
rvtconfig validate -t shcm -i <yaml-config-file-directory>
on the SIMPL VM from the resources subdirectory of the ShCM CSAR.
Step 2 - Upload ShCM RVT configuration
Upload the configuration for the ShCM nodes to the CDS. This will enable each ShCM node to self-configure when they are deployed in the next step.
To upload configuration after creating the YAML files and validating them as described above, run
rvtconfig upload-config -c <tsn-mgmt-addresses> -t shcm -i <yaml-config-file-directory> (--vm-version-source this-rvtconfig | --vm-version <version>)
on the SIMPL VM from the resources subdirectory of the ShCM CSAR.
See Example configuration YAML files for example configuration files.
An in-depth description of RVT YAML configuration can be found in the Rhino VoLTE TAS Configuration and Management Guide.
Deployments using SIMPL 6.7.3
Step 3 - Deploy the OVA
Run csar deploy --vnf shcm --sdf <path to SDF>.
This will validate the SDF, and generate the terraform template. After successful validation, this will upload the image, and deploy the number of ShCM nodes specified in the SDF.
| |
Only one node type should be deployed at the same time. I.e. when deploying these ShCM nodes, don’t deploy other node types at the same time in parallel. |
Backout procedure
To delete the deployed VMs, run csar delete --vnf shcm --sdf <path to SDF>.
You must also delete the MDM state for each VM. To do this, you must first SSH into one of the MDM VMs. Get the instance IDs by running: mdmhelper --deployment-id <deployment ID> instance list. Then for each ShCM VM, run the following command:
curl -X DELETE -k \
     --cert /etc/certs-agent/upload/mdm-cert.crt \
     --cacert /etc/certs-agent/upload/mdm-cas.crt \
     --key /etc/certs-agent/upload/mdm-key.key \
     https://127.0.0.1:4000/api/v1/deployments/<deployment ID>/instances/<instance ID>
Verify that the deletion worked by running mdmhelper --deployment-id <deployment ID> instance list again. You may now log out of the MDM VM.
You must also delete state for this node type and version from the CDS prior to re-deploying the VMs. To delete the state, run rvtconfig delete-node-type --cassandra-contact-point <any TSN IP> --deployment-id <deployment ID>.
--site-id <site ID> --node-type shcm
(--vm-version-source [this-vm | this-rvtconfig] | --vm-version <vm_version>)
Deployments using SIMPL 6.6.x
Step 3 - Validate the SDF
Run csar validate-vsphere --sdf <path to SDF>.
This will validate the SDF.
Backout procedure
To delete the deployed VMs, run csar deploy --vnf shcm --delete.
You must also delete the MDM state for each VM. To do this, you must first SSH into one of the MDM VMs. Get the instance IDs by running: mdmhelper --deployment-id <deployment ID> instance list. Then for each ShCM VM, run the following command:
curl -X DELETE -k \
     --cert /etc/certs-agent/upload/mdm-cert.crt \
     --cacert /etc/certs-agent/upload/mdm-cas.crt \
     --key /etc/certs-agent/upload/mdm-key.key \
     https://127.0.0.1:4000/api/v1/deployments/<deployment ID>/instances/<instance ID>
Verify that the deletion worked by running mdmhelper --deployment-id <deployment ID> instance list again. You may now log out of the MDM VM.
You must also delete state for this node type and version from the CDS prior to re-deploying the VMs. To delete the state, run rvtconfig delete-node-type --cassandra-contact-point <any TSN IP> --deployment-id <deployment ID>.
--site-id <site ID> --node-type shcm
(--vm-version-source [this-vm | this-rvtconfig] | --vm-version <vm_version>)
Next Step
If you are upgrading a full set of VMs, go to Deploy MAG nodes on VMware vSphere, otherwise follow the verification instructions here: Verify the state of the nodes and processes
Deploy MAG nodes on VMware vSphere
Planning for the procedure
Background knowledge
This procedure assumes that:
-
you are installing into an existing VMware vSphere deployment which has pre-configured networks and VLANs; this procedure does not cover setting up a VMware vSphere deployment from scratch
-
you have deployed a SIMPL VM, unpacked the CSAR, and prepared an SDF.
Method of procedure
| |
Refer to the SIMPL VM Documentation for details on the commands mentioned in the procedure. |
Step 1 - Validate MAG RVT configuration
Validate the configuration for the MAG nodes to ensure that each MAG node can properly self-configure.
To validate the configuration after creating the YAML files, run
rvtconfig validate -t mag -i <yaml-config-file-directory>
on the SIMPL VM from the resources subdirectory of the MAG CSAR.
Step 2 - Upload MAG RVT configuration
Upload the configuration for the MAG nodes to the CDS. This will enable each MAG node to self-configure when they are deployed in the next step.
To upload configuration after creating the YAML files and validating them as described above, run
rvtconfig upload-config -c <tsn-mgmt-addresses> -t mag -i <yaml-config-file-directory> (--vm-version-source this-rvtconfig | --vm-version <version>)
on the SIMPL VM from the resources subdirectory of the MAG CSAR.
See Example configuration YAML files for example configuration files.
An in-depth description of RVT YAML configuration can be found in the Rhino VoLTE TAS Configuration and Management Guide.
Deployments using SIMPL 6.7.3
Step 3 - Deploy the OVA
Run csar deploy --vnf mag --sdf <path to SDF>.
This will validate the SDF, and generate the terraform template. After successful validation, this will upload the image, and deploy the number of MAG nodes specified in the SDF.
| |
Only one node type should be deployed at the same time. I.e. when deploying these MAG nodes, don’t deploy other node types at the same time in parallel. |
Backout procedure
To delete the deployed VMs, run csar delete --vnf mag --sdf <path to SDF>.
You must also delete the MDM state for each VM. To do this, you must first SSH into one of the MDM VMs. Get the instance IDs by running: mdmhelper --deployment-id <deployment ID> instance list. Then for each MAG VM, run the following command:
curl -X DELETE -k \
     --cert /etc/certs-agent/upload/mdm-cert.crt \
     --cacert /etc/certs-agent/upload/mdm-cas.crt \
     --key /etc/certs-agent/upload/mdm-key.key \
     https://127.0.0.1:4000/api/v1/deployments/<deployment ID>/instances/<instance ID>
Verify that the deletion worked by running mdmhelper --deployment-id <deployment ID> instance list again. You may now log out of the MDM VM.
You must also delete state for this node type and version from the CDS prior to re-deploying the VMs. To delete the state, run rvtconfig delete-node-type --cassandra-contact-point <any TSN IP> --deployment-id <deployment ID>.
--site-id <site ID> --node-type mag
(--vm-version-source [this-vm | this-rvtconfig] | --vm-version <vm_version>)
Deployments using SIMPL 6.6.x
Step 3 - Validate the SDF
Run csar validate-vsphere --sdf <path to SDF>.
This will validate the SDF.
Backout procedure
To delete the deployed VMs, run csar deploy --vnf mag --delete.
You must also delete the MDM state for each VM. To do this, you must first SSH into one of the MDM VMs. Get the instance IDs by running: mdmhelper --deployment-id <deployment ID> instance list. Then for each MAG VM, run the following command:
curl -X DELETE -k \
     --cert /etc/certs-agent/upload/mdm-cert.crt \
     --cacert /etc/certs-agent/upload/mdm-cas.crt \
     --key /etc/certs-agent/upload/mdm-key.key \
     https://127.0.0.1:4000/api/v1/deployments/<deployment ID>/instances/<instance ID>
Verify that the deletion worked by running mdmhelper --deployment-id <deployment ID> instance list again. You may now log out of the MDM VM.
You must also delete state for this node type and version from the CDS prior to re-deploying the VMs. To delete the state, run rvtconfig delete-node-type --cassandra-contact-point <any TSN IP> --deployment-id <deployment ID>.
--site-id <site ID> --node-type mag
(--vm-version-source [this-vm | this-rvtconfig] | --vm-version <vm_version>)
Next Step
If you are upgrading a full set of VMs, go to Deploy MMT GSM nodes on VMware vSphere, otherwise follow the verification instructions here: Verify the state of the nodes and processes
Deploy MMT GSM nodes on VMware vSphere
Planning for the procedure
Background knowledge
This procedure assumes that:
-
you are installing into an existing VMware vSphere deployment which has pre-configured networks and VLANs; this procedure does not cover setting up a VMware vSphere deployment from scratch
-
you have deployed a SIMPL VM, unpacked the CSAR, and prepared an SDF.
Method of procedure
| |
Refer to the SIMPL VM Documentation for details on the commands mentioned in the procedure. |
Step 1 - Validate MMT GSM RVT configuration
Validate the configuration for the MMT GSM nodes to ensure that each MMT GSM node can properly self-configure.
To validate the configuration after creating the YAML files, run
rvtconfig validate -t mmt-gsm -i <yaml-config-file-directory>
on the SIMPL VM from the resources subdirectory of the MMT GSM CSAR.
Step 2 - Upload MMT GSM RVT configuration
Upload the configuration for the MMT GSM nodes to the CDS. This will enable each MMT GSM node to self-configure when they are deployed in the next step.
To upload configuration after creating the YAML files and validating them as described above, run
rvtconfig upload-config -c <tsn-mgmt-addresses> -t mmt-gsm -i <yaml-config-file-directory> (--vm-version-source this-rvtconfig | --vm-version <version>)
on the SIMPL VM from the resources subdirectory of the MMT GSM CSAR.
See Example configuration YAML files for example configuration files.
An in-depth description of RVT YAML configuration can be found in the Rhino VoLTE TAS Configuration and Management Guide.
Deployments using SIMPL 6.7.3
Step 3 - Deploy the OVA
Run csar deploy --vnf mmt-gsm --sdf <path to SDF>.
This will validate the SDF, and generate the terraform template. After successful validation, this will upload the image, and deploy the number of MMT GSM nodes specified in the SDF.
| |
Only one node type should be deployed at the same time. I.e. when deploying these MMT GSM nodes, don’t deploy other node types at the same time in parallel. |
Backout procedure
To delete the deployed VMs, run csar delete --vnf mmt-gsm --sdf <path to SDF>.
You must also delete the MDM state for each VM. To do this, you must first SSH into one of the MDM VMs. Get the instance IDs by running: mdmhelper --deployment-id <deployment ID> instance list. Then for each MMT GSM VM, run the following command:
curl -X DELETE -k \
     --cert /etc/certs-agent/upload/mdm-cert.crt \
     --cacert /etc/certs-agent/upload/mdm-cas.crt \
     --key /etc/certs-agent/upload/mdm-key.key \
     https://127.0.0.1:4000/api/v1/deployments/<deployment ID>/instances/<instance ID>
Verify that the deletion worked by running mdmhelper --deployment-id <deployment ID> instance list again. You may now log out of the MDM VM.
You must also delete state for this node type and version from the CDS prior to re-deploying the VMs. To delete the state, run rvtconfig delete-node-type --cassandra-contact-point <any TSN IP> --deployment-id <deployment ID>.
--site-id <site ID> --node-type mmt-gsm
(--vm-version-source [this-vm | this-rvtconfig] | --vm-version <vm_version>)
Deployments using SIMPL 6.6.x
Step 3 - Validate the SDF
Run csar validate-vsphere --sdf <path to SDF>.
This will validate the SDF.
Step 4 - Generate the Terraform Template
Run csar generate --vnf mmt-gsm --sdf <path to SDF>.
This will generate the terraform template.
Step 5 - Deploy the OVA
Run csar deploy --vnf mmt-gsm.
This will upload the image, and deploy the number of MMT GSM nodes specified in the SDF.
| |
Only one node type should be deployed at the same time. I.e. when deploying these MMT GSM nodes, don’t deploy other node types at the same time in parallel. |
Backout procedure
To delete the deployed VMs, run csar deploy --vnf mmt-gsm --delete.
You must also delete the MDM state for each VM. To do this, you must first SSH into one of the MDM VMs. Get the instance IDs by running: mdmhelper --deployment-id <deployment ID> instance list. Then for each MMT GSM VM, run the following command:
curl -X DELETE -k \
     --cert /etc/certs-agent/upload/mdm-cert.crt \
     --cacert /etc/certs-agent/upload/mdm-cas.crt \
     --key /etc/certs-agent/upload/mdm-key.key \
     https://127.0.0.1:4000/api/v1/deployments/<deployment ID>/instances/<instance ID>
Verify that the deletion worked by running mdmhelper --deployment-id <deployment ID> instance list again. You may now log out of the MDM VM.
You must also delete state for this node type and version from the CDS prior to re-deploying the VMs. To delete the state, run rvtconfig delete-node-type --cassandra-contact-point <any TSN IP> --deployment-id <deployment ID>.
--site-id <site ID> --node-type mmt-gsm
(--vm-version-source [this-vm | this-rvtconfig] | --vm-version <vm_version>)
Next Step
If you are upgrading a full set of VMs, go to Deploy SMO nodes on VMware vSphere, otherwise follow the verification instructions here: Verify the state of the nodes and processes
Deploy SMO nodes on VMware vSphere
Planning for the procedure
Background knowledge
This procedure assumes that:
-
you are installing into an existing VMware vSphere deployment which has pre-configured networks and VLANs; this procedure does not cover setting up a VMware vSphere deployment from scratch
-
you have deployed a SIMPL VM, unpacked the CSAR, and prepared an SDF.
Method of procedure
| |
Refer to the SIMPL VM Documentation for details on the commands mentioned in the procedure. |
Step 1 - Validate SMO RVT configuration
Validate the configuration for the SMO nodes to ensure that each SMO node can properly self-configure.
To validate the configuration after creating the YAML files, run
rvtconfig validate -t smo -i <yaml-config-file-directory>
on the SIMPL VM from the resources subdirectory of the SMO CSAR.
Step 2 - Upload SMO RVT configuration
Upload the configuration for the SMO nodes to the CDS. This will enable each SMO node to self-configure when they are deployed in the next step.
To upload configuration after creating the YAML files and validating them as described above, run
rvtconfig upload-config -c <tsn-mgmt-addresses> -t smo -i <yaml-config-file-directory> (--vm-version-source this-rvtconfig | --vm-version <version>)
on the SIMPL VM from the resources subdirectory of the SMO CSAR.
See Example configuration YAML files for example configuration files.
An in-depth description of RVT YAML configuration can be found in the Rhino VoLTE TAS Configuration and Management Guide.
Deployments using SIMPL 6.7.3
Step 3 - Deploy the OVA
Run csar deploy --vnf smo --sdf <path to SDF>.
This will validate the SDF, and generate the terraform template. After successful validation, this will upload the image, and deploy the number of SMO nodes specified in the SDF.
| |
Only one node type should be deployed at the same time. I.e. when deploying these SMO nodes, don’t deploy other node types at the same time in parallel. |
Backout procedure
To delete the deployed VMs, run csar delete --vnf smo --sdf <path to SDF>.
You must also delete the MDM state for each VM. To do this, you must first SSH into one of the MDM VMs. Get the instance IDs by running: mdmhelper --deployment-id <deployment ID> instance list. Then for each SMO VM, run the following command:
curl -X DELETE -k \
     --cert /etc/certs-agent/upload/mdm-cert.crt \
     --cacert /etc/certs-agent/upload/mdm-cas.crt \
     --key /etc/certs-agent/upload/mdm-key.key \
     https://127.0.0.1:4000/api/v1/deployments/<deployment ID>/instances/<instance ID>
Verify that the deletion worked by running mdmhelper --deployment-id <deployment ID> instance list again. You may now log out of the MDM VM.
You must also delete state for this node type and version from the CDS prior to re-deploying the VMs. To delete the state, run rvtconfig delete-node-type --cassandra-contact-point <any TSN IP> --deployment-id <deployment ID>.
--site-id <site ID> --node-type smo
(--vm-version-source [this-vm | this-rvtconfig] | --vm-version <vm_version>)
Deployments using SIMPL 6.6.x
Step 3 - Validate the SDF
Run csar validate-vsphere --sdf <path to SDF>.
This will validate the SDF.
Backout procedure
To delete the deployed VMs, run csar deploy --vnf smo --delete.
You must also delete the MDM state for each VM. To do this, you must first SSH into one of the MDM VMs. Get the instance IDs by running: mdmhelper --deployment-id <deployment ID> instance list. Then for each SMO VM, run the following command:
curl -X DELETE -k \
     --cert /etc/certs-agent/upload/mdm-cert.crt \
     --cacert /etc/certs-agent/upload/mdm-cas.crt \
     --key /etc/certs-agent/upload/mdm-key.key \
     https://127.0.0.1:4000/api/v1/deployments/<deployment ID>/instances/<instance ID>
Verify that the deletion worked by running mdmhelper --deployment-id <deployment ID> instance list again. You may now log out of the MDM VM.
You must also delete state for this node type and version from the CDS prior to re-deploying the VMs. To delete the state, run rvtconfig delete-node-type --cassandra-contact-point <any TSN IP> --deployment-id <deployment ID>.
--site-id <site ID> --node-type smo
(--vm-version-source [this-vm | this-rvtconfig] | --vm-version <vm_version>)
Next Step
Follow the verification instructions here: Verify the state of the nodes and processes
Automatic rolling upgrades and patches with SIMPL VM on VMware vSphere
This section provides information on Upgrades and CSAR EFIX patches.
Before running a rolling upgrade or patch, ensure that all node types in the deployment pass validation. See Verify the state of the nodes and processes for instructions on how to do this.
All uplevel CSARs or CSAR EFIX patches must be uploaded to SIMPL for all upgraded node types before installation. In addition, the uplevel SDF must contain the uplevel CSAR versions for all upgraded node types.
- Rolling upgrades with SIMPL VM
- Rolling upgrades using CSAR EFIX patch with SIMPL VM
- Setting up for a rolling upgrade using CSAR EFIX patch
- Rolling CSAR EFIX patch TSN nodes on VMware vSphere
- Rolling CSAR EFIX patch ShCM nodes on VMware vSphere
- Rolling CSAR EFIX patch MAG nodes on VMware vSphere
- Rolling CSAR EFIX patch MMT GSM nodes on VMware vSphere
- Rolling CSAR EFIX patch SMO nodes on VMware vSphere
- Post rolling upgrade using CSAR EFIX patch steps
Rolling upgrades with SIMPL VM
To upgrade all node types, refer to the following pages in the order below.
Setting up for a rolling upgrade
Before running a rolling upgrade, some steps must be completed first.
Verify that Rhino has no duplicate OIDs
This can be done prior to the maintenance window. For each node type with Rhino, SSH into one of the VMs.
Run the following command:
last_seen=0; rhino-console listsnmpoidmappings | while read line;do array=($line); if [ "${array[0]}" == "$last_seen" ]; then
echo "Duplicate ${array[0]}"; fi; last_seen=${array[0]}; done
If there are any duplicates, please contact your Metaswitch Customer Care representative.
Disable scheduled Rhino restarts
If you have configured scheduled Rhino restarts, then these should be disabled before running an upgrade. This can be done by commenting out the scheduled-rhino-restarts section in the VM pool YAML config files. An example is shown below.
  virtual-machines:
    - vm-id: vm01
      rhino-node-id: 101
#      scheduled-rhino-restarts:
#        day-of-week: Saturday
#        time-of-day: 03:00
    - vm-id: vm02
      rhino-node-id: 102
#      scheduled-rhino-restarts:
#        day-of-week: Saturday
#        time-of-day: 04:00
Then to update the VMs with the disabled scheduled restarts, use rvtconfig upload-config.
Verify that HTTPS certificates are valid
The HTTPS certificates on the VMs must be valid for more than 30 days, and must remain valid during the upgrade for the whole deployment. For example, your upgrade will fail if your certificate is valid for 32 days and it takes more than 1 day to upgrade all of the VMs for all node types.
Using your own certificates
If using your own generated certificates, check its expiry date using:
openssl x509 -in <certificate file> -enddate -nooutIf the certificates are expiring, you must first upload the new certificates using rvtconfig upload-config before upgrading.
Using VM generated certificates
If you did not provide certificates to the VMs, the VM will generate its own certificates which are valid for 5 years. So if the current VMs have been deployed less than 5 years ago then there is nothing further to do. If it has been over 5 years, then please contact your Metaswitch Customer Care representative.
Verify all VMs are healthy
All the VMs in the deployment need to be healthy. To check this, run the common health checks for the VMs by following: Verify the state of the nodes and processes. The per-node checks should also be run by following each page under: Per-node checks.
Collect diagnostics from all of the VMs
The diagnostics from all the VMs should be collected. To do this, follow instructions from RVT Diagnostics Gatherer. After generating the diagnostics, transfer it from the VMs to a local machine.
Disable TSN Housekeeping Tasks
Before upgrading TSN VMs, do the following on all downlevel TSN VMs:
sudo systemctl list-timersIf cassandra-repair-daily.timer is present, do the following:
sudo systemctl disable cassandra-repair-daily.timer
sudo systemctl stop cassandra-repair-daily.timer
Run the following command to verify that the cassandra-repair-daily.timer is not present:
sudo systemctl list-timersDisable SNMP on SMO VMs if SNMPv3 is enabled
| |
Omitting this step on the SMO VMs when SNMPv3 is configured will result in Initconf failing to converge on the uplevel VMs. |
SNMP is only required to be disabled on the SMO VMs when:
-
Performing a rolling upgrade or rollback of the SMO; and
-
SNMPv3 is enabled (even if SGC notifications are disabled); and
-
the downlevel VM version is 4.0.0-23-1.0.0 or older; and
-
the uplevel VM version is 4.0.0-24-1.0.0 or newer.
The complete process for doing this is documented in Reconfiguring the SGC’s SNMP subsystem.
Download CDRs from all VMs
If your deployment is configured to generate CDRs on the Rhino VMs, these CDRs are stored on the local disk of the VMs and will be lost when the VMs are upgraded.
Therefore, if you need to keep a record of all CDRs generated the platform, you must download any CDRs not yet downloaded before the upgrade. Any CDRs not downloaded from a VM before that VM is upgraded will be permanently lost.
Upload the uplevel CSARs to the SIMPL VM
If not already done, transfer the uplevel CSARs onto the SIMPL VM. For each CSAR, run csar unpack <path to CSAR>, where <path to CSAR> is the full path to the transferred uplevel CSAR.
This will unpack the uplevel CSARs to ~/.local/share/csar/.
Upload the uplevel SDF to SIMPL VM
If the CSAR uplevel SDF was not created on the SIMPL VM, transfer the previously written CSAR uplevel SDF onto the SIMPL VM.
| |
Ensure that each version in the vnfcs section of the uplevel SDF matches each node type’s CSAR version. |
Upload uplevel RVT configuration
Upload the uplevel configuration for all of the node types to the CDS. This is required for the rolling upgrade to complete.
| |
As configuration is stored against a specific version, you need to re-upload, the uplevel configuration even if it is identical to the downlevel configuration. |
When performing a rolling upgrade some elements of the uplevel configuration must remain identical to those in the downlevel configuration. These elements (and the remedy if that configuration change was made and the cluster upgrade process started) are described in the following table:
Node Type |
Disallowed Configuration Change |
Remedy |
All |
The |
Rollback the affected VM(s) to restore the original configuration, then correct the uplevel configuration and re-run the upgrade. |
All |
The ordering of the VM instances in the SDF may not be altered. |
Rollback the affected VM(s) to restore the original configuration, then correct the uplevel configuration and re-run the upgrade. |
See Example configuration YAML files for example configuration files.
An in-depth description of RVT YAML configuration can be found in the Rhino VoLTE TAS Configuration and Management Guide.
Rolling upgrade TSN nodes on VMware vSphere
Cassandra Upgrade and Rollback
Planning for the procedure
Background knowledge
This procedure assumes that:
-
you are installing into an existing VMware vSphere deployment which has pre-configured networks and VLANs; this procedure does not cover setting up a VMware vSphere deployment from scratch
-
you are upgrading an existing downlevel deployment for TSN.
Method of procedure
| |
Refer to the SIMPL VM Documentation for details on the commands mentioned in the procedure. |
Deployments using SIMPL 6.7.3
Step 1 - Upgrade the downlevel TSN VMs
Run csar update --vnf tsn --sdf <path to SDF>.
| |
To perform a canary upgrade, run csar update --vnf tsn --sites <site> --service-group <service_group> --index-range <range> --sdf <path to SDF>. The indexes start from 0, therefore 0 is the first VM. The range accepts ranges as well as comma separated indexes (e.g. 1-3,7,9). Only the nodes specified in the index will be upgraded. |
This will validate the uplevel SDF, generate the uplevel Terraform template, upload the uplevel image, and then it will start the upgrade.
The following will occur one TSN node at a time:
-
The downlevel node will be quiesced.
-
The uplevel node will be created and boot up.
-
The VM will automatically start applying configuration from the files you uploaded to CDS in the above steps. During this phase, the status of the VM in MDM will be Orange.
-
Once configuration is complete, the status will change to Green, and the node will be ready for service. At this point the
csar updatecommand will move on to the next TSN VM, or report that the upgrade of the TSN was successful if all nodes have now been upgraded. -
Once the upgrade is complete, place calls and run any additional validation tests to verify the uplevel VMs are working as expected.
Backout procedure
If the upgrade has brought up uplevel VMs to replace the downlevel VMs, then the uplevel VMs can be rolled back to the downlevel VMs. To rollback, repeat the steps above with the downlevel TSN CSAR and downlevel SDF.
You may need to use the --skip pre-update-checks flag as part of the csar update command. The --skip pre-update-checks flag allows rollbacks when a node is unhealthy.
If the upgrade has failed to bring up the uplevel VMs or the rollback has failed to bring up the downlevel VMs, then you must redeploy the downlevel VMs. run csar redeploy --vnf tsn --sites <site> --sdf <path to SDF>.
Deployments using SIMPL 6.6.x
Step 1 - Validate the SDF
Run csar validate-vsphere --sdf <path to SDF>.
This will validate the uplevel SDF.
Step 2 - Generate the Terraform Template
Run csar generate --vnf tsn --sdf <path to SDF>.
This will generate the terraform template.
Step 3 - Upgrade the downlevel TSN nodes
Run csar update --vnf tsn.
| |
To perform a canary upgrade, run csar update --vnf tsn --sites <site> --service-group <service_group> --index-range <range>. The indexes start from 0, therefore 0 is the first VM. The range accepts ranges as well as comma separated indexes (e.g. 1-3,7,9). Only the nodes specified in the index will be upgraded. |
This will upload the uplevel image, then it will start the upgrade.
The following will occur one TSN node at a time:
-
The downlevel node will be quiesced.
-
The uplevel node will be created and boot up.
-
The VM will automatically start applying configuration from the files you uploaded to CDS in the above steps. During this phase, the status of the VM in MDM will be Orange.
-
Once configuration is complete, the status will change to Green, and the node will be ready for service. At this point the
csar updatecommand will move on to the next TSN VM, or report that the upgrade of the TSN was successful if all nodes have now been upgraded. -
Once the upgrade is complete, place calls and run any additional validation tests to verify the uplevel VMs are working as expected.
Backout procedure
If the upgrade has brought up uplevel VMs to replace the downlevel VMs, then the uplevel VMs can be rolled back to the downlevel VMs. To rollback, repeat the steps above with the downlevel TSN CSAR and downlevel SDF.
You may need to use the --skip-pre-update-checks flag as part of the csar update command. The --skip-pre-update-checks flag allows rollbacks when a node is unhealthy.
If the upgrade has failed to bring up the uplevel VMs or the rollback has failed to bring up the downlevel VMs, then you must redeploy the downlevel VMs. run csar deploy --redeploy --vnf tsn --sites <site>.
Next Step
If you are upgrading a full set of VMs, go to Rolling upgrade ShCM nodes on VMware vSphere, otherwise follow the post upgrade instructions here: Post rolling upgrade steps
Rolling upgrade ShCM nodes on VMware vSphere
Planning for the procedure
Background knowledge
This procedure assumes that:
-
you are installing into an existing VMware vSphere deployment which has pre-configured networks and VLANs; this procedure does not cover setting up a VMware vSphere deployment from scratch
-
you are upgrading an existing downlevel deployment for ShCM.
Method of procedure
| |
Refer to the SIMPL VM Documentation for details on the commands mentioned in the procedure. |
Deployments using SIMPL 6.7.3
Step 1 - Upgrade the downlevel ShCM VMs
Run csar update --vnf shcm --sdf <path to SDF>.
| |
To perform a canary upgrade, run csar update --vnf shcm --sites <site> --service-group <service_group> --index-range <range> --sdf <path to SDF>. The indexes start from 0, therefore 0 is the first VM. The range accepts ranges as well as comma separated indexes (e.g. 1-3,7,9). Only the nodes specified in the index will be upgraded. |
This will validate the uplevel SDF, generate the uplevel Terraform template, upload the uplevel image, and then it will start the upgrade.
The following will occur one ShCM node at a time:
-
The downlevel node will be quiesced.
-
The uplevel node will be created and boot up.
-
The VM will automatically start applying configuration from the files you uploaded to CDS in the above steps. During this phase, the status of the VM in MDM will be Orange.
-
Once configuration is complete, the status will change to Green, and the node will be ready for service. At this point the
csar updatecommand will move on to the next ShCM VM, or report that the upgrade of the ShCM was successful if all nodes have now been upgraded. -
Once the upgrade is complete, place calls and run any additional validation tests to verify the uplevel VMs are working as expected.
Backout procedure
If the upgrade has brought up uplevel VMs to replace the downlevel VMs, then the uplevel VMs can be rolled back to the downlevel VMs. To rollback, repeat the steps above with the downlevel ShCM CSAR and downlevel SDF.
You may need to use the --skip pre-update-checks flag as part of the csar update command. The --skip pre-update-checks flag allows rollbacks when a node is unhealthy.
If the upgrade has failed to bring up the uplevel VMs or the rollback has failed to bring up the downlevel VMs, then you must redeploy the downlevel VMs. run csar redeploy --vnf shcm --sites <site> --sdf <path to SDF>.
Deployments using SIMPL 6.6.x
Step 1 - Validate the SDF
Run csar validate-vsphere --sdf <path to SDF>.
This will validate the uplevel SDF.
Step 2 - Generate the Terraform Template
Run csar generate --vnf shcm --sdf <path to SDF>.
This will generate the terraform template.
Step 3 - Upgrade the downlevel ShCM nodes
Run csar update --vnf shcm.
| |
To perform a canary upgrade, run csar update --vnf shcm --sites <site> --service-group <service_group> --index-range <range>. The indexes start from 0, therefore 0 is the first VM. The range accepts ranges as well as comma separated indexes (e.g. 1-3,7,9). Only the nodes specified in the index will be upgraded. |
This will upload the uplevel image, then it will start the upgrade.
The following will occur one ShCM node at a time:
-
The downlevel node will be quiesced.
-
The uplevel node will be created and boot up.
-
The VM will automatically start applying configuration from the files you uploaded to CDS in the above steps. During this phase, the status of the VM in MDM will be Orange.
-
Once configuration is complete, the status will change to Green, and the node will be ready for service. At this point the
csar updatecommand will move on to the next ShCM VM, or report that the upgrade of the ShCM was successful if all nodes have now been upgraded. -
Once the upgrade is complete, place calls and run any additional validation tests to verify the uplevel VMs are working as expected.
Backout procedure
If the upgrade has brought up uplevel VMs to replace the downlevel VMs, then the uplevel VMs can be rolled back to the downlevel VMs. To rollback, repeat the steps above with the downlevel ShCM CSAR and downlevel SDF.
You may need to use the --skip-pre-update-checks flag as part of the csar update command. The --skip-pre-update-checks flag allows rollbacks when a node is unhealthy.
If the upgrade has failed to bring up the uplevel VMs or the rollback has failed to bring up the downlevel VMs, then you must redeploy the downlevel VMs. run csar deploy --redeploy --vnf shcm --sites <site>.
Next Step
If you are upgrading a full set of VMs, go to Rolling upgrade MAG nodes on VMware vSphere, otherwise follow the post upgrade instructions here: Post rolling upgrade steps
Rolling upgrade MAG nodes on VMware vSphere
Planning for the procedure
Background knowledge
This procedure assumes that:
-
you are installing into an existing VMware vSphere deployment which has pre-configured networks and VLANs; this procedure does not cover setting up a VMware vSphere deployment from scratch
-
you are upgrading an existing downlevel deployment for MAG.
Method of procedure
| |
Refer to the SIMPL VM Documentation for details on the commands mentioned in the procedure. |
Deployments using SIMPL 6.7.3
Step 1 - Upgrade the initial downlevel MAG VMs
The VM with the Rhino node that has the lowest ID must be upgraded last.
Upgrade all of the other VMs using the following command: csar update --vnf mag --sites <site> --service-group <service_group> --index-range <range> --sdf <path to SDF>.
The indexes start from 0, therefore 0 is the first VM. The --index-range accepts ranges as well as comma separated indexes (e.g. 1-3,7,9). To upgrade the VMs in stages, run the command multiple times using the appropriate --index-range values.
The following will occur one MAG node at a time:
-
The downlevel node will be quiesced.
-
The uplevel node will be created and boot up.
-
The VM will automatically start applying configuration from the files you uploaded to CDS in the above steps. During this phase, the status of the VM in MDM will be Orange.
-
Once configuration is complete, the status will change to Green, and the node will be ready for service. At this point the
csar updatecommand will move on to the next MAG VM, or report that the upgrade of the MAG was successful if all nodes have now been upgraded. -
Once the upgrade is complete, place calls and run any additional validation tests to verify the uplevel VMs are working as expected.
Backout procedure
If the upgrade has brought up uplevel VMs to replace the downlevel VMs, then the uplevel VMs can be rolled back to the downlevel VMs. To rollback, repeat the steps above with the downlevel MAG CSAR and downlevel SDF. The lowest uplevel VM must be rolled back last. For example, if VMs 2-5 are in the uplevel, you must rollback VMs 3-5 then rollback VM 2.
You may need to use the --skip pre-update-checks flag as part of the csar update command. The --skip pre-update-checks flag allows rollbacks when a node is unhealthy.
If the upgrade has failed to bring up the uplevel VMs or the rollback has failed to bring up the downlevel VMs, then you must redeploy the downlevel VMs. run csar redeploy --vnf mag --sites <site> --sdf <path to SDF>.
Deployments using SIMPL 6.6.x
Step 1 - Validate the SDF
Run csar validate-vsphere --sdf <path to SDF>.
This will validate the uplevel SDF.
Step 2 - Generate the Terraform Template
Run csar generate --vnf mag --sdf <path to SDF>.
This will generate the terraform template.
Step 3 - Upgrade the downlevel MAG VMs
The VM with the Rhino node that has the lowest ID must be upgraded last.
Upgrade all of the other VMs using the following command: csar update --vnf mag --sites <site> --service-group <service_group> --index-range <range>.
The indexes start from 0, therefore 0 is the first VM. The --index-range accepts ranges as well as comma separated indexes (e.g. 1-3,7,9). To upgrade the VMs in stages, run the command multiple times using the appropriate --index-range values.
The following will occur one MAG node at a time:
-
The downlevel node will be quiesced.
-
The uplevel node will be created and boot up.
-
The VM will automatically start applying configuration from the files you uploaded to CDS in the above steps. During this phase, the status of the VM in MDM will be Orange.
-
Once configuration is complete, the status will change to Green, and the node will be ready for service. At this point the
csar updatecommand will move on to the next MAG VM, or report that the upgrade of the MAG was successful if all nodes have now been upgraded. -
Once the upgrade is complete, place calls and run any additional validation tests to verify the uplevel VMs are working as expected.
Backout procedure
If the upgrade has brought up uplevel VMs to replace the downlevel VMs, then the uplevel VMs can be rolled back to the downlevel VMs. To rollback, repeat the steps above with the downlevel MAG CSAR and downlevel SDF. The lowest uplevel VM must be rolled back last. For example, if VMs 2-5 are in the uplevel, you must rollback VMs 3-5 then rollback VM 2.
You may need to use the --skip-pre-update-checks flag as part of the csar update command. The --skip-pre-update-checks flag allows rollbacks when a node is unhealthy.
If the upgrade has failed to bring up the uplevel VMs or the rollback has failed to bring up the downlevel VMs, then you must redeploy the downlevel VMs. run csar deploy --redeploy --vnf mag --sites <site>.
Next Step
If you are upgrading a full set of VMs, go to Rolling upgrade MMT GSM nodes on VMware vSphere, otherwise follow the post upgrade instructions here: Post rolling upgrade steps
Rolling upgrade MMT GSM nodes on VMware vSphere
Planning for the procedure
Background knowledge
This procedure assumes that:
-
you are installing into an existing VMware vSphere deployment which has pre-configured networks and VLANs; this procedure does not cover setting up a VMware vSphere deployment from scratch
-
you are upgrading an existing downlevel deployment for MMT GSM.
Method of procedure
| |
Refer to the SIMPL VM Documentation for details on the commands mentioned in the procedure. |
Deployments using SIMPL 6.7.3
Step 1 - Upgrade the initial downlevel MMT GSM VMs
The VM with the Rhino node that has the lowest ID must be upgraded last.
Upgrade all of the other VMs using the following command: csar update --vnf mmt-gsm --sites <site> --service-group <service_group> --index-range <range> --sdf <path to SDF>.
The indexes start from 0, therefore 0 is the first VM. The --index-range accepts ranges as well as comma separated indexes (e.g. 1-3,7,9). To upgrade the VMs in stages, run the command multiple times using the appropriate --index-range values.
The following will occur one MMT GSM node at a time:
-
The downlevel node will be quiesced.
-
The uplevel node will be created and boot up.
-
The VM will automatically start applying configuration from the files you uploaded to CDS in the above steps. During this phase, the status of the VM in MDM will be Orange.
-
Once configuration is complete, the status will change to Green, and the node will be ready for service. At this point the
csar updatecommand will move on to the next MMT GSM VM, or report that the upgrade of the MMT GSM was successful if all nodes have now been upgraded. -
Once the upgrade is complete, place calls and run any additional validation tests to verify the uplevel VMs are working as expected.
Backout procedure
If the upgrade has brought up uplevel VMs to replace the downlevel VMs, then the uplevel VMs can be rolled back to the downlevel VMs. To rollback, repeat the steps above with the downlevel MMT GSM CSAR and downlevel SDF. The lowest uplevel VM must be rolled back last. For example, if VMs 2-5 are in the uplevel, you must rollback VMs 3-5 then rollback VM 2.
You may need to use the --skip pre-update-checks flag as part of the csar update command. The --skip pre-update-checks flag allows rollbacks when a node is unhealthy.
If the upgrade has failed to bring up the uplevel VMs or the rollback has failed to bring up the downlevel VMs, then you must redeploy the downlevel VMs. run csar redeploy --vnf mmt-gsm --sites <site> --sdf <path to SDF>.
Deployments using SIMPL 6.6.x
Step 1 - Validate the SDF
Run csar validate-vsphere --sdf <path to SDF>.
This will validate the uplevel SDF.
Step 2 - Generate the Terraform Template
Run csar generate --vnf mmt-gsm --sdf <path to SDF>.
This will generate the terraform template.
Step 3 - Upgrade the downlevel MMT GSM VMs
The VM with the Rhino node that has the lowest ID must be upgraded last.
Upgrade all of the other VMs using the following command: csar update --vnf mmt-gsm --sites <site> --service-group <service_group> --index-range <range>.
The indexes start from 0, therefore 0 is the first VM. The --index-range accepts ranges as well as comma separated indexes (e.g. 1-3,7,9). To upgrade the VMs in stages, run the command multiple times using the appropriate --index-range values.
The following will occur one MMT GSM node at a time:
-
The downlevel node will be quiesced.
-
The uplevel node will be created and boot up.
-
The VM will automatically start applying configuration from the files you uploaded to CDS in the above steps. During this phase, the status of the VM in MDM will be Orange.
-
Once configuration is complete, the status will change to Green, and the node will be ready for service. At this point the
csar updatecommand will move on to the next MMT GSM VM, or report that the upgrade of the MMT GSM was successful if all nodes have now been upgraded. -
Once the upgrade is complete, place calls and run any additional validation tests to verify the uplevel VMs are working as expected.
Backout procedure
If the upgrade has brought up uplevel VMs to replace the downlevel VMs, then the uplevel VMs can be rolled back to the downlevel VMs. To rollback, repeat the steps above with the downlevel MMT GSM CSAR and downlevel SDF. The lowest uplevel VM must be rolled back last. For example, if VMs 2-5 are in the uplevel, you must rollback VMs 3-5 then rollback VM 2.
You may need to use the --skip-pre-update-checks flag as part of the csar update command. The --skip-pre-update-checks flag allows rollbacks when a node is unhealthy.
If the upgrade has failed to bring up the uplevel VMs or the rollback has failed to bring up the downlevel VMs, then you must redeploy the downlevel VMs. run csar deploy --redeploy --vnf mmt-gsm --sites <site>.
Next Step
If you are upgrading a full set of VMs, go to Rolling upgrade SMO nodes on VMware vSphere, otherwise follow the post upgrade instructions here: Post rolling upgrade steps
Rolling upgrade SMO nodes on VMware vSphere
Planning for the procedure
Background knowledge
This procedure assumes that:
-
you are installing into an existing VMware vSphere deployment which has pre-configured networks and VLANs; this procedure does not cover setting up a VMware vSphere deployment from scratch
-
you are upgrading an existing downlevel deployment for SMO.
Method of procedure
| |
Refer to the SIMPL VM Documentation for details on the commands mentioned in the procedure. |
Deployments using SIMPL 6.7.3
Step 1 - Upgrade the initial downlevel SMO VMs
The VM with the Rhino node that has the lowest ID must be upgraded last.
Upgrade all of the other VMs using the following command: csar update --vnf smo --sites <site> --service-group <service_group> --index-range <range> --sdf <path to SDF>.
The indexes start from 0, therefore 0 is the first VM. The --index-range accepts ranges as well as comma separated indexes (e.g. 1-3,7,9). To upgrade the VMs in stages, run the command multiple times using the appropriate --index-range values.
The following will occur one SMO node at a time:
-
The downlevel node will be quiesced.
-
The uplevel node will be created and boot up.
-
The VM will automatically start applying configuration from the files you uploaded to CDS in the above steps. During this phase, the status of the VM in MDM will be Orange.
-
Once configuration is complete, the status will change to Green, and the node will be ready for service. At this point the
csar updatecommand will move on to the next SMO VM, or report that the upgrade of the SMO was successful if all nodes have now been upgraded. -
Once the upgrade is complete, place calls and run any additional validation tests to verify the uplevel VMs are working as expected.
Backout procedure
If the upgrade has brought up uplevel VMs to replace the downlevel VMs, then the uplevel VMs can be rolled back to the downlevel VMs. To rollback, repeat the steps above with the downlevel SMO CSAR and downlevel SDF. The lowest uplevel VM must be rolled back last. For example, if VMs 2-5 are in the uplevel, you must rollback VMs 3-5 then rollback VM 2.
You may need to use the --skip pre-update-checks flag as part of the csar update command. The --skip pre-update-checks flag allows rollbacks when a node is unhealthy.
If the upgrade has failed to bring up the uplevel VMs or the rollback has failed to bring up the downlevel VMs, then you must redeploy the downlevel VMs. run csar redeploy --vnf smo --sites <site> --sdf <path to SDF>.
Deployments using SIMPL 6.6.x
Step 1 - Validate the SDF
Run csar validate-vsphere --sdf <path to SDF>.
This will validate the uplevel SDF.
Step 2 - Generate the Terraform Template
Run csar generate --vnf smo --sdf <path to SDF>.
This will generate the terraform template.
Step 3 - Upgrade the downlevel SMO VMs
The VM with the Rhino node that has the lowest ID must be upgraded last.
Upgrade all of the other VMs using the following command: csar update --vnf smo --sites <site> --service-group <service_group> --index-range <range>.
The indexes start from 0, therefore 0 is the first VM. The --index-range accepts ranges as well as comma separated indexes (e.g. 1-3,7,9). To upgrade the VMs in stages, run the command multiple times using the appropriate --index-range values.
The following will occur one SMO node at a time:
-
The downlevel node will be quiesced.
-
The uplevel node will be created and boot up.
-
The VM will automatically start applying configuration from the files you uploaded to CDS in the above steps. During this phase, the status of the VM in MDM will be Orange.
-
Once configuration is complete, the status will change to Green, and the node will be ready for service. At this point the
csar updatecommand will move on to the next SMO VM, or report that the upgrade of the SMO was successful if all nodes have now been upgraded. -
Once the upgrade is complete, place calls and run any additional validation tests to verify the uplevel VMs are working as expected.
Backout procedure
If the upgrade has brought up uplevel VMs to replace the downlevel VMs, then the uplevel VMs can be rolled back to the downlevel VMs. To rollback, repeat the steps above with the downlevel SMO CSAR and downlevel SDF. The lowest uplevel VM must be rolled back last. For example, if VMs 2-5 are in the uplevel, you must rollback VMs 3-5 then rollback VM 2.
You may need to use the --skip-pre-update-checks flag as part of the csar update command. The --skip-pre-update-checks flag allows rollbacks when a node is unhealthy.
If the upgrade has failed to bring up the uplevel VMs or the rollback has failed to bring up the downlevel VMs, then you must redeploy the downlevel VMs. run csar deploy --redeploy --vnf smo --sites <site>.
Next Step
Follow the post upgrade instructions here: Post rolling upgrade steps
Post rolling upgrade steps
After a rolling upgrade, some steps must be completed.
Verify all VMs are healthy
All the VMs in the deployment need to be healthy. To check this, run the common health checks for the VMs by following: Verify the state of the nodes and processes. The per-node checks should also be run by following each page under: Per-node checks.
Enable scheduled Rhino restarts
If you have disabled the scheduled Rhino restarts before the upgrades, then it can now be enabled. This can be done by uncommenting out the scheduled-rhino-restarts section in the VM pool YAML config files. Then to update the VMs with the scheduled restarts, use rvtconfig upload-config.
Rolling upgrades using CSAR EFIX patch with SIMPL VM
To patch all node types, refer to the following pages in the order below.
- Setting up for a rolling upgrade using CSAR EFIX patch
- Rolling CSAR EFIX patch TSN nodes on VMware vSphere
- Rolling CSAR EFIX patch ShCM nodes on VMware vSphere
- Rolling CSAR EFIX patch MAG nodes on VMware vSphere
- Rolling CSAR EFIX patch MMT GSM nodes on VMware vSphere
- Rolling CSAR EFIX patch SMO nodes on VMware vSphere
- Post rolling upgrade using CSAR EFIX patch steps
Setting up for a rolling upgrade using CSAR EFIX patch
Before running a rolling upgrade, some steps must be completed first.
Verify that Rhino has no duplicate OIDs
This can be done prior to the maintenance window. For each node type with Rhino, SSH into one of the VMs.
Run the following command:
last_seen=0; rhino-console listsnmpoidmappings | while read line;do array=($line); if [ "${array[0]}" == "$last_seen" ]; then
echo "Duplicate ${array[0]}"; fi; last_seen=${array[0]}; done
If there are any duplicates, please contact your Metaswitch Customer Care representative.
Disable scheduled Rhino restarts
If you have configured scheduled Rhino restarts, then these should be disabled before running an upgrade. This can be done by commenting out the scheduled-rhino-restarts section in the VM pool YAML config files. An example is shown below.
  virtual-machines:
    - vm-id: vm01
      rhino-node-id: 101
#      scheduled-rhino-restarts:
#        day-of-week: Saturday
#        time-of-day: 03:00
    - vm-id: vm02
      rhino-node-id: 102
#      scheduled-rhino-restarts:
#        day-of-week: Saturday
#        time-of-day: 04:00
Then to update the VMs with the disabled scheduled restarts, use rvtconfig upload-config.
Verify that HTTPS certificates are valid
The HTTPS certificates on the VMs must be valid for more than 30 days, and must remain valid during the upgrade for the whole deployment. For example, your upgrade will fail if your certificate is valid for 32 days and it takes more than 1 day to upgrade all of the VMs for all node types.
Using your own certificates
If using your own generated certificates, check its expiry date using:
openssl x509 -in <certificate file> -enddate -nooutIf the certificates are expiring, you must first upload the new certificates using rvtconfig upload-config before upgrading.
Using VM generated certificates
If you did not provide certificates to the VMs, the VM will generate its own certificates which are valid for 5 years. So if the current VMs have been deployed less than 5 years ago then there is nothing further to do. If it has been over 5 years, then please contact your Metaswitch Customer Care representative.
Verify all VMs are healthy
All the VMs in the deployment need to be healthy. To check this, run the common health checks for the VMs by following: Verify the state of the nodes and processes. The per-node checks should also be run by following each page under: Per-node checks.
Collect diagnostics from all of the VMs
The diagnostics from all the VMs should be collected. To do this, follow instructions from RVT Diagnostics Gatherer. After generating the diagnostics, transfer it from the VMs to a local machine.
Disable TSN Housekeeping Tasks
Before upgrading TSN VMs, do the following on all downlevel TSN VMs:
sudo systemctl list-timersIf cassandra-repair-daily.timer is present, do the following:
sudo systemctl disable cassandra-repair-daily.timer
sudo systemctl stop cassandra-repair-daily.timer
Run the following command to verify that the cassandra-repair-daily.timer is not present:
sudo systemctl list-timersDisable SNMP on SMO VMs if SNMPv3 is enabled
| |
Omitting this step on the SMO VMs when SNMPv3 is configured will result in Initconf failing to converge on the uplevel VMs. |
SNMP is only required to be disabled on the SMO VMs when:
-
Performing a rolling upgrade or rollback of the SMO; and
-
SNMPv3 is enabled (even if SGC notifications are disabled); and
-
the downlevel VM version is 4.0.0-23-1.0.0 or older; and
-
the uplevel VM version is 4.0.0-24-1.0.0 or newer.
The complete process for doing this is documented in Reconfiguring the SGC’s SNMP subsystem.
Download CDRs from all VMs
If your deployment is configured to generate CDRs on the Rhino VMs, these CDRs are stored on the local disk of the VMs and will be lost when the VMs are upgraded.
Therefore, if you need to keep a record of all CDRs generated the platform, you must download any CDRs not yet downloaded before the upgrade. Any CDRs not downloaded from a VM before that VM is upgraded will be permanently lost.
Upload the CSAR EFIX patches to the SIMPL VM
If not already done, transfer the CSAR EFIX patches onto the SIMPL VM. For each CSAR EFIX patch, run:
csar efix <node type>/<version> <path to CSAR EFIX><path to CSAR EFIX> is the full path to the CSAR EFIX patch. <node type>/<version> is the downlevel unpacked CSAR located at ~/.local/share/csar/.
| |
If you are not sure of the exact version string to use, run csar list to view the list of installed CSARs. |
This will apply the efix patch to the the downlevel CSAR.
| |
The new patched CSAR is now the uplevel CSAR referenced in the following steps. |
| |
Don’t apply the same CSAR EFIX patch to the same CSAR target more than once. If a previous attempt to run the csar efix command failed, be sure to remove the created CSAR before re-attempting, as the csar efix command requires a clean target directory to work with. |
Upload the uplevel SDF to SIMPL VM
If the CSAR EFIX patch uplevel SDF was not created on the SIMPL VM, transfer the previously written CSAR EFIX patch uplevel SDF onto the SIMPL VM.
| |
Ensure the version in the each node type’s vnfcs section of the uplevel SDF is set to <downlevel-version>-<patch-version>. For example: 4.0.0-14-1.0.0-patch123, where 4.0.0-14-1.0.0 is the downlevel version and patch123 is the patch version. |
Upload uplevel RVT configuration
Upload the uplevel configuration for all of the node types to the CDS. This is required for the rolling upgrade using CSAR EFIX patch to complete.
| |
As configuration is stored against a specific version, you need to re-upload the uplevel configuration even if it is identical to the downlevel configuration. |
The uplevel version for a CSAR EFIX patch is the format <downlevel-version>-<patch-version>. For example: 4.0.0-14-1.0.0-patch123, where 4.0.0-14-1.0.0 is the downlevel version and patch123 is the patch version.
When performing a rolling upgrade some elements of the uplevel configuration must remain identical to those in the downlevel configuration. These elements (and the remedy if that configuration change was made and the cluster upgrade process started) are described in the following table:
Node Type |
Disallowed Configuration Change |
Remedy |
All |
The |
Rollback the affected VM(s) to restore the original configuration, then correct the uplevel configuration and re-run the upgrade. |
All |
The ordering of the VM instances in the SDF may not be altered. |
Rollback the affected VM(s) to restore the original configuration, then correct the uplevel configuration and re-run the upgrade. |
See Example configuration YAML files for example configuration files.
An in-depth description of RVT YAML configuration can be found in the Rhino VoLTE TAS Configuration and Management Guide.
Rolling CSAR EFIX patch TSN nodes on VMware vSphere
Cassandra Upgrade and Rollback
Planning for the procedure
Background knowledge
This procedure assumes that:
-
you are installing into an existing VMware vSphere deployment which has pre-configured networks and VLANs; this procedure does not cover setting up a VMware vSphere deployment from scratch
-
you are upgrading an existing downlevel deployment for TSN.
Method of procedure
| |
Refer to the SIMPL VM Documentation for details on the commands mentioned in the procedure. |
See CSAR EFIX patches to learn more on the CSAR EFIX patching process.
Deployments using SIMPL 6.7.3
Step 1 - Upgrade the downlevel TSN VMs
Run csar update --vnf tsn --sdf <path to SDF>.
| |
To perform a canary upgrade, run csar update --vnf tsn --sites <site> --service-group <service_group> --index-range <range> --sdf <path to SDF>. The indexes start from 0, therefore 0 is the first VM. The range accepts ranges as well as comma separated indexes (e.g. 1-3,7,9). Only the nodes specified in the index will be upgraded. |
This will validate the uplevel SDF, generate the uplevel Terraform template, upload the uplevel image, and then it will start the upgrade.
The following will occur one TSN node at a time:
-
The downlevel node will be quiesced.
-
The uplevel node will be created and boot up.
-
The VM will automatically start applying configuration from the files you uploaded to CDS in the above steps. During this phase, the status of the VM in MDM will be Orange.
-
Once configuration is complete, the status will change to Green, and the node will be ready for service. At this point the
csar updatecommand will move on to the next TSN VM, or report that the upgrade of the TSN was successful if all nodes have now been upgraded. -
Once the upgrade is complete, place calls and run any additional validation tests to verify the uplevel VMs are working as expected.
Backout procedure
If the upgrade has brought up uplevel VMs to replace the downlevel VMs, then the uplevel VMs can be rolled back to the downlevel VMs. To rollback, repeat the steps above with the downlevel TSN CSAR and downlevel SDF.
You may need to use the --skip pre-update-checks flag as part of the csar update command. The --skip pre-update-checks flag allows rollbacks when a node is unhealthy.
If the upgrade has failed to bring up the uplevel VMs or the rollback has failed to bring up the downlevel VMs, then you must redeploy the downlevel VMs. run csar redeploy --vnf tsn --sites <site> --sdf <path to SDF>.
Deployments using SIMPL 6.6.x
Step 1 - Validate the SDF
Run csar validate-vsphere --sdf <path to SDF>.
This will validate the uplevel SDF.
Step 2 - Generate the Terraform Template
Run csar generate --vnf tsn --sdf <path to SDF>.
This will generate the terraform template.
Step 3 - Upgrade the downlevel TSN VMs
Run csar update --vnf tsn.
| |
To perform a canary upgrade, run csar update --vnf tsn --sites <site> --service-group <service_group> --index-range <range>. The indexes start from 0, therefore 0 is the first VM. The range accepts ranges as well as comma separated indexes (e.g. 1-3,7,9). Only the nodes specified in the index will be upgraded. |
This will upload the uplevel image, then it will start the upgrade.
The following will occur one TSN node at a time:
-
The downlevel node will be quiesced.
-
The uplevel node will be created and boot up.
-
The VM will automatically start applying configuration from the files you uploaded to CDS in the above steps. During this phase, the status of the VM in MDM will be Orange.
-
Once configuration is complete, the status will change to Green, and the node will be ready for service. At this point the
csar updatecommand will move on to the next TSN VM, or report that the upgrade of the TSN was successful if all nodes have now been upgraded. -
Once the upgrade is complete, place calls and run any additional validation tests to verify the uplevel VMs are working as expected.
Backout procedure
If the upgrade has brought up uplevel VMs to replace the downlevel VMs, then the uplevel VMs can be rolled back to the downlevel VMs. To rollback, repeat the steps above with the downlevel TSN CSAR and downlevel SDF.
You may need to use the --skip-pre-update-checks flag as part of the csar update command. The --skip-pre-update-checks flag allows rollbacks when a node is unhealthy.
If the upgrade has failed to bring up the uplevel VMs or the rollback has failed to bring up the downlevel VMs, then you must redeploy the downlevel VMs. run csar deploy --redeploy --vnf tsn --sites <site>.
Next Step
If you are upgrading a full set of VMs, go to Rolling CSAR EFIX patch ShCM nodes on VMware vSphere, otherwise follow the post upgrade instructions here: Post rolling upgrade using CSAR EFIX patch steps
Rolling CSAR EFIX patch ShCM nodes on VMware vSphere
Planning for the procedure
Background knowledge
This procedure assumes that:
-
you are installing into an existing VMware vSphere deployment which has pre-configured networks and VLANs; this procedure does not cover setting up a VMware vSphere deployment from scratch
-
you are upgrading an existing downlevel deployment for ShCM.
Method of procedure
| |
Refer to the SIMPL VM Documentation for details on the commands mentioned in the procedure. |
See CSAR EFIX patches to learn more on the CSAR EFIX patching process.
Deployments using SIMPL 6.7.3
Step 1 - Upgrade the downlevel ShCM VMs
Run csar update --vnf shcm --sdf <path to SDF>.
| |
To perform a canary upgrade, run csar update --vnf shcm --sites <site> --service-group <service_group> --index-range <range> --sdf <path to SDF>. The indexes start from 0, therefore 0 is the first VM. The range accepts ranges as well as comma separated indexes (e.g. 1-3,7,9). Only the nodes specified in the index will be upgraded. |
This will validate the uplevel SDF, generate the uplevel Terraform template, upload the uplevel image, and then it will start the upgrade.
The following will occur one ShCM node at a time:
-
The downlevel node will be quiesced.
-
The uplevel node will be created and boot up.
-
The VM will automatically start applying configuration from the files you uploaded to CDS in the above steps. During this phase, the status of the VM in MDM will be Orange.
-
Once configuration is complete, the status will change to Green, and the node will be ready for service. At this point the
csar updatecommand will move on to the next ShCM VM, or report that the upgrade of the ShCM was successful if all nodes have now been upgraded. -
Once the upgrade is complete, place calls and run any additional validation tests to verify the uplevel VMs are working as expected.
Backout procedure
If the upgrade has brought up uplevel VMs to replace the downlevel VMs, then the uplevel VMs can be rolled back to the downlevel VMs. To rollback, repeat the steps above with the downlevel ShCM CSAR and downlevel SDF.
You may need to use the --skip pre-update-checks flag as part of the csar update command. The --skip pre-update-checks flag allows rollbacks when a node is unhealthy.
If the upgrade has failed to bring up the uplevel VMs or the rollback has failed to bring up the downlevel VMs, then you must redeploy the downlevel VMs. run csar redeploy --vnf shcm --sites <site> --sdf <path to SDF>.
Deployments using SIMPL 6.6.x
Step 1 - Validate the SDF
Run csar validate-vsphere --sdf <path to SDF>.
This will validate the uplevel SDF.
Step 2 - Generate the Terraform Template
Run csar generate --vnf shcm --sdf <path to SDF>.
This will generate the terraform template.
Step 3 - Upgrade the downlevel ShCM VMs
Run csar update --vnf shcm.
| |
To perform a canary upgrade, run csar update --vnf shcm --sites <site> --service-group <service_group> --index-range <range>. The indexes start from 0, therefore 0 is the first VM. The range accepts ranges as well as comma separated indexes (e.g. 1-3,7,9). Only the nodes specified in the index will be upgraded. |
This will upload the uplevel image, then it will start the upgrade.
The following will occur one ShCM node at a time:
-
The downlevel node will be quiesced.
-
The uplevel node will be created and boot up.
-
The VM will automatically start applying configuration from the files you uploaded to CDS in the above steps. During this phase, the status of the VM in MDM will be Orange.
-
Once configuration is complete, the status will change to Green, and the node will be ready for service. At this point the
csar updatecommand will move on to the next ShCM VM, or report that the upgrade of the ShCM was successful if all nodes have now been upgraded. -
Once the upgrade is complete, place calls and run any additional validation tests to verify the uplevel VMs are working as expected.
Backout procedure
If the upgrade has brought up uplevel VMs to replace the downlevel VMs, then the uplevel VMs can be rolled back to the downlevel VMs. To rollback, repeat the steps above with the downlevel ShCM CSAR and downlevel SDF.
You may need to use the --skip-pre-update-checks flag as part of the csar update command. The --skip-pre-update-checks flag allows rollbacks when a node is unhealthy.
If the upgrade has failed to bring up the uplevel VMs or the rollback has failed to bring up the downlevel VMs, then you must redeploy the downlevel VMs. run csar deploy --redeploy --vnf shcm --sites <site>.
Next Step
If you are upgrading a full set of VMs, go to Rolling CSAR EFIX patch MAG nodes on VMware vSphere, otherwise follow the post upgrade instructions here: Post rolling upgrade using CSAR EFIX patch steps
Rolling CSAR EFIX patch MAG nodes on VMware vSphere
Planning for the procedure
Background knowledge
This procedure assumes that:
-
you are installing into an existing VMware vSphere deployment which has pre-configured networks and VLANs; this procedure does not cover setting up a VMware vSphere deployment from scratch
-
you are upgrading an existing downlevel deployment for MAG.
Method of procedure
| |
Refer to the SIMPL VM Documentation for details on the commands mentioned in the procedure. |
See CSAR EFIX patches to learn more on the CSAR EFIX patching process.
Deployments using SIMPL 6.7.3
Step 1 - Upgrade the downlevel MAG VMs
The VM with the Rhino node that has the lowest ID must be upgraded last.
Upgrade all of the other VMs using the following command: csar update --vnf mag --sites <site> --service-group <service_group> --index-range <range> --sdf <path to SDF>.
The indexes start from 0, therefore 0 is the first VM. The --index-range accepts ranges as well as comma separated indexes (e.g. 1-3,7,9). To upgrade the VMs in stages, run the command multiple times using the appropriate --index-range values.
The following will occur one MAG node at a time:
-
The downlevel node will be quiesced.
-
The uplevel node will be created and boot up.
-
The VM will automatically start applying configuration from the files you uploaded to CDS in the above steps. During this phase, the status of the VM in MDM will be Orange.
-
Once configuration is complete, the status will change to Green, and the node will be ready for service. At this point the
csar updatecommand will move on to the next MAG VM, or report that the upgrade of the MAG was successful if all nodes have now been upgraded. -
Once the upgrade is complete, place calls and run any additional validation tests to verify the uplevel VMs are working as expected.
Backout procedure
If the upgrade has brought up uplevel VMs to replace the downlevel VMs, then the uplevel VMs can be rolled back to the downlevel VMs. To rollback, repeat the steps above with the downlevel MAG CSAR and downlevel SDF. The lowest uplevel VM must be rolled back last. For example, if VMs 2-5 are in the uplevel, you must rollback VMs 3-5 then rollback VM 2.
You may need to use the --skip pre-update-checks flag as part of the csar update command. The --skip pre-update-checks flag allows rollbacks when a node is unhealthy.
If the upgrade has failed to bring up the uplevel VMs or the rollback has failed to bring up the downlevel VMs, then you must redeploy the downlevel VMs. run csar redeploy --vnf mag --sites <site> --sdf <path to SDF>.
Deployments using SIMPL 6.6.x
Step 1 - Validate the SDF
Run csar validate-vsphere --sdf <path to SDF>.
This will validate the uplevel SDF.
Step 2 - Generate the Terraform Template
Run csar generate --vnf mag --sdf <path to SDF>.
This will generate the terraform template.
Step 3 - Upgrade the downlevel MAG VMs
The VM with the Rhino node that has the lowest ID must be upgraded last.
Upgrade all of the other VMs using the following command: csar update --vnf mag --sites <site> --service-group <service_group> --index-range <range>.
The indexes start from 0, therefore 0 is the first VM. The --index-range accepts ranges as well as comma separated indexes (e.g. 1-3,7,9). To upgrade the VMs in stages, run the command multiple times using the appropriate --index-range values.
The following will occur one MAG node at a time:
-
The downlevel node will be quiesced.
-
The uplevel node will be created and boot up.
-
The VM will automatically start applying configuration from the files you uploaded to CDS in the above steps. During this phase, the status of the VM in MDM will be Orange.
-
Once configuration is complete, the status will change to Green, and the node will be ready for service. At this point the
csar updatecommand will move on to the next MAG VM, or report that the upgrade of the MAG was successful if all nodes have now been upgraded. -
Once the upgrade is complete, place calls and run any additional validation tests to verify the uplevel VMs are working as expected.
Backout procedure
If the upgrade has brought up uplevel VMs to replace the downlevel VMs, then the uplevel VMs can be rolled back to the downlevel VMs. To rollback, repeat the steps above with the downlevel MAG CSAR and downlevel SDF. The lowest uplevel VM must be rolled back last. For example, if VMs 2-5 are in the uplevel, you must rollback VMs 3-5 then rollback VM 2.
You may need to use the --skip-pre-update-checks flag as part of the csar update command. The --skip-pre-update-checks flag allows rollbacks when a node is unhealthy.
If the upgrade has failed to bring up the uplevel VMs or the rollback has failed to bring up the downlevel VMs, then you must redeploy the downlevel VMs. run csar deploy --redeploy --vnf mag --sites <site>.
Next Step
If you are upgrading a full set of VMs, go to Rolling CSAR EFIX patch MMT GSM nodes on VMware vSphere, otherwise follow the post upgrade instructions here: Post rolling upgrade using CSAR EFIX patch steps
Rolling CSAR EFIX patch MMT GSM nodes on VMware vSphere
Planning for the procedure
Background knowledge
This procedure assumes that:
-
you are installing into an existing VMware vSphere deployment which has pre-configured networks and VLANs; this procedure does not cover setting up a VMware vSphere deployment from scratch
-
you are upgrading an existing downlevel deployment for MMT GSM.
Method of procedure
| |
Refer to the SIMPL VM Documentation for details on the commands mentioned in the procedure. |
See CSAR EFIX patches to learn more on the CSAR EFIX patching process.
Deployments using SIMPL 6.7.3
Step 1 - Upgrade the downlevel MMT GSM VMs
The VM with the Rhino node that has the lowest ID must be upgraded last.
Upgrade all of the other VMs using the following command: csar update --vnf mmt-gsm --sites <site> --service-group <service_group> --index-range <range> --sdf <path to SDF>.
The indexes start from 0, therefore 0 is the first VM. The --index-range accepts ranges as well as comma separated indexes (e.g. 1-3,7,9). To upgrade the VMs in stages, run the command multiple times using the appropriate --index-range values.
The following will occur one MMT GSM node at a time:
-
The downlevel node will be quiesced.
-
The uplevel node will be created and boot up.
-
The VM will automatically start applying configuration from the files you uploaded to CDS in the above steps. During this phase, the status of the VM in MDM will be Orange.
-
Once configuration is complete, the status will change to Green, and the node will be ready for service. At this point the
csar updatecommand will move on to the next MMT GSM VM, or report that the upgrade of the MMT GSM was successful if all nodes have now been upgraded. -
Once the upgrade is complete, place calls and run any additional validation tests to verify the uplevel VMs are working as expected.
Backout procedure
If the upgrade has brought up uplevel VMs to replace the downlevel VMs, then the uplevel VMs can be rolled back to the downlevel VMs. To rollback, repeat the steps above with the downlevel MMT GSM CSAR and downlevel SDF. The lowest uplevel VM must be rolled back last. For example, if VMs 2-5 are in the uplevel, you must rollback VMs 3-5 then rollback VM 2.
You may need to use the --skip pre-update-checks flag as part of the csar update command. The --skip pre-update-checks flag allows rollbacks when a node is unhealthy.
If the upgrade has failed to bring up the uplevel VMs or the rollback has failed to bring up the downlevel VMs, then you must redeploy the downlevel VMs. run csar redeploy --vnf mmt-gsm --sites <site> --sdf <path to SDF>.
Deployments using SIMPL 6.6.x
Step 1 - Validate the SDF
Run csar validate-vsphere --sdf <path to SDF>.
This will validate the uplevel SDF.
Step 2 - Generate the Terraform Template
Run csar generate --vnf mmt-gsm --sdf <path to SDF>.
This will generate the terraform template.
Step 3 - Upgrade the downlevel MMT GSM VMs
The VM with the Rhino node that has the lowest ID must be upgraded last.
Upgrade all of the other VMs using the following command: csar update --vnf mmt-gsm --sites <site> --service-group <service_group> --index-range <range>.
The indexes start from 0, therefore 0 is the first VM. The --index-range accepts ranges as well as comma separated indexes (e.g. 1-3,7,9). To upgrade the VMs in stages, run the command multiple times using the appropriate --index-range values.
The following will occur one MMT GSM node at a time:
-
The downlevel node will be quiesced.
-
The uplevel node will be created and boot up.
-
The VM will automatically start applying configuration from the files you uploaded to CDS in the above steps. During this phase, the status of the VM in MDM will be Orange.
-
Once configuration is complete, the status will change to Green, and the node will be ready for service. At this point the
csar updatecommand will move on to the next MMT GSM VM, or report that the upgrade of the MMT GSM was successful if all nodes have now been upgraded. -
Once the upgrade is complete, place calls and run any additional validation tests to verify the uplevel VMs are working as expected.
Backout procedure
If the upgrade has brought up uplevel VMs to replace the downlevel VMs, then the uplevel VMs can be rolled back to the downlevel VMs. To rollback, repeat the steps above with the downlevel MMT GSM CSAR and downlevel SDF. The lowest uplevel VM must be rolled back last. For example, if VMs 2-5 are in the uplevel, you must rollback VMs 3-5 then rollback VM 2.
You may need to use the --skip-pre-update-checks flag as part of the csar update command. The --skip-pre-update-checks flag allows rollbacks when a node is unhealthy.
If the upgrade has failed to bring up the uplevel VMs or the rollback has failed to bring up the downlevel VMs, then you must redeploy the downlevel VMs. run csar deploy --redeploy --vnf mmt-gsm --sites <site>.
Next Step
If you are upgrading a full set of VMs, go to Rolling CSAR EFIX patch SMO nodes on VMware vSphere, otherwise follow the post upgrade instructions here: Post rolling upgrade using CSAR EFIX patch steps
Rolling CSAR EFIX patch SMO nodes on VMware vSphere
Planning for the procedure
Background knowledge
This procedure assumes that:
-
you are installing into an existing VMware vSphere deployment which has pre-configured networks and VLANs; this procedure does not cover setting up a VMware vSphere deployment from scratch
-
you are upgrading an existing downlevel deployment for SMO.
Method of procedure
| |
Refer to the SIMPL VM Documentation for details on the commands mentioned in the procedure. |
See CSAR EFIX patches to learn more on the CSAR EFIX patching process.
Deployments using SIMPL 6.7.3
Step 1 - Upgrade the downlevel SMO VMs
The VM with the Rhino node that has the lowest ID must be upgraded last.
Upgrade all of the other VMs using the following command: csar update --vnf smo --sites <site> --service-group <service_group> --index-range <range> --sdf <path to SDF>.
The indexes start from 0, therefore 0 is the first VM. The --index-range accepts ranges as well as comma separated indexes (e.g. 1-3,7,9). To upgrade the VMs in stages, run the command multiple times using the appropriate --index-range values.
The following will occur one SMO node at a time:
-
The downlevel node will be quiesced.
-
The uplevel node will be created and boot up.
-
The VM will automatically start applying configuration from the files you uploaded to CDS in the above steps. During this phase, the status of the VM in MDM will be Orange.
-
Once configuration is complete, the status will change to Green, and the node will be ready for service. At this point the
csar updatecommand will move on to the next SMO VM, or report that the upgrade of the SMO was successful if all nodes have now been upgraded. -
Once the upgrade is complete, place calls and run any additional validation tests to verify the uplevel VMs are working as expected.
Backout procedure
If the upgrade has brought up uplevel VMs to replace the downlevel VMs, then the uplevel VMs can be rolled back to the downlevel VMs. To rollback, repeat the steps above with the downlevel SMO CSAR and downlevel SDF. The lowest uplevel VM must be rolled back last. For example, if VMs 2-5 are in the uplevel, you must rollback VMs 3-5 then rollback VM 2.
You may need to use the --skip pre-update-checks flag as part of the csar update command. The --skip pre-update-checks flag allows rollbacks when a node is unhealthy.
If the upgrade has failed to bring up the uplevel VMs or the rollback has failed to bring up the downlevel VMs, then you must redeploy the downlevel VMs. run csar redeploy --vnf smo --sites <site> --sdf <path to SDF>.
Deployments using SIMPL 6.6.x
Step 1 - Validate the SDF
Run csar validate-vsphere --sdf <path to SDF>.
This will validate the uplevel SDF.
Step 2 - Generate the Terraform Template
Run csar generate --vnf smo --sdf <path to SDF>.
This will generate the terraform template.
Step 3 - Upgrade the downlevel SMO VMs
The VM with the Rhino node that has the lowest ID must be upgraded last.
Upgrade all of the other VMs using the following command: csar update --vnf smo --sites <site> --service-group <service_group> --index-range <range>.
The indexes start from 0, therefore 0 is the first VM. The --index-range accepts ranges as well as comma separated indexes (e.g. 1-3,7,9). To upgrade the VMs in stages, run the command multiple times using the appropriate --index-range values.
The following will occur one SMO node at a time:
-
The downlevel node will be quiesced.
-
The uplevel node will be created and boot up.
-
The VM will automatically start applying configuration from the files you uploaded to CDS in the above steps. During this phase, the status of the VM in MDM will be Orange.
-
Once configuration is complete, the status will change to Green, and the node will be ready for service. At this point the
csar updatecommand will move on to the next SMO VM, or report that the upgrade of the SMO was successful if all nodes have now been upgraded. -
Once the upgrade is complete, place calls and run any additional validation tests to verify the uplevel VMs are working as expected.
Backout procedure
If the upgrade has brought up uplevel VMs to replace the downlevel VMs, then the uplevel VMs can be rolled back to the downlevel VMs. To rollback, repeat the steps above with the downlevel SMO CSAR and downlevel SDF. The lowest uplevel VM must be rolled back last. For example, if VMs 2-5 are in the uplevel, you must rollback VMs 3-5 then rollback VM 2.
You may need to use the --skip-pre-update-checks flag as part of the csar update command. The --skip-pre-update-checks flag allows rollbacks when a node is unhealthy.
If the upgrade has failed to bring up the uplevel VMs or the rollback has failed to bring up the downlevel VMs, then you must redeploy the downlevel VMs. run csar deploy --redeploy --vnf smo --sites <site>.
Next Step
Follow the post upgrade instructions here: Post rolling upgrade using CSAR EFIX patch steps
Post rolling upgrade using CSAR EFIX patch steps
After a rolling upgrade using CSAR EFIX patch, some steps must be completed.
Verify all VMs are healthy
All the VMs in the deployment need to be healthy. To check this, run the common health checks for the VMs by following: Verify the state of the nodes and processes. The per-node checks should also be run by following each page under: Per-node checks.
Enable scheduled Rhino restarts
If you have disabled the scheduled Rhino restarts before the upgrades, then it can now be enabled. This can be done by uncommenting out the scheduled-rhino-restarts section in the VM pool YAML config files. Then to update the VMs with the scheduled restarts, use rvtconfig upload-config.
Verify the state of the nodes and processes
VNF validation tests
What are VNF validation tests?
The VNF validation tests can be used to run some basic checks on deployed VMs to ensure they have been deployed correctly. Tests include:
-
checking that the management IP can be reached
-
checking that the management gateway can be reached
-
checking that
sudoworks on the VM -
checking that the VM has converged to its configuration.
Running the VNF validation tests
After deploying the VMs for a given VM type, and performing the configuration for those VMs, you can run the VNF validation tests for those VMs from the SIMPL VM.
Run the validation tests: csar validate --vnf <node-type> --sdf <path to SDF>
Here, <node-type> is one of tsn, shcm, mag, mmt-gsm, or smo.
If any of the tests fail, refer to the troubleshooting section.
| |
An MDM CSAR must be unpacked on the SIMPL VM before running the csar validate command. Run csar list on the SIMPL VM to verify whether an MDM CSAR is already installed. |
TSN checks
Cassandra Checks
Check that both Cassandras on the TSN are up. The first command in the Actions column checks the on-disk Cassandra, while the second command checks the ramdisk Cassandra.
Check |
Actions |
Expected Result |
Check Cassandra services are running |
|
Both services should be listed as |
Check Cassandra is accepting client connections |
|
Both commands should start up the |
Check that Cassandra is connected to the other Cassandras in the cluster |
|
All of the TSNs in the same cluster should be listed here. The status of all of the nodes should be |
ShCM checks
Rhino Checks
Alarms
Check using MetaView Server or REM on the MAG node that there are no active Rhino alarms. Refer to the Troubleshooting pages if any alarms are active.
Active components
Check using REM on the MAG node that various ShCM components are active.
| Check | REM Page | Expected Result |
|---|---|---|
Check SLEE is running |
|
The SLEE should be in the |
Check ShCM SLEE services are active |
|
Both |
Check ShCM Resource Adaptors are active |
|
|
Health Check API
If the curl commands fail with a connection exception, check the correct IP address and port is being used. The signaling address of the ShCM needs to be used or the request will be rejected.
| Check | Actions | HTTP Result |
|---|---|---|
Check the microservice is working correctly. |
|
|
Check that the microservice is in service and ready to receive requests on this API. |
|
|
MAG checks
REM checks
Verify REM is running
Log in to the VM with the default credentials.
Run systemctl status rhino-element-manager to view the status of the REM service. It should be listed as active (running).
You can also check the jps command to ensure that the Tomcat process has started. It is listed in the output as Bootstrap.
Verify you can connect to REM
From a PC which is on or can reach the same subnet as the REM node’s management interface, connect to https://<management IP address>:8443/rem/ with a web browser. You should be presented with a login page. From here you can use the credentials set up in the mag-vmpool-config.yaml file to log in.
XCAP server and NAF filter checks
Rhino Checks
Alarms
Check using MetaView Server or REM on the MAG node that there are no active Rhino alarms. Refer to the Troubleshooting pages if any alarms are active.
Active components
Check using REM on the MAG node that various MAG components are active.
| Check | REM Page | Expected Result |
|---|---|---|
Check SLEE is running |
|
The SLEE should be in the |
Check the Sentinel AGW service are active |
|
|
Check Sentinel AGW Resource Adaptors are active |
|
|
MMT GSM checks
Rhino Checks
Alarms
Check using MetaView Server or REM on the MAG node that there are no active Rhino alarms. Refer to the Troubleshooting pages if any alarms are active.
Active components
Check using REM on the MAG node that various MMT GSM components are active.
| Check | REM Page | Expected Result |
|---|---|---|
Check SLEE is running |
|
The SLEE should be in the |
Check Sentinel VoLTE SLEE services are active |
|
|
Check Sentinel VoLTE Resource Adaptors are active |
|
|
SMO checks
Rhino Checks
| |
Sentinel IP-SM-GW can be disabled in smo-vmpool-config.yaml. If Sentinel IP-SM-GW has been disabled, Rhino will not be running. |
Alarms
Check using MetaView Server or REM on the MAG node that there are no active Rhino alarms. Refer to the Troubleshooting pages if any alarms are active.
Active components
Check using REM on the MAG node that various SMO components are active.
| Check | REM Page | Expected Result |
|---|---|---|
Check SLEE is running |
|
The SLEE should be in the |
Check Sentinel IP-SM-GW SLEE services are active |
|
|
Check Sentinel IP-SM-GW Resource Adaptors are active |
|
|
OCSS7 SGC Checks
Verify that the OCSS7 SGC is running
Connect to the OCSS7 SGC using the SGC CLI (command line interface). The SGC CLI executable is located at ~/ocss7/<deployment_id>/<node_id>/current/cli/sgc-cli.sh.
Use the display-info-nodeversioninfo command to show the live nodes. There should be one entry for each SMO node in the cluster.
Alarms
Check using the SGC CLI that there are no active SGC alarms. Use the display-active-alarm command to show the active alarms. There should be no active alarms on a correctly configured cluster with live network connectivity to the configured M3UA peers.
See the OCSS7 Installation and Administration Guide for a full description of the alarms that can be raised by the OCSS7 SGC.
VM configuration
This section describes details of the VM configuration of the nodes.
-
An overview of the configuration process is described in declarative configuration.
-
The bootstrap parameters are derived from the SDF and supplied as either vApp parameters or as OpenStack userdata automatically.
-
After the VMs boot up, they will automatically perform bootstrap. You then need to upload configuration to the CDS for the configuration step.
-
The rvtconfig tool is used to upload configuration to the CDS.
-
You may wish to refer to the Services and Components page for information about each node’s components, directory structure, and the like.
Declarative Configuration
Overview
This section describes how to configure the Rhino VoLTE TAS VMs - that is, the processes of making and applying configuration changes.
It is not intended as a full checklist of the steps to take during an upgrade or full installation - for example, business level change-control processes are not discussed.
The configuration process is based on modifying configuration files, which are validated and sent to a central configuration data store (CDS) using the rvtconfig tool. The Rhino VoLTE TAS VMs will poll the TSN, and will pull down and apply any changes.

Initial setup
The initial configuration process starts with the example YAML files distributed alongside the Rhino VoLTE TAS VMs, as described in Example configuration YAML files.
| |
Metaswitch strongly recommends that the configuration files are stored in a version control system (VCS). A VCS allows version control, rollback, traceability, and reliable storage of the system’s configuration. |
If a VCS is not a viable option for you, you must take backups of the configuration before making any changes. The configuration backups are your responsibility and must be made every time a change is required. In this case, we recommend that you store the full set of configuration files in a reliable cloud storage system (for example, OneDrive) and keep the backups in different folders named with a progressive number and a timestamp of the backup date (for example, v1-20210310T1301).
The rest of the guide is written assuming the use of a VCS to manage the configuration files.
Initially, add the full set of example YAMLs into your VCS as a baseline, alongside the solution definition files (SDFs) described in the Rhino VoLTE TAS VM install guides. You should store all files (including the SDFs for all nodes) in a single directory yamls with no subdirectories.
Making changes
To change the system configuration, the first step is to edit the configuration files, making the desired changes (as described in this guide). You can do this on any machine using a text editor (one with YAML support is recommended). After you have made the changes, record them in the VCS.
Validating the changes
On the SIMPL VM, as the admin user, change to the directory /home/admin/. Check out (or copy) your yamls directory to this location, as /home/admin/yamls/.
| |
If network access allows, we recommend that you retrieve the files directly from the VCS into this directory, rather than copying them. Having a direct VCS connection means that changes made at this point in the process are more likely to be committed back into the VCS, a critical part of maintaining the match between live and stored configuration. |
At this point, use the rvtconfig tool to validate the configuration used for all relevant nodes.
| |
For more information on the rvtconfig tool, see rvtconfig. |
The relevant nodes depend on which configuration files have been changed. To determine the mapping between configuration files and nodes, consult Example configuration YAML files.
The rvtconfig tool is delivered as part of the VM image CSAR file, and unpacked into /home/admin/.local/share/csar/<csar name>/<version>/resources/rvtconfig.
| |
It is important that the rvtconfig binary used to validate a node’s configuration is from a matching release. That is, if the change is being made to a node that is at version x.y.z-p1, the rvtconfig binary must be from a version x.y.z CSAR. |
For example, assume a change has been made to the tsn-vmpool-config.yaml file in the Rhino VoLTE TAS network. This would require reconfiguration of the tsn node at version 4.0.0. To validate this change, use the following command from the /home/admin/ directory.
./.local/share/csar/tsn/4.0.0/resources/rvtconfig validate -t tsn -i ./yamls
If the node fails validation, update the files to fix the errors as reported, and record the changes in your VCS.
Uploading the changes
Once the file is validated, record the local changes in your VCS.
Next, use the rvtconfig upload-config command to upload the changes to the CDS. As described in Uploading configuration to CDS with upload-config, the upload-config command requires a number of command line arguments.
The full syntax to use for this use case is:
rvtconfig upload-config -c <cds-ip-addresses> -t <node type> -i <config-path> --vm-version <vm_version>
where:
-
<cds-ip-addresses>is the signaling IP address of a TSN node. -
<deployment-id>can be found in the relevant SDF. -
<node type>is the node being configured, as described above. -
<config-path>is the path of the directory containing the YAML and SDFs. -
<vm_version>is the version string of the node being configured.
As with validation, the rvtconfig executable must match the version of software being configured. Take the example of a change to the tsn-vmpool-config.yaml as above, on a Rhino VoLTE TAS network with nodes at version 4.0.0, a deployment ID of prod, and a TSN at IP 192.0.0.1. In this environment the configuration could be uploaded with the following commands (from /home/admin/):
./.local/share/csar/tsn/4.0.0/resources/rvtconfig upload-config -c 192.0.0.1 -t tsn -i ./yamls --vm-version 4.0.0
rvtconfig
rvtconfig tool
Configuration YAML files can be validated and uploaded to the CDS using the rvtconfig tool. The rvtconfig tool can be run either on the SIMPL VM or any Rhino VoLTE TAS VM.
On the SIMPL VM, you can find the command in the resources subdirectory of any Rhino VoLTE TAS (tsn, shcm, mag, mmt-gsm, or smo) CSAR, after it has been extracted using csar unpack.
/home/admin/.local/share/csar/<csar name>/<version>/resources/rvtconfig
On any Rhino VoLTE TAS VM, the rvtconfig tool is in the PATH for the sentinel user and can be run directly by running:
rvtconfig <command>
The available rvtconfig commands are:
-
rvtconfig validatevalidates the configuration, even before booting any VMs by using the SIMPL VM. -
rvtconfig upload-configvalidates, encrypts, and uploads the configuration to the CDS. -
rvtconfig delete-deploymentdeletes a deployment from the CDS.
Only use this when advised to do so by a Customer Care Representative. -
rvtconfig delete-node-typedeletes state and configuration for a given node type from the CDS Only use this after deleting all VMs for a given node type. -
rvtconfig list-configdisplays a summary of the configurations stored in the CDS. -
rvtconfig dump-configdumps the current configuration from the CDS. -
rvtconfig print-leader-seedprints the current leader seed as stored in the CDS. -
rvtconfig split-sdfsplits an SDF definition into separate ones, one for each instance. -
rvtconfig generate-private-keygenerates a new private key for use in the SDF. -
rvtconfig export-log-historyexports the quiesce log history from the CDS. -
rvtconfig describe-versionsprints the current values of the versions of the VM found in the config and in the SDF. -
rvtconfig compare-configcompares currently uploaded config with a given set of configuration.
Commands that read or modify the CDS state take a --cds-address parameter (which is also aliased as --cds-addresses, --cassandra-contact-point, --cassandra-contact-points, or simply -c). For this parameter, specify the management address(es) of at least one machine hosting the CDS database. Separate multiple addresses with a space, for example --cds-address 1.2.3.4 1.2.3.5.
For more information, run rvtconfig --help or rvtconfig upload-config --help.
Verifying and uploading configuration
-
Create a directory to hold the configuration YAML files.
mkdir yamls -
Ensure the directory contains the following:
-
configuration YAML files
-
the Solution Definition File (SDF)
-
Rhino license for nodes running Rhino.
-
| |
Do not create any subdirectories. Ensure the file names match the example YAML files. |
Verifying configuration with validate
To validate configuration, run the command:
rvtconfig validate -t <node type> -i ~/yamls
where <node type> is the node type you want to verify, which can be tsn, shcm, mag, mmt-gsm, or smo. If there are any errors, fix them, move the fixed files to the yamls directory, and then re-run the above rvtconfig validate command on the yamls directory.
Once the files pass validation, store the YAML files in the CDS using the rvtconfig upload-config command.
| |
If using the SIMPL VM, the |
Uploading configuration to the CDS with upload-config
To upload the YAML files to the CDS, run the command:
rvtconfig upload-config -c <tsn-mgmt-addresses> -t <node type> -i ~/yamls
 (--vm-version-source [this-vm | this-rvtconfig | sdf-version] | --vm-version <vm_version>) [--reload-resource-adaptors]
| |
The |
-
--vm-versionspecifies the version of the VM to target (as configuration can differ across a VM upgrade). -
--vm-version-sourceautomatically derives the VM version from the given source. Failure to determine the version will result in an error.-
Use
this-rvtconfigwhen running thervtconfigtool included in the CSAR for the target VM, to extract the version information packaged intorvtconfig. -
Use
this-vmif running thervtconfigtool directly on the VM being configured, to extract the version information from the VM. -
Option
sdf-versionextracts the version value written in the SDF for the given node.
-
| |
Whatever way you enter the version, the value obtained must match the version on the SDF. Otherwise, the upload will fail. |
Any YAML configuration values which are specified as secrets are marked as such in the YAML files' comments. These values will be encrypted using the generated private-key created by rvtconfig generate-private-key and prior to uploading the SDF. In other words, the secrets should be entered in plain text in the SDF, and the upload-config command takes care of encrypting them. Currently this applies to the following:
-
Rhino users' passwords
-
REM users' passwords
-
SSH keys for accessing the VM
-
the HTTPS key and certificate for REM.
| |
Use the |
If the CDS is not yet available, this will retry every 30 seconds for up to 15 minutes. As a large Cassandra cluster can take up to one hour to form, this means the command could time out if run before the cluster is fully formed. If the command still fails after several attempts over an hour, troubleshoot Cassandra on the machines hosting the CDS database.
This command first compares the configuration files currently uploaded for the target version with those in the input directory. It summarizes which files are different and how many lines differ. If any files are different, it will prompt the user to confirm the differences are as expected before continuing with the upload.
If the upload is canceled and --output-dir is specified, then full details of any files with differences will be put into the given output directory, which gets created by the command.
Changes to secrets and non-YAML files cannot be detected due to encryption; they will not appear in the summary or detailed output. Any such changes will still be uploaded.
This pre-check on config can be disabled by using the -f flag.
| |
Restarting resource adaptors
Specify the The If you apply configuration changes that don’t include changes to any fields marked as needing an RA restart, then you do not need to specify the If you apply configuration changes that include changes to such fields, and do not specify the |
Comparing existing configuration in the CDS with compare-config
Compare the configuration in an input directory with the currently uploaded configuration in the CDS using the command:
rvtconfig compare-config -c <tsn-mgmt-addresses> -t <node type> -i ~/yamls --output-dir <output-directory>
 [(--vm-version-source [this-vm | this-rvtconfig | sdf-version] | --vm-version <vm_version>)]
This will compare the currently uploaded configuration in the CDS with the configuration in the local input directory.
The version of configuration to look up will be automatically taken from the SDF. If the optional --vm-version-source or --vm-version parameter is provided, then this is used instead. This can be used to check what has changed just before running an upgrade, where the version in the SDF differs.
The files that have differences will be displayed, along with the number of different lines. The full contents of each version of these files will be put in the output directory, along with the differences found. When doing so, secrets and non-YAML files are ignored.
The files in this output directory use the suffix .local for a redacted version of the input file, .live for a redacted version of the live file, and .diff for a diff command run against the two showing the differences.
| |
The contents of the files in the output directory are reordered and no longer have comments; these won’t match the formatting of the original input files, but contain the same information. |
Deleting configuration from the CDS with delete-deployment
Delete all deployment configuration from the CDS by running the command:
rvtconfig delete-deployment -c <tsn-mgmt-addresses> -d <deployment-id> [--delete-audit-history]
| |
Only use this when advised to do so by a Customer Care Representative. |
Deleting state and configuration for a node type from the CDS with delete-node-type
Delete all state and configuration for a given node type and version from the CDS by running the command:
rvtconfig delete-node-type -c <tsn-mgmt-addresses> -d <deployment-id> --site-id <site-id> --node-type <node type>
 (--vm-version-source [this-vm | this-rvtconfig | sdf-version -i ~/yamls] | --vm-version <vm_version>) [-y]
The argument -i ~/yamls is only needed if sdf-version is used.
| |
Only use this after deleting all VMs of this node type within the specified site. Functionality of all nodes of this type within the given site will be lost. These nodes will have to be redeployed to restore functionality. |
Listing configurations available in the CDS with list-config
List all currently available configurations in the CDS by running the command:
rvtconfig list-config -c <tsn-mgmt-addresses> -d <deployment-id>
This command will print a short summary of the configurations uploaded, the VM version they are uploaded for, and which VMs are commissioned in that version.
Retrieving configuration from the CDS with dump-config
Retrieve the VM group configuration from the CDS by running the command:
rvtconfig dump-config -c <tsn-mgmt-addresses> -d <deployment-id> --group-id <group-id>
 (--vm-version-source [this-vm | this-rvtconfig | sdf-version -i ~/yamls -t <node type>] | --vm-version <vm_version>)
 [--output-dir <output-dir>]
| |
Group ID syntax: RVT-<node type>.<site_id>Example: RVT-tsn.DC1Here, <node type> can be tsn, shcm, mag, mmt-gsm, or smo. |
If the optional --output-dir <directory> argument is specified, then the configuration will be dumped as individual files in the given directory. The directory can be expressed as either an absolute or relative path. It will be created if it doesn’t exist.
If the --output-dir argument is omitted, then the configuration is printed to the terminal.
The arguments -i ~/yamls and -t <node type> are only needed if sdf-version is used.
Displaying the current leader seed with print-leader-seed
Display the current leader seed by running the command:
rvtconfig print-leader-seed -c <tsn-mgmt-addresses> -d <deployment-id> --group-id <group-id>
 (--vm-version-source [this-vm | this-rvtconfig | sdf-version -i ~/yamls -t <node type>] | --vm-version <vm_version>)
| |
Group ID syntax: RVT-<node type>.<site_id>Example: RVT-tsn.DC1Here, <node type> can be tsn, shcm, mag, mmt-gsm, or smo. |
The command will display the current leader seed for the specified deployment, group, and VM version. A leader seed may not always exist, in which case the output will include No leader seed found. Conditions where a leader seed may not exist include:
-
No deployment exists with the specified deployment, group, and VM version.
-
A deployment exists, but initconf has not yet initialized.
-
A deployment exists, but the previous leader seed has quiesced and a new leader seed has not yet been selected.
The arguments -i ~/yamls and -t <node type> are only needed if sdf-version is used.
Splitting an SDF by product type with split-sdf
Create partial SDFs for each VM by running the command:
rvtconfig split-sdf -i <input-directory> -o <output-directory> <sdf>
Generating a private-key for Encrypting Passwords with generate-private-key
Rhino TAS and REM require the configuration to supply passwords that are encrypted with a private key. rvtconfig can generate a private-key to encrypt a password with the following command:
rvtconfig generate-private-key
The SDF can be updated with the generated private key.
See here for details.
Retrieving VM logs with export-log-history
During upgrade, when a downlevel VM is removed, it uploads Initconf, Rhino and SGC logs to the CDS. The log files are stored as encrypted data in the CDS.
| |
Only the portions of the logs written during quiesce are stored. |
Retrieve the VM logs for a deployment from the CDS by running the command:
rvtconfig export-log-history -c <tsn-mgmt-addresses> -d <deployment-id> --zip-destination-dir <directory>
 --private-key <private-key>
| |
The --private-key must match the key used in the SDF (secrets-private-key). |
| |
The Initconf, Rhino and SGC logs are exported in unencrypted zip files. The zip file names will consist of VM hostname, version, and type of log. |
Viewing the values associated with the special sdf-version, this-vm, and this-rvtconfig versions with describe-versions
Some commands, upload-config for example, can be used with the special version values sdf-version, this-vm, and this-rvtconfig.
-
Calling
sdf-versionextracts the version from the value given in the SDF for the given node. -
The
this-vmoption takes the version of the VM the commands are being run from. This can only be used when running commands on a node VM. -
Using
this-rvtconfigextracts the version from the rvtconfig found in the directory the command is being run from. This can only be used on a SIMPL VM.
To view the real version strings associated with each of these special values:
rvtconfig describe-versions [-i ~/yamls -t <node type(s)>]
Both optional arguments -i ~/yamls and -t <node type(s)> are required for the sdf-version value to be given. Multiple node types can be taken as arguments.
If a special version value cannot be found, for example if this-vm is run on a SIMPL VM or neither of the optional arguments are called, the describe-versions command will print N/A for that special version.
Overview and structure of SDF
SDF overview and terminology
A Solution Definition File (SDF) contains information about all Metaswitch products in your deployment. It is a plain-text file in YAML format.
-
The deployment is split into
sites. Note that multiple sites act as independent deployments, e.g. there is no automatic georedundancy. -
Within each site you define one or more
service groupsof virtual machines. A service group is a collection of virtual machines (nodes) of the same type. -
The collection of all virtual machines of the same type is known as a
VNFC(Virtual Network Function Component). For example, you may have a SAS VNFC and a MDM VNFC. -
The VMs in a VNFC are also known as
VNFCIs(Virtual Network Function Component Instances), or justinstancesfor short.
| |
Some products may support a VNFC being split into multiple service groups. However, for Rhino VoLTE TAS VMs, all VMs of a particular type must be in a single service group. |
The format of the SDF is common to all Metaswitch products, and in general it is expected that you will have a single SDF containing information about all Metaswitch products in your deployment.
This section describes how to write the parts of the SDF specific to the Rhino VoLTE TAS product. It includes how to configure the MDM and RVT VNFCs, how to configure subnets and traffic schemes, and some example SDF files to use as a starting point for writing your SDF.
Further documentation on how to write an SDF is available in the 'Creating an SDF' section of the SIMPL VM Documentation.
For the Rhino VoLTE TAS solution, the SDF must be named sdf-rvt.yaml when uploading configuration.
Structure of a site
Each site in the SDF has a name, site-parameters and vnfcs.
-
The site
namecan be any unique human-readable name. -
The
site-parametershas multiple sub-sections and sub-fields. Only some are described here. -
The
vnfcsis where you list your service groups.
Site parameters
Under site-parameters, all of the following are required for the Rhino VoLTE TAS product:
-
deployment-id: The common identifier for a SDF and set of YAML configuration files. It can be any name consisting of up to 20 characters. Valid characters are alphanumeric characters and underscores. -
site-id: The identifier for this site. Must be in the formDC1toDC32. -
fixed-ips: Must be set totrue. -
vim-configuration: VNFI-specific configuration (see below) that describes how to connect to your VNFI and the backing resources for the VMs. -
services:→ntp-serversmust be a list of NTP servers. At least one NTP server is required; at least two is recommended. These must be specified as IP addresses, not hostnames. -
networking: Subnet definitions. See Subnets and traffic schemes. -
timezone: Timezone, in POSIX format such asEurope/London. -
mdm: MDM options. See MDM service group.
Structure of a service group
Under the vnfcs section in each site, you list that site’s service groups. For RVT VMs, each service group consists of the following fields:
-
name: A unique human-readable name for the service group. -
type: Must be one oftsn,shcm,mag,mmt-gsm, orsmo. -
version: Must be set to the version of the CSAR.
The version can be found in the CSAR filename, e.g. if the filename is
tsn-4.0.0-12-1.0.0-vsphere-csar.zipthen the version is4.0.0-12-1.0.0. Alternatively, inside each CSAR is a manifest file with a.mfextension, whose content lists the version under the keyvnf_package_version, for examplevnf_package_version: 4.0.0-12-1.0.0.Specifying the version in the SDF is mandatory for Rhino VoLTE TAS service groups, and strongly recommended for other products in order to disambiguate between CSARs in the case of performing an upgrade.
-
cluster-configuration:→count: The number of VMs in this service group. -
cluster-configuration:→instances: A list of instances. Each instance has aname(the VM’s hostname) and, on VMware vSphere, a list ofvnfci-vim-options(see below). -
networks: A list of networks used by this service group. See Subnets and traffic schemes. -
vim-configuration: The VNFI-specific configuration for this service group (see below).
VNFI-specific options
The SDF includes VNFI-specific options at both the site and service group levels. At the site level, you specify how to connect to your VNFI and give the top-level information about the deployment’s backing resources, such as datastore locations on vSphere, or availability zone on OpenStack. At the VNFC level, you can assign the VMs to particular sub-hosts or storage devices (for example vSphere hosts within a vCenter), and specify the flavor of each VM.
Options required for RVT VMs
For each service group, include a vim-configuration section with the flavor information, which varies according to the target VNFI type:
-
VMware vSphere:
vim-configuration:→vsphere:→deployment-size: <flavor name> -
OpenStack:
vim-configuration:→openstack:→flavor: <flavor name>
When deploying to VMware vSphere, include a vnfci-vim-options section for each instance with the following fields set:
-
vnfci-vim-options:→vsphere:→folder
May be any valid folder name on the VMware vSphere instance, or""(i.e. an empty string) if the VMs are not organised into folders. -
vnfci-vim-options:→vsphere:→datastore -
vnfci-vim-options:→vsphere:→host -
vnfci-vim-options:→vsphere:→resource-pool-name
For example:
vnfcs:
  - name: tsn
    cluster-configuration:
      count: 3
      instances:
        - name: tsn-1
        vnfci-vim-options:
            folder: production
            datastore: datastore1
            host: esxi1
            resource-pool-name: Resources
        - name: tsn-2
        ...
    vim-configuration:
      vsphere:
        deployment-size: medium
For OpenStack, no vnfci-vim-options section is required.
MDM service group
MDM site-level configuration
In the site-parameters, include the MDM credentials that you generated when installing MDM:
-
the CA certificate, static certificate, and static private key go into an
mdmsection of thesite-parametersunder the keysmdm:→ca-certificate,mdm:→static-certificateandmdm:→private-keyrespectively -
the public key from the SSH key pair goes into the
sshsection of thesite-parameters.
Include the option mdm: → ssl-certificate-management with the value static.
Copy certificates and keys to the SDF in their plain-text Base64 format, including the BEGIN and END lines, and as a multi-line string using YAML’s |- block-scalar style that keeps all newlines except the final one.
Overall, it should look like this:
site-parameters:
  mdm:
    static-certificate: |-
    ---- BEGIN CERTIFICATE -----
    AAAA.....
    ---- END CERTIFICATE -----

    ca-certificate: |-
    ---- BEGIN CERTIFICATE -----
    BBBB.....
    ---- END CERTIFICATE -----

    private-key: |-
    ---- BEGIN PRIVATE KEY -----
    CCCC.....
    ---- END PRIVATE KEY -----

    ssl-certificate-management: static
MDM service group
Define one service group containing details of all the MDM VMs.
Networks for the MDM service group
MDM requires two traffic types: management and signaling, which must be on separate subnets.
| |
MDM v3.0 or later only requires the management traffic type. Refer to the MDM Overview Guide for further information. |
Each MDM instance needs one IP address on each subnet. The management subnet does not necessarily have to be the same as the management subnet that the RVT VMs are assigned to, but the network firewalling and topology does need to allow for communication between the RVT VMs' management addresses and the MDM instances' management addresses, and as such it is simplest to use the same subnet as a matter of practicality.
RVT service groups
RVT service groups
| |
Note that whilst SDFs include all VNFCs in the deployment, this section only covers the Rhino VoLTE TAS VMs (TSN, ShCM, MAG, MMT GSM, and SMO). |
Define one service group for each RVT node type (tsn, shcm, mag, mmt-gsm, or smo).
Product options for RVT service groups
The following is a list of RVT-specific product options in the SDF. All listed product options must be included in a product-options: → <node type> section, for example:
product-options:
  tsn:
    cds-addresses:
      - 1.2.3.4
etc.-
cds-addresses: Required by all node types. This element lists all the CDS addresses. Must be set to all the signaling IPs of the TSN nodes. -
secrets-private-key: Required by all node types. Contains the private key to encrypt/decrypt passwords generated for configuration. Thervtconfigtool should be used to generate this key. More details can be found in the rvtconfig page. The same key must be used for all VMs in a deployment
Subnets and traffic schemes
The SDF defines subnets. Each subnet corresponds to a virtual NIC on the VMs, which in turn maps to a physical NIC on the VNFI. The mapping from subnets to VMs' vNICs is one-to-one, but the mapping from vNICs to physical NICs can be many-to-one.
A traffic scheme is a mapping of traffic types (such as management or SIP traffic) to these subnets. The list of traffic types required by each VM, and the possible traffic schemes, can be found in Traffic types and traffic schemes.
Defining subnets
Networks are defined in the site-parameters: → networking: → subnets section. For each subnet, define the following parameters:
-
cidr: The subnet mask in CIDR notation, for example172.16.0.0/24. All IP addresses assigned to the VMs must be congruent with the subnet mask. -
default-gateway: The default gateway IP address. Must be congruent with the subnet mask. -
identifier: A unique identifier for the subnet, for examplemanagement. This identifier is used when assigning traffic types to the subnet (see below). -
vim-network: The name of the corresponding VNFI physical network, as configured on the VNFI.
The subnet that is to carry management traffic must include a dns-servers option, which specifies a list of DNS server IP addresses. Said DNS server addresses must be reachable from the management subnet.
Physical network requirements
Each physical network attached to the VNFI must be at least 100Mb/s Ethernet (1Gb/s or better is preferred).
As a security measure, we recommend that you set up network firewalls to prevent traffic flowing between subnets. Note however that the VMs' software will send traffic over a particular subnet only when the subnet includes the traffic’s destination IP address; if the destination IP address is not on any of the VM’s subnets, it will use the management subnet as a default route.
If configuring routing rules for every destination is not possible, then an acceptable, but less secure, workaround is to firewall all interfaces except the management interface.
Allocating IP addresses and traffic types
Within each service group, define a networks section, which is a list of subnets on which the VMs in the service group will be assigned addresses. Define the following fields for each subnet:
-
name: A human-readable name for the subnet. -
subnet: The subnetidentifierof a subnet defined in thesite-parameterssection as described above. -
ip-addresses:-
ip: A list of IP addresses, in the same order as theinstancesthat will be assigned those IP addresses. Note that while, in general, the SDF supports various formats for specifying IP addresses, for RVT VMs theiplist form must be used.
-
-
traffic-types: A list of traffic types to be carried on this subnet.
Examples
Example 1
The following example shows a partial service group definition, describing three VMs with IPs allocated on two subnets - one for management traffic, and one for SIP and internal signaling traffic.
The order of the IP addresses on each subnet matches the order of the instances, so the first VM (vm01) will be assigned IP addresses 172.16.0.11 for management traffic and 172.18.0.11 for sip and internal traffic, the next VM (vm02) is assigned 172.16.0.12 and 172.18.0.12, and so on.
Ensure that each VM in the service group has an IP address - i.e. each list of IP addresses must have the same number of elements as there are VM instances.
vnfcs:
  - name: tsn
    cluster-configuration:
      count: 3
      instances:
      - name: vm01
      - name: vm02
      - name: vm03
    networks:
      - name: Management network
        ip-addresses:
          ip:
            - 172.16.0.11
            - 172.16.0.12
            - 172.16.0.13
        subnet: management-subnet
        traffic-types:
          - management
      - name: Core Signaling network
        ip-addresses:
          ip:
            - 172.18.0.11
            - 172.18.0.12
            - 172.18.0.13
        subnet: core-signaling-subnet
        traffic-types:
          - sip
          - internal
    ...
Example 2
The order of the IP addresses on each subnet matches the order of the instances, so the first VM (vm01) will be assigned IP addresses 172.16.0.11 for management traffic, 172.17.0.11 for cluster traffic etc.; the next VM (vm02) will be assigned 172.16.0.12, 172.17.0.12 etc; and so on. Ensure that each VM in the service group has an IP address - i.e. each list of IP addresses must have the same number of elements as there are VM instances.
vnfcs:
  - name: tsn
    cluster-configuration:
      count: 3
      instances:
      - name: vm01
      - name: vm02
      - name: vm03
    networks:
      - name: Management network
        ip-addresses:
          ip:
            - 172.16.0.11
            - 172.16.0.12
            - 172.16.0.13
        subnet: management-subnet
        traffic-types:
          - management
      - name: Cluster
        ip-addresses:
          ip:
            - 172.17.0.11
            - 172.17.0.12
            - 172.17.0.13
        subnet: cluster
        traffic-types:
          - cluster
      - name: Core Signaling network
        ip-addresses:
          ip:
            - 172.18.0.11
            - 172.18.0.12
            - 172.18.0.13
        subnet: core-signaling-subnet
        traffic-types:
          - diameter
          - internal
    ...
Traffic type assignment restrictions
For all RVT service groups in a site, where two or more service groups use a particular traffic type, this traffic type must be assigned to the same subnet throughout the site. For example, it is not permitted to use one subnet for management traffic on the TSN VMs and a different subnet for management traffic on another VM type.
Within each site, traffic types must each be assigned to a different subnet.
Traffic types and traffic schemes
About traffic types, network interfaces and traffic schemes
A traffic type is a particular classification of network traffic. It may include more than one protocol, but generally all traffic of a particular traffic type serves exactly one purpose, such as Diameter signaling or VM management.
A network interface is a virtual NIC (vNIC) on the VM. These are mapped to physical NICs on the host, normally one vNIC to one physical NIC, but sometimes many vNICs to one physical NIC.
A traffic scheme is an assignment of each of the traffic types that a VM uses to one of the VM’s network interfaces. For example:
-
First interface: Management
-
Second interface: Cluster
-
Third interface: Diameter signaling and Internal signaling
-
Fourth interface: SS7 signaling
Applicable traffic types
| Traffic type | Name in SDF | Description | Examples of use | Node types |
|---|---|---|---|---|
Management |
management |
Used by Administrators for managing the node. |
|
TSN, ShCM, MAG, MMT GSM, and SMO |
Cluster |
cluster |
Used by Rhino and the OCSS7 SGC for inter-node communication. |
|
MAG, MMT GSM, and SMO |
Access |
access |
Allows UEs to access the MAG node from the public internet. |
|
MAG |
Diameter signaling |
diameter |
Used for Diameter traffic to the HSS or CDF. |
|
ShCM, MAG, MMT GSM, and SMO |
SIP signaling |
sip |
Used for SIP traffic. |
|
MMT GSM and SMO |
SS7 signaling |
ss7 |
Used for SS7 (TCAP over M3UA) traffic from the OCSS7 SGC to an SS7 Signaling Gateway. |
|
SMO |
Internal signaling |
internal |
Used for signaling traffic between a site’s Rhino VoLTE TAS nodes. |
|
TSN, ShCM, MAG, MMT GSM, and SMO |
Diameter Multihoming |
diameter_multihoming |
This is an optional interface used for Diameter-over-SCTP multihoming. You only need to specify the configuration for this interface if you plan to use Diameter-over-SCTP multihoming. |
|
ShCM, MAG, MMT GSM, and SMO |
SS7 Multihoming |
ss7_multihoming |
This is an optional interface used for SS7 (M3UA/SCTP) multihoming. You only need to specify the configuration for this interface if you plan to use SS7 multihoming. |
|
SMO |
| |
No cluster traffic type is required for ShCM. Each ShCM node operates independently and is automatically configured to have cluster traffic routed over a local loopback address. |
| |
On MMT and SMO nodes, the Diameter traffic type is required if Diameter charging is in use, but can be omitted if Diameter charging is not in use. |
Defining a traffic scheme
Traffic schemes are defined in the SDF. Specifically, within the vnfcs section of the SDF there is a VNFC entry for each node type, and each VNFC has a networks section. Within each network interface defined in the networks section of the VNFC, there is a list named traffic_types, where you list the traffic type(s) (use the Name in SDF from the table above) that are assigned to that network interface.
| |
Traffic type names use lowercase letters and underscores only. Specify traffic types as a YAML list, not a comma-separated list. For example: |
When defining the traffic scheme in the SDF, for each node type (VNFC), be sure to include only the relevant traffic types for that VNFC. If an interface in your chosen traffic scheme has no traffic types applicable to a particular VNFC, then do not specify the corresponding network in that VNFC.
The following table lists the permitted traffic schemes for the VMs.
| Traffic scheme description | First interface | Second interface | Third interface | Fourth interface | Fifth interface | Sixth interface | Seventh interface |
|---|---|---|---|---|---|---|---|
All signaling together |
management |
cluster |
access |
diameter sip ss7 internal |
|
|
|
SS7 signaling separated |
management |
cluster |
access |
diameter sip internal |
ss7 |
|
|
SS7 and Diameter signaling separated |
management |
cluster |
access |
sip internal |
diameter |
ss7 |
|
Internal signaling separated |
management |
cluster |
access |
diameter sip ss7 |
internal |
|
|
SIP signaling separated |
management |
cluster |
access |
diameter ss7 internal |
sip |
|
|
All signaling separated |
management |
cluster |
access |
diameter |
sip |
ss7 |
internal |
| |
|
SCTP multihoming
SCTP multihoming is currently supported for Diameter connections to/from Rhino’s Diameter Resource Adaptor, and M3UA connections to/from the OCSS7 SGC, only. Use of multihoming is optional, but recommended (provided both your network and the SCTP peers can support it).
To enable SCTP multihoming on a group of VMs, include the traffic types diameter_multihoming (for Diameter) and/or ss7_multihoming (for SS7) in the VNFC definition for those VMs in your SDF. SCTP connections will then be set up with an additional redundant path, such that if the primary path experiences a connection failure or interruption, traffic will continue to flow via the secondary path.
Note that for Diameter, be sure to also set the protocol-transport value to sctp in the appropriate places in the YAML configuration files to make Diameter traffic use SCTP rather than TCP.
The diameter_multihoming traffic type can only be specified when the VNFC also includes the diameter traffic type. Likewise, the ss7_multihoming traffic type can only be specified when the VNFC also includes the ss7 traffic type.
Multihoming traffic schemes
The multihoming traffic types diameter_multihoming and ss7_multihoming can augment any traffic scheme from the table above. The multihoming traffic types must be assigned to a separate interface to any other traffic type.
Where a VM uses both Diameter and SS7 multihoming, we recommend that you put the two multihoming traffic types on separate interfaces, though the two multihoming types can also be placed on the same interface if desired (for back-compatibility reasons).
As with the standard network interfaces, you must configure any multihoming network interface(s) on a different subnet(s) to any other network interface.
| |
Due to a product limitation, for multihoming to function correctly the device at the far end of the connection must also be configured to use multihoming and provide exactly two endpoints. |
SDF examples for RVT traffic schemes
This page contains some example partial RVT SDF service group definitions, that demonstrate how to configure various traffic schemes in the SDF.
Without SCTP multihoming
All signaling on one interface
The split traffic types were introduced in version 4.0.0-12-1.0.0. Prior to that version there were only signaling and signaling2 traffic types, which became deprecated in 4.0.0-12-1.0.0 and will be removed in a future version.
When upgrading from a prior version, you may want to keep the same networking topology to avoid reconfiguring VNFI networks, firewalls, and the like. As such, for this case you should use the traffic scheme where all signaling is on one interface.
The following example shows how to configure this for the SMO node, which uses all four of the signaling traffic types (internal, diameter, sip and ss7). For other node types you should only include the traffic types relevant to that node, as described in Traffic types and traffic schemes.
  networks:
    - ip-addresses:
        ip:
          - 172.16.0.11
      name: Management
      subnet: management
      traffic-types:
        - management
    - ip-addresses:
        ip:
          - 172.17.0.11
      name: Cluster
      subnet: cluster
      traffic-types:
        - cluster
    - ip-addresses:
        ip:
          - 172.18.0.11
      name: Signaling
      subnet: signaling
      traffic-types:
        - internal
        - diameter
        - sip
        - ss7
Signaling split across many interfaces
The following example shows the most fault-tolerant traffic scheme currently permitted, where the four traffic types are split amongst three interfaces.
  networks:
    - ip-addresses:
        ip:
          - 172.16.0.11
      name: Management
      subnet: management
      traffic-types:
        - management
    - ip-addresses:
        ip:
          - 172.17.0.11
      name: Cluster
      subnet: cluster
      traffic-types:
        - cluster
    - ip-addresses:
        ip:
          - 172.18.0.11
      name: Core Signaling
      subnet: core-signaling
      traffic-types:
        - internal
        - sip
    - ip-addresses:
        ip:
          - 172.19.0.11
      name: SS7 Signaling
      subnet: ss7-signaling
      traffic-types:
        - ss7
    - ip-addresses:
        ip:
          - 172.20.0.11
      name: Diameter Signaling
      subnet: diameter-signaling
      traffic-types:
        - diameter
With SCTP multihoming
Using Diameter multihoming on ShCM
The following example shows a basic Diameter multihoming setup for the ShCM node. (ShCM does not use the cluster traffic type, so it is not included here.)
  networks:
    - ip-addresses:
        ip:
          - 172.16.0.11
      name: Management
      subnet: management
      traffic-types:
        - management
    - ip-addresses:
        ip:
          - 172.17.0.11
      name: Core Signaling
      subnet: core-signaling
      traffic-types:
        - internal
        - diameter
    - ip-addresses:
        ip:
          - 172.18.0.11
      name: Diameter Multihoming
      subnet: diameter-secondary
      traffic-types:
        - diameter_multihoming
Using both SS7 and Diameter multihoming on SMO
Whether the selected traffic scheme has both the ss7 and diameter traffic types on the same subnet or on different subnets does not affect the options available for multihoming. The following example shows how to configure the secondary (multihoming) traffic types on separate interfaces despite using only one signaling interface for all the primary signaling traffic types.
  networks:
    - ip-addresses:
        ip:
          - 172.16.0.11
      name: Management
      subnet: management
      traffic-types:
        - management
    - ip-addresses:
        ip:
          - 172.17.0.11
      name: Cluster
      subnet: cluster
      traffic-types:
        - cluster
    - ip-addresses:
        ip:
          - 172.18.0.11
      name: Signaling
      subnet: signaling
      traffic-types:
        - internal
        - diameter
        - sip
        - ss7
    - ip-addresses:
        ip:
          - 172.19.0.11
      name: Diameter Multihoming
      subnet: diameter-secondary
      traffic-types:
        - diameter_multihoming
    - ip-addresses:
        ip:
          - 172.20.0.11
      name: SS7 Multihoming
      subnet: ss7-secondary
      traffic-types:
        - ss7_multihoming
Example SDF for VMware vSphere
---
msw-deployment:deployment:
sites:
- name: my-site-1
site-parameters:
deployment-id: example
fixed-ips: true
mdm:
ca-certificate: |-
-----BEGIN CERTIFICATE-----
oooooooooooooooooooooooooooooooooooooooooooooooooooooooooooooooo
oooooooooooooooooooooooooooooooooooooooooooooooooooooooooooooooo
oooooooooooooooooooooooooooooooooooooooooooooooooooooooooooooooo
oooooooooooooooooooooooooooooooooooooooooooooooooooooooooooooooo
oooooooooooooooooooooooooooooooooooooooooooooooooooooooooooooooo
oooooooooooooooooooooooooooooooooooooooooooooooooooooooooooooooo
oooooooooooooooooooooooooooooooooooooooooooooooooooooooooooooooo
oooooooooooooooooooooooooooooooooooooooooooooooooooooooooooooooo
oooooooooooooooooooooooooooooooooooooooooooooooooooooooooooooooo
oooooooooooooooooooooooooooooooooooooooooooooooooooooooooooooooo
oooooooooooooooooooooooooooooooooooooooooooooooooooooooooooooooo
oooooooooooooooooooooooooooooooooooooooooooooooooooooooooooooooo
oooooooooooooooooooooooooooooooooooooooooooooooooooooooooooooooo
oooooooooooooooooooooooooooooooooooooooooooooooooooooooooooooooo
oooooooooooooooooooooooooooooooooooooooooooooooooooooooooooooooo
-----END CERTIFICATE-----
private-key: |-
-----BEGIN RSA PRIVATE KEY-----
oooooooooooooooooooooooooooooooooooooooooooooooooooooooooooooooo
oooooooooooooooooooooooooooooooooooooooooooooooooooooooooooooooo
oooooooooooooooooooooooooooooooooooooooooooooooooooooooooooooooo
oooooooooooooooooooooooooooooooooooooooooooooooooooooooooooooooo
oooooooooooooooooooooooooooooooooooooooooooooooooooooooooooooooo
oooooooooooooooooooooooooooooooooooooooooooooooooooooooooooooooo
oooooooooooooooooooooooooooooooooooooooooooooooooooooooooooooooo
oooooooooooooooooooooooooooooooooooooooooooooooooooooooooooooooo
oooooooooooooooooooooooooooooooooooooooooooooooooooooooooooooooo
oooooooooooooooooooooooooooooooooooooooooooooooooooooooooooooooo
oooooooooooooooooooooooooooooooooooooooooooooooooooooooooooooooo
oooooooooooooooooooooooooooooooooooooooooooooooooooooooooooooooo
oooooooooooooooooooooooooooooooooooooooooooooooooooooooooooooooo
oooooooooooooooooooooooooooooooooooooooooooooooooooooooooooooooo
oooooooooooooooooooooooooooooooooooooooooooooooooooooooooooooooo
oooooooooooooooooooooooooooooooooooooooooooooooooooooooooooooooo
oooooooooooooooooooooooooooooooooooooooooooooooooooooooooooooooo
oooooooooooooooooooooooooooooooooooooooooooooooooooooooooooooooo
oooooooooooooooooooooooooooooooooooooooooooooooooooooooooooooooo
oooooooooooooooooooooooooooooooooooooooooooooooooooooooooooooooo
oooooooooooooooooooooooooooooooooooooooooooooooooooooooooooooooo
oooooooooooooooooooooooooooooooooooooooooooooooooooooooooooooooo
-----END RSA PRIVATE KEY-----
ssl-certificate-management: static
static-certificate: |-
-----BEGIN CERTIFICATE-----
oooooooooooooooooooooooooooooooooooooooooooooooooooooooooooooooo
oooooooooooooooooooooooooooooooooooooooooooooooooooooooooooooooo
oooooooooooooooooooooooooooooooooooooooooooooooooooooooooooooooo
oooooooooooooooooooooooooooooooooooooooooooooooooooooooooooooooo
oooooooooooooooooooooooooooooooooooooooooooooooooooooooooooooooo
oooooooooooooooooooooooooooooooooooooooooooooooooooooooooooooooo
oooooooooooooooooooooooooooooooooooooooooooooooooooooooooooooooo
oooooooooooooooooooooooooooooooooooooooooooooooooooooooooooooooo
oooooooooooooooooooooooooooooooooooooooooooooooooooooooooooooooo
oooooooooooooooooooooooooooooooooooooooooooooooooooooooooooooooo
oooooooooooooooooooooooooooooooooooooooooooooooooooooooooooooooo
oooooooooooooooooooooooooooooooooooooooooooooooooooooooooooooooo
oooooooooooooooooooooooooooooooooooooooooooooooooooooooooooooooo
oooooooooooooooooooooooooooooooooooooooooooooooooooooooooooooooo
oooooooooooooooooooooooooooooooooooooooooooooooooooooooooooooooo
oooooooooooooooooooooooooooooooooooooooooooooooooooooooooooooooo
oooooooooooooooooooooooooooooooooooooooooooooooooooooooooooooooo
oooooooooooooooooooooooooooooooooooooooooooooooooooooooooooooooo
oooooooooooooooooooooooooooooooooooooooooooooooooooooooooooooooo
oooooooooooooooooooooooooooooooooooooooooooooooooooooooooooooooo
-----END CERTIFICATE-----
networking:
subnets:
- cidr: 172.16.0.0/24
default-gateway: 172.16.0.1
dns-servers:
- 2.3.4.5
- 3.4.5.6
identifier: management
vim-network: management-network
- cidr: 173.16.0.0/24
default-gateway: 173.16.0.1
identifier: cluster
vim-network: cluster-network
- cidr: 174.16.0.0/24
default-gateway: 174.16.0.1
identifier: access
vim-network: access-network
- cidr: 175.16.0.0/24
default-gateway: 175.16.0.1
identifier: core-signaling
vim-network: core-signaling-network
- cidr: 176.16.0.0/24
default-gateway: 176.16.0.1
identifier: sip
vim-network: sip-network
- cidr: 177.16.0.0/24
default-gateway: 177.16.0.1
identifier: diameter-multihoming
vim-network: diameter-multihoming-network
- cidr: 178.16.0.0/24
default-gateway: 178.16.0.1
identifier: ss7-multihoming
vim-network: ss7-multihoming-network
- cidr: 12ab:10cd:4000:ef80::/64
default-gateway: 12ab:10cd:4000:ef80::1
identifier: access-ipv6
ip-version: ipv6
vim-network: access-network
services:
ntp-servers:
- 1.2.3.4
- 1.2.3.5
site-id: DC1
ssh:
authorized-keys:
- ssh-rsa XXXXXXXXXXXXXXXXXXXX
timezone: Europe/London
vim-configuration:
vsphere:
connection:
allow-insecure: true
password: vsphere
server: 172.1.1.1
username: VSPHERE.LOCAL\vsphere
datacenter: Automation
folder: ''
reserve-resources: false
resource-pool-name: Resources
vnfcs:
- cluster-configuration:
count: 3
instances:
- name: example-mdm-1
vnfci-vim-options:
datastore: data:storage1
host: esxi.hostname
resource-pool-name: Resources
- name: example-mdm-2
vnfci-vim-options:
datastore: data:storage1
host: esxi.hostname
resource-pool-name: Resources
- name: example-mdm-3
vnfci-vim-options:
datastore: data:storage1
host: esxi.hostname
resource-pool-name: Resources
name: mdm
networks:
- ip-addresses:
ip:
- 172.16.0.135
- 172.16.0.136
- 172.16.0.137
name: Management
subnet: management
traffic-types:
- management
- ip-addresses:
ip:
- 175.16.0.135
- 175.16.0.136
- 175.16.0.137
name: Core Signaling
subnet: core-signaling
traffic-types:
- signaling
product-options:
mdm:
consul-token: ABCdEfgHIJkLmNOp-MS-MDM
custom-topology: |-
{
"member_groups": [
{
"group_name": "DNS",
"neighbors": []
},
{
"group_name": "RVT-smo.DC1",
"neighbors": [
"SAS-DATA"
]
},
{
"group_name": "RVT-shcm.DC1",
"neighbors": [
"SAS-DATA"
]
},
{
"group_name": "RVT-mmt-gsm.DC1",
"neighbors": [
"SAS-DATA"
]
},
{
"group_name": "RVT-mag.DC1",
"neighbors": [
"SAS-DATA"
]
},
{
"group_name": "RVT-tsn.DC1",
"neighbors": [
"SAS-DATA"
]
}
]
}
type: mdm
version: 2.31.0
vim-configuration:
vsphere:
deployment-size: medium
- cluster-configuration:
count: 3
instances:
- name: example-smo-1
vnfci-vim-options:
datastore: data:storage1
host: esxi.hostname
resource-pool-name: Resources
- name: example-smo-2
vnfci-vim-options:
datastore: data:storage1
host: esxi.hostname
resource-pool-name: Resources
- name: example-smo-3
vnfci-vim-options:
datastore: data:storage1
host: esxi.hostname
resource-pool-name: Resources
name: smo
networks:
- ip-addresses:
ip:
- 172.16.0.10
- 172.16.0.11
- 172.16.0.12
name: Management
subnet: management
traffic-types:
- management
- ip-addresses:
ip:
- 173.16.0.10
- 173.16.0.11
- 173.16.0.12
name: Cluster
subnet: cluster
traffic-types:
- cluster
- ip-addresses:
ip:
- 175.16.0.10
- 175.16.0.11
- 175.16.0.12
name: Core Signaling
subnet: core-signaling
traffic-types:
- diameter
- ss7
- internal
- ip-addresses:
ip:
- 176.16.0.10
- 176.16.0.11
- 176.16.0.12
name: Sip
subnet: sip
traffic-types:
- sip
- ip-addresses:
ip:
- 177.16.0.10
- 177.16.0.11
- 177.16.0.12
name: Diameter Multihoming
subnet: diameter-multihoming
traffic-types:
- diameter_multihoming
- ip-addresses:
ip:
- 178.16.0.10
- 178.16.0.11
- 178.16.0.12
name: SS7 Multihoming
subnet: ss7-multihoming
traffic-types:
- ss7_multihoming
product-options:
smo:
cds-addresses:
- 1.2.3.4
ims-domain-name: mnc123.mcc530.3gppnetwork.org
primary-user-password: ooooooooooooo
secrets-private-key: ooooooooooooooooooooooooooooooooo
shcm-vnf: shcm
smo-vnf: smo
type: smo
version: 4.0.0-99-1.0.0
vim-configuration:
vsphere:
deployment-size: medium
- cluster-configuration:
count: 2
instances:
- name: example-shcm-1
vnfci-vim-options:
datastore: data:storage1
host: esxi.hostname
resource-pool-name: Resources
- name: example-shcm-2
vnfci-vim-options:
datastore: data:storage1
host: esxi.hostname
resource-pool-name: Resources
name: shcm
networks:
- ip-addresses:
ip:
- 172.16.0.20
- 172.16.0.21
name: Management
subnet: management
traffic-types:
- management
- ip-addresses:
ip:
- 175.16.0.20
- 175.16.0.21
name: Core Signaling
subnet: core-signaling
traffic-types:
- diameter
- internal
- ip-addresses:
ip:
- 177.16.0.20
- 177.16.0.21
name: Diameter Multihoming
subnet: diameter-multihoming
traffic-types:
- diameter_multihoming
product-options:
shcm:
cds-addresses:
- 1.2.3.4
ims-domain-name: mnc123.mcc530.3gppnetwork.org
primary-user-password: ooooooooooooo
secrets-private-key: ooooooooooooooooooooooooooooooooo
shcm-vnf: shcm
type: shcm
version: 4.0.0-99-1.0.0
vim-configuration:
vsphere:
deployment-size: shcm
- cluster-configuration:
count: 3
instances:
- name: example-mmt-gsm-1
vnfci-vim-options:
datastore: data:storage1
host: esxi.hostname
resource-pool-name: Resources
- name: example-mmt-gsm-2
vnfci-vim-options:
datastore: data:storage1
host: esxi.hostname
resource-pool-name: Resources
- name: example-mmt-gsm-3
vnfci-vim-options:
datastore: data:storage1
host: esxi.hostname
resource-pool-name: Resources
name: mmt-gsm
networks:
- ip-addresses:
ip:
- 172.16.0.30
- 172.16.0.31
- 172.16.0.32
name: Management
subnet: management
traffic-types:
- management
- ip-addresses:
ip:
- 173.16.0.20
- 173.16.0.21
- 173.16.0.22
name: Cluster
subnet: cluster
traffic-types:
- cluster
- ip-addresses:
ip:
- 175.16.0.30
- 175.16.0.31
- 175.16.0.32
name: Core Signaling
subnet: core-signaling
traffic-types:
- diameter
- internal
- ip-addresses:
ip:
- 176.16.0.20
- 176.16.0.21
- 176.16.0.22
name: Sip
subnet: sip
traffic-types:
- sip
- ip-addresses:
ip:
- 177.16.0.30
- 177.16.0.31
- 177.16.0.32
name: Diameter Multihoming
subnet: diameter-multihoming
traffic-types:
- diameter_multihoming
product-options:
mmt-gsm:
atu-sti-hostname: atu-sti.example.invalid
cds-addresses:
- 1.2.3.4
ims-domain-name: mnc123.mcc530.3gppnetwork.org
mmt-vnf: mmt
primary-user-password: ooooooooooooo
secrets-private-key: ooooooooooooooooooooooooooooooooo
shcm-vnf: shcm
type: mmt-gsm
version: 4.0.0-99-1.0.0
vim-configuration:
vsphere:
deployment-size: medium
- cluster-configuration:
count: 3
instances:
- name: example-mag-1
vnfci-vim-options:
datastore: data:storage1
host: esxi.hostname
resource-pool-name: Resources
- name: example-mag-2
vnfci-vim-options:
datastore: data:storage1
host: esxi.hostname
resource-pool-name: Resources
- name: example-mag-3
vnfci-vim-options:
datastore: data:storage1
host: esxi.hostname
resource-pool-name: Resources
name: mag
networks:
- ip-addresses:
ip:
- 172.16.0.40
- 172.16.0.41
- 172.16.0.42
name: Management
subnet: management
traffic-types:
- management
- ip-addresses:
ip:
- 173.16.0.30
- 173.16.0.31
- 173.16.0.32
name: Cluster
subnet: cluster
traffic-types:
- cluster
- ip-addresses:
ip:
- 174.16.0.10
- 174.16.0.11
- 174.16.0.12
ipv6:
- 12ab:10cd:4000:ef80:174::10
- 12ab:10cd:4000:ef80:174::11
- 12ab:10cd:4000:ef80:174::12
name: Access
subnet: access
subnet-ipv6: access-ipv6
traffic-types:
- access
- ip-addresses:
ip:
- 175.16.0.40
- 175.16.0.41
- 175.16.0.42
name: Core Signaling
subnet: core-signaling
traffic-types:
- diameter
- internal
- ip-addresses:
ip:
- 177.16.0.40
- 177.16.0.41
- 177.16.0.42
name: Diameter Multihoming
subnet: diameter-multihoming
traffic-types:
- diameter_multihoming
product-options:
mag:
cds-addresses:
- 1.2.3.4
ims-domain-name: mnc123.mcc530.3gppnetwork.org
primary-user-password: ooooooooooooo
secrets-private-key: ooooooooooooooooooooooooooooooooo
shcm-vnf: shcm
type: mag
version: 4.0.0-99-1.0.0
vim-configuration:
vsphere:
deployment-size: medium
- cluster-configuration:
count: 3
instances:
- name: example-tsn-1
vnfci-vim-options:
datastore: data:storage1
host: esxi.hostname
resource-pool-name: Resources
- name: example-tsn-2
vnfci-vim-options:
datastore: data:storage1
host: esxi.hostname
resource-pool-name: Resources
- name: example-tsn-3
vnfci-vim-options:
datastore: data:storage1
host: esxi.hostname
resource-pool-name: Resources
name: tsn
networks:
- ip-addresses:
ip:
- 172.16.0.50
- 172.16.0.51
- 172.16.0.52
name: Management
subnet: management
traffic-types:
- management
- ip-addresses:
ip:
- 175.16.0.50
- 175.16.0.51
- 175.16.0.52
name: Core Signaling
subnet: core-signaling
traffic-types:
- internal
product-options:
tsn:
cds-addresses:
- 1.2.3.4
primary-user-password: ooooooooooooo
secrets-private-key: ooooooooooooooooooooooooooooooooo
type: tsn
version: 4.0.0-99-1.0.0
vim-configuration:
vsphere:
deployment-size: tsnExample SDF for OpenStack
---
msw-deployment:deployment:
  sites:
  - name: my-site-1
    site-parameters:
      deployment-id: example
      fixed-ips: true
      mdm:
        ca-certificate: |-
          -----BEGIN CERTIFICATE-----
          oooooooooooooooooooooooooooooooooooooooooooooooooooooooooooooooo
          oooooooooooooooooooooooooooooooooooooooooooooooooooooooooooooooo
          oooooooooooooooooooooooooooooooooooooooooooooooooooooooooooooooo
          oooooooooooooooooooooooooooooooooooooooooooooooooooooooooooooooo
          oooooooooooooooooooooooooooooooooooooooooooooooooooooooooooooooo
          oooooooooooooooooooooooooooooooooooooooooooooooooooooooooooooooo
          oooooooooooooooooooooooooooooooooooooooooooooooooooooooooooooooo
          oooooooooooooooooooooooooooooooooooooooooooooooooooooooooooooooo
          oooooooooooooooooooooooooooooooooooooooooooooooooooooooooooooooo
          oooooooooooooooooooooooooooooooooooooooooooooooooooooooooooooooo
          oooooooooooooooooooooooooooooooooooooooooooooooooooooooooooooooo
          oooooooooooooooooooooooooooooooooooooooooooooooooooooooooooooooo
          oooooooooooooooooooooooooooooooooooooooooooooooooooooooooooooooo
          oooooooooooooooooooooooooooooooooooooooooooooooooooooooooooooooo
          oooooooooooooooooooooooooooooooooooooooooooooooooooooooooooooooo
          -----END CERTIFICATE-----
        private-key: |-
          -----BEGIN RSA PRIVATE KEY-----
          oooooooooooooooooooooooooooooooooooooooooooooooooooooooooooooooo
          oooooooooooooooooooooooooooooooooooooooooooooooooooooooooooooooo
          oooooooooooooooooooooooooooooooooooooooooooooooooooooooooooooooo
          oooooooooooooooooooooooooooooooooooooooooooooooooooooooooooooooo
          oooooooooooooooooooooooooooooooooooooooooooooooooooooooooooooooo
          oooooooooooooooooooooooooooooooooooooooooooooooooooooooooooooooo
          oooooooooooooooooooooooooooooooooooooooooooooooooooooooooooooooo
          oooooooooooooooooooooooooooooooooooooooooooooooooooooooooooooooo
          oooooooooooooooooooooooooooooooooooooooooooooooooooooooooooooooo
          oooooooooooooooooooooooooooooooooooooooooooooooooooooooooooooooo
          oooooooooooooooooooooooooooooooooooooooooooooooooooooooooooooooo
          oooooooooooooooooooooooooooooooooooooooooooooooooooooooooooooooo
          oooooooooooooooooooooooooooooooooooooooooooooooooooooooooooooooo
          oooooooooooooooooooooooooooooooooooooooooooooooooooooooooooooooo
          oooooooooooooooooooooooooooooooooooooooooooooooooooooooooooooooo
          oooooooooooooooooooooooooooooooooooooooooooooooooooooooooooooooo
          oooooooooooooooooooooooooooooooooooooooooooooooooooooooooooooooo
          oooooooooooooooooooooooooooooooooooooooooooooooooooooooooooooooo
          oooooooooooooooooooooooooooooooooooooooooooooooooooooooooooooooo
          oooooooooooooooooooooooooooooooooooooooooooooooooooooooooooooooo
          oooooooooooooooooooooooooooooooooooooooooooooooooooooooooooooooo
          oooooooooooooooooooooooooooooooooooooooooooooooooooooooooooooooo
          -----END RSA PRIVATE KEY-----
        ssl-certificate-management: static
        static-certificate: |-
          -----BEGIN CERTIFICATE-----
          oooooooooooooooooooooooooooooooooooooooooooooooooooooooooooooooo
          oooooooooooooooooooooooooooooooooooooooooooooooooooooooooooooooo
          oooooooooooooooooooooooooooooooooooooooooooooooooooooooooooooooo
          oooooooooooooooooooooooooooooooooooooooooooooooooooooooooooooooo
          oooooooooooooooooooooooooooooooooooooooooooooooooooooooooooooooo
          oooooooooooooooooooooooooooooooooooooooooooooooooooooooooooooooo
          oooooooooooooooooooooooooooooooooooooooooooooooooooooooooooooooo
          oooooooooooooooooooooooooooooooooooooooooooooooooooooooooooooooo
          oooooooooooooooooooooooooooooooooooooooooooooooooooooooooooooooo
          oooooooooooooooooooooooooooooooooooooooooooooooooooooooooooooooo
          oooooooooooooooooooooooooooooooooooooooooooooooooooooooooooooooo
          oooooooooooooooooooooooooooooooooooooooooooooooooooooooooooooooo
          oooooooooooooooooooooooooooooooooooooooooooooooooooooooooooooooo
          oooooooooooooooooooooooooooooooooooooooooooooooooooooooooooooooo
          oooooooooooooooooooooooooooooooooooooooooooooooooooooooooooooooo
          oooooooooooooooooooooooooooooooooooooooooooooooooooooooooooooooo
          oooooooooooooooooooooooooooooooooooooooooooooooooooooooooooooooo
          oooooooooooooooooooooooooooooooooooooooooooooooooooooooooooooooo
          oooooooooooooooooooooooooooooooooooooooooooooooooooooooooooooooo
          oooooooooooooooooooooooooooooooooooooooooooooooooooooooooooooooo
          -----END CERTIFICATE-----
      networking:
        subnets:
        - cidr: 172.16.0.0/24
          default-gateway: 172.16.0.1
          dns-servers:
          - 2.3.4.5
          - 3.4.5.6
          identifier: management
          vim-network: management-network
        - cidr: 173.16.0.0/24
          default-gateway: 173.16.0.1
          identifier: cluster
          vim-network: cluster-network
        - cidr: 174.16.0.0/24
          default-gateway: 174.16.0.1
          identifier: access
          vim-network: access-network
        - cidr: 175.16.0.0/24
          default-gateway: 175.16.0.1
          identifier: core-signaling
          vim-network: core-signaling-network
        - cidr: 176.16.0.0/24
          default-gateway: 176.16.0.1
          identifier: sip
          vim-network: sip-network
        - cidr: 177.16.0.0/24
          default-gateway: 177.16.0.1
          identifier: diameter-multihoming
          vim-network: diameter-multihoming-network
        - cidr: 178.16.0.0/24
          default-gateway: 178.16.0.1
          identifier: ss7-multihoming
          vim-network: ss7-multihoming-network
        - cidr: 12ab:10cd:4000:ef80::/64
          default-gateway: 12ab:10cd:4000:ef80::1
          identifier: access-ipv6
          ip-version: ipv6
          vim-network: access-network
      services:
        ntp-servers:
        - 1.2.3.4
        - 1.2.3.5
      site-id: DC1
      ssh:
        keypair-name: key-pair
      timezone: Europe/London
      vim-configuration:
        openstack:
          availability-zone: nonperf
          connection:
            auth-url: http://my-openstack-server:5000/v3
            keystone-v3:
              project-id: 0102030405060708090a0b0c0d0e0f10
              user-domain-name: Default
            password: openstack-password
            username: openstack-user
    vnfcs:
    - cluster-configuration:
        count: 3
        instances:
        - name: example-mdm-1
        - name: example-mdm-2
        - name: example-mdm-3
      name: mdm
      networks:
      - ip-addresses:
          ip:
          - 172.16.0.135
          - 172.16.0.136
          - 172.16.0.137
        name: Management
        subnet: management
        traffic-types:
        - management
      - ip-addresses:
          ip:
          - 175.16.0.135
          - 175.16.0.136
          - 175.16.0.137
        name: Core Signaling
        subnet: core-signaling
        traffic-types:
        - signaling
      product-options:
        mdm:
          consul-token: ABCdEfgHIJkLmNOp-MS-MDM
          custom-topology: |-
            {
              "member_groups": [
                {
                  "group_name": "DNS",
                  "neighbors": []
                },
                {
                  "group_name": "RVT-smo.DC1",
                  "neighbors": [
                    "SAS-DATA"
                  ]
                },
                {
                  "group_name": "RVT-shcm.DC1",
                  "neighbors": [
                    "SAS-DATA"
                  ]
                },
                {
                  "group_name": "RVT-mmt-gsm.DC1",
                  "neighbors": [
                    "SAS-DATA"
                  ]
                },
                {
                  "group_name": "RVT-mag.DC1",
                  "neighbors": [
                    "SAS-DATA"
                  ]
                },
                {
                  "group_name": "RVT-tsn.DC1",
                  "neighbors": [
                    "SAS-DATA"
                  ]
                }
              ]
            }
      type: mdm
      version: 2.31.0
      vim-configuration:
        openstack:
          flavor: medium
    - cluster-configuration:
        count: 3
        instances:
        - name: example-smo-1
        - name: example-smo-2
        - name: example-smo-3
      name: smo
      networks:
      - ip-addresses:
          ip:
          - 172.16.0.10
          - 172.16.0.11
          - 172.16.0.12
        name: Management
        subnet: management
        traffic-types:
        - management
      - ip-addresses:
          ip:
          - 173.16.0.10
          - 173.16.0.11
          - 173.16.0.12
        name: Cluster
        subnet: cluster
        traffic-types:
        - cluster
      - ip-addresses:
          ip:
          - 175.16.0.10
          - 175.16.0.11
          - 175.16.0.12
        name: Core Signaling
        subnet: core-signaling
        traffic-types:
        - diameter
        - ss7
        - internal
      - ip-addresses:
          ip:
          - 176.16.0.10
          - 176.16.0.11
          - 176.16.0.12
        name: Sip
        subnet: sip
        traffic-types:
        - sip
      - ip-addresses:
          ip:
          - 177.16.0.10
          - 177.16.0.11
          - 177.16.0.12
        name: Diameter Multihoming
        subnet: diameter-multihoming
        traffic-types:
        - diameter_multihoming
      - ip-addresses:
          ip:
          - 178.16.0.10
          - 178.16.0.11
          - 178.16.0.12
        name: SS7 Multihoming
        subnet: ss7-multihoming
        traffic-types:
        - ss7_multihoming
      product-options:
        smo:
          cds-addresses:
          - 1.2.3.4
          ims-domain-name: mnc123.mcc530.3gppnetwork.org
          primary-user-password: ooooooooooooo
          secrets-private-key: ooooooooooooooooooooooooooooooooo
          shcm-vnf: shcm
          smo-vnf: smo
      type: smo
      version: 4.0.0-99-1.0.0
      vim-configuration:
        openstack:
          flavor: medium
    - cluster-configuration:
        count: 2
        instances:
        - name: example-shcm-1
        - name: example-shcm-2
      name: shcm
      networks:
      - ip-addresses:
          ip:
          - 172.16.0.20
          - 172.16.0.21
        name: Management
        subnet: management
        traffic-types:
        - management
      - ip-addresses:
          ip:
          - 175.16.0.20
          - 175.16.0.21
        name: Core Signaling
        subnet: core-signaling
        traffic-types:
        - diameter
        - internal
      - ip-addresses:
          ip:
          - 177.16.0.20
          - 177.16.0.21
        name: Diameter Multihoming
        subnet: diameter-multihoming
        traffic-types:
        - diameter_multihoming
      product-options:
        shcm:
          cds-addresses:
          - 1.2.3.4
          ims-domain-name: mnc123.mcc530.3gppnetwork.org
          primary-user-password: ooooooooooooo
          secrets-private-key: ooooooooooooooooooooooooooooooooo
          shcm-vnf: shcm
      type: shcm
      version: 4.0.0-99-1.0.0
      vim-configuration:
        openstack:
          flavor: shcm
    - cluster-configuration:
        count: 3
        instances:
        - name: example-mmt-gsm-1
        - name: example-mmt-gsm-2
        - name: example-mmt-gsm-3
      name: mmt-gsm
      networks:
      - ip-addresses:
          ip:
          - 172.16.0.30
          - 172.16.0.31
          - 172.16.0.32
        name: Management
        subnet: management
        traffic-types:
        - management
      - ip-addresses:
          ip:
          - 173.16.0.20
          - 173.16.0.21
          - 173.16.0.22
        name: Cluster
        subnet: cluster
        traffic-types:
        - cluster
      - ip-addresses:
          ip:
          - 175.16.0.30
          - 175.16.0.31
          - 175.16.0.32
        name: Core Signaling
        subnet: core-signaling
        traffic-types:
        - diameter
        - internal
      - ip-addresses:
          ip:
          - 176.16.0.20
          - 176.16.0.21
          - 176.16.0.22
        name: Sip
        subnet: sip
        traffic-types:
        - sip
      - ip-addresses:
          ip:
          - 177.16.0.30
          - 177.16.0.31
          - 177.16.0.32
        name: Diameter Multihoming
        subnet: diameter-multihoming
        traffic-types:
        - diameter_multihoming
      product-options:
        mmt-gsm:
          atu-sti-hostname: atu-sti.example.invalid
          cds-addresses:
          - 1.2.3.4
          ims-domain-name: mnc123.mcc530.3gppnetwork.org
          mmt-vnf: mmt
          primary-user-password: ooooooooooooo
          secrets-private-key: ooooooooooooooooooooooooooooooooo
          shcm-vnf: shcm
      type: mmt-gsm
      version: 4.0.0-99-1.0.0
      vim-configuration:
        openstack:
          flavor: medium
    - cluster-configuration:
        count: 3
        instances:
        - name: example-mag-1
        - name: example-mag-2
        - name: example-mag-3
      name: mag
      networks:
      - ip-addresses:
          ip:
          - 172.16.0.40
          - 172.16.0.41
          - 172.16.0.42
        name: Management
        subnet: management
        traffic-types:
        - management
      - ip-addresses:
          ip:
          - 173.16.0.30
          - 173.16.0.31
          - 173.16.0.32
        name: Cluster
        subnet: cluster
        traffic-types:
        - cluster
      - ip-addresses:
          ip:
          - 174.16.0.10
          - 174.16.0.11
          - 174.16.0.12
          ipv6:
          - 12ab:10cd:4000:ef80:174::10
          - 12ab:10cd:4000:ef80:174::11
          - 12ab:10cd:4000:ef80:174::12
        name: Access
        subnet: access
        subnet-ipv6: access-ipv6
        traffic-types:
        - access
      - ip-addresses:
          ip:
          - 175.16.0.40
          - 175.16.0.41
          - 175.16.0.42
        name: Core Signaling
        subnet: core-signaling
        traffic-types:
        - diameter
        - internal
      - ip-addresses:
          ip:
          - 177.16.0.40
          - 177.16.0.41
          - 177.16.0.42
        name: Diameter Multihoming
        subnet: diameter-multihoming
        traffic-types:
        - diameter_multihoming
      product-options:
        mag:
          cds-addresses:
          - 1.2.3.4
          ims-domain-name: mnc123.mcc530.3gppnetwork.org
          primary-user-password: ooooooooooooo
          secrets-private-key: ooooooooooooooooooooooooooooooooo
          shcm-vnf: shcm
      type: mag
      version: 4.0.0-99-1.0.0
      vim-configuration:
        openstack:
          flavor: medium
    - cluster-configuration:
        count: 3
        instances:
        - name: example-tsn-1
        - name: example-tsn-2
        - name: example-tsn-3
      name: tsn
      networks:
      - ip-addresses:
          ip:
          - 172.16.0.50
          - 172.16.0.51
          - 172.16.0.52
        name: Management
        subnet: management
        traffic-types:
        - management
      - ip-addresses:
          ip:
          - 175.16.0.50
          - 175.16.0.51
          - 175.16.0.52
        name: Core Signaling
        subnet: core-signaling
        traffic-types:
        - internal
      product-options:
        tsn:
          cds-addresses:
          - 1.2.3.4
          primary-user-password: ooooooooooooo
          secrets-private-key: ooooooooooooooooooooooooooooooooo
      type: tsn
      version: 4.0.0-99-1.0.0
      vim-configuration:
        openstack:
          flavor: tsn
Bootstrap parameters
Bootstrap parameters are provided to the VM when the VM is created. They are used by the bootstrap process to configure various settings in the VM’s operating system.
On VMware vSphere, the bootstrap parameters are provided as vApp parameters. On OpenStack, the bootstrap parameters are provided as userdata in YAML format.
Configuration of bootstrap parameters is handled automatically by the SIMPL VM. This page is only relevant if you are deploying VMs manually or using an orchestrator other than the SIMPL VM, in consultation with your Metaswitch Customer Care Representative.
List of bootstrap parameters
| Property | Description | Format and Example |
|---|---|---|
|
Required. The hostname of the server. |
A string consisting of letters A-Z, a-z, digits 0-9, and hyphens (-). Maximum length is 27 characters. Example: |
|
Required. List of DNS servers. |
For VMware vSphere, a comma-separated list of IPv4 addresses. For OpenStack, a list of IPv4 addresses. Example: |
|
Required. List of NTP servers. |
For VMware vSphere, a comma-separated list of IPv4 addresses or FQDNs. For OpenStack, a list of IPv4 addresses or FQDNs. Example: |
|
Optional. The system time zone in POSIX format. Defaults to UTC. |
Example: |
|
Required. The list of signaling addresses of Config Data Store (CDS) servers which will provide configuration for the cluster. CDS is provided by the TSN nodes. Refer to the Configuration section of the documentation for more information. |
For VMware vSphere, a comma-separated list of IPv4 addresses. For OpenStack, a list of IPv4 addresses. Example: |
|
Required. This is only for TSN VMs. The IP address of the leader node of the CDS cluster. This should only be set in the "node heal" case, not when doing the initial deployment of a cluster. |
A single IPv4 address. Example: |
|
Required. An identifier for this deployment. A deployment consists of one or more sites, each of which consists of several clusters of nodes. |
A string consisting of letters A-Z, a-z, digits 0-9, and hyphens (-). Maximum length is 15 characters. Example: |
|
Required. A unique identifier (within the deployment) for this site. |
A string of the form |
|
Required only when there are multiple clusters of the same type in the same site. A suffix to distinguish between clusters of the same node type within a particular site. For example, when deploying the MaX product, a second TSN cluster may be required. |
A string consisting of letters A-Z, a-z, and digits 0-9. Maximum length is 8 characters. Example: |
|
Optional. A list of SSH public keys. Machines configured with the corresponding private key will be allowed to access the node over SSH as the |
For VMware vSphere, a comma-separated list of SSH public key strings, including the For OpenStack, a list of SSH public key strings. Example: |
|
Optional. An identifier for the VM to use when communicating with MDM, provided by the orchestrator. Supply this only for an MDM-managed deployment. |
Free form string Example: |
|
Optional. The list of management addresses of Metaswitch Deployment Manager(MDM) servers which will manage this cluster. Supply this only for an MDM-managed deployment. |
For VMware vSphere, a comma-separated list of IPv4 addresses. For OpenStack, a list of IPv4 addresses. Example: |
|
Optional. The static certificate for connecting to MDM. Supply this only for an MDM-managed deployment. |
The static certificate as a string Example: |
|
Optional. The CA certificate for connecting to MDM. Supply this only for an MDM-managed deployment. |
The static certificate as a string Example: |
|
Optional. The private key for connecting to MDM. Supply this only for an MDM-managed deployment. |
The static certificate as a string Example: |
|
Required. The private Fernet key used to encrypt and decrypt secrets used by this deployment. A Fernet key may be generated for the deployment using the |
The private key as a string Example: |
|
Required. The primary user’s password. The primary user is the |
The password as a string. Minimum length is 8 characters. Be sure to quote it if it contains special characters. Example: |
|
Required. The IP address information for the VM. |
An encoded string. Example: |
The ip_info parameter
For all network interfaces on a VM, the assigned traffic types, MAC address (OpenStack only), IP address, subnet mask, are encoded in a single parameter called ip_info. Refer to Traffic types and traffic schemes for a list of traffic types found on each VM and how to assign them to network interfaces.
The names of the traffic types as used in the ip_info parameter are:
| Traffic type | Name used in ip_info |
|---|---|
Management |
management |
Cluster |
cluster |
Access |
access |
Diameter signaling |
diameter |
SIP signaling |
sip |
SS7 signaling |
ss7 |
Internal signaling |
internal |
Diameter Multihoming |
diameter_multihoming |
SS7 Multihoming |
ss7_multihoming |
Constructing the ip_info parameter
-
Choose a traffic scheme.
-
For each interface in the traffic scheme which has traffic types relevant to your VM, note down the values of the parameters for that interface: traffic types, MAC address, IP address, subnet mask, and default gateway address.
-
Construct a string for each parameter using these prefixes:
Parameter Prefix Format Traffic types
t=
A comma-separated list (without spaces) of the names given above.
Example:t=diameter,sip,internalMAC address
m=
Six pairs of hexadecimal digits, separated by colons. Case is unimportant.
Example:m=01:23:45:67:89:ABIP address
i=
IPv4 address in dotted-decimal notation.
Example:i=172.16.0.11Subnet mask
s=
CIDR notation.
Example:s=172.16.0.0/24Default gateway address
g=
IPv4 address in dotted-decimal notation.
Example:g=172.16.0.1 -
Join all the parameter strings together with an ampersand (
&) between each.
Example:t=diameter,sip,internal&m=01:23:45:67:89:AB&i=172.16.0.11&s=172.16.0.0/24&g=172.16.0.1 -
Repeat for every other network interface.
-
Finally, join the resulting strings for each interface together with a semicolon (
;) between each.
| |
The individual strings for each network interface must not contain a trailing When including the string in a YAML userdata document, be sure to quote the string, e.g. Do not include details of any interfaces which haven’t been assigned any traffic types. |
Bootstrap and configuration
Bootstrap
Bootstrap is the process whereby, after a VM is started for the first time, it is configured with key system-level configuration such as IP addresses, DNS and NTP server addresses, a hostname, and so on. This process runs automatically on the first boot of the VM. For bootstrap to succeed it is crucial that all entries in the SDF (or in the case of a manual deployment, all the bootstrap parameters) are correct.
Successful bootstrap
Once the VM has booted into multi-user mode, bootstrap normally takes about one minute.
SSH access to the VM is not possible until bootstrap has completed. If you want to monitor bootstrap from the console, log in as the sentinel user and examine the log file bootstrap/bootstrap.log. Successful completion is indicated by the line Bootstrap complete.
Troubleshooting bootstrap
If bootstrap fails, an exception will be written to the log file. If the network-related portion of bootstrap succeeded but a failure occurred afterwards, the VM will be accessible over SSH and logging in will display a warning Automatic bootstrap failed.
Examine the log file bootstrap/bootstrap.log to see why bootstrap failed. In the majority of cases it will be down to an incorrect SDF or a missing or invalid bootstrap parameter. Destroy the VM and recreate it with the correct SDF or bootstrap parameters (it is not possible to run bootstrap more than once).
If you are sure you have the SDF or bootstrap parameters correct, or it is not obvious what is wrong, contact your Customer Care Representative.
Configuration
Configuration occurs after bootstrap. It sets up product-level configuration such as:
-
configuring Rhino and the relevant products (on systems that run Rhino)
-
SNMP-based monitoring, and
-
SSH key exchange to allow access from other VMs in the cluster to this VM.
To perform this configuration, the process retrieves its configuration in the form of YAML files from the CDS. The CDS to contact is determined using the cds-addresses parameter from the SDF or bootstrap parameters.
The configuration process constantly looks for new configuration, and reconfigures the system if new configuration has been uploaded to the CDS.
The YAML files describing the configuration should be prepared in advance.
Configuration files
The configuration process reads settings from YAML files. Each YAML file refers to a particular set of configuration options, for example, SNMP settings. The YAML files are validated against a YANG schema. The YANG schema is human-readable and lists all the possible options, together with a description. It is therefore recommended to reference the Configuration YANG schema while preparing the YAML files.
Some YAML files are shared between different node types. If a file with the same file name is required for two different node types, the same file must be used in both cases.
| |
The CDS nodes should be ready for service before booting any other nodes. |
| |
When uploading configuration files, you must also include a Solution Definition File containing all nodes in the deployment (see below). Furthermore, for any VM which runs Rhino, you must also include a valid Rhino license. |
Solution Definition File
You will already have written a Solution Definition File (SDF) as part of the creation of the VMs. As the configuration process discovers other RVT nodes using the SDF, this SDF needs to be uploaded as part of the configuration.
| |
The SDF must be named |
Successful configuration
The configuration process on the VMs starts after bootstrap completes. It is constantly listening for configuration to be written to CDS (via rvtconfig upload-config). Once it detects configuration has been uploaded, it will automatically download and validate it. Assuming everything passes validation, the configuration will then be applied automatically. This can take up to 20 minutes depending on node type.
The configuration process can be monitored using the report-initconf status tool. The tool can be run via an VM SSH session. Success is indicated by status=vm_converged.
Troubleshooting configuration
Like bootstrap, errors are reported to the log file, located at initconf/initconf.log in the default user’s home directory.
initconf initialization failed due to an error: This indicates that initconf initialization has irrecoverably failed. Contact a Customer Care Representative for next steps.
Task <name> marked as permanently failed: This indicates that configuration has irrecoverably failed. Contact a Customer Care Representative for next steps.
<file> failed to validate against YANG schemas: This indicates something in one of the YAML files was invalid. Refer to the output to check which field was invalid, and fix the problem. For configuration validation issues, the VM doesn’t need to be destroyed and recreated. The fixed configuration can be uploaded using rvtconfig upload-config. The configuration process will automatically try again once it detects the uploaded configuration has been updated.
| |
If there is a configuration validation error on the VM, initconf will NOT run tasks until new configuration has been validated and uploaded to the CDS. |
Other errors: If these relate to invalid field values or a missing license, it is normally safe to fix the configuration and try again. Otherwise, contact a Customer Care Representative.
Configuration alarms
The configuration process can raise the following SNMP alarms, which are sent to the configured notification targets (all with OID prefix 1.3.6.1.4.1.19808.2):
| OID | Description |
|---|---|
12355 |
Initconf warning. This alarm is raised if a task has failed to converge after 30 tries. If this alarm does not eventually clear, refer to Troubleshooting configuration to troubleshoot the issue. |
12356 |
Initconf failed. This alarm is raised if the configuration process irrecoverably failed. Refer to Troubleshooting configuration to troubleshoot the issue. |
12361 |
Initconf unexpected exception. This alarm is raised if the configuration process encountered an unexpected exception. Initconf will attempt to retry the task up to five times, and might eventually succeed. However, the configuration of the node after this recovery attempt might not match the desired configuration exactly. It is therefore recommended to troubleshoot this issue. This alarm must be administratively cleared as it indicates an issue that requires manual intervention. |
12363 |
Configuration validation warning. This alarm is raised if the VM’s configuration contains items that require attention, such as expired or expiring REM certificates. The configuration will be applied, but some services may not be fully operational. Further information regarding the configuration warning may be found in the initconf log. |
REM, XCAP and BSF certificates
About HTTPS certificates for REM
On the MAG VMs, REM runs on Apache Tomcat, where the Tomcat webserver is configured to only accept traffic over HTTPS. As such, Tomcat requires a server-side certificate, which is presented to the user’s browser to prove the server’s identity when a user accesses REM.
Certificates are generated and signed by a known and trusted Certificate Authority (CA). This is done by having a chain of certificates, starting from the CA’s root certificate, where each certificate signs the next in the chain - creating a chain of trust from the CA to the end user’s webserver.
Each certificate is associated with a private key. The certificate itself contains a public key which matches the private key, and these keys are used to encrypt and decrypt the traffic flowing over the HTTPS connection. While the certificate can be safely shared publicly, the private key must be kept safe and not revealed to anyone.
Using rvtconfig, you can upload certificates and private keys to the MAG nodes, and initconf will automatically set up Tomcat to use them. Alternatively, you can opt to have initconf generate self-signed certificates.
| |
REM, being a tool for network operators and available only over the management interface, should not be exposed to the public Internet. As such public CAs such as Let’s Encrypt will not be able to issue a certificate for it. To avoid any browser warnings for users accessing REM, you will need to set up a private CA and issue a certificate from that, and add the CA’s root certificate to the browser’s in-built list of trusted root certificates, for example, by using group policy settings. If you do not have an in-house CA, use of a self-signed certificate is the recommended approach. |
Self-signed certificates
If no certificate is uploaded for REM, initconf creates a self-signed certificate. This will be entirely functional, though users trying to log in to REM will see a browser warning stating that the certificate is self-signed, and will have to add a security exception in order to use REM.
HTTPS certificate specification
If you have an in-house Certificate Authority, they can issue you with a signed certificate for your REM domain(s) and/or IP address(es). To ensure your certificate is compatible with initconf, it should conform to RFC 2818, that is to say that each domain name and/or IP address through which users will log in to REM must be specified in the certificate as a Subject Alternative Name (SAN), and not as the Common Name (CN). SANs must be of DNS (also known as IA5 dNSName) type for hostnames and IP (IA5 iPAddress) type for IP addresses.
| |
If users are to connect to REM via hostname(s) rather than IP address(es), be sure the DNS entry for each hostname resolves to only one node. This ensures that all REM requests made in a single session are directed to a single node. |
For the subject, specify at least the Country (C), Organisation (O), Organisational Unit (OU) and Common Name (CN) fields to match the details of your deployment.
Here is an example set of field values for a certificate request:
C = NZ
O = SomeTelco
OU = SomeCity Network Operations Center
CN = REM

SAN = DNS:rem.sometelco.com
SAN = IP:192.168.10.10
Ensure that the CA issues your certificate in PEM (Privacy-Enhanced Mail) format. In addition, the private key must not have a passphrase (even an empty one).
A certificate bundle issued by a CA generally contains your certificate, your private key, their root certificate, and possibly one or more intermediate certificates. All certificates in the chain need to be merged into a single file in order to be uploaded for use with Tomcat. Follow the steps below:
-
Ensure the files are in PEM format. You can do this by first checking that the contents of each file begins with this line
----- BEGIN CERTIFICATE -----and ends with this line
----- END CERTIFICATE -----(the exact number of hyphens in the line can vary). Then check the certificates are valid and not expired by using
openssl:openssl x509 -in <filename> -inform pem -text -nooutIf the certificate is indeed in PEM format, this command will display the certificate details. You can check that for your certificate, the subject details (the C, OU and so on) match those you specified on the certificate request. Look at the
Validityfields to ensure all certificates in the bundle are valid. Forinitconfto accept them, they must all be valid for at least 30 days from the day you upload them. -
Work out the order of the certificates. To take an example of a bundle containing your certificate, the root certificate and one intermediate certificate: your certificate is signed by the intermediate, and the intermediate certificate is signed by the root. If there is more than one intermediate certificate then the CA can tell you which certificate is signed by which.
-
Construct the chain by concatenating the files together in the correct order such that each certificate is signed by the next, starting with your certificate and ending with the root certificate. For example, this can be done using the Linux
catutility as follows:cat my_certificate.crt intermediate_certificate.crt root_certificate.crt >chain.crtwhich will create a file
chain.crtcontaining the entire certificate chain and suitable for uploading to the MAG nodes. -
Keep the private key safe - you should not reveal the contents of the file to anyone outside of your organisation, not even Metaswitch. You will however need to upload it to the MAG nodes alongside the certificate chain. If you have multiple HTTPS certificates and private keys, ensure you can associate each private key with the certificate it refers to.
Uploading a certificate chain and private key for REM during configuration
When uploading the YAML configuration files using rvtconfig, you can also include the certificate chain and private key and upload those at the same time.
To do this, place the certificate chain and private key files in the directory containing the YAML files before running rvtconfig.
-
For REM, the certificate chain file must have the filename
rem-cert.crt, and the private key file must have the filenamerem-cert.key.
No additional rvtconfig arguments are required; rvtconfig will locate the files through the known filenames given above. It will then run a few basic checks on the files, such as checking whether the private key matches the certificate, and that the certificate is not due to expire in less than 30 days. If all checks pass, then the certificates will be uploaded to the CDS and installed by initconf. Otherwise, rvtconfig will inform you of any errors. Correct these and try again.
Note that you must provide either both the certificate chain and private key, or neither (in which case initconf will generate a self-signed certificate). If you provide only one, rvtconfig will fail.
Changing the certificate
Once a certificate and key have been successfully uploaded to the nodes, there is no need to upload them again on subsequent reconfigurations. The node will continue to use the same certificate.
If you are using a self-signed certificate, then subsequent reconfigurations will not recreate it. Self-signed certificates generated by initconf are valid for 5 years. If the certificate expires or you need to refresh it for some other reason (such as the private key being compromised), contact your Metaswitch Customer Care representative.
You can replace a CA-issued certificate at any time by following the same steps above with a new certificate chain file and private key file. Providing a CA-issued certificate this way will also override any self-signed certificate currently in use.
SAS configuration
Service Assurance Server (SAS) configuration is automatically configured based on the contents of the sas-config.yaml file. Here you can enable or disable SAS tracing, specify the list of SAS servers that Rhino will send diagnostics to, and optionally set the system type and version that Rhino will use when communicating with SAS.
More information about SAS configuration can be found in the Rhino Administration and Deployment Guide.
System name, type and version
The system name, type and version define how each Rhino node identifies itself to SAS. The system name identifies each node individually, and can be searched on, e.g. to filter the received events in SAS' Detailed Timeline view. The system type and version are presented as user-friendly descriptions of what application and software version the node is running.
Limitations on reconfiguration
Changing the SAS configuration parameters
It is only possible to reconfigure the SAS configuration options (SAS servers, system name, system type and system version) when SAS is disabled. As such, in order to change these settings you will first need to disable SAS, either by uploading a temporary set of configuration files with SAS disabled, or by using rhino-console. This should be done in a maintenance window to reduce the impact of the temporary loss of SAS tracing.
It is possible to enable SAS tracing at any time.
SAS resource bundle
Rhino’s SAS resource identifier is based on the system type and version. This resource identifier is contained in the SAS resource bundle, and is what allows SAS to decode the messages that Rhino sends. If you change the system type or version then you will need to re-export the SAS resource bundle from Rhino and import it into the SAS server(s) or federation. Follow the instructions in the Rhino Administration and Deployment Guide or the deployment guide for your solution.
Services and components
Please refer to the pages below for information about the services and components on each node type.
TSN services and components
This section describes details of components and services running on the TSN.
Systemd Services
Cassandra containers
Each TSN node runs two Cassandra databases as docker containers. One database stores its data on disk, while the other stores its data in memory (sacrificing durability in exchange for speed). The in-memory Cassandra, also known as the ramdisk Cassandra, is used by Rhino on the MMT and SMO nodes for session replication and KV store replication. The on-disk Cassandra is used for everything else.
You can examine the state of the Cassandra services by running:
-
sudo systemctl status cassandra
[sentinel@tsn-1 ~]$ sudo systemctl status cassandra
● cassandra.service - cassandra container
   Loaded: loaded (/etc/systemd/system/cassandra.service; enabled; vendor preset: disabled)
   Active: active (running) since Thu 2020-10-29 15:37:25 NZDT; 2 months 12 days ago
  Process: 26746 ExecStopPost=/usr/bin/bash -c /usr/bin/docker stop %N || true (code=exited, status=0/SUCCESS)
  Process: 26699 ExecStop=/usr/bin/bash -c /usr/bin/docker stop %N || true (code=exited, status=0/SUCCESS)
  Process: 26784 ExecStartPre=/usr/local/bin/set_systemctl_tz.sh (code=exited, status=0/SUCCESS)
  Process: 26772 ExecStartPre=/usr/bin/bash -c /usr/bin/docker rm %N || true (code=exited, status=0/SUCCESS)
  Process: 26758 ExecStartPre=/usr/bin/bash -c /usr/bin/docker stop %N || true (code=exited, status=0/SUCCESS)
 Main PID: 2161 (docker)
    Tasks: 15
   Memory: 36.9M
   CGroup: /system.slice/cassandra.service
└─2161 /usr/bin/docker run --name cassandra --rm --network host --hostname localhost --log-driver json-file --log-opt max-size=50m --log-opt max-file=5 --tmpfs /tmp:rw,exec,nosuid,nodev,size=65536k -v /home/sentinel/cassand...-
sudo systemctl status cassandra-ramdisk
[sentinel@tsn-1 ~]$ sudo systemctl status cassandra-ramdisk
● cassandra-ramdisk.service - cassandra-ramdisk container
   Loaded: loaded (/etc/systemd/system/cassandra-ramdisk.service; enabled; vendor preset: disabled)
   Active: active (running) since Thu 2020-10-29 15:38:59 NZDT; 2 months 12 days ago
  Process: 26746 ExecStopPost=/usr/bin/bash -c /usr/bin/docker stop %N || true (code=exited, status=0/SUCCESS)
  Process: 26699 ExecStop=/usr/bin/bash -c /usr/bin/docker stop %N || true (code=exited, status=0/SUCCESS)
  Process: 26784 ExecStartPre=/usr/local/bin/set_systemctl_tz.sh (code=exited, status=0/SUCCESS)
  Process: 26772 ExecStartPre=/usr/bin/bash -c /usr/bin/docker rm %N || true (code=exited, status=0/SUCCESS)
  Process: 26758 ExecStartPre=/usr/bin/bash -c /usr/bin/docker stop %N || true (code=exited, status=0/SUCCESS)
 Main PID: 5427 (docker)
    Tasks: 15
   Memory: 35.8M
   CGroup: /system.slice/cassandra-ramdisk.service
           └─5427 /usr/bin/docker run --name cassandra-ramdisk --rm --network host --hostname localhost --log-driver json-file --log-opt max-size=50m --log-opt max-file=5 --tmpfs /tmp:rw,exec,nosuid,nodev,size=65536k -v /home/sentinel...
and check if the containers are running with docker ps.
SNMP service monitor
The SNMP service monitor process is responsible for raising SNMP alarms when a disk partition gets too full.
The SNMP service monitor alarms are compatible with Rhino alarms and can be accessed in the same way. Refer to Accessing SNMP Statistics and Notifications for more information about this.
Alarms are sent to SNMP targets as configured through the configuration YAML files.
The following partitions are monitored:
-
the root partition (
/) -
the log partition (
/var/log)
There are two thresholds for disk monitoring, expressed as a percentage of the total partition size. When disk usage exceeds:
-
the lower threshold, a warning (MINOR severity) alarm will be raised.
-
the upper threshold, a MAJOR severity alarm will be raised, and (except for the root partition) files will be automatically cleaned up where possible.
Once disk space has returned to a non-alarmable level, the SNMP service monitor will clear the associated alarm on the next check. By default, it checks disk usage once per day. Running the command sudo systemctl reload disk-monitor will force an immediate check of the disk space, for example, if an alarm was raised and you have since cleaned up the appropriate partition and want to clear the alarm.
Configuring the SNMP service monitor
The default monitoring settings should be appropriate for the vast majority of deployments.
Should your Metaswitch Customer Care Representative advise you to reconfigure the disk monitor, you can do so by editing the file /etc/disk_monitor.yaml (you will need to use sudo when editing this file due to its permissions):
global:
  check_interval_seconds: 86400
log:
  lower_threshold: 80
  max_files_to_delete: 10
  upper_threshold: 90
root:
  lower_threshold: 90
  upper_threshold: 95
snmp:
  enabled: true
  notification_type: trap
  targets:
  - address: 192.168.50.50
    port: 162
    version: 2c
The file is in YAML format, and specifies the alarm thresholds for each disk partition (as a percentage), the interval between checks in seconds, and the SNMP targets.
-
Supported SNMP versions are
2cand3. -
Supported notification types are
trapandnotify. -
Supported values for the upper and lower thresholds are:
Partition |
Lower threshold range |
Upper threshold range |
Minimum difference between thresholds |
|
50% to 80% |
60% to 90% |
10% |
|
50% to 90% |
60% to 99% |
5% |
-
check_interval_secondsmust be in the range 60 to 86400 seconds inclusive. It is recommended to keep the interval as long as possible to minimise performance impact.
After editing the file, you can apply the configuration by running sudo systemctl reload disk-monitor.
Verify that the service has accepted the configuration by running sudo systemctl status disk-monitor. If it shows an error, run journalctl -u disk-monitor for more detailed information. Correct the errors in the configuration and apply it again.
Partitions
The TSN VMs contain three on-disk partitions:
-
/boot, with a size of 100 MB. This contains the kernel and bootloader. -
/var/log, with a size of 7 GB. This is where the OS and Cassandra databases store their logfiles. Cassandra logs are written to/var/log/tas/cassandraand/var/log/tas/cassandra-ramdisk. -
/, which uses the rest of the disk. This is the root filesystem.
There is another partition at /home/sentinel/cassandra-ramdisk/data, which is an in-memory filesystem (tmpfs) and contains the data for the ramdisk Cassandra. Its contents are lost on reboot and are also cleared when the partition gets too full. The partition’s total size is 8 GB.
Monitoring
Each VM contains a Prometheus exporter, which monitors statistics about the VM’s health (such as CPU usage, RAM usage, etc). These statistics can be retrieved using SIMon by connecting it to port 9100 on the VM’s management interface.
System health statistics can be retrieved using SNMP walking. They are available via the standard UCD-SNMP-MIB OIDs with prefix 1.3.6.1.4.1.2021.
ShCM services and components
This section describes details of components and services running on the ShCM nodes.
Systemd Services
Rhino Process
The Rhino process is managed via the rhino.service Systemd Service. To start Rhino, run sudo systemctl start rhino.service. To stop, run sudo systemctl stop rhino.service.
To check the status run sudo systemctl status rhino.service. This is an example of a healthy status:
[sentinel@vm-1 ~]$ sudo systemctl status rhino.service
● rhino.service - Rhino Telecom Application Server
   Loaded: loaded (/etc/systemd/system/rhino.service; disabled; vendor preset: disabled)
  Drop-In: /etc/systemd/system/rhino.service.d
           └─50-ulimit-nofile.conf
   Active: active (running) since Mon 2021-02-15 01:20:58 UTC; 9min ago
     Docs: https://docs.rhino.metaswitch.com/ocdoc/go/product/rhino-documentation
 Main PID: 25802 (bash)
    Tasks: 134
   Memory: 938.6M
   CGroup: /system.slice/rhino.service
           ├─25802 /usr/bin/bash -c /home/sentinel/rhino/node-101/start-rhino.sh -l 2>&1              | /home/sentinel/rhino/node-101/consolelog.sh
           ├─25803 /bin/sh /home/sentinel/rhino/node-101/start-rhino.sh -l
           ├─25804 /home/sentinel/java/current/bin/java -classpath /home/sentinel/rhino/lib/log4j-api.jar:/home/sentinel/rhino/lib/log4j-core.jar:/home/sentinel/rhino/lib/rhino-logging.jar -Xmx64m -Xms64m c...
           └─26114 /home/sentinel/java/current/bin/java -server -Xbootclasspath/a:/home/sentinel/rhino/lib/RhinoSecurity.jar -classpath /home/sentinel/rhino/lib/RhinoBoot.jar -Drhino.ah.gclog=True -Drhino.a...

Feb 15 01:20:58 vm-1 systemd[1]: Started Rhino Telecom Application Server.
Linkerd
Linkerd is a transparent proxy that is used for outbound communication. The proxy is run from inside a Docker container. To check if the process is running run docker ps --filter name=linkerd.
SNMP service monitor
The SNMP service monitor process is responsible for raising SNMP alarms when a disk partition gets too full.
The SNMP service monitor alarms are compatible with Rhino alarms and can be accessed in the same way. Refer to Accessing SNMP Statistics and Notifications for more information about this.
Alarms are sent to SNMP targets as configured through the configuration YAML files.
The following partitions are monitored:
-
the root partition (
/) -
the log partition (
/var/log)
There are two thresholds for disk monitoring, expressed as a percentage of the total partition size. When disk usage exceeds:
-
the lower threshold, a warning (MINOR severity) alarm will be raised.
-
the upper threshold, a MAJOR severity alarm will be raised, and (except for the root partition) files will be automatically cleaned up where possible.
Once disk space has returned to a non-alarmable level, the SNMP service monitor will clear the associated alarm on the next check. By default, it checks disk usage once per day. Running the command sudo systemctl reload disk-monitor will force an immediate check of the disk space, for example, if an alarm was raised and you have since cleaned up the appropriate partition and want to clear the alarm.
Configuring the SNMP service monitor
The default monitoring settings should be appropriate for the vast majority of deployments.
Should your Metaswitch Customer Care Representative advise you to reconfigure the disk monitor, you can do so by editing the file /etc/disk_monitor.yaml (you will need to use sudo when editing this file due to its permissions):
global:
  check_interval_seconds: 86400
log:
  lower_threshold: 80
  max_files_to_delete: 10
  upper_threshold: 90
root:
  lower_threshold: 90
  upper_threshold: 95
snmp:
  enabled: true
  notification_type: trap
  targets:
  - address: 192.168.50.50
    port: 162
    version: 2c
The file is in YAML format, and specifies the alarm thresholds for each disk partition (as a percentage), the interval between checks in seconds, and the SNMP targets.
-
Supported SNMP versions are
2cand3. -
Supported notification types are
trapandnotify. -
Supported values for the upper and lower thresholds are:
Partition |
Lower threshold range |
Upper threshold range |
Minimum difference between thresholds |
|
50% to 80% |
60% to 90% |
10% |
|
50% to 90% |
60% to 99% |
5% |
-
check_interval_secondsmust be in the range 60 to 86400 seconds inclusive. It is recommended to keep the interval as long as possible to minimise performance impact.
After editing the file, you can apply the configuration by running sudo systemctl reload disk-monitor.
Verify that the service has accepted the configuration by running sudo systemctl status disk-monitor. If it shows an error, run journalctl -u disk-monitor for more detailed information. Correct the errors in the configuration and apply it again.
Systemd Timers
Cleanup Timer
The node contains a daily timer that cleans up stale Rhino SLEE activities and SBB instances which are created as part of transactions. This timer runs every night at 02:00 (in the system’s timezone), with a random delay of 15 minutes to avoid all nodes running the cleanup at the same time, as a safeguard to minimize the chance of a potential service impact.
This timer consists of two systemd units: cleanup-sbbs-activities.timer, which is the actual timer, and cleanup-sbbs-activities.service, which is the service that the timer activates. The service in turn calls the manage-sbbs-activities tool. This tool can also be run manually to investigate if there are any stale activities or SBB instances. Run it with the -h option to get help about its command line options.
Partitions
The nodes contain three partitions:
-
/boot, with a size of 100MB. This contains the kernel and bootloader. -
/var/log, with a size of 7000MB. This is where the OS and Rhino store their logfiles. The Rhino logs are within thetassubdirectory, and within that each cluster has its own directory. -
/, which uses up the rest of the disk. This is the root filesystem.
PostgreSQL Configuration
On the node, there are default restrictions made to who may access the postgresql instance. These lie within the root-restricted file /var/lib/pgsql/9.6/data/pg_hba.conf. The default trusted authenticators are as follows:
Type of authenticator |
Database |
User |
Address |
Authentication method |
Local |
All |
All |
Trust unconditionally |
|
Host |
All |
All |
127.0.0.1/32 |
MD5 encrypted password |
Host |
All |
All |
::1/128 |
MD5 encrypted password |
Host |
All |
sentinel |
127.0.0.1/32 |
Unencrypted password |
In addition, the instance will listen on the localhost interface only. This is recorded in /var/lib/pgsql/9.6/data/postgresql.conf in the listen addresses field.
Monitoring
Each VM contains a Prometheus exporter, which monitors statistics about the VM’s health (such as CPU usage, RAM usage, etc). These statistics can be retrieved using SIMon by connecting it to port 9100 on the VM’s management interface.
System health statistics can be retrieved using SNMP walking. They are available via the standard UCD-SNMP-MIB OIDs with prefix 1.3.6.1.4.1.2021.
MAG services and components
This section describes details of components and services running on the MMT GSM nodes.
Systemd Services
Rhino Process
The Rhino process is managed via the rhino.service Systemd Service. To start Rhino, run sudo systemctl start rhino.service. To stop, run sudo systemctl stop rhino.service.
To check the status run sudo systemctl status rhino.service. This is an example of a healthy status:
[sentinel@vm-1 ~]$ sudo systemctl status rhino.service
● rhino.service - Rhino Telecom Application Server
   Loaded: loaded (/etc/systemd/system/rhino.service; disabled; vendor preset: disabled)
  Drop-In: /etc/systemd/system/rhino.service.d
           └─50-ulimit-nofile.conf
   Active: active (running) since Mon 2021-02-15 01:20:58 UTC; 9min ago
     Docs: https://docs.rhino.metaswitch.com/ocdoc/go/product/rhino-documentation
 Main PID: 25802 (bash)
    Tasks: 134
   Memory: 938.6M
   CGroup: /system.slice/rhino.service
           ├─25802 /usr/bin/bash -c /home/sentinel/rhino/node-101/start-rhino.sh -l 2>&1              | /home/sentinel/rhino/node-101/consolelog.sh
           ├─25803 /bin/sh /home/sentinel/rhino/node-101/start-rhino.sh -l
           ├─25804 /home/sentinel/java/current/bin/java -classpath /home/sentinel/rhino/lib/log4j-api.jar:/home/sentinel/rhino/lib/log4j-core.jar:/home/sentinel/rhino/lib/rhino-logging.jar -Xmx64m -Xms64m c...
           └─26114 /home/sentinel/java/current/bin/java -server -Xbootclasspath/a:/home/sentinel/rhino/lib/RhinoSecurity.jar -classpath /home/sentinel/rhino/lib/RhinoBoot.jar -Drhino.ah.gclog=True -Drhino.a...

Feb 15 01:20:58 vm-1 systemd[1]: Started Rhino Telecom Application Server.
Rhino Element Manager
REM runs as a 'webapp' inside Apache Tomcat. This runs as a systemd service called rhino-element-manager. REM comes equipped with the Sentinel VoLTE and Sentinel IP-SM-GW plugins, to simplify management of the MMT and SMO nodes.
You can examine the state of the REM service by running sudo systemctl status rhino-element-manager.service. This is an example of a healthy status:
[sentinel@mag-1 ~]$ sudo systemctl status rhino-element-manager.service
● rhino-element-manager.service - Rhino Element Manager (REM)
   Loaded: loaded (/etc/systemd/system/rhino-element-manager.service; enabled; vendor preset: disabled)
   Active: active (running) since Mon 2021-01-11 05:43:10 NZDT; 3s ago
     Docs: https://docs.opencloud.com/ocdoc/books/devportal-documentation/1.0/documentation-index/platforms/rhino-element-manager-rem.html
  Process: 4659 ExecStop=/home/sentinel/apache-tomcat/bin/systemd_relay.sh stop (code=exited, status=0/SUCCESS)
  Process: 4705 ExecStart=/home/sentinel/apache-tomcat/bin/systemd_relay.sh start (code=exited, status=0/SUCCESS)
 Main PID: 4713 (catalina.sh)
    Tasks: 89
   Memory: 962.1M
   CGroup: /system.slice/rhino-element-manager.service
           ├─4713 /bin/sh bin/catalina.sh start
           └─4715 /home/sentinel/java/current/bin/java -Djava.util.logging.config.file=/home/sentinel/apache-tomcat-8.5.38/conf/logging.properties -Djava.util.logging.manager=org.apache.juli.ClassLoaderLogManager -Xms2048m -Xmx2048m -...

Jan 11 05:43:00 mag-1 systemd[1]: Starting Rhino Element Manager (REM)...
Jan 11 05:43:00 mag-1 systemd_relay.sh[4705]: Tomcat started.
Jan 11 05:43:10 mag-1 systemd[1]: Started Rhino Element Manager (REM).
Alternatively, the Tomcat service will show up as Bootstrap when running jps.
For more information about REM, see the Rhino Element Manager (REM) Guide.
Linkerd
Linkerd is a transparent proxy that is used for outbound communication. The proxy is run from inside a Docker container. To check if the process is running run docker ps --filter name=linkerd.
NGINX
NGINX is a reverse proxy that is used for incoming communications. The proxy is run from inside a Docker container. To check if the process is running run docker ps --filter name=nginx.
SNMP service monitor
The SNMP service monitor process is responsible for raising SNMP alarms when a disk partition gets too full.
The SNMP service monitor alarms are compatible with Rhino alarms and can be accessed in the same way. Refer to Accessing SNMP Statistics and Notifications for more information about this.
Alarms are sent to SNMP targets as configured through the configuration YAML files.
The following partitions are monitored:
-
the root partition (
/) -
the log partition (
/var/log)
There are two thresholds for disk monitoring, expressed as a percentage of the total partition size. When disk usage exceeds:
-
the lower threshold, a warning (MINOR severity) alarm will be raised.
-
the upper threshold, a MAJOR severity alarm will be raised, and (except for the root partition) files will be automatically cleaned up where possible.
Once disk space has returned to a non-alarmable level, the SNMP service monitor will clear the associated alarm on the next check. By default, it checks disk usage once per day. Running the command sudo systemctl reload disk-monitor will force an immediate check of the disk space, for example, if an alarm was raised and you have since cleaned up the appropriate partition and want to clear the alarm.
Configuring the SNMP service monitor
The default monitoring settings should be appropriate for the vast majority of deployments.
Should your Metaswitch Customer Care Representative advise you to reconfigure the disk monitor, you can do so by editing the file /etc/disk_monitor.yaml (you will need to use sudo when editing this file due to its permissions):
global:
  check_interval_seconds: 86400
log:
  lower_threshold: 80
  max_files_to_delete: 10
  upper_threshold: 90
root:
  lower_threshold: 90
  upper_threshold: 95
snmp:
  enabled: true
  notification_type: trap
  targets:
  - address: 192.168.50.50
    port: 162
    version: 2c
The file is in YAML format, and specifies the alarm thresholds for each disk partition (as a percentage), the interval between checks in seconds, and the SNMP targets.
-
Supported SNMP versions are
2cand3. -
Supported notification types are
trapandnotify. -
Supported values for the upper and lower thresholds are:
Partition |
Lower threshold range |
Upper threshold range |
Minimum difference between thresholds |
|
50% to 80% |
60% to 90% |
10% |
|
50% to 90% |
60% to 99% |
5% |
-
check_interval_secondsmust be in the range 60 to 86400 seconds inclusive. It is recommended to keep the interval as long as possible to minimise performance impact.
After editing the file, you can apply the configuration by running sudo systemctl reload disk-monitor.
Verify that the service has accepted the configuration by running sudo systemctl status disk-monitor. If it shows an error, run journalctl -u disk-monitor for more detailed information. Correct the errors in the configuration and apply it again.
Systemd Timers
Cleanup Timer
The node contains a daily timer that cleans up stale Rhino SLEE activities and SBB instances which are created as part of transactions. This timer runs every night at 02:00 (in the system’s timezone), with a random delay of 15 minutes to avoid all nodes running the cleanup at the same time, as a safeguard to minimize the chance of a potential service impact.
This timer consists of two systemd units: cleanup-sbbs-activities.timer, which is the actual timer, and cleanup-sbbs-activities.service, which is the service that the timer activates. The service in turn calls the manage-sbbs-activities tool. This tool can also be run manually to investigate if there are any stale activities or SBB instances. Run it with the -h option to get help about its command line options.
Partitions
The nodes contain three partitions:
-
/boot, with a size of 100MB. This contains the kernel and bootloader. -
/var/log, with a size of 7000MB. This is where the OS and Rhino store their logfiles. The Rhino logs are within thetassubdirectory, and within that each cluster has its own directory. -
/, which uses up the rest of the disk. This is the root filesystem.
PostgreSQL Configuration
On the node, there are default restrictions made to who may access the postgresql instance. These lie within the root-restricted file /var/lib/pgsql/9.6/data/pg_hba.conf. The default trusted authenticators are as follows:
Type of authenticator |
Database |
User |
Address |
Authentication method |
Local |
All |
All |
Trust unconditionally |
|
Host |
All |
All |
127.0.0.1/32 |
MD5 encrypted password |
Host |
All |
All |
::1/128 |
MD5 encrypted password |
Host |
All |
sentinel |
127.0.0.1/32 |
Unencrypted password |
In addition, the instance will listen on the localhost interface only. This is recorded in /var/lib/pgsql/9.6/data/postgresql.conf in the listen addresses field.
Monitoring
Each VM contains a Prometheus exporter, which monitors statistics about the VM’s health (such as CPU usage, RAM usage, etc). These statistics can be retrieved using SIMon by connecting it to port 9100 on the VM’s management interface.
System health statistics can be retrieved using SNMP walking. They are available via the standard UCD-SNMP-MIB OIDs with prefix 1.3.6.1.4.1.2021.
MMT GSM services and components
This section describes details of components and services running on the MMT GSM nodes.
Systemd Services
Rhino Process
The Rhino process is managed via the rhino.service Systemd Service. To start Rhino, run sudo systemctl start rhino.service. To stop, run sudo systemctl stop rhino.service.
To check the status run sudo systemctl status rhino.service. This is an example of a healthy status:
[sentinel@vm-1 ~]$ sudo systemctl status rhino.service
● rhino.service - Rhino Telecom Application Server
   Loaded: loaded (/etc/systemd/system/rhino.service; disabled; vendor preset: disabled)
  Drop-In: /etc/systemd/system/rhino.service.d
           └─50-ulimit-nofile.conf
   Active: active (running) since Mon 2021-02-15 01:20:58 UTC; 9min ago
     Docs: https://docs.rhino.metaswitch.com/ocdoc/go/product/rhino-documentation
 Main PID: 25802 (bash)
    Tasks: 134
   Memory: 938.6M
   CGroup: /system.slice/rhino.service
           ├─25802 /usr/bin/bash -c /home/sentinel/rhino/node-101/start-rhino.sh -l 2>&1              | /home/sentinel/rhino/node-101/consolelog.sh
           ├─25803 /bin/sh /home/sentinel/rhino/node-101/start-rhino.sh -l
           ├─25804 /home/sentinel/java/current/bin/java -classpath /home/sentinel/rhino/lib/log4j-api.jar:/home/sentinel/rhino/lib/log4j-core.jar:/home/sentinel/rhino/lib/rhino-logging.jar -Xmx64m -Xms64m c...
           └─26114 /home/sentinel/java/current/bin/java -server -Xbootclasspath/a:/home/sentinel/rhino/lib/RhinoSecurity.jar -classpath /home/sentinel/rhino/lib/RhinoBoot.jar -Drhino.ah.gclog=True -Drhino.a...

Feb 15 01:20:58 vm-1 systemd[1]: Started Rhino Telecom Application Server.
Linkerd
Linkerd is a transparent proxy that is used for outbound communication. The proxy is run from inside a Docker container. To check if the process is running run docker ps --filter name=linkerd.
SNMP service monitor
The SNMP service monitor process is responsible for raising SNMP alarms when a disk partition gets too full.
The SNMP service monitor alarms are compatible with Rhino alarms and can be accessed in the same way. Refer to Accessing SNMP Statistics and Notifications for more information about this.
Alarms are sent to SNMP targets as configured through the configuration YAML files.
The following partitions are monitored:
-
the root partition (
/) -
the log partition (
/var/log)
There are two thresholds for disk monitoring, expressed as a percentage of the total partition size. When disk usage exceeds:
-
the lower threshold, a warning (MINOR severity) alarm will be raised.
-
the upper threshold, a MAJOR severity alarm will be raised, and (except for the root partition) files will be automatically cleaned up where possible.
Once disk space has returned to a non-alarmable level, the SNMP service monitor will clear the associated alarm on the next check. By default, it checks disk usage once per day. Running the command sudo systemctl reload disk-monitor will force an immediate check of the disk space, for example, if an alarm was raised and you have since cleaned up the appropriate partition and want to clear the alarm.
Configuring the SNMP service monitor
The default monitoring settings should be appropriate for the vast majority of deployments.
Should your Metaswitch Customer Care Representative advise you to reconfigure the disk monitor, you can do so by editing the file /etc/disk_monitor.yaml (you will need to use sudo when editing this file due to its permissions):
global:
  check_interval_seconds: 86400
log:
  lower_threshold: 80
  max_files_to_delete: 10
  upper_threshold: 90
root:
  lower_threshold: 90
  upper_threshold: 95
snmp:
  enabled: true
  notification_type: trap
  targets:
  - address: 192.168.50.50
    port: 162
    version: 2c
The file is in YAML format, and specifies the alarm thresholds for each disk partition (as a percentage), the interval between checks in seconds, and the SNMP targets.
-
Supported SNMP versions are
2cand3. -
Supported notification types are
trapandnotify. -
Supported values for the upper and lower thresholds are:
Partition |
Lower threshold range |
Upper threshold range |
Minimum difference between thresholds |
|
50% to 80% |
60% to 90% |
10% |
|
50% to 90% |
60% to 99% |
5% |
-
check_interval_secondsmust be in the range 60 to 86400 seconds inclusive. It is recommended to keep the interval as long as possible to minimise performance impact.
After editing the file, you can apply the configuration by running sudo systemctl reload disk-monitor.
Verify that the service has accepted the configuration by running sudo systemctl status disk-monitor. If it shows an error, run journalctl -u disk-monitor for more detailed information. Correct the errors in the configuration and apply it again.
Systemd Timers
Cleanup Timer
The node contains a daily timer that cleans up stale Rhino SLEE activities and SBB instances which are created as part of transactions. This timer runs every night at 02:00 (in the system’s timezone), with a random delay of 15 minutes to avoid all nodes running the cleanup at the same time, as a safeguard to minimize the chance of a potential service impact.
This timer consists of two systemd units: cleanup-sbbs-activities.timer, which is the actual timer, and cleanup-sbbs-activities.service, which is the service that the timer activates. The service in turn calls the manage-sbbs-activities tool. This tool can also be run manually to investigate if there are any stale activities or SBB instances. Run it with the -h option to get help about its command line options.
Partitions
The nodes contain three partitions:
-
/boot, with a size of 100MB. This contains the kernel and bootloader. -
/var/log, with a size of 7000MB. This is where the OS and Rhino store their logfiles. The Rhino logs are within thetassubdirectory, and within that each cluster has its own directory. -
/, which uses up the rest of the disk. This is the root filesystem.
PostgreSQL Configuration
On the node, there are default restrictions made to who may access the postgresql instance. These lie within the root-restricted file /var/lib/pgsql/9.6/data/pg_hba.conf. The default trusted authenticators are as follows:
Type of authenticator |
Database |
User |
Address |
Authentication method |
Local |
All |
All |
Trust unconditionally |
|
Host |
All |
All |
127.0.0.1/32 |
MD5 encrypted password |
Host |
All |
All |
::1/128 |
MD5 encrypted password |
Host |
All |
sentinel |
127.0.0.1/32 |
Unencrypted password |
In addition, the instance will listen on the localhost interface only. This is recorded in /var/lib/pgsql/9.6/data/postgresql.conf in the listen addresses field.
Monitoring
Each VM contains a Prometheus exporter, which monitors statistics about the VM’s health (such as CPU usage, RAM usage, etc). These statistics can be retrieved using SIMon by connecting it to port 9100 on the VM’s management interface.
System health statistics can be retrieved using SNMP walking. They are available via the standard UCD-SNMP-MIB OIDs with prefix 1.3.6.1.4.1.2021.
SMO services and components
This section describes details of components and services running on the SMO nodes.
Systemd Services
| |
Sentinel IP-SM-GW can be disabled in smo-vmpool-config.yaml. If Sentinel IP-SM-GW has been disabled, Rhino will not be running. |
Rhino Process
The Rhino process is managed via the rhino.service Systemd Service. To start Rhino, run sudo systemctl start rhino.service. To stop, run sudo systemctl stop rhino.service.
To check the status run sudo systemctl status rhino.service. This is an example of a healthy status:
[sentinel@vm-1 ~]$ sudo systemctl status rhino.service
● rhino.service - Rhino Telecom Application Server
   Loaded: loaded (/etc/systemd/system/rhino.service; disabled; vendor preset: disabled)
  Drop-In: /etc/systemd/system/rhino.service.d
           └─50-ulimit-nofile.conf
   Active: active (running) since Mon 2021-02-15 01:20:58 UTC; 9min ago
     Docs: https://docs.rhino.metaswitch.com/ocdoc/go/product/rhino-documentation
 Main PID: 25802 (bash)
    Tasks: 134
   Memory: 938.6M
   CGroup: /system.slice/rhino.service
           ├─25802 /usr/bin/bash -c /home/sentinel/rhino/node-101/start-rhino.sh -l 2>&1              | /home/sentinel/rhino/node-101/consolelog.sh
           ├─25803 /bin/sh /home/sentinel/rhino/node-101/start-rhino.sh -l
           ├─25804 /home/sentinel/java/current/bin/java -classpath /home/sentinel/rhino/lib/log4j-api.jar:/home/sentinel/rhino/lib/log4j-core.jar:/home/sentinel/rhino/lib/rhino-logging.jar -Xmx64m -Xms64m c...
           └─26114 /home/sentinel/java/current/bin/java -server -Xbootclasspath/a:/home/sentinel/rhino/lib/RhinoSecurity.jar -classpath /home/sentinel/rhino/lib/RhinoBoot.jar -Drhino.ah.gclog=True -Drhino.a...

Feb 15 01:20:58 vm-1 systemd[1]: Started Rhino Telecom Application Server.
OCSS7 Process
The OCSS7 process is managed via the ocss7.service Systemd Service. To start OCSS7, run sudo systemctl start ocss7.service. To stop, run sudo systemctl stop ocss7.service.
To check the status run sudo systemctl status ocss7.service. This is an example of a healthy status:
[sentinel@smo-1 ~]$ sudo systemctl status ocss7.service
● ocss7.service - Start the OCSS7 SGC
   Loaded: loaded (/etc/systemd/system/ocss7.service; enabled; vendor preset: disabled)
   Active: active (running) since Mon 2021-01-11 06:29:34 NZDT; 6min ago
   CGroup: /system.slice/ocss7.service
           ├─1215 /bin/bash /home/sentinel/ocss7/DC1/smo1.sentinel-oc.internal/current/bin/sgc daemon --jmxhost 172.31.110.129 --jmxport 55555 --seed /dev/./urandom
           ├─1216 java com.cts.utils.LogRollover /home/sentinel/ocss7/DC1/smo1.sentinel-oc.internal/current/logs/startup.20210111062915
           └─1225 java -DMODULE=SGC -server -ea -XX:MaxNewSize=128m -XX:NewSize=128m -Xms5120m -Xmx5120m -XX:SurvivorRatio=128 -XX:MaxTenuringThreshold=0 -Dsun.rmi.dgc.server.gcInterval=0x7FFFFFFFFFFFFFFE -Dsun.rmi.dgc.client.gcInterv...

Jan 11 06:29:15 smo-1 systemd[1]: Starting Start the OCSS7 SGC...
Jan 11 06:29:15 smo-1 ocss7[1201]: SGC starting - daemonizing ...
Jan 11 06:29:34 smo-1 systemd[1]: Started Start the OCSS7 SGC.
Linkerd
Linkerd is a transparent proxy that is used for outbound communication. The proxy is run from inside a Docker container. To check if the process is running run docker ps --filter name=linkerd.
SNMP service monitor
The SNMP service monitor process is responsible for raising SNMP alarms when a disk partition gets too full.
The SNMP service monitor alarms are compatible with Rhino alarms and can be accessed in the same way. Refer to Accessing SNMP Statistics and Notifications for more information about this.
Alarms are sent to SNMP targets as configured through the configuration YAML files.
The following partitions are monitored:
-
the root partition (
/) -
the log partition (
/var/log)
There are two thresholds for disk monitoring, expressed as a percentage of the total partition size. When disk usage exceeds:
-
the lower threshold, a warning (MINOR severity) alarm will be raised.
-
the upper threshold, a MAJOR severity alarm will be raised, and (except for the root partition) files will be automatically cleaned up where possible.
Once disk space has returned to a non-alarmable level, the SNMP service monitor will clear the associated alarm on the next check. By default, it checks disk usage once per day. Running the command sudo systemctl reload disk-monitor will force an immediate check of the disk space, for example, if an alarm was raised and you have since cleaned up the appropriate partition and want to clear the alarm.
Configuring the SNMP service monitor
The default monitoring settings should be appropriate for the vast majority of deployments.
Should your Metaswitch Customer Care Representative advise you to reconfigure the disk monitor, you can do so by editing the file /etc/disk_monitor.yaml (you will need to use sudo when editing this file due to its permissions):
global:
  check_interval_seconds: 86400
log:
  lower_threshold: 80
  max_files_to_delete: 10
  upper_threshold: 90
root:
  lower_threshold: 90
  upper_threshold: 95
snmp:
  enabled: true
  notification_type: trap
  targets:
  - address: 192.168.50.50
    port: 162
    version: 2c
The file is in YAML format, and specifies the alarm thresholds for each disk partition (as a percentage), the interval between checks in seconds, and the SNMP targets.
-
Supported SNMP versions are
2cand3. -
Supported notification types are
trapandnotify. -
Supported values for the upper and lower thresholds are:
Partition |
Lower threshold range |
Upper threshold range |
Minimum difference between thresholds |
|
50% to 80% |
60% to 90% |
10% |
|
50% to 90% |
60% to 99% |
5% |
-
check_interval_secondsmust be in the range 60 to 86400 seconds inclusive. It is recommended to keep the interval as long as possible to minimise performance impact.
After editing the file, you can apply the configuration by running sudo systemctl reload disk-monitor.
Verify that the service has accepted the configuration by running sudo systemctl status disk-monitor. If it shows an error, run journalctl -u disk-monitor for more detailed information. Correct the errors in the configuration and apply it again.
Systemd Timers
Cleanup Timer
The node contains a daily timer that cleans up stale Rhino SLEE activities and SBB instances which are created as part of transactions. This timer runs every night at 02:00 (in the system’s timezone), with a random delay of 15 minutes to avoid all nodes running the cleanup at the same time, as a safeguard to minimize the chance of a potential service impact.
This timer consists of two systemd units: cleanup-sbbs-activities.timer, which is the actual timer, and cleanup-sbbs-activities.service, which is the service that the timer activates. The service in turn calls the manage-sbbs-activities tool. This tool can also be run manually to investigate if there are any stale activities or SBB instances. Run it with the -h option to get help about its command line options.
Partitions
The nodes contain three partitions:
-
/boot, with a size of 100MB. This contains the kernel and bootloader. -
/var/log, with a size of 7000MB. This is where the OS and Rhino store their logfiles. The Rhino logs are within thetassubdirectory, and within that each cluster has its own directory. -
/, which uses up the rest of the disk. This is the root filesystem.
PostgreSQL Configuration
On the node, there are default restrictions made to who may access the postgresql instance. These lie within the root-restricted file /var/lib/pgsql/9.6/data/pg_hba.conf. The default trusted authenticators are as follows:
Type of authenticator |
Database |
User |
Address |
Authentication method |
Local |
All |
All |
Trust unconditionally |
|
Host |
All |
All |
127.0.0.1/32 |
MD5 encrypted password |
Host |
All |
All |
::1/128 |
MD5 encrypted password |
Host |
All |
sentinel |
127.0.0.1/32 |
Unencrypted password |
In addition, the instance will listen on the localhost interface only. This is recorded in /var/lib/pgsql/9.6/data/postgresql.conf in the listen addresses field.
Monitoring
Each VM contains a Prometheus exporter, which monitors statistics about the VM’s health (such as CPU usage, RAM usage, etc). These statistics can be retrieved using SIMon by connecting it to port 9100 on the VM’s management interface.
System health statistics can be retrieved using SNMP walking. They are available via the standard UCD-SNMP-MIB OIDs with prefix 1.3.6.1.4.1.2021.
Configuration YANG schema
The YANG schema for the VMs consists of the following subschemas:
| Schema | Node types |
|---|---|
TSN |
|
TSN, ShCM, MAG, MMT GSM, and SMO |
|
TSN, ShCM, MAG, MMT GSM, and SMO |
|
TSN, ShCM, MAG, MMT GSM, and SMO |
|
TSN, ShCM, MAG, MMT GSM, and SMO |
|
ShCM, MAG, MMT GSM, and SMO |
|
ShCM |
|
ShCM |
|
ShCM, MAG, MMT GSM, and SMO |
|
MAG |
|
MAG |
|
MAG |
|
MAG, MMT GSM, and SMO |
|
MAG and MMT GSM |
|
MMT GSM |
|
MMT GSM |
|
MMT GSM and SMO |
|
MMT GSM and SMO |
|
SMO |
|
SMO |
|
SMO |
|
TSN, ShCM, MAG, MMT GSM, and SMO |
tsn-vm-pool.yang
module tsn-vm-pool {
    yang-version 1.1;
    namespace "http://metaswitch.com/yang/tas-vm-build/tsn-vm-pool";
    prefix "tsn-vm-pool";


    import vm-types {
        prefix "vmt";
    }

    organization "Metaswitch Networks";
    contact "rvt-schemas@metaswitch.com";
    description "TSN VM pool configuration schema.";

    revision 2019-11-29 {
        description
            "Initial revision";
        reference
            "Metaswitch Deployment Definition Guide";
    }

    grouping tsn-virtual-machine-pool {
        leaf deployment-id {
            type vmt:deployment-id-type;
            mandatory true;
            description "The deployment identifier. Used to form a unique VM identifier within the
                         VM host.";
        }

        leaf site-id {
            type vmt:site-id-type;
            mandatory true;
            description "Site ID for the site that this VM pool is a part of.";
        }

        leaf node-type-suffix {
            type vmt:node-type-suffix-type;
            default "";
            description "Suffix to add to the node type when deriving the group identifier. Should
                         normally be left blank.";
        }

        list virtual-machines {
            key "vm-id";

            leaf vm-id {
                type string;
                mandatory true;
                description "The unique virtual machine identifier.";
            }

            description "Configured virtual machines.";
        }

        container scheduled-cassandra-repairs {
            presence "This container is optional, but has mandatory descendants.";
            uses vmt:scheduled-task;
            description "Repair Cassandra on specified schedules, for maintenance purposes.
                         If omitted, Cassandra repairs will be scheduled on the leader node
                         every day at 02:00.

                         Note: Please ensure there are no Rhino restarts within one hour of a
                         scheduled Cassandra repair.";
        }

        description "TSN virtual machine pool.";
    }
}
snmp-configuration.yang
module snmp-configuration {
yang-version 1.1;
namespace "http://metaswitch.com/yang/tas-vm-build/snmp-configuration";
prefix "snmp";
import ietf-inet-types {
prefix "ietf-inet";
}
organization "Metaswitch Networks";
contact "rvt-schemas@metaswitch.com";
description "SNMP configuration schema.";
revision 2019-11-29 {
description
"Initial revision";
reference
"Metaswitch Deployment Definition Guide";
}
grouping snmp-configuration-grouping {
leaf v1-enabled {
type boolean;
default false;
description "Enables the use of SNMPv1 if set to 'true'. Note that support for SNMPv1
is deprecated and SNMP v2c should be used instead. Use of v1 is limited
to Rhino only and may cause some Rhino statistics to fail to appear
correctly or not at all. Set to 'false' to disable SNMPv1.";
}
leaf v2c-enabled {
type boolean;
default true;
description "Enables the use of SNMPv2c if set to 'true'.
Set to 'false' to disable SNMPv2c.";
}
leaf v3-enabled {
type boolean;
default false;
description "Enables the use of SNMPv3 if set to 'true'.
Set to 'false' to disable SNMPv3.";
}
leaf trap_type {
when "../v2c-enabled = 'true'";
type enumeration {
enum trap {
description "Generate TRAP type notifications.";
}
enum inform {
description "Generate INFORM type notifications.";
}
}
default trap;
description "Configure the notification type to use when SNMPv2c is enabled.";
}
leaf community {
when "../v2c-enabled = 'true'";
type string;
default "clearwater";
description "The SNMPv2c community name.";
}
container v3-authentication {
when "../v3-enabled = 'true'";
leaf username {
type string;
mandatory true;
description "The SNMPv3 user name.";
}
leaf authentication-protocol {
type enumeration {
enum SHA {
description "SHA";
}
enum MD5 {
description "MD5 message digest.";
}
}
default SHA;
description "The authentication mechanism to use.";
}
leaf authentication-key {
type string {
length "8 .. max";
}
mandatory true;
description "The authentication key.";
}
leaf privacy-protocol {
type enumeration {
enum DES {
description "Data Encryption Standard (DES)";
}
enum 3DES {
description "Triple Data Encryption Standard (3DES).";
}
enum AES128 {
description "128 bit Advanced Encryption Standard (AES).";
}
enum AES192 {
description "192 bit Advanced Encryption Standard (AES).";
}
enum AES256 {
description "256 bit Advanced Encryption Standard (AES).";
}
}
default AES128;
description "The privacy mechanism to use.";
}
leaf privacy-key {
type string {
length "8 .. max";
}
mandatory true;
description "The privacy key.";
}
description "SNMPv3 authentication configuration. Only used when 'v3-enabled' is set
to 'true'.";
}
container agent-details {
when "../v2c-enabled = 'true' or ../v3-enabled= 'true'";
// agent name is the VM ID
// description is the human-readable node description from the metadata
leaf location {
type string;
mandatory true;
description "The physical location of the SNMP agent.";
}
leaf contact {
type string;
mandatory true;
description "The contact email address for this SNMP agent.";
}
description "The configurable SNMP agent details. The VM ID is used as the agent's
name, and the human readable node description from the metadata is used
as the description.";
}
container notifications {
leaf rhino-notifications-enabled {
when "../../v2c-enabled = 'true' or ../../v3-enabled = 'true'";
type boolean;
default true;
description "Specifies whether or not Rhino SNMP v2c/3 notifications are enabled.
Applicable only when SNMPv2c and/or SNMPv3 are enabled.";
}
must "rhino-notifications-enabled = 'false'
or (count(targets[send-rhino-notifications = 'true']) > 0)" {
error-message "Since you have enabled Rhino notifications,
you must specify at least one Rhino notification target.";
}
leaf system-notifications-enabled {
when "../../v2c-enabled = 'true' or ../../v3-enabled = 'true'";
type boolean;
default true;
description "Specifies whether or not system SNMP v2c/3 notifications are enabled.
System notifications are: high memory and CPU usage warnings,
and system boot notifications.
If you use MetaView Server to monitor
your platform, then it is recommended to leave this set to 'false'.";
}
must "system-notifications-enabled = 'false'
or (count(targets[send-system-notifications = 'true']) > 0)" {
error-message "Since you have enabled system notifications,
you must specify at least one system notification target.";
}
leaf sgc-notifications-enabled {
when "../../v2c-enabled = 'true' or ../../v3-enabled = 'true'";
type boolean;
default true;
description "Specifies whether or not OCSS7 SGC SNMP v2c/3 notifications are
enabled.
Applicable only when SNMPv2c and/or SNMPv3 are enabled.";
}
must "sgc-notifications-enabled = 'false'
or (count(targets[send-sgc-notifications = 'true']) > 0)" {
error-message "Since you have enabled SGC notifications,
you must specify at least one SGC notification target.";
}
list targets {
key "version host port";
leaf version {
type enumeration {
enum v1 {
description "SNMPv1";
}
enum v2c {
description "SNMPv2c";
}
enum v3 {
description "SNMPv3";
}
}
description "The SNMP notification version to use for this target.";
}
leaf host {
type ietf-inet:host;
description "The target host.";
}
leaf port {
type ietf-inet:port-number;
// 'port' is a key and YANG ignores the default value of any keys, hence we
// cannot set a default '162' here.
description "The target port, normally 162.";
}
leaf send-rhino-notifications {
when "../../rhino-notifications-enabled = 'true'";
type boolean;
default true;
description "Specifies whether or not to send Rhino SNMP v2c/3 notifications
to this target.
Can only be specified if ../rhino-notifications-enabled is true.";
}
leaf send-system-notifications {
when "../../system-notifications-enabled = 'true'";
type boolean;
default true;
description "Specifies whether or not to send system SNMP v2c/3 notifications
to this target.
Can only be specified if ../system-notifications-enabled is true.";
}
leaf send-sgc-notifications {
when "../../sgc-notifications-enabled = 'true'";
type boolean;
default true;
description "Specifies whether or not to send SGC SNMP v2c/3 notifications
to this target.
Can only be specified if ../sgc-notifications-enabled is true.";
}
description "The list of SNMP notification targets.
Note that you can specify targets even if not using Rhino or system
notifications - the targets are also used for the disk and
service monitor alerts.";
}
list categories {
when "../rhino-notifications-enabled = 'true'";
key "category";
leaf category {
type enumeration {
enum alarm-notification {
description "Alarm related notifications.";
}
enum log-notification {
description "Log related notifications.";
}
enum log-rollover-notification {
description "Log rollover notifications.";
}
enum resource-adaptor-entity-state-change-notification {
description "Resource adaptor entity state change notifications.";
}
enum service-state-change-notification {
description "Service state change notifications.";
}
enum slee-state-change-notification {
description "SLEE state change notifications.";
}
enum trace-notification {
description "Trace notifications.";
}
enum usage-notification {
description "Usage notifications.";
}
}
description "Notification category.
If you are using MetaView Server, only the `alarm-notification`
category of Rhino SNMP notifications is supported.
Therefore, all other notification categories should be disabled.";
}
leaf enabled {
type boolean;
mandatory true;
description "Set to 'true' to enable this category. Set to 'false' to disable.";
}
description "Rhino notification categories to enable or disable.";
}
description "Notification configuration.";
}
container sgc {
leaf v2c-port {
when "../../v2c-enabled = 'true'";
type ietf-inet:port-number;
default 11100;
description "The port to bind to for v2c SNMP requests.";
}
leaf v3-port {
when "../../v3-enabled = 'true'";
type ietf-inet:port-number;
default 11101;
description "The port to bind to for v3 SNMP requests.";
}
description "SGC-specific SNMP configuration.";
}
description "SNMP configuration.";
}
}routing-configuration.yang
module routing-configuration {
    yang-version 1.1;
    namespace "http://metaswitch.com/yang/tas-vm-build/routing-configuration";
    prefix "routing";

    import ietf-inet-types {
        prefix "ietf-inet";
    }

    import traffic-type-configuration {
        prefix "traffic-type";
        revision-date 2022-04-11;
    }

    organization "Metaswitch Networks";
    contact "rvt-schemas@metaswitch.com";
    description "Routing configuration schema.";

    revision 2019-11-29 {
        description
            "Initial revision";
        reference
            "Metaswitch Deployment Definition Guide";
    }

    grouping routing-configuration-grouping {
        list routing-rules {
            key "name";
            unique "target";

            leaf name {
                type string;
                mandatory true;
                description "The name of the routing rule.";
            }

            leaf target {
                type union {
                    type ietf-inet:ip-address;
                    type ietf-inet:ip-prefix;
                }
                mandatory true;
                description "The target for the routing rule.
                             Can be either an IP address or a block of IP addresses.";
            }

            leaf interface {
                type traffic-type:traffic-type;
                mandatory true;
                description "The interface to use to connect to the specified endpoint.
                             This must be one of the allowed traffic types,
                             corresponding to the interface carrying the traffic type.";
            }

            leaf gateway {
                type ietf-inet:ip-address;
                mandatory true;
                description "The IP address of the gateway to route through.";
            }

            leaf-list node-types {
                type enumeration {
                    enum shcm {
                        description "Apply this routing rule to the shcm nodes.";
                    }
                    enum mag {
                        description "Apply this routing rule to the mag nodes.";
                    }
                    enum mmt-gsm {
                        description "Apply this routing rule to the mmt-gsm nodes.";
                    }
                    enum mmt-cdma {
                        description "Apply this routing rule to the mmt-cdma nodes.";
                    }
                    enum smo {
                        description "Apply this routing rule to the smo nodes.";
                    }
                    enum tsn {
                        description "Apply this routing rule to the tsn nodes.";
                    }
                    enum max {
                        description "Apply this routing rule to the max nodes.";
                    }
                    enum rem {
                        description "Apply this routing rule to the rem nodes.";
                    }
                    enum sgc {
                        description "Apply this routing rule to the sgc nodes.";
                    }
                    enum custom {
                        description "Apply this routing rule to the custom nodes.";
                    }
                }
                description "The node-types this routing rule applies to.";
            }

            description "The list of routing rules.";
        }
        description "Routing configuration";
    }
}
system-configuration.yang
module system-configuration {
    yang-version 1.1;
    namespace "http://metaswitch.com/yang/tas-vm-build/system-configuration";
    prefix "system";

    organization "Metaswitch Networks";
    contact "rvt-schemas@metaswitch.com";
    description "OS-level parameters configuration schema.";

    revision 2019-11-29 {
        description
            "Initial revision";
        reference
            "Metaswitch Deployment Definition Guide";
    }

    grouping system-configuration-grouping {
        container networking {
            container core {
                leaf receive-buffer-size-default {
                    type uint32 {
                        range "65536 .. 16777216";
                    }
                    units "bytes";
                    default 512000;

                    description "Default socket receive buffer size.";
                }

                leaf receive-buffer-size-max {
                    type uint32 {
                        range "65536 .. 16777216";
                    }
                    units "bytes";
                    default 2048000;

                    description "Maximum socket receive buffer size.";
                }

                leaf send-buffer-size-default {
                    type uint32 {
                        range "65536 .. 16777216";
                    }
                    units "bytes";
                    default 512000;

                    description "Default socket send buffer size.";
                }

                leaf send-buffer-size-max {
                    type uint32 {
                        range "65536 .. 16777216";
                    }
                    units "bytes";
                    default 2048000;

                    description "Maximum socket send buffer size.";
                }

                description "Core network settings.";
            }

            container sctp {
                leaf rto-min {
                    type uint32 {
                        range "10 .. 5000";
                    }
                    units "milliseconds";

                    default 50;

                    description "Round trip estimate minimum. "
                              + "Used in SCTP's exponential backoff algorithm for retransmissions.";
                }

                leaf rto-initial {
                    type uint32 {
                        range "10 .. 5000";
                    }
                    units "milliseconds";

                    default 300;

                    description "Round trip estimate initial value. "
                              + "Used in SCTP's exponential backoff algorithm for retransmissions.";
                }

                leaf rto-max {
                    type uint32 {
                        range "10 .. 5000";
                    }
                    units "milliseconds";

                    default 1000;

                    description "Round trip estimate maximum. "
                              + "Used in SCTP's exponential backoff algorithm for retransmissions.";
                }

                leaf sack-timeout {
                    type uint32 {
                        range "50 .. 5000";
                    }
                    units "milliseconds";

                    default 100;

                    description "Timeout within which the endpoint expects to receive "
                              + "a SACK message.";
                }

                leaf hb-interval {
                    type uint32 {
                        range "50 .. 30000";
                    }
                    units "milliseconds";

                    default 1000;

                    description "Heartbeat interval. The longer the interval, "
                              + "the longer it can take to detect that communication with a peer "
                              + "has been lost.";
                }

                leaf path-max-retransmissions {
                    type uint32 {
                        range "1 .. 20";
                    }

                    default 5;

                    description "Maximum number of retransmissions on one path before "
                              + "communication via that path is considered to be lost.";
                }

                leaf association-max-retransmissions {
                    type uint32 {
                        range "1 .. 20";
                    }

                    default 10;

                    description "Maximum number of retransmissions to one peer before "
                              + "communication with that peer is considered to be lost.";
                }

                description "SCTP-related settings.";
            }

            description "Network-related settings.";
        }

        description "OS-level parameters. It is advised to leave all settings at their defaults.";
    }
}
traffic-type-configuration.yang
module traffic-type-configuration {
    yang-version 1.1;
    namespace "http://metaswitch.com/yang/tas-vm-build/traffic-type-configuration";
    prefix "traffic-type";

    organization "Metaswitch Networks";
    contact "rvt-schemas@metaswitch.com";
    description "Traffic type configuration schema.";

    revision 2022-04-11 {
        description "Initial revision";
        reference "Metaswitch Deployment Definition Guide";
    }

    typedef signaling-traffic-type {
        type enumeration {
            enum internal {
                description "Internal signaling traffic.";
            }
            enum diameter {
                description "Diameter signaling traffic.";
            }
            enum ss7 {
                description "SS7 signaling traffic.";
            }
            enum sip {
                description "SIP signaling traffic.";
            }
            enum http {
                description "HTTP signaling traffic.";
            }
            enum custom-signaling {
                description "Applies to custom VMs only.
                                Custom signaling traffic.";
            }
            enum custom-signaling2 {
                description "Applies to custom VMs only.
                                Second custom signaling traffic.";
            }
        }
        description "The name of the signaling traffic type.";
    }

    typedef multihoming-signaling-traffic-type {
        type enumeration {
            enum diameter-multihoming {
                description "Second Diameter signaling traffic.";
            }
            enum ss7-multihoming {
                description "Second SS7 signaling traffic.";
            }
        }
        description "The name of the multihoming signaling traffic type.";
    }

    typedef traffic-type {
        type union {
            type signaling-traffic-type;
            type multihoming-signaling-traffic-type;
            type enumeration {
                enum management {
                    description "Management traffic.";
                }
                enum cluster {
                    description "Cluster traffic.";
                }
                enum access {
                    description "Access traffic.";
                }
            }
        }
        description "The name of the traffic type.";
    }
}
common-configuration.yang
module common-configuration {
    yang-version 1.1;
    namespace "http://metaswitch.com/yang/tas-vm-build/common-configuration";
    prefix "common";

    import ietf-inet-types {
        prefix "ietf-inet";
    }

    organization "Metaswitch Networks";
    contact "rvt-schemas@metaswitch.com";
    description "Common configuration schema.";

    revision 2019-11-29 {
        description
            "Initial revision";
        reference
            "Metaswitch Deployment Definition Guide";
    }

    grouping common-configuration-grouping {

        leaf shcm-domain {
            type ietf-inet:domain-name;
            description "Deprecated. Now set in
                         product-options.rvt.[mmt-gsm|mmt-cdma|smo|mag].shcm-vnf and
                         product-options.rvt.[mmt-gsm|mmt-cdma|smo|mag].ims-domain-name in SDF
                         file.";
        }

        leaf platform-operator-name {
            type string {
                pattern "[a-zA-Z0-9_-]+";
            }
            mandatory true;
            description "The platform operator name.";
        }

        description "Common configuration.";
    }
}
shcm-service-configuration.yang
module shcm-service-configuration {
    yang-version 1.1;
    namespace "http://metaswitch.com/yang/tas-vm-build/shcm-service-configuration";
    prefix "shcm-service";

    import vm-types {
        prefix "vmt";
        revision-date 2019-11-29;
    }

    import extensions {
        prefix "yangdoc";
        revision-date 2020-12-02;
    }

    organization "Metaswitch Networks";
    contact "rvt-schemas@metaswitch.com";
    description "ShCM service configuration schema.";

    revision 2019-11-29 {
        description
            "Initial revision";
        reference
            "Metaswitch Deployment Definition Guide";
    }

    typedef cache-strategy-type {
        type enumeration {
            enum no-cache {
                description "Do not use a cache.";
            }
            enum simple-cache {
                description "Use a simple cache.";
            }
            enum subscription-cache {
                description "Use a subscription cache.";
            }
        }
        description "The type used to define the caching strategy.";
    }

    grouping shcm-service-configuration-grouping {
        container diameter-sh {
            uses vmt:diameter-configuration-grouping;
            description "Diameter Sh configuration.";
            yangdoc:change-impact "external";
            yangdoc:change-impact "converges";
        }

        leaf health-check-user-identity {
            type vmt:sip-uri-type;
            mandatory true;
            description "The health check user identity.
                         This should match a test user configured in the HSS.";
        }

        leaf diameter-request-timeout-milliseconds {
            type uint32 {
                range "909 .. 27273";
            }
            default 5000;
            description "The Diameter request timeout (in milliseconds).";
        }

        container cassandra-locking {
            leaf backoff-time-milliseconds {
                type uint32 {
                    range "50 .. 5000";
                }
                default 5000;
                description "The time (in milliseconds) to backoff before re-attempting to obtain
                             the lock in Cassandra.";
            }

            leaf backoff-limit {
                type uint32 {
                    range "1 .. 10";
                 }
                default 5;
                description "The limit of times to backoff and re-attempt to obtain a lock in
                             Cassandra.";
            }

            leaf hold-time-milliseconds {
                type uint32 {
                    range "1000 .. 30000";
                 }
                default 12000;
                description "The time (in milliseconds) to hold a lock in Cassandra.";
            }

            description "Cassandra locking configuration.";
        }

        grouping cache-parameters-group {
            description "Parameters describing the configuration for this cache.";

            leaf cache-validity-time-seconds {
                type uint32 {
                    range "1..172800";
                }
                mandatory true;
                description "Cache validity time (in seconds).";
            }
        }

        container caching {
            list service-indications {
                key "service-indication";

                leaf service-indication {
                    type string;
                    mandatory true;
                    description "Service indication.";
                }

                leaf cache-strategy {
                    type cache-strategy-type;
                    default "subscription-cache";
                    description "Cache strategy.";
                }

                container cache-parameters {
                    when "../cache-strategy != 'no-cache'";
                    uses "cache-parameters-group";
                    description "Parameters describing the configuration for this cache.";
                }

                description "Service indications.";
            }

            list data-references-subscription-allowed {
                key "data-reference";

                leaf data-reference {
                    type enumeration {
                        enum ims-public-identity {
                            description "IMS public identity";
                        }
                        enum s-cscfname {
                            description "S-CSCF Name";
                        }
                        enum initial-filter-criteria {
                            description "Initial filter criteria";
                        }
                        enum service-level-trace-info {
                            description "Service level trace info";
                        }
                        enum ip-address-secure-binding-information {
                            description "IP address secure binding information";
                        }
                        enum service-priority-level {
                            description "Service priority level";
                        }
                        enum extended-priority {
                            description "Extended priority";
                        }
                    }
                    mandatory true;
                    description "The data reference.";
                }

                leaf cache-strategy {
                    type cache-strategy-type;
                    default "subscription-cache";
                    description "The cache strategy.";
                }

                container cache-parameters {
                    when "../cache-strategy != 'no-cache'";
                    uses "cache-parameters-group";
                    description "Parameters describing the configuration for this cache.";
                }

                description "List of data references for which subscription is permitted, and
                             their caching strategy configuration";
            }

            list data-references-subscription-not-allowed {
                key "data-reference";

                leaf data-reference {
                    type enumeration {
                        enum charging-information {
                            description "Charging information";
                        }
                        enum msisdn {
                            description "MS-ISDN";
                        }
                        enum psiactivation {
                            description "PSI activation";
                        }
                        enum dsai {
                            description "DSAI";
                        }
                        enum sms-registration-info {
                            description "SMS registration info";
                        }
                        enum tads-information {
                            description "TADS information";
                        }
                        enum stn-sr {
                            description "STN SR";
                        }
                        enum ue-srvcc-capability {
                            description "UE SRV CC capability";
                        }
                        enum csrn {
                            description "CSRN";
                        }
                        enum reference-location-information {
                            description "Reference location information";
                        }
                    }
                    mandatory true;
                    description "The data reference.";
                }

                leaf cache-strategy {
                    type enumeration {
                        enum no-cache {
                            description "Do not use a cache.";
                        }
                        enum simple-cache {
                            description "Use a simple cache.";
                        }
                    }
                    default "simple-cache";
                    description "The cache strategy.";
                }

                container cache-parameters {
                    when "../cache-strategy != 'no-cache'";
                    uses "cache-parameters-group";
                    description "Parameters describing the configuration for this cache.";
                }

                description "List of data references for which subscription is not permitted,
                             and their caching strategy configuration.";
            }

            description "Caching configuration.";
        }

        leaf debug-logging-enabled {
            type boolean;
            default false;
            description "Enable extensive logging for verification and issue diagnosis during
                         acceptance testing. Must not be enabled in production.";
        }

        description "ShCM service configuration.";
    }
}
shcm-vm-pool.yang
module shcm-vm-pool {
    yang-version 1.1;
    namespace "http://metaswitch.com/yang/tas-vm-build/shcm-vm-pool";
    prefix "shcm-vm-pool";

    import ietf-inet-types {
        prefix "ietf-inet";
    }

    import vm-types {
        prefix "vmt";
        revision-date 2019-11-29;
    }

    import extensions {
        prefix "yangdoc";
        revision-date 2020-12-02;
    }

    organization "Metaswitch Networks";
    contact "rvt-schemas@metaswitch.com";
    description "ShCM VM pool configuration schema.";

    revision 2019-11-29 {
        description
            "Initial revision";
        reference
            "Metaswitch Deployment Definition Guide";
    }

    grouping shcm-virtual-machine-pool {
        leaf deployment-id {
            type vmt:deployment-id-type;
            mandatory true;
            description "The deployment identifier. Used to form a unique VM identifier within the
                         VM host.";
        }

        leaf site-id {
            type vmt:site-id-type;
            mandatory true;
            description "Site ID for the site that this VM pool is a part of.";
        }

        leaf node-type-suffix {
            type vmt:node-type-suffix-type;
            default "";
            description "Suffix to add to the node type when deriving the group identifier. Should
                         normally be left blank.";
        }
        list cassandra-contact-points {
            key "management.ipv4 signaling.ipv4";

            uses vmt:cassandra-contact-point-interfaces;
            description "A list of Cassandra contact points. These should normally not be specified
                         as this option is intended for testing and/or special use cases.";
            yangdoc:change-impact "converges";
        }

        list additional-rhino-jvm-options {
            key "name";

            leaf "name" {
                type string;
                description "Name of the JVM option. Do not include '-D'.";
            }

            leaf "value" {
                type string;
                mandatory true;
                description "Value for the JVM option.";
            }

            description "Additional JVM options to use when running Rhino.
                         Should normally be left blank.";
        }

        list rhino-auth {
            key "username";
            min-elements 1;

            uses vmt:rhino-auth-grouping;

            description "List of Rhino users and their plain text passwords.";
            yangdoc:change-impact "converges";
        }

        list virtual-machines {
            key "vm-id";

            leaf vm-id {
                type string;
                mandatory true;
                description "The unique virtual machine identifier.";
            }

            unique diameter-sh-origin-host;
            leaf diameter-sh-origin-host {
                type ietf-inet:domain-name;
                mandatory true;
                description "Diameter Sh origin host.";
                yangdoc:change-impact "restart";
            }

            uses vmt:rvt-vm-grouping {
                // Rhino node IDs are not required for ShCM, as it's an unclustered product
                refine rhino-node-id {
                    mandatory false;
                }
            }

            description "Configured virtual machines.";
        }

        description "ShCM virtual machine pool.";
    }
}
sas-configuration.yang
module sas-configuration {
    yang-version 1.1;
    namespace "http://metaswitch.com/yang/tas-vm-build/sas-configuration";
    prefix "sas";

    import ietf-inet-types {
        prefix "ietf-inet";
    }

    organization "Metaswitch Networks";
    contact "rvt-schemas@metaswitch.com";
    description "SAS configuration schema.";

    revision 2019-11-29 {
        description
            "Initial revision";
        reference
            "Metaswitch Deployment Definition Guide";
    }

    grouping sas-configuration-grouping {
        leaf enabled {
            type boolean;
            default true;
            description "'true' enables the use of SAS, 'false' disables.";
        }

        container sas-connection {
            when "../enabled = 'true'";

            leaf system-type {
                type string {
                    length "1..255";
                    pattern "[a-zA-Z0-9.\\-_@:\"', ]+";
                }
                description "The SAS system type.
                             Only valid for custom nodes.
                             Defaults to the image name if not specified.";
            }

            leaf system-version {
                type string;
                description "The SAS system version.
                             Defaults to the VM version if not specified.";
            }

            leaf-list servers {
                type ietf-inet:ipv4-address-no-zone;
                min-elements 1;
                description "The list of SAS servers to send records to.";
            }

            description "Configuration for connecting to SAS.";
        }
        description "SAS configuration.";
    }

    grouping sas-instance-configuration-grouping {
        leaf system-name {
            type string {
                length "1..64";
            }
            description "The SAS system name.
                         Defaults to a string containing the deployment ID, system type,
                         and the node ID (or the VM index for unclustered nodes)
                         if not specified.";
        }
        description "SAS instance configuration.";
    }
}
mag-vm-pool.yang
module mag-vm-pool {
    yang-version 1.1;
    namespace "http://metaswitch.com/yang/tas-vm-build/mag-vm-pool";
    prefix "mag-vm-pool";

    import ietf-inet-types {
        prefix "ietf-inet";
    }

    import vm-types {
        prefix "vmt";
        revision-date 2019-11-29;
    }

    import extensions {
        prefix "yangdoc";
        revision-date 2020-12-02;
    }

    organization "Metaswitch Networks";
    contact "rvt-schemas@metaswitch.com";
    description "Management and Authentication Gateway (MAG) virtual machine pool configuration
                 schema.";

    revision 2019-11-29 {
        description
            "Initial revision";
        reference
            "Metaswitch Deployment Definition Guide";
    }

    grouping mag-virtual-machine-pool {

        leaf deployment-id {
            type vmt:deployment-id-type;
            mandatory true;
            description "The deployment identifier. Used to form a unique VM identifier within the
                         VM host.";
        }

        leaf site-id {
            type vmt:site-id-type;
            mandatory true;
            description "Site ID for the site that this VM pool is a part of.";
        }

        leaf node-type-suffix {
            type vmt:node-type-suffix-type;
            default "";
            description "Suffix to add to the node type when deriving the group identifier. Should
                         normally be left blank.";
        }

        list cassandra-contact-points {
            key "management.ipv4 signaling.ipv4";

            uses vmt:cassandra-contact-point-interfaces;
            description "Explicit list of Cassandra contact points. This should only be specified
                         for testing or special use cases. When left unspecified, the Cassandra
                         contact points will be automatically determined from the TSN VM pool IP
                         addresses.";
            yangdoc:change-impact "converges";
        }

        leaf-list xcap-domains {
            type ietf-inet:domain-name {
                pattern "xcap.*";
            }
            min-elements 1;
            description "The list of domains that the XCAP server will accept requests for.
                         Requests received by the XCAP server with a request URI containing a
                         domain not in this list will be rejected with a `404 Not Found`
                         error response.

                         Each domain must start with the string 'xcap'.

                         The domains that the BSF server will accept requests for
                         are derived from these XCAP domains,
                         by replacing the initial 'xcap' string with 'bsf'.
                         Requests received by the BSF server with a request URI containing a
                         domain not in this list (after replacement of 'xcap' with 'bsf')
                         will be rejected with a `404 Not Found` error response.";
            yangdoc:change-impact "contact";
        }

        list additional-rhino-jvm-options {
            key "name";

            leaf "name" {
                type string;
                description "Name of the JVM option. Do not include '-D'.";
            }

            leaf "value" {
                type string;
                mandatory true;
                description "Value for the JVM option.";
            }

            description "Additional JVM options to use when running Rhino.
                         Should normally be left blank.";
        }

        list rhino-auth {
            key "username";
            min-elements 1;

            uses vmt:rhino-auth-grouping;

            description "List of Rhino users and their plain text passwords.";
            yangdoc:change-impact "converges";
        }

        list rem-auth {
            key "username";
            min-elements 1;

            uses vmt:rem-auth-grouping;

            description "List of REM users and their plain text passwords.";
            yangdoc:change-impact "converges";
        }

        list virtual-machines {
            key "vm-id";

            leaf vm-id {
                type string;
                mandatory true;
                description "The unique virtual machine identifier.";
            }

            unique diameter-zh-origin-host;
            leaf diameter-zh-origin-host {
                type ietf-inet:domain-name;
                mandatory true;
                description "The origin host to use when sending Diameter Zh requests from this
                             node to the HSS.";
                yangdoc:change-impact "restart";
            }

            unique rhino-node-id;
            uses vmt:rvt-vm-grouping;

            description "Configured virtual machines.";
        }

        description "Management and Authentication Gateway (MAG) virtual machine pool.";
    }
}
bsf-configuration.yang
module bsf-configuration {
    yang-version 1.1;
    namespace "http://metaswitch.com/yang/tas-vm-build/bsf-configuration";
    prefix "bsf";

    import vm-types {
        prefix "vmt";
        revision-date 2019-11-29;
    }

    organization "Metaswitch Networks";
    contact "rvt-schemas@metaswitch.com";
    description "BSF configuration schema.";

    revision 2019-11-29 {
        description
            "Initial revision";
        reference
            "Metaswitch Deployment Definition Guide";
    }

    grouping bsf-configuration-grouping {

        // Zh is the interface between the BSF and the HSS
        container zh-diameter {
            uses vmt:diameter-configuration-grouping;
            description "Diameter Zh configuration.";
        }

        // HTTP RA address and port is hardcoded since it has to match nginx.conf.
        // Cassandra address and port is taken from the NAF filter config.

        leaf debug-logging-enabled {
            type boolean;
            default false;
            description "Enable extensive logging for verification and issue diagnosis during
                         acceptance testing. Must not be enabled in production.";
        }

        description "The Bootstrap Security Function (BSF) configuration";
    }
}
naf-filter-configuration.yang
module naf-filter-configuration {
    yang-version 1.1;
    namespace "http://metaswitch.com/yang/tas-vm-build/naf-filter-configuration";
    prefix "naf-filter";

    import cassandra-configuration {
        prefix "cassandra";
        revision-date 2019-11-29;
    }

    import extensions {
        prefix "yangdoc";
        revision-date 2020-12-02;
    }

    organization "Metaswitch Networks";
    contact "rvt-schemas@metaswitch.com";
    description "NAF filter configuration schema.";

    revision 2019-11-29 {
        description
            "Initial revision";
        reference
            "Metaswitch Deployment Definition Guide";
    }

    grouping naf-filter-configuration-grouping {
        leaf service-type {
            type uint8;
            default 0;
            description "Identifies the type of service the NAF filter is providing.
                         Recognised values for this setting are defined in Annex B of
                         3GPP TS 29.109. Affects which settings are selected from the GUSS.";
        }

        leaf service-id {
            type uint16;
            default 0;
            description "An operator specific identifier that uniquely identifies the service the
                         NAF filter is providing within the network. Affects which settings
                         are selected from the GUSS.";
        }

        leaf naf-group {
            type string;
            default "";
            description "Identifies the group that the NAF filter belongs to. Affects which
                         settings are selected from the GUSS.";
        }

        leaf-list force-auth-on-paths {
            type string;
            default "/rem/auth-check";
            description "A list of URL path prefixes for which authentication should always be
                         enforced, even for requests from trusted entities.";
        }

        container cassandra-connectivity {
            uses cassandra:cassandra-connectivity-grouping;
            description "Cassandra connectivity configuration for the NAF filter";
        }

        container nonce-options {
            uses nonce-options-grouping;
            description "Settings for how the NAF filter handles nonce values";
        }

        leaf debug-logging-enabled {
            type boolean;
            default false;
            description "Enable extensive logging for verification and issue diagnosis during
                         acceptance testing. Must not be enabled in production.";
        }

        leaf intercept-tomcat-errors {
            type boolean;
            default false;
            description "Let NGINX intercept Tomcat errors and replace them with default errors.
                         Use only on advice of your Customer Care representative.";
            yangdoc:change-impact "contact";
        }

        leaf http-version {
            type enumeration {
                enum 1.0 {
                    description "Use HTTP version 1.0.";
                }
                enum 1.1 {
                    description "Use HTTP version 1.1.";
                }
            }
            default 1.1;
            description "HTTP version to use on the Ub (BSF) and Ua/Ut (NAF) interfaces.";
            yangdoc:change-impact "contact";
        }

        description "The Network Application Functions (NAF) filter configuration.";
    }

    grouping nonce-options-grouping {
        leaf reuse-count {
            type uint32;
            default 100;
            description "The maximum number of times a nonce can be reused by incrementing the
                         nonce count.";
        }

        leaf lifetime-milliseconds {
            type uint32;
            default 180000;
            description "The time that a nonce remains valid for after being generated
                         (in milliseconds).";
        }

        leaf cache-capacity {
            type uint32 {
                range "1 .. max";
            }
            default 100000;
            description "The capacity of the nonce cache. This setting is only relevant when
                         using the local storage mechanism.";
        }

        leaf storage-mechanism {
            type enumeration {
                enum cassandra {
                    description "Use Cassandra storage.";
                }
                enum local {
                    description "Use local storage.";
                }
            }
            default local;
            description "The storage mechanism to use for the nonce cache.";
        }

        leaf nonce-cassandra-keyspace {
            type string;
            default "opencloud_nonce_info";
            description "The Cassandra keyspace for the nonce cache. This setting is only relevant
                         when using the Cassandra storage mechanism.";
        }

        description "Nonce option configuration.";
    }
}
home-network-configuration.yang
module home-network-configuration {
    yang-version 1.1;
    namespace "http://metaswitch.com/yang/tas-vm-build/home-network-configuration";
    prefix "home-network";

    import vm-types {
        prefix "vmt";
        revision-date 2019-11-29;
    }

    organization "Metaswitch Networks";
    contact "rvt-schemas@metaswitch.com";
    description "Home network configuration schema.";

    revision 2019-11-29 {
        description
            "Initial revision";
        reference
            "Metaswitch Deployment Definition Guide";
    }

    grouping home-network-configuration-grouping {
        leaf home-domain {
            type string {
                pattern "[a-zA-Z0-9@.:_/-]+";
            }
            description "Identifier for the home network.

                         Should match the value in the SIP: p-visited-network-id header inserted by
                         the S-CSCF or P-CSCF.

                         Used for determining whether a call is roaming or not.";
            reference "RFC 3455 section 4.3";
        }

        leaf home-network-country-dialing-code {
            type vmt:number-string {
                length "1 .. 4";
            }
            mandatory true;
            description "The home network country dialing code.";
        }

        leaf home-network-iso-country-code {
            type string {
                length "2";
                pattern "[A-Z]*";
            }
            description "The home network ISO country code.";
        }

        list home-plmn-ids {
            key "mcc";

            leaf mcc {
                type vmt:number-string {
                    length "3";
                }
                mandatory true;
                description "The Mobile Country Code (MCC).";
            }

            leaf-list mncs {
                type vmt:number-string {
                    length "2..3";
                }
                min-elements 1;
                description "The list of Mobile Network Codes (MNCs).";
            }

            description "The home Public Land Mobile Network (PLMN) identifiers.";
        }

        description "The home network configuration.";
    }
}
number-analysis-configuration.yang
module number-analysis-configuration {
    yang-version 1.1;
    namespace "http://metaswitch.com/yang/tas-vm-build/number-analysis-configuration";
    prefix "number-analysis";

    import vm-types {
        prefix "vmt";
        revision-date 2019-11-29;
    }

    organization "Metaswitch Networks";
    contact "rvt-schemas@metaswitch.com";
    description "Number analysis configuration schema.";

    revision 2019-11-29 {
        description
            "Initial revision";
        reference
            "Metaswitch Deployment Definition Guide";
    }

    typedef dialing-code-type {
        type string {
            pattern '[0-9]+';
        }
        description "A type that represents a dialing code.";
    }

    grouping number-analysis-configuration-grouping {
        container normalization {
            leaf international-prefix {
                type dialing-code-type {
                    length "1 .. 5"; // from http://www.idd.com.au/international-dialling-codes.php
                }
                mandatory true;
                description "The international prefix. 1 to 5 digits in length.";
            }

            leaf min-normalizable-length {
                type uint8 {
                    range "0 .. 31";
                }
                mandatory true;
                description "The minimum normalizable length.";
            }

            leaf national-prefix {
                type dialing-code-type {
                    length "1 .. 5";
                }
                mandatory true;
                description "The national prefix. 1 to 5 digits in length.";
            }

            leaf network-dialing-code {
                type dialing-code-type {
                    length "1 .. 3";
                }
                mandatory true;
                description "The network dialing code. 1 to 3 digits in length.";
            }

            leaf normalize-to {
                type enumeration {
                    enum international {
                        description "Normalize to international format.";
                    }
                    enum national {
                        description "Normalize to national format.";
                    }
                }
                default international;
                description "The format to normalize to when comparing numbers, sending outgoing
                             requests and checking whether numbers are normalizable.";
            }

            description "Normalization configuration.";
        }

        leaf-list non-provisionable-uris {
            type union {
                type vmt:sip-or-tel-uri-type;
                type vmt:phone-number-type;
            }
            description "List of URIs that cannot be provisioned.";
        }

        leaf assume-sip-uris-are-phone-numbers {
            type boolean;
            default true;
            description "Set to 'true' to attempt to extract phone numbers from SIP URIs
                        even if they don't contain the 'user=phone' parameter.
                        Set to 'false' to disable this behaviour.";
        }

        description "Number analysis configuration.";
    }
}
mmt-gsm-vm-pool.yang
module mmt-gsm-vm-pool {
    yang-version 1.1;
    namespace "http://metaswitch.com/yang/tas-vm-build/mmt-gsm-vm-pool";
    prefix "mmt-gsm-vm-pool";

    import ietf-inet-types {
        prefix "ietf-inet";
    }

    import vm-types {
        prefix "vmt";
        revision-date 2019-11-29;
    }

    import extensions {
        prefix "yangdoc";
        revision-date 2020-12-02;
    }

    organization "Metaswitch Networks";
    contact "rvt-schemas@metaswitch.com";
    description "MMTel Services (MMT) VM pool configuration schema.";

    revision 2019-11-29 {
        description
            "Initial revision";
        reference
            "Metaswitch Deployment Definition Guide";
    }

    grouping mmt-gsm-virtual-machine-pool {

        leaf deployment-id {
            type vmt:deployment-id-type;
            mandatory true;
            description "The deployment identifier. Used to form a unique VM identifier within the
                         VM host.";
        }

        leaf site-id {
            type vmt:site-id-type;
            mandatory true;
            description "Site ID for the site that this VM pool is a part of.";
        }

        leaf node-type-suffix {
            type vmt:node-type-suffix-type;
            default "";
            description "Suffix to add to the node type when deriving the group identifier. Should
                         normally be left blank.";
        }

        list cassandra-contact-points {
            key "management.ipv4 signaling.ipv4";

            uses vmt:cassandra-contact-point-interfaces;
            description "Explicit list of Cassandra contact points. This should only be specified
                         for testing or special use cases. When left unspecified, the Cassandra
                         contact points will be automatically determined from the TSN VM pool IP
                         addresses.";
            yangdoc:change-impact "converges";
        }

        leaf cluster-dns-name {
            type ietf-inet:domain-name;
            description "Deprecated. Now set in product-options.rvt.mmt-gsm.mmt-vnf and
                         product-options.rvt.mmt-gsm.ims-domain-name in SDF file.";
        }

        list additional-rhino-jvm-options {
            key "name";

            leaf "name" {
                type string;
                description "Name of the JVM option. Do not include '-D'.";
            }

            leaf "value" {
                type string;
                mandatory true;
                description "Value for the JVM option.";
            }

            description "Additional JVM options to use when running Rhino.
                         Should normally be left blank.";
        }

        list rhino-auth {
            key "username";
            min-elements 1;

            uses vmt:rhino-auth-grouping;

            description "List of Rhino users and their plain text passwords.";
            yangdoc:change-impact "converges";
        }

        list virtual-machines {

            key "vm-id";

            leaf vm-id {
                type string;
                mandatory true;
                description "The unique virtual machine identifier.";
            }

            unique rhino-node-id;
            uses vmt:rvt-vm-grouping;

            unique per-node-diameter-ro/diameter-ro-origin-host;
            container per-node-diameter-ro {
                when "../../../sentinel-volte/charging/gsm-online-charging-type = 'ro'
                     or ../../../sentinel-volte/charging/cdma-online-charging-enabled = 'true'";
                description "Configuration for Diameter Ro.";
                leaf diameter-ro-origin-host {
                    type ietf-inet:domain-name;
                    mandatory true;
                    description "The Diameter Ro origin host.

                                 The value that will be used for the Origin-Host AVP when sending
                                 messages to the OCS";
                    yangdoc:change-impact "restart";
                }
            }

            unique per-node-diameter-rf/diameter-rf-origin-host;
            container per-node-diameter-rf {
                when "../../../sentinel-volte/charging/rf-charging";

                description "Configuration for Diameter Rf.";
                leaf diameter-rf-origin-host {
                    type ietf-inet:domain-name;
                    mandatory true;
                    description "The Diameter Rf origin host.

                                 The value that will be used for the Origin-Host AVP when sending
                                 messages to the CDF";
                    yangdoc:change-impact "restart";
                }
            }

            description "Configured virtual machines.";
        }

        description "MMT GSM virtual machine pool.";
    }
}
sentinel-volte-configuration.yang
module sentinel-volte-configuration {
yang-version 1.1;
namespace "http://metaswitch.com/yang/tas-vm-build/sentinel-volte-configuration";
prefix "volte";
import vm-types {
prefix "vmt";
revision-date 2019-11-29;
}
import ietf-inet-types {
prefix "ietf-inet";
}
import diameter-rf-configuration {
prefix "rf";
revision-date 2019-11-29;
}
import diameter-ro-configuration {
prefix "ro";
revision-date 2019-11-29;
}
import privacy-configuration {
prefix "privacy";
revision-date 2020-05-04;
}
import extensions {
prefix "yangdoc";
revision-date 2020-12-02;
}
organization "Metaswitch Networks";
contact "rvt-schemas@metaswitch.com";
description "Sentinel VoLTE configuration schema.";
revision 2019-11-29 {
description
"Initial revision";
reference
"Metaswitch Deployment Definition Guide";
}
grouping sentinel-volte-configuration-grouping {
leaf session-replication-enabled {
type boolean;
default true;
description "When enabled, SIP dialogs and charging sessions can be failed over to
other cluster nodes if the original node fails.
Set to 'true' to enable session replication. Set to 'false' to disable.";
yangdoc:change-impact "restart";
}
container scc {
must "fetch-cmsisdn-source != 'EXTENDED_MSISDN'
or udr-included-identities = 'IMPU_AND_IMPI'" {
error-message "When `fetch-cmsisdn-source` is set to `EXTENDED_MSISDN`,"
+ " `udr-included-identities` MUST be set to `IMPU_AND_IMPI`.";
}
leaf scc-mobile-core-type {
type enumeration {
enum "gsm" {
description "GSM";
}
enum "cdma" {
description "CDMA";
}
}
mandatory true;
description "The SCC mobile core type: 'GSM' or 'CDMA'.";
}
leaf fetch-cmsisdn-source {
type enumeration {
enum "MSISDN" {
description "MS-ISDN";
}
enum "EXTENDED_MSISDN" {
description "Extended MS-ISDN";
}
}
default "MSISDN";
description "The fetch Correlation Mobile Station ISDN (CMS-ISDN) source.
If set to 'EXTENDED_MSISDN', `udr-included-identities` MUST
be set to 'IMPU_AND_IMPI'.";
}
leaf udr-included-identities {
type enumeration {
enum "IMPU" {
description "IMPU";
}
enum "IMPU_AND_IMPI" {
description "IMPU_AND_IMPI";
}
}
mandatory true;
description "Defines which IMS user identities to include in outgoing user data
requests. Can be either 'IMPU' or 'IMPU_AND_IMPI'.
Must be set to 'IMPU_AND_IMPI' if `fetch-cmsisdn-source` is set
to 'EXTENDED_MSISDN'";
}
container service-continuity {
leaf atu-sti {
type vmt:sip-uri-type;
description "Deprecated. Now set in product-options.rvt.atu-sti-hostname"
+ " in SDF file.";
}
leaf atcf-update-timeout-milliseconds {
type uint32;
default 2000;
description "The Access Transfer Control Function (ATCF) update timeout";
}
leaf stn-sr {
type vmt:number-string;
mandatory true;
description "The Session Transfer Number for SRVCC (STN-SR).";
}
description "Service continuity configuration.";
}
container service-centralisation {
leaf inbound-ss7-address {
type vmt:sccp-address-type;
mandatory true;
description "The originating SCCP address.";
yangdoc:change-impact "restart";
}
leaf use-direct-icscf-routing {
type boolean;
mandatory true;
description "If 'true', the configured I-CSCF URI will be added to the route
header of the reoriginated INVITE. If 'false', the HSS will be
queried for the S-CSCF URI to use for the subscriber.";
}
leaf generated-pvni-template {
type string;
mandatory true;
description "A template string for the P-Visited-Network-Information header
generated in the reorigination, where {mnc} and {mcc} are
replaced with the MNC and MCC respectively.";
}
leaf police-originating-requests {
type boolean;
mandatory true;
description "Police incoming originating requests, and reject attempts to
hijack the call.";
}
container simple-imrn-pool {
must "minimum-correlation-id < maximum-correlation-id" {
error-message "When configuring simple-imrn-pool config,"
+ " minimum-correlation-id must be less than"
+ " maximum-correlation-id.";
}
leaf minimum-correlation-id {
type uint64 {
range "0 .. 999999999999999999";
}
mandatory true;
description "The minimum correlation ID value used in the cluster.
0 to maximum-correlation-id.";
}
leaf maximum-correlation-id {
type uint64 {
range "0 .. 999999999999999999";
}
mandatory true;
description "The maximum correlation ID value used in the cluster. 0 to
(10^18-1).";
}
leaf number-of-digits-in-correlation-id {
type uint8 {
range "1 .. 18";
}
mandatory true;
description "The number of digits the correlation ID should have.
Minimum of number of digits in maximum-correlation-id
to 18 maximum.";
}
description "Simple IMRN pool config for mainline case.";
}
container scc-gsm-service-centralisation {
when "../../scc-mobile-core-type = 'gsm'";
container gsm-imrn-formation {
leaf routing-to-internal-network-number-allowed {
type boolean;
mandatory true;
description "If set to 'true', routing to an internal network number is
allowed.";
}
leaf nature {
type enumeration {
enum "SUBSCRIBER" {
description "Subscriber";
}
enum "UNKNOWN" {
description "Unknown";
}
enum "NATIONAL" {
description "National";
}
enum "INTERNATIONAL" {
description "International";
}
enum "NETWORK_SPECIFIC" {
description "Network specific";
}
enum "NETWORK_ROUTING_NATIONAL" {
description "Network routing national";
}
enum "NETWORK_ROUTING_NETWORK_SPECIFIC" {
description "Network routing network specific";
}
enum "NETWORK_ROUTING_WITH_CALLED_DIRECTORY" {
description "Network routing with call directory";
}
}
mandatory true;
description "The type of call. Used when forwarding a call.";
}
leaf numbering-plan {
type enumeration {
enum "SPARE_0" {
description "Spare 0";
}
enum "ISDN" {
description "ISDN";
}
enum "SPARE_2" {
description "Spare 2";
}
enum "DATA" {
description "Data";
}
enum "TELEX" {
description "Telex";
}
enum "NATIONAL_5" {
description "National 5";
}
enum "NATIONAL_6" {
description "National 6";
}
enum "SPARE_7" {
description "Spare 7";
}
}
mandatory true;
description "The numbering plan to be used when forwarding a call.";
}
description "GSM IMRN formation configuration.";
}
leaf bypass-terminating-forwarding-if-served-user-not-ims-registered {
type boolean;
mandatory true;
description "If true, reorigination is skipped if the subscriber
is not registered in the IMS network.";
}
leaf always-term-reoriginate-if-served-user-is-roaming {
type boolean;
default false;
description "If true, roaming terminating sessions will always be
reoriginated (regardless of IMS registration).";
}
description "SCC GSM Service Centralisation Configuration.";
}
container scc-cdma-service-centralisation {
when "../../scc-mobile-core-type = 'cdma'";
container scc-cdma-actions {
typedef action {
type enumeration {
enum "accessDenied_notUsed" {
description "Access Denied - Not Used";
}
enum "accessDenied_unassignedDirectoryNumber" {
description "Access Denied - Unassigned Directory Number";
}
enum "accessDeniedReason_inactive" {
description "Access Denied, Reason - Inactive";
}
enum "accessDeniedReason_busy" {
description "Access Denied, Reason - Busy";
}
enum "accessDeniedReason_terminationDenied" {
description "Access Denied, Reason - Termination Denied";
}
enum "accessDeniedReason_noPageResponse" {
description "Access Denied, Reason - No Page Response";
}
enum "accessDeniedReason_unavailable" {
description "Access Denied, Reason - Unavailable";
}
enum "accessDeniedReason_serviceRejectedByMS" {
description "Access Denied, Reason - Service Rejected By MS";
}
enum "accessDeniedReason_serviceRejectedByTheSystem" {
description "Access Denied, Reason - Service Rejected By The
System";
}
enum "accessDeniedReason_serviceTypeMismatch" {
description "Access Denied, Reason - Service Type Mismatch";
}
enum "accessDeniedReason_serviceDenied" {
description "Access Denied, Reason - Service Denied";
}
enum "allowCallToContinue" {
description "Allow Call To Continue";
}
}
description "SCC CDMA actions";
}
leaf action-on-unsupported-trigger {
type action;
mandatory true;
description "Action to take when an unexpected trigger is received.";
}
leaf action-on-failed-to-allocate-routing-number {
type action;
mandatory true;
description "Action to take when there is a failure generating a
routing number.";
}
leaf default-failure-action {
type action;
mandatory true;
description "Default action to take on error.";
}
description "SCC CDMA actions configuration.";
}
container cdma-imrn-formation {
leaf imrn-type-of-digits {
type enumeration {
enum "DIALED_OR_CALLED_PARTY_NUMBER" {
description "Dialed Number or Called Party Number";
}
enum "CALLING_PARTY_NUMBER" {
description "Calling Party Number";
}
enum "CALLER_INTERACTION" {
description "Caller Interaction";
}
enum "ROUTING_NUMBER" {
description "Routing Number";
}
enum "BILLING_NUMBER" {
description "Billing Number";
}
enum "DESTINATION_NUMBER" {
description "Destination Number";
}
enum "LATA" {
description "LATA";
}
enum "CARRIER" {
description "Carrier Number";
}
}
mandatory true;
description "The type of digits used in the generated IMRN.";
}
leaf imrn-nature-of-number {
type enumeration {
enum "NATIONAL" {
description "National";
}
enum "INTERNATIONAL" {
description "International";
}
}
mandatory true;
description "The nature field of the IMRN generated.";
}
leaf imrn-numbering-plan {
type enumeration {
enum "UNKNOWN" {
description "Unknown Numbering Plan";
}
enum "ISDN" {
description "ISDN Numbering";
}
enum "TELEPHONY" {
description "Telephony Numbering (ITU-T E.164, E.163)";
}
enum "DATA" {
description "Data Numbering (ITU-T X.121)";
}
enum "TELEX" {
description "Telex Numbering (ITU-T F.69)";
}
enum "MARITIME_MOBILE" {
description "Maritime Mobile Numbering";
}
enum "LAND_MOBILE" {
description "Land Mobile Numbering (ITU-T E.212)";
}
enum "PRIVATE" {
description "Private Numbering Plan (service provider defined)";
}
enum "PC_SSN" {
description "SS7 Point Code and Subsystem Number";
}
enum "IP_ADDRESS" {
description "Internet Protocol Address";
}
}
mandatory true;
description "The numbering plan field of the IMRN generated.";
}
description "CDMA IMRN formation configuration.";
}
leaf bypass-forwarding-if-served-user-not-ims-registered {
type boolean;
mandatory true;
description "If true, reorigination is skipped if the subscriber
is not registered in the IMS network.";
}
description "SCC CDMA Service Centralisation Configuration.";
}
description "SCC Service Centralisation Configuration.";
}
container tads {
leaf csrn-prefix {
type string;
description "The Circuit Switched Routing Number (CSRN) prefix.";
}
leaf address-source-for-scc-tads {
type enumeration {
enum "CMSISDN" {
description "Use the Correlation Mobile Station International
Subscriber Directory Number (CMSISDN) for SCC TADS.";
}
enum "MSRN" {
description "Use the Mobile Station Roaming Number (MSRN) for SCC TADS.
Only valid when the scc-mobile-core-type is 'gsm'.";
}
enum "TLDN" {
description "Use the Temporary Local Directory Number (TLDN) for SCC
TADS. Only valid when the scc-mobile-core-type is
'cdma'.";
}
}
must "(. != 'MSRN' and ../../scc-mobile-core-type = 'cdma')
or ../../scc-mobile-core-type = 'gsm'" {
error-message "'address-source-for-scc-tads' cannot be set to 'MSRN' when"
+ " 'scc-mobile-core-type' is set to 'cmda'.";
}
must "(. != 'TLDN' and ../../scc-mobile-core-type = 'gsm')
or ../../scc-mobile-core-type = 'cdma'" {
error-message "'address-source-for-scc-tads' cannot be set to 'TLDN' when"
+ "'scc-mobile-core-type' is set to 'gsm'";
}
mandatory true;
description "Which value should be used for routing TADS requests to. Valid
values are 'MSISDN', 'MSRN' (GSM only), and 'TLDN' (CDMA only)";
}
container voice-over-ps-support {
presence "Indicates that voice over PS support is required.";
leaf request-user-identity-type {
type enumeration {
enum "IMPU" {
description "The IMS Public ID user identity type.";
}
enum "MSISDN" {
description "The MS-ISDN user identity type.";
}
enum "IMPU_IMPI" {
description "The IMPU IMPI user identity type.";
}
enum "MSISDN_IMPI" {
description "The MS-ISDN IMPI user identity type.";
}
}
mandatory true;
description "The user identity type to use in requests.";
}
description "Configuration for voice over PS support.";
}
leaf wlan-allowed {
type boolean;
default false;
description "Set to 'true' if W-LAN is allowed. Set to 'false' to disallow.";
}
leaf tads-identity-for-terminating-device {
type enumeration {
enum "IMS_PUBLIC_IDENTITY" {
description "Send TADS requests to the IMS public identity of the
terminating device";
}
enum "SIP_INSTANCE" {
description "Send TADS requests to the 'sip.instance' of the
terminating device";
}
enum "PATH_FROM_SIP_INSTANCE" {
description "Send TADS requests to the 'path' header within the
'sip.instance' of the terminating device";
}
}
default "IMS_PUBLIC_IDENTITY";
description "The identity of the terminating device that TADS will send the
request to.";
}
leaf end-session-error-code {
type uint32 {
range "400 .. 699";
}
default 480;
description "The SIP response code that is returned when a session is ended
due to an error.";
}
leaf cs-routing-via-icscf {
type boolean;
default true;
description "When enabled INVITE requests destined for the CS network will be
sent directly via the I-CSCF, bypassing the S-CSCF.";
}
container on-sequential-routing {
leaf tads-timer-max-wait-milliseconds {
type uint32 {
range "500 .. 5000";
}
mandatory true;
description "Time to wait (in milliseconds) for a potentially better forked
response.";
}
leaf-list ps-fallback-response-codes {
type vmt:sip-status-code {
range "400 .. 699";
}
description "List of SIP response codes that will trigger attempts of more
routes after a PS attempt.";
}
description "Configuration for TADS sequential routing";
}
container on-parallel-routing {
leaf parallel-timer-max-wait-milliseconds {
type uint32 {
range "0 .. 30000";
}
mandatory true;
description "Time to wait (in milliseconds) for a final response.";
}
leaf release-all-legs-on-busy {
type boolean;
mandatory true;
description "When enabled TADS will end all parallel forks on the first
busy response (486).";
}
description "Configuration for TADS parallel routing";
}
container sri-requests-to-hlr {
when "../../scc-mobile-core-type = 'gsm'";
leaf set-suppress-tcsi-flag {
type boolean;
default false;
description "If enabled, when sending an SRI request to the HLR the feature
will set the suppress T-CSI flag on the request";
}
leaf set-suppress-announcement-flag {
type boolean;
default false;
description "If enabled, when sending an SRI request to the HLR on a
terminating call the feature will set the
'Suppression of Announcement' flag on the request.";
}
description "Configuration for SRI requests sent to the HLR";
}
container suppress-cs-domain-call-diversion {
presence "Suppress call diversion in CS domain";
leaf use-diversion-counter-parameter {
type boolean;
mandatory true;
description "When true, use diversion counter parameter, otherwise use
number of headers.";
}
leaf cs-domain-diversion-limit {
type uint32 {
range "1 .. max";
}
mandatory true;
description "The configured diversion limit in the CS network to suppress
further call diversion.";
}
description "When present, requests destined to the CS domain will contain a
Diversion header to suppress call diversion in the CS domain
side of the call.";
}
description "TADS configuration.";
}
description "SCC configuration.";
}
container mmtel {
container announcement {
leaf announcements-media-server-uri {
type vmt:sip-or-tel-uri-type;
mandatory true;
description "The URI of the media server used to play announcements.";
}
leaf announcements-no-response-timeout-milliseconds {
type uint32 {
range "1 .. max";
}
default 1000;
description "The maximum time to wait (in milliseconds) for the media server
to respond before cancelling an announcement.";
}
list announcements {
must "repeat > '-1' or interruptable = 'true'" {
error-message "'interruptable' must be set to 'true' if 'repeat' is set to
'-1'.";
}
key "id";
leaf id {
type uint32 {
range "1 .. max";
}
mandatory true;
description "The ID for this announcement.";
}
leaf description {
type string;
description "A description of what this announcement is used for.";
}
leaf announcement-url {
type string;
mandatory true;
description "The file URL of this announcement on the media server.";
}
leaf delay-milliseconds {
type uint32;
mandatory true;
description "The delay interval (in milliseconds) between repetitions
of this announcement.";
}
leaf duration-milliseconds {
type uint32;
mandatory true;
description "The maximum duration (in milliseconds) of this announcement.";
}
leaf repeat {
type int32 {
range "-1 .. max";
}
mandatory true;
description "How many times the media server should repeat this
announcement. A value of -1 will cause the announcement
to repeat continuously until it is interrupted.";
}
leaf mimetype {
type string;
description "The MIME content type for this announcement, e.g audio/basic,
audio/G729, audio/mpeg, video/mpeg.";
}
leaf interruptable {
type boolean;
mandatory true;
description "Determines whether this announcement can be interrupted. This
only applies to announcements played after the call is
established.";
}
leaf suspend-charging {
type boolean;
mandatory true;
description "Determines whether online charging should be suspended while
this announcement is in progress. This only applies to
announcements played after the call is established.";
}
leaf end-session-on-failure {
type boolean;
mandatory true;
description "Determines whether the session should be terminated if this
announcement fails to play. This only applies to
announcements played during call setup.";
}
leaf enforce-one-way-media {
type boolean;
mandatory true;
description "Determines whether to enforce one-way media from the media
server to the party hearing the announcement. This only applies
to announcements played after the call is established.";
}
leaf locale {
type string;
description "The language/language variant used in the announcement.";
}
description "A list containing the configuration for each announcement that
the system can play.";
}
container default-error-code-announcement {
presence "Enable default error code announcement";
leaf announcement-id {
type vmt:announcement-id-type;
mandatory true;
description "The ID of the announcement to be played to the calling party
when an error response is received during call setup.";
}
leaf end-call-with-487-response {
type boolean;
description "Determines whether the call should be ended with a 487
error code rather than the error code that triggered the
announcement.";
}
description "Configuration for the default announcement that is played when
an error response is received during call setup.";
}
list error-code-announcements {
key error-code;
leaf error-code {
type uint16 {
range "400..699";
}
mandatory true;
description "The SIP error response code that this entry applies to.";
}
leaf disable-announcement {
type boolean;
default false;
description "If set to 'true', no announcement will be played for this
error code, overriding any default error code announcement
that has been set.";
}
leaf announcement-id {
when "../disable-announcement = 'false'";
type vmt:announcement-id-type;
description "ID of the announcement to play when this error code is
received.";
}
leaf end-call-with-487-response {
type boolean;
description "Determines whether to use the original received error code,
or a 487 error code to end the call after the announcement.";
}
description "A list containing configuration for assigning specific
announcements for specific SIP error response codes received during
call setup.";
}
description "Configuration for SIP announcements.";
}
container hss-queries-enabled {
leaf odb {
type boolean;
default false;
description "Determines whether the HSS will be queried for operator
determined barring (ODB) subscriber data.";
}
leaf metaswitch-tas-services {
type boolean;
default false;
description "Determines whether the HSS will be queried for Metaswitch TAS
services subscriber data.";
}
description "Configuration for enabling optional queries for certain types of
subscriber data in the HSS.";
}
leaf determine-roaming-from-hlr {
when "../../scc/scc-mobile-core-type = 'gsm'";
type boolean;
default true;
description "Determines whether location information from the GSM HLR should be
used to determine the roaming status of the subscriber.";
}
container conferencing {
leaf conference-mrf-uri {
type vmt:sip-uri-type;
mandatory true;
description "The URI for the Media Resource Function (MRF) used for
conferencing.";
}
leaf route-to-mrf-via-ims {
type boolean;
mandatory true;
description "Set to 'true' to add the I-CSCF to the 'route' header of messages
towards the MRF. Set to 'false' and the messages will be routed
directly to the MRF from the TAS.";
}
leaf msml-vendor {
type enumeration {
enum Dialogic {
description "Dialogic";
}
enum Radisys {
description "Radisys";
}
}
mandatory true;
description "The Media Server Markup Language (MSML) vendor, for Conferencing.";
}
leaf enable-scc-conf-handling {
type boolean;
default true;
description "Determines the SIP signaling used to draw conference participants
from their consulting call into the conference call. When 'false'
the 3GPP standard conferencing signaling will be used, when 'true'
a more reliable method based on SCC access transfer procedures will
be used instead.";
}
leaf root-on-selector {
type boolean;
default true;
description "Determines where the root element is placed when generating MSML.
When 'false' it will be placed directly on the video layout
element, when 'true' its will be set on the selector element on
the video layout element.";
}
leaf-list conference-factory-psi-aliases {
type vmt:sip-or-tel-uri-type;
description "A list of conference factory PSIs to use in addition to the
standard conference factory PSIs, as per TS 23.003, which are:
- 'sip:mmtel@conf-factory.<HOME-DOMAIN>'
- 'sip:mmtel@conf-factory.ims.mnc<MNC>.mcc<MCC>.3gppnetwork.org'
- 'sip:mmtel@conf-factory.ics.mnc<MNC>.mcc<MCC>.3gppnetwork.org'
Within values '<HOME-DOMAIN>' matches the value defined for
/home-network/home-domain.
Within values, if both '<MCC>' and '<MNC>' are used in an entry,
they will match any MCC/MNC pair defined in
/home-network/home-plmn-ids.";
}
leaf maximum-participants {
type uint8 {
range "3 .. max";
}
mandatory true;
description "The maximum number of participants that are allowed in a single
conference call.";
}
leaf allow-video-conference-calls {
type boolean;
mandatory true;
description "Set to 'true' to allow video to be used in conference calls.";
}
leaf conference-view-removal-delay-milliseconds {
type uint32;
mandatory true;
description "Delay (in milliseconds) after a conference ends before
conference view information in cleaned up.";
}
container subscription {
leaf default-subscription-expiry-seconds {
type uint32;
default 3600;
description "Time (in seconds) for a subscription to last if the SUBSCRIBE
message doesn't contain an Expires header.";
}
leaf min-subscription-expiry-seconds {
type uint32;
default 5;
description "Minimum time (in seconds) that a subscription is allowed to
last for. SUBSCRIBE requests with an Expires value lower than
this are rejected.";
}
leaf polling-interval-seconds {
type uint32;
default 5;
description "Interval (in seconds) between of polls for changes to the
conference view.";
}
description "Configuration for conference event subscriptions.";
}
description "Configuration for the MMTel conferencing service.";
}
container international-and-roaming {
leaf non-international-format-number-is-national {
type boolean;
default false;
description "Set to 'true' to treat non-international numbers (no leading '+')
as national. Set to 'false' to disable this behaviour.";
}
leaf end-call-if-no-visited-network {
type boolean;
default false;
description "Set to 'true' to end the call if no visited network can be
determined. Set to 'false' to allow the call to proceed.";
}
leaf use-mcc-specific {
type boolean;
default false;
description "Set to 'true' to determine international status using different
configuration for each access network MCC.
Set to 'false' to use the default configuration.";
}
leaf min-length {
type uint8 {
range "0 .. 31";
}
mandatory true;
description "Minimum length that the destination address must be before doing
a check for international and roaming status.";
}
description "Configuration for determining international and roaming status.";
}
container north-american-numbering-plan-analysis {
leaf enable-nanp-analysis {
type boolean;
default false;
description "Whether to analyse numbers according to the North American
Numbering Plan, using this to determine location information.";
}
description "Configuration for analysing numbers according to the North American
Numbering Plan.";
}
container international-call-management {
container default-international-call-management {
leaf bar-calls-with-missing-prefix {
type boolean;
default false;
description "Whether calls dialed without the international prefix are
barred.";
}
leaf bar-calls-with-missing-prefix-announcement-id {
when "../bar-calls-with-missing-prefix = 'true'";
type vmt:announcement-id-type;
description "The ID of the announcement to play when calls dialed without
the international prefix are barred.";
}
leaf international-call-announcement-id {
type vmt:announcement-id-type;
description "The ID of the announcement to play to the calling party when an
international call is made.";
}
description "The default handling of calls determined to be international.";
}
list call-management-by-country-code {
when "../../north-american-numbering-plan-analysis/enable-nanp-analysis
= 'true'" ;
key iso-country-code;
leaf iso-country-code {
type string {
length "2";
pattern "[A-Z]*";
}
description "The determined ISO country code of the called party if
within the NANP.";
}
leaf bar-calls-with-missing-prefix {
type boolean;
default false;
description "Whether to bar calls to this destination that were dialled
without an international prefix.";
}
leaf bar-calls-with-missing-prefix-announcement-id {
when "../bar-calls-with-missing-prefix = 'true'";
type vmt:announcement-id-type;
description "The ID of the announcement to play if calls to this destination
were barred.";
}
leaf international-call-announcement-id {
type vmt:announcement-id-type;
description "The ID of the announcement to play before international calls
to this destination are connected.";
}
description "The configuration of international NANP calls by destination
country. Only available if North American Numbering Plan
analysis is enabled.";
}
description "Configuration for barring and announcements of calls determined to be
international.";
}
container call-diversion {
uses vmt:feature-announcement {
refine "announcement/announcement-id" {
mandatory false;
}
augment "announcement" {
leaf voicemail-announcement-id {
when "../../forward-to-voicemail";
type vmt:announcement-id-type;
description "The ID of the announcement to be played when forwarding
to a recognized voicemail server.";
}
description "Add voicemail-specific announcement.";
}
}
container mmtel-call-diversion {
leaf max-diversions {
type uint32;
mandatory true;
description "Maximum number of diversions that may be made while attempting
to establish a session.";
}
leaf max-diversion-action {
type enumeration {
enum REJECT {
description "Reject the call.";
}
enum DELIVER_TO_FIXED_DESTINATION {
description "Direct the call to the address specified in
max-diversion-fixed-destination.";
}
enum DELIVER_TO_SUBSCRIBERS_VOICEMAIL_SERVER {
description "Direct the call to the subscriber's voicemail
server.";
}
}
mandatory true;
description "Action to take when the maximum number of diversions is
exceeded.";
}
leaf max-diversion-fixed-destination {
when "../max-diversion-action = 'DELIVER_TO_FIXED_DESTINATION'";
type vmt:sip-or-tel-uri-type;
description "The address to deliver communication to when the maximum
number of diversions is exceeded and ../max-diversion-action
is set to 'DELIVER_TO_FIXED_DESTINATION'.";
}
leaf no-reply-timeout-seconds {
type uint8 {
range "5 .. 180";
}
mandatory true;
description "Time to wait (in seconds) for a reply before diverting due to
a no reply rule. This value is the network default, and can
be overridden in subscriber data.";
}
leaf add-orig-tag {
type boolean;
default true;
description "Set to 'true' to add an 'orig' tag to the Route header when
diverting a call.";
}
leaf-list diversion-limit-exempt-uris {
type vmt:sip-or-tel-uri-type;
description "List of URIs may still be diverted to after the max diversions
limit has been reached.";
}
leaf suppress-for-cs-terminating-domain {
type boolean;
mandatory true;
description "Set to 'true' to suppress call diversion behaviour for calls
terminating in the CS domain.";
}
leaf prefer-subscriber {
type boolean;
mandatory true;
description "Set to 'true' to have subscriber configuration take
precedence over operator configuration.";
}
leaf default-target-uri {
type vmt:sip-or-tel-uri-type;
description "The address to forward to if an operator or subscriber
forward-to rule has no target specified.";
}
leaf-list additional-not-reachable-status-codes {
type vmt:sip-status-code {
range "300..301|303..399|400..403|405..407|409..485|488..699";
}
description "List of response codes that can trigger a 'not-reachable'
diversion rule (in addition to those outlined in the MMTel
call diversion specification). The following status codes
cannot be used: 1xx, 2xx, 302, 404, 408, 486, 487.";
}
leaf allow-not-reachable-during-alerting {
type boolean;
mandatory true;
description "Set to 'true' to allow diversion rules with 'not-reachable'
conditions to be triggered after a 180 response has been
received from the called party.";
}
leaf add-mp-param {
type boolean;
mandatory true;
description "Set to 'true' to add a 'hi-target-param' of type 'mp' to the
History-Info header entry added by a diversion.";
}
description "Configuration for the MMTel call diversion service.";
}
container forward-to-voicemail {
presence "Enable forwarding to a subscriber's configured voicemail server if
all other connection attempts fail.";
leaf-list voicemail-uris {
type vmt:sip-or-tel-uri-type;
description "List of URIs for which a voicemail-specific announcement will
be played (if specified) and for which forwarding to
without allocated credit will be allowed (if enabled).";
}
leaf forward-to-voicemail-timeout-seconds {
type uint32;
mandatory true;
description "Maximum amount of time to wait (in seconds) for a call to be
successfully connected before executing default forward to
voicemail behaviour (if enabled). Set to '0' to disable
the timer.";
}
leaf forward-to-voicemail-without-ocs-credit {
when "../../../../charging/gsm-online-charging-type = 'ro'
or ../../../../charging/cdma-online-charging-enabled = 'true'";
type enumeration {
enum NEVER_ALLOW {
description "Never forward to voicemail when credit has not been
allocated.";
}
enum ALLOW_ONLY_FOR_WELL_KNOWN_SERVERS {
description "Allow forwarding to voicemail when credit has not been
allocated if address matches a known voicemail
server.";
}
enum ALWAYS_ALLOW {
description "Always allow forwarding to voicemail when credit has
not been allocated.";
}
}
description "Determines whether to allow forwarding to voicemail when
credit cannot be allocated for a call. Only applies when using
Diameter Ro based online charging.";
}
description "Configuration for forwarding to a subscriber's voicemail server.";
}
description "Configuration for the MMTel call diversion service.";
}
container communication-hold {
uses vmt:feature-announcement;
container bandwidth-adjustment {
presence "Bandwidth adjustment is enabled.";
leaf b-as-parameter {
type uint32;
mandatory true;
description "The value to set for the 'b=AS:' parameter to use when
processing a Hold response.";
}
leaf b-rr-parameter {
type uint32;
mandatory true;
description "The value to set for the 'b=RR:' parameter to use when
processing a Hold response.";
}
leaf b-rs-parameter {
type uint32;
mandatory true;
description "The value to set for the 'b=RS:' parameter to use when
processing a Hold response.";
}
description "Configuration for adjusting the bandwidth of responses when
sessions are Held and Resumed.
Parameter definitions: 3GPP TS 24.610 Rel 12.6.0 section 4.5.2.4.";
}
leaf holding-party-media-mode {
type enumeration {
enum NO_HOLD {
description "The passive party is not put on hold during the
announcement, media streams are left as they were.";
}
enum BLACK_HOLE_ONLY {
description "SDP is renegotiated with the passive party so that for
the duration of the announcement, all media streams
are directed to a black hole IP.";
}
enum FULL_HOLD {
description "SDP is renegotiated with the passive party so that for
the duration of the announcement, all media streams
are directed to a black hole IP; and additionally the
passive party is put on hold by setting the stream
status to `sendonly` or `inactive`.";
}
}
default FULL_HOLD;
description "Determines how media streams for the holding party are handled
while an announcement to the held party is in progress.";
}
description "Configuration for the MMTel communication hold service.";
}
container communication-waiting {
uses vmt:feature-announcement;
leaf timer-seconds {
type uint8 {
range "0 | 30 .. 120";
}
mandatory true;
description "The maximum time (in seconds) that the communication waiting
service will wait for the call to be answered before abandoning
it.";
}
description "Configuration for the MMTel communication waiting service.";
}
container privacy {
uses privacy:privacy-config-grouping;
description "Configuration for the MMTel privacy services.";
}
container psap-callback {
leaf use-priority-header {
type boolean;
mandatory true;
description "If set to 'true', use the contents of the Priority header in
the initial INVITE to determine whether the session is a
PSAP callback.";
}
container sip-message-options {
presence "Use the SIP MESSAGE mechanism to determine whether session is a PSAP
callback.";
leaf expiry-time-seconds {
type uint32;
mandatory true;
description "When a SIP MESSAGE notifying that a PSAP call has taken
place, this is the time (in seconds) after receiving that
MESSAGE that sessions for the identified user are assumed
to be a PSAP callback.";
}
leaf terminate-message {
type boolean;
mandatory true;
description "If set to true, SIP MESSAGEs notifying a PSAP call will be
terminated at the MMTel, otherwise they are propagated
through the network.";
}
description "Configuration for the SIP MESSAGE mechanism for determining
whether a session is a PSAP callback.";
}
description "Configuration for PSAP callback service.";
}
container communication-barring {
container incoming-communication-barring {
uses vmt:feature-announcement {
refine "announcement/announcement-id" {
mandatory false;
}
augment "announcement" {
leaf anonymous-call-rejection-announcement-id {
type vmt:announcement-id-type;
description "The ID for a different announcement that can be played
if the call is barred because it is from an anonymous
user.";
}
description "Add new fields to announcement.";
}
}
leaf international-rules-active {
type boolean;
default false;
description "If 'false', incoming call barring will ignore International
and International-exHC rules. This is because it is not
possible to accurately determine whether the calling party
is international in all circumstances.";
}
description "Configuration for incoming communication barring.";
}
container outgoing-communication-barring {
uses vmt:feature-announcement;
description "Configuration for outgoing communication barring.";
}
container operator-communication-barring {
container operator-barring-rules {
when "../../../hss-queries-enabled/odb = 'true'";
container type1 {
uses operator-barring-rule;
presence "Enable type1 operator barring rule";
description "The Type1 operator barring rule.";
}
container type2 {
uses operator-barring-rule;
presence "Enable type2 operator barring rule";
description "The Type2 operator barring rule.";
}
container type3 {
uses operator-barring-rule;
presence "Enable type3 operator barring rule";
description "The Type3 operator barring rule.";
}
container type4 {
uses operator-barring-rule;
presence "Enable type4 operator barring rule";
description "The Type4 operator barring rule.";
}
description "Configuration for operator barring rules.";
}
container outgoing-prefix-barring {
presence "Outgoing prefix barring is configured";
list prefixes {
key "prefix";
leaf prefix {
type string;
mandatory true;
description "The prefix to match against for outgoing barring.";
}
leaf-list classifications {
type leafref {
path "../../classifications/name";
}
description "The classification(s) to apply when this prefix
is matched.";
}
description "The list of prefixes to match against, and their
corresponding classifications to be used for outgoing
barring.";
}
list classifications {
must 'minimum-number-length <= maximum-number-length' {
error-message "'minimum-number-length' must be less than or equal
to 'maximum-number-length'.";
}
must "not(announcement and disable-ocb-announcement = 'true')" {
error-message "'disable-ocb-announcement' must be omitted or
set to 'false' if an outgoing prefix barring
announcement is specified.";
}
key "name";
leaf name {
type string {
pattern '[^\t\n\r]+';
}
mandatory true;
description "The name for this barring classification.";
}
leaf minimum-number-length {
type uint8 {
range "1 .. 20";
}
mandatory true;
description "The minimum length the number must be to match
this classification.";
}
leaf maximum-number-length {
type uint8 {
range "1 .. 20";
}
mandatory true;
description "The maximum length the number can be to match
this classification.";
}
leaf match-international {
type boolean;
mandatory true;
description "When true, the normalized number must be international
and not within the Home Country Code to match this
classification.";
}
leaf barring-treatment {
type enumeration {
enum OSBType1 {
description "Treat call as a Type1 operator barring rule.";
}
enum OSBType2 {
description "Treat call as a Type2 operator barring rule.";
}
enum OSBType3 {
description "Treat call as a Type3 operator barring rule.";
}
enum OSBType4 {
description "Treat call as a Type4 operator barring rule.";
}
enum OperatorAllow {
description "Allow call to proceed.";
}
enum OperatorBar {
description "Bar the call.";
}
enum PremiumRateInformation {
description "Treat call as premium rate information.";
}
enum PremiumRateEntertainment {
description "Treat call as premium rate entertainment.";
}
}
mandatory true;
description "How to handle a call that this classification applies
to.";
}
leaf disable-ocb-announcement {
type boolean;
default false;
description "Disables the 'outgoing-call-barring' announcement.
Cannot be 'true' when an announcement is specified.";
}
uses vmt:feature-announcement {
refine "announcement/announcement-id" {
description "The ID of an announcement to play instead of the
usual 'outgoing-call-barring' announcement.";
}
}
description "The list of classifications that can be applied for a
prefix match.";
}
description "Configuration for outgoing prefix barring.";
}
description "Configuration for operator communication barring.";
}
description "Configuration for MMTel communication barring service.";
}
container vertical-service-codes {
container xcap-data-update {
leaf host {
type ietf-inet:domain-name;
mandatory true;
description "Hostname of XCAP server to send HTTP requests to.";
}
leaf port {
type ietf-inet:port-number;
description "Port of XCAP server to send HTTP requests to. Can be omitted
to use the default port for the protocol port.";
}
leaf use-https {
type boolean;
mandatory true;
description "Indicates whether or not to use HTTP over TLS to connect to
the XCAP server.";
}
leaf base-uri {
type ietf-inet:uri;
mandatory true;
description "Base URI of XCAP server.";
}
leaf auid {
type string;
mandatory true;
description "XCAP application unique identifier to use in request URI.";
}
leaf document {
type string;
mandatory true;
description "XCAP document to use in request URI.";
}
leaf success-response-status-code {
type vmt:sip-status-code;
mandatory true;
description "Response status code to use following a successful HTTP
response.";
}
leaf failure-response-status-code {
type vmt:sip-status-code;
mandatory true;
description "Response status code to use following a failure HTTP
response.";
}
container failure-announcement {
presence "Enables announcement on failure";
leaf announcement-id {
type vmt:announcement-id-type;
mandatory true;
description "The ID of the announcement to be played.";
}
description "An announcement be played if the update fails.";
}
description "Configuration for service codes that execute XCAP data updates.";
}
description "Configuration for vertical service codes.";
}
description "Configuration for MMTel services.";
}
container registrar {
leaf data-storage-type {
when "../../scc/scc-mobile-core-type = 'gsm'";
type enumeration {
enum hsscache {
description "HSS cache data storage.";
}
enum cassandra {
description "Cassandra data storage.";
}
}
default cassandra;
description "Data storage type.";
}
leaf user-identity-type-for-stn-sr-request {
type enumeration {
enum CMSISDN {
description "The user's CMS ISDN.";
}
enum PUBLIC_ID {
description "The user's public ID.";
}
}
default PUBLIC_ID;
description "The type of user identity to use when creating Sh requests for the
STN-SR.";
}
leaf include-private-id-in-stn-sr-request {
type boolean;
default false;
description "Whether the user's IMS Private ID should be included in Sh requests
for the STN-SR.";
}
description "Registrar configuration.";
}
container sis {
leaf unavailable-peer-list-timer-milliseconds {
type uint64;
default 60000;
description "The duration for which a server will be blocked after a failure is
detected. This avoids the RA trying to use the server immediately
after a failure, when it is most likely just going to fail again.
After this time has passed the failed server may be tried again on
subsequent client transactions. If a server specifies a Retry-After
duration in a 503 response, that value will be used instead.";
}
leaf failover-timer-milliseconds {
type uint64;
default 4000;
description "Specifies the duration of the failover timer. If
this timer expires before any responses were received, the
RA treats this as a transport error and tries sending the request to
the next available server. This timer should be set to a value smaller
than the default Timer B and Timer F timers (32s) so that failures can
be detected promptly. A value of zero disables this timer.";
}
leaf originating-address {
type vmt:sccp-address-type;
description "Deprecated. Now set in scc.service-centralisation.inbound-ss7-address";
}
description "SIS configuration.";
}
container hlr-connectivity-origin {
when "../scc/tads/address-source-for-scc-tads != 'CMSISDN'
or ../mmtel/determine-roaming-from-hlr = 'true'
or ../charging/cap-charging/imssf/imcsi-fetching/originating-tdp
or ../charging/cap-charging/imssf/imcsi-fetching/terminating-tdp";
leaf originating-address {
type vmt:sccp-address-type;
mandatory true;
description "The originating SCCP address. This often is a Point Code and SSN,
where the SSN is typically 145 or 146";
}
container gsm {
when "../../scc/scc-mobile-core-type = 'gsm'";
description "HLR connectivity configuration specific to GSM.";
leaf mlc-address {
type vmt:ss7-address-string-type;
mandatory true;
description "The MLC SCCP address. This is the logical address
of the originator, i.e. this service. Typically a Global Title.";
}
leaf use-msisdn-as-hlr-address {
type boolean;
mandatory true;
description "Indicates if 'hlr/hlr-address' should be used as the actual
HLR address, or have its digits replaced with the MSISDN of
the subscriber.";
}
leaf msc-originating-address {
type vmt:sccp-address-type;
description "Originating SCCP address when acting as an MSC, used when
establishing the MAP dialog. Will default to the value of
'originating-address' when not present. Typically used to set a
different originating SSN when sending a SendRoutingInformation
message to the HLR.";
}
}
container cdma {
when "../../scc/scc-mobile-core-type = 'cdma'";
description "HLR connectivity configuration specific to CDMA.";
leaf market-id {
type uint32 {
range "0..65535";
}
mandatory true;
description "The market ID (MarketID).
Forms part of the Mobile Switching Center Identification (MSCID)";
reference "X.S0004-550-E v3.0 2.161";
}
leaf switch-number {
type uint32 {
range "0..255";
}
mandatory true;
description "The switch number (SWNO).
Forms part of the Mobile Switching Center Identification (MSCID)";
reference "X.S0004-550-E v3.0 2.161";
}
}
leaf map-invoke-timeout-milliseconds {
type uint32 {
range "250 .. 45000";
}
default 5000;
description "The Message Application Part (MAP) invoke timeout (in milliseconds).";
}
description "Origin HLR connectivity configuration.";
}
container charging {
leaf gsm-online-charging-type {
when "../../scc/scc-mobile-core-type = 'gsm'";
type enumeration {
enum ro {
description "Use Diameter Ro charging.";
}
enum cap {
description "Use CAMEL Application Part (CAP) charging.";
}
enum disabled {
description "Disable online charging.";
}
}
default ro;
description "The online charging type. Only valid when 'scc-mobile-core-type' is
'gsm'.";
}
leaf cdma-online-charging-enabled {
when "../../scc/scc-mobile-core-type = 'cdma'";
type boolean;
default true;
description "Set to 'true' to enable online charging. Set to 'false' to disable.
Only valid when 'scc-mobile-core-type' is 'cdma'.";
}
container ro-charging {
when "../gsm-online-charging-type = 'ro'
or ../cdma-online-charging-enabled = 'true'";
container diameter-ro {
uses ro:diameter-ro-configuration-grouping;
leaf continue-session-on-ocs-failure {
type boolean;
default false;
description "Set to 'true' to permit sessions to continue if there is an
OCS (Online Charging System) failure.";
}
description "Diameter Ro configuration.";
}
container charging-announcements {
container low-credit-announcements {
leaf call-setup-announcement-id {
type vmt:announcement-id-type;
description "Announcement ID to be played during call setup if the
subscriber has low credit.";
}
leaf mid-call-announcement-id {
type vmt:announcement-id-type;
description "Announcement ID to be played during a call if the
subscriber has low credit.";
}
leaf charging-reauth-delay-milliseconds {
type uint32;
description "The delay (in milliseconds) for issuing a credit check
after a call is connected with low balance (0 indicates
immediate reauth).";
}
description "Configuration for low credit announcements.";
}
container out-of-credit-announcements {
leaf call-setup-announcement-id {
type vmt:announcement-id-type;
description "Announcement ID to be played during call setup if the
subscriber is out of credit.";
}
leaf mid-call-announcement-id {
type vmt:announcement-id-type;
description "Announcement ID to be played during a call if the
subscriber is out of credit.";
}
description "Configuration for out of credit announcements.";
}
description "Configuration for charging related announcements.";
}
description "Ro charging configuration. Used when 'cdma-online-charging-type' is
set to 'true' or when 'gsm-online-charging-type' is set to 'ro'.";
}
container rf-charging {
must "../cdr/interim-cdrs" {
error-message "'interim-cdrs' section must be present when 'rf-charging' is"
+ " present.";
}
presence "Enables Rf charging.";
container diameter-rf {
uses rf:diameter-rf-configuration-grouping;
description "Diameter Rf configuration.";
}
description "Rf charging configuration. Presence enables Rf charging.";
}
container cap-charging {
when "../gsm-online-charging-type = 'cap'";
container imssf {
container imcsi-fetching {
leaf originating-tdp {
type uint8 {
range "2 | 3 | 12";
}
description "The requested Trigger Detection Point for originating
calls, which determines whether T_CSI or O_CSI is
requested from the HLR. Values of '2' or '3' will
request the O_CSI, '12' will request the T_CSI, other
values are not valid.";
}
leaf terminating-tdp {
type uint8 {
range "2 | 3 | 12";
}
description "The requested Trigger Detection Point for terminating
calls, which determines whether T_CSI or O_CSI is
requested from the HLR. Values of '2' or '3' will
request the O_CSI, '12' will request the T_CSI, other
values are not valid.";
}
description "IM-CSI fetching configuration.";
}
container charging-gt {
leaf format {
type string {
pattern '(\d*({iso})*({mcc})*({mnc})*)+';
}
mandatory true;
description "The format template to use when creating Charging GTs
(global title). It must be a digit string except for
tokens ('{iso}', '{mcc}', '{mnc}') which are
substituted in.";
}
leaf unknown-location {
type vmt:number-string;
mandatory true;
description "The Charging GT (global title) to use when one could not
be generated because the user’s location could not be
determined.";
}
leaf only-charge-terminating-call-if-international-roaming {
type boolean;
default false;
description "Should terminating charging only be applied if the served
user is roaming internationally.";
}
description "Configuration for the charging GT (global title) that is sent
to the SCP.";
}
leaf scf-address {
type vmt:sccp-address-type;
mandatory true;
description "The SCCP address of the GSM charging SCP.";
}
description "IM-SSF configuration.";
}
description "CAP charging configuration. Used when 'gsm-online-charging-type' is
set to 'cap'.";
}
container cdr {
container interim-cdrs {
presence "Enables interim CDRs.";
leaf write-cdrs-in-filesystem {
type boolean;
default true;
description "'true' means that CDRs are written locally by the application.
CDRs are written via Diameter Rf if the Sentinel VoLTE
configuration value 'rf-charging' is present.";
}
leaf write-cdr-on-sdp-change {
type boolean;
default true;
description "Indicates whether or not to write CDRs on SDP changes.";
}
leaf interim-cdrs-period-seconds {
type uint32;
default 300;
description "The maximum duration (in seconds) between timer driven interim
CDRs.
Setting this to zero will disable timer based interim CDRs.";
}
description "Interim CDR configuration. Presence enables Interim CDRs.";
}
leaf session-cdrs-enabled {
type boolean;
mandatory true;
description "'true' enables the creation of session CDRs, 'false' disables.";
}
leaf registrar-audit-cdrs-enabled {
type boolean;
default false;
description "'true' enables the creation of Registrar audit CDRs, 'false'
disables.";
}
leaf registrar-cdr-stream-name {
type string;
default 'registrar-cdr-stream';
description "CDR stream to write Registrar audit CDRs to.";
}
description "CDR configuration.";
}
description "Charging configuration";
}
container session-refresh {
leaf timer-interval-seconds {
type uint32;
default 30;
description "The interval (in seconds) of the periodic timer used to check whether
a session needs refreshing.";
}
leaf refresh-period-seconds {
type uint32;
default 570;
description "Period of no activity for leg to refresh (in seconds).";
}
leaf refresh-with-update-if-allowed {
type boolean;
default true;
description "Whether the session should be refreshed using UPDATE requests,
when the endpoint allows UPDATE requests.
Otherwise sessions are refreshed using re-INVITE requests.";
}
leaf max-call-duration-seconds {
type uint32;
default 86400;
description "Maximum allowed duration of a call (in seconds).";
}
description "Session Refresh configuration.";
}
leaf debug-logging-enabled {
type boolean;
default false;
description "Enable extensive logging for verification and issue diagnosis during
acceptance testing. Must not be enabled in production.";
}
description "The Sentinel VoLTE configuration.";
}
grouping operator-barring-rule {
anyxml rule {
mandatory true;
description "";
}
container retarget {
presence "Indicates that the call should be retargeted when this rule matches.";
leaf retarget-uri {
type vmt:sip-or-tel-uri-type;
mandatory true;
description "The URI to retarget this call to if the barring rule matches.";
}
uses vmt:feature-announcement;
leaf disable-online-charging-on-retarget {
type boolean;
default false;
description "Should charging be disabled when we retarget.";
}
description "Should the call be retargeted if this barring rule matches.";
}
description "Operator barring rule";
}
}hlr-configuration.yang
module hlr-configuration {
    yang-version 1.1;
    namespace "http://metaswitch.com/yang/tas-vm-build/hlr-configuration";
    prefix "hlr";

    import vm-types {
        prefix "vmt";
        revision-date 2019-11-29;
    }

    organization "Metaswitch Networks";
    contact "rvt-schemas@metaswitch.com";
    description "HLR configuration schema.";

    revision 2020-06-01 {
        description
            "Initial revision";
        reference
            "Metaswitch Deployment Definition Guide";
    }

    grouping hlr-configuration-grouping {
        leaf hlr-address {
            type vmt:sccp-address-type;
            mandatory true;
            description "The HLR SCCP address.
                         This is typically in the form of a Global Title";
        }

        description "HLR configuration.";
    }
}
icscf-configuration.yang
module icscf-configuration {
    yang-version 1.1;
    namespace "http://metaswitch.com/yang/tas-vm-build/icscf-configuration";
    prefix "icscf";

    import vm-types {
        prefix "vmt";
        revision-date 2019-11-29;
    }

    organization "Metaswitch Networks";
    contact "rvt-schemas@metaswitch.com";
    description "I-CSCF configuration schema.";

    revision 2020-06-01 {
        description
            "Initial revision";
        reference
            "Metaswitch Deployment Definition Guide";
    }

    grouping icscf-configuration-grouping {
        leaf i-cscf-uri {
            type vmt:sip-uri-type;
            mandatory true;
            description "The URI of the Interrogating Call Session Control Function (I-CSCF).

                         For MMT, the Conf and ECT features will automatically add an 'lr'
                         parameter to it. The hostname part should either be a resolvable name or
                         the IP address of the I-CSCF.";
        }

        description "I-CSCF configuration.";
    }
}
smo-vm-pool.yang
module smo-vm-pool {
    yang-version 1.1;
    namespace "http://metaswitch.com/yang/tas-vm-build/smo-vm-pool";
    prefix "smo-vm-pool";

    import ietf-inet-types {
        prefix "ietf-inet";
    }

    import vm-types {
        prefix "vmt";
        revision-date 2019-11-29;
    }

    import extensions {
        prefix "yangdoc";
        revision-date 2020-12-02;
    }

    organization "Metaswitch Networks";
    contact "rvt-schemas@metaswitch.com";
    description "SMO VM pool configuration schema.";

    revision 2019-11-29 {
        description
            "Initial revision";
        reference
            "Metaswitch Deployment Definition Guide";
    }

    grouping smo-virtual-machine-pool {

        leaf deployment-id {
            type vmt:deployment-id-type;
            mandatory true;
            description "The deployment identifier. Used to form a unique VM identifier within the
                         VM host.";
        }

        leaf site-id {
            type vmt:site-id-type;
            mandatory true;
            description "Site ID for the site that this VM pool is a part of.";
        }

        leaf node-type-suffix {
            type vmt:node-type-suffix-type;
            default "";
            description "Suffix to add to the node type when deriving the group identifier. Should
                         normally be left blank.";
        }

        leaf sentinel-ipsmgw-enabled {
            type boolean;
            description "Sentinel-IPMSGW will be installed and enabled on SMO nodes.";
        }

        list cassandra-contact-points {
            key "management.ipv4 signaling.ipv4";

            uses vmt:cassandra-contact-point-interfaces;
            description "A list of Cassandra contact points. These should normally not be specified
                         as this option is intended for testing and/or special use cases.";
            yangdoc:change-impact "converges";
        }

        leaf cluster-dns-name {
            type ietf-inet:domain-name;
            description "Deprecated. Now set in product-options.rvt.smo.smo-vnf and
                         product-options.rvt.smo.ims-domain-name in SDF file.";
        }

        list additional-rhino-jvm-options {
            when "../sentinel-ipsmgw-enabled = 'true'";

            key "name";
            leaf "name" {
                type string;
                description "Name of the JVM option. Do not include '-D'.";
            }

            leaf "value" {
                type string;
                mandatory true;
                description "Value for the JVM option.";
            }

            description "Additional JVM options to use when running Rhino.
                         Should normally be left blank.";
        }

        list rhino-auth {
            when "../sentinel-ipsmgw-enabled = 'true'";
            key "username";
            min-elements 1;

            uses vmt:rhino-auth-grouping;

            description "List of Rhino users and their plain text passwords.";
            yangdoc:change-impact "converges";
        }

        list virtual-machines {
            key "vm-id";

            leaf vm-id {
                type string;
                mandatory true;
                description "The unique virtual machine identifier.";
            }

            uses vmt:rvt-vm-grouping {
                refine rhino-node-id {
                    description "Rhino node identifier.

                                If sentinel-ipsmgw-enabled is set to false, specify an arbitrary
                                placeholder value here.";
                }
            }

            unique per-node-diameter-ro/diameter-ro-origin-host;
            container per-node-diameter-ro {
                when "../../../sentinel-ipsmgw/charging-options/diameter-ro";
                description "Configuration for Diameter Ro.";
                leaf diameter-ro-origin-host {
                    type ietf-inet:domain-name;
                    mandatory true;
                    description "The Diameter Ro origin host.

                                 If sentinel-ipsmgw-enabled is set to false, specify an arbitrary
                                 placeholder value here.";
                    yangdoc:change-impact "restart";
                }
            }

            unique sip-local-uri;
            leaf sip-local-uri {
                type vmt:sip-uri-type;
                mandatory true;
                description "SIP URI for this node.

                             If sentinel-ipsmgw-enabled is set to false, specify an arbitrary
                             placeholder value here.";
            yangdoc:change-impact "converges";
            }

            description "Configured virtual machines.";
        }

        description "SMO virtual machine pool.";
    }
}
sgc-configuration.yang
module sgc-configuration {
    yang-version 1.1;
    namespace "http://metaswitch.com/yang/tas-vm-build/sgc-configuration";
    prefix "sgc";

    import ietf-inet-types {
        prefix "ietf-inet";
    }

    import hazelcast-configuration {
        prefix "hazelcast";
    }

    import m3ua-configuration {
        prefix "m3ua";
    }

    organization "Metaswitch Networks";
    contact "rvt-schemas@metaswitch.com";
    description "SGC configuration schema.";

    revision 2019-11-29 {
        description
            "Initial revision";
        reference
            "Metaswitch Deployment Definition Guide";
    }

    grouping sgc-configuration-grouping {
        container hazelcast {
            uses hazelcast:hazelcast-configuration-grouping;
            description "Cluster-wide Hazelcast configuration.";
        }

        container sgcenv {
            uses sgcenv-configuration-grouping;
            description "Values to be placed in the sgcenv configuration file.";
        }

        container sgc-properties {
            presence "This container is optional, but has mandatory descendants.";
            uses sgc-properties-configuration-grouping;
            description "Values to be placed in the SGC.properties configuration file.";
        }

        container m3ua {
            uses m3ua:m3ua-configuration-grouping;
            description "M3UA configuration.";
        }

        description "SGC configuration.";
    }

    grouping sgcenv-configuration-grouping {
        leaf jmx-port {
            type ietf-inet:port-number;
            default 10111;
            description "The port to bind to for JMX service, used by the CLI and MXBeans.

                         The SGC's jmx-host will be set to the cluster IP";
        }

        description "Values to be placed in the sgcenv configuration file.";
    }

    grouping sgc-properties-configuration-grouping {
        list properties {
            key "name";
            leaf name {
                type string;
                mandatory true;
                description "Property name.";
            }
            leaf value {
                type string;
                mandatory true;
                description "Property value.";
            }

            description "List of name,value property pairs.";
        }

        description "Values to be placed in the SGC.properties configuration file.";
    }
}
sentinel-ipsmgw-configuration.yang
module sentinel-ipsmgw-configuration {
    yang-version 1.1;
    namespace "http://metaswitch.com/yang/tas-vm-build/sentinel-ipsmgw-configuration";
    prefix "ipsmgw";

    import ietf-inet-types {
        prefix "ietf-inet";
    }

    import vm-types {
        prefix "vmt";
        revision-date 2019-11-29;
    }

    import diameter-ro-configuration {
        prefix "ro";
        revision-date 2019-11-29;
    }

    import extensions {
        prefix "yangdoc";
        revision-date 2020-12-02;
    }

    organization "Metaswitch Networks";
    contact "rvt-schemas@metaswitch.com";
    description "Sentinel IPSMGW configuration schema.";

    revision 2020-06-01 {
        description
            "Initial revision";
        reference
            "Metaswitch Deployment Definition Guide";
    }

    grouping sentinel-ipsmgw-configuration-grouping {
        container georedundancy {

            presence "Enables geo-redundancy for IPSMGW.";
            leaf total-sites {
                type uint32 {
                    range '2 .. 32';
                }
                mandatory true;
                description "The number of geo-redundant sites.";
            }

            // Site ID is derived from site-id in the vmpool config

            description "Geo-redundancy configuration.";
        }

        container map-messaging {
            leaf template-smsc-address {
                type vmt:sccp-address-type;
                mandatory true;
                description "The 'digits' parameter value in this template
                             is replaced by the value of that parameter from the
                             received SMSC address to create a return address to the SMSC.";
            }

            leaf originating-address {
                type vmt:sccp-address-type;
                mandatory true;
                description "The SCCP address used as the calling party address in SS7 messages
                             initiated by the IP-SM-GW.";
                yangdoc:change-impact "restart";
            }

            leaf ipsmgw-as-msc-address {
                type vmt:ss7-address-string-type;
                mandatory true;
                description "The ipsmgw-as-msc-address is the address that the IP-SM-GW will
                            return to the GMSC during the SendRoutingInformation phase of the
                            MT message procedure, so that subsequent messages will be delivered
                            to the IP-SM-GW. TCAP messages with this address should be
                            routeable to an IP-SM-GW node.";
            }

            leaf use-msisdn-as-hlr-address {
                type boolean;
                mandatory true;
                description "Indicates if 'hlr/hlr-address' should be used as the actual HLR
                             address, or have its digits replaced with the MSISDN of the
                             subscriber.";
            }

            leaf suppress-hlr-interaction {
                type boolean;
                must ". = 'true' and ../../delivery-order = 'PS_ONLY' or . = 'false'" {
                    error-message "'suppress-hlr-interaction' can only be 'true' when"
                                  + " 'delivery-order' is set to 'PS_ONLY'";
                }
                mandatory true;
                description "If true, no MAP messages will be sent to the HLR. Useful in LTE-only
                             networks. Can only be set to true when 'delivery-order' is 'PS_ONLY'";
            }

            leaf use-gt-as-calling-party {
                type boolean;
                mandatory true;
                description "When accepting an OpenRequest, the SCCP responder address in the
                             OpenAccept will, by default, be set to the value of the SCCP called
                             party in the OpenRequest. If `UseGtAsCallingParty` is set to true,
                             and if the received sccp-called-party contains a global title, then
                             the global title will be used.";
            }

            leaf sms-content-size-threshold {
                type uint32;
                mandatory true;
                description "If the length of the message content falls within the configured
                             maximum then send the ForwardSM as part of the TC-BEGIN. As a
                             special case a configured max size of 0 disables this functionality
                             regardless of the actual content length.";
            }

            leaf sri-sm-delivery-not-intended {
                type boolean;
                mandatory true;
                description "If true, specify the SmDeliveryNotIntended flag when performing an SRI
                             for SM IMSI-only query (i.e. during SMMA callflows).";
            }

            leaf discard-inform-sc {
                type boolean;
                default true;
                description "If true, discard outbound InformSC components from requests sent to
                             the HLR.";
            }

            leaf force-sm-rp-pri {
                type boolean;
                default true;
                description "If true, force Sm_RP_PRI to be set to true in SendRoutingInfoForSM
                             requests sent to the HLR.";
            }

            description "IPSMGW address configuration.";
        }

        leaf invoke-timeout-milliseconds {
            type uint32;
            default 4500;
            description "Timeout (in milliseconds) when invoking MAP operations.";
        }

        leaf terminating-domain {
            type ietf-inet:domain-name;
            mandatory true;
            description "Domain defined by the operator to compose SIP URIs from the MSISDN.";
        }

        leaf sip-transport {
            type enumeration {
                enum tcp {
                    description "TCP.";
                }

                enum udp {
                    description "UDP.";
                }
            }
            default udp;
            description "The SIP transport to use for IPSMGW's own SIP URI in
                         outbound requests.";
        }

        leaf delivery-order {
            type enumeration {
                enum PS_THEN_CS {
                    description "Try IMS network first, then circuit-switched network second.";
                }

                enum CS_THEN_PS {
                    description "Try circuit-switched network first, then IMS network second.";
                }

                enum PS_ONLY {
                    description "Only try delivery over the IMS network.";
                }

                enum CS_ONLY {
                    description "Only try delivery over the circuit-switched network.";
                }
            }

            mandatory true;
            description "The delivery order for mobile-terminating messages.";
        }

        container charging-options {
            leaf mt-ps-enabled {
                type boolean;
                mandatory true;
                description "Whether charging is enabled for mobile-terminating PS messages.";
            }

            leaf mt-cs-enabled {
                type boolean;
                mandatory true;
                description "Whether charging is enabled for mobile-terminating CS messages.";
            }

            leaf mo-ps-enabled {
                type boolean;
                mandatory true;
                description "Whether charging is enabled for mobile-originating PS messages.";
            }

            container diameter-ro {
                when "../mt-ps-enabled = 'true'
                    or ../mt-cs-enabled = 'true'
                    or ../mo-ps-enabled = 'true'";
                uses ro:diameter-ro-configuration-grouping;
                description "Diameter Ro configuration.";
            }

            container cdr {
                leaf max-size-bytes {
                    type uint64;
                    default 100000000;
                    description "Approximate maximum size in bytes before a new CDR file is
                                 started. After a CDR is written, the total file size is
                                 compared to MaxSize. If the current file size is larger, it is
                                 completed. If set to 0, no size-based rollover is done.";
                }

                leaf max-cdrs {
                    type uint32;
                    default 0;
                    description "Number of records to be written to a CDR file before a new file is
                               started. If set to 0, no record-based rollover is done.";
                }

                leaf max-interval-milliseconds {
                    type uint32 {
                        range "0 | 1000 .. max";
                    }
                    default 0;
                    description "The length of time (in milliseconds) before time-based file
                                rollover. If a CDR file is used for more than
                                max-interval-milliseconds without being rolled over due to
                                record- or size-based limits, it is completed anyway. If set to
                                0, no time-based rollover is done.";
                }

                leaf registrar-audit-cdrs-enabled {
                    type boolean;
                    default false;
                    description "'true' enables the creation of Registrar audit CDRs, 'false'
                                 disables.";
                }

                description "CDR configuration.";
            }

            description "Message charging options.";
        }

        container ue-reachability-notifications {
            presence "Enables UE reachability notifications.";

            leaf notification-host {
                type string;
                description "IGNORED - DO NOT USE.
                            Hostname sent in subscription requests to the ShCM for receiving
                            back notifications from the ShCM.
                            This value is now hardcoded to the IPSMGW nodes' group URI
                            (smo-vnf and ims-domain-name in the product options in the SDF).";
            }

            leaf subscription-expiry-time-seconds {
                type uint32;
                mandatory true;
                description "The UE reachability subscription expiry time (in seconds).";
            }

            description "Settings regarding UE reachability subscriptions.";
        }

        container correlation-ra-plmnid {
            leaf mcc {
                type leafref {
                    path "/home-network/home-plmn-ids/mcc";
                }
                mandatory true;
                description "The Mobile Country Code (MCC).";
            }

            leaf mnc {
                type leafref {
                    path "/home-network/home-plmn-ids[mcc = current()/../mcc]/mncs";
                }
                mandatory true;
                description "The Mobile Network Code (MNC).";
            }

            description "The PLMNID used by the correlation RA to generate MT correlation IMSIs
                         when the routing info for the terminating subscriber cannot be
                         determined. Must match one of the PLMNIDs defined in the
                         home network configuration.";
        }

        container fallback-settings {
            leaf fallback-timer-milliseconds {
                type uint32;
                default 5000;
                description "Timeout (in milliseconds) before attempting message delivery
                             fallback.";
            }

            leaf-list avoidance-codes-ps-to-cs {
                type uint32;
                description "List of error codes which will prevent fallback from PS to CS.";
            }

            leaf-list avoidance-codes-cs-to-ps {
                type uint32;
                description "List of error codes which will prevent fallback from CS to PS.";
            }

            description "Delivery fallback settings.";
        }

        leaf-list sccp-allowlist {
            type string;
            description "List of allowed GT prefixes.
                        If non-empty, then requests from any GT originating addresses not on the
                        list will be rejected. If empty, then all requests will be allowed.
                        Requests from non-GT addresses are always allowed.";
        }

        leaf routing-info-cassandra-ttl-seconds {
            type uint32;
            default 120;
            description "Timeout (in seconds) that routing info is stored in Cassandra.";
        }

        container ussi {

            container reject-all-with-default-message {
                presence "Reject all USSI messages with a default message";

                leaf language {
                    type string {
                        length "2";
                        pattern "[a-zA-Z]*";
                    }
                    mandatory true;
                    description "The language that will be set in the USSI response message.";
                }

                leaf message {
                    type string;
                    mandatory true;
                    description "The text that will be set in the USSI response message.";
                }

                description "Should all USSI messages be rejected with a default message.";
            }

            description "USSI configuration.";
        }

        leaf debug-logging-enabled {
            type boolean;
            default false;
            description "Enable extensive logging for verification and issue diagnosis during
                         acceptance testing. Must not be enabled in production.";
        }

        description "IPSMGW configuration.";
    }
}
vm-types.yang
module vm-types {
yang-version 1.1;
namespace "http://metaswitch.com/yang/tas-vm-build/vm-types";
prefix "vm-types";
import ietf-inet-types {
prefix "ietf-inet";
}
import extensions {
prefix "yangdoc";
revision-date 2020-12-02;
}
organization "Metaswitch Networks";
contact "rvt-schemas@metaswitch.com";
description "Types used by the various virtual machine schemas.";
revision 2019-11-29 {
description
"Initial revision";
reference
"Metaswitch Deployment Definition Guide";
}
typedef rhino-node-id-type {
type uint16 {
range "1 .. 32767";
}
description "The Rhino node identifier type.";
}
typedef sgc-cluster-name-type {
type string;
description "The SGC cluster name type.";
}
typedef deployment-id-type {
type string {
pattern "[a-zA-Z0-9-]{1,20}";
}
description "Deployment identifier type. May only contain upper and lower case letters 'a'
through 'z', the digits '0' through '9' and hyphens. Must be between 1 and
20 characters in length, inclusive.";
}
typedef site-id-type {
type string {
pattern "DC[0-9]+";
}
description "Site identifier type. Must be the letters DC followed by one or more
digits 0-9.";
}
typedef node-type-suffix-type {
type string {
pattern "[a-zA-Z0-9]*";
}
description "Node type suffix type. May only contain upper and lower case letters 'a'
through 'z' and the digits '0' through '9'. May be empty.";
}
typedef trace-level-type {
type enumeration {
enum off {
description "The 'off' trace level.";
}
enum severe {
description "The 'severe' trace level.";
}
enum warning {
description "The 'warning level.";
}
enum info {
description "The 'info' trace level.";
}
enum config {
description "The 'config' trace level.";
}
enum fine {
description "The 'fine' trace level.";
}
enum finer {
description "The 'finer' trace level.";
}
enum finest {
description "The 'finest' trace level.";
}
}
description "The Rhino trace level type";
}
typedef sip-uri-type {
type string {
pattern 'sip:.*';
}
description "The SIP URI type.";
}
typedef tel-uri-type {
type string {
pattern 'tel:\+?[-*#.()A-F0-9]+';
}
description "The Tel URI type.";
}
typedef sip-or-tel-uri-type {
type union {
type sip-uri-type;
type tel-uri-type;
}
description "A type allowing either a SIP URI or a Tel URI.";
}
typedef number-string {
type string {
pattern "[0-9]+";
}
description "A type that permits a non-negative integer value.";
}
typedef phone-number-type {
type string {
pattern '\+?[*0-9]+';
}
description "A type that represents a phone number.";
}
typedef sccp-address-type {
type string {
pattern "(.*,)*type=(A|C)7.*";
pattern "(.*,)*ri=(gt|pcssn).*";
pattern "(.*,)*ssn=[0-2]?[0-9]?[0-9].*";
pattern ".*=.*(,.*=.*)*";
}
description "A type representing an SCCP address in string form.
The basic form of an SCCP address is:
`type=<variant>,ri=<address type>,<parameter>=<value>,...`
where `<variant>` is `A7` for ANSI-variant SCCP or `C7` for ITU-variant SCCP,
and `<address type>` is one of `gt` or `pcssn`
(for an address specified by Global Title (GT),
or Point Code (PC) and Subsystem Number (SSN), respectively).
The `<parameter>` options are:
- Point code: `pc=<point code in network-cluster-member (ANSI)
or integer (ITU) format>`
- Subsystem number: `ssn=<subsystem number 0-255>`
- Global title address digits: `digits=<address digits, one or more 0-9>`
- Nature of address: `nature=<nature>` where `<nature>` is
`unknown`, `international`, `national`, or `subscriber`
- Numbering plan: `numbering=<numbering>` where `<numbering>` is
`unknown`, `isdn`, `generic`, `data`, `telex`, `maritime-mobile`,
`land-mobile`, `isdn-mobile`, or `private`
- Global title translation type: `tt=<integer 0-255>`
- National indicator: `national=<true or false>`.
`parameter` names are separated from their values by an equals sign,
and all `<parameter>=<value>` pairs are separated by commas.
Do not include any whitespace anywhere in the address.
Only the `ssn` and `national` parameters are mandatory; the others are optional,
depending on the details of the address - see below.
Note carefully the following:
- For ANSI addresses, ALWAYS specify `national=true`,
unless using ITU-format addresses in an ANSI-variant network.
- For ITU addresses, ALWAYS specify `national=false`.
- All SCCP addresses across the deployment's configuration
must use the same variant (`A7` or `C7`).
- Be sure to update the SGC's SCCP variant in `sgc-config.yaml`
to match the variant of the addresses.
---
For PC/SSN addresses (with `ri=pcssn`), you need to specify
the point code and SSN.
For GT addresses (with `ri=gt`), you must specify the global title digits
and SSN in addition to the fields listed below (choose one option).
There are two options for ANSI GT addresses:
- translation type only
- numbering plan and translation type.
There are four options for ITU GT addresses:
- nature of address only
- translation type only
- numbering plan and translation type
- nature of address with either or both of numbering plan and translation type.
---
Some valid ANSI address examples are:
- `type=A7,ri=pcssn,pc=0-0-5,ssn=147,national=true`
- `type=A7,ri=gt,ssn=146,tt=8,digits=12012223333,national=true`
Some valid ITU address examples are:
- `type=C7,ri=pcssn,pc=1434,ssn=147,national=false`
- `type=C7,ri=gt,ssn=146,nature=INTERNATIONAL,numbering=ISDN,tt=0,
digits=123456,national=false`
- `type=C7,ri=gt,ssn=148,numbering=ISDN,tt=0,digits=0778899,national=false`";
}
typedef ss7-point-code-type {
type string {
pattern "(([0-2]?[0-9]?[0-9]-){2}[0-2]?[0-9]?[0-9])|"
+ "([0-1]?[0-9]{1,4})";
}
description "A type representing an SS7 point code.
When ANSI variant is in use, specify this in network-cluster-member format,
such as 1-2-3, where each element is between 0 and 255.
When ITU variant is in use, specify this as an integer between 0 and 16383.
Note that for ITU you will need to quote the integer,
as this field takes a string rather than an integer.";
}
typedef ss7-address-string-type {
type string {
pattern "(.*,)*address=.*";
pattern ".*=.*(,.*=.*)*";
}
description "The SS7 address string type.";
}
typedef sip-status-code {
type uint16 {
range "100..699";
}
description "SIP response status code type.";
}
typedef secret {
type string;
description "A secret, which will be automatically encrypted using the secrets-private-key
configured in the Site Definition File (SDF).";
}
grouping cassandra-contact-point-interfaces {
leaf management.ipv4 {
type ietf-inet:ipv4-address-no-zone;
mandatory true;
description "The IPv4 address of the management interface.";
}
leaf signaling.ipv4 {
type ietf-inet:ipv4-address-no-zone;
mandatory true;
description "The IPv4 address of the signaling interface.";
}
description "Base network interfaces: management and signaling";
}
grouping day-of-week-grouping {
leaf day-of-week {
type enumeration {
enum Monday {
description "Every Monday.";
}
enum Tuesday {
description "Every Tuesday.";
}
enum Wednesday {
description "Every Wednesday.";
}
enum Thursday {
description "Every Thursday.";
}
enum Friday {
description "Every Friday.";
}
enum Saturday {
description "Every Saturday.";
}
enum Sunday {
description "Every Sunday.";
}
}
description "The day of the week on which to run the scheduled task.";
}
description "Grouping for the day of the week.";
}
grouping day-of-month-grouping {
leaf day-of-month {
type uint8 {
range "1..28";
}
description "The day of the month (from the 1st to the 28th)
on which to run the scheduled task.";
}
description "Grouping for the day of the month.";
}
grouping frequency-grouping {
choice frequency {
case daily {
// empty
}
case weekly {
uses day-of-week-grouping;
}
case monthly {
uses day-of-month-grouping;
}
description "Frequency options for running a scheduled task.
Note: running a scheduled task in the single-entry
format is deprecated.";
}
uses time-of-day-grouping;
description "Grouping for frequency options for running a scheduled task.
Note: This field is deprecated. Use the options in
frequency-list-grouping instead.";
}
grouping frequency-list-grouping {
choice frequency-list {
case weekly {
list weekly {
key "day-of-week";
uses day-of-week-grouping;
uses time-of-day-grouping;
description "A list of schedules that specifies the days of the week
and times of day to run the scheduled task";
}
}
case monthly {
list monthly {
key "day-of-month";
uses day-of-month-grouping;
uses time-of-day-grouping;
description "A list of schedules that specifies the days of the month
and times of day to run the scheduled task";
}
}
description "Frequency options for running a scheduled task.";
}
description "Grouping for frequency options for a task scheduled multiple times.";
}
grouping time-of-day-grouping {
leaf time-of-day {
type string {
pattern "([0-1][0-9]|2[0-3]):[0-5][0-9]";
}
mandatory true;
description "The time of day (24hr clock in the system's timezone)
at which to run the scheduled task.";
}
description "Grouping for specifying the time of day.";
}
grouping scheduled-task {
choice scheduling-rule {
case single-schedule {
uses frequency-grouping;
}
case multiple-schedule {
uses frequency-list-grouping;
}
description "Whether the scheduled task runs once or multiple times per interval.";
}
description "Grouping for determining whether the scheduled task runs once
or multiple times per interval.
Note: Scheduling a task once per interval is deprecated.
Use the options in frequency-list-grouping instead
to schedule a task multiple times per interval.";
}
grouping rvt-vm-grouping {
uses rhino-vm-grouping;
container scheduled-sbb-cleanups {
presence "This container is optional, but has mandatory descendants.";
uses scheduled-task;
description "Cleanup leftover SBBs and activities on specified schedules.
If omitted, SBB cleanups will be scheduled for every day at 02:00.";
}
description "Parameters for a Rhino VoLTE TAS (RVT) VM.";
}
grouping rhino-vm-grouping {
leaf rhino-node-id {
type rhino-node-id-type;
mandatory true;
description "The Rhino node identifier.";
}
container scheduled-rhino-restarts {
presence "This container is optional, but has mandatory descendants.";
uses scheduled-task;
description "Restart Rhino on a specified schedule, for maintenance purposes.
If omitted, no Rhino restarts will be enabled.
Note: Please ensure there are no Rhino restarts within one hour of a
scheduled Cassandra repair.";
}
description "Parameters for a VM that runs Rhino.";
}
grouping rhino-auth-grouping {
leaf username {
type string {
length "3..16";
pattern "[a-zA-Z0-9]+";
}
description "The user's username.
Must consist of between 3 and 16 alphanumeric characters.";
}
leaf password {
type secret {
length "8..max";
pattern "[a-zA-Z0-9_@!$%^/.=-]+";
}
description "The user's password. Will be automatically encrypted at deployment using
the deployment's 'secret-private-key'.";
}
leaf role {
type enumeration {
enum admin {
description "Administrator role. Can make changes to Rhino configuration.";
}
enum view {
description "Read-only role. Cannot make changes to Rhino configuration.";
}
}
default view;
description "The user's role.";
}
description "Configuration for one Rhino user.";
}
grouping rem-auth-grouping {
leaf username {
type string {
length "3..16";
pattern "[a-zA-Z0-9]+";
}
description "The user's username.
Must consist of between 3 and 16 alphanumeric characters.";
}
leaf real-name {
type string;
description "The user's real name.";
}
leaf password {
type secret {
length "8..max";
pattern "[a-zA-Z0-9_@!$%^/.=-]+";
}
description "The user's password. Will be automatically encrypted at deployment using
the deployment's 'secret-private-key'.";
}
leaf role {
type enumeration {
enum em-admin {
description "Administrator role. Can make changes to REM configuration.
Also has access to the HSS Subscriber Provisioning REST API.";
}
enum em-user {
description "Read-only role. Cannot make changes to REM configuration.
Note: Rhino write permissions are controlled by the Rhino
credentials used to connect to Rhino, NOT the REM credentials.";
}
}
default em-user;
description "The user's role.";
}
description "Configuration for one REM user.";
}
grouping diameter-configuration-grouping {
leaf origin-realm {
type ietf-inet:domain-name;
mandatory true;
description "The Diameter origin realm.";
yangdoc:change-impact "restart";
}
leaf destination-realm {
type ietf-inet:domain-name;
mandatory true;
description "The Diameter destination realm.";
}
list destination-peers {
key "destination-hostname";
min-elements 1;
leaf protocol-transport {
type enumeration {
enum aaa {
description "The Authentication, Authorization and Accounting (AAA)
protocol over tcp";
}
enum aaas {
description "The Authentication, Authorization and Accounting with Secure
Transport (AAAS) protocol over tcp.
IMPORTANT: this protocol is currently not supported.";
}
enum sctp {
description "The Authentication, Authorization and Accounting (AAA)
protocol over Stream Control Transmission Protocol
(SCTP) transport. Will automatically be configured
multi-homed if multiple signaling interfaces are
provisioned.";
}
}
default aaa;
description "The combined Diameter protocol and transport.";
}
leaf destination-hostname {
type ietf-inet:domain-name;
mandatory true;
description "The destination hostname.";
}
leaf port {
type ietf-inet:port-number;
default 3868;
description "The destination port number.";
}
leaf metric {
type uint32;
default 1;
description "The metric to use for this peer.
Peers with lower metrics take priority over peers
with higher metrics. If all peers have the same metric,
traffic is round-robin load balanced over all peers.";
}
description "Diameter destination peer(s).";
}
description "Diameter configuration.";
}
typedef announcement-id-type {
type leafref {
path "/sentinel-volte/mmtel/announcement/announcements/id";
}
description "The announcement-id type, limits use to be one of the configured SIP
announcement IDs from
'/sentinel-volte/mmtel/announcement/announcements/id'.";
}
grouping feature-announcement {
container announcement {
presence "Enables announcements";
leaf announcement-id {
type announcement-id-type;
mandatory true;
description "The announcement to be played.";
}
description "Should an announcement be played";
}
description "Configuration for announcements.";
}
}Example configuration YAML files
Mandatory YAML files
The configuration process requires the following YAML files:
| YAML file | Node types |
|---|---|
TSN |
|
TSN, ShCM, MAG, MMT GSM, and SMO |
|
TSN, ShCM, MAG, MMT GSM, and SMO |
|
TSN, ShCM, MAG, MMT GSM, and SMO |
|
ShCM |
|
ShCM |
|
ShCM, MAG, MMT GSM, and SMO |
|
ShCM, MAG, MMT GSM, and SMO |
|
MAG |
|
MAG |
|
MAG |
|
MAG, MMT GSM, and SMO |
|
MAG and MMT GSM |
|
MMT GSM |
|
MMT GSM |
|
MMT GSM and SMO |
|
MMT GSM and SMO |
|
SMO |
|
SMO |
|
SMO |
Optional YAML files
The example files included here are "empty", showing a file which has the minimum content to make it syntactically correct, but not actually adding any configuration. If the file is not in use, you can either upload the empty example file to CDS, or simply not include the file at all in the upload.
| |
Low-level Rhino configuration override files
The files ending in |
| YAML file | Node types |
|---|---|
ShCM |
|
MAG |
|
MMT GSM |
|
SMO |
Example for tsn-vmpool-config.yaml
# this file describes the pool of Virtual Machines that comprise a TSN Cluster
deployment-config:tsn-virtual-machine-pool:

  # needs to match the deployment_id vapp parameter
  deployment-id: example

  # needs to match the site_id vapp parameter
  site-id: DC1

  virtual-machines:
    - vm-id: example-tsn-1

    - vm-id: example-tsn-2

    - vm-id: example-tsn-3
Example for snmp-config.yaml
deployment-config:snmp:

  # Enable SNMP v1 (not recommended)
  v1-enabled: false

  # Enable SNMP v2c
  v2c-enabled: true

  # Enable SNMP v3
  v3-enabled: false

  # SNMP Community. Required for SNMP v2c
  community: clearwater

  # SNMP agent details
  agent-details:
    location: Unknown location
    contact: support.contact@invalid.com

  # SNMP Notifications
  notifications:

    # Enable Rhino SNMP Notifications
    rhino-notifications-enabled: true

    # Enable System SNMP Notifications
    system-notifications-enabled: true

    # Enable SGC SNMP Notifications
    sgc-notifications-enabled: true

    # SNMP notification targets. Normally this is the address of your MVS
    targets:
      - version: v2c
        host: 127.0.0.1
        port: 162

    # Enable different SNMP notification categories
    categories:
      - category: alarm-notification
        enabled: true

      - category: log-notification
        enabled: false

      - category: log-rollover-notification
        enabled: false

      - category: resource-adaptor-entity-state-change-notification
        enabled: false

      - category: service-state-change-notification
        enabled: false

      - category: slee-state-change-notification
        enabled: false

      - category: trace-notification
        enabled: false

      - category: usage-notification
        enabled: false
Example for routing-config.yaml
deployment-config:routing:
  routing-rules: []

# To create routing rules, populate the routing-rules list as shown in the example below.
#  routing-rules:
#    - name: Example
#
##     The target for the routing rule.
##     Can be either an IP address or a block of addresses (e.g. 10.0.0.0/8).
#      target: 8.8.8.8
#
##     The interface to use.
##     Can be one of 'management', 'diameter', 'ss7', 'sip', 'internal', 'access', 'cluster',
##     'diameter-multihoming' or 'ss7_multihoming'.
#      interface: management
#
##     The IP address of the gateway to route through.
#      gateway: 0.0.0.0
#
#      The node types this routing rule applies to.
#      If ommitted, this routing rule will be attempt to apply itself to all node types.
#      node-types:
#      - tsn
#      - mag
#
#    - name: Example2
##     ...
Example for system-config.yaml
# This file contains OS-level settings.
# It is recommended to leave all these options at their default values,
# unless advised to change them by your Metaswitch Customer Care representative.

deployment-config:system:
  networking: {}

# To populate settings, remove the "{}" and fill in the appropriate keys and values.
# For example:
#
# deployment-config:system:
#   networking:
#     sctp:
#       hb-interval: 1000
Example for shcm-vmpool-config.yaml
# This file describes the pool of Virtual Machines that comprise a "ShCM group"
deployment-config:shcm-virtual-machine-pool:

  # needs to match the deployment_id vapp parameter
  deployment-id: example

  # needs to match the site_id vApp parameter
  site-id: DC1

  # Define one or more Rhino users and give their passwords in plain-text.
  # Passwords will be encrypted by 'rvtconfig upload-config' before this file is uploaded to CDS.
  # This user is a read-only user, they can log in and see things in Rhino but do not have permission to change configuration
  # it is discouraged to log into Rhino to modify configuration using REM, instead the declarative configuration system should be used
  rhino-auth:
    - username: readonly
      password: xxxxxxxx

  virtual-machines:
    - vm-id: example-shcm-1
      diameter-sh-origin-host: shcm1.shcm.site1.mnc123.mcc530.3gppnetwork.org

    - vm-id: example-shcm-2
      diameter-sh-origin-host: shcm2.shcm.site1.mnc123.mcc530.3gppnetwork.org
Example for shcm-service-config.yaml
# Service configuration for the Sh Cache Microservice
deployment-config:shcm-service:
  ##
  ## Diameter Sh Configuration
  ##
  diameter-sh:

    # The origin realm to use when sending messages.
    origin-realm: opencloud.com

    # The value to use as the destination realm.
    destination-realm: opencloud

    # The HSS destination peers.
    destination-peers:
      - destination-hostname: hss.opencloud.com
        port: 3868
        protocol-transport: aaa
        metric: 1


  # The user identity that is put in the diameter message to the HSS when a health check is performed
  health-check-user-identity: sip:shcm-health-check@example.com

  ##
  ## Advanced settings - don't change unless specifically instructed
  ## by a Metaswitch engineer
  ##

  # The request timeout (milliseconds) the Sh RA should use
  diameter-request-timeout-milliseconds: 5000

  ##
  ## Cassandra locking configuration
  ##
  cassandra-locking:

    # The time (in milliseconds) to wait before retrying to acquire the cassandra lock. Limited to 50-5000.
    backoff-time-milliseconds: 200

    # The number of times to retry to acquire the cassandra lock. Limited to 1-10.
    backoff-limit: 5

    # The time (in milliseconds) to hold the cassandra lock. Limited to 1000-30000.
    hold-time-milliseconds: 12000


  ##
  ## Caching strategy
  ## Every setting has both no-cache or simple-cache options, and for most settings
  ##   subscription-cache is also available.
  ##
  ##   no-cache:
  ##    The cache functionality will not be used; every read and write will
  ##    always query the HSS for the requested information. Subscription is
  ##    not applicable.
  ##   simple-cache:
  ##    Results from HSS queries will be cached. Updates will always write
  ##    through to the HSS. The cache will not receive updates from the HSS.
  ##   subscription-cache:
  ##    Results from HSS queries will be cached. Updates will always write
  ##    through to the HSS. ShCM will subscribe to data changes in the HSS and
  ##    cache entries will be updated if the data is modified in the HSS.
  ##
  ## Recommendation:
  ##   Don't change the default settings below.
  ##   However, some HSS's don't support subscriptions and for these simple-cache
  ##   should be used.
  ##
  ##   If a Cassandra database isn't available for caching then no-cache can be
  ##   used for test purposes.
  ##
  caching:

    ##
    ## Caching strategy: one of `no-cache, simple-cache, subscription-cache`
    ##
    service-indications:
      # Caching configuration for MMTel-Services
      - service-indication: mmtel-services
        cache-strategy: subscription-cache
        cache-parameters:
          cache-validity-time-seconds: 86400

      # Caching configuration for ims-odb-information
      - service-indication: ims-odb-information
        cache-strategy: subscription-cache
        cache-parameters:
          cache-validity-time-seconds: 86400

      # Caching configuration for opencloud-3rd-party-registrar
      - service-indication: opencloud-3rd-party-registrar
        cache-strategy: subscription-cache
        cache-parameters:
          cache-validity-time-seconds: 86400

      # Caching configuration for metaswitch-tas-services
      - service-indication: metaswitch-tas-services
        cache-strategy: subscription-cache
        cache-parameters:
          cache-validity-time-seconds: 86400

    data-references-subscription-allowed:
      # Caching configuration for ims-public-identity
      - data-reference: ims-public-identity
        cache-strategy: subscription-cache
        cache-parameters:
          cache-validity-time-seconds: 86400

      # Caching configuration for s-cscfname
      - data-reference: s-cscfname
        cache-strategy: subscription-cache
        cache-parameters:
          cache-validity-time-seconds: 86400

      # Caching configuration for initial-filter-criteria
      - data-reference: initial-filter-criteria
        cache-strategy: subscription-cache
        cache-parameters:
          cache-validity-time-seconds: 86400

      # Caching configuration for service-level-trace-info
      - data-reference: service-level-trace-info
        cache-strategy: subscription-cache
        cache-parameters:
          cache-validity-time-seconds: 86400

      # Caching configuration for ip-address-secure-binding-information
      - data-reference: ip-address-secure-binding-information
        cache-strategy: subscription-cache
        cache-parameters:
          cache-validity-time-seconds: 86400

      # Caching configuration for service-priority-level
      - data-reference: service-priority-level
        cache-strategy: subscription-cache
        cache-parameters:
          cache-validity-time-seconds: 86400

      # Caching configuration for extended-priority
      - data-reference: extended-priority
        cache-strategy: subscription-cache
        cache-parameters:
          cache-validity-time-seconds: 86400


    ##
    ## Caching strategy: one of `no-cache, simple-cache`
    ##
    data-references-subscription-not-allowed:
      # Caching configuration for charging-information
      - data-reference: charging-information
        cache-strategy: simple-cache
        cache-parameters:
          cache-validity-time-seconds: 3600

      # Caching configuration for msisdn
      - data-reference: msisdn
        cache-strategy: simple-cache
        cache-parameters:
          cache-validity-time-seconds: 3600

      # Caching configuration for psi-activation
      - data-reference: psiactivation
        cache-strategy: simple-cache
        cache-parameters:
          cache-validity-time-seconds: 3600

      # Caching configuration for dsai
      - data-reference: dsai
        cache-strategy: simple-cache
        cache-parameters:
          cache-validity-time-seconds: 3600

      # Caching configuration for sms-registration-info
      - data-reference: sms-registration-info
        cache-strategy: simple-cache
        cache-parameters:
          cache-validity-time-seconds: 3600

      # Caching configuration for tads-information
      - data-reference: tads-information
        cache-strategy: simple-cache
        cache-parameters:
          cache-validity-time-seconds: 3600

      # Caching configuration for stn-sr
      - data-reference: stn-sr
        cache-strategy: simple-cache
        cache-parameters:
          cache-validity-time-seconds: 3600

      # Caching configuration for ue-srvcc-capability
      - data-reference: ue-srvcc-capability
        cache-strategy: simple-cache
        cache-parameters:
          cache-validity-time-seconds: 3600

      # Caching configuration for csrn
      - data-reference: csrn
        cache-strategy: simple-cache
        cache-parameters:
          cache-validity-time-seconds: 3600

      # Caching configuration for reference-location-information
      - data-reference: reference-location-information
        cache-strategy: simple-cache
        cache-parameters:
          cache-validity-time-seconds: 3600

  # DO NOT ENABLE IN PRODUCTION
  # Enable extensive logging for verification and issue diagnosis during acceptance testing
  debug-logging-enabled: false
Example for common-config.yaml
# This file contains configuration common to the deployment

deployment-config:common:

  # Platform operator name. Can contain letters, numbers, - and _.
  platform-operator-name: Metaswitch
Example for sas-config.yaml
deployment-config:sas:

  # Whether SAS is enabled ('true') or disabled ('false')
  enabled: true

  # Parameters for connecting to SAS
  sas-connection:
    # List of SAS servers.
    # SAS servers can also be discovered from MDM, so if both this VM and SAS are connected
    # to MDM, these do not have to be specified.
    servers:
      - 10.10.10.10
      - 10.10.10.11
Example for mag-vmpool-config.yaml
# This file describes the pool of Virtual Machines that comprise a "MAG cluster"
# there are some pieces of software on this VM type that require clustering and
# knowing each other's IP addresses, for example Rhino
deployment-config:mag-virtual-machine-pool:

  # needs to match the deployment_id vapp parameter
  deployment-id: example

  # needs to match the site_id vapp parameter
  site-id: DC1

  xcap-domains:
    - xcap.site1.ims.mnc123.mcc530.pub.3gppnetwork.org
    - xcap2.site1.ims.mnc123.mcc530.pub.3gppnetwork.org

  # Define one or more Rhino users and give their passwords in plain-text.
  # Passwords will be encrypted by 'rvtconfig upload-config' before this file is uploaded to CDS.
  # This user is a read-only user, they can log in and see things in Rhino but do not have permission to change configuration
  # it is discouraged to log into Rhino to modify configuration using REM, instead the declarative configuration system should be used
  rhino-auth:
    - username: readonly
      password: xxxxxxxx

  # Define one or more REM users and give their passwords in plain-text.
  # Passwords will be encrypted by 'rvtconfig upload-config' before this file is uploaded to CDS.
  # each REM user maps to a Rhino user, when REM logs into Rhino
  rem-auth:
    - username: remreadonly
      real-name: REM read only user
      password: xxxxxxxx

  virtual-machines:
    - vm-id: example-mag-1
      rhino-node-id: 101
      diameter-zh-origin-host: mag1.mag.site1.mnc123.mcc530.3gppnetwork.org

    - vm-id: example-mag-2
      rhino-node-id: 102
      diameter-zh-origin-host: mag2.mag.site1.mnc123.mcc530.3gppnetwork.org

    - vm-id: example-mag-3
      rhino-node-id: 103
      diameter-zh-origin-host: mag3.mag.site1.mnc123.mcc530.3gppnetwork.org
Example for bsf-config.yaml
# This file contains the configuration for the BSF

deployment-config:bsf:
  # the Zh interface is between the BSF and the HSS only
  # It is a Diameter interface
  # the Destination realm and peers are configured in this file
  # As each Virtual Machine needs to have an origin host, the Zh origin host is present
  # in the MAG VM Pool file rather than this file.
  # I.e, each virtual machine is defined in the MAG VM pool file, with its own origin host
  zh-diameter:

    origin-realm: opencloud.com

    destination-realm: opencloud.com

    destination-peers:
      - destination-hostname: hss.opencloud.com
        port: 3868
        protocol-transport: aaa
        metric: 1

  # DO NOT ENABLE IN PRODUCTION
  # Enable extensive logging for verification and issue diagnosis during acceptance testing
  debug-logging-enabled: false
Example for naf-filter-config.yaml
# This file contains the configuration for the NAF
#nothing is mandatory as the defaults are always suitable

deployment-config:naf-filter:

  service-type: 0
  service-id: 0

  # By default the naf group is the empty string, but it can be set to something like nafgroup1
  naf-group: ""

  cassandra-connectivity:
    reconnection-policy: constant
    reconnection-interval-seconds: 5
    socket-receive-buffer-size-bytes: 1048576
    lb-recipe: latency-aware-round-robin
    use-ssl: none

  nonce-options:
    reuse-count: 500
    cache-capacity: 10000
    storage-mechanism: cassandra
    nonce-cassandra-keyspace: opencloud_nonce_info

  # DO NOT ENABLE IN PRODUCTION
  # Enable extensive logging for verification and issue diagnosis during acceptance testing
  debug-logging-enabled: false
Example for home-network-config.yaml
# This file contains configuration for the home network.

deployment-config:home-network:

  # Home domain.
  home-domain: metaswitch.com

  # Home network country dialing code.
  home-network-country-dialing-code: "64"

  # Two letter ISO country code for the home network.
  home-network-iso-country-code: NZ

  # Home PLMN IDs.
  home-plmn-ids:
    - mcc: "001"
      mncs:
        - "01"
        - "001"
Example for number-analysis-config.yaml
deployment-config:number-analysis:
  normalization:
    international-prefix: "00"
    min-normalizable-length: 0
    national-prefix: "0"
    network-dialing-code: "6"
    normalize-to: international

  non-provisionable-uris:
    - "111"
    - "tel:111"
    - "sip:111"
Example for mmt-gsm-vmpool-config.yaml
# This file describes the pool of Virtual Machines that comprise a "MMT cluster"
# there are some pieces of software on this VM type that require clustering and
# knowing each other's IP addresses, for example Rhino
deployment-config:mmt-gsm-virtual-machine-pool:

  # needs to match the deployment_id vapp parameter
  deployment-id: example

  # needs to match the site_id vapp parameter
  site-id: DC1

  # Define one or more Rhino users and give their passwords in plain-text.
  # Passwords will be encrypted by 'rvtconfig upload-config' before this file is uploaded to CDS.
  # This user is a read-only user, they can log in and see things in Rhino but do not have permission to change configuration
  # it is discouraged to log into Rhino to modify configuration using REM, instead the declarative configuration system should be used
  rhino-auth:
    - username: readonly
      password: xxxxxxxx

  virtual-machines:
    - vm-id: example-mmt-gsm-1
      rhino-node-id: 101
      # Remove this if diameter-ro is disabled
      per-node-diameter-ro:
        diameter-ro-origin-host: mmt1.mmt.site1.mnc123.mcc530.3gppnetwork.org
      # Remove this if diameter-rf is disabled
#      per-node-diameter-rf:
#        diameter-rf-origin-host: mmt1.mmt.site1.mnc123.mcc530.3gppnetwork.org


    - vm-id: example-mmt-gsm-2
      rhino-node-id: 102
      # Remove this if diameter-ro is disabled
      per-node-diameter-ro:
        diameter-ro-origin-host: mmt2.mmt.site1.mnc123.mcc530.3gppnetwork.org
      # Remove this if diameter-rf is disabled
#      per-node-diameter-rf:
#        diameter-rf-origin-host: mmt2.mmt.site1.mnc123.mcc530.3gppnetwork.org

    - vm-id: example-mmt-gsm-3
      rhino-node-id: 103
      # Remove this if diameter-ro is disabled
      per-node-diameter-ro:
        diameter-ro-origin-host: mmt3.mmt.site1.mnc123.mcc530.3gppnetwork.org
      # Remove this if diameter-rf is disabled
#      per-node-diameter-rf:
#        diameter-rf-origin-host: mmt3.mmt.site1.mnc123.mcc530.3gppnetwork.org
Example for sentinel-volte-gsm-config.yaml
# This file contains the configuration for Sentinel VoLTE that is not already in a shared file.
deployment-config:sentinel-volte:
# Whether session replication is enabled.
session-replication-enabled: true
# SCC configuration.
scc:
# Whether this deployment is 'gsm' or 'cdma'.
scc-mobile-core-type: gsm
# Whether to retrieve the MSISDN from 'MSISDN' or 'EXTENDED_MSISDN'.
# If set to 'EXTENDED_MSISDN', udr-included-identities MUST be set to 'IMPU_AND_IMPI'.
fetch-cmsisdn-source: MSISDN
# Defines which IMS user identities to include in outgoing user data requests.
# Can be either 'IMPU' or 'IMPU_AND_IMPI'.
# Must be set to 'IMPU_AND_IMPI' if fetch-cmsisdn-source is set to 'EXTENDED_MSISDN'.
udr-included-identities: IMPU_AND_IMPI
# Service continuity configuration.
service-continuity:
# Time (in milliseconds) to wait before we consider the ATCF update has failed.
atcf-update-timeout-milliseconds: 2000
# STN-SR.
stn-sr: "6421999999"
# Service Centralisation configuration.
service-centralisation:
# The SCCP address of the Sentinel VoLTE AS.
inbound-ss7-address: type=C7,ri=gt,ssn=146,nature=INTERNATIONAL,numbering=ISDN,tt=0,digits=123456,national=false
# Add the I-CSCF to the route header of the reoriginated invite.
use-direct-icscf-routing: true
# A template string for the P-Visited-Network-Information header generated in the reorigination,
# where {mnc} and {mcc} are replaced with the MNC and MCC respectively.
# IR 65 versions 12 or earlier define this to be epc.ims.mnc{mnc}.mcc{mcc}.3gppnetwork.org,
# while later versions define this as ims.mnc{mnc}.mcc{mcc}.3gppnetwork.org.
generated-pvni-template: "epc.ims.mnc{mnc}.mcc{mcc}.3gppnetwork.org"
# Police incoming originating requests, and reject attempts to hijack the call. Enabled by default.
police-originating-requests: true
# Simple IMRN pool config for mainline case.
simple-imrn-pool:
# The minimum correlation ID value used in the cluster. 0 to maximum-correlation-id.
minimum-correlation-id: "0"
# The maximum correlation ID value used in the cluster. 0 to (10^18-1).
maximum-correlation-id: "999"
# The number of digits the correlation ID should have.
# Minimum of number of digits in maximum-correlation-id to 18 maximum.
number-of-digits-in-correlation-id: 10
# GSM specific configuration.
scc-gsm-service-centralisation:
# Config for IMRN formation.
gsm-imrn-formation:
# Whether routing to an internal network number is allowed or not.
routing-to-internal-network-number-allowed: true
# The type of call, with several possible values. Used when forwarding a call.
nature: NATIONAL
# The numbering plan to be used when forwarding a call.
numbering-plan: ISDN
# If true, reorigination is skipped for terminating sessions if the subscriber
# is not registered in the IMS network.
bypass-terminating-forwarding-if-served-user-not-ims-registered: true
# If true, roaming terminating sessions will always be reoriginated (regardless
# of ims registration)
always-term-reoriginate-if-served-user-is-roaming: false
# TADS configuration.
tads:
# (Optional) prefix to append to the CMSISDN, MSRN or TLDN when forming a CSRN.
# csrn-prefix:
# By default SCC TADS Routing uses the 'CMSISDN' from the HSS,
# but it can also be configured to use the 'MSRN' from the HLR.
# Valid values are 'CMSISDN' and 'MSRN'.
address-source-for-scc-tads: CMSISDN
# If true, the HSS must be queried for voice over PS support as part of
# the decision to attempt to route via PS.
voice-over-ps-support:
# Specifies which identities will be used for the voice over PS support
# request to the HSS.
# One of 'IMPU', 'MSISDN', 'IMPU_IMPI' and 'MSISDN_IMPI'.
request-user-identity-type: IMPU
# Allow WLAN access.
wlan-allowed: false
# The identity of the terminating device that TADS will send the request to.
# One of 'IMS_PUBLIC_IDENTITY', 'SIP_INSTANCE', and 'PATH_FROM_SIP_INSTANCE'
tads-identity-for-terminating-device: IMS_PUBLIC_IDENTITY
# The SIP response code that is returned when a session is ended due to an error.
end-session-error-code: 480
# When enabled INVITE requests destined for the CS network will be sent directly via
# the I-CSCF, bypassing the S-CSCF.
cs-routing-via-icscf: true
# Configuration for TADS sequential routing
on-sequential-routing:
# Time to wait (in milliseconds) for a potentially better forked response.
tads-timer-max-wait-milliseconds: 5000
# List of SIP response codes that will trigger attempts of more routes after a PS attempt.
ps-fallback-response-codes: []
# Configuration for TADS parallel routing
on-parallel-routing:
# Time to wait (in milliseconds) for a final response.
parallel-timer-max-wait-milliseconds: 20000
# When enabled TADS will end all parallel forks on the first busy response (486).
release-all-legs-on-busy: false
# Configuration for SRI requests sent to the HLR
sri-requests-to-hlr:
# If enabled, when sending an SRI request to the HLR the feature will set the suppress T-CSI flag on the request
set-suppress-tcsi-flag: false
# If enabled, when sending an SRI request to the HLR on a terminating call the feature
# will set the 'Suppression of Announcement' flag on the request.
set-suppress-announcement-flag: false
# When present, requests destined to the CS domain will contain a Diversion header to
# suppress call diversion in the CS domain side of the call.
# suppress-cs-domain-call-diversion:
#
# # When true, use diversion counter parameter, otherwise use number of headers.
# use-diversion-counter-parameter: true
#
# # The configured diversion limit in the CS network to suppress further call diversion.
# cs-domain-diversion-limit: 1
# Configuration for MMTel services.
mmtel:
announcement:
# Media server URI, used when playing announcements
# This is distinct from mrf-uri for Conferencing
announcements-media-server-uri: sip:annc-audio@localhost:5260;lr;transport=tcp
# Each announcement needs to be configured with the following:
# id - The announcement ID that is used to correlate between services and the
# announcement that will be played.
# description - A human readable string that indicates what the announcement is for.
# announcement-url - The URL to the file on the MRF that will be played.
# duration-milliseconds - The maximum duration (in milliseconds) of the announcement.
# repeat - The number of times the announcement will be repeated.
# delay-milliseconds - The delay (in milliseconds) between repeated announcements.
# mimetype - The MimeType of the announcement to be played.
# interruptable - Whether or not the announcement can be interrupt by user actions.
# end-session-on-failure - Whether or not the current session should be ended if there
# is an error while playing the announcement.
# enforce-one-way-media - Whether or not the media stream should be forced to be one
# way between the MRF and the user during the announcement.
# suspend-charging - Whether or not charging should be suspended while the
# announcement is being played.
announcements:
- id: 20
description: "MMTel - Outgoing Call Barring"
announcement-url: "file://mmtel_ocb.3gp"
duration-milliseconds: 13000
repeat: 2
delay-milliseconds: 1000
mimetype: "audio/3gpp"
interruptable: false
end-session-on-failure: false
enforce-one-way-media: false
suspend-charging: false
- id: 21
description: "MMTel - Incoming Call Barring"
announcement-url: "file://mmtel_icb.3gp"
duration-milliseconds: 13000
repeat: 2
delay-milliseconds: 1000
mimetype: "audio/3gpp"
interruptable: false
end-session-on-failure: false
enforce-one-way-media: false
suspend-charging: false
- id: 22
description: "MMTel - Anonymous Call Rejection"
announcement-url: "file://mmtel_acr.3gp"
duration-milliseconds: 21000
repeat: 2
delay-milliseconds: 1000
mimetype: "audio/3gpp"
interruptable: false
end-session-on-failure: false
enforce-one-way-media: false
suspend-charging: false
- id: 23
description: "MMTel - Call Diversion"
announcement-url: "file://mmtel_cdiv.3gp"
duration-milliseconds: 5000
repeat: 1
delay-milliseconds: 0
mimetype: "audio/3gpp"
interruptable: false
end-session-on-failure: false
enforce-one-way-media: false
suspend-charging: false
- id: 24
description: "MMTel - Call Waiting"
announcement-url: "file://mmtel_cw.3gp"
duration-milliseconds: 600000
repeat: 500
delay-milliseconds: 10000
mimetype: "audio/3gpp"
interruptable: true
end-session-on-failure: false
enforce-one-way-media: false
suspend-charging: false
- id: 25
description: "MMTel - Call Hold (Hold)"
announcement-url: "file://mmtel_hold_hold.3gp"
duration-milliseconds: 600000
repeat: 500
delay-milliseconds: 10000
mimetype: "audio/3gpp"
interruptable: true
end-session-on-failure: false
enforce-one-way-media: false
suspend-charging: false
- id: 100
description: "OCS - Low Balance"
announcement-url: "file://charging_low.3gp"
duration-milliseconds: 4000
repeat: 1
delay-milliseconds: 0
mimetype: "audio/3gpp"
interruptable: false
end-session-on-failure: false
enforce-one-way-media: false
suspend-charging: false
- id: 101
description: "OCS - Insufficient Balance"
announcement-url: "file://charging_insuf.3gp"
duration-milliseconds: 13000
repeat: 2
delay-milliseconds: 1000
mimetype: "audio/3gpp"
interruptable: false
end-session-on-failure: false
enforce-one-way-media: false
suspend-charging: false
- id: 102
description: "OCS - Out Of Credit"
announcement-url: "file://charging_out.3gp"
duration-milliseconds: 9000
repeat: 2
delay-milliseconds: 1000
mimetype: "audio/3gpp"
interruptable: true
end-session-on-failure: false
enforce-one-way-media: false
suspend-charging: false
# Default error code announcement config.
# Presence determines whether an announcement should be played to the calling party on receipt
# of any error code not explicitly listed in the error-code-announcements configuration.
# default-error-code-announcement:
# # ID of the announcement to be played on an error response.
# announcement-id: 22
# # Whether the call should be ended with a 487 response rather than the error code that
# # triggered this announcement.
# end-call-with-487-response: false
# Config for whether or not an announcement should be played to calling party on particular error codes
# error-code-announcements:
# # Each announcement is configured with the following:
# # error-code - The SIP error response code that should trigger this announcement.
# # announcement-id - The announcement ID that is to be used for this error code.
# # Cannot be specified when disable-announcement is set to true.
# # disable-announcement - Optional. If set to true, no announcement
# # will be played for the specified error code, overriding any default error
# # code announcement that may have been specified. If set to true, then
# # announcement-id must not be specified.
# # end-call-with-487-response - Once the announcement is finished should the call be
# # ended with a 487 response or the original error that triggered this announcement.
# - error-code: 486
# announcement-id: 24
# end-call-with-487-response: false
# - error-code: 488
# announcement-id: 22
# end-call-with-487-response: true
# - error-code: 489
# disable-announcement: true
# end-call-with-487-response: true
# Support for enabling or disabling specific HSS queries.
hss-queries-enabled:
# Whether to query for Operator Determined Barring Information (IMS-ODB-Information).
odb: false
# Whether to query for Metaswitch TAS Services (Metaswitch-TAS-Services).
metaswitch-tas-services: false
# When the roaming status is unknown the HLR can be used to try to determine the roaming status
# of a subscriber by sending an ATI query to it.
determine-roaming-from-hlr: true
# Configuration for conferencing.
conferencing:
# The URI of the Media Resource Function used for Conferencing.
# This is distinct from the media-server-uri used for Announcements
# The hostname part should either be a resolvable name or the IP address of the MRF.
conference-mrf-uri: sip:mrf@mrfhost.example:5060
# Should messages to the MRF be routed via the IMS, or are they allowed to be routed
# direcectly from the TAS to MRF.
route-to-mrf-via-ims: false
# The MMTel Conference MSML Schema Vendor Name.
# Used by the Conf feature to determine mapper selection
# when creating MSML documents for interaction with the MRF.
# 'Dialogic' or 'Radisys'.
msml-vendor: Radisys
# Whether to use the Re-INVITE based three-party conference flow.
enable-scc-conf-handling: true
# Decides whether the 'root' element will be a child of the 'selector' element,
# otherwise will be a child of 'videolayout'
root-on-selector: true
# A list of conference factory PSIs to use in addition to the standard conference
# factory PSIs, as per TS 23.003. They are as follows:
# "sip:mmtel@conf-factory.<HOME-DOMAIN>"
# "sip:mmtel@conf-factory.ims.mnc<MNC>.mcc<MCC>.3gppnetwork.org"
# "sip:mmtel@conf-factory.ics.mnc<MNC>.mcc<MCC>.3gppnetwork.org"
conference-factory-psi-aliases: []
# Maximum number of participants that are allowed in each conference call.
maximum-participants: 3
# Should video be allowed during conference calls
allow-video-conference-calls: false
# Delay (in milliseconds) after a conference ends before ConferenceView profiles are
# removed.
conference-view-removal-delay-milliseconds: 0
# Conferencing event subscription configuration.
subscription:
# Value to be used if the SUBSCRIBE message doesn't contain an Expires header.
default-subscription-expiry-seconds: 3600
# SUBSCRIBE requests with an Expires value lower than this are rejected.
min-subscription-expiry-seconds: 5
# Frequency of polls for changes to conference view.
polling-interval-seconds: 5
# Configuration for determining international and roaming status
international-and-roaming:
# Treat non-international format numbers as national.
non-international-format-number-is-national: false
# End call if no visited network.
end-call-if-no-visited-network: false
# Use different configuration for each access network MCC.
# Set to false to use the default configuration.
use-mcc-specific: false
# Minimum length of destination address to set international
# and roaming status for. Destination addresses less than this
# length will not have international or roaming status set.
min-length: 0
# Configuration for analysing numbers according to the North American Numbering Plan.
north-american-numbering-plan-analysis:
# Whether to analyse numbers according to the North American Numbering Plan, using
# this to determine location information.
enable-nanp-analysis: false
# Configuration for barring and announcements of calls determined to be international
international-call-management:
# The default handling of calls determined to be international
default-international-call-management:
# Whether calls dialed without the international prefix are barred.
bar-calls-with-missing-prefix: false
# The ID of the announcement to play when calls dialed without the international
# prefix are barred.
# bar-calls-with-missing-prefix-announcement-id: 102
# The ID of the announcement to play to the calling party when an international
# call is made.
# international-call-announcement-id: 101
# The configuration of international NANP calls by destination
# country. Only available if North American Numbering Plan
# analysis is enabled.
# call-management-by-country-code:
# The determined ISO country code of the called party if within the NANP.
# - iso-country-code: "CA"
# Whether to bar calls to this destination that were dialled without an international prefix
# bar-calls-with-missing-prefix: true
# The ID of the announcement to play if calls to this destination were barred
# bar-calls-with-missing-prefix-announcement-id: 102
# The ID of the announcement to play to the caller before international calls to this
# destination are connected
# international-call-announcement-id: 102
# Configuration for the communication hold feature.
communication-hold:
# Parameters for Hold response processing. If one is specified, then all should be.
# Their presence indicates bandwidth should be adjusted when a session is Held and Resumed.
# Default values taken from 3GPP TS 24.610 Rel 12.6.0 section 4.5.2.4.
bandwidth-adjustment:
# The value of the "b=AS:" parameter to use when processing a Hold response.
b-as-parameter: 0
# The value of the "b=RR:" parameter to use when processing a Hold response.
b-rr-parameter: 800
# The value of the "b=RS:" parameter to use when processing a Hold response.
b-rs-parameter: 800
# Should an announcement be played when a session is held.
announcement:
# The announcement to be played when a session is held.
announcement-id: 25
# Determines how media streams for the holding party are handled while an announcement
# to the held party is in progress. Can be set to NO_HOLD, BLACK_HOLE_ONLY, or FULL_HOLD.
holding-party-media-mode: FULL_HOLD
# Configuration for the communication waiting feature.
communication-waiting:
# Should an announcement be played to a calling user when communication waiting is
# applied.
announcement:
# The announcement to be played when communication waiting is applied.
announcement-id: 24
# Time (in seconds) for the communication waiting timer.
timer-seconds: 0
# Configuration for privacy features.
privacy:
# Configuration for the Originating Identification Presentation (OIP) feature.
originating-identification-presentation:
# When set to true, the from header of the originating INVITE will be
# anonymized if the OIP feature is not active for the subscriber.
#
# If set to 'true', this typically means that:
# - OIP is authorized for the large majority of subscribers, and that;
# - The OIP active flag is either not present in the subscriber's data
# (therefore defaulting to true), or the OIP flag is present in the
# subscriber's data (typically set to true).
# - This also implies that the OIR user-policy is set to 'None'.
#
# If set to 'false', this typically means that:
# - OIP is not 'active' or 'authorized' yet the operator desires the
# called party to see the calling party.
# - This implies that the OIR user-policy would be set to
# ANONYMIZE_FROM or ADD_USER_PRIVACY.
anonymize-from-header: true
# If true, allows History-Info header deletion.
allow-history-info-header-deletion: false
# Configuration for the Originating Identification Restriction (OIR) feature.
originating-identification-restriction:
# Can be one of two values: ONLY_IDENTITY, and ALL_PRIVATE_INFORMATION.
# Use of ONLY_IDENTITY means the Privacy header is set to Privacy:id.
# Use of ALL_PRIVATE_INFORMATION means the Privacy header is set to Privacy:header.
presentation-restriction-type: ALL_PRIVATE_INFORMATION
# The user policy for OIR. Must be one of NONE, ANONYMIZE_FROM, and ADD_USER_PRIVACY.
user-policy: NONE
# Configuration for PSAP callback functionality.
psap-callback:
# Use the contents of the Priority header in the initial INVITE
# to determine whether the session is a PSAP callback.
use-priority-header: false
# Configuration for the SIP MESSAGE mechanism for determining PSAP callbacks.
# Presence determines whether the mechanism is used or not.
sip-message-options:
# For use when use-sip-message is set to true.
# When a SIP MESSAGE notifying that a PSAP call has taken place, this is the time
# (in seconds) after receiving that MESSAGE that sessions for the identified user are
# assumed to be a PSAP callback.
expiry-time-seconds: 86400
# For use when use-sip-message is set to true.
# If set to true, SIP MESSAGEs notifying a PSAP call will be terminated at the MMTel,
# otherwise they are propagated through the network.
terminate-message: true
# Configuration for call diversion (CDIV)
call-diversion:
# Play announcement on diversion.
announcement:
announcement-id: 23
# voicemail-announcement-id: 23
# Standard MMTel call diversion configuration
mmtel-call-diversion:
# Maximum number of diversions that may be made while
# attempting to establish a session.
max-diversions: 20
# Action to take when the maximum number of diversions is exceeded.
# Must be one of:
# REJECT, DELIVER_TO_FIXED_DESTINATION, DELIVER_TO_SUBSCRIBERS_VOICEMAIL_SERVER
max-diversion-action: REJECT
# Address to divert to when max-diversions limit is reached and
# max-diversion-action is set to DELIVER_TO_FIXED_DESTINATION.
# max-diversion-fixed-destination: sip:no-reply@example.com
# Time to wait (in seconds) for a reply before diverting due to a no reply rule.
# This value is the network default, and can be overridden in subscriber data.
no-reply-timeout-seconds: 20
# Whether to add orig tag when diverting a call.
add-orig-tag: true
# URIs allowed to be re-targeted to in case of max-diversions limit being reached.
# diversion-limit-exempt-uris:
# - sip:user@example.com
# Whether diversion should be suppressed if call terminates in CS domain.
suppress-for-cs-terminating-domain: false
# Whether subscriber configuration should take precedence over operator
# configuration.
prefer-subscriber: false
# Address to forward to if operator or subscriber forward-to rule has no target
# specified.
# default-target-uri: sip:user@example.com
# Additional response codes that will trigger CDIV Not-Reachable (in addition to
# those outlined in the MMTel CDIV specification).
# additional-not-reachable-status-codes:
# - 488
# Whether to allow CDIV rules with not-reachable conditions to be triggered after
# a 180 response has been received from the called-party.
allow-not-reachable-during-alerting: false
# Whether to add 'hi-target-param' of type 'mp' to the 'hi-entry' added by a
# diversion.
add-mp-param: false
# Configuration for forwarding to a voicemail server
# If present, enables forwarding to subscriber's voicemail server if all other
# connection attempts fail.
# forward-to-voicemail:
#
# # URIs of voicemail servers for which a voicemail-specific announcement may be
# # played (if specified) and for which forwarding to without allocated credit
# # can be allowed (if enabled).
# voicemail-uris:
# - sip:vms1@example.com
# - sip:vms2@example.com
#
# # Time to wait (in seconds) for a call to be successfully connected before
# # forwarding to voicemail (if enabled) or 0 to disable timer.
# forward-to-voicemail-timeout-seconds: 0
#
# # When to allow forwarding to voicemail when out of credit.
# # Only specified when using 'ro' for online charging.
# # Must be one of:
# # NEVER_ALLOW, ALLOW_ONLY_FOR_WELL_KNOWN_SERVERS, ALWAYS_ALLOW
# forward-to-voicemail-without-ocs-credit: NEVER_ALLOW
# Configuration for communication barring
communication-barring:
# Configuration for incoming communication barring
incoming-communication-barring:
# Should an announcement be played when an incoming call is barred.
announcement:
# The announcement to be played when an incoming call is barred.
announcement-id: 21
# (Optional) A different announcement can be played if the call is barred
# because it is from an anonymous user.
anonymous-call-rejection-announcement-id: 22
# If false, incoming call barring will ignore International and International-exHC
# rules. This is because it is not possible to accurately determine whether the
# calling party is international in all circumstances.
international-rules-active: false
# # Configuration for outgoing communication barring
# outgoing-communication-barring:
#
# # Should an announcement be played when an outgoing call is barred.
# announcement:
#
# # The announcement to be played when an outgoing call is barred.
# announcement-id: 20
# Configuration for operator communication barring
# operator-communication-barring:
# The set of operator barring rules that can be applied.
# (Optional) Only required if '../hss-queries-enabled/odb' is 'true'.
# operator-barring-rules:
#
# # Operator barring rule for 'Type1'
# type1:
#
# # The barring rule to be applied
# rule: # Bar domain "example.com"
# <cp:ruleset xmlns="http://uri.etsi.org/ngn/params/xml/simservs/xcap"
# xmlns:cp="urn:ietf:params:xml:ns:common-policy">
# <cp:rule id="blacklist-domain">
# <cp:conditions>
# <cp:identity>
# <many domain="example.com" />
# </cp:identity>
# </cp:conditions>
# <cp:actions>
# <allow>false</allow>
# </cp:actions>
# </cp:rule>
# </cp:ruleset>
#
# # Should the call be redirected when barred by this rule.
# retarget:
#
# # The URI to redirect the barred call to.
# retarget-uri: sip:retarget@retargethost.example:5060
#
# # Should an announcement be played when the call is barred by this rule.
# announcement:
#
# # The announcement to be played if the call is barred by this rule.
# announcement-id: 20
#
# # If we retarget the call, should online charging be disabled.
# disable-online-charging-on-retarget: false
#
# # Operator barring rule for 'Type2'
# type2:
#
# # The barring rule to be applied
# rule: # Bar international calls
# <cp:ruleset xmlns="http://uri.etsi.org/ngn/params/xml/simservs/xcap"
# xmlns:cp="urn:ietf:params:xml:ns:common-policy">
# <cp:rule id="bar-international">
# <cp:conditions>
# <international/>
# </cp:conditions>
# <cp:actions>
# <allow>false</allow>
# </cp:actions>
# </cp:rule>
# </cp:ruleset>
#
# # Should the call be redirected when barred by this rule.
# retarget:
#
# # The URI to redirect the barred call to.
# retarget-uri: sip:retarget@retargethost.example:5060
#
# # Should an announcement be played when the call is barred by this rule.
# announcement:
#
# # The announcement to be played if the call is barred by this rule.
# announcement-id: 20
#
# # If we retarget the call, should online charging be disabled.
# disable-online-charging-on-retarget: false
#
# # Operator barring rule for 'Type3'
# type3:
#
# # The barring rule to be applied
# rule: # Bar roaming calls
# <cp:ruleset xmlns="http://uri.etsi.org/ngn/params/xml/simservs/xcap"
# xmlns:cp="urn:ietf:params:xml:ns:common-policy">
# <cp:rule id="bar-roaming">
# <cp:conditions>
# <roaming/>
# </cp:conditions>
# <cp:actions>
# <allow>false</allow>
# </cp:actions>
# </cp:rule>
# </cp:ruleset>
#
# # Should the call be redirected when barred by this rule.
# retarget:
#
# # The URI to redirect the barred call to.
# retarget-uri: sip:retarget@retargethost.example:5060
#
# # Should an announcement be played when the call is barred by this rule.
# announcement:
#
# # The announcement to be played if the call is barred by this rule.
# announcement-id: 20
#
# # If we retarget the call, should online charging be disabled.
# disable-online-charging-on-retarget: false
#
# # Operator barring rule for 'Type4'
# type4:
#
# # The barring rule to be applied
# rule: # Allow audio calls
# <cp:ruleset xmlns="http://uri.etsi.org/ngn/params/xml/simservs/xcap"
# xmlns:cp="urn:ietf:params:xml:ns:common-policy">
# <cp:rule id="allow-audio">
# <cp:conditions>
# <media>audio</media>
# </cp:conditions>
# <cp:actions>
# <allow>true</allow>
# </cp:actions>
# </cp:rule>
# </cp:ruleset>
#
# # Should the call be redirected when barred by this rule.
# retarget:
#
# # The URI to redirect the barred call to.
# retarget-uri: sip:retarget@retargethost.example:5060
#
# # Should an announcement be played when the call is barred by this rule.
# announcement:
#
# # The announcement to be played if the call is barred by this rule.
# announcement-id: 20
#
# # If we retarget the call, should online charging be disabled.
# disable-online-charging-on-retarget: false
# Outgoing prefix barring configuration
# outgoing-prefix-barring:
#
# # The list of prefixes to match against when doing prefix barring
# prefixes:
#
# # The prefix barring rule for prefix '87'
# - prefix: '87'
# # List of the classifications to apply when the above prefix is matched.
# # Must refer to the name of a defined classification.
# classifications:
# - 'Operator Bar'
#
# # The list of classifications that can be applied to a prefix match
# classifications:
#
# # A barring configuration called 'Operator Bar'.
# - name: 'Operator Bar'
#
# # The minimum length of dialled digits to match against
# minimum-number-length: 5
#
# # The maximum length of dialled digits to match against
# maximum-number-length: 8
#
# # When true, the normalized number must be international and not
# # within the Home Country Code to match this classification.
# match-international: false
#
# # The barring treatment to apply if this condition matches.
# # Valid values are: 'OSBType1', 'OSBType2', 'OSBType3', 'OSBType4',
# # 'OperatorAllow', 'OperatorBar', 'PremiumRateInformation',
# # and 'PremiumRateEntertainment'.
# barring-treatment: 'OperatorBar'
#
# # Disables the outgoing-call-barring (OCB) announcement.
# # Cannot be specified alongside a prefix barring announcement.
# #disable-ocb-announcement: true
#
# # Should a different announcement be used rather than the one
# # from 'outgoing-communication-barring/announcement'
# announcement:
#
# # The announcement ID to use instead of the one from
# # `outgoing-communication-barring/announcement/announcement-id`
# announcement-id: 20
# Configuration for Vertical Service Codes
vertical-service-codes:
# Configuration for Vertical Service Codes XCAP Data Update feature
xcap-data-update:
# Internally-accessible hostname of the XCAP server.
host: xcap-internal.example
# Internally-accessible port of the XCAP server.
port: 8443
# Whether to use TLS for the HTTP connection.
use-https: true
# Base URI of XCAP server when accessed via specified hostname:port.
base-uri: /rem/sentinel/xcap
# Application Unique Identifier (AUID) to use in the request URI.
auid: simservs.ngn.etsi.org
# XCAP document to use in request URI.
document: simservs.xml
# SIP status code to respond with following a successful HTTP response.
success-response-status-code: 603
# SIP status code to respond with following an unsuccessful HTTP response.
failure-response-status-code: 409
# Whether an announcement should be played on failure.
# failure-announcement:
# # ID of the announcement to play on failure.
# announcement-id: 23
# Configuration for the third party registrar.
registrar:
# The registrar can either use the HSS (hsscache) or Cassandra (cassandra) for data storage.
data-storage-type: cassandra
# The type of user identity to use when creating Sh requests for the STN-SR.
user-identity-type-for-stn-sr-request: PUBLIC_ID
# Whether the user's IMS Private ID should be included in Sh requests for the STN-SR.
include-private-id-in-stn-sr-request: false
# Configuration for the SIS.
sis:
# RFC3263 unavailable peer list timer (milliseconds).
unavailable-peer-list-timer-milliseconds: "60000"
# RFC3263 failover timer (milliseconds).
failover-timer-milliseconds: "4000"
# Origin configuration for this application when connecting to the HLR.
# The actual HLR SCCP address (destination) is in the hlr-configuration.yaml file
hlr-connectivity-origin:
# The SCCP address of the Sentinel VoLTE AS.
originating-address: type=C7,ri=pcssn,pc=5,ssn=147,national=false
# The timeout value for opening the MAP dialog with the HLR (in milliseconds).
map-invoke-timeout-milliseconds: 5000
# GSM specific configuration.
gsm:
# The address of the MLC (Sentinel).
mlc-address: address=653333333,nature=INTERNATIONAL,numberingPlan=ISDN
# Indicates if 'hlr-config/hlr-address' should be used as the actual HLR address, or have
# its digits replaced with the MSISDN of the subscriber.
use-msisdn-as-hlr-address: true
# Originating SCCP address when acting as an MSC, used when
# establishing the MAP dialog. Will default to the value of
# 'originating-address' when not present. Typically used to set a
# different originating SSN when sending a SendRoutingInformation
# message to the HLR.
# msc-originating-address: type=C7,ri=pcssn,pc=5,ssn=148,national=false
# Charging configuration
charging:
# Online charging type to use. One of 'ro', 'cap' and 'disabled'.
# If ro is chosen, the peers should be configured in the diameter-ro section below.
# If cap or disabled is chosen, then you must also remove or comment out the
# diameter-ro section below.
gsm-online-charging-type: ro
# When not using Diameter Ro, comment out the contents of this file down to the <<<< END ro-charging
# Also you must remove the lines from mmt-gsm-vmpool-config.yaml
ro-charging:
diameter-ro:
# The Diameter Ro release to use.
diameter-ro-release: Vcb0
# The origin realm to use when sending messages.
origin-realm: metaswitch.com
# The value to use as the destination realm.
destination-realm: metaswitch.com
# The Diameter Ro destination peers.
destination-peers:
- destination-hostname: peer.metaswitch.com
port: 3868
protocol-transport: aaa
metric: 1
# Whether the session is permitted to continue if there is an OCS failure.
continue-session-on-ocs-failure: false
charging-announcements:
# Config for low balance announcements
low-credit-announcements:
# Low balance announcement ID to be used during call setup.
call-setup-announcement-id: 100
# Low balance announcement ID to be used after call setup.
mid-call-announcement-id: 100
# The delay (in milliseconds) before a another credit check should happen after a
# low balance announcement has occurred.
charging-reauth-delay-milliseconds: 30000
# Config for out of credit announcements.
out-of-credit-announcements:
# Out of credit announcement ID to be used during call setup.
call-setup-announcement-id: 101
# Out of credit announcement ID to be used after call setup.
mid-call-announcement-id: 102
# <<<< END ro-charging
# Whether to enable connections to Diameter Rf peer through the Diameter Rf Control RA.
# If present, Rf is enabled. Comment out to disable Rf.
# When not using Diameter Rf, comment out the contents of this file down to the <<<< END rf-charging
# Also you must remove the lines from mmt-gsm-vmpool-config.yaml
# rf-charging:
#
# diameter-rf:
#
# # The Diameter Rf release to use.
# diameter-rf-release: Vcb0
#
# # The origin realm to use when sending messages.
# origin-realm: metaswitch.com
#
# # The value to use as the destination realm.
# destination-realm: metaswitch.com
#
# # The Diameter Rf destination peers.
# destination-peers:
# - destination-hostname: peer.metaswitch.com
# port: 3868
# protocol-transport: sctp
# metric: 1
# <<<< END rf-charging
# When not using CAP charging, comment out the contents of this file down to the <<<< END cap-charging
# cap-charging:
#
# # Configuration for the IM-SSF.
# imssf:
# # When using CAP charging and GSM, the IMCSI can be fetched from the HLR and provided to the IMSSF
# # in the originating and/or terminating case.
# # Comment out the whole section to disable for both originating and terminating calls.
# imcsi-fetching:
# # The requested Trigger Detection Point for originating calls, which determines whether
# # T_CSI or O_CSI is requested from the HLR.
# # Values of '2' or '3' will request the O_CSI, '12' will request the T_CSI, other values
# # are not valid.
# # Comment out to disable for originating calls.
# originating-tdp: 2
#
# # The requested Trigger Detection Point for terminating calls, which determines whether
# # T_CSI or O_CSI is requested from the HLR.
# # Values of '2' or '3' will request the O_CSI, '12' will request the T_CSI, other values
# # are not valid.
# # Comment out to disable for terminating calls.
# terminating-tdp: 12
#
# # Configuration for the charging GT (global title) that is sent to the SCP.
# charging-gt:
# # The format template to use when creating Charging GTs (global title). It must
# # be a digit string except for tokens ('{iso}', '{mcc}', '{mnc}) which are
# # substituted in.
# format: "6422142{iso}"
#
# # The Charging GT (global title) to use when one could not be generated because
# # the user’s location could not be determined.
# unknown-location: "64221429090"
#
# # The SCCP address of the GSM charging SCP.
# scf-address: "type=C7,ri=pcssn,pc=6,ssn=156"
# <<<< END cap-charging
# Configuration for CDRs
cdr:
# If present, interim CDRs are enabled. If Diameter Rf has been enabled, this is required.
interim-cdrs:
# Enable CDRs to go to the local filesystem
# Diameter Rf is selected separately
write-cdrs-in-filesystem: true
# Indicates whether or not to write CDRs on SDP changes.
write-cdr-on-sdp-change: true
# The maximum duration (in seconds) between timer driven interim CDRs.
# Setting this to zero will disable timer based interim CDRs.
interim-cdrs-period-seconds: 300
# Enable session CDRs.
session-cdrs-enabled: true
# Configuration for the Session Refresh feature.
session-refresh:
# The interval of the periodic timer (in seconds).
timer-interval-seconds: 30
# Period of no activity for leg tp refresh (in seconds).
refresh-period-seconds: 570
# Whether the session should be refreshed using UPDATE requests,
# as long as the endpoint allows UPDATE requests.
refresh-with-update-if-allowed: true
# Maximum allowed duration of a call (in seconds).
max-call-duration-seconds: 86400
# DO NOT ENABLE IN PRODUCTION
# Enable extensive logging for verification and issue diagnosis during acceptance testing
debug-logging-enabled: falseExample for hlr-config.yaml
# This file contains Home Location Register (HLR) configuration.
# This file must be present alongside the other Rhino VoLTE TAS YAML configuration files on the SIMPL server,
# regardless of whether the HLR is enabled or disabled.

deployment-config:hlr:
  hlr-address: "type=C7,ri=pcssn,pc=5,ssn=6,national=false"
Example for icscf-config.yaml
# This file contains Interrogating Call Service Control Function (I-CSCF) configuration.

deployment-config:icscf:

  # The URI of the Interrogating Call Session Control Function.
  # For MMT, the Conf and ECT features will automatically add an "lr" parameter to it.
  # The hostname part should either be a resolvable name or the IP address of the I-CSCF.
  i-cscf-uri: sip:icscf@icscfhost.example:5060
Example for smo-vmpool-config.yaml
# This file describes the pool of Virtual Machines that comprise an "SMO cluster"
# there are some pieces of software on this VM type that require clustering and
# knowing each other's IP addresses, for example Rhino and the OCSS7 SGC.
deployment-config:smo-virtual-machine-pool:

  # needs to match the deployment_id vapp parameter
  deployment-id: example

  # needs to match the site_id vapp parameter
  site-id: DC1

  # Whether sentinel-ipsmgw should be enabled and installed on the smo node.
  # If set to false, ipsmgw will not be installed and no other sentinel-ipsmgw config
  # should be specified.
  sentinel-ipsmgw-enabled: true

  # Define one or more Rhino users and give their passwords in plain-text.
  # Passwords will be encrypted by 'rvtconfig upload-config' before this file is uploaded to CDS.
  # This user is a read-only user, they can log in and see things in Rhino but do not have permission to change configuration
  # it is discouraged to log into Rhino to modify configuration using REM, instead the declarative configuration system should be used
  rhino-auth:
    - username: readonly
      password: xxxxxxxx

  virtual-machines:
    - vm-id: example-smo-1
      rhino-node-id: 101
      # Uncomment this if diameter-ro is enabled
#      per-node-diameter-ro:
#        diameter-ro-origin-host: smo1.smo.site1.mnc123.mcc530.3gppnetwork.org
      sip-local-uri: sip:smo1@mnc123.mcc530.3gppnetwork.org

    - vm-id: example-smo-2
      rhino-node-id: 102
      # Uncomment this if diameter-ro is enabled
#      per-node-diameter-ro:
#        diameter-ro-origin-host: smo2.smo.site1.mnc123.mcc530.3gppnetwork.org
      sip-local-uri: sip:smo2@mnc123.mcc530.3gppnetwork.org

    - vm-id: example-smo-3
      rhino-node-id: 103
      # Uncomment this if diameter-ro is enabled
#      per-node-diameter-ro:
#        diameter-ro-origin-host: smo3.smo.site1.mnc123.mcc530.3gppnetwork.org
      sip-local-uri: sip:smo3@mnc123.mcc530.3gppnetwork.org
Example for sgc-config.yaml
# This file contains configuration for the OCSS7 SGC.
deployment-config:sgc:
  sgcenv:
    # The port to bind to for JMX service, used by the CLI and MXBeans.
    jmx-port: 55555

  hazelcast:
    # If omitted, backup-count defaults to N-1, where N is number of SMO nodes.
    # Don't uncomment, unless support instructs you to.
    # backup-count: 1

    password: xxxxxxxx

  # Only change SGC properties if support instructs you to
  #sgc-properties:
  #  properties:
  #    - name: com.cts.ss7.shutdown.gracefulWait
  #      value: '30000'

  m3ua:
    # The default port to bind for this local M3UA endpoint.
    local-port: 2905
#    # Normally each node in an SGC cluster will use the same port for its local M3UA endpoint.
#    # However, some configurations require that each node uses a different local port.
#    # Uncomment and configure if required.  For 'node-index', '1' is the first SMO node, '2' the
#    # second and so on.  Any nodes not configured here will use the global default 'local-port'
#    # above.
#    per-node-local-port:
#      - node-index: 2
#        local-port: 2906
#      - node-index: 3
#        local-port: 2907

    # The SCCP variant to configure this SGC to use.
    # Can be either: ITU or ANSI
    sccp-variant: ITU
    # This cluster's signaling point code.
    # If specifying a single integer (for ITU point codes), be sure to quote it
    # along with all other point codes in this file.
    point-code: "5"

    remote:
      peers:
        - id: 'STP-1'
          remote-ips:
            # The index of the SMO node that hosts the SGC that will be
            # connected to this IP set.  '1' is the first SMO node,
            # '2' is the second, and so on.  '-1' indicates that all
            # SGC nodes in the cluster will use this remote IP set.
            - node-index: -1
              ips:
                - 10.14.144.71
                - 10.14.144.134
          # The remote port for this M3UA association.
          port: 2906
          # The AS to which this connection belongs.
          application-servers:
            - as-id: 'NN-AS'

        - id: 'STP-2'
          remote-ips:
            - node-index: -1
              ips:
                - 10.14.144.81
                - 10.14.144.144
          port: 2906
          application-servers:
            - as-id: 'NN-AS'

      application-servers:
        - id: 'NN-AS'
          routes:
            default-priority: 5
            # The DPC identifiers applicable to this route.
            dpc-ids:
              - id: 'alias-2-233-3'
        - id: 'NN-AS2'
          routes:
            default-priority: 0
            # The DPC identifiers applicable to this route.
            dpc-ids:
              - id: 'alias-2-233-3'
          precond-ssns:
            - 2
            - 3
      dpcs:
        - id: 'alias-2-233-3'
          dpc: "5963"
          # maximum unsegmented SCCP message size to send to this
          # destination as a single unsegmented message
          muss: 252
          # maximum user data length per segment to send to this
          # destination
          mss: 245

      cpcs:
        - dpc: "5963"
          # The local SSNs to monitor.
          ssns:
            - 8
            - 146

    global-title:
      # For this example:
      # Match everything and send to the single alias point code.
      outbound:
        matchers:
          defaults:
            natofaddr: 0
            numplan: 7
            trtype: 129
          rules:
            - id: '1'
              is-prefix: false
              translations:
                - 'all'
        translations:
          - id: 'all'
            dpc: "5963"
            priority: 5

#        # Example rewriter would take all translation rules that
#        # use the 'example' rewriter, replace the digits with
#        # '123456', and set translated messages to route on the SSN.
#        rewriters:
#          - id: 'example'
#            addrinfo: '123456'
#            route-on: 'SSN'

      # Inbound translation has only matching rules.
      # If an address is matched, it is sent to the
      # configured SSN
      inbound:
        - id: 'to-sentinel-volte-gsm'
          addrinfo: '123456'
          is-prefix: false
          natofaddr: 4
          numplan: 1
          trtype: 0
          ssn: 146
        - id: 'to-sentinel-volte-cdma'
          addrinfo: '987654'
          is-prefix: false
          trtype: 0
          ssn: 146
Example for sentinel-ipsmgw-config.yaml
# This file contains the configuration for Sentinel IPSMGW that is not already in a shared file.

deployment-config:sentinel-ipsmgw:

  # Geo-redundancy configuration.
  # Comment out, or remove this section to disable geo-redundancy.
#  georedundancy:
#    # The number of IPSMGW sites
#    total-sites: 2

  # MAP messaging configuration
  map-messaging:
    # Template SMSC address. The digits are replaced by those of the received SMSC address.
    template-smsc-address: type=C7,ri=gt,digits=0,ssn=8,national=false,nature=INTERNATIONAL,numbering=ISDN,tt=0

    # IPSMGW SCCP address.
    originating-address: type=C7,ri=pcssn,pc=5,ssn=148,national=false

    # IPSMGW as msc address.
    ipsmgw-as-msc-address: "address=653333333,nature=INTERNATIONAL,numberingPlan=ISDN"

    # Indicates if 'hlr-config/hlr-address' should be used as the actual HLR address, or have its
    # digits replaced with the MSISDN of the subscriber.
    use-msisdn-as-hlr-address: false

    # If true, no MAP messages will be sent to the HLR.
    # Can only be set to true when 'delivery-order' is 'PS_ONLY'
    suppress-hlr-interaction: false

    # When accepting an OpenRequest, the SCCP responder address in theOpenAccept will, by
    # default, be set to the value of the SCCP called party in the OpenRequest.
    # If `UseGtAsCallingParty` is set to true, and if the received sccp-called-party contains a
    # global title, then the global title will be used.
    use-gt-as-calling-party: false

    # If the length of the message content falls within the configured maximum then send the
    # ForwardSM as part of the TC-BEGIN.
    # As a special case a configured max size of 0 disables this functionality regardless of the
    # actual content length.
    sms-content-size-threshold: 0

    # If true, specify the SmDeliveryNotIntended flag when performing an SRI for SM IMSI-only
    # query (i.e. during SMMA callflows).
    sri-sm-delivery-not-intended: false

  # The domain name used in SIP URIs on IPSMGW-generated outbound requests.
  terminating-domain: metaswitch.com

  # The delivery order for mobile-terminating messages.
  # Choices are PS_THEN_CS, CS_THEN_PS, PS_ONLY or CS_ONLY.
  # PS stands for "packet-switched network" (i.e. IMS network).
  # CS stands for "circuit-switched network".
  delivery-order: PS_THEN_CS

  # Charging options.
  charging-options:
    # Whether to enable charging for mobile-terminating PS messages.
    mt-ps-enabled: false

    # Whether to enable charging for mobile-terminating CS messages.
    mt-cs-enabled: false

    # Whether to enable charging for mobile-originating PS messages.
    mo-ps-enabled: false

    # Only required if one of the charging options is enabled.
    # You must also specify the per-node-diameter-ro configuration in smo-vmpool-config.yaml
#    diameter-ro:
#      # The Diameter Ro release to use.
#      diameter-ro-release: Vcb0
#
#      # The origin realm to use when sending messages.
#      origin-realm: metaswitch.com
#
#      # The value to use as the destination realm.
#      destination-realm: metaswitch.com
#
#      # The Diameter Ro destination peers.
#      destination-peers:
#        - destination-hostname: peer.metaswitch.com
#          port: 3868
#          protocol-transport: aaa
#          metric: 1

  # Presence enables UE reachability notifications.
  ue-reachability-notifications:
    # Reachability notification subscription expiry time (in seconds).
    subscription-expiry-time-seconds: 3600

  # MCC/MNC used by the Correlation RA to generate a Correlation IMSI when the terminating
  # subscriber's routing info cannot be determined. Must match one of the PLMNIDs in
  # the home network configuration.
  correlation-ra-plmnid:
    mcc: "001"
    mnc: "01"

  # Fallback control for message delivery.
  fallback-settings:
    # Timeout (in milliseconds) before falling back to the other network type.
    fallback-timer-milliseconds: 5000

    # List of error codes which will prevent fallback from PS to CS.
    avoidance-codes-ps-to-cs:
      - 22

    # List of error codes which will prevent fallback from CS to PS.
    avoidance-codes-cs-to-ps: []

  # SCCP allowed GT prefixes.
  sccp-allowlist: []

  # Configuration for USSI functions
#  ussi:
#
#    # Should all USSI messages be rejected with a default message.
#    # Remove or comment out this section to allow USSI messages to be processed.
#    reject-all-with-default-message:
#
#      # The language of the message to be sent in the USSI response
#      language: "en"
#
#      # The message to be sent in the USSI response
#      message: "Please visit www.example.com"

  # DO NOT ENABLE IN PRODUCTION
  # Enable extensive logging for verification and issue diagnosis during acceptance testing
  debug-logging-enabled: false
Example for shcm-overrides.yaml
# This file contains low-level Rhino configuration.
# Use only on advice of your Customer Care representative.
# If this file is not in use, you don't have to upload it to CDS.

rhino-config:config-bundle:
  format: partial
  schema-version: '1.0'

rhino-config:rhino-configuration:
  namespaces:
    - name: ''
Example for mag-overrides.yaml
# This file contains low-level Rhino configuration.
# Use only on advice of your Customer Care representative.
# If this file is not in use, you don't have to upload it to CDS.

rhino-config:config-bundle:
  format: partial
  schema-version: '1.0'

rhino-config:rhino-configuration:
  namespaces:
    - name: ''
Example for mmt-gsm-overrides.yaml
# This file contains low-level Rhino configuration.
# Use only on advice of your Customer Care representative.
# If this file is not in use, you don't have to upload it to CDS.

rhino-config:config-bundle:
  format: partial
  schema-version: '1.0'

rhino-config:rhino-configuration:
  namespaces:
    - name: ''
Example for smo-overrides.yaml
# This file contains low-level Rhino configuration.
# Use only on advice of your Customer Care representative.
# If this file is not in use, you don't have to upload it to CDS.

rhino-config:config-bundle:
  format: partial
  schema-version: '1.0'

rhino-config:rhino-configuration:
  namespaces:
    - name: ''
Changing Cassandra data
This page describes how to change Cassandra data. As Cassandra only runs on the TSN nodes, this page only applies to the TSN nodes.
Uploading files to containers
As both Cassandras run in docker containers, it is necessary to upload any cql files to the container. The containers can’t access files directly from the host filesystem.
For example, to run a cql file:
user@local:~  $ scp cassandra-data-change.cql tsn1:
WARNING: Access to this system is for authorized users only.
cassandra-data-change.cql                100% 4696    18.5KB/s   00:00
user@local:~  $
user@local:~  $ ssh tsn1
WARNING: Access to this system is for authorized users only.
[sentinel@tsn1 ~]$
[sentinel@tsn1 ~]$ ls cassandra-data-change.cql
cassandra-data-change.cql
[sentinel@tsn1 ~]$
[sentinel@tsn1 ~]$ docker exec cassandra cqlsh -f cassandra-data-change.cql
Can't open 'cassandra-data-change.cql': [Errno 2] No such file or directory: 'cassandra-data-change.cql'
[sentinel@tsn1 ~]$
[sentinel@tsn1 ~]$ docker cp cassandra-data-change.cql cassandra:/basedir/
[sentinel@tsn1 ~]$
[sentinel@tsn1 ~]$ docker exec cassandra cqlsh -f cassandra-data-change.cql
[sentinel@tsn1 ~]$
Connecting to MetaView Server
If you have deployed MetaView Server, Metaswitch’s network management and monitoring solution, you can use MetaView Explorer to monitor alarms on your VMs.
These instructions have been tested on version 9.5.40 of MetaView Server; for other versions the procedure could differ. In that case, refer to the MetaView Server documentation for more details.
Setting up your VMs to forward alarms to MetaView Server
To set up your VMs to forward alarms to MetaView Server, configure the following settings in snmp-config.yaml. An example can be found in the example snmp-config.yaml page.
| Field | Value |
|---|---|
|
|
|
|
|
|
|
|
|
|
| |
MetaView Server only supports the alarm-notification category of Rhino SNMP notifications. Therefore, all other notification categories should be disabled. |
Then, perform the configuration to upload the configuration.
Adding your VMs to MetaView Server
-
Set up a deployment (if one does not already exist). From the
Object tree and Views, right-click onAll managed componentsand selectAdd Rhino deployment. Give the deployment a name and clickapply. -
Right-click on your deployment and select
add Rhino Cluster. This needs to be done once per node type. We recommend that you name your cluster after the node type. -
For every node in your deployment, right-click on the Rhino cluster created in the previous step for this node type and select
add Rhino node. Enter the management IP address for the node, and the SNMP community configured insnmp-config.yaml. If the node has been set up correctly, it will show a green tick. If it shows a red cross, click on the bell next toAlarm state → Attention Requiredto see the problem.
SGC configuration tools
On the SIMPL VM, you can find the following commands in the resources subdirectory of any RVT CSAR, after it has been extracted using csar unpack.
/home/admin/.local/share/csar/<csar name>/<version>/resources/
sgc-mml-to-yaml
Generate SGC and SNMP configuration YAML files from MML file.
sgc-mml-to-yaml [--one-peer-per-connection] --mml <mml_file> --snmp-yaml-output <snmp.yaml> --sgc-yaml-output <sgc.yaml>The following table describes the parameters in more detail:
| Parameter | Description |
|---|---|
|
The input file containing MML. |
|
The output file to write the |
|
The output file to write the |
|
By default the MML connection name is examined to determine if connections from multiple SGCs to the same remote peer should be considered to be one logical peer. This is done by examining the connection name and seeing if it matches the form This option may be used to disable this behaviour. i.e. every connection will be considered to be a connection to a distinct peer. |
sgc-yaml-to-mml
Generate SGC configuration MML file from snmp-config and sgc-config YAML files.
sgc_yaml_to_mml --deployment-id <deployment-id> --node-count <node-count> --management-ip <mgmt-ip> +
--signaling-ip <sig-ip> [--signaling2-ip <sig2-ip>] --clustering-ip <cluster-ip> +
[--schema-dir <schema-dir>] --snmp-yaml <snmp.yaml> --m3ua-yaml <sgc.yaml> --mml-output <output.mml>
The following table describes the parameters in more detail:
| Parameter | Description |
|---|---|
|
The deployment ID. |
|
The number of SGC/SMO nodes to generate configuration for. |
|
The base management IP address of the first SGC/SMO node. |
|
The base signaling IP address of the first SGC/SMO node. |
|
The optional base signaling2 IP address of the first SGC/SMO node if a locally multihomed SCTP configuration is required. |
|
The base clustering IP address of the first SGC/SMO node. |
|
The optional schema dir, if schemas are not in the default location. Typically not required. |
|
The input file containing the SNMP config YAML. Usually |
|
The input file containing the SGC config YAML. Usually |
|
The output file to write the MML to. |
Troubleshooting node installation
Please refer to the pages below for troubleshooting the individual node types.
Troubleshooting TSN installation
Cassandra not running after installation
Check that bootstrap and configuration were successful:
[sentinel@tsn1 ~]$ grep 'Bootstrap complete' ~/bootstrap/bootstrap.log
2019-10-28 13:53:54,226 INFO bootstrap.main Bootstrap complete
[sentinel@tsn1 ~]$
If the bootstrap.log does not contain that string, examine the log for any exceptions or errors.
[sentinel@tsn1 ~]$ report-initconf status
status=vm_converged
[sentinel@tsn1 ~]$
If the status is different, examine the output from report-initconf for any problems. If that is not sufficient, examine the ~/initconf/initconf.log file for any exceptions or errors.
If bootstrap and configuration were successful, check that the docker containers are present and up:
[sentinel@tsn1 ~]$ docker ps

CONTAINER ID        IMAGE                                                COMMAND                  CREATED             STATUS              PORTS               NAMES

6999eacf6868        art-docker.metaswitch.com/rhino/cassandra:3.11.4-4   "docker-entrypoint..."   8 minutes ago       Up 8 minutes                            cassandra-ramdisk

77520b74d274        art-docker.metaswitch.com/rhino/cassandra:3.11.4-4   "docker-entrypoint..."   8 minutes ago       Up 8 minutes                            cassandra
[sentinel@tsn1 ~]$
If the containers are present and Cassandra is not running, use journalctl and systemctl to check system logs for any errors or exceptions.
For the on-disk Cassandra:
$ journalctl -u cassandra -l
$ systemctl status cassandra -l
For the ramdisk Cassandra:
$ journalctl -u cassandra-ramdisk -l
$ systemctl status cassandra-ramdisk -l
Confirm that the two Cassandra processes are running and listening on ports 9042 and 19042:
[sentinel@tsn1 ~]$ sudo netstat -plant | grep 9042

tcp        0      0 0.0.0.0:19042           0.0.0.0:*               LISTEN      1856/java

tcp        0      0 0.0.0.0:9042            0.0.0.0:*               LISTEN      1889/java

[sentinel@tsn1 ~]$
Check that the Cassandra cluster has formed and each node is UN (Up and Normal).
For the on-disk Cassandra:
[sentinel@tsn1 ~]$ docker exec cassandra nodetool status
Datacenter: dc1
===============
Status=Up/Down
|/ State=Normal/Leaving/Joining/Moving
--  Address        Load       Tokens       Owns    Host ID                               Rack
UN  172.31.58.207  678.58 KiB  256          ?       f81bc71d-4ba3-4400-bed5-77f317105cce  rack1
UN  172.31.53.62   935.66 KiB  256          ?       aa134a07-ef93-4e09-8631-0e438a341e57  rack1
UN  172.31.55.24   958.34 KiB  256          ?       8ce540ea-8b52-433f-9464-1581d32a99bc  rack1

Note: Non-system keyspaces don't have the same replication settings, effective ownership information is meaningless
[sentinel@tsn1 ~]$
For the ramdisk Cassandra:
[sentinel@tsn1 ~]$ docker exec cassandra-ramdisk nodetool status
Datacenter: dc1
===============
Status=Up/Down
|/ State=Normal/Leaving/Joining/Moving
--  Address        Load       Tokens       Owns (effective)  Host ID                               Rack
UN  172.31.58.207  204.68 KiB  256          69.0%             1df3c9c5-3159-42af-91bd-0869d0cecf44  rack1
UN  172.31.53.62   343.98 KiB  256          67.1%             77d05776-14bd-49e9-8bcd-9834670c2907  rack1
UN  172.31.55.24   291.58 KiB  256          63.9%             7a0e9deb-4903-483a-8702-4508ca17c42c  rack1

[sentinel@tsn1 ~]$
Bootstrap and/or initconf failures are often caused by networking issues.
-
Check that each TSN node can ping all of the other TSN signaling IPs.
-
Check that each TSN node is configured to use its signaling interface for Cassandra.
[sentinel@tsn1 ~]$ docker exec cassandra grep "seeds:" /basedir/config/cassandra.yaml
      - seeds: "172.31.58.207,172.31.53.62,172.31.55.24"
[sentinel@tsn1 ~]$
[sentinel@tsn1 ~]$ docker exec cassandra grep "listen_address:" /basedir/config/cassandra.yaml
listen_address: 172.31.58.207
[sentinel@tsn1 ~]$
Cassandra resource exhaustion
To check the resource usage of the docker containers:
[sentinel@tsn1 ~]$ docker stats

CONTAINER           CPU %               MEM USAGE / LIMIT       MEM %               NET I/O             BLOCK I/O           PIDS

6999eacf6868        0.45%               2.374 GiB / 14.95 GiB   15.88%              0 B / 0 B           57 MB / 856 kB      73

77520b74d274        0.76%               3.217 GiB / 14.95 GiB   21.52%              0 B / 0 B           38.1 MB / 1.7 MB    81
To check diskspace usage:
[sentinel@tsn1 ~]$ df -h

Filesystem                             Size  Used Avail Use% Mounted on
/dev/nvme0n1p3                         7.9G  2.5G  5.1G  33% /
devtmpfs                               7.5G     0  7.5G   0% /dev
tmpfs                                  7.5G     0  7.5G   0% /dev/shm
tmpfs                                  7.5G  716K  7.5G   1% /run
tmpfs                                  7.5G     0  7.5G   0% /sys/fs/cgroup
tmpfs                                  7.5G     0  7.5G   0% /tmp
/home/sentinel/cassandra-ramdisk/data  8.0G     0  8.0G   0% /home/sentinel/cassandra-ramdisk/data
/dev/nvme0n1p2                         6.7G  799M  5.6G  13% /var/log
/dev/nvme0n1p1                          93M   44M   45M  50% /boot
tmpfs                                  1.5G     0  1.5G   0% /run/user/5101
tmpfs                                  1.5G     0  1.5G   0% /run/user/0

[sentinel@tsn1 ~]$
-
The on-disk Cassandra runs in the root partition.
-
The ramdisk Cassandra runs in
/home/sentinel/cassandra-ramdisk/data -
Cassandra logs are stored in
/var/log/tas/cassandraand/var/log/tas/cassandra-ramdisk
Cassandra keyspaces missing
The ramdisk Cassandra contains keyspaces for Rhino Session Ownership and possibly Rhino Key/Value Stores.
Both the on-disk and ramdisk Cassandra contain keyspaces for CDS and system functionality.
To check if an expected Cassandra keyspace is present:
[sentinel@tsn1 ~]$ docker exec cassandra cqlsh <signaling ip> 9042 -e 'describe keyspaces';

system                             system_distributed
system_schema                      system_traces
system_auth                        metaswitch_tas_deployment_info

[sentinel@tsn1 ~]$
[sentinel@tsn1 ~]$ docker exec cassandra-ramdisk <signaling ip> 19042 cqlsh -e 'describe keyspaces';

system                             system_distributed
system_schema                      system_traces
system_auth                        metaswitch_tas_deployment_info
rhino_session_ownership_0_default  rhino_kv_0_default

[sentinel@tsn1 ~]$
Cannot run cqlsh command when using ssh
The cqlsh command is set up as a Bash alias. It can be run as-is from an interactive ssh session. If running the cqlsh command directly from an ssh command, e.g. as ssh tsn1 cqlsh, these aliases are not loaded. Instead, run the command as ssh -t tsn1 bash -ci cqlsh.
Troubleshooting ShCM installation
Sh Cache Microservice not running after installation
Check that bootstrap and configuration were successful:
[sentinel@shcm1 ~]$ grep 'Bootstrap complete' ~/bootstrap/bootstrap.log
2019-10-28 13:53:54,226 INFO bootstrap.main Bootstrap complete
[sentinel@shcm1 ~]$
If the bootstrap.log does not contain that string, examine the log for any exceptions or errors.
[sentinel@shcm1 ~]$ report-initconf status
status=vm_converged
[sentinel@shcm1 ~]$
If the status is different, examine the output from report-initconf for any problems. If that is not sufficient, examine the ~/initconf/initconf.log file for any exceptions or errors. If bootstrap and configuration were successful, check the Rhino journalctl logs.
[sentinel@shcm1 ~]$ journalctl -u rhino -l
Further information can be found from the ShCM logs in /var/log/tas. In particular, the Rhino logs are found in a subdirectory of /var/log/tas with the same name as the Rhino directory has in the home directory, e.g. gaa-4.0.0.0-cluster-110.
Rhino Alarms
Not Connected to Cassandra
Node: 101
Level: Critical
Type: CassandraCQLRA.ConnectToCluster
Message: Not connected to Cassandra. Attempting to connect each 10s
-
Check that the Cassandra server is active on the TSN nodes.
-
Check the network connectivity to the TSN nodes.
-
As TSN nodes are discovered automatically, no further configuration should be necessary. Ensure this node has been provided (as part of its configuration bundle) with the correct SDF for the TSN nodes, as the IP addresses to connect to are derived from this SDF.
Troubleshooting MAG installation
REM, XCAP or Sentinel AGW not running after installation
Check that bootstrap and configuration were successful:
[sentinel@mag1 ~]$ grep 'Bootstrap complete' ~/bootstrap/bootstrap.log 2019-10-28 13:53:54,226 INFO bootstrap.main Bootstrap complete [sentinel@mag1 ~]$
If the bootstrap.log does not contain that string, examine the log for any exceptions or errors.
[sentinel@mag1 ~]$ report-initconf status status=vm_converged [sentinel@mag1 ~]$
If the status is different, examine the output from report-initconf for any problems. If that is not sufficient, examine the ~/initconf/initconf.log file for any exceptions or errors. If bootstrap and configuration were successful, check the Rhino journalctl logs.
[sentinel@mag1 ~]$ journalctl -u rhino -l
Further information can be found from the MAG logs in /var/log/tas. In particular, the Rhino logs are found in a subdirectory of /var/log/tas with the same name as the Rhino directory has in the home directory, e.g. gaa-4.0.0.0-cluster-110.
Cannot connect to REM
Connect to REM using a web browser. The connection should be over HTTPS to port 8443 of the management interface, and to the /rem/ page. For example: https://192.168.10.10:8443/rem/
If you connect using a hostname rather than the IP address, be sure that the hostname refers only to a single server in DNS.
If connections to REM fail despite use of the correct hostname/IP and port, try the following:
-
Check the REM service status on the node you are trying to connect to with
sudo systemctl status rhino-element-manager. It should be listed asactive (running). -
Check that
jpslists aBootstrapprocess (this is the Apache Tomcat process). -
Check that
netstat -ant6shows two listening sockets, one on the loopback address127.0.0.1, port 8005, and the other on the management address, port 8443:tcp6 0 0 127.0.0.1:8005 :::* LISTEN tcp6 0 0 192.168.10.10:8443 :::* LISTEN
If any of the above checks fail, try restarting REM with sudo systemctl restart rhino-element-manager. You can also check for errors in the log files in the /var/log/tas/apache-tomcat directory.
Cannot log in to REM
When connecting to REM, you should use one of the accounts set up in the mag-vmpool-config.yaml file. The default username/password documented in the REM product documentation is not available on the REM node.
When trying to connect to Rhino, REM asks for credentials
When trying to connect to a Rhino instance, you need to enter the credentials REM can use to connect to Rhino. The Rhino username and password are configured in the VM pool YAML file for the Rhino nodes being monitored.
The mapping from REM users to Rhino users is deployment-specific (for example, you may wish to allocate a separate Rhino user to each REM user, so it is clear in Rhino audit logs which user made a certain change to Rhino configuration). As such, the VM software is unable to set up these credentials automatically.
It is recommended to use the "Save credentials" option so that you only need to specify the Rhino credentials once (per user, per instance).
Known REM product issues
For known REM issues, refer to the Known issues in REM section in the REM documentation.
Cannot connect to the XCAP server or NAF authentication filter
The XCAP server and NAF authentication filter are executed as components within REM. Thus, for troubleshooting connection issues, first check you can connect to REM. If not, please refer to the Cannot connect to REM section.
If you can connect to REM but not to the XCAP server or NAF authentication filter, check that you are connecting over the access interface, on port 80 (HTTP) or 8443 (HTTPS).
If connections to the XCAP server or NAF authentication filter fail despite use of the correct IP, try the following:
-
Check the NGINX service status on the node you are trying to connect to with
sudo systemctl status nginx. It should be listed asactive (running). -
Check the NGINX container is running on the node you are trying to connect to with
docker ps --filter name=nginx. It should be listed asUp. -
Check that
netstat -antshows the following listening sockets:tcp 0 0 [access ip]:8080 0.0.0.0:* LISTEN tcp 0 0 [access ip]:80 0.0.0.0:* LISTEN tcp 0 0 [access ip]:8443 0.0.0.0:* LISTEN tcp 0 0 [access ip]:443 0.0.0.0:* LISTEN tcp6 0 0 127.0.0.1:8080 :::* LISTEN tcp6 0 0 [signaling ip]:8443 :::* LISTEN tcp6 0 0 [signaling ip]:8001 :::* LISTEN -
(If a dual-stack access network is configured) Check that
netstat -antalso shows the following listening sockets:tcp6 0 0 [access ipv6]:8080 :::* LISTEN tcp6 0 0 [access ipv6]:80 :::* LISTEN tcp6 0 0 [access ipv6]:8443 :::* LISTEN tcp6 0 0 [access ipv6]:443 :::* LISTEN
If any of the above checks fail, try restarting nginx with sudo systemctl restart nginx. You can also check for errors in the log files in the /var/log/tas/nginx directory.
Rhino Alarms
Rhino alarms indicate issues that should be reserved promptly. Rhino alarms can be monitored using MetaView Server or REM on the MAG node. Some common Rhino alarms are described below.
Not Connected to Cassandra
Node: 101 Level: Critical Type: CassandraCQLRA.ConnectToCluster Message: Not connected to Cassandra. Attempting to connect each 10s
-
Check that the Cassandra server is active on the TSN nodes.
-
Check the network connectivity to the TSN nodes.
-
As TSN nodes are discovered automatically, no further configuration should be necessary. Ensure this node has been provided (as part of its configuration bundle) with the correct SDF for the TSN nodes, as the IP addresses to connect to are derived from this SDF.
Troubleshooting MMT GSM installation
Sentinel VoLTE not running after installation
Check that bootstrap and configuration were successful:
[sentinel@mmt-gsm1 ~]$ grep 'Bootstrap complete' ~/bootstrap/bootstrap.log 2019-10-28 13:53:54,226 INFO bootstrap.main Bootstrap complete [sentinel@mmt-gsm1 ~]$
If the bootstrap.log does not contain that string, examine the log for any exceptions or errors.
[sentinel@mmt-gsm1 ~]$ report-initconf status status=vm_converged [sentinel@mmt-gsm1 ~]$
If the status is different, examine the output from report-initconf for any problems. If that is not sufficient, examine the ~/initconf/initconf.log file for any exceptions or errors. If bootstrap and configuration were successful, check the Rhino journalctl logs.
[sentinel@mmt-gsm1 ~]$ journalctl -u rhino -l
Further information can be found from the MMT GSM logs in /var/log/tas. In particular, the Rhino logs are found in a subdirectory of /var/log/tas with the same name as the Rhino directory has in the home directory, e.g. gaa-4.0.0.0-cluster-110.
Rhino Alarms
Rhino alarms indicate issues that should be reserved promptly. Rhino alarms can be monitored using MetaView Server or REM on the MAG node. Some common Rhino alarms are described below.
Not Connected to Cassandra
Node: 101 Level: Critical Type: CassandraCQLRA.ConnectToCluster Message: Not connected to Cassandra. Attempting to connect each 10s
-
Check that the Cassandra server is active on the TSN nodes.
-
Check the network connectivity to the TSN nodes.
-
As TSN nodes are discovered automatically, no further configuration should be necessary. Ensure this node has been provided (as part of its configuration bundle) with the correct SDF for the TSN nodes, as the IP addresses to connect to are derived from this SDF.
Lost connection to SGC
Node: 101 Level: Major Type: noconnection Message: Lost connection to SGC localhost:11002
-
Check that SGC on the SMO nodes is active.
-
Check the network connectivity to the SMO nodes.
Connection to Diameter Rf peer is down
Node: 101 Level: Warning Type: diameter.peer.connectiondown Message: Connection to [host]:[port] is down
-
Check the Diameter Rf peers are configured correctly.
-
Check the network connectivity to the Diameter Rf peer host and port.
Connection to Diameter Ro peer is down
Node: 101 Level: Warning Type: diameter.peer.connectiondown Message: Connection to [host]:[port] is down
-
Check the Diameter Ro peers are configured correctly.
-
Check the network connectivity to the Diameter Ro peer host and port.
Connection to SAS server is down
Node: 101
Level: Major
Type: rhino.sas.connection.lost
Message: Connection to SAS server at [host]:[port] is down
-
Check that SAS is active.
-
Check the network connectivity to the SAS server host and port.
Not connected to any instances of the configured Sh Cache Microservice host.
Node: 101 Level: Critical Type: ShCMRA.ShCMConnectFailed Message: Not connected to any instances of the configured Sh Cache Microservice host.
-
Check that ShCM is active on the ShCM nodes.
-
Check the network connectivity to the ShCM nodes.
-
Check that the DNS SRV records for ShCM are set up correctly. The ShCM domain that is configured in
common-config.yamlshould have DNS SRV records set up for every ShCM node.
Troubleshooting SMO installation
Sentinel IP-SM-GW or OCSS7 not running after installation
| |
Sentinel IP-SM-GW can be disabled in smo-vmpool-config.yaml. If Sentinel IP-SM-GW has been disabled, Rhino will not be running. |
Check that bootstrap and configuration were successful:
[sentinel@smo1 ~]$ grep 'Bootstrap complete' ~/bootstrap/bootstrap.log 2019-10-28 13:53:54,226 INFO bootstrap.main Bootstrap complete [sentinel@smo1 ~]$
If the bootstrap.log does not contain that string, examine the log for any exceptions or errors.
[sentinel@smo1 ~]$ report-initconf status status=vm_converged [sentinel@smo1 ~]$
If the status is different, examine the output from report-initconf for any problems. If that is not sufficient, examine the ~/initconf/initconf.log file for any exceptions or errors. If bootstrap and configuration were successful, check the Rhino and OCSS7 journalctl logs.
[sentinel@smo1 ~]$ journalctl -u rhino -l [sentinel@smo1 ~]$ journalctl -u ocss7 -l
Further information can be found from the SMO logs in /var/log/tas. In particular, the Rhino logs are found in a subdirectory of /var/log/tas with the same name as the Rhino directory has in the home directory, e.g. gaa-4.0.0.0-cluster-110.
Rhino Alarms
Rhino alarms indicate issues that should be reserved promptly. Rhino alarms can be monitored using MetaView Server or REM on the MAG node. Some common Rhino alarms are described below.
Not Connected to Cassandra
Node: 101
Level: Critical
Type: CassandraCQLRA.ConnectToCluster
Message: Not connected to Cassandra. Attempting to connect each 10s
-
Check that the Cassandra server is active on the TSN nodes.
-
Check the network connectivity to the TSN nodes.
-
As TSN nodes are discovered automatically, no further configuration should be necessary. Ensure this node has been provided (as part of its configuration bundle) with the correct SDF for the TSN nodes, as the IP addresses to connect to are derived from this SDF.
Lost connection to SGC
Node: 101 Level: Major Type: noconnection Message: Lost connection to SGC localhost:11002
-
Check that SGC on this node is active.
Connection to Diameter Ro peer is down
Node: 101
Level: Warning
Type: diameter.peer.connectiondown
Message: Connection to [host]:[port] is down
-
Check the Diameter Ro peers are configured correctly.
-
Check the network connectivity to the Diameter Ro peer host and port.
Connection to SAS server is down
Node: 101
Level: Major
Type: rhino.sas.connection.lost
Message: Connection to SAS server at [host]:[port] is down
-
Check that SAS is active.
-
Check the network connectivity to the SAS server host and port.
Not connected to any instances of the configured Sh Cache Microservice host.
Node: 101
Level: Critical
Type: ShCMRA.ShCMConnectFailed
Message: Not connected to any instances of the configured Sh Cache Microservice host.
-
Check that ShCM is active on the ShCM nodes.
-
Check the network connectivity to the ShCM nodes.
-
Check that the DNS SRV records for ShCM are set up correctly. The ShCM domain that is configured in
common-config.yamlshould have DNS SRV records set up for every ShCM node.
OCSS7 SGC
The OCSS7 SGC is not running
-
Use
systemctl status ocss7to determine if theocss7service is enabled and running. -
Check using
jpsto see if anSGCprocess is running. -
Check the most recent
startup.logandss7.login/var/log/tas/ocss7/for information relating to any failed startup.
OCSS7 SGC Alarms
The OCSS7 SGC CLI may be used to query the SGC for its active alarms. The SGC CLI executable is located at ~/ocss7/<deployment_id>/<node_id>/current/cli/bin/sgc-cli.sh.
Use the display-active-alarm command in the SGC CLI to show the active alarms.
See the OCSS7 Installation and Administration Guide for a full description of the alarms that can be raised by the OCSS7 SGC.
RVT Diagnostics Gatherer
rvt-gather_diags
The rvt-gather_diags scripts collects diagnostic information. Run rvt-gather_diags [--force] [--force-confirmed] on the VM command line.
| Option | Description |
|---|---|
|
option will prompt user to allow execution under high cpu load. |
|
option will not prompt user to run under high cpu load. |
Diagnostics dumps are written to /var/rvt-diags-monitor/dumps as a gzipped tarball. The dump name is of the form {timestamp}.{hostname}.tar.gz. This can be extracted by running the command tar -zxf {tarball-name}.
The script automatically deletes old dumps so that the total size of all dumps doesn’t exceed 1GB. However, it will not delete the dump just taken, even if that dump exceeds the 1GB threshold.
Diagnostics collected
A diagnostic dump contains the following information:
General
-
Everything in
/var/logand/var/run-
This includes the raw journal files.
-
-
NTP status in
ntpq.txt -
snmp status from
snmpwalkinsnmpstats.txt
Platform information
-
lshw.txt- Output of thelshwcommand -
cpuinfo.txt- Processor details -
meminfo.txt- Memory details -
os.txt- Operating System information
Networking information
-
ifconfig.txt- Interface settings -
routes.txt- IP routing tables -
netstat.txt- Currently allocated sockets, as reported bynetstat -
/etc/hostsand/etc/resolv.conf
Resource usage
-
df-kh.txt- Disk usage as reported bydf -kh -
sar.{datestamp}.txt- The historical system resource usage as reported -
fdisk-l.txt- Output offdisk -l -
ps_axo.txt- Output ofps axo
TAS-VM-Build information
-
bootstrap.log -
initconf.log -
The configured YAML files
-
disk_monitor.log -
msw-release- Details of the node type and version -
cds_deployment_data.txt- Developer-level configuration information from the CDS -
Text files that hold the output of journalctl run for a allowlist set of both system and TAS specific services.
Glossary
The following acronyms and abbreviations are used throughout this documentation.
BSF |
Bootstrapping Server Function Component that is, together with the NAF Authentication Filter, responsible for authenticating XCAP requests. |
CDS |
Configuration Data Store Database used to store configuration data for the VMs. |
CSAR |
Cloud Service ARchive File type used by the SIMPL VM. |
Deployment ID |
Uniquely identifies a deployment, which can consist of many sites, each with many groups of VMs |
GSM |
Global System for Mobile Communications One of two mobile core types supported by the MMT nodes. |
HSS |
Home Subscriber System |
HTTP |
Hypertext Transfer Protocol |
HTTPS |
Hypertext Transfer Protocol Secure |
MAG |
Management and Authentication Gateway Node hosting the REM management and monitoring software, as well as the XCAP, NAF Authentication Filter and BSF components. |
MDM |
Metaswitch Deployment Manager Virtual appliance compatible with many Metaswitch products, that co-ordinates deployment, scale and healing of product nodes, and provides DNS and NTP services. |
MMT |
MMTel node Node hosting the Sentinel VoLTE MMT and SCC functionality. |
MOP |
Method Of Procedure A set of instructions for a specific operation. |
NAF Authentication Filter |
Network Application Function Authentication Filter Component that is, together with the BSF, responsible for authenticating XCAP requests. |
OCSS7 |
Metaswitch stack for SS7. |
OVA |
Open Virtual Appliance File type used by VMware vSphere and VMware vCloud. |
OVF |
Open Virtualization Format File type used by VMware vSphere and VMware vCloud. |
QCOW2 |
QEMU Copy on Write 2 File type used by OpenStack. |
REM |
Rhino Element Manager |
RVT |
Rhino VoLTE TAS |
SAS |
Service Assurance Server |
SDF |
Solution Definition File Describes the deployment, for consumption by the SIMPL VM. |
SGC |
Signaling Gateway Client Both used as name of the OCSS7 SGC application, as well as the SGC node type hosting said application. |
Sh |
Diameter Sh protocol |
ShCM |
Sh Cache Microservice The abbreviated form ShCM is pronounced as |
SIMPL VM |
ServiceIQ Management Platform VM This VM has tools for deploying and upgrading a deployment. |
Site ID |
Uniquely identifies one site within the deployment, normally a geographic site (e.g. one data center) |
SLEE |
Service Logic Execution Environment An environment that is used for developing and deploying network services in telecommunications (JSLEE Guide). For more information on how to manage the SLEE, see SLEE Management. |
SMO |
Short Message (Gateway) and OCSS7 Node type hosting the Sentinel IP-SM-GW application on Rhino, and the OCSS7 servers. |
TAS |
Telecom Application Server |
TSN |
TAS Storage Node TSNs provide Cassandra databases and CDS services to TSN, ShCM, MAG, MMT GSM, and SMO. |
VM |
Virtual Machine |
XCAP |
XML Configuration Access Protocol Protocol that allows a UE to read, write and modify application configuration data. |
YAML |
Yet Another Markup Language Data serialisation language used in the Rhino VoLTE TAS solution for writing configuration files. |
YANG |
Yet Another Next Generation Schemas used for verifying YAML files. |