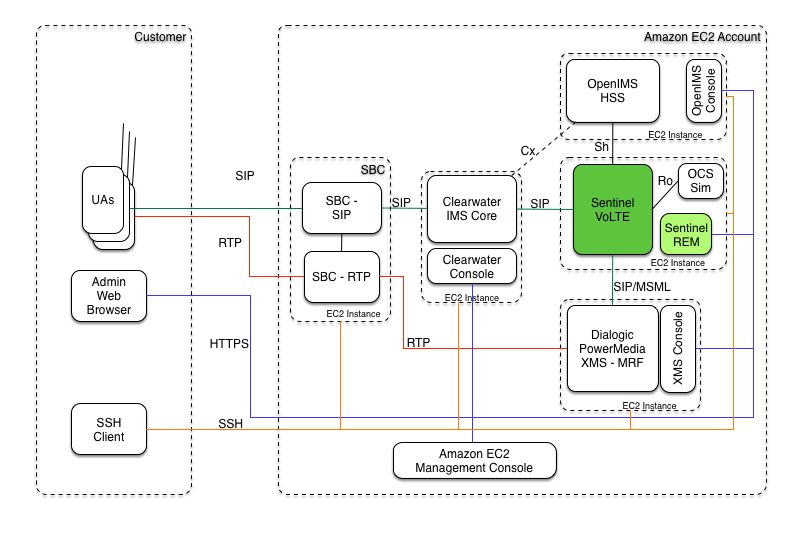
The Sentinel VoLTE Cloud environment is an Amazon Elastic Cloud Compute (EC2) based, functional IMS network in the Cloud.
Topics
-
Cloud Environment Architecture — an overview explaining the relationships between the individual components
-
Commissioning the Cloud Environment — how to gain access to an instance of the Sentinel VoLTE cloud environment
-
Using the Cloud Environment — how to use the cloud environment once it has been set up
-
Decommissioning the Cloud Environment — how to dispose of the cloud environment.
Cloud Environment Architecture
The Sentinel VoLTE Cloud environment is an Amazon Elastic Cloud Compute (EC2) based, small scale, functional IMS network in the Cloud.
Components
It includes five main components, each running in its own EC2 instance:
-
OpenCloud Sentinel VoLTE TAS
-
OpenIMS HSS
-
Metaswitch Clearwater IMS
-
Session Border Controller (not yet available)
-
Dialogic XMS - Media Resource Function (not yet available).
Each instance is published in Amazon as an EC2 AMI. New instances of the three images can be spun-up from the AMIs in about five minutes.
Architecture
| Component | Features |
|---|---|
Sentinel VoLTE TAS |
|
OpenIMS HSS |
|
Clearwater IMS |
Project Clearwater is an open source implementation of the IP Multimedia Subsystem for cloud computing environments. |
| |
OpenCloud configures the three instances to communicate between themselves. |
Product documentation links
| Component | Documentation URL |
|---|---|
Sentinel VoLTE |
|
Clearwater IMS Core |
|
OpenIMS HSS |
|
Dialogic XMS |
http://www.dialogic.com/en/products/media-server-software/xms.aspx |
Perimeta Session Border Controller |
http://www.metaswitch.com/perimeta-session-border-controller-sbc |
Commissioning the Cloud Environment
Commissioning options
There are three options for setting up the Sentinel VoLTE cloud environment in EC2:
-
OpenCloud provides access to a demo account that has the VoLTE environment installed.
-
The customer provides an EC2 account and OpenCloud installs the VoLTE environment.
-
The customer manually installs from shared AMIs.
OpenCloud provides account
-
OpenCloud has responsibility for billing.
-
OpenCloud R&D installs Sentinel VoLTE and other network infrastructure on a new EC2 account.
-
EC2 sub-account is created, providing full access to the customer.
-
The sub-account can be manually disabled/removed by OpenCloud at any point.
-
OpenCloud provides the customer with a specific login URL for EC2 console, a username/password, and an ssh key.
-
Customer configures SIP user agents to make calls.
| |
A user for your Amazon AWS account must be created for OpenCloud to set up the account. Here’s how to give OpenCloud access to your account. |
Customer provides account
-
Customer has responsibility for billing.
-
Customer provides OpenCloud with temporary access to an EC2 ‘power user’ account by providing the following details:
-
Access key
-
Secret key
-
Amazon EC2 region
-
Amazon EC2 account number.
-
-
OpenCloud R&D installs Sentinel VoLTE and other network infrastructure in the customer’s account via an automated Jenkins job.
-
OpenCloud provides ssh keys to the customer for ssh access to the EC2 instances.
-
Customer configures SIP User Agents to make calls.
Customer manually installs
-
Customer provides OpenCloud with ec2 account number.
-
OpenCloud shares the three AMIs with the customer.
-
Customer installs the Sentinel VoLTE cloud environment by following how to manually install the Sentinel VoLTE cloud environment.
Amazon AWS account types
OpenCloud supports both ‘classic’ and newer ‘default-VPC’ EC2 accounts.
-
If the ec2 account is classic:
A separate VPC is deployed and configured for the Sentinel VoLTE Cloud Environment.
-
If the ec2 account has a default VPC:
that VPC is used for the Sentinel VoLTE Cloud Environment.
How to give OpenCloud access to your account
To use the first of the two options above, a user for your Amazon AWS account must be created for OpenCloud.
Here is how to do that:
1 |
Log in to your AWS account. |
||
|---|---|---|---|
2 |
Select “IAM” from the drop-down Services menu at the top-left of the screen. 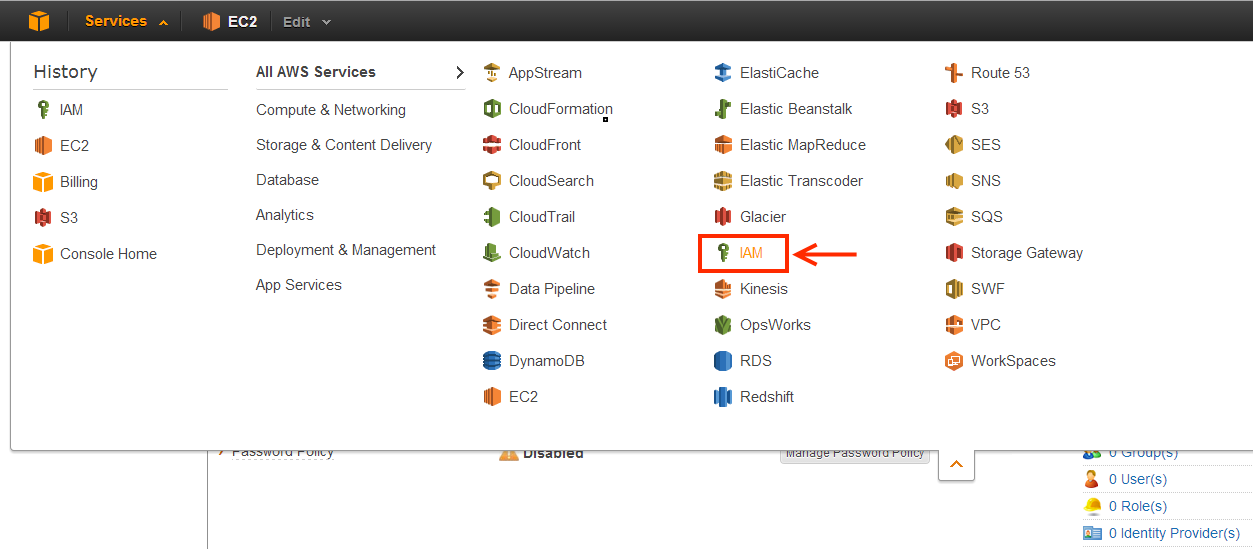
|
||
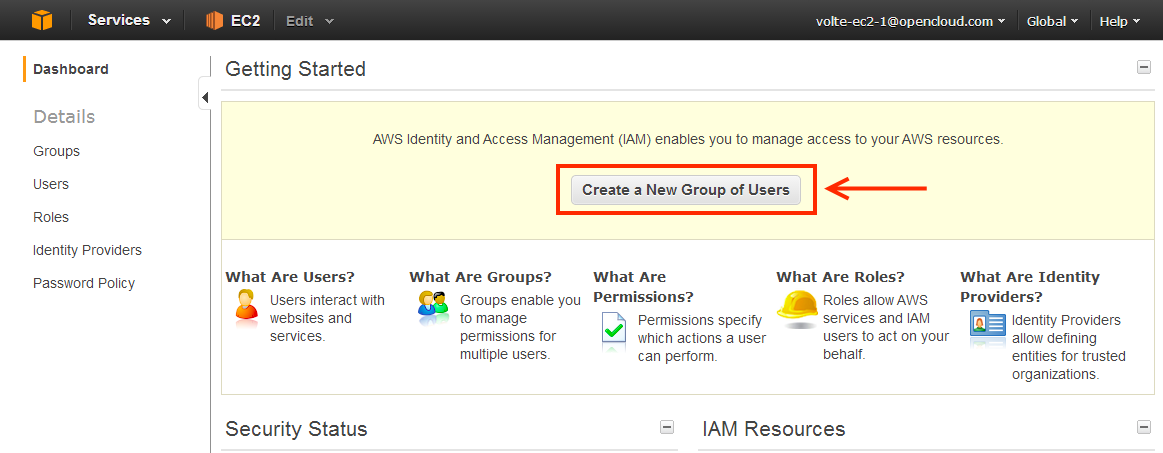
3 |
From the IAM dashboard:
|
||
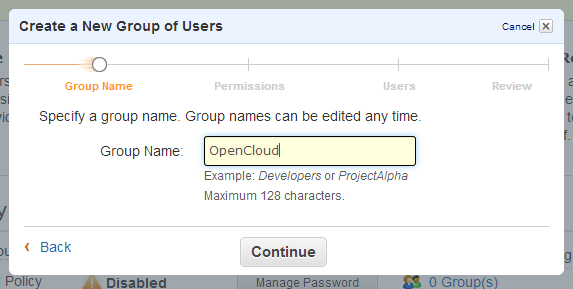
4 |
On the GROUP NAME page:
|
||
5 |
On the PERMISSIONS page:
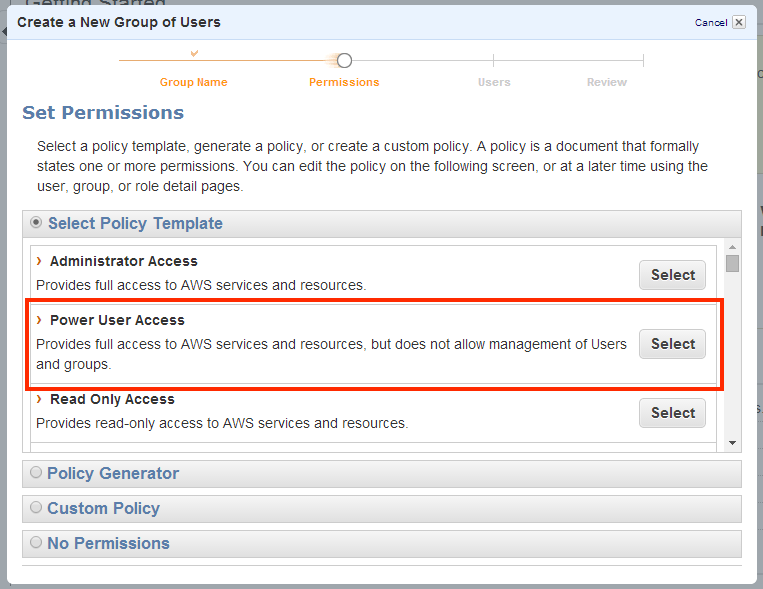
|
||
6 |
On the USERS page:
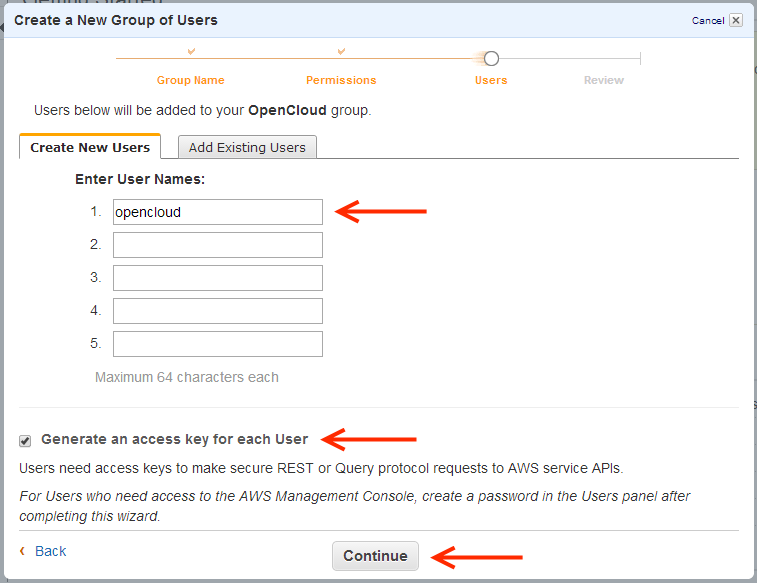
|
||
7 |
|
||
8 |
On the next screen:
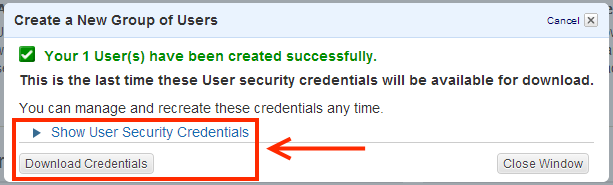
|
Once you have finished, provide OpenCloud with the security credentials for the new user, and we will set up and configure the Sentinel VoLTE cloud environment.
You can then delete the new user by right-clicking on it and selecting Delete from the Users section of the IAM web console.
Manually Install Sentinel VoLTE Cloud Environment
Follow these steps to manually install an ec2 Sentinel VoLTE cloud environment.
| |
An output (bulleted in blue) from a step should be noted, as it forms the input to a subsequent step. |
1 Determine the AMI IDs
Determine the AMI IDs for the VoLTE, HSS and Clearwater images:
-
$VOLTEAMIID
-
$HSSAMIID
-
$CWAMIID.
2 Create a keypair, VPC, and security groups
Create a VPC
If the ec2 account is an ‘ec2 classic’ then it won’t have a default VPC.
If there is no default VPC, follow the steps in this table.
Otherwise, use the default VPC.
| Step | Command | Output | |
|---|---|---|---|
1 |
Create VPC |
ec2-create-vpc 10.0.0.0/24 |
$VPCID |
2 |
Create Internet Gateway |
ec2-create-internet-gateway |
$GATEWAYID |
3 |
Attach Internet Gateway to VPC |
ec2-attach-internet-gateway $GATEWAYID -c $VPCID |
|
4 |
Create Route Table |
ec2-create-route-table $VPCID |
$ROUTETABLEID |
5 |
Create Route Table entry |
ec2-create-route $ROUTETABLEID -g $GATEWAYID -r 0.0.0.0/0 |
|
6 |
Create Subnet |
ec2-create-subnet -c $VPCID -i 10.0.0.0/24 |
$SUBNETID |
7 |
Modify Subnet: Auto-assign public IP |
ec2-modify-subnet-attribute $SUBNETID -m true |
|
8 |
Set DNS hostnames to true |
ec2-modify-vpc-attribute -c $VPCID -d true |
|
9 |
Associate Subnet to Route Table |
ec2-associate-route-table $ROUTETABLEID -s $SUBNETID |
Create two security groups
| Step | Command | Output | |
|---|---|---|---|
1 |
Create Access group |
ec2-create-group "VoLTE cloud access" -d "Access Security group for VoLTE environment" -c $VPCID |
$SGID‑ACCESS |
2 |
Create Internal group |
ec2-create-group "VoLTE cloud internal" -d "Internal Security group for VoLTE environment" -c $VPCID |
$SGID‑INTERNAL |
3 Add rules to security groups
Add these rules to the security groups you created:
| Security group | Rules |
|---|---|
|
Access |
SIP ec2-authorize $SGID-ACCESS -P tcp -p 5052 -o $SGID-INTERNAL ec2-authorize $SGID-ACCESS -P tcp -p 5054 -o $SGID-INTERNAL ec2-authorize $SGID-ACCESS -P tcp -p 5060 ec2-authorize $SGID-ACCESS -P udp -p 5060 SSH ec2-authorize $SGID-ACCESS -P tcp -p 22 RTP ec2-authorize $SGIDaccess -P udp -p 16000-18000 |
|
Internal |
All internal traffic ec2-authorize $SGID-INTERNAL -P all -o $SGID-INTERNAL All traffic from access group ec2-authorize $SGID-INTERNAL -P all -o $SGID-ACCESS SSH ec2-authorize $SGID-INTERNAL -P tcp -p 22 GUI Access for REM, HSS, MRF ec2-authorize $SGID-INTERNAL -P tcp -p 8080 ec2-authorize $SGID-INTERNAL -P tcp -p 443 Limit outbound access to only the access and internal security groups ec2-authorize $SGID-INTERNAL -P all -o $SGID-INTERNAL --egress ec2-authorize $SGID-INTERNAL -P all -o $SGID-ACCESS --egress ec2-revoke $SGID-INTERNAL -P all -s 0.0.0.0/0 --egress |
4 Create the instances from the AMIs
| Command | Output | |
|---|---|---|
1 |
ec2-run-instances $VOLTEAMIID -t m3.large -k $KEYPAIR -s $SUBNETID --associate-public-ip-address true -g $SGID-INTERNAL |
$VOLTE_INSTANCE_ID |
2 |
ec2-run-instances $HSSAMIID -t m1.medium -k $KEYPAIR -s $SUBNETID --associate-public-ip-address true -g $SGID-INTERNAL |
$HSS_INSTANCE_ID |
3 |
ec2-run-instances $CWAMIID -t m3.large -k $KEYPAIR -s $SUBNETID --associate-public-ip-address true -g $SGID-INTERNAL |
$CW_INSTANCE_ID |
| |
|
5 Note IP addresses and DNS names
Note the following:
internal IP address of each of the servers |
|
|---|---|
internal DNS name of each of the servers |
|
external IP address of each of the servers |
|
external DNS of each of the servers |
|
6 Add entries to each instance in /etc/hosts
ssh into each instance and add these entries to /etc/hosts:
| Instance | Entry |
|---|---|
volte-instance |
$VOLTE-INTERNAL-IP |
hss-instance |
$HSS-INTERNAL-IP |
clearwater-instance |
$CW-INTERNAL-IP |
7 Update configuration
Update these configurations:
| Configuration | What to update | Command |
|---|---|---|
|
HSS Application Server |
rhino address |
rhinosipaddr="sip:$VOLTE-INTERNAL-DNS:5060;transport=tcp" +
Via HSS Admin GUI --> Services / Application Servers page
or ssh ec2 hss + mysql -u root -ppassword -D hss_db -e "update application_server set server_name = '$rhinosipaddr' where name = 'Rhino_AS';" |
|
HSS S-CSCF |
clearwater address |
cwsipaddr="sip:$CW-INTERNAL-IP:5054" +
Via HSS Admin GUI --> Network Configuration / Preferred S-CSCF Sets page
or ssh ec2 hss + mysql -u root -ppassword -D hss_db -e "update preferred_scscf_set set scscf_name = '$cwsipaddr' where name = 'sprout';" |
|
clearwater |
HSS and upstream details |
ssh ec2 cw + vi /etc/clearwater/config + upstream_hostname=$CW-INTERNAL-IP + hss_hostname=$HSS-INTERNAL-DNS + hss_port=3868 |
|
/etc/clearwater/s-cscf.json |
clearwater hostname |
ssh ec2 cw +
vi /etc/clearwater/s-cscf.json
{
"s-cscfs" : [
{ "server" : "sip:$CW-EXTERNAL-DNS:5054;transport=TCP",
"priority" : 0,
"weight" : 100,
"capabilities" : []
}
]
}
|
8 Effect changes
To effect the configuration changes:
| Step | Command | |||
|---|---|---|---|---|
1 |
Install Ralf and point clearwater config at Ralf |
ssh ec2 cw +
vi /etc/clearwater/config +
#ralf_hostname=
|
||
2 |
Restart clearwater to pick up changes |
ssh ec2 cw + sudo service clearwater-infrastructure restart + sudo monit stop bono + sudo monit stop ellis + sudo monit restart sprout + sudo monit restart homestead |
||
3 |
Update details in HSS configuration |
ssh ec2 hss + vi /home/ubuntu/HSS/FHoSS/deploy/DiameterPeerHSS.xml + change: + FQDN="$HSS-INTERNAL-DNS" + Realm="example.com" + <Acceptor port="3868" bind="$HSS-INTERNAL-IP" /> + vi /home/ubuntu/HSS/FHoSS/deploy/hss.properties + change: + host=$HSS-INTERNAL-IP + port=8080 |
||
4 |
Restart HSS to pick up changes |
ssh ec2 hss + sudo /etc/init.d/hss stop + sudo /etc/init.d/hss start |
Using the Cloud Environment
This section includes the following topics about how to interact with the Sentinel VoLTE Cloud environment:
Basic Access
Administrators can access the EC2 instances, for configuration, using SSH or OAM consoles.
SSH access
With the provided ssh key (such as volte-cloud.pem), the administrator can ssh access each of the servers.
User Agent Configuration
This section gives instructions for how to configure a variety of SIP user agents (UAs) for use with the Sentinel VoLTE cloud environment.
OpenCloud has successfully tested the cloud environment with the following programs:
| Name | Tested platforms |
|---|---|
Windows 8, Windows 7, Ubuntu Linux, Mac OS X, Android, iOS 7 |
|
Ubuntu Linux |
|
Windows 8, Windows 7, Linux, iOS 7 |
|
Ubuntu Linux |
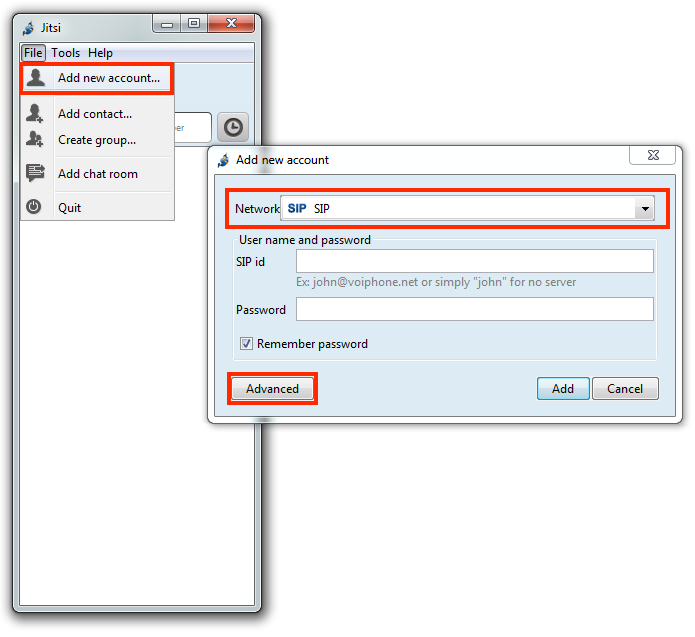
Jitsi
Jitsi runs on Windows, Linux, and Mac platforms.
Windows configuration
| |
|
1 |
From the menubar:
|
|---|---|
2 |
On the Account tab:
|
3 |
On the Connection tab:
|
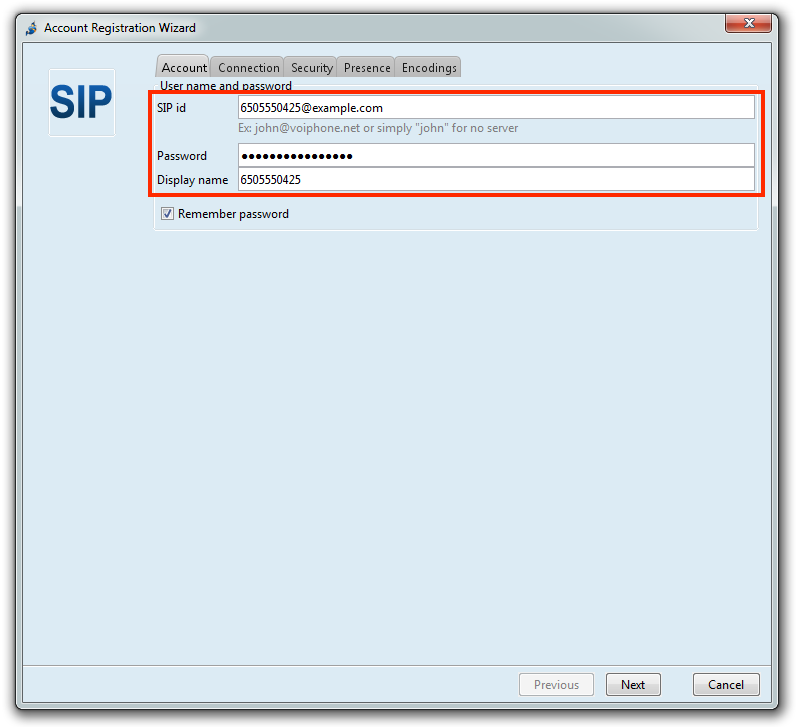
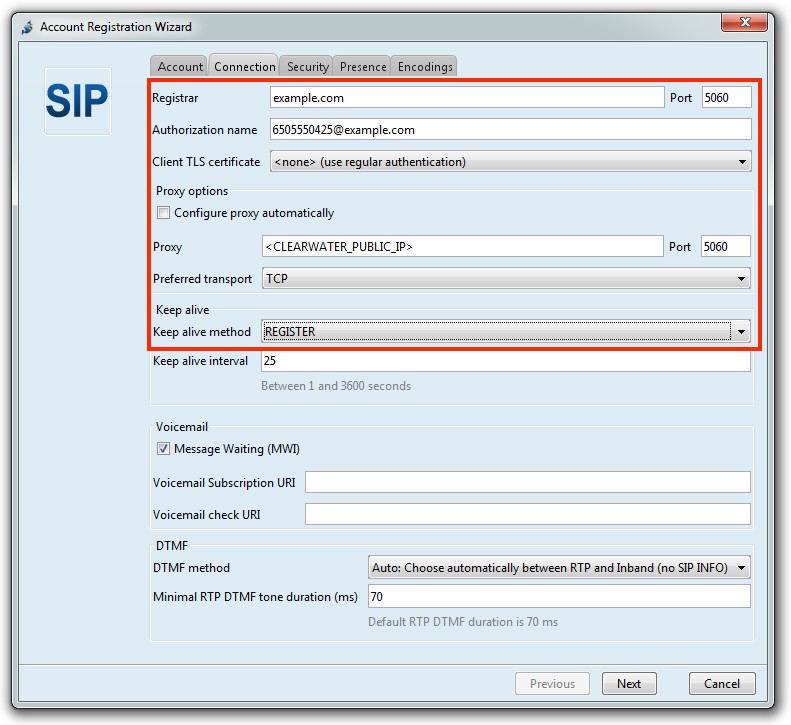
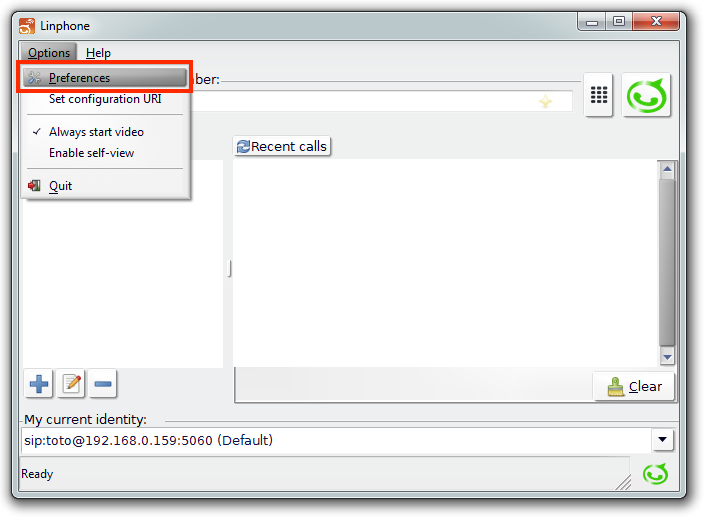
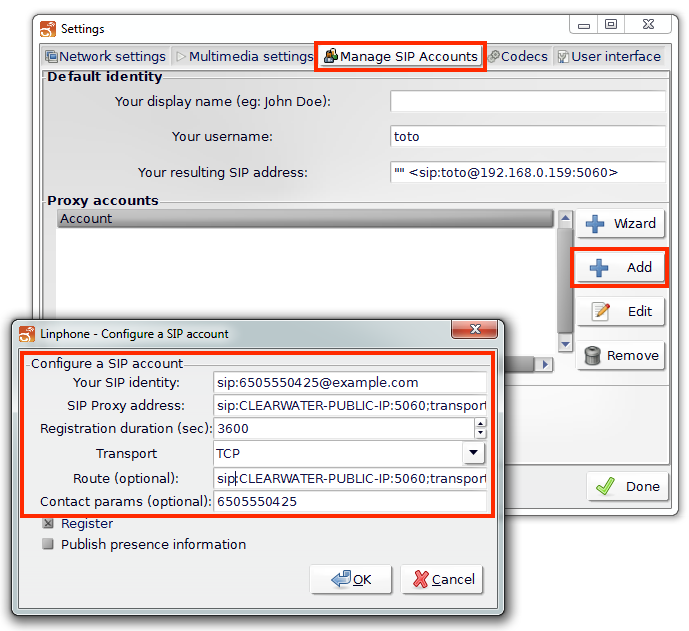
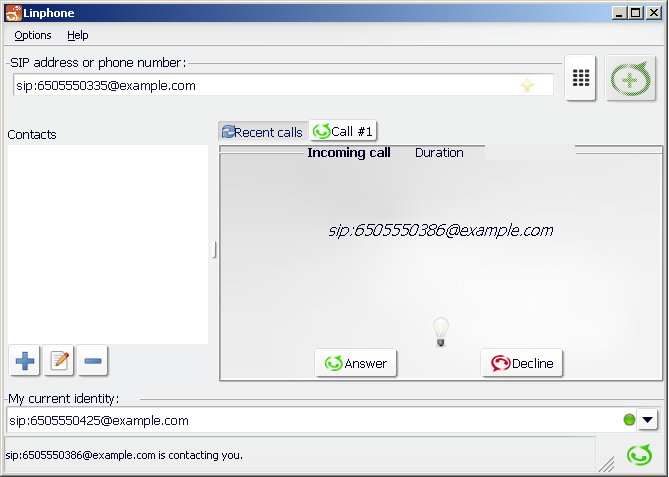
Linphone
Linphone runs on Windows, Linux, Mac, Android, iPhone, and Blackberry platforms.
| |
You must use version 3.7.0 or later!
Windows and Linux have been successfully tested by OpenCloud. |
Windows configuration
| |
|
1 |
Open Options ▶ Preferences.
|
|---|---|
2 |
Under the Manage SIP Accounts tab, add a proxy account with these details:
|
3 |
When attempting to connect with this account, you will be prompted for a username and password:
|
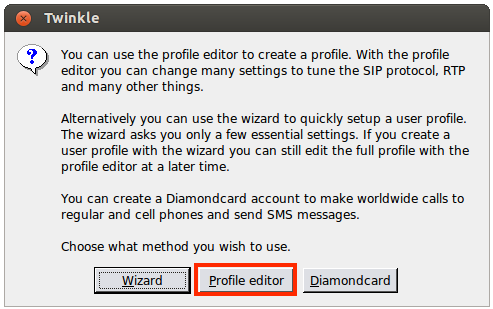
Twinkle
Twinkle runs on the Linux platform.
| |
Twinkle has not been updated in some time; getting it to run on recent versions of Linux can be difficult. |
Linux configuration
| |
|
1 |
When starting Twinkle for the first time, it will prompt you to create a user account.
|
||
|---|---|---|---|
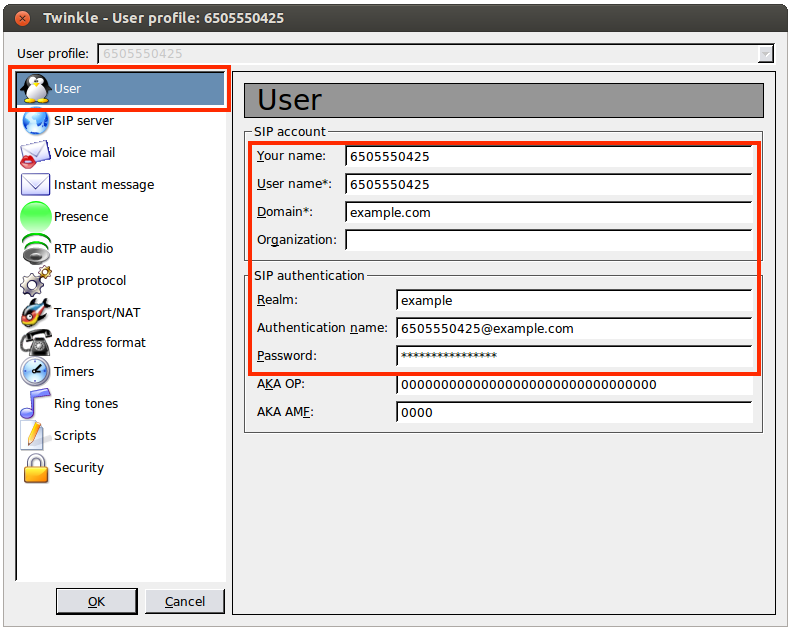
2 |
Under the User tab:
|
||
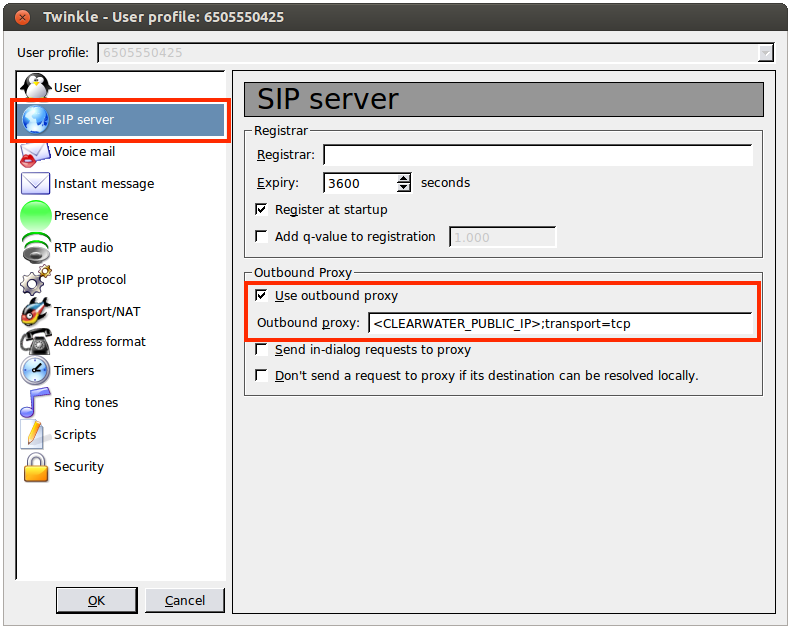
3 |
Under the SIP server tab:
|
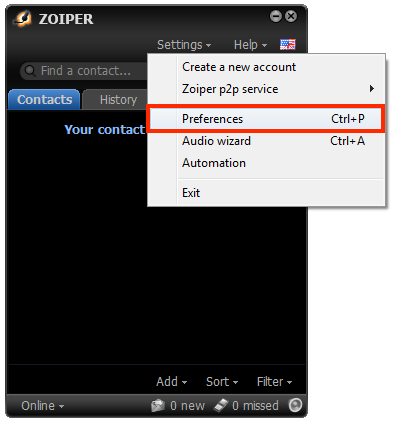
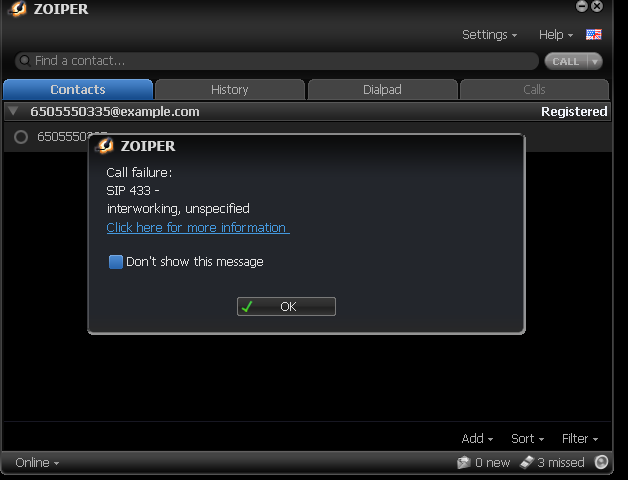
Zoiper
Zoiper runs on the Windows, Linux, Mac, Android, and iPhone platforms.
| |
User Use default values unless otherwise stated.
|
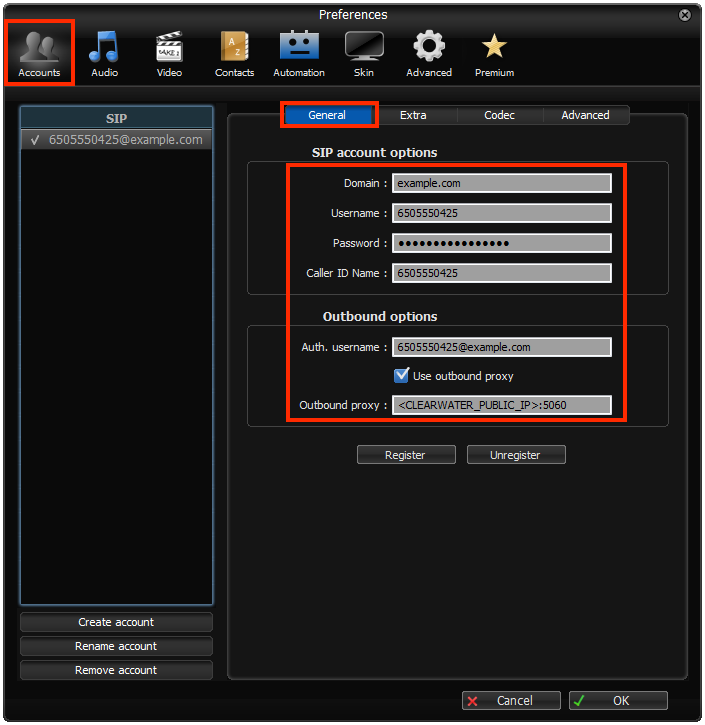
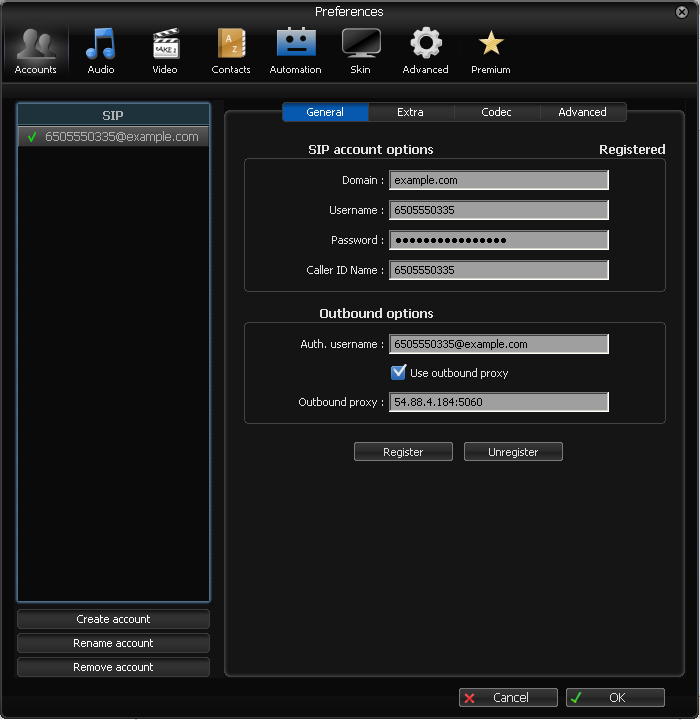
Windows configuration
1 |
Select Preferences from the Settings menu.
|
||
|---|---|---|---|
2 |
Under Accounts / General: SIP Account options
Outbound options
|
||
3 |
Under Accounts ▶ Advanced:
|

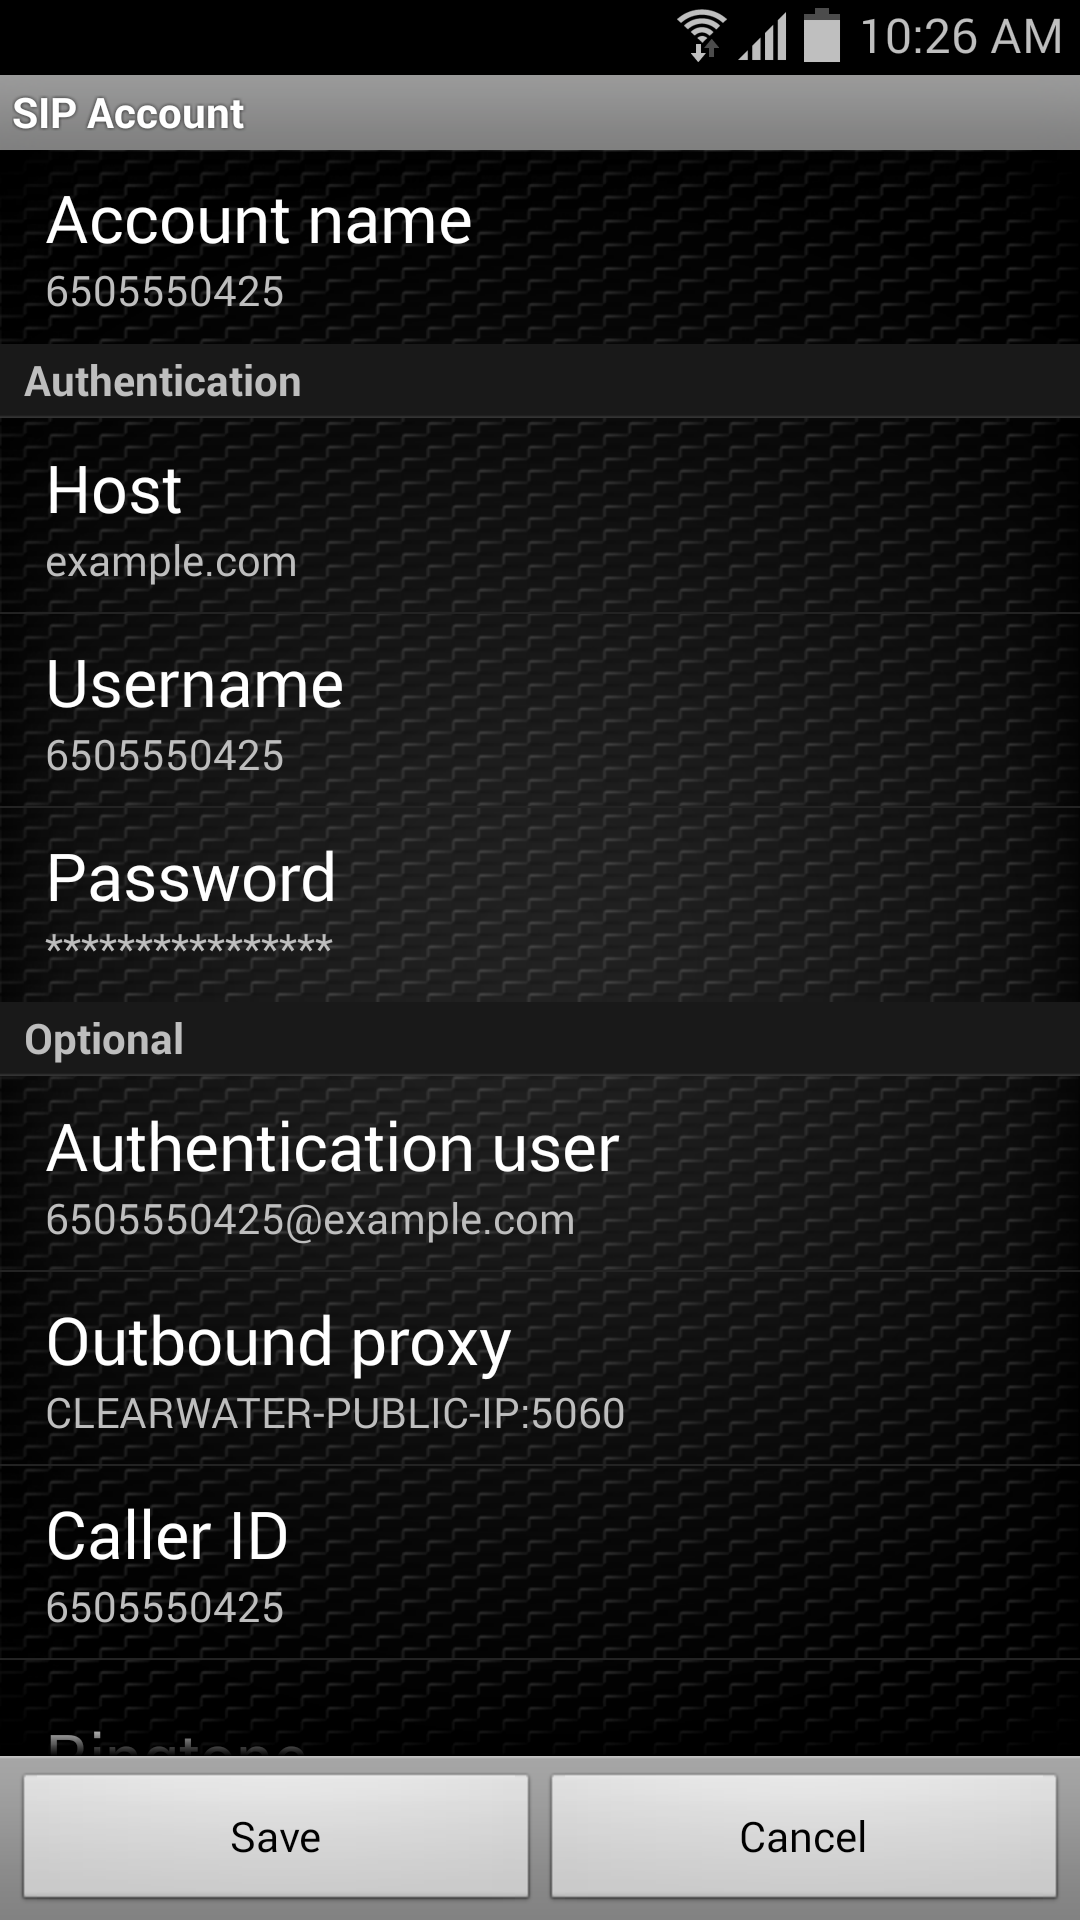
Android configuration
1 |
Go to Config ▶ Accounts ▶ Add Account ▶ SIP. |
||
|---|---|---|---|
2 |
Enter the following details into the SIP Account screen: Authentication
Optional (not actually optional!)
|
||
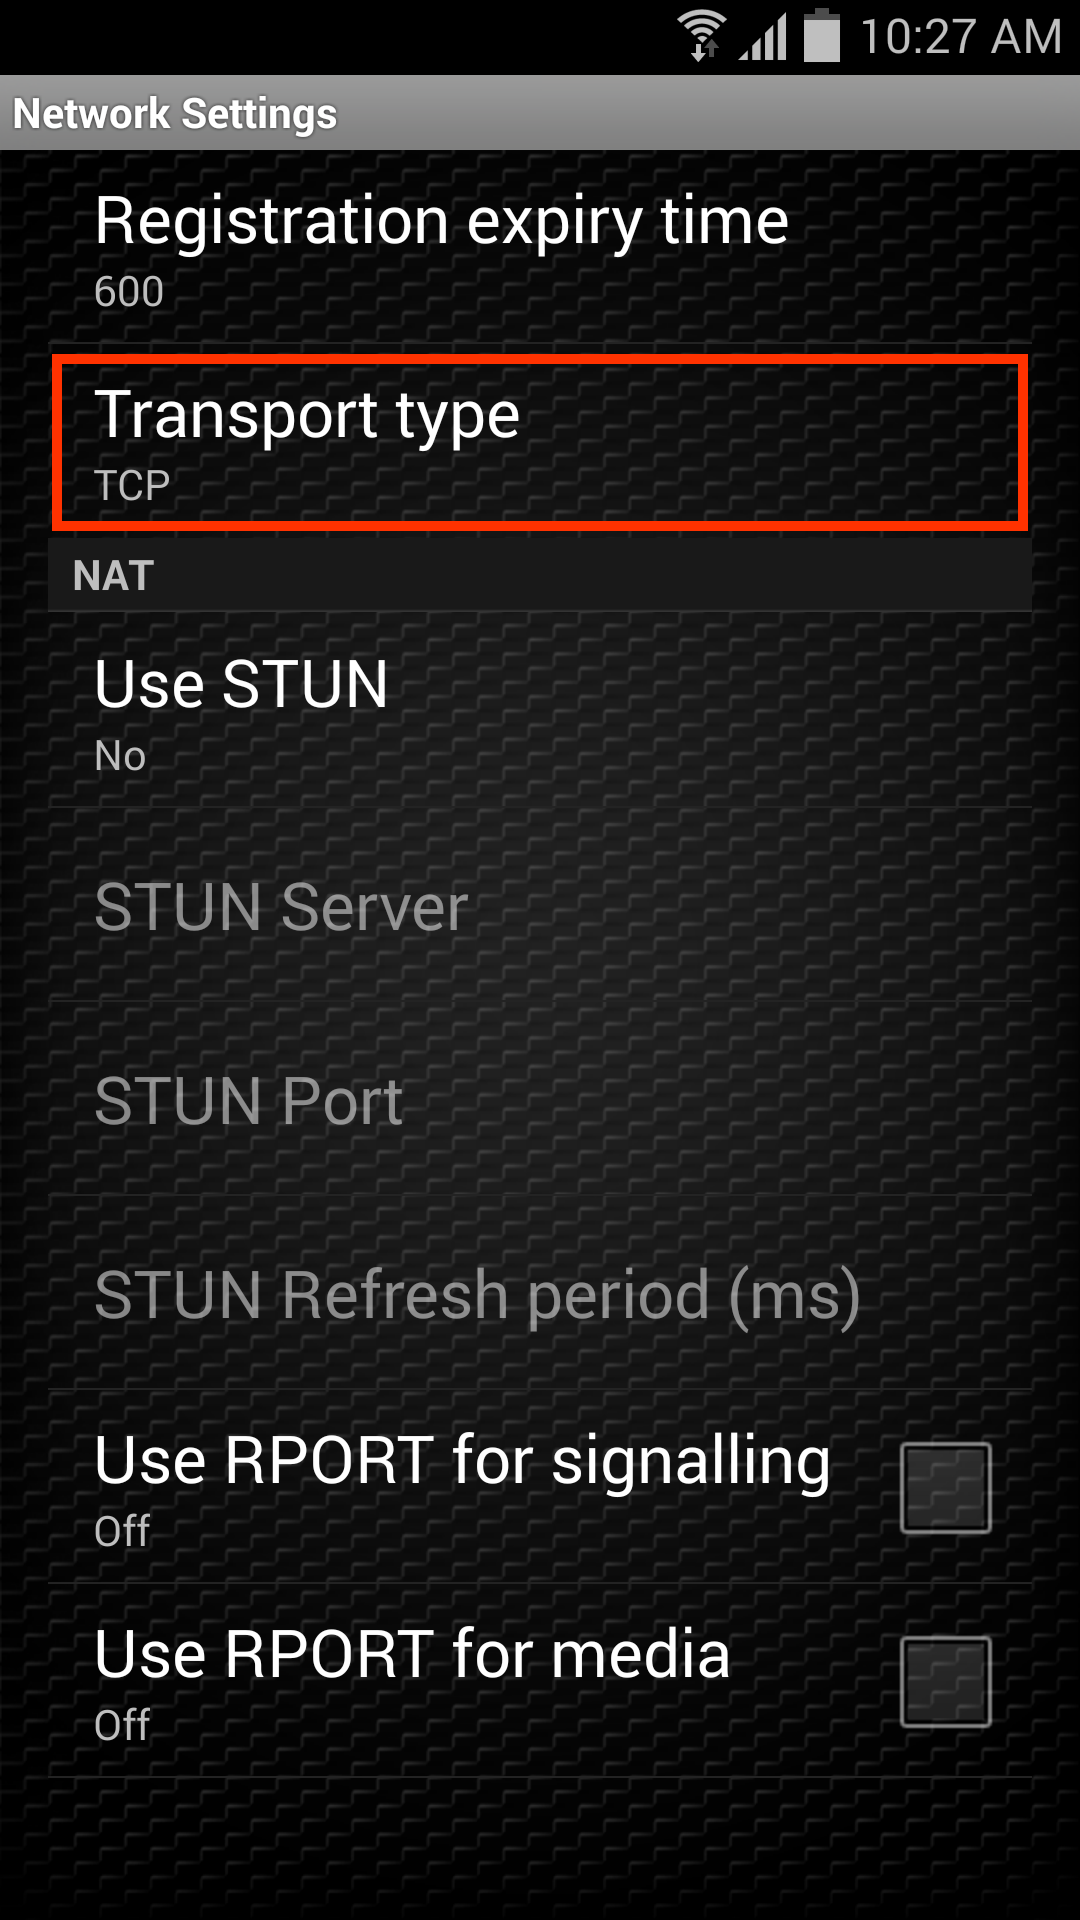
3 |
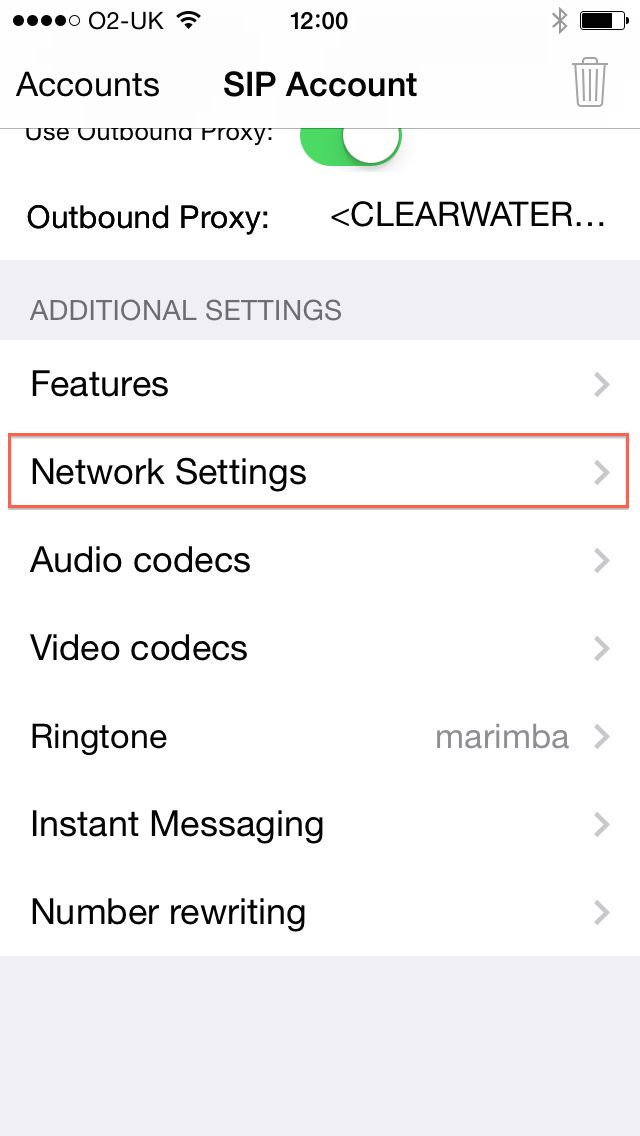
From the SIP Account screen, select Network Settings:
|
||
4 |
If set-up is successful, the new account will appear on the Config ▶ Accounts screen, with a green tick next to it.
|

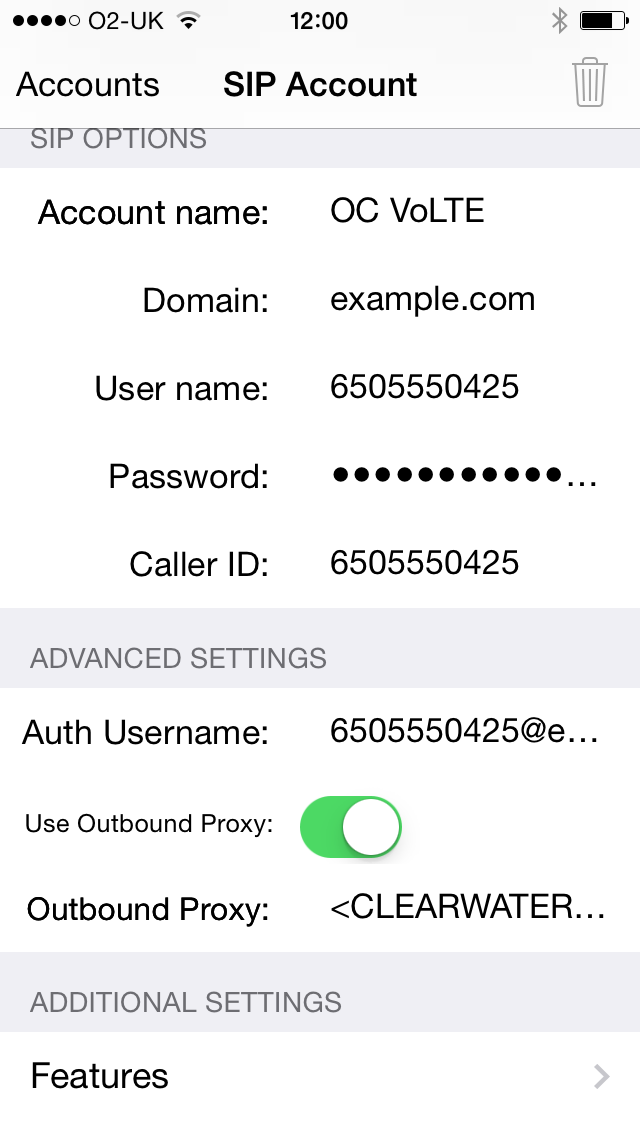
iOS 7 configuration
1 |
Go to Settings ▶ Accounts ▶ Add Account |
|---|---|
2 |
Enter the following details into the SIP Account screen: SIP options
Advanced Settings
|
3 |
Under Additional Settings on the same screen:
|
4 |
Select Transports type:
|
5 |
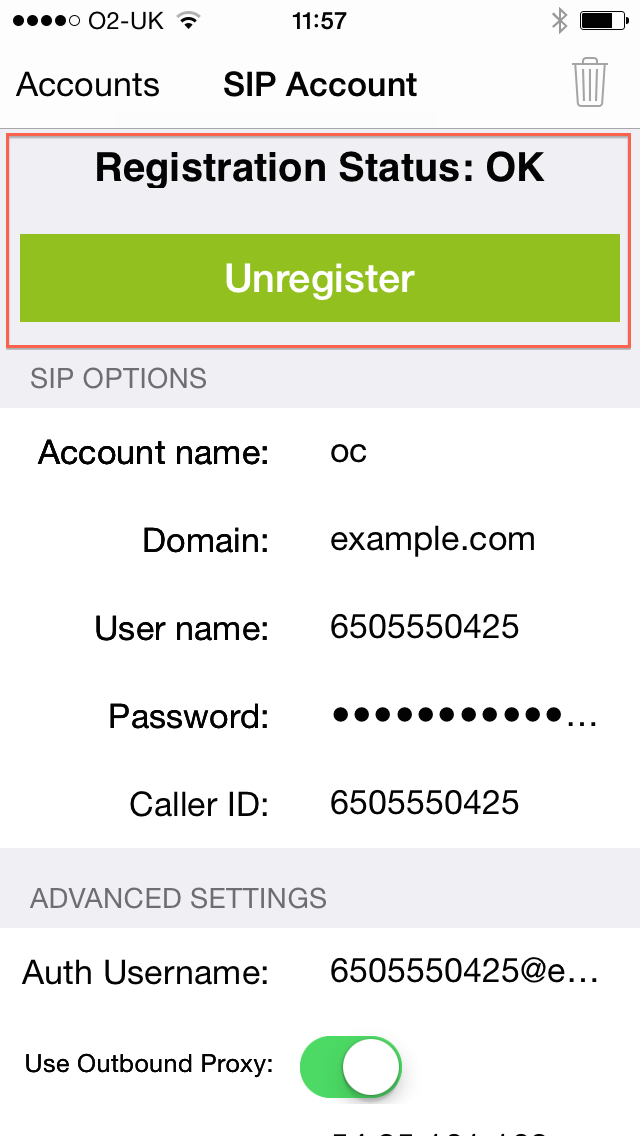
If set up is successful, the new account will appear on the Settings ▶ Accounts screen. If registration is successful, selecting the account will show a Registration Status of OK, under which there is an Unregister button to un-register.
|

IMS Identities
Included IMS subscriptions
Several preconfigured IMS subscriptions are included in the VoLTE cloud environment for testing purposes.
| IMS Subscription | IMS Public Identity | IMS Private Identity | Domain | Password |
|---|---|---|---|---|
6505550335 |
sip:6505550335@example.com |
6505550335@example.com |
example.com |
ec2oc‑6505550335 |
6505550337 |
sip:6505550337@example.com |
6505550337@example.com |
example.com |
ec2oc‑6505550337 |
6505550386 |
sip:6505550386@example.com |
6505550386@example.com |
example.com |
ec2oc‑6505550386 |
6505550425 |
sip:6505550425@example.com |
6505550425@example.com |
example.com |
ec2oc‑6505550425 |
6505550201 |
sip:6505550201@example.com |
6505550201@example.com |
example.com |
ec2oc‑6505550201 |
6505550202 |
sip:6505550202@example.com |
6505550202@example.com |
example.com |
ec2oc‑6505550202 |
6505550203 |
sip:6505550203@example.com |
6505550203@example.com |
example.com |
ec2oc‑6505550203 |
6505550204 |
sip:6505550204@example.com |
6505550204@example.com |
example.com |
ec2oc‑6505550204 |
6505550205 |
sip:6505550205@example.com |
6505550205@example.com |
example.com |
ec2oc‑6505550205 |
6505550206 |
sip:6505550206@example.com |
6505550206@example.com |
example.com |
ec2oc‑6505550206 |
6505550207 |
sip:6505550207@example.com |
6505550207@example.com |
example.com |
ec2oc‑6505550207 |
6505550208 |
sip:6505550208@example.com |
6505550208@example.com |
example.com |
ec2oc‑6505550208 |
6505550209 |
sip:6505550209@example.com |
6505550209@example.com |
example.com |
ec2oc‑6505550209 |
6505550210 |
sip:6505550210@example.com |
6505550210@example.com |
example.com |
ec2oc‑6505550210 |
Viewing IMS subscription and identities
IMS Subscriptions and related identities can be viewed through the HSS Web Console.
1 |
|||||
|---|---|---|---|---|---|
2 |
Click the User Identities link. A User Identities page displays. 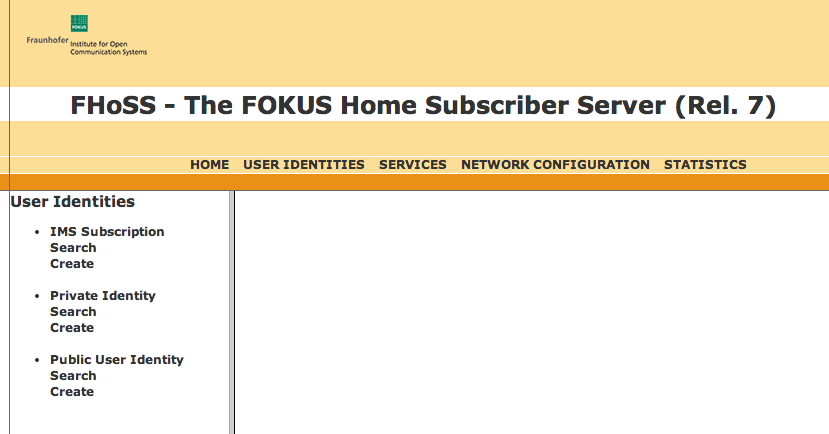
|
||||
3 |
Click the Search link under IMS Subscriptions. The Search page displays. 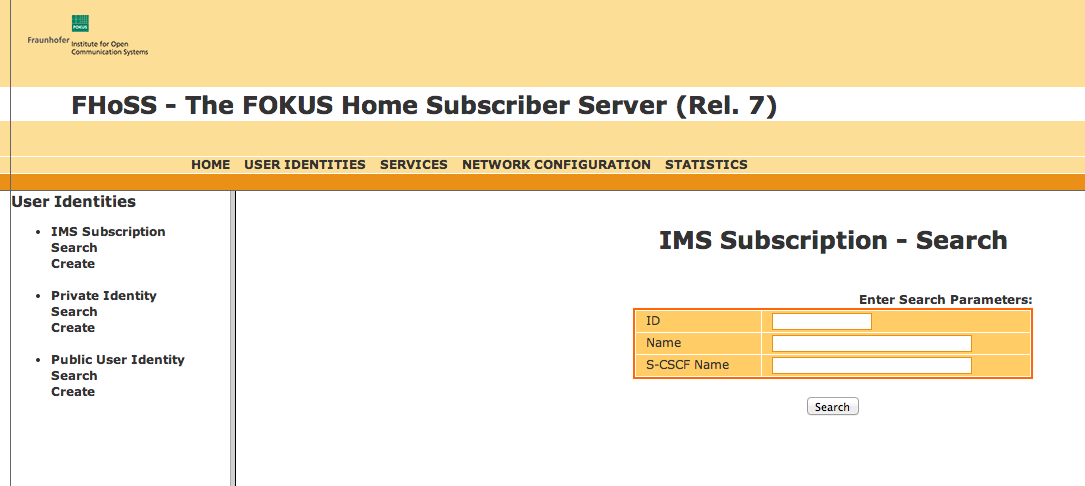
|
||||
4 |
Click the Search button on the Subscription Search page.
The Search Results page displays. 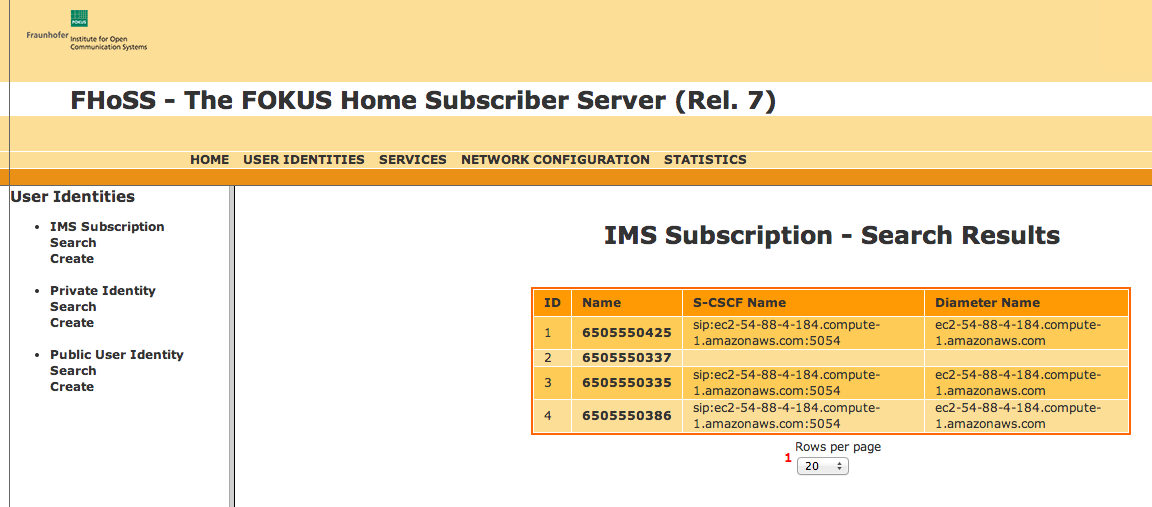
|
||||
5 |
View a subscription within the results.
The Subscription page displays (in this example, IMS subscription '6505550425'). 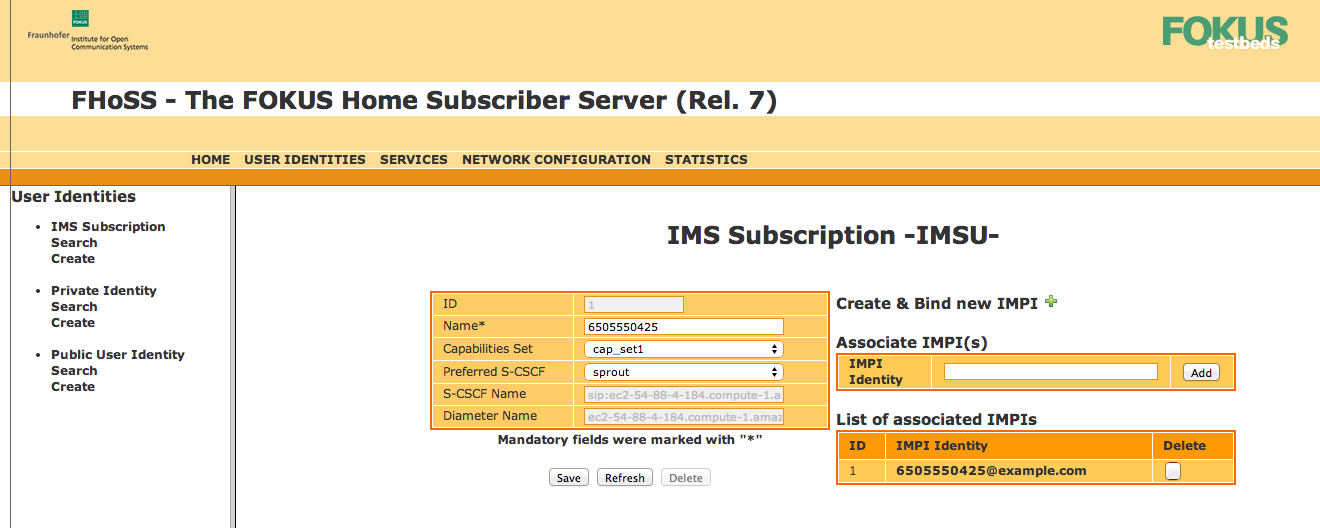
|
| |
Viewing other aspects of IMS identities
In the IMS Identities page, there are three search menus you can use for more detail:
|
| |
Adding new IMS subscriptions and identities
To add new IMS subscriptions and identities, see Adding a New User to the HSS. |
Viewing transparent user data
Transparent user data can be stored in the HSS and accessed over the Diameter Sh interface. The OpenIMS HSS does not provide a view of transparent user data within its web console, but Sentinel VoLTE’s Rhino Element Manager does.
To view transparent user data:
1 |
Log into Rhino Element Manager (REM).
|
||
|---|---|---|---|
2 |
Select Sentinel ▶ HSS Subscriber Data. 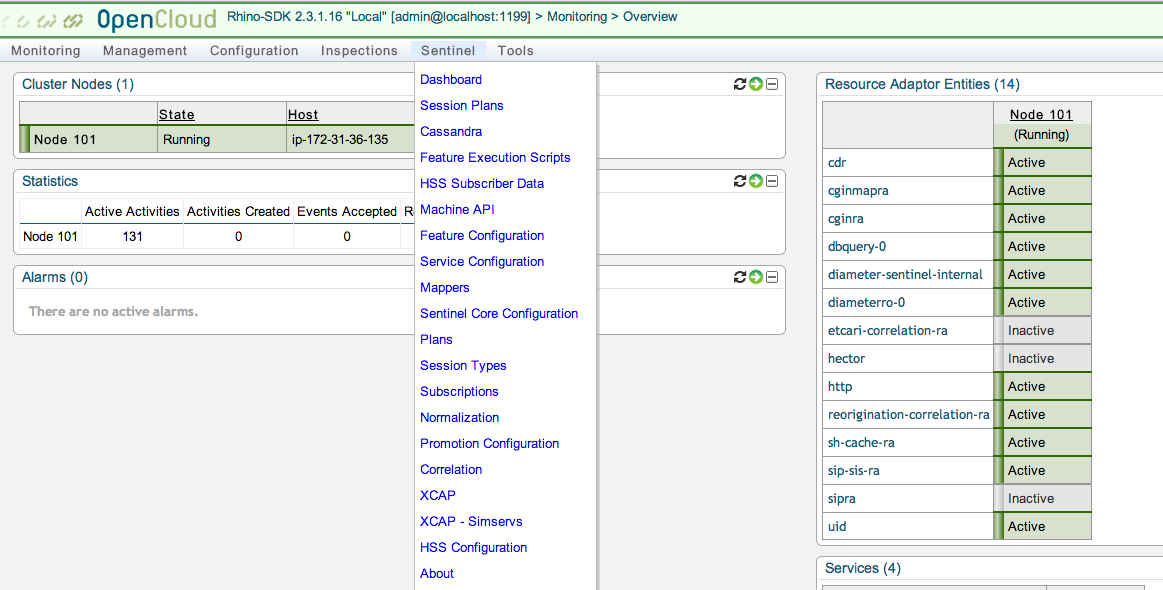
The HSS Subscriber Data screen displays. 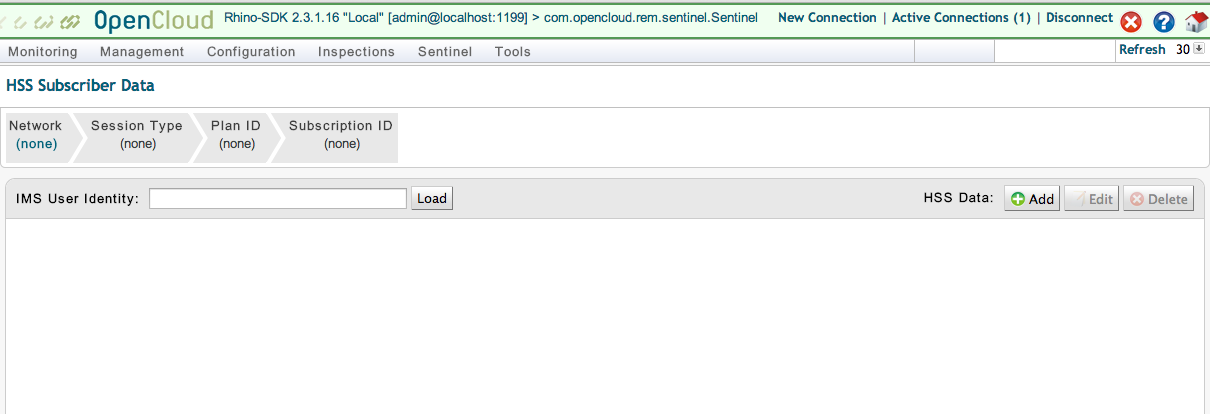
|
||
3 |
Enter an IMS Public User Identity (IMPU) in the IMS User Identity box, then click the Load button. In this case, the IMPU 
|
||
4 |
Check the ICB Rules line to see that the user has an Anonymous condition for Incoming Communication Barring.
|
Adding a New User to the HSS
| |
As an example, this page shows how to add user 6505550411. |
HSS configuration
To configure HSS:
1 |
Login to the HSS web console; 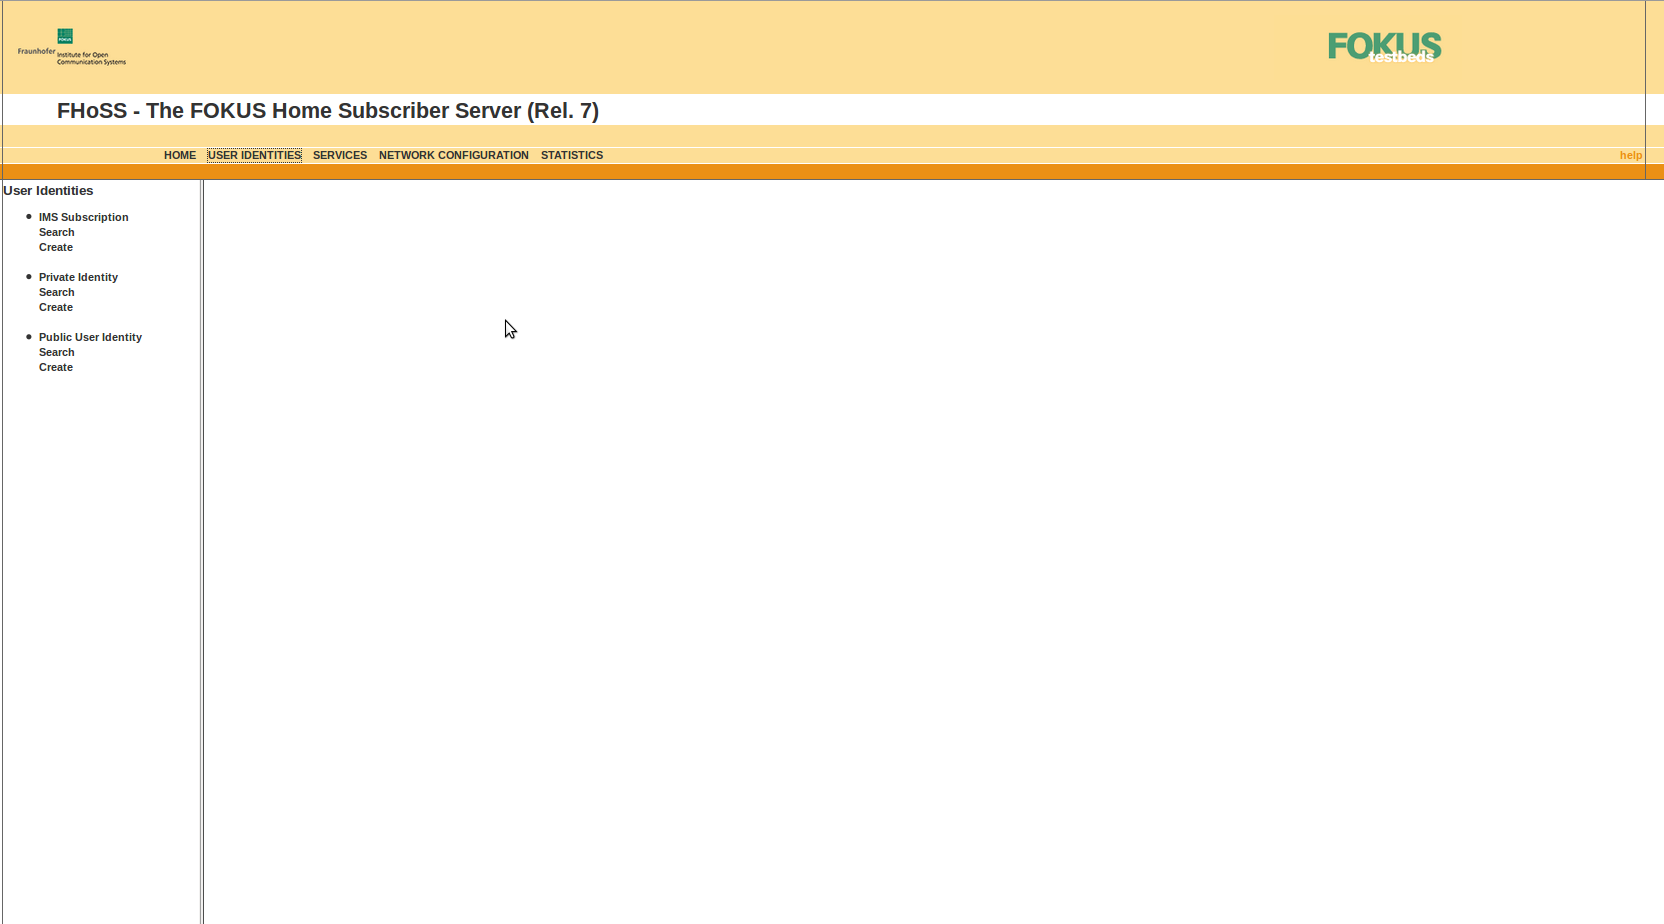
|
|---|---|
2 |
Create the IMS:
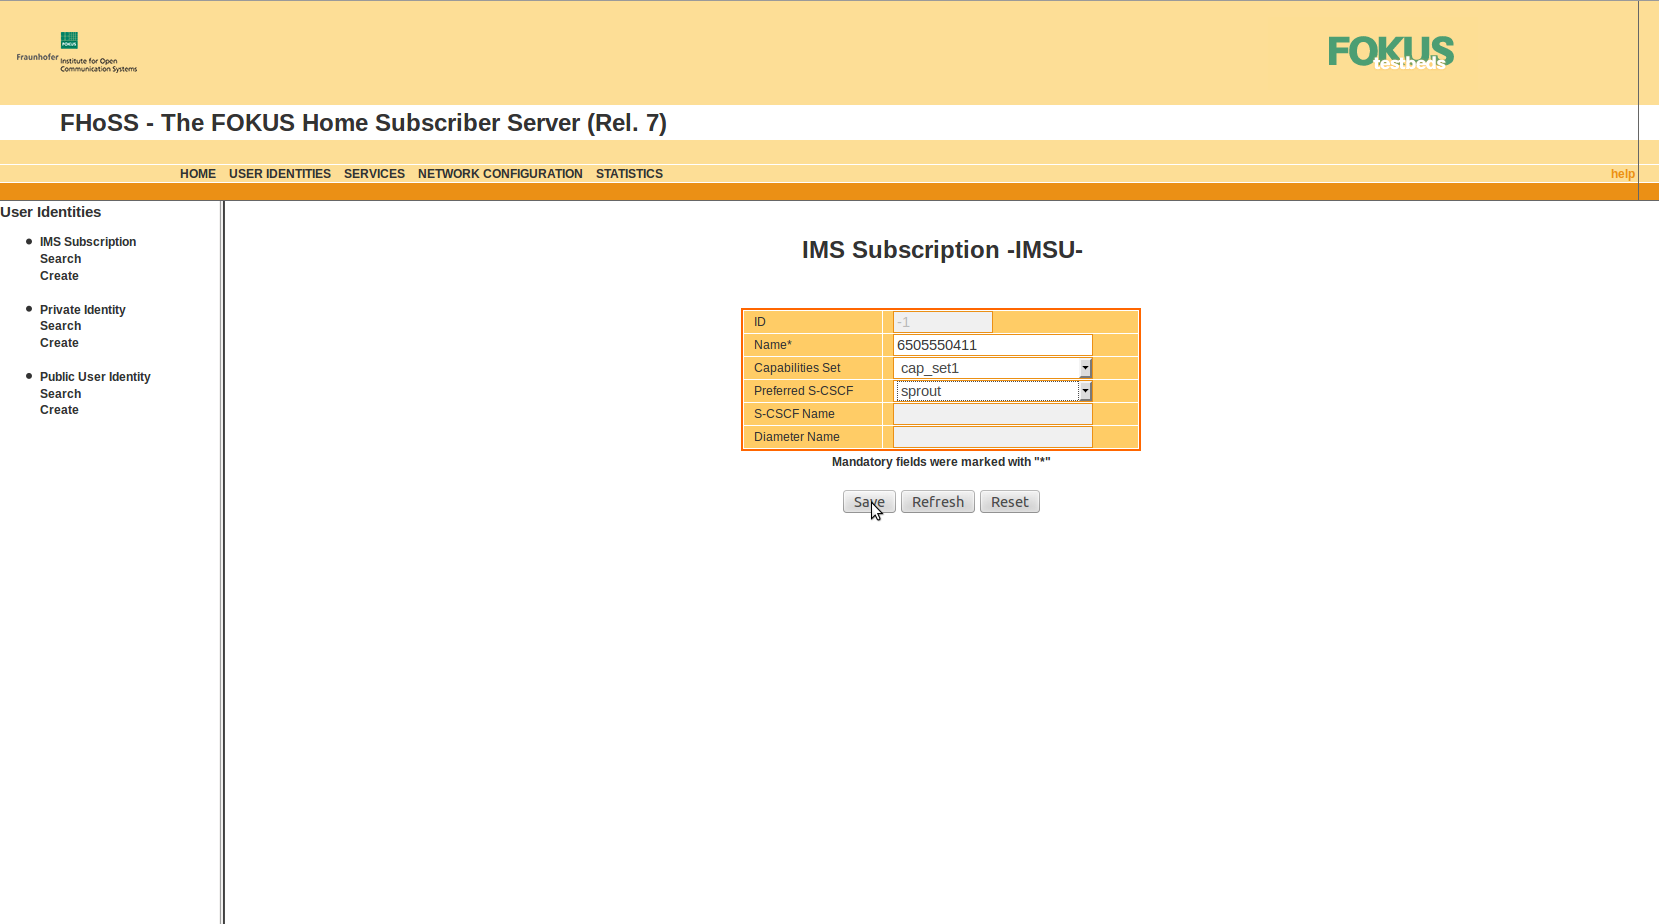
|
3 |
Create the IMPI:
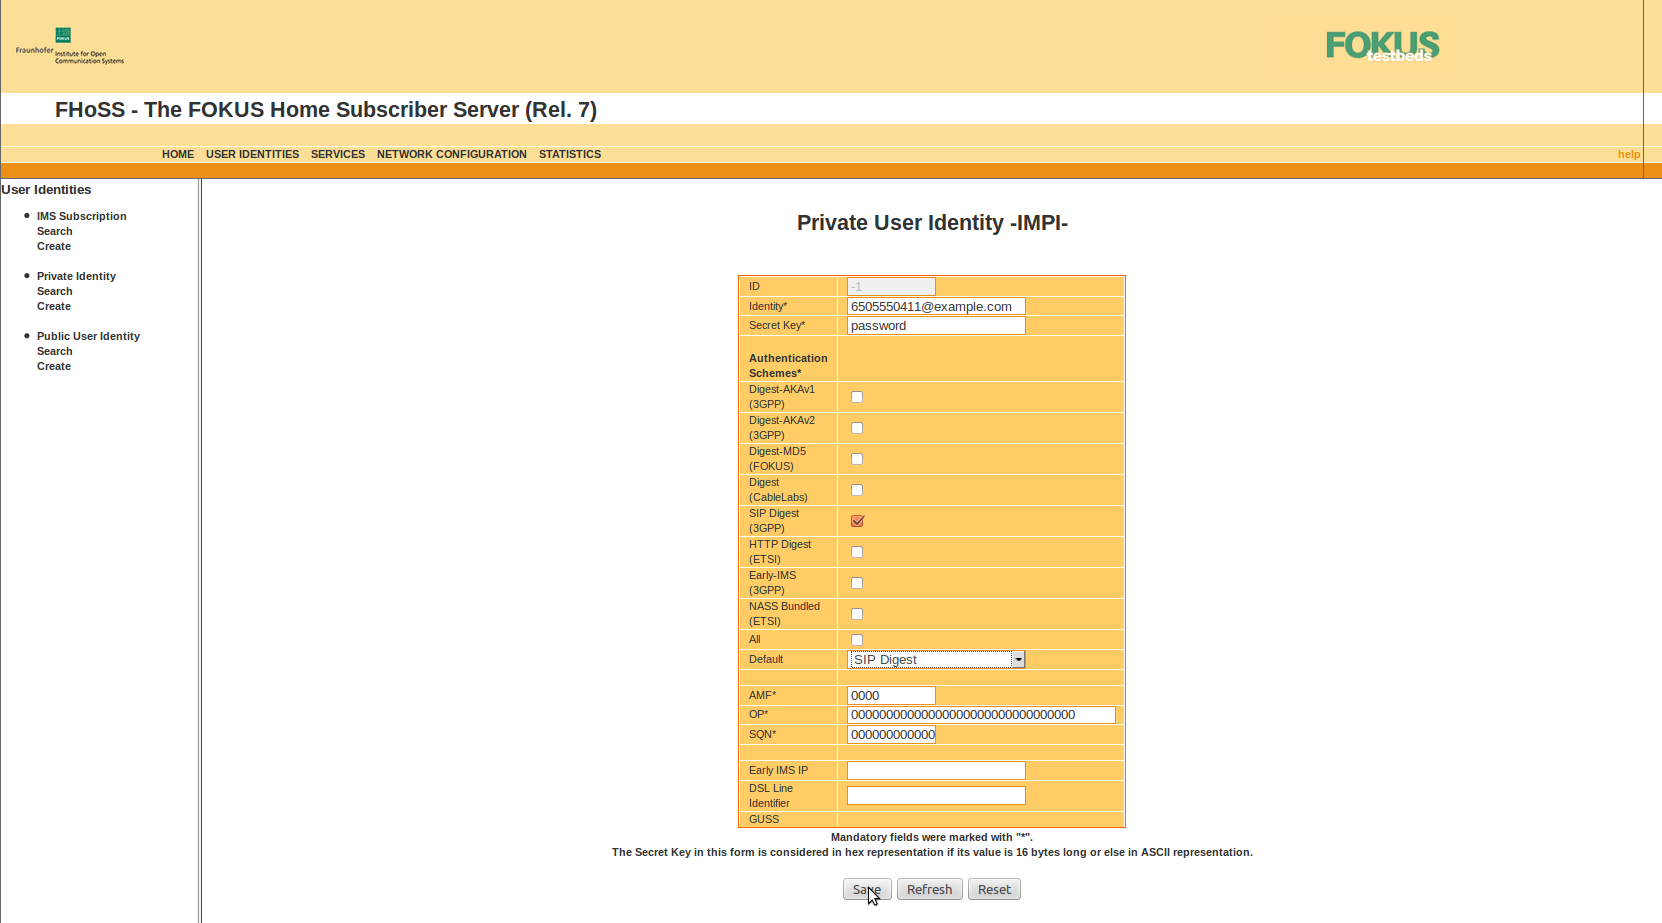
|
4 |
Associate the IMPI to the IMSU:
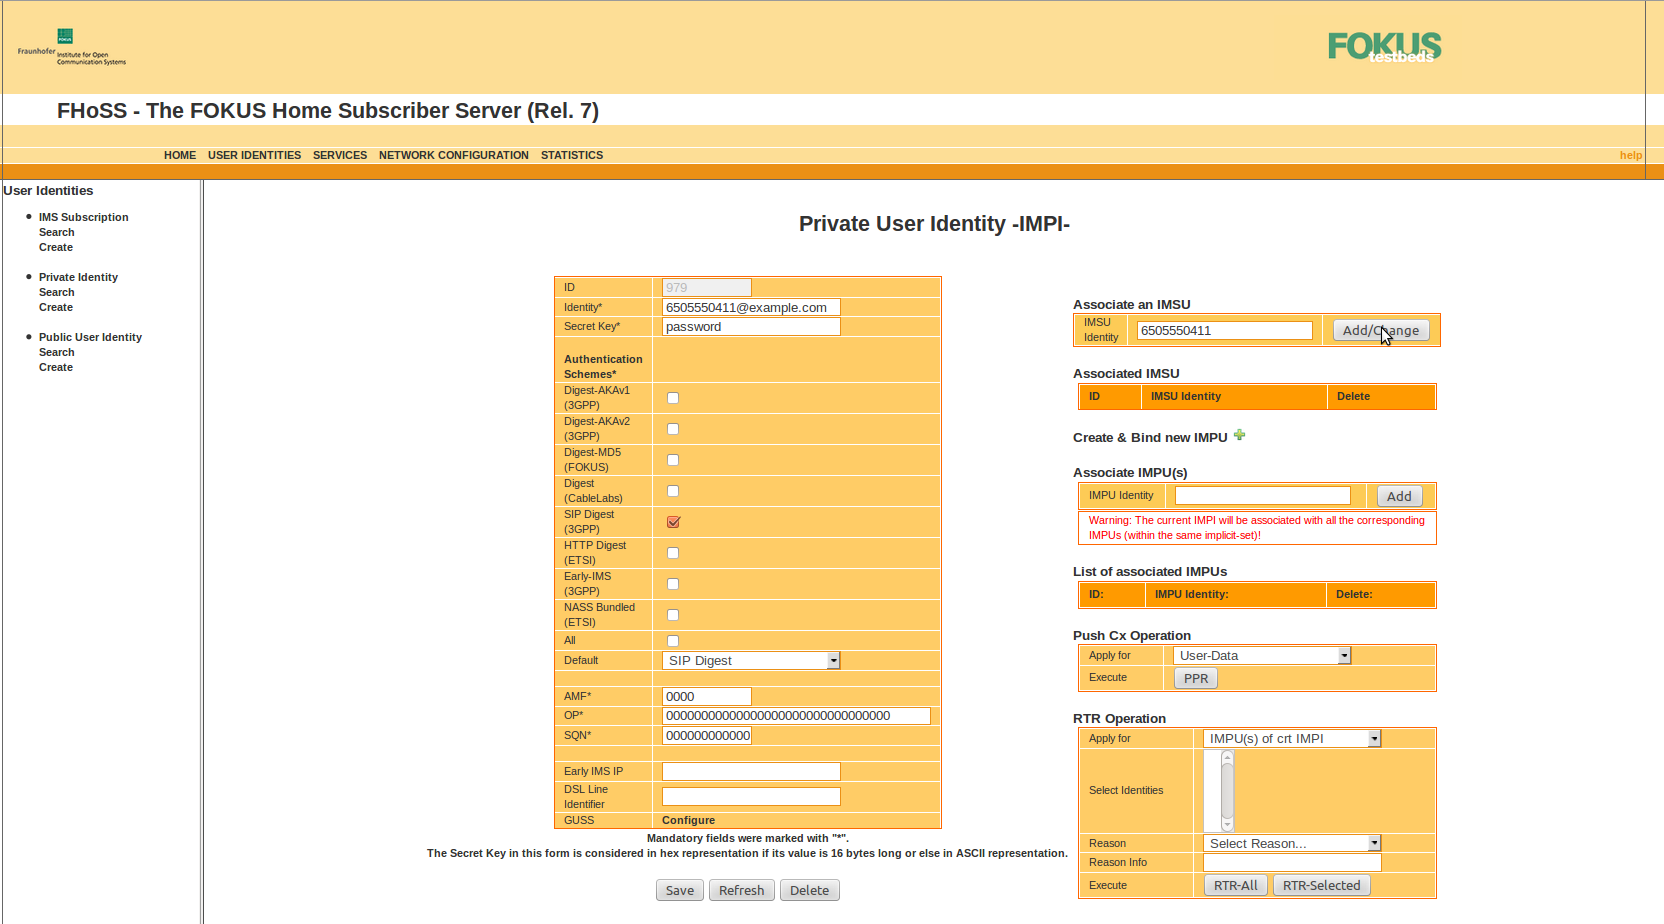
|
5 |
Create the IMPU:
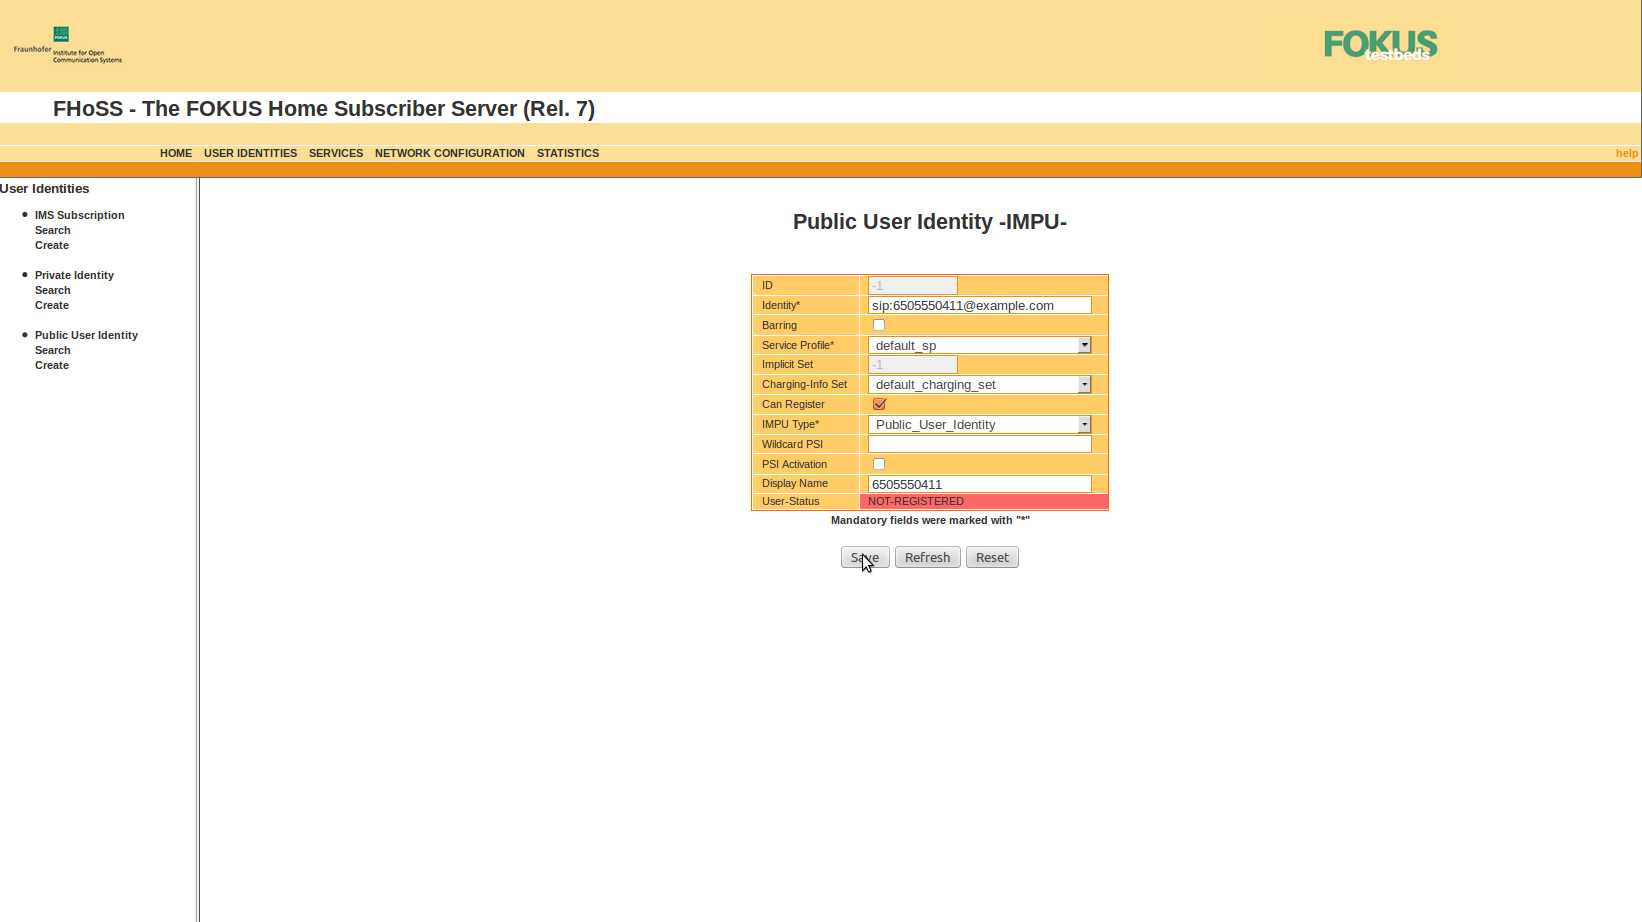
|
6 |
Associate IMPI to IMPU:
|
7 |
Add Visited Network to IMPU:

|
OCS configuration
To configure OCS:
1 |
Login to VoLTE TAS and edit this file: |
|---|---|
2 |
Add an entry for |
3 |
Restart the OCS simulator: ubuntu@ip-172-31-36-135:~/RhinoSDK/rhino-connectivity/diameter-2.6.0.7/simulators/ocs-simulator$ sudo /etc/init.d/ocs stop ubuntu@ip-172-31-36-135:~/RhinoSDK/rhino-connectivity/diameter-2.6.0.7/simulators/ocs-simulator$ sudo /etc/init.d/ocs start |
Add MMTel CDIV data in REM
To add MMTel CDIV data:
1 |
Login to the REM HSS Subscriber Data page. 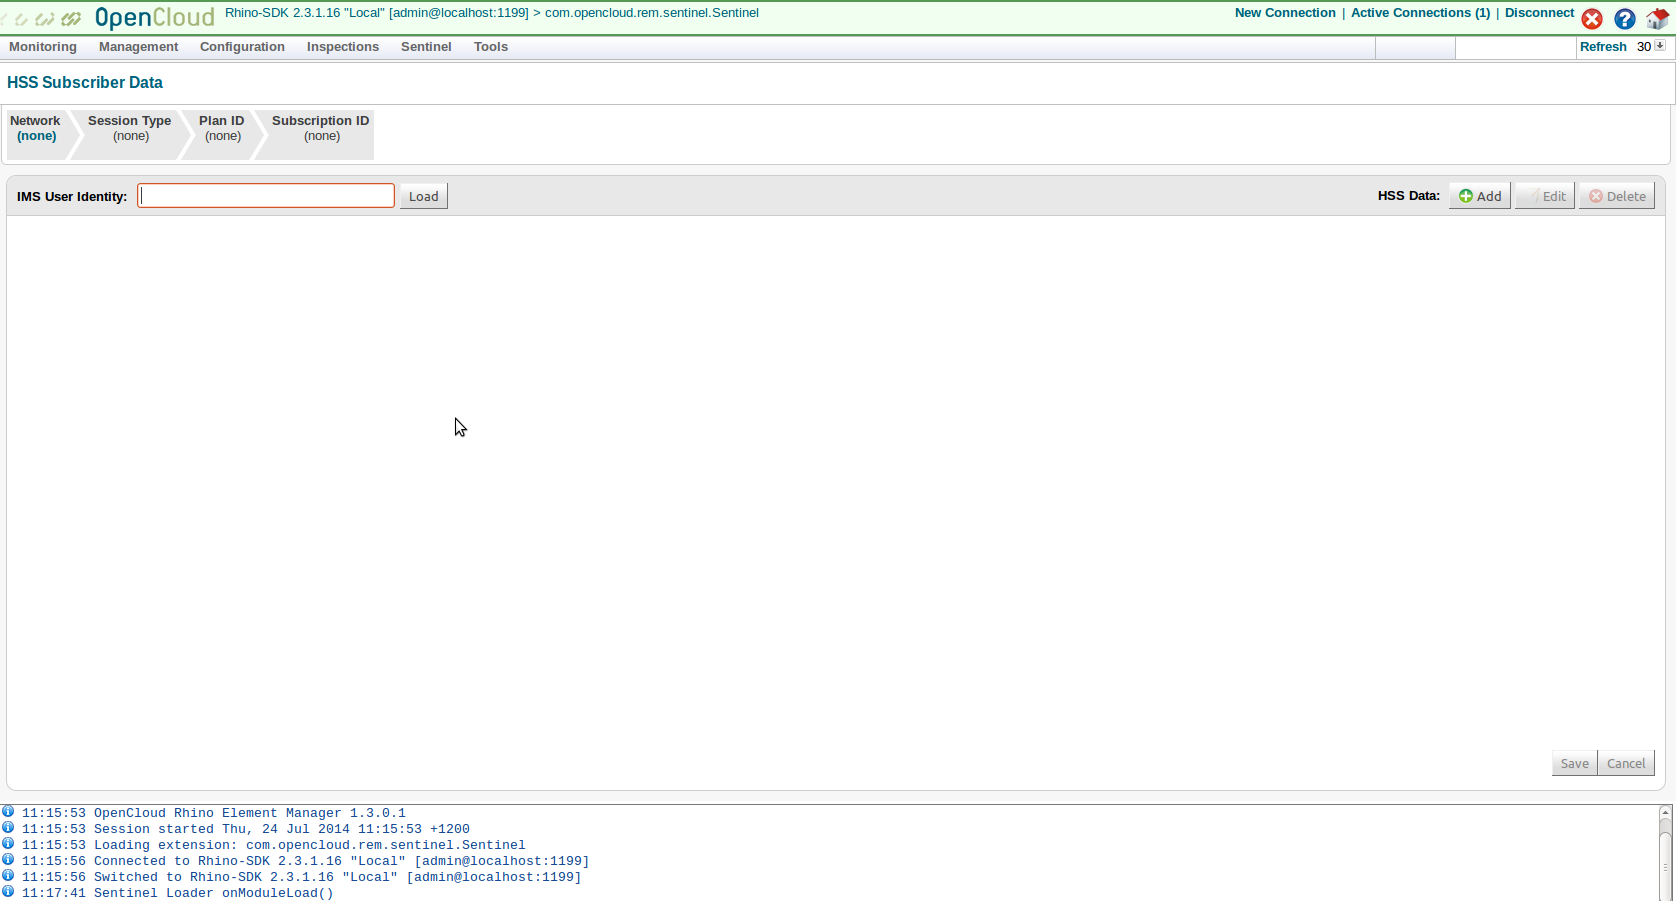
|
||
|---|---|---|---|
2 |
Click HSS Data: Add, 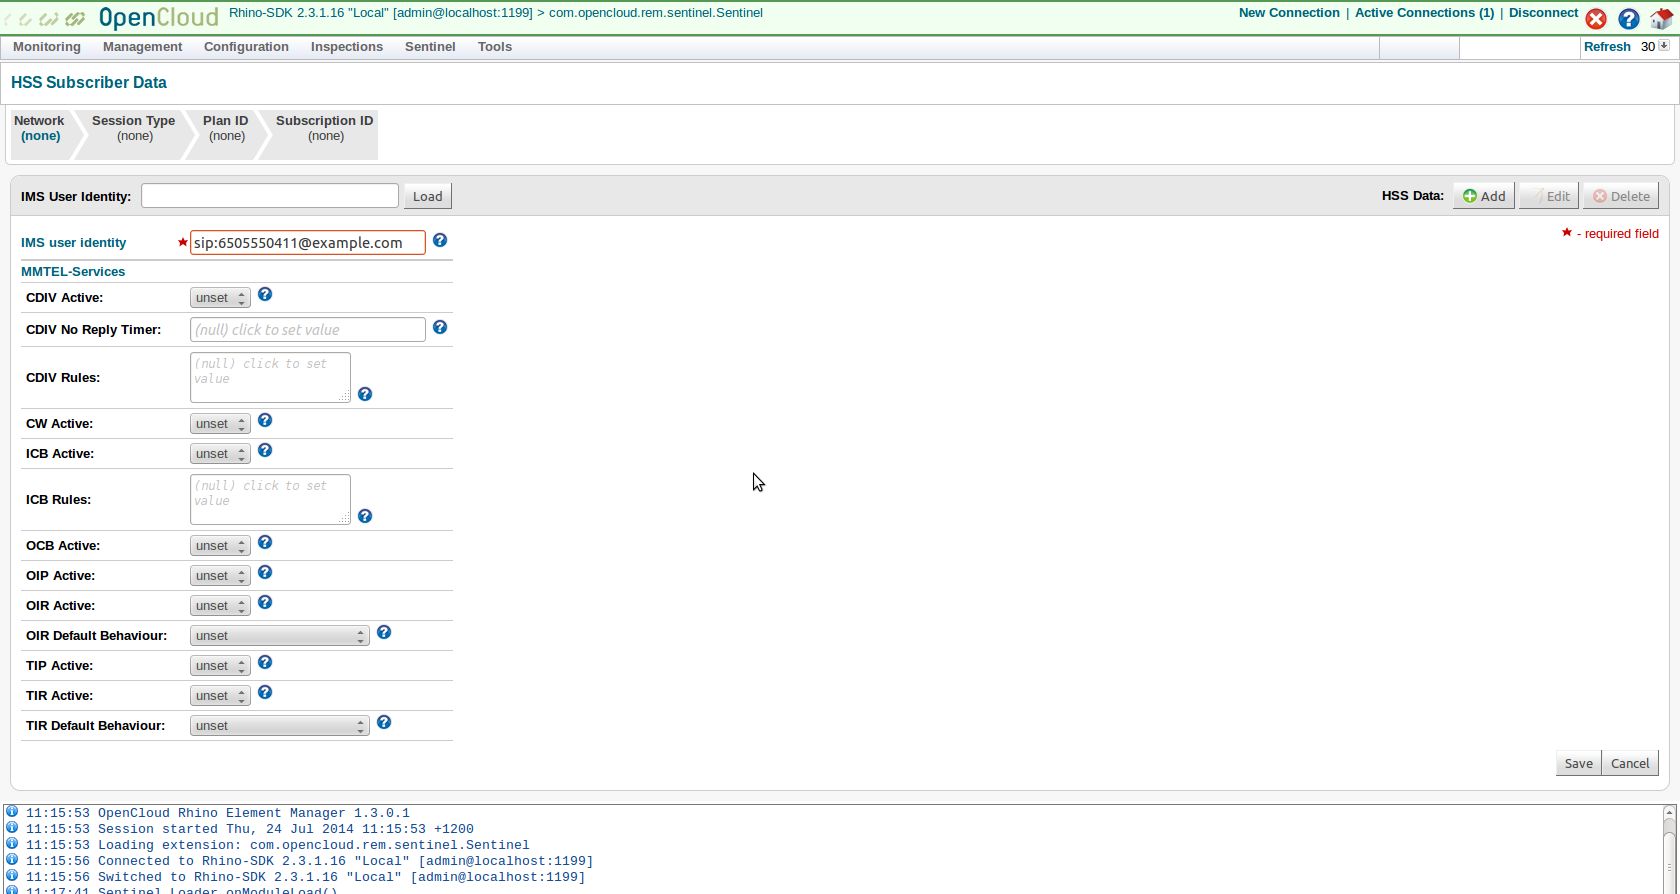
|
||
3 |
Set CDIV features.
|
||
4 |
Set ACR rules.
|
||
5 |
Click Save. 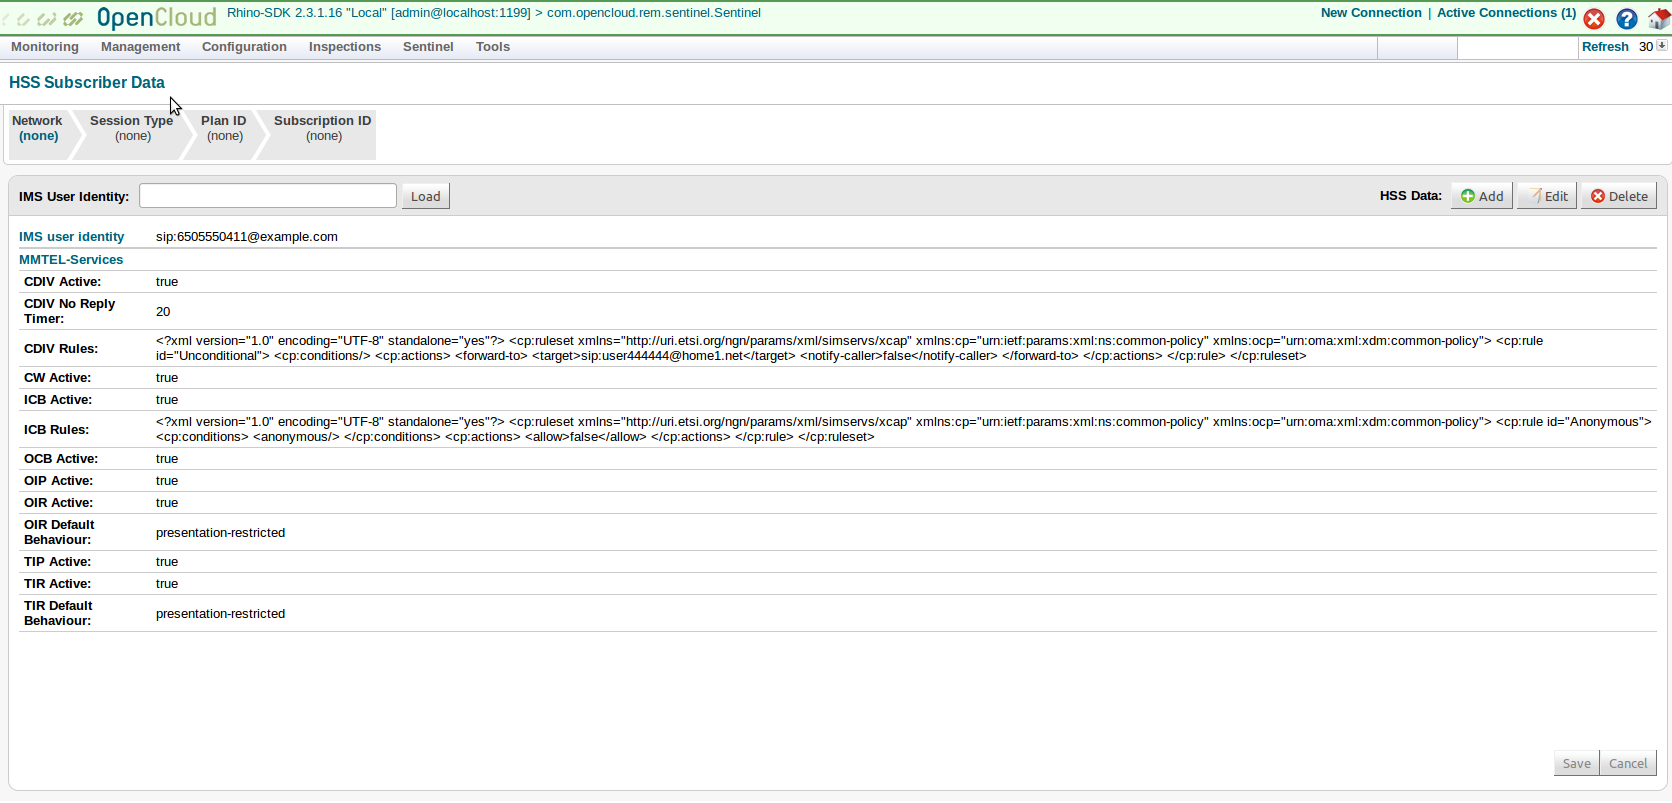
|
MMTel Demonstrations
This section shows how to set up subscribers to see a variety of MMTel features in action.
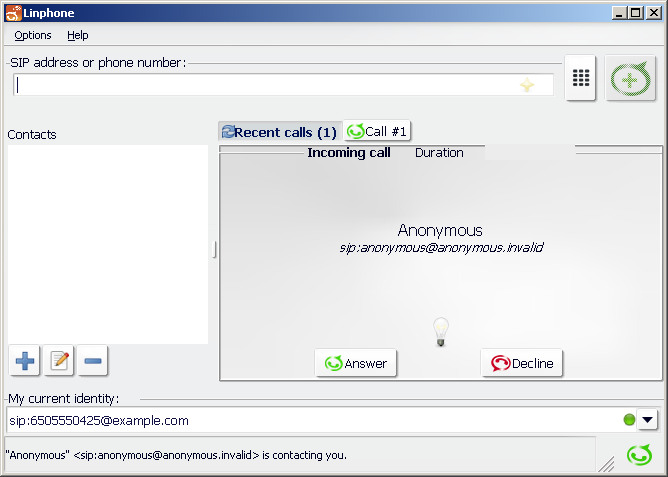
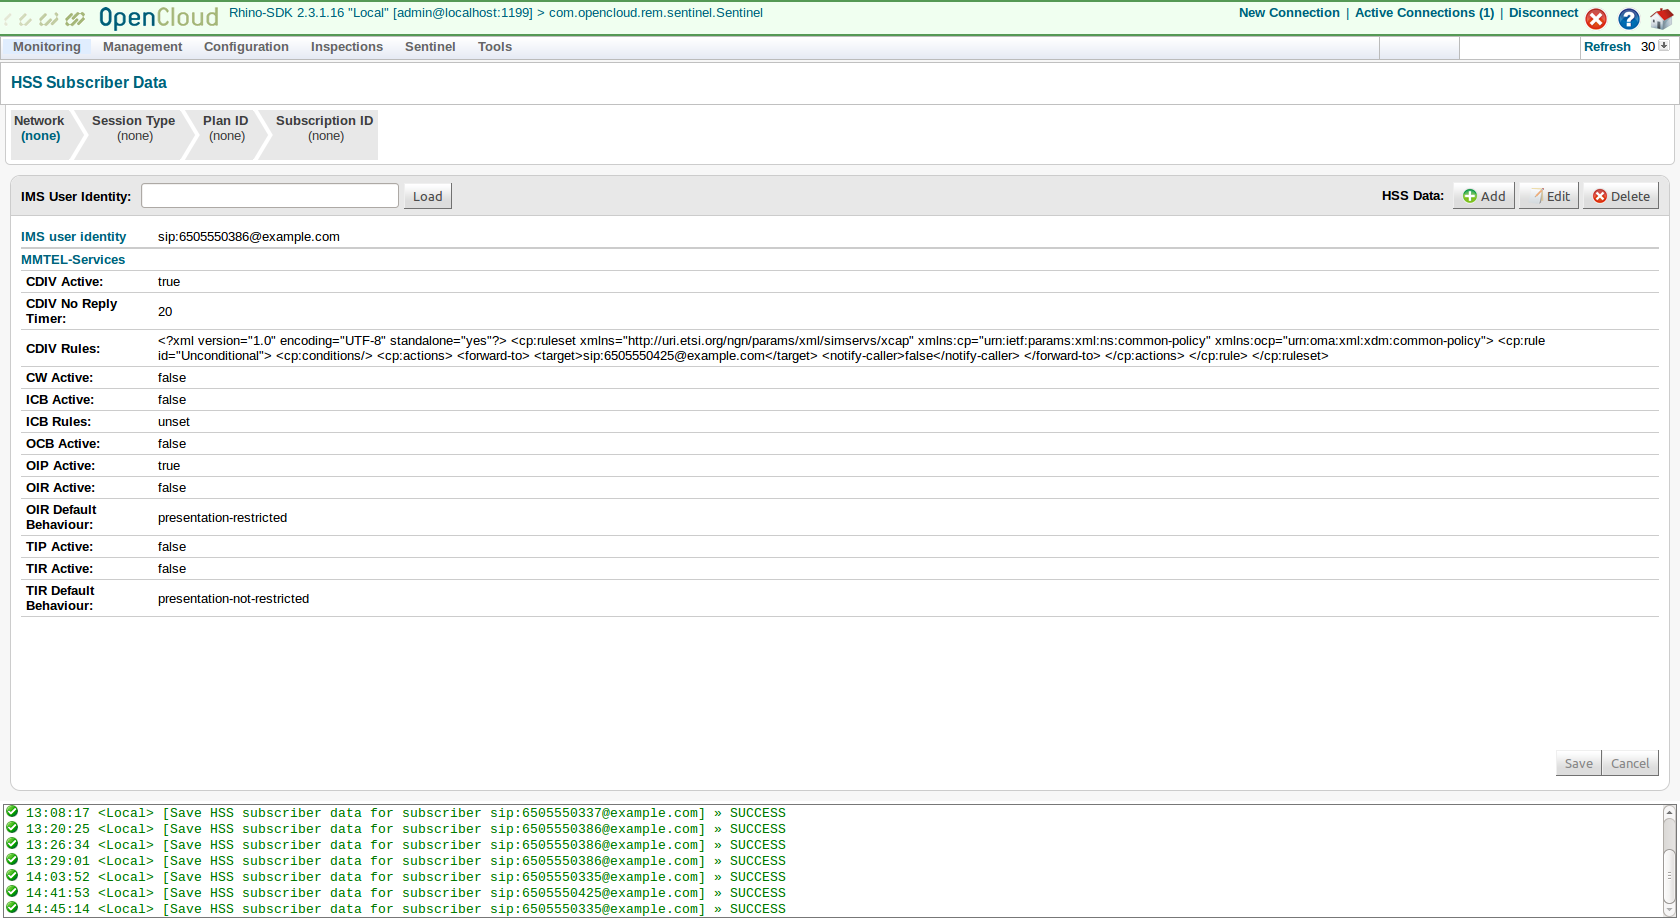
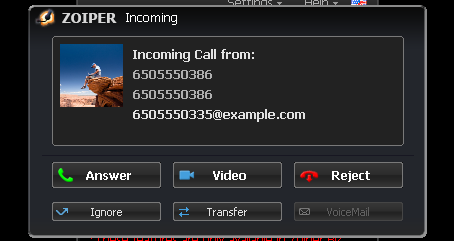
Anonymous Calling
To see anonymous calling in action:
1 |
Start two UEs:
|
||
|---|---|---|---|
2 |
Make a call from
|
||
3 |
In REM, navigate to Sentinel / HSS Subscriber data OR XCAP…. |
||
4 |
Search for |
||
5 |
Edit the HSS Data and set:
|
||
6 |
Wait 30 seconds. |
||
7 |
Make a call from
The incoming call is |

Anonymous Call Rejection
To see anonymous call rejection in action:
1 |
Start two UEs:
|
|---|---|
2 |
In REM, navigate to Sentinel / HSS Subscriber data. |
3 |
Search for |
4 |
Edit the HSS Data and set:
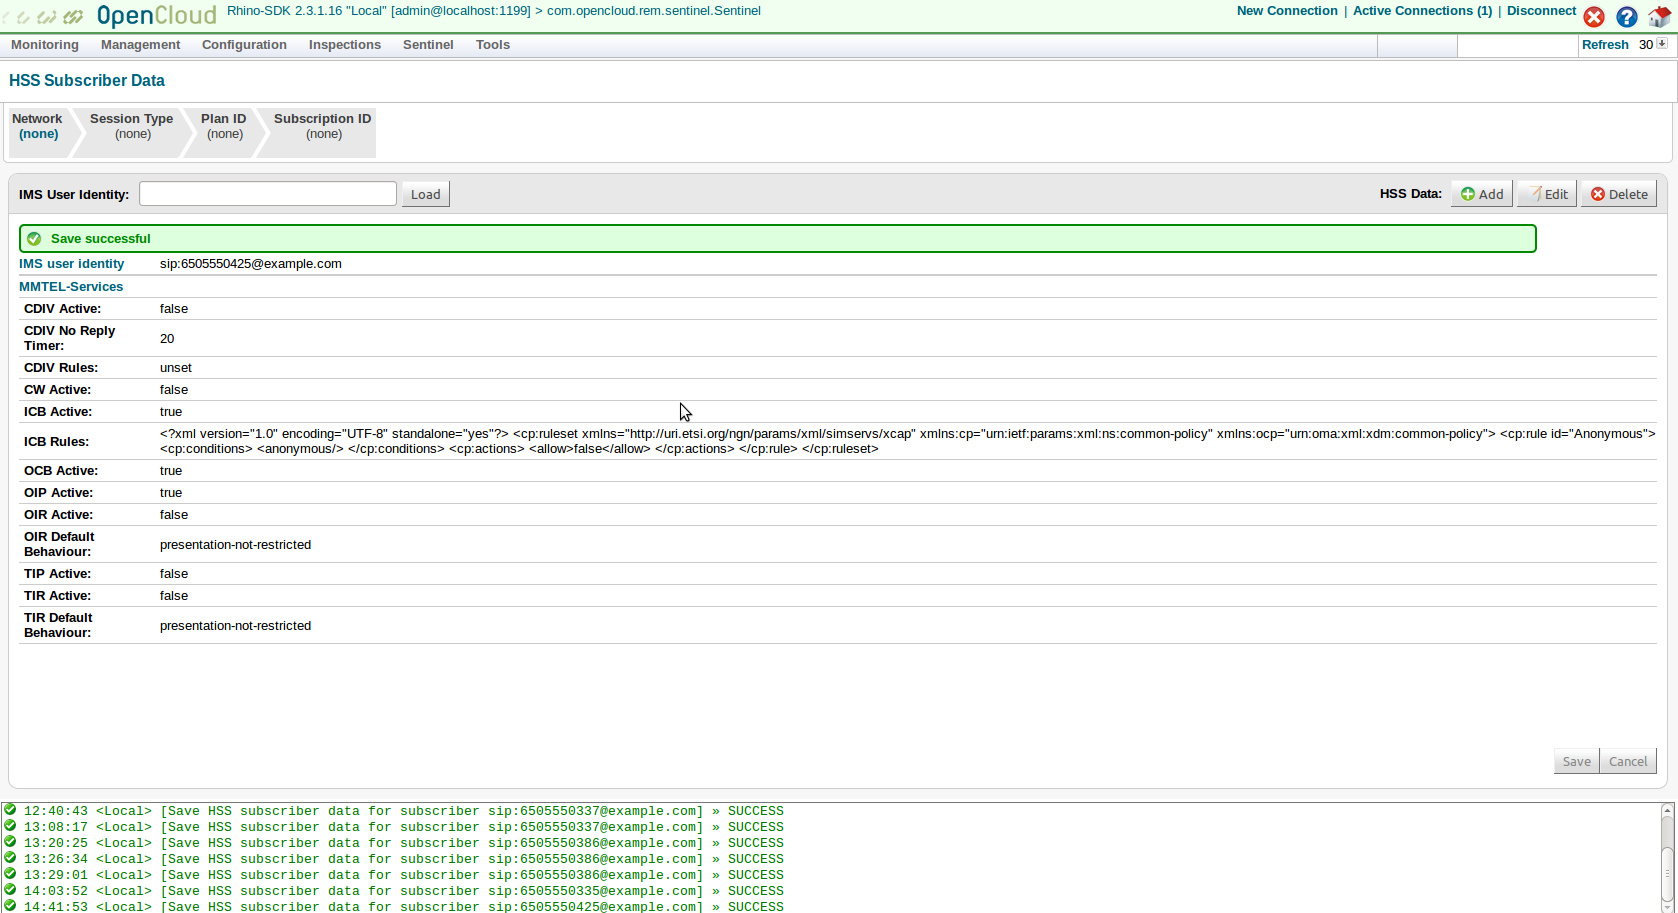
|
5 |
Wait 30 seconds. |
6 |
Make a call from The incoming call is rejected.
|
CDIV No-Answer Scenario
To see the CDIV no-answer scenario in action:
1 |
Start a UE for each of:
For example: 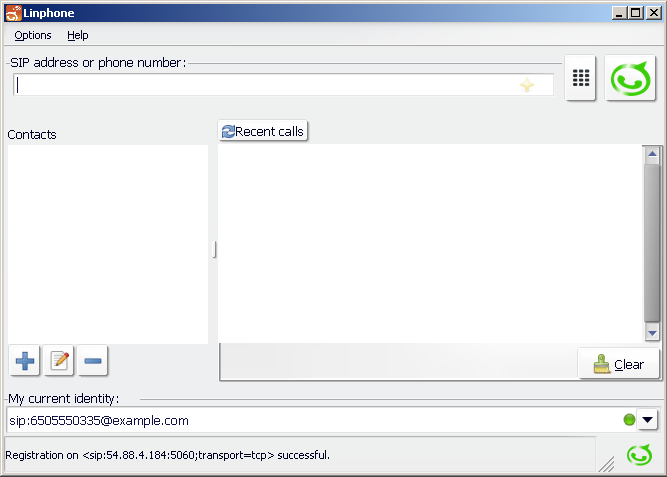
|
||
|---|---|---|---|
2 |
Make a call 
|
||
3 |
Make a call 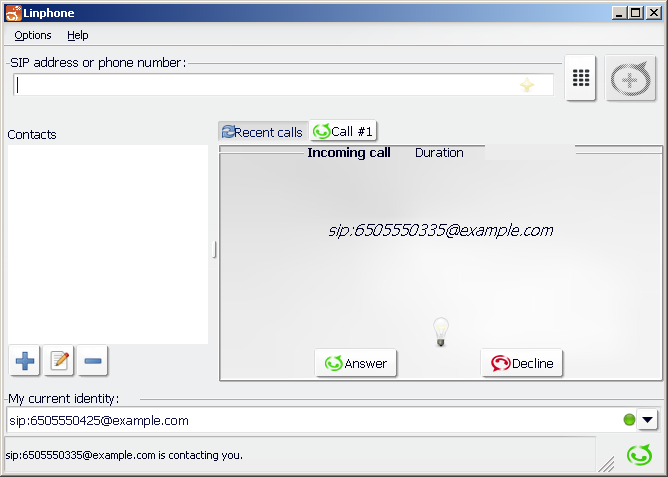
|
||
4 |
In REM:
|
||
5 |
Wait 30 seconds. |
||
6 |
Make a call
The incoming call to 
|
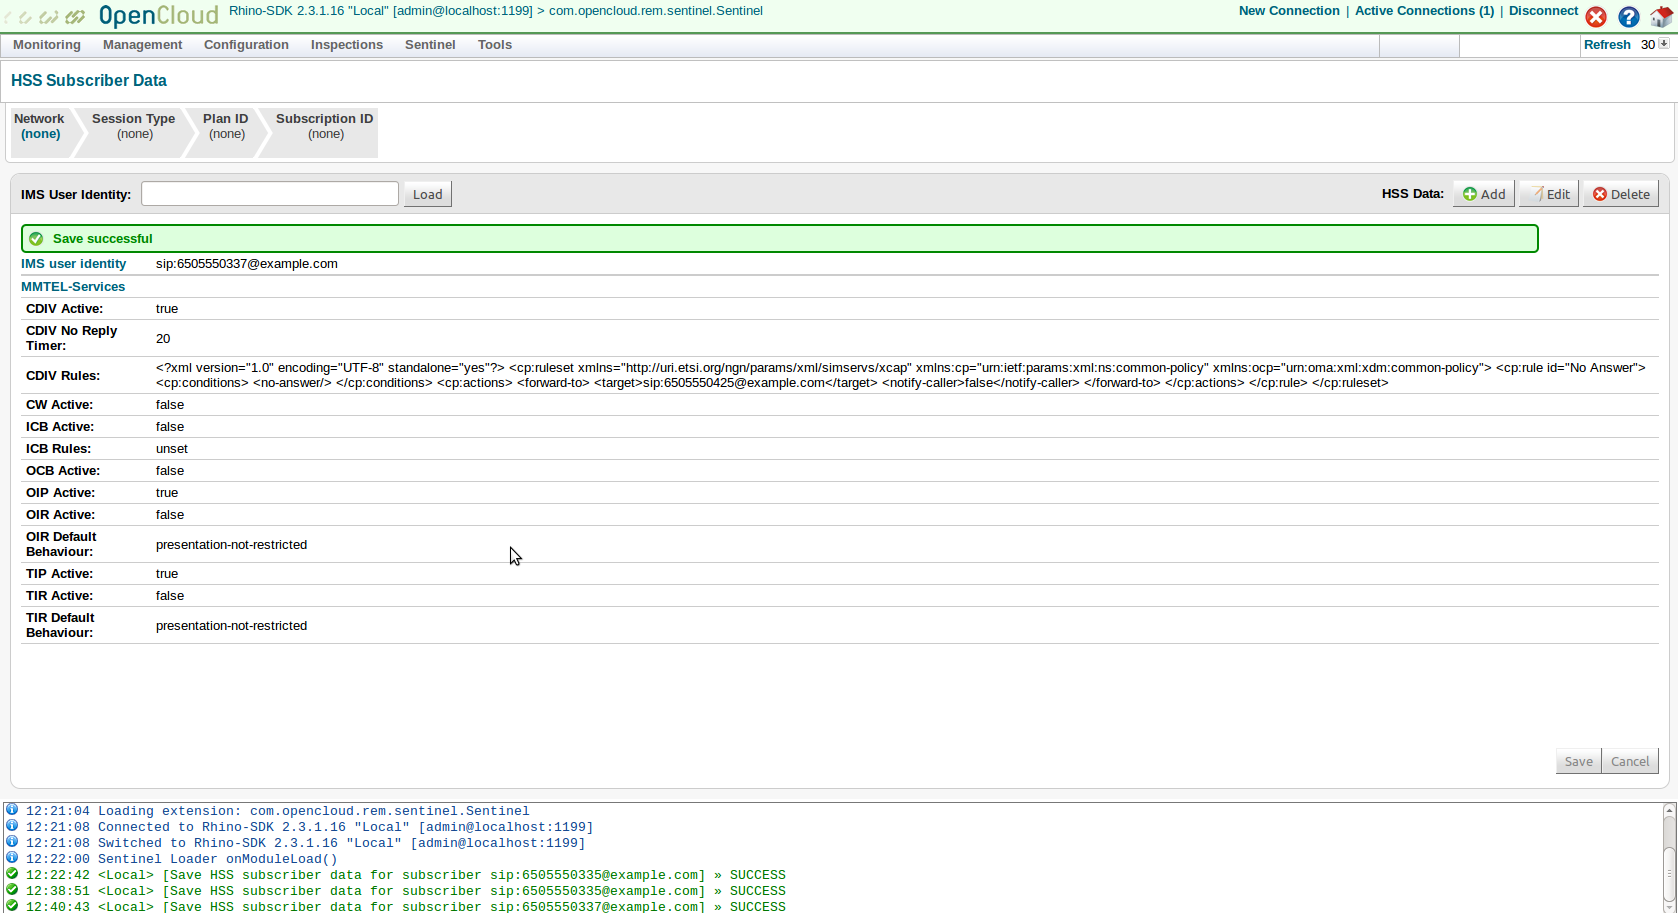
CDIV Unconditional Scenario
To see the CDIV unconditional scenario in action:
1 |
Start a UE for each of:
For example:
|
||
|---|---|---|---|
2 |
Make a call 
|
||
3 |
In REM:
|
||
4 |
Wait 30 seconds. |
||
5 |
Make a call
The incoming call is automatically diverted to
|
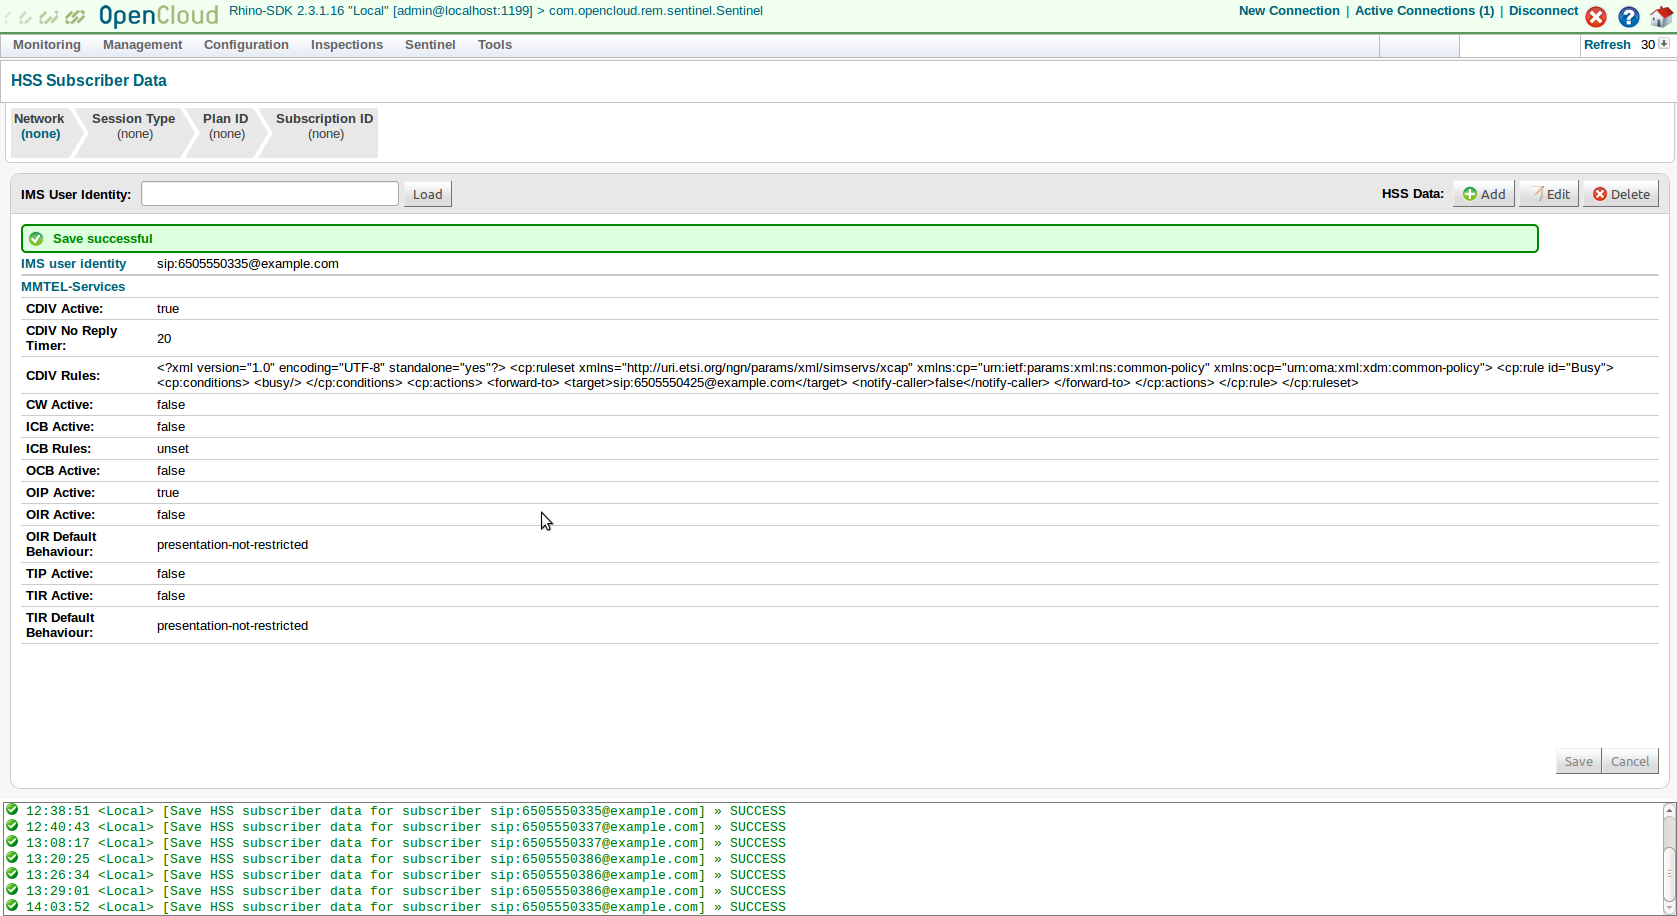
CDIV Busy Scenario
To see the CDIV busy scenario in action:
1 |
Start a UE for each of:
For example:
|
||
|---|---|---|---|
2 |
In REM:
|
||
3 |
Wait 30 seconds. |
||
4 |
Make a call
|
||
5 |
Reject the call. The call is automatically diverted to
|
IMS Configuration in HSS
IMS configuration is stored in HSS. This page shows which IMS components are stored where.
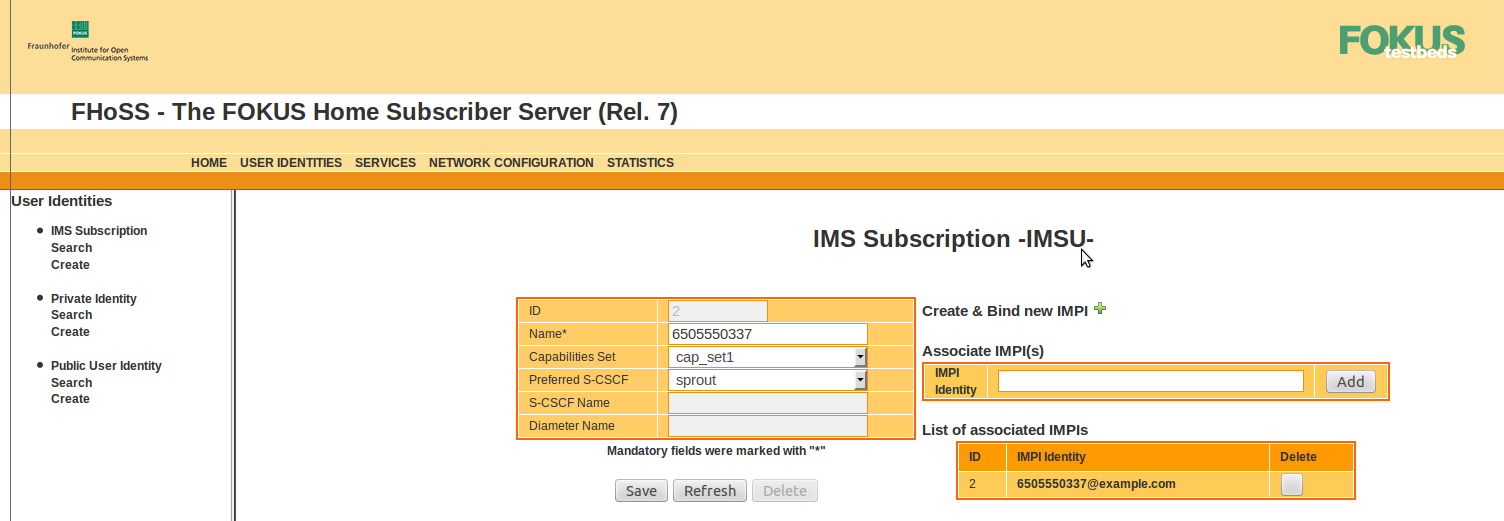
IMS subscription (IMSI)
Each subscriber has a IMS subscription which is linked to a preferred S-CSCF — Sprout.
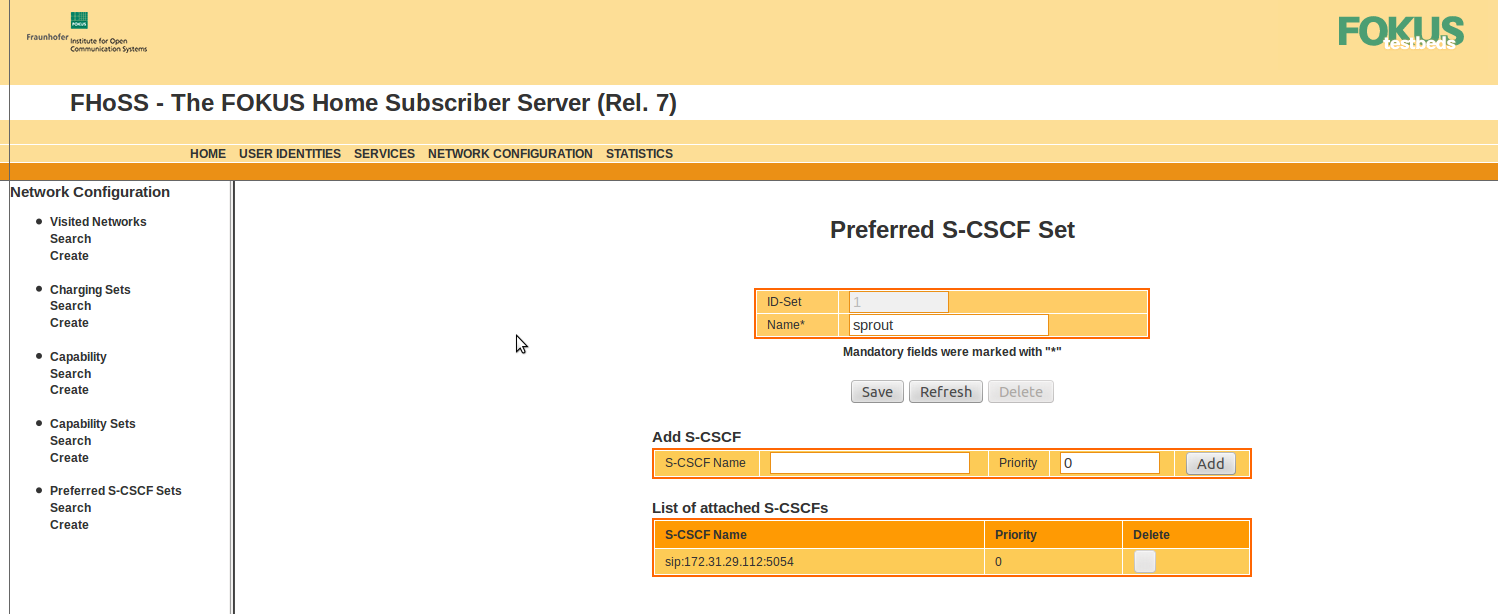
Preferred S‑CSCF
The Preferred S-CSCF page can be reached from the network configuration page. The entry for Sprout points to the SIP URI of the S-CSCF.
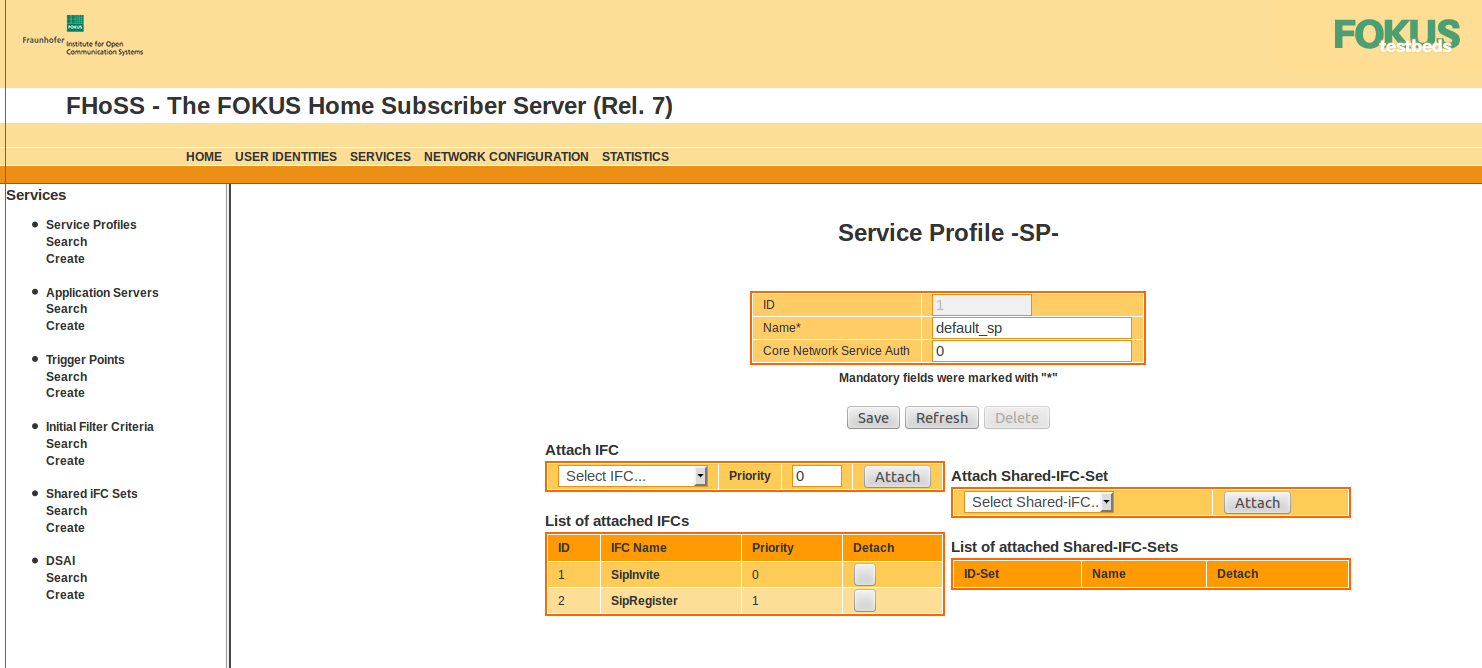
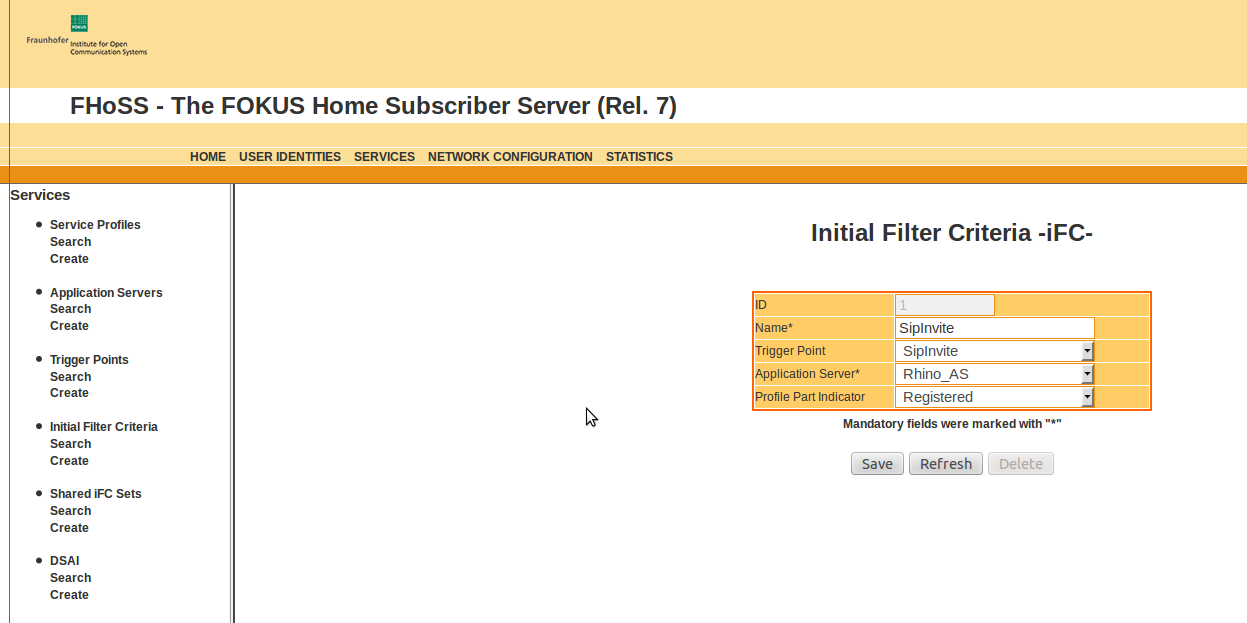
Default profile
Each of the subscribers in HSS is linked to the service profile default_sp. This service profile is linked to the two iFCs SipInvite and SipRegister.
As the name implies, the 'SipInvite' iFC is for INVITE initiated signalling, and 'SipRegister' is for REGISTER initiated signalling.

Decommissioning the Cloud Environment
To decommission the VoLTE cloud environment, the EC2 the administrator needs to:
1 |
Login to the AWS console. |
|---|---|
2 |
Terminate:
|
3 |
Delete:
|