| |
This document explains the Sentinel IP-SM-GW SDK — what it does and how to use it |
What is the Sentinel IP-SM-GW SDK?
The Sentinel IP-SM-GW SDK:
-
enables a developer to create and modify features, mappers, and OCS Drivers, using Sentinel as a set of APIs and framework
-
provides a build environment and set of tools to facilitate development, deployment, configuration, and testing.
Getting the SDK
You can download the most recent SDK version from here as a single zip file.
Once you extract this zip, you’ll have an uninitialized Sentinel IP-SM-GW SDK environment.
What’s in the SDK?
The SDK includes:
OpenCloud tools |
|
|---|---|
Third-party software |
|
Workings of the SDK
The SDK consists of:
-
source code, for features, mappers, OCS drivers, profiles, libraries, services, and so-on; written in Java
-
modules, which contain the source code, in a standard directory structure; built and published into a local filesystem-based Ivy repository inside the SDK
-
OpenCloud-supplied tools, which read published modules from one or more Ivy repositories and then read/write state in the Rhino SLEE.
The various tools in the SDK operate on modules which have been built and published.
| |
For further information about repositories, see Using Ivy with the Sentinel IP-SM-GW SDK |
What to read next
First read the Installing the Sentinel IP-SM-GW SDK and Creating a feature tutorials
(to learn how to install the product and create a feature).
| |
References
See also: |
Installing the SDK
| |
Tutorial: install, configure, deploy
For beginning users, this tutorial walks step by step through:
Completing the walkthrough will leave you ready to continue with the next tutorial: Creating a feature. |
Installation Method
The instructions below provide a manual SDK installation. This is suitable for users who want to have a better understanding of the SDK capabilities and how so called "deployment modules" are created and function. Another option is to use the Sentinel IPSMGW Installer, which leads to the same result, but automatically performs these steps, in effect simplifying the installation process. If you use the installer you can skip to Creating a Feature, otherwise continue reading this page.
Prerequisites
Before installing the Sentinel IP-SM-GW SDK, download:
|
Prerequisite |
Download URL |
||
|
Java 8 Standard Edition SDK |
|||
|
RhinoSDK 2.7.0 |
|
||
|
Sentinel IP-SM-GW SDK zip |
Please download the most recent SDK version from the link above. The Sentinel IP-SM-GW SDK bundles:
|
||
|
Git (recommended,optional) |
The Sentinel IP-SM-GW SDK has Ant targets in the rhino-sdk/ module to install, start, and stop the Rhino SDK. This is recommended for developers new to Rhino and the Sentinel IP-SM-GW SDK.
Setting environment variables
On your Operating System, ensure that the JAVA_HOME environment variable is set and points to Oracle Hotspot Java 8. On Linux or Unix systems, you can test this as follows:
user@machine:~$ $JAVA_HOME/bin/java -version
java version "1.8.0_131"
Java(TM) SE Runtime Environment (build 1.8.0_131-b11)
Java HotSpot(TM) 64-Bit Server VM (build 25.131-b11, mixed mode)
Ensure that the ANT_HOME environment variable is set and points to Apache Ant 1.9.4 or later. On Linux or Unix systems, you can test this as follows:
user@machine:~$ $ANT_HOME/bin/ant -version
Apache Ant(TM) version 1.9.4 compiled on April 29 2014
It is recommended to set your PATH environment variable to include $ANT_HOME/bin and $JAVA_HOME/bin. The remainder of the documentation assumes that the correct version of Java and Ant are in the users PATH. On Linux or Unix systems, this can be tested as follows:
user@machine:~$ java -version
java version "1.8.0_131"
Java(TM) SE Runtime Environment (build 1.8.0_131-b11)
Java HotSpot(TM) 64-Bit Server VM (build 25.131-b11, mixed mode)

user@machine:~$ ant -version
Apache Ant(TM) version 1.9.4 compiled on April 29 2014
Installing the Sentinel IP-SM-GW SDK
To install the Sentinel IP-SM-GW SDK:
1 |
Unzip the $ unzip ipsmgw-sdk.zip Archive: ipsmgw-sdk.zip creating: ipsmgw-sdk/ creating: ipsmgw-sdk/build/ creating: ipsmgw-sdk/build/ant/ creating: ipsmgw-sdk/build/bin/ creating: ipsmgw-sdk/build/ivy/ creating: ipsmgw-sdk/rhino-sdk/ inflating: ipsmgw-sdk/.build inflating: ipsmgw-sdk/.gitignore inflating: ipsmgw-sdk/.sdk.root inflating: ipsmgw-sdk/README.txt inflating: ipsmgw-sdk/build.xml inflating: ipsmgw-sdk/build/.gitignore inflating: ipsmgw-sdk/build/.sdk.root inflating: ipsmgw-sdk/build/README.txt inflating: ipsmgw-sdk/build/ant/ant-build-support.jar inflating: ipsmgw-sdk/build/ant/ant-launcher.jar inflating: ipsmgw-sdk/build/ant/ant.jar inflating: ipsmgw-sdk/build/ant/ivy.jar inflating: ipsmgw-sdk/build/branch-targets.xml inflating: ipsmgw-sdk/build/build-ivy.xml inflating: ipsmgw-sdk/build/common.properties inflating: ipsmgw-sdk/build/common.xml inflating: ipsmgw-sdk/build/default-branch-targets.xml inflating: ipsmgw-sdk/build/default-targets.xml inflating: ipsmgw-sdk/build/deps.properties inflating: ipsmgw-sdk/build/dynamic-targets.xml inflating: ipsmgw-sdk/build/init.xml inflating: ipsmgw-sdk/build/ivy-common.xml inflating: ipsmgw-sdk/build/ivy/ivy-defaults.properties inflating: ipsmgw-sdk/build/ivy/ivysettings.xml inflating: ipsmgw-sdk/build/ivy/local-resolvers.xml inflating: ipsmgw-sdk/build/ivy/offline-resolvers.xml inflating: ipsmgw-sdk/build/ivy/online-resolvers.xml inflating: ipsmgw-sdk/build/ivy/resolvers-remote.xml inflating: ipsmgw-sdk/build/module-targets.xml inflating: ipsmgw-sdk/build/public-macrodefs.xml inflating: ipsmgw-sdk/build/sdk.version inflating: ipsmgw-sdk/build/sdkroot-targets.xml inflating: ipsmgw-sdk/build/targets.xml inflating: ipsmgw-sdk/build/toolchain-macrodefs.xml inflating: ipsmgw-sdk/deps.properties inflating: ipsmgw-sdk/rhino-sdk/.sdk.root inflating: ipsmgw-sdk/rhino-sdk/build.xml inflating: ipsmgw-sdk/rhino-sdk/rhino.properties inflating: ipsmgw-sdk/sdk.properties inflating: ipsmgw-sdk/build/bin/.sdk.root inflating: ipsmgw-sdk/build/bin/ant inflating: ipsmgw-sdk/build/bin/go-offline inflating: ipsmgw-sdk/build/bin/go-online inflating: ipsmgw-sdk/build/bin/sdkadm inflating: ipsmgw-sdk/build/bin/sentinel-rest-example inflating: ipsmgw-sdk/build/bin/installer inflating: ipsmgw-sdk/build/installer.xml |
|---|---|
2 |
From the ./build/bin/ant init-sdk This command initialises the Sentinel IP-SM-GW SDK directory. |
3 |
As part of the initialisation you may be asked to enter your Artifactory username and password. These credentials are supplied by OpenCloud in order to access the OpenCloud artifact repository. Once entered, the $ ant init-sdk
Buildfile: /home/testuser/ipsmgw-sdk/build.xml
init-build-extensions:
pre-init-ivy-common:
init-ivy-common:
Determining Ivy settings.
Checking ivy-defaults.properties for ivy settings.
artifactory.host=${download.link.host} (from ivy-defaults.properties)
artifactory.url=https://${artifactory.host}/artifactory (from ivy-defaults.properties)
ivy.cache.root=${sdk.root}/build/target/ivy-caches/online-resolvers.cache(from ivy-defaults.properties)
ivy.checksums=sha1 (from ivy-defaults.properties)
ivy.dir=${basedir} (from ivy-defaults.properties)
ivy.libs=${target}/libs (from ivy-defaults.properties)
ivy.local.root=${ivy.default.ivy.user.dir}/opencloud-local (from ivy-defaults.properties)
ivy.offline.root=${sdk.root}/repositories/opencloud-offline-mirror(from ivy-defaults.properties)
ivy.publication.root=${ivy.local.root} (from ivy-defaults.properties)
ivy.resolve.refresh=false (from ivy-defaults.properties)
ivy.sdk-resolvers.file=resolvers-remote.xml (from ivy-defaults.properties)
ivy.sdk-resolvers.file.internal=resolvers-remote.xml(from ivy-defaults.properties)
ivy.sdk-resolvers.path=${ivy.settings.dir}/${ivy.sdk-resolvers.file}(from ivy-defaults.properties)
ivy.symlinks=false (from ivy-defaults.properties)
artifactory.host=${download.link.host} (from ant environment)
artifactory.password=******************************** (from ant environment)
artifactory.url=https://${download.link.host}/artifactory (from ant environment)
artifactory.username=testuser (from ant environment)
ivy.symlinks=true (from ant environment)
Writing Ivy configuration to: /home/testuser/ipsmgw-sdk/ivy.properties
[echo] Ivy Resolvers: /home/testuser/ipsmgw-sdk/build/ivy/resolvers-remote.xml
[echo] Configuring Ivy with settings: /home/testuser/ipsmgw-sdk/build/ivy/ivysettings.xml
[ivy:var] :: Apache Ivy 2.3.0 - 20130110142753 :: http://ant.apache.org/ivy/ ::
[ivy:var] :: loading settings :: file = /home/testuser/ipsmgw-sdk/build/ivy/ivysettings.xml
ivy-authentication-check:
[ivy:resolve] :: loading settings :: file = /home/testuser/ipsmgw-sdk/build/ivy/ivysettings.xml
[echo] Build infrastructure lib/ directory is missing or out of date.
[echo] Populating lib/ from ivy...
[mkdir] Created dir: /home/testuser/ipsmgw-sdk/build/target/lib
[touch] Creating /home/testuser/ipsmgw-sdk/build/target/lib/.lib.uptodate
update-index-properties:
[oc:index-properties] Resolving: opencloud#sentinel-express-index#sentinel-pack/3.1.0;latest.integration
[oc:index-properties] Copying /home/testuser/ipsmgw-sdk/build/target/ivy-caches/online-resolvers.cache/opencloud/sentinel-express-index/sentinel-pack/3.1.0/jsons/sentinel-express-index-3.1.0.0.json to /home/testuser/ipsmgw-sdk/build/target/lib/index/sentinel-express-index-3.1.0.0.json
[oc:index-properties] Reading Module metadata from index: /home/testuser/ipsmgw-sdk/build/target/lib/index/sentinel-express-index-3.1.0.0.json
[oc:index-properties] Writing dependency properties to: /home/testuser/ipsmgw-sdk/release.properties
init:
init-branch:
init-sdk:
BUILD SUCCESSFUL
Total time: 13 seconds
If the credentials are entered correctly you should observe a delay whilst downloading artifacts from Artifactory, and then see the following output: $ ant init-sdk
Buildfile: /home/testuser/ipsmgw-sdk/build.xml
init-build-extensions:
pre-init-ivy-common:
init-ivy-common:
[echo] Ivy Resolvers: /home/testuser/ipsmgw-sdk/build/ivy/resolvers-remote.xml
[echo] Configuring Ivy with settings: /home/testuser/ipsmgw-sdk/build/ivy/ivysettings.xml
[ivy:var] :: Apache Ivy 2.3.0 - 20130110142753 :: http://ant.apache.org/ivy/ ::
[ivy:var] :: loading settings :: file = /home/testuser/ipsmgw-sdk/build/ivy/ivysettings.xml
ivy-authentication-check:
[ivy:resolve] :: loading settings :: file = /home/testuser/ipsmgw-sdk/build/ivy/ivysettings.xml
[echo] Build infrastructure lib/ directory is up to date.
update-index-properties:
[oc:index-properties] Properties file "/home/testuser/ipsmgw-sdk/release.properties" already exists.
[oc:index-properties] Index configuration has not changed since previous build.
[oc:index-properties] Index configuration uses dynamic revisions. Current version of indexes will be queried.
[oc:index-properties] Querying current version of: opencloud#sentinel-express-index#sentinel-pack/3.1.0;latest.integration
[oc:index-properties] Current version is: opencloud#sentinel-express-index#sentinel-pack/3.1.0;3.1.0.0
[oc:index-properties] Currently available index versions are the same as previous build. Properties file "/home/testuser/ipsmgw-sdk/release.properties" will not be regenerated.
init:
init-branch:
init-sdk:
BUILD SUCCESSFUL
Total time: 3 seconds
|
The Sentinel IP-SM-GW SDK is now installed.
Directory structure
Here’s a directory listing of a newly installed SDK:
$ ls
README.txt      build           build.xml       deps.properties rhino-sdk       sdk.properties
Here’s what those files and directories are for:
| File or directory | Contents | ||
|---|---|---|---|
|
Build scripts, tools, and libraries. |
||
|
'branch'-level commands for building of all modules within the SDK, |
||
|
Common Ivy dependencies across modules in the SDK.
|
||
|
Configuration for Ivy, such as repository location, credentials, and so on.
|
||
|
Generated file containing version and branch properties for all standard {productname} dependencies associated with a release.
|
||
|
A README file. It points the user to this documentation. |
||
|
Support module for installing, starting, stopping, and resetting a Rhino SDK directly from within the Sentinel IP-SM-GW SDK |
||
|
SDK configuration variables used by all build scripts.
|
Setting the SDK properties
sdk.properties contains the following variables which need to be set:
| Property | Description | Default value | Example value | Valid values |
|---|---|---|---|---|
|
Organisation name used for Ivy publishing from the SDK |
UNSET |
rocket |
Single lowercase string. |
|
Vendor name of the components created using the SDK |
UNSET |
Rocket Inc. |
SLEE component identifier. |
|
Platform operator name for configuration of the service |
UNSET |
Rocket |
Any valid Java identifier. |
Use a text editor to edit sdk.properties and replace the default value of UNSET in each case with a value suitable for your organisation.
If you are setting up the SDK behind the proxy, the section Proxy setting in sdk.prperties needs to be updated. For example:
# Proxy settings
#

sdk.http.proxyHost=your.proxy.com
sdk.http.proxyPort=3128
sdk.https.proxyHost=your.proxy.com
sdk.https.proxyPort=3128

#These properties are used for both http and https.
sdk.http.nonProxyHosts=localhost|127.0.0.1
sdk.http.proxyUser=username
sdk.http.proxyPassword=password
Setting up Source Control
Setting up source control on the SDK is recommended at this point but is optional. If you choose not to set up source control continue from the next section.
If you are setting up the SDK for personal use, git is a useful system for tracking your local changes.
The SDK has a .gitignore which is suitable for an initial installation. For information on setting up .gitignore files so that other working files and directories that you add are not tracked, see Source control with the Sentinel IP-SM-GW SDK.
To set up the SDK directory as a git repository run the following command from the SDK root:
$ git init
Initialized empty git repository in /home/testuser/ipsmgw-sdk/.git/
Now add the initial files and directories. The SDK already has a suitable .gitignore on installation.
$ git add .
Commit the initial state:
git commit -m "Add initial version of the Sentinel IP-SM-GW SDK"
Setting up Ant
The SDK provides a copy of the Apache Ant build tool. Alternatively you may use an existing Ant installation.
Using Ant from the SDK
The SDK includes a copy of Ant that is preconfigured with the necessary libraries for retrieving SDK dependencies. To use the SDK’s Ant, run ipsmgw-sdk/build/bin/ant.
Using an existing Ant installation
You can use your own Ant installation (version 1.9.4 or later) by copying the bundled libraries to your ~/.ant/lib directory:
$ cd ipsmgw-sdk/build/ant
$ cp ivy.jar ant-build-support.jar ~/.ant/lib
The Sentinel IP-SM-GW SDK build scripts will not work without the above libraries.
First steps post-installation
After installing Sentinel IP-SM-GW SDK:
1 |
Ensure that Ant version 1.9.4 or later is in your ant -version |
|---|---|
2 |
Within the SDK, run |
3 |
Type |
4 |
Use the |
5 |
Next create a deployment module, which will let you install Sentinel IP-SM-GW components into Rhino. To view the available service deployment modules, use the > list-modules +service-deploy Listing modules based on module tags. Modules matching all of the following tags will be listed: service-deploy opencloud#ipsmgw-full-deploy#sentinel-ipsmgw/3.1.0;3.1.0.0 opencloud#ipsmgw-mapra-deploy#sentinel-ipsmgw/3.1.0;3.1.0.0 opencloud#sentinel-registrar-full-deploy#sentinel-registrar/3.1.0;3.1.0.0 opencloud#sentinel-registrar-test-full-deploy#sentinel-registrar/3.1.0;3.1.0.0 opencloud#sentinel-sip-full-deploy#sentinel-sip/3.1.0;3.1.0.0 opencloud#sentinel-sip-modules-deploy#sentinel-sip/3.1.0;3.1.0.0 opencloud#sentinel-sip-test-full-deploy#sentinel-sip/3.1.0;3.1.0.0 7 modules matched search criteria out of a total possible 483. Pagination was set to display unlimited results per page. Specify a pagination entry count as an argument (e.g. '10') to pause output during display. Specify '-tag' arguments to narrow results by excluding modules matching one or more -tags. Specify '-v' or '--verbose' to enable display all module details including descriptions. Specify '--show-all-versions' to list modules for all versions instead of only the latest version. As can be seen, there is one Sentinel IPSMGW service-deployment module suitable for installation. |
6 |
Now create a deployment module for the service, using the > create-deployment-module deploy-ipsmgw deploy-ipsmgw opencloud#ipsmgw-full-deploy#sentinel-ipsmgw/3.1.0;3.1.0.0 The following dependencies will be included in the new module: opencloud#ipsmgw-full-deploy#sentinel-ipsmgw/3.1.0;3.1.0.0 Creating deployment module 'deploy-ipsmgw' in directory 'deploy-ipsmgw'. downloading https://repo.opencloud.com/artifactory/opencloud-internal-snapshots/opencloud/sentinel-core/3.1.0/deployment-template/3.1.0.0/deployment-template-module-pack-3.1.0.0.zip ... .. (2kB) .. (0kB) [SUCCESSFUL ] opencloud#deployment-template#sentinel-core/3.1.0;3.1.0.0!deployment-template-module-pack.zip(module-pack) (236ms) Populating '/home/testuser/ipsmgw-sdk/deploy-ipsmgw/config' with configuration artifacts. downloading https://repo.opencloud.com/artifactory/opencloud-internal-snapshots/opencloud/sentinel-ipsmgw/3.1.0/ipsmgw-determine-network-operator-profile/3.1.0.0/ipsmgw-determine-network-operator-profile-config-3.1.0.0.zip ... .. (0kB) .. (0kB) [SUCCESSFUL ] opencloud#ipsmgw-determine-network-operator-profile#sentinel-ipsmgw/3.1.0;3.1.0.0!ipsmgw-determine-network-operator-profile-config.zip(config) (145ms) ... edited for brevity ... downloading https://repo.opencloud.com/artifactory/opencloud-internal-snapshots/opencloud/sentinel-ipsmgw/3.1.0/ipsmgw-full-deploy/3.1.0.0/ipsmgw-full-deploy-config-3.1.0.0.properties ... .. (0kB) .. (0kB) [SUCCESSFUL ] opencloud#ipsmgw-full-deploy#sentinel-ipsmgw/3.1.0;3.1.0.0!ipsmgw-full-deploy-config.properties (148ms) [warn] Default value for configuration property 'cdr.maxinterval' is being changed from '6000000' to '600000'. Please review. [warn] Default value for configuration property 'cdr.maxlines' is being changed from '1000' to '0'. Please review. [warn] Default value for configuration property 'cdr.maxsize' is being changed from '0' to '10000000'. Please review. Finished writing deployment module to: /home/testuser/ipsmgw-sdk/deploy-ipsmgw The purpose of deployment modules is to be able to install a complete product in one go, and creating one is therefore typically one of the first things to do in an SDK. For more information about deployment modules see Modules. Custom features can also be added to deployment modules, see Creating a Feature. |
7 |
Now that the deployment module has been created successfully, you can use the > list-sdk-modules Searching for modules in: /home/testuser/ipsmgw-sdk Found 1 module: deploy-ipsmgw The new module |
8 |
Exit the sdkadm program: type The file system will have a new directory called $ cd deploy-ipsmgw/ /deploy-ipsmgw$ ls build.xml config doc ivy.xml module.properties |
9 |
Look at the contents of each of the files and directories, to 'get a feel' for what is included in a deployment module. |
10 |
Make sure that you are in the The output should look like this: $ ant clean publish-local
Buildfile: /home/testuser/ipsmgw-sdk/build.xml
... edited for brevity ...
init-ivy-common:
[echo] Ivy Resolvers: /home/testuser/ipsmgw-sdk/build/ivy/resolvers-remote.xml
[echo] Configuring Ivy with settings: /home/testuser/ipsmgw-sdk/build/ivy/ivysettings.xml
[ivy:resolve] :: loading settings :: file = /home/testuser/ipsmgw-sdk/build/ivy/ivysettings.xml
[echo] Build infrastructure lib/ directory is up to date.
init:
init-branch:
publish-local-branch:
[oc:ivymultimodulebuild] Modules to be built: [UNSET#deploy-ipsmgw]
[oc:ivymultimodulebuild]
[oc:ivymultimodulebuild] ========================================
[oc:ivymultimodulebuild] Entering module UNSET#deploy-ipsmgw
[oc:ivymultimodulebuild] ========================================
[oc:ivymultimodulebuild]
init-build-extensions:
pre-init-ivy-common:
init-ivy-common:
[echo] Ivy Resolvers: /home/testuser/ipsmgw-sdk/build/ivy/resolvers-remote.xml
[echo] Configuring Ivy with settings: /home/testuser/ipsmgw-sdk/build/ivy/ivysettings.xml
[ivy:var] :: loading settings :: file = /home/testuser/ipsmgw-sdk/build/ivy/ivysettings.xml
[ivy:resolve] :: loading settings :: file = /home/testuser/ipsmgw-sdk/build/ivy/ivysettings.xml
[echo] Build infrastructure lib/ directory is up to date.
init:
... edited for brevity ...
set-default-build-revision:
do-build:
[echo] Initialising build extensions.
[echo] Retrieving ivy configuration "antlib" into /home/testuser/ipsmgw-sdk/deploy-ipsmgw/target/libs/antlib
[copy] Copying 1 file to /home/testuser/ipsmgw-sdk/deploy-ipsmgw/target/generated
[echo] Skipping default module src build - no source available.
[echo] Skipping default module test build - no test source available.
[mkdir] Created dir: /home/testuser/ipsmgw-sdk/deploy-ipsmgw/target/artifacts
[echo]
[echo]
[touch] Creating /home/testuser/ipsmgw-sdk/deploy-ipsmgw/target/artifacts/deploy-ipsmgw-deploy.xml
[echo]
[copy] Copying 133 files to /home/testuser/ipsmgw-sdk/deploy-ipsmgw/target/generated/config
[zip] Building zip: /home/testuser/ipsmgw-sdk/deploy-ipsmgw/target/artifacts/deploy-ipsmgw-config.zip
[copy] Copying 1 file to /home/testuser/ipsmgw-sdk/deploy-ipsmgw/target/artifacts
[echo]
[echo] Building module as a module pack.
[echo] Building module pack using the following properties:
[echo] module.pack.include.path=**/*
[echo] module.pack.exclude.path=
[echo] module.pack.basedir=/home/testuser/ipsmgw-sdk/deploy-ipsmgw
[echo] module.pack.prepend.file=
[echo] module.pack.prepend.include.path=**/*.java
[echo] module.pack.prepend.exclude.path=
[mkdir] Created dir: /home/testuser/ipsmgw-sdk/deploy-ipsmgw/target/module-pack
[copy] Copying 139 files to /home/testuser/ipsmgw-sdk/deploy-ipsmgw/target/module-pack
[oc:update-module-pack-dependencies] Updating module-pack ivy dependencies for: /home/testuser/ipsmgw-sdk/deploy-ipsmgw/target/module-pack
[oc:update-module-pack-dependencies]
[oc:update-module-pack-dependencies]
[oc:verify-module-pack] Verifying module-pack content: /home/testuser/ipsmgw-sdk/deploy-ipsmgw/target/module-pack
[oc:verify-module-pack]
[zip] Building zip: /home/testuser/ipsmgw-sdk/deploy-ipsmgw/target/artifacts/deploy-ipsmgw-module-pack.zip
build:
test:
[echo] Skipping default module test - no tests available.
publish-local-module:
[echo] Publishing module to local repository.
[ivy:publish] :: delivering :: UNSET#deploy-ipsmgw#trunk;working@testmachine :: 1.0.0.0-DEV0-testuser :: integration :: Fri Apr 01 14:23:11 NZDT 2016
[ivy:publish] delivering ivy file to /home/testuser/ipsmgw-sdk/deploy-ipsmgw/target/artifacts/ivy.xml
[ivy:publish] :: publishing :: UNSET#deploy-ipsmgw
[ivy:publish] published deploy-ipsmgw-config to /home/testuser/.ivy2/opencloud-local/UNSET/trunk/deploy-ipsmgw/1.0.0.0-DEV0-testuser.part/deploy-ipsmgw-config-1.0.0.0-DEV0-testuser.zip
[ivy:publish] published deploy-ipsmgw-config to /home/testuser/.ivy2/opencloud-local/UNSET/trunk/deploy-ipsmgw/1.0.0.0-DEV0-testuser.part/deploy-ipsmgw-config-1.0.0.0-DEV0-testuser.properties
[ivy:publish] published deploy-ipsmgw-module-pack to /home/testuser/.ivy2/opencloud-local/UNSET/trunk/deploy-ipsmgw/1.0.0.0-DEV0-testuser.part/deploy-ipsmgw-module-pack-1.0.0.0-DEV0-testuser.zip
[ivy:publish] published ivy to /home/testuser/.ivy2/opencloud-local/UNSET/trunk/deploy-ipsmgw/1.0.0.0-DEV0-testuser.part/ivy.xml
[ivy:publish] publish commited: moved /home/testuser/.ivy2/opencloud-local/UNSET/trunk/deploy-ipsmgw/1.0.0.0-DEV0-testuser.part
[ivy:publish] to /home/testuser/.ivy2/opencloud-local/UNSET/trunk/deploy-ipsmgw/1.0.0.0-DEV0-testuser
[oc:ivymultimodulebuild]
[oc:ivymultimodulebuild] ========================================
[oc:ivymultimodulebuild] Exiting module UNSET#deploy-ipsmgw
[oc:ivymultimodulebuild] ========================================
[oc:ivymultimodulebuild]
[oc:ivymultimodulebuild]
[oc:ivymultimodulebuild] ========================================
[oc:ivymultimodulebuild] Build Report:
[oc:ivymultimodulebuild] ========================================
[oc:ivymultimodulebuild]
[oc:ivymultimodulebuild] deploy-ipsmgw:
[oc:ivymultimodulebuild] [SUCCESS] (1m, 12.976s)
[oc:ivymultimodulebuild] Tests: none
publish-local:
BUILD SUCCESSFUL
Total time: 1 minute 18 seconds
|
Setting up Rhino in the Sentinel IP-SM-GW SDK
Once the module is built, you can deploy it into Rhino using the deployer. However, first you need to set up Rhino in the Sentinel IP-SM-GW SDK. You do this by:
-
using the built-in Rhino SDK bootstrap (recommended for new users)
-
configuring an external Rhino location (for advanced users).
Rhino SDK setup using the built-in bootstrap
The Sentinel IP-SM-GW SDK includes a built-in mechanism for using the Rhino SDK. This mechanism downloads the Rhino SDK and sets it up under the rhino-sdk directory of your Sentinel IP-SM-GW SDK install. It includes commands to initialise and start the Rhino SDK. Once running, the various Rhino utilities are available under the rhino-sdk/RhinoSDK/client/bin directory.
Four steps are necessary to install a Rhino suitable for testing all the way from service deployment straight through to handled test network traffic:
1 |
Installation
Enter the |
||
|---|---|---|---|
2 |
Licensing
Retrieve a suitable license and copy it over the file
|
||
3 |
Starting
Type
Rhino will be operational when the the following message displays: [exec] 2014-10-30 12:00:05.065 INFO [rhino.sleestate] <main> SLEE successfully started on node(s) [101] |
Configuring an external Rhino location in the Sentinel IP-SM-GW SDK
If you want to use another version of Rhino (SDK or production) other than the one provided through the Sentinel IP-SM-GW SDK:
1 |
Download and install Rhino (production or SDK). |
||
|---|---|---|---|
2 |
In the Sentinel IP-SM-GW SDK install directory, there is a file called
|
||
3 |
Once this variable has been set, save the file, and start your Rhino. |
The Sentinel IP-SM-GW SDK is now configured to use the user-defined Rhino.
Deploying the deployment module
Now that the Sentinel IP-SM-GW SDK has been configured with the location of Rhino, and Rhino is running, to deploy the ipsmgw-deploy module:
1 |
Enter the ant -Ddb.type=postgres -Dpostgres.jdbc.dir=$PWD/../rhino-sdk/RhinoSDK/lib deploy-with-deps
Here’s some sample output (edited for brevity): $ ant -Ddb.type=postgres -Dpostgres.jdbc.dir=$PWD/../rhino-sdk/RhinoSDK/lib -Ddeployer.latest-revision-checks.enabled=false deploy-with-deps
Buildfile: /home/testuser/ipsmgw-sdk/deploy-ipsmgw/build.xml
init-build-extensions:
pre-init-ivy-common:
init-ivy-common:
[echo] Ivy Resolvers: /home/testuser/ipsmgw-sdk/build/ivy/resolvers-remote.xml
[echo] Configuring Ivy with settings: /home/testuser/ipsmgw-sdk/build/ivy/ivysettings.xml
[ivy:var] :: Apache Ivy 2.3.0 - 20130110142753 :: http://ant.apache.org/ivy/ ::
[ivy:var] :: loading settings :: file = /home/testuser/ipsmgw-sdk/build/ivy/ivysettings.xml
ivy-authentication-check:
[ivy:resolve] :: loading settings :: file = /home/testuser/ipsmgw-sdk/build/ivy/ivysettings.xml
[echo] Build infrastructure lib/ directory is up to date.
update-index-properties:
[oc:index-properties] Properties file "/home/testuser/ipsmgw-sdk/release.properties" already exists.
[oc:index-properties] Index configuration has not changed since previous build.
[oc:index-properties] Index configuration uses dynamic revisions. Current version of indexes will be queried.
[oc:index-properties] Querying current version of: opencloud#ipsmgw-index#sentinel-ipsmgw/3.1.0;latest.integration
[oc:index-properties] Current version is: opencloud#ipsmgw-index#sentinel-ipsmgw/3.1.0;3.1.0.0
[oc:index-properties] Currently available index versions are the same as previous build. Properties file "/home/testuser/ipsmgw-sdk/release.properties" will not be regenerated.
init:
init-module:
[echo] Resolving ivy configurations "*" for deploy-ipsmgw
deploy-with-deps:
[echo] Deploying module.
[oc:deploy] :: loading settings :: file = /home/testuser/ipsmgw-sdk/build/ivy/ivysettings.xml
[oc:deploy] Created deployer with options: OutdatedIvyModuleDetection: Disabled, IvyStatusesToCheck: [integration]
[oc:deploy] Invoking the deployer to process root module UNSET#deploy-ipsmgw#trunk;1.0.0.0-DEV0-testuser and its dependencies ...
[oc:deploy] WARNING: Dependency order for module opencloud#ipsmgw-full-deploy#sentinel-ipsmgw/3.1.0;3.1.0.0 mentions module sentinel-ocsip-deploy, which doesn't match any of opencloud#ipsmgw-full-deploy#sentinel-ipsmgw/3.1.0;3.1.0.0's dependencies.
[oc:deploy] WARNING: Dependency order for module opencloud#ipsmgw-full-deploy#sentinel-ipsmgw/3.1.0;3.1.0.0 mentions module sentinel-diameter-mediation-mappers, which doesn't match any of opencloud#ipsmgw-full-deploy#sentinel-ipsmgw/3.1.0;3.1.0.0's dependencies.
[oc:deploy] downloading https://repo.opencloud.com/artifactory/opencloud-internal-snapshots/opencloud/third-party/commons-jxpath-library/1.3/commons-jxpath-library-1.3.du.jar ...
[oc:deploy] .................. (267kB)
[oc:deploy] [SUCCESSFUL ] opencloud#commons-jxpath-library#third-party;1.3!commons-jxpath-library.du.jar (69ms)
... edited for brevity ...
[oc:deploy] Deployment Result:
[oc:deploy] ---------------------------------------------------------------------
[oc:deploy]
|
||||||||||||
|---|---|---|---|---|---|---|---|---|---|---|---|---|---|
Deploy result: [oc:deploy] --------------------------------------------------------------------- [oc:deploy] |
Already Deployed: |
||||||||||||
opencloud#sentinel-addresslist#sentinel-core/3.1.0;3.1.0.0 [oc:deploy] |
|||||||||||||
__ ProfileSpecificationID[name=AddressListConfigurationProfile,vendor=OpenCloud,version=3.1.0] [oc:deploy] |
LibraryID[name=SentinelAddressList,vendor=OpenCloud,version=3.1.0] |
||||||||||||
ProfileSpecificationID[name=AddressListEntryProfile,vendor=OpenCloud,version=3.1.0] [oc:deploy] |
opencloud#sentinel-uniqueid-ra#sentinel-core/3.1.0;3.1.0.0 |
||||||||||||
|
__ ResourceAdaptorTypeID[name=UniqueID RA Type,vendor=OpenCloud,version=3.1.0] |
|||||||||||||
ResourceAdaptorID[name=UniqueID RA,vendor=OpenCloud,version=3.1.0] [oc:deploy] |
opencloud#sentinel-profile-util-library#sentinel-core/3.1.0;3.1.0.0 |
||||||||||||
|
__ LibraryID[name=sentinel-profile-util-library,vendor=OpenCloud,version=3.1.0] |
|||||||||||||
opencloud#cdr-ra#cdr-ra/2.2.0;2.2.0.3 [oc:deploy] |
|||||||||||||
__ ResourceAdaptorTypeID[name=CDR Generation,vendor=OpenCloud,version=2.2] [oc:deploy] |
ResourceAdaptorID[name=CDR Generation,vendor=OpenCloud,version=2.2] [oc:deploy] --------------------------------------------------------------------- |
||||||||||||
Modules with no Component: [oc:deploy] |
opencloud#ipsmgw-features#sentinel-ipsmgw/3.1.0;3.1.0.0 |
||||||||||||
opencloud#ipsmgw-full-deploy#sentinel-ipsmgw/3.1.0;3.1.0.0 … edited for brevity … [oc:deploy] --------------------------------------------------------------------- [oc:deploy] |
Deployed Modules: |
||||||||||||
opencloud#commons-jxpath-library#third-party;1.3.1-oc2 [oc:deploy] |
|||||||||||||
__ LibraryID[name=commons-jxpath,vendor=opencloud,version=1.3.1-oc2] [oc:deploy] |
opencloud#ipsmgw-determine-network-operator-feature#sentinel-ipsmgw/3.1.0;3.1.0.0 |
||||||||||||
|
__ SbbPartID[name=ipsmgw-determine-network-operator-feature,vendor=OpenCloud,version=3.1.0] |
|||||||||||||
opencloud#sentinel-sip-downstream-forking-feature#sentinel-sip/3.1.0;3.1.0.0 [oc:deploy] |
|||||||||||||
__ SbbPartID[name=sentinel-sip-downstream-forking-feature,vendor=OpenCloud,version=3.1.0] [oc:deploy] |
opencloud#sentinel-registrar-fetch-previous-registration-data-feature#sentinel-registrar/3.1.0;3.1.0.0 |
||||||||||||
|
__ SbbPartID[name=sentinel-registrar-fetch-previous-registration-data-feature,vendor=OpenCloud,version=3.1.0] |
|||||||||||||
opencloud#sentinel-diameter-mediation-promotions-db-query-config-profile#sentinel-core/3.1.0;3.1.0.0 [oc:deploy] |
|||||||||||||
__ ProfileSpecificationID[name=PromotionsDbQueryConfigProfile,vendor=OpenCloud,version=3.1.0] [oc:deploy] |
opencloud#sentinel-registrar-store-subscriber-data-feature#sentinel-registrar/3.1.0;3.1.0.0 |
||||||||||||
|
__ SbbPartID[name=sentinel-registrar-store-subscriber-data-feature,vendor=OpenCloud,version=3.1.0]
[oc:deploy] --------------------------------------------------------------------- [oc:deploy] All modules deployed successfully. [delete] Deleting directory /home/testuser/ipsmgw-sdk/deploy-ipsmgw/target/deployer-work BUILD SUCCESSFUL Total time: 7 minutes 26 seconds |
Binding features into the services
Next bind the deployed services and features together by running:
ant -Dslee.binder.service-strategy=copy_if_active bind-with-deps
Use REM or rhino-console to view what has been deployed. You can also check the Rhino logs to get a feeling for typical output when installing a Sentinel service.
Here is some sample output:
$ ant -Dslee.binder.service-strategy=copy_if_active bind-with-deps
Buildfile: /home/testuser/ipsmgw-sdk/deploy-ipsmgw/build.xml

... edited for brevity ...

bind-with-deps:
     [echo] Binding module.
  [oc:bind] Connecting to Rhino ...
  [oc:bind] Connected to Rhino.
  [oc:bind] Initialising Ivy.

... edited for brevity ...


  [oc:bind] Finished processing root modules.
  [oc:bind] Bind Result:
  [oc:bind] ---------------------------------------------------------------------
  [oc:bind] |  Bind result:
  [oc:bind] ---------------------------------------------------------------------
  [oc:bind] |  Successfully processed modules:
  [oc:bind] |  opencloud#ipsmgw-features#sentinel-ipsmgw/3.1.0;3.1.0.0
  [oc:bind] |  |__ ModuleBindResult{resultParts=[no bindings in module]}
  [oc:bind] |  opencloud#commons-jxpath-library#third-party;1.3.1-oc2
  [oc:bind] |  |__ ModuleBindResult{resultParts=[no bindings in module]}
  [oc:bind] |  opencloud#ipsmgw-determine-network-operator-feature#sentinel-ipsmgw/3.1.0;3.1.0.0
  [oc:bind] |  |__ ModuleBindResult{resultParts=[bindings installed, bindings applied for service ServiceID[name=sentinel.ipsmgw,vendor=OpenCloud,version=3.1.0.0]]}
  [oc:bind] |  opencloud#sentinel-sip-downstream-forking-feature#sentinel-sip/3.1.0;3.1.0.0
  [oc:bind] |  |__ ModuleBindResult{resultParts=[bindings installed, bindings applied for service ServiceID[name=sentinel.ipsmgw,vendor=OpenCloud,version=3.1.0.0]]}

 ... edited for brevity ...

  [oc:bind] ---------------------------------------------------------------------
  [oc:bind] ---------------------------------------------------------------------
  [oc:bind] |  Created service copies:
  [oc:bind] |  ServiceID[name=sentinel.ipsmgw,vendor=OpenCloud,version=3.1.0.0-copy#1]
  [oc:bind] |  |__ copied from ServiceID[name=sentinel.ipsmgw,vendor=OpenCloud,version=3.1.0.0]
  [oc:bind] |  ServiceID[name=sentinel.registrar,vendor=OpenCloud,version=3.1.0.0-copy#1]
  [oc:bind] |  |__ copied from ServiceID[name=sentinel.registrar,vendor=OpenCloud,version=3.1.0.0]
  [oc:bind] ---------------------------------------------------------------------
  [oc:bind] All modules bound successfully.

BUILD SUCCESSFUL
Total time: 1 minute 3 seconds
Configuring the services
Once the services have been deployed, before running any calls through, they must be configured.
The SDK creates an 'out-of-the-box' example configuration when it makes the deployment module. The example configuration files are in the config directory in the deployment module.
To configure the services:
Enter the deployment module directory, and type:
ant configure-with-deps
The Sentinel Installer
Introduction
The Sentinel Installer is the quickest and easiest way to deploy Sentinel IP-SM-GW on a Rhino installation. It has two main modes of operation: interactive mode and non-interactive mode. The interactive mode, which is the default mode, allows interactive configuration of the environment and the desired deployment, and non-interactive mode allows unattended installation based on a set of properties read from a file.
Command-line help
The installer can be run with the --help or -h argument to print a list of all the supported arguments:
$ build/bin/installer --help
Options:

 --configure-only                  : Only run the configure step of the
                                     installation, after asking the deployment
                                     module configuration questions. (default:
                                     false)
 --no-configure                    : Only run deploy and bind steps of the
                                     installation, not configure. Also skips
                                     the questions related to deployment module
                                     configuration. (default: false)
 -D (--deploy-module-deps) MODULES : A comma-separated list of modules to use
                                     as dependencies for the locally-created
                                     deployment module, either as simple module
                                     names or full Ivy strings
 -P (--print-properties)           : Print a list of all the supported
                                     properties. This will recreate the local
                                     deployment module. (default: false)
 -d (--debug)                      : Enable debug logging (default: false)
 -h (--help)                       : Print usage information (default: true)
 -l (--logfile) FILE               : Alternate logfile to use (default:
                                     /home/user/jan/msw/issues/volte-4617-print-
                                     installer-properties/ipsmgw-sdk/build/targe
                                     t/log/installer.log)
 -p (--properties) PROPERTYFILE    : Run installer in non-interactive mode,
                                     using a property file created with a
                                     previous interactive run
Installing Sentinel IP-SM-GW with the Sentinel Installer
Interactive mode
This is the default mode of the installer, which is used if the installer is invoked without any arguments from the root directory of the SDK:
$ build/bin/installer
This mode will ask a variety of questions about the desired setup and configuration of the deployment module:
-
Whether to create an offline repository. This will download all artifacts necessary for a complete installation, and allows to move the Sentinel IP-SM-GW SDK to a machine without internet access at any point of the installation after the creation of the repository. For more information about offline repositories please refer to Running the SDK offline.
-
Basic SDK configuration. This allows configuring things like the Platform Operator name, the product version, and the details of the Rhino installation to use for deployment.
-
Configuration of the deployment module. This is the most substantial part of the installation. Several parameters necessary for a functioning deployment will be configured here. This includes things like addresses of other network functions, charging configuration, and other behavioural tweaks.
All of the answers to these questions will automatically get saved in a properties file named install.properties. This file can be used in non-interactive mode to perform an unattended installation.
At the end of the configuration the installer will ask whether to proceed with the actual installation or exit. This makes it possible to prepare the installation on a workstation, copy the install.properties file to an SDK on a production machine, and perform the actual installation there.
| |
If there is an install.properties file present in the SDK when interactive mode is run, then the questions will default to the values from the properties file. |
Non-interactive mode
Non-interactive mode allows an installation to be run unattended, making multiple similar deployments easier. In this mode the installer reads a properties file, either created automatically by the interactive mode or written by hand, to answer the questions that would normally be asked in interactive mode.
Non-interactive mode is invoked by passing the --properties/-p argument to the installer, together with the filename of the properties file to use:
$ build/bin/installer --properties install.properties
The installation will then begin immediately based on the values in the properties file.
Running deploy/bind and configure steps separately
Sometimes it may be desired to finish the deployment and binding of an installation, but not the configuration part. There are two installer arguments available to support this, --no-configure and --configure-only. These arguments can be passed to the installer during one of the two installation modes described above. Both arguments are supported for both installation modes and any combination thereof.
If the --no-configure argument is passed to the installer, the questions about the deployment module configuration will be skipped. If the --configure-only argument is passed to the installer then only the deployment module configuration questions will be asked.
Specifying deployment module dependencies manually
During normal operation the installer will either determine the upstream deployment module to use automatically, or ask any necessary questions to determine the correct deployment module. However, in some cases it may be desired to specify the deployment module dependencies manually. This is possible with the --deploy-module-deps/-D argument:
$ build/bin/installer --deploy-module-deps my-full-deploy,my-additional-deploy
The dependencies can be specified either as simple module names, or as full Ivy strings like myorg#branch#mymodule;latest.integration:
$ build/bin/installer --deploy-module-deps opencloud#sentinel-ipsmgw/3.1.0#ipsmgw-full-deploy;3.1.0.0
Specifying a module as a simple name only works for official OpenCloud modules that have an entry in the release.properties file in the root of the SDK.
Printing out supported properties
In order to make creating install.properties files easier, it is possible to print out all supported properties with the installer, along with their default values. This is accomplished with the --print-properties/-P argument:
$ build/bin/installer --print-properties

Creating deployment module ipsmgw-deploy ... done.

# Available properties:
gooffline=false
doinstall=true
sdk.component.vendor=UNSET
sdk.component.version=1.0
sdk.platform.operator.name=UNSET
sdk.ivy.org=UNSET
sdk.ivy.publish.revision=1.0.0
...
The output of this command can be redirected into a file to create a valid properties file for use in non-interactive mode.
$ build/bin/installer --print-properties > install.properties
This argument can be combined with --deploy-module-deps to skip potential questions about the exact upstream deployment module to use.
Logfile location
The installer logs all of its interactions and the output of all the commands it runs to a logfile. The default location for this logfile is build/target/log/installer.log. An alternative location can be specified with the --logfile/-l argument:
$ build/bin/installer --logfile /tmp/installer.log
This argument can be combined with any other argument.
Creating a Feature
| |
Tutorial: create, build, publish, deploy
This tutorial walks new users step by step through:
This section assumes that the instructions in installing the SDK have been followed. |
Creating a new module
The sdkadm tool includes a command named create-module. For help on using this command, type the following command in the sdkadm tool:
help create-module
create-module uses "module-pack" artifacts as a template for the creation of a new module. Any module-pack can be used to create a new module.
| |
A module-pack contains one or more modules. The create-module command may create more than one module in the SDK (all in a single directory). |
The module pack used in this tutorial contains:
-
a group module
-
a SIP POJO feature module
-
a mapper module
-
a profile module.
To view the available module-packs, type the following command inside the sdkadm tool:
list-modules +module-pack
| |
Where you see a version number of 3.1.0.0 use the version number of the product you have downloaded. |
Now create a new module from the module pack published in opencloud#sentinel-sip-example#sentinel-sip/3.1.0;3.1.0.0. This requires two steps:
1 |
Run the command: create-module my-sip-example opencloud#sentinel-sip-example#sentinel-sip/3.1.0;3.1.0.0 This command:
When prompted, answer as shown in the example output below. Numbered annotations mark the prompts, and their answers are listed by number immediately after the example output. > create-module my-sip-example opencloud#sentinel-sip-example#sentinel-sip/3.1.0;3.1.0.0 downloading https://repo.opencloud.com/artifactory/opencloud-internal-snapshots/opencloud/sentinel-sip/3.1.0/sentinel-sip-example/3.1.0.0/sentinel-sip-example-module-pack-3.1.0.0.zip ... .... (40kB) .. (0kB) [SUCCESSFUL ] opencloud#sentinel-sip-example#sentinel-sip/3.1.0;3.1.0.0!sentinel-sip-example-module-pack.zip(module-pack) (80ms) Extracting '/home/testuser/ipsmgw-sdk/build/target/ivy-caches/online-resolvers.cache/opencloud/sentinel-sip-example/sentinel-sip/3.1.0/module-packs/sentinel-sip-example-module-pack-3.1.0.0.zip' to '/home/testuser/ipsmgw-sdk/my-sip-example'. Command line invocation did not contain enough rename arguments to rename all modules. To specify rename arguments on the command line, include <oldvalue>:<newvalue> pairs as additional arguments. Missing values will now be prompted for interactively. Please enter a name for the top level module, usually this will match the name of the directory for the new module Rename top level module 'sentinel-sip-example' to [my-sip-example]:
|
||||||||||||||||||
|---|---|---|---|---|---|---|---|---|---|---|---|---|---|---|---|---|---|---|---|
2 |
Add the new module to source control (optional). git add my-sip-example git commit -m "Added initial version of my-sip-example." my-sip-example |
Directory structure
Here’s what your my-sip-example directory should look like:
$ cd my-sip-example/
$ ls
build.xml                             my-sip-example-event-handler-sbbpart feature                               ivy.xml                               mapper                                module.properties                     profile
It contains these files and directories:
| File or directory | What it’s for |
|---|---|
|
|
contains build targets so that the module can be built, published, deployed, and so on |
|
|
provides Ivy with enough information to correctly publish the module |
|
|
contains variables that are substituted during build and publish |
|
|
contains a sbbpart module |
|
|
contains a feature module |
|
|
contains a mapper module |
|
|
contains a profile module |
The module.properties file is fairly typical for a group module that publishes a module-pack. Note the three lines indicating where the module pack is created from.
The build.xml and ivy.xml files are also typical for a group module. It’s worth noting that group modules often may publish no artifacts, or only documentation artifacts. In this case the group module publishes no artifact.
Here’s what the build.xml file looks like:
<?xml version="1.0"?>

<project name="sentinel-sip-example" default="publish-local" basedir=".">

    <!-- Common build infrastructure. -->
    <property file=".sdk.root"/>
    <property file="${sdk.root}/.build.local"/>
    <property file="${sdk.root}/.build"/>
    <import file="${build}/targets.xml"/>

    <target name="do-build">
      <default-module-build/>
      <default-module-create-artifacts/>
      <default-package-module-pack/>
    </target>

</project>
Here’s what the ivy.xml file looks like:
<ivy-module version="2.0" xmlns:e="http://ant.apache.org/ivy/extra">
    <info organisation="${sdk.ivy.org}"
          module="sentinel-sip-example" e:user="${user.name}"
          e:indextags="sip, group, example"/>
    <configurations>
       <conf name="antlib"           description="Ant tasks used to build this module" />

        <conf name="slee-component"   description="SLEE Components published by this module" />
        <conf name="api"              description="Artifacts needed to compile components using this module" />
        <conf name="deploy"           description="Deployment artifacts" />
        <conf name="doc"              description="Documentation source artifacts" />
        <conf name="config"           description="SLEE component configuration files" />
        <conf name="module-pack"      description="Module source artifact" />
        <conf name="slee-binding"     description="SLEE component binding metadata" />
        <conf name="provisioning"     description="Feature provisioning definitions" />

        <conf name="self"             description="" visibility="private"/>
        <conf name="test"             description="" visibility="private"/>

    </configurations>
    <publications>
        <artifact name="${ivy.module}-module-pack"    type="module-pack"    ext="zip"     conf="module-pack"/>
    </publications>
    <dependencies>
        <dependency org="opencloud"       name="sentinel-support"                       rev="${sentinel-support.ivy.revision}"  branch="${sentinel-support.ivy.branch}"  conf="antlib; self -> api" />

        <!-- Add additional features here to have them pulled in by 'ant deploy' -->
        <dependency org="${sdk.ivy.org}"  name="sentinel-sip-example-feature"           rev="latest.${ivy.status}"              branch="${branch.name}"                  conf="slee-component; config; provisioning; slee-binding" />
        <dependency org="${sdk.ivy.org}"  name="example-pojo-feature-with-multiple-fsms"           rev="latest.${ivy.status}"              branch="${branch.name}"                  conf="slee-component; config; slee-binding" />
         <dependency org="${sdk.ivy.org}"  name="example-feature-event-handler-sbbpart"  rev="latest.${ivy.status}"              branch="${branch.name}"                  conf="slee-component; config; slee-binding" />
    </dependencies>
</ivy-module>| |
This is the original ivy.xml file — it will have different module names than those in your environment. |
feature
The feature directory is an Ivy module containing a Sentinel POJO feature.
Here’s what it contains:
| File or directory | What it’s for |
|---|---|
|
|
contains build targets so that the module can be built, published, deployed, and so on |
|
|
provides Ivy with enough information to correctly build and publish the module |
|
|
contains variables that are substituted during build and publish |
|
|
contains feature-specific provisioning definitions, to configure the feature using the Element Manager |
|
|
contains a sample configuration for the feature, such as JSLEE profile tables and profiles for the configurer to create |
|
|
contains documentation source code, in Asciidoc markup format |
|
|
contains the module’s source code |
build.xml
This build.xml file is typical of any feature (nothing noteworthy to mention):
<?xml version="1.0"?>

<project name="sentinel-sip-example-feature" default="publish-local" basedir="." xmlns:ivy="antlib:org.apache.ivy.ant">

    <!-- Common build infrastructure. -->
    <property file=".sdk.root"/>
    <property file="${sdk.root}/.build.local"/>
    <property file="${sdk.root}/.build"/>
    <import file="${build}/targets.xml"/>

    <target name="do-build">
      <init-extensions/>
      <sentinel-annotation-processing/>

      <default-module-build/>
      <default-module-create-artifacts/>
      <default-package-module-pack/>
    </target>

</project>
ivy.xml
This ivy.xml file is also typical; however it is very important and so warrants discussion. It includes module identification-related information, publications, and dependencies.
Here’s more about the info, publications, and dependencies sections in ivy.xml:
|
The 'identification' information is contained in the Here is the This module’s name is |
||||||||||||
|---|---|---|---|---|---|---|---|---|---|---|---|---|---|
|
Next is the publications section, which looks like this: This feature is a POJO feature. All POJO features publish a single jar file to the JSLEE component jar files can contain many different types of components. POJO features always publish an SBB Part component.
|
||||||||||||
|
Finally the dependencies section for the feature: The dependencies for the feature include:
The |
The feature includes various Java source files until the src directory. The following is a source listing of the ExamplePojoFeature.java source file.
/** * Copyright (c) 2014 Open Cloud Limited, a company incorporated in England and Wales (Registration Number 6000941) with its principal place of business at Edinburgh House, St John's Innovation Park, Cowley Road, Cambridge CB4 0DS. * * All rights reserved. * * Redistribution and use in source and binary forms, with or without modification, are permitted provided that the following conditions are met: * * 1 Redistributions of source code must retain the above copyright notice, this list of conditions and the following disclaimer. * * 2 Redistributions in binary form must reproduce the above copyright notice, this list of conditions and the following disclaimer in the documentation and/or other materials provided with the distribution. * * 3 The name of the author may not be used to endorse or promote products derived from this software without specific prior written permission. * * 4 The source code may not be used to create, develop, use or distribute software for use on any platform other than the Open Cloud Rhino and Open Cloud Rhino Sentinel platforms or any successor products. * * 5 Full license terms may be found https://developer.opencloud.com/devportal/display/OCDEV/Feature+Source+License * * THIS SOFTWARE IS PROVIDED BY THE AUTHOR "AS IS" AND ANY EXPRESS OR IMPLIED WARRANTIES, INCLUDING, BUT NOT LIMITED TO, THE IMPLIED WARRANTIES OF SATISFACTORY QUALITY AND FITNESS FOR A PARTICULAR PURPOSE ARE EXCLUDED TO THE FULLEST EXTENT PERMITTED BY LAW. * * TO THE FULLEST EXTENT PERMISSIBLE BUY LAW, THE AUTHOR SHALL NOT BE LIABLE FOR ANY LOSS OF REVENUE, LOSS OF PROFIT, LOSS OF FUTURE BUSINESS, LOSS OF DATA OR ANY INDIRECT, SPECIAL, CONSEQUENTIAL, PUNITIVE OR OTHER LOSS OR DAMAGES ARISING OUT OF OR IN CONNECTION WITH THE SOFTWARE, WHETHER ARISING IN CONTRACT, TORT (INCLUDING NEGLIGENCE) MISREPRESENTATION OR OTHERWISE AND REGARDLESS OF WHETHER OPEN CLOUD HAS BEEN ADVISED OF THE POSSIBILITY OF ANY SUCH LOSS OR DAMAGE. THE AUTHORS MAXIMUM AGGREGATE LIABILITY WHETHER IN CONTRACT, TORT (INCLUDING NEGLIGENCE) OR OTHERWISE, SHALL NOT EXCEED EUR100. * * NOTHING IN THIS LICENSE SHALL LIMIT THE LIABILITY OF THE AUTHOR FOR DEATH OR PERSONAL INJURY RESULTING FROM NEGLIGENCE, FRAUD OR FRAUDULENT MISREPRESENTATION. * * Visit Open Cloud Developer's Portal for how-to guides, examples, documentation, forums and more: http://developer.opencloud.com */
package com.opencloud.sentinel.example.feature;
import com.opencloud.rhino.facilities.sas.InvokingTrailAccessor;
import com.opencloud.rhino.facilities.sas.Trail;
import com.opencloud.sce.fsmtool.Facilities;
import com.opencloud.sentinel.annotations.ConfigurationReader;
import com.opencloud.sentinel.annotations.FeatureProvisioning;
import com.opencloud.sentinel.annotations.ProvisioningConfig;
import com.opencloud.sentinel.annotations.ProvisioningField;
import com.opencloud.sentinel.annotations.ProvisioningProfile;
import com.opencloud.sentinel.annotations.ProvisioningProfileId;
import com.opencloud.sentinel.annotations.SentinelFeature;
import com.opencloud.sentinel.common.NullSentinelSessionState;
import com.opencloud.sentinel.feature.ExecutionPhase;
import com.opencloud.sentinel.feature.impl.BaseFeature;
import com.opencloud.sentinel.feature.spi.FeatureEndpoint;
import com.opencloud.sentinel.feature.spi.init.InjectFeatureConfigurationReader;
import com.opencloud.sentinel.feature.spi.init.InjectFeatureStats;
import com.opencloud.slee.annotation.BinderTargets;
import com.opencloud.slee.annotation.SBBPartReference;
import com.opencloud.slee.annotation.SBBPartReferences;
import javax.slee.ActivityContextInterface;
import javax.slee.annotation.ComponentId;
import javax.slee.annotation.ProfileReference;
import javax.slee.annotation.ProfileReferences;
import javax.slee.facilities.Tracer;
/** * * An example feature. */
@SentinelFeature(
featureName = ExamplePojoFeature.NAME,
componentName = "@component.name@",
featureVendor = "@component.vendor@",
featureVersion = "@component.version@",
featureGroup = SentinelFeature.CORE_FEATURE_GROUP,
configurationReader = @ConfigurationReader(
readerInterface = ExampleConfigReader.class,
readerClass = ExampleConfigProfileReader.class
),
usageStatistics = ExampleUsageStats.class,
executionPhases = ExecutionPhase.SipSessionPhase,
provisioning = @FeatureProvisioning(
displayName = "SIP POJO Feature",
configs = {
@ProvisioningConfig(
type = "SipPojoFeatureConfig",
displayName = "Config",
fields = {
@ProvisioningField(
name = "aValue",
displayName = "A value",
type = "int",
description = "An example value to set."
)
},
profile = @ProvisioningProfile(
tableName = "ExampleConfigProfileTable",
specification = @ProvisioningProfileId(name = "@sentinel-sip-example-profile.name@", vendor = "@sentinel-sip-example-profile.vendor@", version = "@sentinel-sip-example-profile.version@")
)
)
}
)
)
@SBBPartReferences(
sbbPartRefs = {
@SBBPartReference(id = @ComponentId(name = "@sentinel-sip-spi.SentinelSipFeatureSPI SBB Part.name@", vendor = "@sentinel-sip-spi.SentinelSipFeatureSPI SBB Part.vendor@", version = "@sentinel-sip-spi.SentinelSipFeatureSPI SBB Part.version@")),
@SBBPartReference(id = @ComponentId(name = "@sentinel-sip-example-mapper.name@", vendor = "@sentinel-sip-example-mapper.vendor@", version = "@sentinel-sip-example-mapper.version@"))
}
)
@ProfileReferences(
profileRefs = {
@ProfileReference(profile = @ComponentId(name="@sentinel-sip-example-profile.name@", vendor="@sentinel-sip-example-profile.vendor@", version="@sentinel-sip-example-profile.version@"))
}
)
@BinderTargets(services = "sip")
@SuppressWarnings("unused")
public class ExamplePojoFeature extends BaseFeature<NullSentinelSessionState, FeatureEndpoint> implements InjectFeatureConfigurationReader<ExampleConfigReader>, InjectFeatureStats<ExampleUsageStats> {
public ExamplePojoFeature(FeatureEndpoint caller, Facilities facilities, NullSentinelSessionState sessionState) {
super(caller, facilities, sessionState);
}
public static final String NAME = "SipPojoFeature";
@SuppressWarnings("FieldCanBeLocal")
private ExampleConfigReader configReader;
private ExampleUsageStats featureStats;
/** * All features must have a unique name. * * @return the name of this feature */
@Override
public String getFeatureName() { return NAME; }
/** * Kick off the feature. * * @param trigger a triggering context. The feature implementation must be able to cast this to a useful type for it to run * @param activity the slee activity object this feature is related to (may be null) * @param aci the activity context interface of the slee activity this feature is related to */
@Override
public void startFeature(Object trigger, Object activity, ActivityContextInterface aci) {
Tracer tracer = getTracer();
if (tracer.isInfoEnabled()) {
tracer.info("Starting " + NAME);
}
// Report a SAS event
Trail sasTrail = InvokingTrailAccessor.getInvokingTrail();
sasTrail.event(SasEvent.EXAMPLE_POJO_SAS_TRACE).staticParam(0).varParam(trigger).varParam(activity).report();
getCaller().featureHasFinished();
featureStats.incrementFeatureStarted(1);
}
public void injectFeatureConfigurationReader(ExampleConfigReader configurationReader) {
this.configReader = configurationReader;
}
/** * Implement {@link InjectFeatureStats#injectFeatureStats} */
@Override
public void injectFeatureStats(ExampleUsageStats featureStats) {
this.featureStats = featureStats;
}
}| |
This is the original source file — it may have different package names and feature names than those in your environment. |
sbbpart
The sbbpart directory is an Ivy module containing a Sentinel SbbPart component, in this case defining a simple extension event handler.
Here’s what it contains:
| File or directory | What it’s for |
|---|---|
|
|
contains build targets so that the module can be built, published, deployed, and so on |
|
|
provides Ivy with enough information to correctly build and publish the module |
|
|
contains variables that are substituted during build and publish |
|
|
contains the module’s source code |
build.xml
The build.xml file is a typical build file (there is nothing specific to describe):
<?xml version="1.0"?>
<project name="example-feature-event-handler-sbbpart" default="publish-local" basedir=".">
<!-- Common build infrastructure. -->
<property file=".sdk.root"/>
<property file="${sdk.root}/.build.local"/>
<property file="${sdk.root}/.build"/>
<import file="${build}/targets.xml"/>
<target name="do-build">
<default-module-build/>
<default-module-create-artifacts/>
</target>
</project>ivy.xml
The ivy.xml file is typical for an sbbpart that is 'part of' a feature:
<ivy-module version="2.0" xmlns:e="http://ant.apache.org/ivy/extra">
<info organisation="${sdk.ivy.org}"
module="example-feature-event-handler-sbbpart" e:user="${user.name}"
e:indextags="sip, sbb-part">
<description>Example sbb part that demonstrates how to create an event handler that fires an extension event.</description>
</info>
<configurations>
<conf name="antlib" description="Ant tasks used to build this module" />
<conf name="slee-component" description="SLEE Components published by this module" />
<conf name="api" description="Artifacts needed to compile components using this module" />
<conf name="deploy" description="Deployment artifacts" />
<conf name="doc" description="Documentation source artifacts" />
<conf name="config" description="SLEE component configuration files" />
<conf name="module-pack" description="Module source artifact" />
<conf name="slee-binding" description="SLEE component binding metadata" />
<conf name="self" description="" visibility="private"/>
<conf name="test" description="" visibility="private"/>
</configurations>
<publications>
<artifact name="${ivy.module}" type="sbbpart" ext="jar" conf="slee-component, api"/>
<artifact name="${ivy.module}-javadoc" type="javadoc" ext="zip" conf="doc"/>
<artifact name="${ivy.module}-bindings" type="binding" ext="zip" conf="slee-binding"/>
</publications>
<dependencies>
<!-- Common Sentinel build extension and dependencies. -->
<dependency org="opencloud" name="sentinel-sip-support" rev="${sentinel-sip-support.ivy.revision}" branch="${sentinel-sip-support.ivy.branch}" conf="antlib; self -> api" />
<dependency org="opencloud" name="sentinel-diameter-ra-deploy" rev="${sentinel-diameter-ra-deploy.ivy.revision}" branch="${sentinel-diameter-ra-deploy.ivy.branch}" conf="self -> slee-component" />
<dependency org="opencloud" name="diameter-ro" rev="${diameter-ro.ivy.revision}" branch="${diameter-ro.ivy.branch}" conf="api; self -> api" />
<dependency org="javax.inject" name="inject-api" rev="${inject-api.ivy.revision}" conf="self -> api" />
</dependencies>
</ivy-module>| |
This is the original source file --- it may have different module names than those in your environment. |
SBB parts are always published as an SBB part component into the slee-component Ivy configuration. A single SBB part component may contain multiple event handler methods.
The sbb part example above is included to show the right file locations, annotations, publications, and dependencies for a typical SIP feature event handler.
Java source
The sbb part includes a single source file under the example-feature-event-handler-sbbpart/src directory.
The sbb part class itself, in the ExampleFeatureEventHandlerSbbPart.java source file:
/** * Copyright (c) 2014 Open Cloud Limited, a company incorporated in England and Wales (Registration Number 6000941) with its principal place of business at Edinburgh House, St John's Innovation Park, Cowley Road, Cambridge CB4 0DS. * * All rights reserved. * * Redistribution and use in source and binary forms, with or without modification, are permitted provided that the following conditions are met: * * 1 Redistributions of source code must retain the above copyright notice, this list of conditions and the following disclaimer. * * 2 Redistributions in binary form must reproduce the above copyright notice, this list of conditions and the following disclaimer in the documentation and/or other materials provided with the distribution. * * 3 The name of the author may not be used to endorse or promote products derived from this software without specific prior written permission. * * 4 The source code may not be used to create, develop, use or distribute software for use on any platform other than the Open Cloud Rhino and Open Cloud Rhino Sentinel platforms or any successor products. * * 5 Full license terms may be found https://developer.opencloud.com/devportal/display/OCDEV/Feature+Source+License * * THIS SOFTWARE IS PROVIDED BY THE AUTHOR "AS IS" AND ANY EXPRESS OR IMPLIED WARRANTIES, INCLUDING, BUT NOT LIMITED TO, THE IMPLIED WARRANTIES OF SATISFACTORY QUALITY AND FITNESS FOR A PARTICULAR PURPOSE ARE EXCLUDED TO THE FULLEST EXTENT PERMITTED BY LAW. * * TO THE FULLEST EXTENT PERMISSIBLE BUY LAW, THE AUTHOR SHALL NOT BE LIABLE FOR ANY LOSS OF REVENUE, LOSS OF PROFIT, LOSS OF FUTURE BUSINESS, LOSS OF DATA OR ANY INDIRECT, SPECIAL, CONSEQUENTIAL, PUNITIVE OR OTHER LOSS OR DAMAGES ARISING OUT OF OR IN CONNECTION WITH THE SOFTWARE, WHETHER ARISING IN CONTRACT, TORT (INCLUDING NEGLIGENCE) MISREPRESENTATION OR OTHERWISE AND REGARDLESS OF WHETHER OPEN CLOUD HAS BEEN ADVISED OF THE POSSIBILITY OF ANY SUCH LOSS OR DAMAGE. THE AUTHORS MAXIMUM AGGREGATE LIABILITY WHETHER IN CONTRACT, TORT (INCLUDING NEGLIGENCE) OR OTHERWISE, SHALL NOT EXCEED EUR100. * * NOTHING IN THIS LICENSE SHALL LIMIT THE LIABILITY OF THE AUTHOR FOR DEATH OR PERSONAL INJURY RESULTING FROM NEGLIGENCE, FRAUD OR FRAUDULENT MISREPRESENTATION. * * Visit Open Cloud Developer's Portal for how-to guides, examples, documentation, forums and more: http://developer.opencloud.com */
package com.opencloud.sentinel.example.feature.eventhandler;
import com.opencloud.rhino.facilities.Tracer;
import com.opencloud.rhino.slee.lifecycle.PostCreate;
import com.opencloud.rhino.slee.sbbpart.SbbPartContext;
import com.opencloud.sentinel.common.SentinelFireEventException;
import com.opencloud.sentinel.endpoint.SentinelEndpoint;
import com.opencloud.slee.annotation.du.SBBPartDeployableUnit;
import com.opencloud.slee.annotation.SBBPart;
import com.opencloud.slee.annotation.SBBPartClass;
import com.opencloud.slee.annotation.SBBPartClasses;
import com.opencloud.slee.annotation.SBBPartReference;
import org.jainslee.resources.diameter.base.DiameterAvp;
import org.jainslee.resources.diameter.cca.types.ReAuthAnswer;
import javax.inject.Inject;
import javax.inject.Named;
import javax.slee.ActivityContextInterface;
import javax.slee.CreateException;
import javax.slee.EventContext;
import javax.slee.InitialEventSelector;
import javax.slee.annotation.ComponentId;
import javax.slee.annotation.EventMethod;
import javax.slee.annotation.RATypeBinding;
import javax.slee.annotation.RATypeBindings;
import javax.slee.annotation.SecurityPermissions;
@SBBPart(
id = @ComponentId(name = "@component.name@", vendor = "@component.vendor@", version = "@component.version@"),
sbbPartRefs = {
@SBBPartReference(id = @ComponentId(name = "@sentinel-sip-spi.SentinelSipFeatureSPI SBB Part.name@", vendor = "@sentinel-sip-spi.SentinelSipFeatureSPI SBB Part.vendor@", version = "@sentinel-sip-spi.SentinelSipFeatureSPI SBB Part.version@")),
},
sbbPartClasses = @SBBPartClasses(
sbbPartClass = @SBBPartClass(
className="com.opencloud.sentinel.example.feature.eventhandler.ExampleFeatureEventHandlerSbbPart"
)
)
)
@RATypeBindings(
raTypeBindings = {
@RATypeBinding(
activityContextInterfaceFactoryName = "slee/resources/diameterro/sentinel/activitycontextinterfacefactory",
resourceAdaptorObjectName = "slee/resources/diameterro/sentinel/provider",
resourceAdaptorEntityLink = "sentinel-internal-diameterro",
raType = @ComponentId(name = "@sentinel-diameter-ra-deploy.ResourceAdaptorTypeID.Diameter Ro.name@", vendor = "@sentinel-diameter-ra-deploy.ResourceAdaptorTypeID.Diameter Ro.vendor@", version = "@sentinel-diameter-ra-deploy.ResourceAdaptorTypeID.Diameter Ro.version@")
)
}
)
@SBBPartDeployableUnit(
securityPermissions = @SecurityPermissions(securityPermissionSpec = "grant { permission java.security.AllPermission; };")
)
@SuppressWarnings("unused")
public class ExampleFeatureEventHandlerSbbPart {
@PostCreate
public void onCreate() throws CreateException {
if(rootTracer.isFinerEnabled())
rootTracer.finer("SBB part created");
}
public InitialEventSelector ies(InitialEventSelector ies) {
return ies;
}
@EventMethod(
initialEvent = false,
eventType = @ComponentId(name = "@sentinel-diameter-cca-ra-deploy.EventTypeID.org.jainslee.resources.diameter.cca.ReAuthAnswer.name@", vendor = "@sentinel-diameter-cca-ra-deploy.EventTypeID.org.jainslee.resources.diameter.cca.ReAuthAnswer.vendor@", version = "@sentinel-diameter-cca-ra-deploy.EventTypeID.org.jainslee.resources.diameter.cca.ReAuthAnswer.version@")
)
/** * This event handler is an example only. * * Receive a CCA ReAuthAnswer. This message will not be sent by an external system unless that system * is acting as a CCA client. Sentinel's charging structure does not provide this as part of the * internal RA interface, which is an RO client, not a CCA server. */
public void onReAuthAnswer(ReAuthAnswer event, ActivityContextInterface aci, EventContext eventContext) {
if (rootTracer.isFinerEnabled())
rootTracer.finer("ExampleFeatureEventHandlerSbbPart received: " + event);
// see if there is a custom header included that tells me which feature should receive the response
String featureToInvoke = getStringAvpValue(event.getExtensionAvps(), "FeatureToInvoke");
if (null == featureToInvoke || "".equals(featureToInvoke))
featureToInvoke = "TestReceiveReAuthAnswer";
// processEvent does not return until the event has been processed by Sentinel.
try {
SentinelEndpoint sentinelEndpoint = (SentinelEndpoint)sbbPartContext.getSbbLocalObject();
// ask sentinel to process the http response by calling the 'featureToInvoke' feature
sentinelEndpoint.processEvent(featureToInvoke, event, false, aci, eventContext);
}
catch (NullPointerException | IllegalArgumentException | SentinelFireEventException e) {
rootTracer.fine("Caught exception in processEvent for ReAuthAnswer", e);
}
}
private String getStringAvpValue(DiameterAvp[] avps, String avpName) {
for(DiameterAvp avp : avps) {
if(avp.getName().equals(avpName)) {
return avp.stringValue();
}
}
return null;
}
@Inject
private Tracer rootTracer;
@Inject @Named("timer")
private Tracer timerTracer;
@Inject
private SbbPartContext sbbPartContext;
}| |
This is the original source file — it may have a different package name than that in your environment. |
mapper
The mapper directory is an Ivy module containing a Sentinel Mapper component.
Here’s what it contains:
| File or directory | What it’s for |
|---|---|
|
|
contains build targets so that the module can be built, published, deployed, and so on |
|
|
provides Ivy with enough information to correctly build and publish the module |
|
|
contains variables that are substituted during build and publish |
|
|
contains the module’s source code |
build.xml
The build.xml file is a typical build file (there is nothing specific to describe):
<?xml version="1.0"?>
<project name="sentinel-sip-example-mapper" default="publish-local" basedir="." xmlns:ivy="antlib:org.apache.ivy.ant">
<!-- Common build infrastructure. -->
<property file=".sdk.root"/>
<property file="${sdk.root}/.build.local"/>
<property file="${sdk.root}/.build"/>
<import file="${build}/targets.xml"/>
<target name="do-build">
<default-module-build/>
<default-module-create-artifacts/>
<default-package-module-pack/>
</target>
</project>ivy.xml
The ivy.xml file is typical for a mapper that is 'part of' a feature:
<ivy-module version="2.0" xmlns:e="http://ant.apache.org/ivy/extra">
<info organisation="${sdk.ivy.org}"
module="sentinel-sip-example-mapper" e:user="${user.name}"
e:indextags="sip, sbb-part, mapper"/>
<configurations>
<conf name="antlib" description="Ant tasks used to build this module" />
<conf name="slee-component" description="SLEE Components published by this module" />
<conf name="api" description="Artifacts needed to compile components using this module" />
<conf name="deploy" description="Deployment artifacts" />
<conf name="doc" description="Documentation source artifacts" />
<conf name="config" description="SLEE component configuration files" />
<conf name="module-pack" description="Module source artifact" />
<conf name="slee-binding" description="SLEE component binding metadata" />
<conf name="provisioning" description="Feature provisioning definitions" />
<conf name="self" description="" visibility="private"/>
<conf name="test" description="" visibility="private"/>
</configurations>
<publications>
<artifact name="${ivy.module}" type="sbbpart" ext="jar" conf="slee-component,api"/>
<artifact name="${ivy.module}-javadoc" type="javadoc" ext="zip" conf="doc"/>
<artifact name="${ivy.module}-bindings" type="binding" ext="zip" conf="slee-binding"/>
</publications>
<dependencies>
<dependency org="opencloud" name="sentinel-sip-support" rev="${sentinel-sip-support.ivy.revision}" branch="${sentinel-sip-support.ivy.branch}" conf="antlib; self -> api" />
</dependencies>
</ivy-module>| |
This is the original source file --- it may have different module names than those in your environment. |
Mappers are always published as an SBB part component into the slee-component Ivy configuration. A single SBB part component may contain multiple Sentinel mappers. Each mapper tends to be small, and many of them tend to be related to one feature or purpose. Therefore a module tends to hold one or more mappers and publish them into a single SBB part.
The mapper example above is included to show the right file locations, annotations, publications, and dependencies for a typical SIP feature mapper.
Java source
The mapper includes two source files, under the mapper/src directory.
First, the package-info.java source file, declaring the mapper as an SBB part component:
/** * Copyright (c) 2014 Open Cloud Limited, a company incorporated in England and Wales (Registration Number 6000941) with its principal place of business at Edinburgh House, St John's Innovation Park, Cowley Road, Cambridge CB4 0DS. * * All rights reserved. * * Redistribution and use in source and binary forms, with or without modification, are permitted provided that the following conditions are met: * * 1 Redistributions of source code must retain the above copyright notice, this list of conditions and the following disclaimer. * * 2 Redistributions in binary form must reproduce the above copyright notice, this list of conditions and the following disclaimer in the documentation and/or other materials provided with the distribution. * * 3 The name of the author may not be used to endorse or promote products derived from this software without specific prior written permission. * * 4 The source code may not be used to create, develop, use or distribute software for use on any platform other than the Open Cloud Rhino and Open Cloud Rhino Sentinel platforms or any successor products. * * 5 Full license terms may be found https://developer.opencloud.com/devportal/display/OCDEV/Feature+Source+License * * THIS SOFTWARE IS PROVIDED BY THE AUTHOR "AS IS" AND ANY EXPRESS OR IMPLIED WARRANTIES, INCLUDING, BUT NOT LIMITED TO, THE IMPLIED WARRANTIES OF SATISFACTORY QUALITY AND FITNESS FOR A PARTICULAR PURPOSE ARE EXCLUDED TO THE FULLEST EXTENT PERMITTED BY LAW. * * TO THE FULLEST EXTENT PERMISSIBLE BUY LAW, THE AUTHOR SHALL NOT BE LIABLE FOR ANY LOSS OF REVENUE, LOSS OF PROFIT, LOSS OF FUTURE BUSINESS, LOSS OF DATA OR ANY INDIRECT, SPECIAL, CONSEQUENTIAL, PUNITIVE OR OTHER LOSS OR DAMAGES ARISING OUT OF OR IN CONNECTION WITH THE SOFTWARE, WHETHER ARISING IN CONTRACT, TORT (INCLUDING NEGLIGENCE) MISREPRESENTATION OR OTHERWISE AND REGARDLESS OF WHETHER OPEN CLOUD HAS BEEN ADVISED OF THE POSSIBILITY OF ANY SUCH LOSS OR DAMAGE. THE AUTHORS MAXIMUM AGGREGATE LIABILITY WHETHER IN CONTRACT, TORT (INCLUDING NEGLIGENCE) OR OTHERWISE, SHALL NOT EXCEED EUR100. * * NOTHING IN THIS LICENSE SHALL LIMIT THE LIABILITY OF THE AUTHOR FOR DEATH OR PERSONAL INJURY RESULTING FROM NEGLIGENCE, FRAUD OR FRAUDULENT MISREPRESENTATION. * * Visit Open Cloud Developer's Portal for how-to guides, examples, documentation, forums and more: http://developer.opencloud.com */
/** <p>Example POJO Feature Mappers</p> */
@SBBPart(
id = @ComponentId(name = "@component.name@", vendor = "@component.vendor@", version = "@component.version@")
)
@SBBPartDeployableUnit(
securityPermissions = @SecurityPermissions(securityPermissionSpec = "grant { permission java.security.AllPermission; };")
)
package com.opencloud.sentinel.example.feature;
import javax.slee.annotation.ComponentId;
import javax.slee.annotation.SecurityPermissions;
import com.opencloud.slee.annotation.du.SBBPartDeployableUnit;
import com.opencloud.slee.annotation.SBBPart;Next, the mapper class itself, in the StringToStringMapper.java source file:
/** * Copyright (c) 2014 Open Cloud Limited, a company incorporated in England and Wales (Registration Number 6000941) with its principal place of business at Edinburgh House, St John's Innovation Park, Cowley Road, Cambridge CB4 0DS. * * All rights reserved. * * Redistribution and use in source and binary forms, with or without modification, are permitted provided that the following conditions are met: * * 1 Redistributions of source code must retain the above copyright notice, this list of conditions and the following disclaimer. * * 2 Redistributions in binary form must reproduce the above copyright notice, this list of conditions and the following disclaimer in the documentation and/or other materials provided with the distribution. * * 3 The name of the author may not be used to endorse or promote products derived from this software without specific prior written permission. * * 4 The source code may not be used to create, develop, use or distribute software for use on any platform other than the Open Cloud Rhino and Open Cloud Rhino Sentinel platforms or any successor products. * * 5 Full license terms may be found https://developer.opencloud.com/devportal/display/OCDEV/Feature+Source+License * * THIS SOFTWARE IS PROVIDED BY THE AUTHOR "AS IS" AND ANY EXPRESS OR IMPLIED WARRANTIES, INCLUDING, BUT NOT LIMITED TO, THE IMPLIED WARRANTIES OF SATISFACTORY QUALITY AND FITNESS FOR A PARTICULAR PURPOSE ARE EXCLUDED TO THE FULLEST EXTENT PERMITTED BY LAW. * * TO THE FULLEST EXTENT PERMISSIBLE BUY LAW, THE AUTHOR SHALL NOT BE LIABLE FOR ANY LOSS OF REVENUE, LOSS OF PROFIT, LOSS OF FUTURE BUSINESS, LOSS OF DATA OR ANY INDIRECT, SPECIAL, CONSEQUENTIAL, PUNITIVE OR OTHER LOSS OR DAMAGES ARISING OUT OF OR IN CONNECTION WITH THE SOFTWARE, WHETHER ARISING IN CONTRACT, TORT (INCLUDING NEGLIGENCE) MISREPRESENTATION OR OTHERWISE AND REGARDLESS OF WHETHER OPEN CLOUD HAS BEEN ADVISED OF THE POSSIBILITY OF ANY SUCH LOSS OR DAMAGE. THE AUTHORS MAXIMUM AGGREGATE LIABILITY WHETHER IN CONTRACT, TORT (INCLUDING NEGLIGENCE) OR OTHERWISE, SHALL NOT EXCEED EUR100. * * NOTHING IN THIS LICENSE SHALL LIMIT THE LIABILITY OF THE AUTHOR FOR DEATH OR PERSONAL INJURY RESULTING FROM NEGLIGENCE, FRAUD OR FRAUDULENT MISREPRESENTATION. * * Visit Open Cloud Developer's Portal for how-to guides, examples, documentation, forums and more: http://developer.opencloud.com */
package com.opencloud.sentinel.example.feature;
import com.opencloud.sentinel.annotations.Mapping;
import com.opencloud.sentinel.annotations.SentinelMapper;
import com.opencloud.sentinel.common.NullSentinelSessionState;
import com.opencloud.sentinel.mapper.Mapper;
import com.opencloud.sentinel.mapper.MapperException;
import com.opencloud.sentinel.mapper.MapperFacilities;
/** * An example mapper. */
@SentinelMapper(
mappings = {
@Mapping(name = "StringToString", fromClass = String.class, toClass = String.class)
}
)
@SuppressWarnings("unused")
public class StringToStringMapper implements Mapper<NullSentinelSessionState> {
@Override
public Object map(final Object arg, final NullSentinelSessionState sessionState, final MapperFacilities facilities) throws MapperException {
return arg;
}
}| |
These are the original source files — they may have different package names than those in your environment. |
profile
The profile directory is an Ivy module containing a SLEE profile.
Here’s what it contains:
| File or directory | What it’s for |
|---|---|
|
|
contains build targets so that the module can be built, published, deployed, and so on |
|
|
provides Ivy with enough information to correctly build and publish the module |
|
|
contains variables that are substituted during build and publish |
|
|
contains feature-specific provisioning definitions, to configure the feature using the Element Manager |
|
|
contains the module’s source code |
| |
The build.xml file is a typical build file; there is nothing specific to describe. |
ivy.xml
Here’s what the profile directory’s ivy.xml file looks like:
<ivy-module version="2.0" xmlns:e="http://ant.apache.org/ivy/extra">
<info organisation="${sdk.ivy.org}"
module="sentinel-sip-example-profile" e:user="${user.name}"
e:indextags="sip, profile"/>
<configurations>
<conf name="antlib" description="Ant tasks used to build this module" />
<conf name="slee-component" description="SLEE Components published by this module" />
<conf name="api" description="Artifacts needed to compile components using this module" />
<conf name="deploy" description="Deployment artifacts" />
<conf name="doc" description="Documentation source artifacts" />
<conf name="config" description="SLEE component configuration files" />
<conf name="module-pack" description="Module source artifact" />
<conf name="slee-binding" description="SLEE component binding metadata" />
<conf name="self" description="" visibility="private"/>
<conf name="test" description="" visibility="private"/>
</configurations>
<publications>
<artifact name="${ivy.module}" type="profile" ext="jar" conf="slee-component,api"/>
<artifact name="${ivy.module}-javadoc" type="javadoc" ext="zip" conf="doc"/>
<artifact name="${ivy.module}-config" type="config" ext="zip" conf="config"/>
<artifact name="${ivy.module}-bindings" type="binding" ext="zip" conf="slee-binding"/>
</publications>
<dependencies>
<dependency org="opencloud" name="sentinel-sip-support" rev="${sentinel-sip-support.ivy.revision}" branch="${sentinel-sip-support.ivy.branch}" conf="antlib; self -> api" />
</dependencies>
</ivy-module>| |
This is the original source file — it may have different module names than those in your environment. |
The module publishes a SLEE component jar to the Ivy configurations named slee-component and api. This SLEE component jar is a JSLEE profile specification jar. Only one JSLEE component can be published into the slee-component Ivy configuration.
The profile module, for a SIP feature, only needs to depend on sentinel-sip-support.
Java source
The profile module includes several source files located under the profile/src directory. The most relevant file is ExampleConfigProfileCMP.java:
/** * Copyright (c) 2014 Open Cloud Limited, a company incorporated in England and Wales (Registration Number 6000941) with its principal place of business at Edinburgh House, St John's Innovation Park, Cowley Road, Cambridge CB4 0DS. * * All rights reserved. * * Redistribution and use in source and binary forms, with or without modification, are permitted provided that the following conditions are met: * * 1 Redistributions of source code must retain the above copyright notice, this list of conditions and the following disclaimer. * * 2 Redistributions in binary form must reproduce the above copyright notice, this list of conditions and the following disclaimer in the documentation and/or other materials provided with the distribution. * * 3 The name of the author may not be used to endorse or promote products derived from this software without specific prior written permission. * * 4 The source code may not be used to create, develop, use or distribute software for use on any platform other than the Open Cloud Rhino and Open Cloud Rhino Sentinel platforms or any successor products. * * 5 Full license terms may be found https://developer.opencloud.com/devportal/display/OCDEV/Feature+Source+License * * THIS SOFTWARE IS PROVIDED BY THE AUTHOR "AS IS" AND ANY EXPRESS OR IMPLIED WARRANTIES, INCLUDING, BUT NOT LIMITED TO, THE IMPLIED WARRANTIES OF SATISFACTORY QUALITY AND FITNESS FOR A PARTICULAR PURPOSE ARE EXCLUDED TO THE FULLEST EXTENT PERMITTED BY LAW. * * TO THE FULLEST EXTENT PERMISSIBLE BUY LAW, THE AUTHOR SHALL NOT BE LIABLE FOR ANY LOSS OF REVENUE, LOSS OF PROFIT, LOSS OF FUTURE BUSINESS, LOSS OF DATA OR ANY INDIRECT, SPECIAL, CONSEQUENTIAL, PUNITIVE OR OTHER LOSS OR DAMAGES ARISING OUT OF OR IN CONNECTION WITH THE SOFTWARE, WHETHER ARISING IN CONTRACT, TORT (INCLUDING NEGLIGENCE) MISREPRESENTATION OR OTHERWISE AND REGARDLESS OF WHETHER OPEN CLOUD HAS BEEN ADVISED OF THE POSSIBILITY OF ANY SUCH LOSS OR DAMAGE. THE AUTHORS MAXIMUM AGGREGATE LIABILITY WHETHER IN CONTRACT, TORT (INCLUDING NEGLIGENCE) OR OTHERWISE, SHALL NOT EXCEED EUR100. * * NOTHING IN THIS LICENSE SHALL LIMIT THE LIABILITY OF THE AUTHOR FOR DEATH OR PERSONAL INJURY RESULTING FROM NEGLIGENCE, FRAUD OR FRAUDULENT MISREPRESENTATION. * * Visit Open Cloud Developer's Portal for how-to guides, examples, documentation, forums and more: http://developer.opencloud.com */
package com.opencloud.sentinel.example.feature;
import javax.slee.annotation.ComponentId;
import javax.slee.annotation.LibraryReference;
import javax.slee.annotation.Profile;
import javax.slee.annotation.ProfileAbstractClass;
import javax.slee.annotation.ProfileClasses;
import javax.slee.annotation.ProfileLocalInterface;
@Profile(
vendorExtensionID = "@component.name@",
description = "Example Configuration Profile",
id = @ComponentId(name = "@component.name@", vendor = "@component.vendor@", version = "@component.version@"),
libraryRefs = {
@LibraryReference(library = @ComponentId(name = "@sentinel-profile-util-library.name@", vendor = "@sentinel-profile-util-library.vendor@", version = "@sentinel-profile-util-library.version@"))
},
profileClasses = @ProfileClasses(
profileLocal = @ProfileLocalInterface(interfaceName = "com.opencloud.sentinel.example.feature.ExampleConfigProfileLocal"),
profileAbstractClass = @ProfileAbstractClass(className = "com.opencloud.sentinel.example.feature.ExampleConfigProfileAbstractClass")
),
singleProfile = false
)
@SuppressWarnings("unused")
public interface ExampleConfigProfileCMP {
void setAValue(int value);
int getAValue();
}| |
This is the original source file — it may have different package names than those in your environment. |
Building a module
All modules include a build.xml file. This means that they can be built and published using Ant.
There are two ant target to build and publish a module:
-
publish-local— Compiles and publishes just the current module. Does not include any other modules. -
publish-local-branch— Compiles and publishes all modules, from the current directory and all subdirectories. The module compilation and publication order is automatically determined, such that the modules are compiled and published in the correct order.
If there is ever a question about which to use, publish-local-branch should take precedence over publish-local. (The publish-local target can be considered an 'optimisation', where only one module is compiled and published.)
The publish-local-branch target can be run from within any module that includes the availability of the target under the ant -p output. This means that all modules within a module group can be built (and not other, unnecessary modules). If this target is used from the 'root' of the Sentinel IP-SM-GW SDK, then all modules are compiled and published.
There are two 'clean' targets, that delete on-disk files generated by a build. These are:
-
clean— Cleans the current module. This is often used in conjunction withpublish-local. -
clean-branch— Cleans all modules, from the current directory and all subdirectories. This is often used in conjunction withpublish-local-branch.
| |
As my-sip-example is a module that contains other modules, it makes sense to use publish-local-branch to build it and the contained modules. |
To compile and publish the my-sip-example module group, use following command:
1 |
|
|---|---|
2 |
Run |
Checking deployment prerequisites
Before you deploy a feature, make sure that the Sentinel services you want are deployed. The installation of Sentinel SIP service is necessary for this example feature. And if the module is bound to a running service, the service must be deactivated.
Check the Sentinel service
To view the currently deployed services, use the following command within the rhino-console tool:
listservices
Registrar features will always bind to the sentinel.registrar service, while SIP or TCAP features will bind to sentinel.ipsmgw
Deactivate the running service
In order to deactivate the running service, use the rhino-console program and use command deactivateservice in console.
[Rhino@localhost (#1)] deactivateservice name=sentinel.ipsmgw,vendor=OpenCloud,version=3.1.0.0-copy#1 Deactivating service ServiceID[name=sentinel.ipsmgw,vendor=OpenCloud,version=3.1.0.0-copy#1] on node(s) [101] Service transitioned to the Stopping state on node 101
After configuring a feature, the service must be activated again, please see activate a service.
Deploying a feature
Once a module has been published, it can be deployed. To deploy in the Sentinel IP-SM-GW SDK, you use the deployer tool.
The deployer reads the current module and looks for its published artifacts. It then uses published artifacts and their dependencies to deploy a module.
| |
This means that a module must be published before it can be deployed ! |
To deploy my-sip-example:
1 |
|
|---|---|
2 |
Run This command will deploy the current module, after having first deployed any dependent modules. It does so all the way up the dependency heirarchy. If a module has already been deployed into Rhino, and it has the most recent version, then the deployer will skip it. |
| |
For more about the deployer, please see Deploying modules in Rhino |
Deployer output
Here’s what the deployer’s output should look like:
$ ant -Ddeployer.latest-revision-checks.enabled=false deploy-with-deps
Buildfile: /home/testuser/ipsmgw-sdk/my-sip-example/build.xml
init-build-extensions:
pre-init-ivy-common:
init-ivy-common:
[echo] Ivy Resolvers: /home/testuser/ipsmgw-sdk/build/ivy/resolvers-remote.xml
[echo] Configuring Ivy with settings: /home/testuser/ipsmgw-sdk/build/ivy/ivysettings.xml
[ivy:var] :: Apache Ivy 2.3.0 - 20130110142753 :: http://ant.apache.org/ivy/ ::
[ivy:var] :: loading settings :: file = /home/testuser/ipsmgw-sdk/build/ivy/ivysettings.xml
ivy-authentication-check:
[ivy:resolve] :: loading settings :: file = /home/testuser/ipsmgw-sdk/build/ivy/ivysettings.xml
[echo] Build infrastructure lib/ directory is up to date.
update-index-properties:
[oc:index-properties] Properties file "/home/testuser/ipsmgw-sdk/release.properties" already exists.
[oc:index-properties] Index configuration has not changed since previous build.
[oc:index-properties] Index configuration uses dynamic revisions. Current version of indexes will be queried.
[oc:index-properties] Querying current version of: opencloud#ipsmgw-index#sentinel-ipsmgw/3.1.0;latest.integration
[oc:index-properties] Current version is: opencloud#ipsmgw-index#sentinel-ipsmgw/3.1.0;3.1.0.0
[oc:index-properties] Currently available index versions are the same as previous build. Properties file "/home/testuser/ipsmgw-sdk/release.properties" will not be regenerated.
init:
init-module:
[echo] Resolving ivy configurations "*" for my-sip-example
deploy-with-deps:
[echo] Deploying module.
[oc:deploy] :: loading settings :: file = /home/testuser/ipsmgw-sdk/build/ivy/ivysettings.xml
[oc:deploy] Created deployer with options: OutdatedIvyModuleDetection: Disabled, IvyStatusesToCheck: [integration]
[oc:deploy] Invoking the deployer to process root module UNSET#my-sip-example#trunk;1.0.0.0-DEV4-testuser and its dependencies ...
[oc:deploy] Installing module UNSET#my-sip-example-event-handler-sbbpart#trunk;1.0.0.0-DEV4-testuser
[oc:deploy] Installing module UNSET#my-sip-example-mapper#trunk;1.0.0.0-DEV4-testuser
[oc:deploy] Installing module UNSET#my-sip-example-profile#trunk;1.0.0.0-DEV6-testuser
[oc:deploy] Installing module UNSET#my-sip-example-feature#trunk;1.0.0.0-DEV4-testuser
[oc:deploy] Deployment Result:
[oc:deploy] ---------------------------------------------------------------------
[oc:deploy] | Deploy result:
[oc:deploy] ---------------------------------------------------------------------
[oc:deploy] | Modules with no Component:
[oc:deploy] | UNSET#my-sip-example#trunk;1.0.0.0-DEV4-testuser
[oc:deploy] ---------------------------------------------------------------------
[oc:deploy] | Deployed Modules:
[oc:deploy] | UNSET#my-sip-example-mapper#trunk;1.0.0.0-DEV4-testuser
[oc:deploy] | |__ SbbPartID[name=my-sip-example-mapper,vendor=UNSET,version=1.0]
[oc:deploy] | UNSET#my-sip-example-feature#trunk;1.0.0.0-DEV4-testuser
[oc:deploy] | |__ SbbPartID[name=my-sip-example-feature,vendor=UNSET,version=1.0]
[oc:deploy] | UNSET#my-sip-example-event-handler-sbbpart#trunk;1.0.0.0-DEV4-testuser
[oc:deploy] | |__ SbbPartID[name=my-sip-example-event-handler-sbbpart,vendor=UNSET,version=1.0]
[oc:deploy] | UNSET#my-sip-example-profile#trunk;1.0.0.0-DEV6-testuser
[oc:deploy] | |__ ProfileSpecificationID[name=my-sip-example-profile,vendor=UNSET,version=1.0]
[oc:deploy] ---------------------------------------------------------------------
[oc:deploy] All modules deployed successfully.
[delete] Deleting directory /home/testuser/ipsmgw-sdk/my-sip-example/target/deployer-work
BUILD SUCCESSFUL
Total time: 9 seconds
The output shows:
-
The deployer analyses the dependencies of the
my-sip-examplemodule. -
The group module depends on the feature module.
-
The deployer analyses the dependencies of the feature module.
It has deployment dependencies on the mapper and profile modules.
These are dependencies on theslee-componentIvy configuration in the feature’sivy.xmlfile. -
The deployer analyses the dependencies of the mapper and profile modules.
These modules have no deployment dependencies, so the deployer installs them into Rhino.
Once the mapper and profile modules have been installed, the feature can be installed, because its dependencies have been deployed. -
The deployer analyses the group module.
This module has published noslee-components, so deployment has finished.
The end of the deployment output shows a summary of what was deployed.
Undeploying and redeploying modules
If code in a module has changed, it makes sense to re-compile and re-publish the module. In order to test changes within Rhino, the module must be deployed. Since a version is already deployed, you’ll want to undeploy it.
The undeploy target is available to remove SLEE components from Rhino. This command works by:
-
calculating which components the module deployed
-
uninstalling those SLEE components from Rhino
| |
undeploy and deploy-with-deps
The way the
|
For example, the group module my-sip-example has no slee-component publications; so the undeploy target does nothing when executed. However, the profile, mapper, and feature modules it contains do publish SLEE components. And the feature depends on the profile.
Therefore, if you uninstall the profile, you’ll be prompted to confirm that you want to uninstall both the the profile component and the feature component (since it depends on the profile).
But if you uninstall the feature itself, since there are no dependencies on it, only the feature component will be uninstalled.
The undeploy-all target is also available to remove SLEE components from Rhino. This command works by finding all modules in subdirectories of the current working directory, and then asking each module to undeploy.
| |
If a component has been bound, we recommend unbinding it before undeploying it. |
For more about deployment and undeployment, see Deploying modules in Rhino
Version checks and deployment
When a module is published, its dependencies are published along with it.
With the my-sip-example group, the first time you run publish-local-branch you get this:
| Module | Published revision | Dependency A name and revision | Dependency B name and revision |
|---|---|---|---|
|
group |
1.0.0-DEV0 |
feature revision 1.0.0-DEV0 |
N/A |
|
profile |
1.0.0-DEV0 |
N/A |
N/A |
|
mapper |
1.0.0-DEV0 |
N/A |
N/A |
|
feature |
1.0.0-DEV0 |
profile revision 1.0.0-DEV0 |
mapper revision 1.0.0-DEV0 |
When the deployer reads the published group module or feature module it will retrieve revision 1.0.0-DEV0, and follow the dependencies to published revision 1.0.0-DEV0 of the appropriate module.
Then, if you rebuilt all modules using the publish-local-branch target, you’d get this:
| Module | Published revision | Dependency A name and revision | Dependency B name and revision |
|---|---|---|---|
|
group |
1.0.0-DEV1 |
feature revision 1.0.0-DEV1 |
N/A |
|
profile |
1.0.0-DEV1 |
N/A |
N/A |
|
mapper |
1.0.0-DEV1 |
N/A |
N/A |
|
feature |
1.0.0-DEV1 |
profile revision 1.0.0-DEV1 |
mapper revision 1.0.0-DEV1 |
Next, if you’d changed some logic in your profile module, then entered publish-local in the profile module, the revisions would be:
| Module | Published revision | Dependency A name and revision | Dependency B name and revision |
|---|---|---|---|
|
group |
1.0.0-DEV1 |
feature revision 1.0.0-DEV1 |
N/A |
|
profile |
1.0.0-DEV2 |
N/A |
N/A |
|
mapper |
1.0.0-DEV1 |
N/A |
N/A |
|
feature |
1.0.0-DEV1 |
profile revision 1.0.0-DEV1 |
mapper revision 1.0.0-DEV1 |
When the deployer reads the feature now, it will see that it depends on profile revision 1.0.0-DEV1, not profile revision 1.0.0-DEV2. So it would have to deploy profile revision 1.0.0-DEV1. This would likely to cause confusion, as the changes to the profile would have not taken effect!
This is almost certainly not the desired result (after publishing some changes to the profile).
To avoid this situation, by default the deployer checks that the dependent revision of a module is also the most recently published revision of that module. If those two revisions are not equal, it will not deploy anything into Rhino.
Here’s what the error message looks like:
$ ant deploy-with-deps
Buildfile: /home/testuser/ipsmgw-sdk/my-sip-example/build.xml
init-build-extensions:
pre-init-ivy-common:
init-ivy-common:
[echo] Ivy Resolvers: /home/testuser/ipsmgw-sdk/build/ivy/resolvers-remote.xml
[echo] Configuring Ivy with settings: /home/testuser/ipsmgw-sdk/build/ivy/ivysettings.xml
[ivy:var] :: Apache Ivy 2.3.0 - 20130110142753 :: http://ant.apache.org/ivy/ ::
[ivy:var] :: loading settings :: file = /home/testuser/ipsmgw-sdk/build/ivy/ivysettings.xml
ivy-authentication-check:
[ivy:resolve] :: loading settings :: file = /home/testuser/ipsmgw-sdk/build/ivy/ivysettings.xml
[echo] Build infrastructure lib/ directory is up to date.
update-index-properties:
[oc:index-properties] Properties file "/home/testuser/ipsmgw-sdk/release.properties" already exists.
[oc:index-properties] Index configuration has not changed since previous build.
[oc:index-properties] Index configuration uses dynamic revisions. Current version of indexes will be queried.
[oc:index-properties] Querying current version of: opencloud#ipsmgw-index#sentinel-ipsmgw/3.1.0;latest.integration
[oc:index-properties] Current version is: opencloud#ipsmgw-index#sentinel-ipsmgw/3.1.0;3.1.0.0
[oc:index-properties] Currently available index versions are the same as previous build. Properties file "/home/testuser/ipsmgw-sdk/release.properties" will not be regenerated.
init:
init-module:
[echo] Resolving ivy configurations "*" for my-sip-example
deploy-with-deps:
[echo] Deploying module.
[oc:deploy] :: loading settings :: file = /home/testuser/ipsmgw-sdk/build/ivy/ivysettings.xml
[oc:deploy] Created deployer with options: OutdatedIvyModuleDetection: Enabled, IvyStatusesToCheck: [integration]
[oc:deploy] Invoking the deployer to process root module UNSET#my-sip-example#trunk;1.0.0.0-DEV5-testuser and its dependencies ...
[oc:deploy] Deployment Result:
[oc:deploy] ---------------------------------------------------------------------
[oc:deploy] | Deploy result:
[oc:deploy] ---------------------------------------------------------------------
[oc:deploy] | Failed Modules:
[oc:deploy] | UNSET#my-sip-example-profile#trunk;1.0.0.0-DEV7-testuser
[oc:deploy] | |__ Module has a newer revision available in 'latest.integration': '1.0.0.0-DEV8-testuser'.
[oc:deploy] | Note: this failure was encountered while checking that versions are up to date.
[oc:deploy] | To disable this version checking behaviour when running the 'deploy' or 'deploy-with-deps' targets,
[oc:deploy] | set the system property 'deployer.latest-revision-checks.enabled' to 'false'.
[oc:deploy] | E.g. when using Ant:
[oc:deploy] | ant -Ddeployer.latest-revision-checks.enabled=false deploy-with-deps
[oc:deploy] | or within the sdkadm client:
[oc:deploy] | deploy-module ... -properties deployer.latest-revision-checks.enabled=false
[oc:deploy] ---------------------------------------------------------------------
BUILD FAILED
/home/testuser/ipsmgw-sdk/build/module-targets.xml:88: The following error occurred while executing this line:
/home/testuser/ipsmgw-sdk/build/toolchain-macrodefs.xml:22:
task failed to deploy all modules.
Total time: 5 seconds
To override this behaviour, add the following to the deploy or deploy-with-deps target:
-Ddeployer.latest-revision-checks.enabled=false
For example:
ant -Ddeployer.latest-revision-checks.enabled=false deploy-with-deps
Binding a module
Once the module has been deployed, its SLEE components are present inside the SLEE. However they are not referenced by the appropriate Sentinel service(s).
To have them referenced, they must be bound into the appropriate service(s).
To do this, you use a tool called the binder:
1 |
To invoke the binder, enter the group module (in the example, the ant bind-with-deps This command will read the For the $ ant bind-with-deps
Buildfile: /home/testuser/ipsmgw-sdk/my-sip-example/build.xml
init-build-extensions:
pre-init-ivy-common:
init-ivy-common:
[echo] Ivy Resolvers: /home/testuser/ipsmgw-sdk/build/ivy/resolvers-remote.xml
[echo] Configuring Ivy with settings: /home/testuser/ipsmgw-sdk/build/ivy/ivysettings.xml
[ivy:var] :: Apache Ivy 2.3.0 - 20130110142753 :: http://ant.apache.org/ivy/ ::
[ivy:var] :: loading settings :: file = /home/testuser/ipsmgw-sdk/build/ivy/ivysettings.xml
... edited for brevity ...
init:
init-module:
[echo] Resolving ivy configurations "*" for my-sip-example
bind-with-deps:
[echo] Binding module.
[oc:bind] Connecting to Rhino ...
[oc:bind] Connected to Rhino.
[oc:bind] Initialising Ivy.
[oc:bind] :: loading settings :: file = /home/testuser/ipsmgw-sdk/build/ivy/ivysettings.xml
[oc:bind] Creating binder.
[oc:bind] Created binder with options: ServiceStrategy: FAIL_IF_ACTIVE
[oc:bind] Finished resolving dependencies.
... edited for brevity ...
[oc:bind] Finished processing root modules.
[oc:bind] Bind Result:
[oc:bind] ---------------------------------------------------------------------
[oc:bind] | Bind result:
[oc:bind] ---------------------------------------------------------------------
[oc:bind] | Successfully processed modules:
[oc:bind] | UNSET#my-sip-example-event-handler-sbbpart#trunk;1.0.0.0-DEV5-testuser
[oc:bind] | |__ ModuleBindResult{resultParts=[bindings already installed, bindings applied for service ServiceID[name=sentinel.ipsmgw,vendor=OpenCloud,version=3.1.0.0-copy#1]]}
[oc:bind] | UNSET#my-sip-example-mapper#trunk;1.0.0.0-DEV5-testuser
[oc:bind] | |__ ModuleBindResult{resultParts=[no bindings in module]}
[oc:bind] | UNSET#my-sip-example-feature#trunk;1.0.0.0-DEV5-testuser
[oc:bind] | |__ ModuleBindResult{resultParts=[bindings already installed, bindings applied for service ServiceID[name=sentinel.ipsmgw,vendor=OpenCloud,version=3.1.0.0-copy#1]]}
[oc:bind] | UNSET#my-sip-example#trunk;1.0.0.0-DEV5-testuser
[oc:bind] | |__ ModuleBindResult{resultParts=[no bindings in module]}
[oc:bind] | UNSET#my-sip-example-profile#trunk;1.0.0.0-DEV7-testuser
[oc:bind] | |__ ModuleBindResult{resultParts=[bindings already installed, bindings applied for service ServiceID[name=sentinel.ipsmgw,vendor=OpenCloud,version=3.1.0.0-copy#1]]}
[oc:bind] ---------------------------------------------------------------------
[oc:bind] ---------------------------------------------------------------------
[oc:bind] All modules bound successfully.
BUILD SUCCESSFUL
Total time: 19 seconds
When applying bindings, the binder has created a copy of the service and its root SBB, and added a reference from the root SBB to the new feature’s SBB part. |
||
|---|---|---|---|
2 |
In order to see the new service, use the rhino-console program and type [Rhino@localhost (#0)] listservices ServiceID[name=sentinel.ipsmgw,vendor=OpenCloud,version=3.1.0.0-copy#1] ServiceID[name=sentinel.ipsmgw,vendor=OpenCloud,version=3.1.0.0] ServiceID[name=sentinel.ipsmgw,vendor=OpenCloud,version=3.1.0] ServiceID[name=sentinel.ipsmgw,vendor=OpenCloud,version=current] ServiceID[name=sentinel.registrar,vendor=OpenCloud,version=3.1.0.0-copy#1] ServiceID[name=sentinel.registrar,vendor=OpenCloud,version=3.1.0.0] ServiceID[name=sentinel.registrar,vendor=OpenCloud,version=3.1.0] ServiceID[name=sentinel.registrar,vendor=OpenCloud,version=current]
|
||
3 |
Compare a copy with an original using the [Rhino@localhost (#2)] getdescriptor service name=sentinel.ipsmgw,vendor=OpenCloud,version=3.1.0.0 For component ServiceID[name=sentinel.ipsmgw,vendor=OpenCloud,version=3.1.0.0]: Deployable unit: DeployableUnitID[url=file:modules/opencloud/ipsmgw-service-build-3.1.0.0.jar] Component source: service.xml Defined using SLEE version: 1.1 Checksum: 0xb91f693d34e149dc1374f913306ef1d57b120652 Install level: DEPLOYED Copies made from this component: ServiceID[name=sentinel.ipsmgw,vendor=OpenCloud,version=3.1.0.0-copy#1] Root sbb: SbbID[name=sentinel.ipsmgw,vendor=OpenCloud,version=3.1.0] Address profile table: none This component is a dependent of: none [Rhino@localhost (#3)] getdescriptor service name=sentinel.ipsmgw,vendor=OpenCloud,version=3.1.0.0-copy#1 For component ServiceID[name=sentinel.ipsmgw,vendor=OpenCloud,version=3.1.0.0-copy#1]: Copied from: ServiceID[name=sentinel.ipsmgw,vendor=OpenCloud,version=3.1.0.0] Copy date: Fri Apr 01 17:51:27 NZDT 2016 Original component: ServiceID[name=sentinel.ipsmgw,vendor=OpenCloud,version=3.1.0.0] Install level: VERIFIED Incoming links to this component: ServiceID[name=sentinel.ipsmgw,vendor=OpenCloud,version=3.1.0] ServiceID[name=sentinel.ipsmgw,vendor=OpenCloud,version=current] Root sbb: SbbID[name=sentinel.ipsmgw,vendor=OpenCloud,version=3.1.0-copy#1] Address profile table: none This component is a dependent of: none [Rhino@localhost (#4)]
|
||
4 |
Use the [Rhino@localhost (#5)] getdescriptor sbb name=sentinel.ipsmgw,vendor=OpenCloud,version=3.1.0-copy#1 For component SbbID[name=sentinel.ipsmgw,vendor=OpenCloud,version=3.1.0-copy#1]: Copied from: SbbID[name=sentinel.ipsmgw,vendor=OpenCloud,version=3.1.0] Copy date: Fri Apr 01 17:51:25 NZDT 2016 Original component: SbbID[name=sentinel.ipsmgw,vendor=OpenCloud,version=3.1.0] Install level: VERIFIED Library refs: LibraryID[name=FSMTool Library,vendor=OpenCloud,version=1.1.0] LibraryID[name=Google Protocol Buffers support runtime,vendor=OpenCloud,version=2.3.0] LibraryID[name=Sentinel promotion script library,vendor=OpenCloud,version=3.1.0] LibraryID[name=SentinelAddressList,vendor=OpenCloud,version=3.1.0] LibraryID[name=SentinelFeaturesCommon,vendor=OpenCloud,version=3.1.0] LibraryID[name=SentinelSdpLibrary,vendor=OpenCloud,version=1.0.0] LibraryID[name=SentinelXpath,vendor=OpenCloud,version=3.1.0] LibraryID[name=ipsmgw-rp-message-library,vendor=OpenCloud,version=3.1.0] Event type refs: EventTypeID[name=com.opencloud.slee.resources.http.HttpRequest.GET,vendor=OpenCloud,version=2.2] EventTypeID[name=com.opencloud.slee.resources.http.HttpRequest.POST,vendor=OpenCloud,version=2.2] EventTypeID[name=javax.slee.ActivityEndEvent,vendor=javax.slee,version=1.0] EventTypeID[name=javax.slee.facilities.TimerEvent,vendor=javax.slee,version=1.0] EventTypeID[name=org.jainslee.resources.sip.IncomingSipRequest.ACK,vendor=jainslee.org,version=1.4] EventTypeID[name=org.jainslee.resources.sip.IncomingSipRequest.BYE,vendor=jainslee.org,version=1.4] EventTypeID[name=org.jainslee.resources.sip.IncomingSipRequest.CANCEL,vendor=jainslee.org,version=1.4] EventTypeID[name=org.jainslee.resources.sip.IncomingSipRequest.INFO,vendor=jainslee.org,version=1.4] EventTypeID[name=org.jainslee.resources.sip.IncomingSipRequest.INVITE,vendor=jainslee.org,version=1.4] ... edited for brevity ... Profile spec refs: ProfileSpecificationID[name=AddressListEntryProfile,vendor=OpenCloud,version=3.1.0] ProfileSpecificationID[name=DiameterMediationConfigurationProfile,vendor=OpenCloud,version=3.1.0] ProfileSpecificationID[name=DiameterMediationOcsConfigurationProfile,vendor=OpenCloud,version=3.1.0] ProfileSpecificationID[name=DiameterSentinelServiceIDConfigProfile,vendor=OpenCloud,version=3.1.0] ProfileSpecificationID[name=ExecutionPoint,vendor=OpenCloud,version=3.1.0] ProfileSpecificationID[name=FeatureExecutionScript,vendor=OpenCloud,version=3.1.0] ProfileSpecificationID[name=PromotionsTable,vendor=OpenCloud,version=3.1.0] ProfileSpecificationID[name=SentinelConfigurationProfile,vendor=OpenCloud,version=3.1.0] ProfileSpecificationID[name=SipSentinelConfigurationProfile,vendor=OpenCloud,version=3.1.0] ProfileSpecificationID[name=SipThirdPartyCallConfigurationProfile,vendor=OpenCloud,version=3.1.0] ProfileSpecificationID[name=TccTimerConfigurationProfile,vendor=OpenCloud,version=3.1.0] SBB refs: SbbID[name=ipsmgw-delivery-report-handover-feature,vendor=OpenCloud,version=3.1.0-copy#1] SbbID[name=sentinel-core-subscriber-data-lookup-feature,vendor=OpenCloud,version=3.1.0-copy#1] SbbID[name=sentinel.ro.ocs,vendor=OpenCloud,version=3.1.0] SBB part refs: SbbPartID[name=SentinelDiameterMediationMappers,vendor=OpenCloud,version=3.1.0] SbbPartID[name=SentinelSipFeatureSPI SBB Part,vendor=OpenCloud,version=3.1.0] SbbPartID[name=my-sip-example-event-handler-sbbpart,vendor=UNSET,version=1.0-copy#1] SbbPartID[name=ipsmgw-accept-dialog-feature,vendor=OpenCloud,version=3.1.0-copy#1] SbbPartID[name=ipsmgw-adjustroutinginforesponse-feature,vendor=OpenCloud,version=3.1.0-copy#1] SbbPartID[name=ipsmgw-cs-delivery-feature,vendor=OpenCloud,version=3.1.0-copy#1] ... edited for brevity ... Resource adaptor type refs: ResourceAdaptorTypeID[name=CDR Generation,vendor=OpenCloud,version=2.2] ResourceAdaptorTypeID[name=Database Query,vendor=OpenCloud,version=1.4] ResourceAdaptorTypeID[name=Diameter Ro,vendor=jainslee.org,version=2.6] ResourceAdaptorTypeID[name=EasySIP,vendor=jainslee.org,version=1.4] ResourceAdaptorTypeID[name=HTTP,vendor=OpenCloud,version=2.2] ResourceAdaptorTypeID[name=MAP,vendor=OpenCloud,version=1.5.2] ResourceAdaptorTypeID[name=UniqueID RA Type,vendor=OpenCloud,version=3.1.0] ResourceAdaptorTypeID[name=sentinel.management.ra.type,vendor=OpenCloud,version=3.1.0] Resource adaptor entity links: sentinel-cassandra sentinel-cdrra sentinel-cgin-mapra sentinel-dbquery sentinel-http sentinel-internal-diameterro sentinel-management sentinel-sip sentinel-uid Address profile spec: none This component is a dependent of: ServiceID[name=sentinel.ipsmgw,vendor=OpenCloud,version=3.1.0.0-copy#1]
Both the bindings metadata files and the Rhino bindings files are in JSON format and so can be viewed in a text editor. The bindings metadata files are published in a zip file in the module’s The content of the bindings metadata zip file is created in the module’s |
In order to unbind a module in Rhino, the unbind and unbind-all targets exist.
For more about the binder, please see Binding modules in Rhino .
Configuring a feature
Once a module has been bound it can be configured. Configuration can include:
-
profile tables and profiles
-
RA entity link names
-
RA entity configuration properties
-
RA entity activation state
-
service activation state
-
trace levels for SLEE components.
Configuration is applied through the configure-with-deps target. This target reads the config Ivy configuration, and walks up the Ivy dependencies configuring components as necessary. If the configuration in the SLEE matches the desired configuration, the configurer does not apply any changes for that module.
Configuration is specified in a YAML format. An example is included in the my-sip-example/feature/config directory.
For more about configuration, please see Configuring modules in Rhino
Activate a service
If a service was deactivated in checking deployment prerequisites, the service must be activated again.
In order to activate the running service, use the rhino-console program and use activateservice in console.
For Example, to activate the service name=sentinel.ipsmgw,vendor=OpenCloud,version=3.1.0-copy#1, type the following command in console:
activateservice name=sentinel.ipsmgw,vendor=OpenCloud,version=3.1.0-copy#1
[Rhino@localhost (#7)] activateservice name=sentinel.ipsmgw,vendor=OpenCloud,version=3.1.0.0-copy#1 Activating service ServiceID[name=sentinel.ipsmgw,vendor=OpenCloud,version=3.1.0.0-copy#1] on node(s) [101] Service transitioned to the Active state on node 101
Testing the feature
For unit testing, include the sentinel-unit-test-support dep in ivy.xml and write unit tests in the tests/directory of the module
Once deployed, bound, and configured, the feature can be integration tested.
After installing your module you may want to make changes and install again. See General Development Cycles for more information.
Adding the feature to the deployment module
In order to be able to easily deploy the feature as part of the deployment module, you can add a dependency to the ivy.xml in the deployment module so that the deployment module depends upon the feature module. If the new feature is a dependency of a group module, then the group module should instead be added as the dependency to the deployment module’s ivy.xml file.
For the example feature, this means that you would have to add this line to the dependencies section of the deployment module’s ivy.xml:
<dependency org="${sdk.ivy.org}" name="my-sip-example-feature" rev="latest.${ivy.status}" conf="slee-component; deploy; config; slee-binding" />
See also Dependencies between module types.
Customising CDRs
Defining extension AVPs
In order for Rhino to be able to handle extension AVPs they need to be defined in two Diameter-specific profile tables, DiameterExtension-AVP and DiameterExtensions. The source for these profile tables are the two respective YAML files in the sentinel-diameter-ra-deploy module. The paths to the profile tables relative to the SDK root directory are:
ipsmgw-deploy/config/sentinel-diameter-ra-deploy/profiles/DiameterExtension-AVP.yaml ipsmgw-deploy/config/sentinel-diameter-ra-deploy/profiles/DiameterExtensions.yaml
The DiameterExtension-AVP profile table contains one profile for every extension AVP. Below is an example of such an AVP definition:
OC-Sentinel-Selection-Key:
AvpCode: 1001
AvpName: OC-Sentinel-Selection-Key
AvpType: UTF8String
MandatoryRule: 1
ProtectedRule: 1
VendorId: 19808
See Configuring Extension AVPs for the full documentation of these profile tables.
Extending CDRs generated by Sentinel
Sentinel defines the general format of the CDRs as a collection of arbitrary AVPs, and specialised features are then used to create AVPs from session state information and write the AVPs to a CDR. Therefore there should be no need to modify the protocol buffers definition (i.e. disk format does not need modification). However, if custom information should be written to CDRs using extension AVPs then these need to be defined in the Diameter profile configuration files in the deployment module.
Sentinel provides to enable extension of both Session CDRs and Interim CDRs.
Extending Session CDRs generated by Sentinel
A Session CDR means a CDR that is written once per Session.
AVP CDR feature module pack
Sentinel IP-SM-GW includes two module packs for writing CDR features: sentinel-sip-avp-cdr-feature and ipsmgw-avp-cdr-feature. The former contains most of the code for populating CDRs, the latter extends that feature and adds a few IP-SM-GW-specific fields. Since you may need to modify certain methods in the base feature it is recommended that you create features from both module packs as explained below and then only work on the IP-SM-GW feature, copying code from the base feature as needed.
Note that if you want to completely replace the CDR generation then you will have to change the feature class signature so as not to inherit from the base feature by changing the line
public class AcmeSipAvpCdrFeature extends BaseSipAvpCdrFeature {
to
public class AcmeSipAvpCdrFeature extends BaseFeature<SentinelSipSessionState, SentinelSipMultiLegFeatureEndpoint>
implements SipFeature, InjectResourceAdaptorProvider, InjectFeatureStats<CDRStats> {
and copy over all the necessary methods.
Creating a Module from the Module Pack
For background information refer to Module Packs and Creating a Feature for general information on how to create, build and deploy a new feature.
| |
The examples given assume the SDK was installed for (vendor=Acme Inc, vendorKey=acme, version=1.5) |
To view the available module-packs, type the following command inside the sdkadm tool:
list-modules +module-pack
| |
Where you see a version number of 3.1.0.0 use the version number of the product you have downloaded. |
Now create a new module from the module pack published in opencloud#sentinel-sip-avp-cdr-feature#sentinel-sip/3.1.0;3.1.0.0:
Run the command:
create-module acme-sip-avp-feature opencloud#sentinel-sip-avp-cdr-feature#sentinel-sip/3.1.0;3.1.0.0
This command:
-
downloads the module pack from the repository
-
creates a new directory called
acme-sip-avp-featureinside your Sentinel IP-SM-GW SDK, which contains all the newly created modules -
scans the content of the module pack and prompts you to enter new values where necessary
-
re-writes the new modules according to your answers.
When prompted, answer as shown in the example output below. Numbered annotations mark the prompts, and their answers are listed by number immediately after the example output.
> create-module acme-sip-avp-feature opencloud#sentinel-sip-avp-cdr-feature#sentinel-sip/3.1.0;3.1.0.0
downloading https://${download.link.host}/artifactory/opencloud-internal-snapshots/opencloud/sentinel-sip/3.1.0/sentinel-sip-avp-cdr-feature/3.1.0.0/sentinel-sip-avp-cdr-feature-module-pack-3.1.0.0.zip ...
... (12kB)
.. (0kB)
[SUCCESSFUL ] opencloud#sentinel-sip-avp-cdr-feature#sentinel-sip/3.1.0;3.1.0.0!sentinel-sip-avp-cdr-feature-module-pack.zip(module-pack) (81ms)
Extracting '/home/testuser/ipsmgw-sdk/build/target/ivy-caches/online-resolvers.cache/opencloud/sentinel-sip-avp-cdr-feature/sentinel-sip/3.1.0/module-packs/sentinel-sip-avp-cdr-feature-module-pack-3.1.0.0.zip' to '/home/testuser/ipsmgw-sdk/acme-sip-avp-feature'.
Command line invocation did not contain enough rename arguments to rename all modules.
To specify rename arguments on the command line, include <oldvalue>:<newvalue> pairs as additional arguments.
Missing values will now be prompted for interactively.
Please enter a name for the top level module, usually this will match the name of the directory for the new module
Rename top level module 'sentinel-sip-avp-cdr-feature' to [acme-sip-avp-feature]:  The longest common package prefix is 'com.opencloud.sentinel.feature.common.cdr'.
Rename package prefix 'com.opencloud.sentinel.feature.common.cdr' to [com.opencloud.sentinel.feature.common.cdr]: com.acme.sentinel
The longest common package prefix is 'com.opencloud.sentinel.feature.common.cdr'.
Rename package prefix 'com.opencloud.sentinel.feature.common.cdr' to [com.opencloud.sentinel.feature.common.cdr]: com.acme.sentinel  Command line invocation did not contain enough rename arguments to rename all features.
To specify rename arguments on the command line, include <oldvalue>:<newvalue> pairs as additional arguments.
Missing values will now be prompted for interactively.
Rename feature 'SipAvpCdr' to [SipAvpCdr]: AcmeSipAvpCdr
Command line invocation did not contain enough rename arguments to rename all features.
To specify rename arguments on the command line, include <oldvalue>:<newvalue> pairs as additional arguments.
Missing values will now be prompted for interactively.
Rename feature 'SipAvpCdr' to [SipAvpCdr]: AcmeSipAvpCdr  Re-writing source files with new package declarations.
Renaming ivy modules and updating dependencies.
Renaming symbolic property references in source files.
Checking "deps.properties" for missing values.
Done. New module(s) should now be available at: /home/testuser/ipsmgw-sdk/acme-sip-avp-feature
Re-writing source files with new package declarations.
Renaming ivy modules and updating dependencies.
Renaming symbolic property references in source files.
Checking "deps.properties" for missing values.
Done. New module(s) should now be available at: /home/testuser/ipsmgw-sdk/acme-sip-avp-feature
| Press Enter to accept the default | |
Type com.acme.sentinel and press Enter |
|
Type AcmeSipAvpCdr and press Enter |
| |
It is possible to use the command in a non-interactive mode by providing all substitution values. Run help create-module for instructions. |
Modifying the Session CDR feature
The CDR feature module contains two classes: SipAvpCdrFeature and BaseSipAvpCdrFeature. BaseSipAvpCdrFeature contains the actual code, and SipAvpCdrFeature inherits from it and contains the feature annotations. This split is necessary to make it possible for other features to inherit the functionality of the base feature without causing problems with conflicting annotations.
When modifying the CDR feature you can choose to completely replace the existing code in the createCdr() method or to extend it with your own additions. Regardless of which you prefer, there are two main helper methods that make adding new AVPs to a CDR very easy:
-
addAvp() -
This method simply takes a
DiameterAvpobject created through the Diameter API, in addition to theAvpCdrFormat.AvpCdr.BuilderandDiameterMessageFactoryinstances created at the beginning of thecreateCdr()method, and adds it to the top level of the CDR. This is useful for standard AVPs. The feature contains two examples of how to use this method, theSubscription-IdAVP and theService-Context-IdAVP. -
addCustomAvp() -
This method is used for adding extension AVPs to the top level of the CDR. In addition to the builder and message-factory arguments mentioned above it takes an AVP code, name, and value to create the AVP with. There are several examples in the feature that demonstrate how to use this method.

By default the extension AVPs will be added with the OpenCloud vendor ID, so make sure to adjust the code to your needs in both the createCustomAvp()andcreateCdrAvp()methods when defining your own extension AVPs.
You may have to modify the createCustomAvp()method if the AVP you want to create is of a type that is not yet supported by that method.
Updating feature scripts for the Session CDR feature
In order for the new CDR feature to be used instead of the default one, the feature execution scripts have to be updated, replacing calls to the default feature with calls to the new one.
The feature is only run at the end of a session, which is made up of the default_sf_Post_SipEndSession and MOFSM_sf_Post_SipEndSession execution points, so simply replacing run IpsmgwAvpCdr with run AcmeSipAvpCdr in ipsmgw-deploy/config/ipsmgw-full-deploy/ipsmgw-service/profiles/PlatformOperatorName_FeatureExecutionScriptTable.yaml at these execution points will be enough to enable the new feature.
Customising Mappers
Mapper introduction
Mappers allow you to "map" incoming objects to output objects. For a general overview of what mappers are and how they work see Mappers.
Creating a custom mapper
Creating a custom mapper requires two things: an SBB part with the actual code, and an entry in the SentinelMapperSetEntryTable. The table already contains entries for all the standard mappers, so if you want to replace an existing mapper then the table should not need to be updated.
The mapper SBB part
Mappers typically live in their own modules, so the first step of creating a mapper is to create a new module. The easiest way to accomplish this is to use the create-module functionality of the sdkadm tool. See Creating a new module for more information about this. Some modules already contain a mapper as a nested module, making the initial creation of the mapper module very easy.
The sentinel-sip-example module is an example of such a case. The example mapper that it contains will be used to illustrate the explanations in this document.
The mapper class
The implementing class of a mapper has two requirements:
-
It must contain a
SentinelMapperannotation that defines the name, the input class and the output class of the mapper. -
It must implement the
Mapperinterface, which consists of the single methodmap().
To illustrate this here is a simple example of a mapper class, taken from the aforementioned sentinel-sip-example module:
package com.opencloud.sentinel.example.feature;
@SentinelMapper(
mappings = {
@Mapping(name = "StringToString", fromClass = String.class, toClass = String.class)
}
)
public class StringToStringMapper implements Mapper<NullSentinelSessionState> {
@Override
public Object map(final Object arg, final NullSentinelSessionState sessionState, final MapperFacilities facilities) throws MapperException {
return arg;
}
}This mapper takes a String as an input and outputs a String as well. Note that you can have multiple @Mapping annotations to have a mapper handle more than one combination of classes.
The map() implementation here simply returns the input string unmodified. It also only uses the NullSentinelSessionState class instead of a concrete one that would allow it to read and manipulate the available session state fields available through the concrete implementation. This is something that a real mapper implementation is likely to want to do.
Finally, the MapperFacilities object gives the mapper access to the log() method so it can log diagnostic messages.
Note that instead of directly implementing the Mapper interface a mapper could also subclass an existing mapper.
The package info class
In addition to the actual mapper implementation a mapper module also needs a package-info.java file in the same package as the mapper class. This class contains the @SBBPart annotation necessary to create a valid SBB part out of the mapper. This class is subsequently very simple:
@SBBPart(
id = @ComponentId(name = "@component.name@", vendor = "@component.vendor@", version = "@component.version@")
)
package com.opencloud.sentinel.example.feature;The component variables are substituted with the correct variables at compilation time by the build system. The definitions of them should reside in the module.properties file in the module root directory and look like this:
component.name=${ivy.module}
component.vendor=${sdk.component.vendor}
component.version=${sdk.component.version}
If the module was created using sdkadm then this file should already contain the correct properties.
The execution point enum
Mappers support different mapper execution points. These allow specialising mappers based on a condition. An example of an execution point could be a specific state of an ongoing call, but there are no restrictions on what they have to represent. When looking up a mapper the mapper registry will first perform a lookup that respects the execution point, and if that fails it will perform a more general lookup that ignores the execution point (for more information about mapper lookup refer to Mappers).
The execution points have to be specified as a Java enum in the mapper module.
Publishing the SBB part artifact
In order for Ivy to be able to publish the SBB part correctly it needs the correct publication configuration in the module’s ivy.xml file. This consists of an <artifact> line in the file’s <publications> section and typically would look like this:
<artifact name="${ivy.module}" type="sbbpart" ext="jar" conf="slee-component,api"/>
Making the mapper known to Sentinel
In order to be able to use a mapper it has to be added to the SentinelMapperSetEntryTable profile table, which contains the information that Sentinel needs to be able to look up mappers at runtime. For configuring the table in a running Rhino see Mappers.
If the new mapper should be deployed as part of a full Sentinel installation it can also be manipulated directly by editing the config/<full-deploy-module>/profiles/SentinelMapperSetEntryTable.yaml file in your SDK’s deployment module.
Each profile in this table specifies the configuration for one mapper. The below example illustrates the structure of such a profile:
${platform.operator.name}:::::StringToString:
MapperExecutionPoint: StringExecutionPoint
MapperSetName: '${platform.operator.name}:'
MappingName: StringToString
PlanId: ''
SessionType: ''
The name of such a profile consists of a Sentinel selection key and the appended mapper name.
The MapperExecutionPoint, PlanId, and SessionType attributes are optional. The MapperExecutionPoint attribute specifies the execution point explained above and must be one of the values of the mapper’s enum.
Using a mapper in a feature
Making use of a mapper in a feature consists of two parts: giving the feature access to the mapper registry through the mapper library, and actually calling the mapper from the feature. The feature also needs a reference to the mapper component.
Injecting the mapper library
The mapper library is injected into a feature just like a resource adaptor is. Subsequently it requires two changes in a feature:
-
Changing the
@SentinelFeatureannotation to include theuseMapperLibraryandmappingExecutionPointEnumfields, and -
Implementing the
InjectMapperLibraryinterface’sinjectMapperLibrary()method.
The following shows a minimal example of this, with all the non-relevant code elided:
package com.opencloud.sentinel.example.feature;
// import ...
@SentinelFeature(
// ...
useMapperLibrary = true,
mappingExecutionPointEnum = MyExecutionPointEnum.class,
// ...
)
@SBBPartReferences(
sbbPartRefs = {
// ...
// The appropriate variables here should be available in a feature's
// "target/generated/module.properties" file after building if the
// feature has the correct dependency on the mapper module.
@SBBPartReference(id = @ComponentId(name = "@sentinel-sip-example-mapper.name@",
vendor = "@sentinel-sip-example-mapper.vendor@",
version = "@sentinel-sip-example-mapper.version@"))
}
)
// ...
public class ExampleFeature extends BaseFeature<SessionStateType, FeatureEndpoint>
implements ..., InjectMapperLibrary<MyExecutionPointEnum> {
// ...
@Override
public void injectMapperLibrary(MapperLibrary<MyExecutionPointEnum> mapperLibrary,
MapperFacilities mapperFacilities) {
this.mapperLibrary = mapperLibrary;
this.mapperFacilities = mapperFacilities;
}
// ...
private MapperFacilities mapperFacilities;
private MapperLibrary<MyExecutionPointEnum> mapperLibrary;
}Calling the mapper from the feature
This is where it all comes together. Mapper usage in a feature again comes down to two steps:
-
Looking up the appropriate mapper in the mapper registry, and
-
Calling the mapper.
Looking up a mapper
Looking up a mapper is done with the mapper library that got injected into the feature earlier. This is where the execution point comes into play, as the lookup can optionally include an execution point.
Mapper<SessionStateType> mapper = mapperLibrary.findMapper(getSessionState().getSentinelSelectionKey(),
String.class,
String.class,
MyExecutionPointEnum.FooExecutionPoint);Calling the mapper
Calling a mapper simply involves calling the map() function with the input object we want to map and checking that the result is actually as expected.
Object mappingResult = mapper.map(inputObject, getSessionState(), mapperFacilities);
if (mappingResult == null)
throw new MapperException("Mapper " + mapper + " returned null");
if (!(mappingResult instanceof String))
throw new MapperException("Mapper " + mapper + " returned incorrect class: " + mappingResult.getClass());
String resultString = (String) mappingResult;General Development Cycles
| |
This section explains how to reinstall modules |
When developing a feature it is more than likely that you will need to go through a build, deploy, bind, configure, and test cycle multiple times to find any bugs. The recommended path to do this depends on whether you are updating a feature module that has no dependencies on it, or you are updating a profile or library that is depended on by other modules.
The starting point for both options assumes that all modules are currently deployed and bound into an active service.
Single Feature Module
Use this approach when you are working on a single feature that is in its own module and has no dependencies on it. All ant commands should be run from in the feature module’s directory.
| Step | Action | Command | Notes |
|---|---|---|---|
1 |
Edit your feature code in an IDE and save it. |
||
2 |
Build and publish the feature. |
|
This compiles and publish your feature in the repository. If there are errors, they will be shown in this step. |
3 |
Redeploy your feature |
|
This will deactivate the services in which your feature is bound, unbind your feature, undeploy it, deploy the new published version, bind it and re-activate the service(s). |
| |
First publish your feature, otherwise the redeploy will find the previously published version and install that, rather than your changed version. |
Profile, Library or Group Module
Use this approach when you are working on a profile or library that is in a module group, and is not depended on by any module outside of the module group. This is the common case for related features and their configuration profiles. All modules in the group need to go through the cycle, and this is supported with a slightly expanded version of the earlier approach. Assuming the following:
my-group-module (a directory containing one module with multiple modules in sub-directories) - build.xml - my-feature-module (a directory containing a module) - my-library-module (a directory containing a module) - my-profile-module (a directory containing a module) - ivy.xml - module.properties
All ant commands should be run from inside the my-group-module (i.e. the current working directory is my-group-module)
| Step | Action | Command | Notes |
|---|---|---|---|
1 |
Create or edit your feature in an IDE and save it. |
||
2 |
Build and publish the group of modules. |
|
This compiles and publishes all modules in the directory structure feature in the repository. If there are errors, they will be shown in this step. |
3 |
Redeploy your group of modules |
|
This will deactivate the services in which your modules are bound, unbind and undeploy the group of modules, deploy the newly published group of modules, bind them, and re-activate the service(s). |
| |
Don’t forget to publish your group-module first, otherwise redeploy-all will find the previous version and install that. |
Sentinel Feature Development Best Practices
| |
This section discusses some Sentinel feature development Best Practices |
This page documents and describes some of the Best Practices established by the Sentinel development team.
For each guideline this page discusses why the practice should be followed, and whether there are situations when it may not be appropriate to follow the guideline. While there are existing features that do not follow all these guidelines, new features should be written to follow the instructions on this page.
Effective Tracing
Trace messages serve a number of purposes. Trace messages at fine, finer and finest should be used when diagnosing a problem. Trace messages at warning and severe should be used to record information related to a situation that will cause unexpected behaviour when it happens. info trace level is generally not useful in sentinel features.
It is important to put effort into designing the tracing a features does so:
-
there is useful information available for troubleshooting
-
unexpected behaviour does not cause a snowballing number of warning and severe trace messages that impact the stability of the platform.
| Rule | Rationale | Exceptions |
|---|---|---|
|
Always guard trace statements. if (tracer.isXEnabled()) {
...
}
|
This pattern avoids unnecessary overhead caused when evaluating the argument to the tracer (eg string concatenation), when the trace message would not be written. |
The pattern should be followed in all cases for consistency, even when there is no overhead required to evaluate the argument of tracer methods. |
Tracer messages written at |
This allows |
Always follow this rule. |
Features should trace |
Allows for simple, consistent search in log files to follow control flow. |
Always follow this rule. |
Features should minimise using |
This avoids the possibility of log spam on production systems, which could compound failures (for example during severe load) |
Generally avoid these trace levels in features. Use statistics instead. |
Features should rarely use |
Logging of feature execution should be done at |
Using |
| |
Java uses eager evaluation - all arguments to a method are evaluated before the method itself is executed. This includes calls to tracers. Remember that the |
Using Statistics
Statistics associate counters with actions a feature performs, such rejecting a session, or unexpected situations, such as an external system not being available. Platform administrators can use statistics to track stability and performance; for example, noting how long an external component takes to answer a request or how many retries a feature has had to make.
| Rule | Rationale | Exceptions |
|---|---|---|
Feature statistics should represent problem domain related occurrences that reflect the behaviour of the feature. |
Statistics provide a low impact method to monitor the behaviour of Sentinel. |
Always follow this recommendation |
Don’t replicate feature statistics that are already collected by the Sentinel core. |
The sentinel core already collects statistics when a feature runs, and related to the outcome (failing to start, issued a warning and so on). |
Always follow this recommendation |
Consider defining threshold alarms |
A threshold alarm is a custom alarm that is created by the platform administrator. Threshold alarms are raised or cleared automatically based rules that are based on statistics. |
Using the Feature API
| Rule | Rationale | Exceptions |
|---|---|---|
|
One of …
must be called when a feature’s main control block completes. If the feature is waiting for an asynchronous non-sip event, |
The sentinel run-time requires features to signal the outcome of being invoked, so it can update its own state and continue running other features. |
Always follow this rule. For SIP-only features, or features with no asynchronous calls, trace |
|
The Sentinel run-time collects statistics related to feature failures that can be monitored. |
Always follow this rule. |
|
The Sentinel run-time collects statistics that can be monitored by the platform operator |
The decision about whether to call |
|
The Sentinel run-time collects statistics that can be monitored by the platform operator |
In general, if the problem is internal to the system - eg a timer cannot be set - |
Dependencies and Annotations
| Rule | Rationale | Exceptions | ||
|---|---|---|---|---|
|
Don’t hard-code name/vendor/version values. |
If the version of a dependency changes, you have to change it in all places it is used. |
Always follow this rule. |
||
|
Add dependencies to the slee-component ivy conf |
The sentinel build system inspects resolved dependencies at build time and, where possible, sets variables that can be used during annotation processing.
|
Always follow this rule. |
||
|
For example …
Ivy dependency
<dependency org="${sdk.ivy.org}"
name="volte-example-pojo-feature-library"
rev="latest.${ivy.status}"
branch="${branch.name}"
conf="self, provisioning -> api; api; slee-component; slee-binding"/>
Annotation in a feature
@LibraryReferences(
libraryRefs = {
@LibraryReference(
library = @ComponentId(name = "@volte-example-pojo-feature-library.name@",
vendor = "@volte-example-pojo-feature-library.vendor@",
version = "@volte-example-pojo-feature-library.version@"))
}
)
Output from the build (ant -v)
... [oc:finddepcomponentinfo] Processing module: volte-example-pojo-feature-library [oc:finddepcomponentinfo] Adding property: name=volte-example-pojo-feature-library.name, value=volte-example-pojo-feature-library [oc:finddepcomponentinfo] Adding property: name=volte-example-pojo-feature-library.vendor, value=OpenCloud [oc:finddepcomponentinfo] Adding property: name=volte-example-pojo-feature-library.version, value=2.7.1-TRUNK ...
Generated fragment of the deployment descriptor
...
<library-ref>
<library-name>volte-example-pojo-feature-library</library-name>
<library-vendor>OpenCloud</library-vendor>
<library-version>2.7.1-TRUNK</library-version>
</library-ref>
...
|
||||
|
Minimise the number of dependencies in |
Ivy is a transitive package manager. Make use of ivy and only include the direct dependencies your components need and let ivy transitively resolve the rest. |
Follow this rule unless you need fine grained control of transitive dependencies, for example to exclude a component. |
||
Using Cassandra CQL
| Rule | Rationale | Exceptions |
|---|---|---|
Prepared statements should used in preference to executing raw strings when using the cassandraCQLProvider |
Efficiency and security |
There may be some situations where prepared statements are not practical or efficient, and in those cases raw strings can be used |
Using SLEE Profiles
| Rule | Rationale | Exceptions |
|---|---|---|
Each profile specification should include a profile management class that extends |
|
Always follow this rule. |
| |
See Chapter 10 Profiles and Profile Specifications of the SLEE specification. |
Using SIP
| Rule | Rationale | Exceptions |
|---|---|---|
Prefer using sip header names from predefined classes, eg |
Avoids typos and regional spelling differences |
Whenever importing the relevant libraries is not feasible |
Feature Configuration
| Rule | Rationale | Exceptions |
|---|---|---|
Feature configuration should be provisioned using the @Provisioning annotation. |
These annotations are used to generate the REST API and web UI for the feature. |
If configuration profiles are shared between multiple features, only one feature should be responsible for provisioning. |
Session State
| Rule | Rationale | Exceptions |
|---|---|---|
the |
Proper initialisation of session state fields means that less validation logic is needed, spread throughout the features that use the session state fields. |
Use this pattern whenever:
|
Using the SIP Leg Manager
| Rule | Rationale | Exceptions |
|---|---|---|
Don’t look up legs by name - use the ACI instead |
|
Binding components in Rhino
| |
This section explains the Binder — what it consists of and how to use it |
What is the Binder ?
The Binder is a tool supplied with the Sentinel SDK.
It is able to ‘bind’ various components together once they have been deployed into the Rhino.
It makes use of the bindings features introduced in Rhino 2.4.0.
| |
For a comparison between JSLEE deployment descriptor references and Rhino bindings, see this page. |
Module publications
When a module is built, bindings meta-data is created in the target/generated/bindings directory. The bindings meta-data file(s) are then archived and published with the module.
The archive itself is created in target/artifacts, and whether or not it is published is declared in the publications section of a modules ivy.xml file.
Bindings meta-data is produced from the Java annotations in a feature’s source files.
| Type of module | Generated bindings files |
|---|---|
JSLEE Library |
target/generated/library-bindings.json |
JSLEE Profile |
target/generated/profile-bindings.json |
Sentinel POJO feature |
target/generated/sbbpart-bindings.json |
Sentinel Mapper |
target/generated/sbbpart-bindings.json |
Sentinel SBB feature |
target/generated/sbb-bindings.json |
It may be useful to review the content of the generated bindings meta-data files when developing a module.
Here is an example for a Sentinel POJO feature:
{
"componentType": "SBBPart",
"dependencies": [
{
"type": "Library",
"sleeComponent": {
"name": "SentinelFeaturesCommon",
"vendor": "OpenCloud",
"version": "2.3"
},
"ivyInfo": {
"type": "transitive",
"name": "SentinelFeaturesCommon",
"organisation": "",
"revision": "",
"branch": ""
}
},
{
"type": "Library",
"sleeComponent": {
"name": "SentinelSipFeatureSPI",
"vendor": "OpenCloud",
"version": "2.3"
},
"ivyInfo": {
"type": "transitive",
"name": "SentinelSipFeatureSPI",
"organisation": "",
"revision": "",
"branch": ""
}
},
{
"type": "SBBPart",
"sleeComponent": {
"name": "my-sip-example-mapper",
"vendor": "UNSET",
"version": "1.0"
},
"ivyInfo": {
"type": "direct",
"name": "my-sip-example-mapper",
"organisation": "UNSET",
"revision": "1.0.0-DEV4-davidf",
"branch": "trunk"
}
},
{
"type": "SBBPart",
"sleeComponent": {
"name": "SentinelSipFeatureSPI SBB Part",
"vendor": "OpenCloud",
"version": "2.3"
},
"ivyInfo": {
"type": "transitive",
"name": "SentinelSipFeatureSPI SBB Part",
"organisation": "",
"revision": "",
"branch": ""
}
},
{
"type": "Profile",
"sleeComponent": {
"name": "my-sip-example-profile",
"vendor": "UNSET",
"version": "1.0"
},
"ivyInfo": {
"type": "direct",
"name": "my-sip-example-profile",
"organisation": "UNSET",
"revision": "1.0.0-DEV4-davidf",
"branch": "trunk"
}
}
]
}-
Each outward reference from the component (in this case a Sentinel POJO feature) is listed in the file.
-
The type of reference (e.g. library, profile, sbb part) is indicated in the "type" field.
-
The “sleeComponent” field provided the SLEE Component ID name, vendor, and version.
-
The “ivyInfo” field states whether the dependency is a direct dependency (i.e. directly depended on in the modules ivy.xml file) or transitive.
-
It also lists the Ivy module’s name. In the case that a dependency is a direct dependency, the organisation, revision and branch fields have values.
-
In the example above, it can be seen that the POJO feature has:
-
two library references
-
two SBB part references
-
one profile reference
Required annotations in Sentinel features
Specific annotations are required in Sentinel feature source file(s) for bindings to successfully occur.
Annotations in the feature source are read when a feature is built, and make their way into the bindings meta-data.
These annotations indicate which type of Sentinel service a feature should be bound into.
Sentinel supports two mechanisms for explicitly declaring which Sentinel services a feature should be bound into:
-
@BinderTargets annotations, declaring the targeted Sentinel services, or
-
@LibraryReference and @SBBPartReference annotations on a Sentinel SPI library or SBB part
The binder will consider @BinderTargets annotations first. For features which do not declare a ‘@BinderTargets’ annotation, the binder will choose the target services based on SLEE references to the relevant SPI library/SBB part.
The @BinderTargets annotation
Sentinel supports a ‘@BinderTargets’ annotation for explicitly declaring which Sentinel services a feature should be bound into.
The services attribute contains a list of service target names representing the Sentinel services to bind the feature into.
This table shows how the service target names used in the @BinderTargets annotation map to Sentinel services:
Target service name |
Services to bind into |
ss7 |
sentinel.ss7, sentinel.volte.ss7 |
sip |
sentinel.sip, sentinel.volte.sip, sentinel.ipsmgw |
sip.charge |
sentinel.sip, sentinel.volte.sip |
sip.test |
sentinel.sip, sentinel.volte.sip, sentinel.ipsmgw |
ipsmgw |
sentinel.ipsmgw |
ipsmgw.test |
sentinel.ipsmgw |
diameter |
sentinel.diameter |
ussd |
sentinel.ussd |
registrar |
sentinel.registrar |
core |
sentinel.ss7, sentinel.sip, sentinel.diameter |
ims |
sentinel.volte.sip |
ims.gsm |
sentinel.volte.sip |
mmtel |
sentinel.volte.sip |
mmtel.conference |
sentinel.volte.sip |
scc |
sentinel.volte.sip |
scc.gsm |
sentinel.volte.sip |
scc.cdma |
sentinel.volte.sip |
The following example shows how to use the @BinderTargets annotation to bind MyFeature into both the SIP and SS7 Sentinel services:
@BinderTargets(services = {"sip", "ss7"})
// ...
public class MyFeature {
// ...
}Which annotations to use for each Sentinel service
| Desired Service | Service name | @BinderTargets annotation target service name | SPI annotation |
|---|---|---|---|
Sentinel SIP |
“sentinel.sip” |
sip |
Library reference to “SentinelSipFeatureSPI”, or SBB Part reference to “SentinelSipFeatureSPI SBB Part” |
Sentinel SS7 |
“sentinel.ss7” |
ss7 |
Library reference to “SentinelSs7FeatureSPI”, or SBB Part reference to “SentinelSs7FeatureSPI SBB Part” |
Sentinel Diameter |
“sentinel.diameter” |
diameter |
Library reference to “SentinelDiameterFeatureSPI”, or SBB Part reference to “SentinelDiameterFeatureSPI SBB Part” |
Sentinel Registrar |
“sentinel.registrar” |
registrar |
Library reference to “SentinelRegistrarFeatureSPI”, or SBB Part reference to “SentinelRegistrarFeatureSPI SBB Part” |
The binder will attempt to bind a feature with the above annotations into the particular service or set of services, assuming that those services are deployed. If any of the related services are not deployed, the binder will skip those services and will not treat that situation as an error.
Other annotations needed
Core features
Core features need:
-
a @BinderTargets annotation targeting "core" (e.g.
@BinderTargets(services = "core")); OR -
a Library reference to “SentinelFeatureSPI”; OR
-
an SBB Part reference to “SentinelFeatureSPI SBB Part”
Diameter Mediation features
Diameter Mediation features need:
-
a @BinderTargets annotation targeting "core" (e.g.
@BinderTargets(services = "core"})); OR -
a Library reference to “SentinelDiameterMediationFeatureSPI”; OR
-
an SBB Part reference to “SentinelDiameterMediationFeatureSPI SBB Part”.
Result
These mean that the feature will be bound into any of the following Sentinel services:
-
Sentinel SIP
-
Sentinel SS7
-
Sentinel Diameter
If only Sentinel Diameter is deployed, then such a feature will be bound into Sentinel Diameter.
If both Sentinel SIP and Sentinel Diameter are deployed, then such a feature will be bound into Sentinel SIP and Sentinel Diameter services.
Example required annotations
SIP feature annotations
One of the three annotations is required, either will suffice:
@BinderTargets(services = "sip")
@LibraryReferences(
libraryRefs = {
@LibraryReference(library = @ComponentId(name = "SentinelSipFeatureSPI", vendor = "OpenCloud", version = "@sentinel-sip.component.version@"))
}
)
@SBBPartReferences(
sbbPartRefs = {
@SBBPartReference(id = @ComponentId(name = "SentinelSipFeatureSPI SBB Part", vendor = "OpenCloud", version = "@sentinel-sip.component.version@"))
}
)SS7 feature annotations
One of the three annotations is required, either will suffice:
@BinderTargets(services = "ss7")
@LibraryReferences(
libraryRefs = {
@LibraryReference(library = @ComponentId(name = "SentinelSs7FeatureSPI", vendor = "OpenCloud", version = "@sentinel-ss7.component.version@"))
}
)
@SBBPartReferences(
sbbPartRefs = {
@SBBPartReference(id = @ComponentId(name = "SentinelSs7FeatureSPI SBB Part", vendor = "OpenCloud", version = "@sentinel-ss7.component.version@"))
}
)Diameter feature annotations
One of the three annotations is required, either will suffice:
@BinderTargets(services = "diameter")
@LibraryReferences(
libraryRefs = {
@LibraryReference(library = @ComponentId(name = "SentinelDiameterFeatureSPI", vendor = "OpenCloud", version = "@sentinel-diameter.component.version@"))
}
)
@SBBPartReferences(
sbbPartRefs = {
@SBBPartReference(id = @ComponentId(name = "SentinelDiameterFeatureSPI SBB Part", vendor = "OpenCloud", version = "@sentinel-diameter.component.version@"))
}
)Registrar feature annotations
One of the three annotations is required, either will suffice:
@BinderTargets(services = "registrar")
@LibraryReferences(
libraryRefs = {
@LibraryReference(library = @ComponentId(name = "SentinelRegistrarFeatureSPI", vendor = "OpenCloud", version = "@sentinel-registrar.component.version@"))
}
)
@SBBPartReferences(
sbbPartRefs = {
@SBBPartReference(id = @ComponentId(name = "SentinelRegistrarFeatureSPI SBB Part", vendor = "OpenCloud", version = "@sentinel-registrar.component.version@"))
}
)Core feature annotations
One of the three annotations is required, either will suffice:
@BinderTargets(services = "core")
@LibraryReferences(
libraryRefs = {
@LibraryReference(library = @ComponentId(name = "SentinelFeatureSPI", vendor = "OpenCloud", version = "@sentinel-core.component.version@"))
}
)
@SBBPartReferences(
sbbPartRefs = {
@SBBPartReference(id = @ComponentId(name = "SentinelFeatureSPI SBB Part", vendor = "OpenCloud", version = "@sentinel-core.component.version@"))
}
)Diameter Mediation feature annotations
One of the three annotations is required, either will suffice:
@BinderTargets(services = "core")
@LibraryReferences(
libraryRefs = {
@LibraryReference(library = @ComponentId(name = "SentinelDiameterMediationFeatureSPI", vendor = "OpenCloud", version = "@sentinel-core.component.version@"))
}
)
@SBBPartReferences(
sbbPartRefs = {
@SBBPartReference(id = @ComponentId(name = "SentinelDiameterMediationFeatureSPI SBB Part", vendor = "OpenCloud", version = "@sentinel-core.component.version@"))
}
)Required Ivy dependencies for bindings
Modules must publish their bindings archive to the ‘slee-binding’ Ivy configuration.
When modules depend on other modules, typically they should include the ‘slee-binding’ Ivy configuration in their dependencies. This is so that the binder can traverse a graph of modules, binding all of them.
So for example, in the case of a related set of modules, such as a feature, a profile for configuring that feature, and a library containing shared session state fields, the Ivy dependencies from the feature must contain slee-binding.
Here is an example of a features ivy.xml file where the feature depends on a profile and mapper:
<ivy-module version="2.0" xmlns:e="http://ant.apache.org/ivy/extra">
    <info organisation="${sdk.ivy.org}"
          module="my-sip-example-feature"
          e:sourceurl="${svn.info.url}" e:sourcerev="${svn.info.wcversion}" e:user="${user.name}"
          e:indextags="sip, feature, sbb-part"/>
<configurations>
<conf name="antlib" description="Ant tasks used to build this module" />
<conf name="slee-component" description="SLEE Components published by this module" />
<conf name="api" description="Artifacts needed to compile components using this module" />
<conf name="deploy" description="Deployment artifacts" />
<conf name="doc" description="Documentation source artifacts" />
<conf name="config" description="SLEE component configuration files" />
<conf name="module-pack" description="Module source artifact" />
<conf name="slee-binding" description="SLEE component binding metadata" />
<conf name="provisioning" description="Feature provisioning definitions" />
<conf name="self" description="" visibility="private"/>
<conf name="test" description="" visibility="private"/>
</configurations>
    <publications>
        <artifact name="${ivy.module}"                type="sbbpart"        ext="jar"     conf="slee-component,api"/>
        <artifact name="${ivy.module}-javadoc"        type="javadoc"        ext="zip"     conf="doc"/>
        <artifact name="${ivy.module}-config"         type="config"         ext="zip"     conf="config"/>
        <artifact name="${ivy.module}-provisioning"   type="provisioning"   ext="xml"     conf="provisioning"/>
        <artifact name="${ivy.module}-bindings"       type="binding"        ext="zip"          conf="slee-binding"/>
    </publications>
    <dependencies>
        <dependency org="opencloud"  name="sentinel-sip-support"    rev="${sentinel-sip-support.ivy.revision}" branch="${sentinel-sip-support.ivy.branch}" conf="antlib; self->api" />

        <dependency org="${sdk.ivy.org}"  name="my-sip-example-profile"   rev="latest.${ivy.status}" conf="self,provisioning -> api; slee-component; config; slee-binding"/>
        <dependency org="${sdk.ivy.org}"  name="my-sip-example-mapper"    rev="latest.${ivy.status}" conf="self -> api; slee-component; config; slee-binding"/>
    </dependencies>
</ivy-module>Annotation processing and Rhino bindings
The SLEE annotation processor is executed when a module is built. It produces both component deployment descriptor files, and bindings meta-data files.
It can be configured to generate “outwards” component references in:
-
the component deployment descriptor only
-
the component deployment descriptor, and in the bindings meta-data file
-
the bindings meta-data file only
The Sentinel SDK uses the second of the three options — outwards references in modules are included in both the deployment descriptor and bindings meta-data files.
Sentinel Services themselves are published without any feature or mapper references. This allows features to be added and removed through bindings.
Types of SLEE components that bindings are applied to in the Sentinel SDK
Rhino 2.4.0.x and later enables bindings to be used in place of deployment descriptor references.
| From component type | Reference type | Destination component type |
|---|---|---|
Service |
Root SBB Ref |
SBB |
SBB |
Child SBB Ref |
SBB |
SBB |
SBB Part Ref |
SBB Part |
SBB |
Library Ref |
Library |
SBB |
RA Type Ref |
RA Type |
SBB Part |
Library Ref |
Library |
SBB Part |
RA Type Ref |
RA Type |
SBB Part |
SBB Part Ref |
SBB Part |
Profile Spec |
Profile Spec Ref |
Profile Spec |
Profile Spec |
Library Ref |
Library |
Library |
Library Ref |
Library |
The binder that ships with the Sentinel SDK applies bindings to a subset of those available in the platform. Specifically binding is used in the Sentinel SDK for:
| From component type | Reference type | Destination component type | Purpose |
|---|---|---|---|
SBB |
Child SBB Ref |
SBB |
Support Feature SBBs and OCS drivers being dynamically bound into Sentinel Services |
SBB |
SBB Part Ref |
SBB Part |
Support POJO features and mappers being dynamically bound into Sentinel Services |
SBB Part |
SBB Part Ref |
SBB Part |
Support Features and mappers being dynamically bound into Sentinel Services |
Using the Binder to apply bindings
There are two commands that the binder takes - bind or bind-with-deps.
The bind command attempts to bind a single module, whereas bind-with-deps walks the Ivy dependency hierarchy reading the slee-binding Ivy configuration. Each command may require Rhino to make component copies. The bind-with-deps command will perform multiple bindings within a single 'block of work', and so create only one copy of a Service. Whereas if bind is run many times, then multiple copies may be taken.
Walking the Ivy graph, short cutting when finding a Profile or Library.
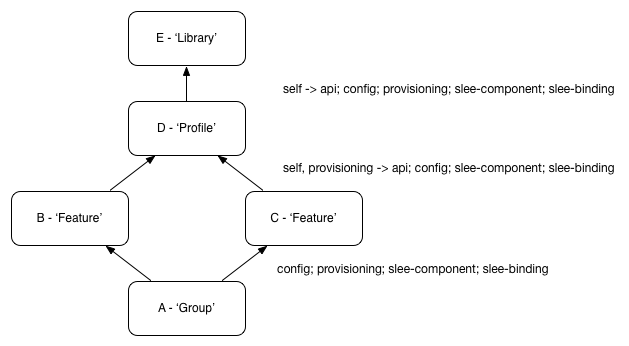
In this dependency graph there are five modules. Starting from the root:
-
Module A - a Group module. This module does not publish any SLEE components. It has Ivy dependencies on two modules, modules B and C.
-
Module B - a Feature module. This module publishes a POJO feature into the slee-component Ivy configuration and bindings meta-data into the slee-bindings Ivy configuration.
It has an Ivy dependency on a Profile module. -
Module C - a Feature module. This module publishes a POJO feature into the slee-component Ivy configuration and bindings meta-data into the slee-bindings Ivy configuration.
It has an Ivy dependency on a Profile module. -
Module D - a Profile module. This module publishes a Profile component into the slee-component Ivy configuration and bindings meta-data into the slee-bindings Ivy configuration.
It has an Ivy dependency on a Library module. -
Module E - a Library module. This module publishes a Library component into the slee-component Ivy configuration and bindings meta-data into the slee-bindings Ivy configuration.
It has no dependencies.
The Ivy configurations as part of the dependencies are shown in text on the diagram, next to the dependency line. The important thing to note is that all modules are using the 'slee-binding' configuration in their dependencies. This means that the binder can traverse the module structure.
Assume that bind-with-deps is invoked pointing to Module A. The binder will read module A and classify it as a group module. It will then look at the dependencies of Module A finding B and C. B and C are analysed as being POJO Feature modules. Their dependencies are followed to module D. This module is a Profile module. The binder does not ask Rhino to apply bindings to Profile modules, so evaluation of Module D is exited and Module D’s dependencies are not analysed.
The binder is able to classify modules based on their publications and dependencies. To see if there are any bindings present the binder scans the publications of the module, looking for a zip file with the filename ending in 'bindings.zip' published with "type=binding" conf of "slee-binding". If there is a bindings archive present, the binder determines the component type by reading the bindings meta-data contained in the archive. In the case that there is no bindings archive present, the binder queries the Ivy dependencies of the component seeing if they have bindings information present. If any module (either directly or indirectly) depended on by this module publishes bindings, then this module has its type set to 'group'.
Common error messages
The following message is output by the binder when a component is of the wrong type to be bound. In this case the module is a profile module.
  [oc:bind] Bind Result:
  [oc:bind]     ---------------------------------------------------------------------
  [oc:bind]     |  Bind result:
  [oc:bind]     ---------------------------------------------------------------------
  [oc:bind]     |  Nothing to report:
  [oc:bind]     ---------------------------------------------------------------------
  [oc:bind]     ---------------------------------------------------------------------
  [oc:bind] All modules bound successfully.
The following error message is output by the binder when a component has not been installed into the Rhino SLEE, but the binder has been asked to bind it.
[oc:bind] Bind Result:
  [oc:bind]     ---------------------------------------------------------------------
  [oc:bind]     |  Bind result:
  [oc:bind]     ---------------------------------------------------------------------
  [oc:bind]     |  Failed modules:
  [oc:bind]     |  UNSET#my-sip-example-feature#trunk;1.0.0-DEV6-davidf
  [oc:bind]     |  |__ ModuleBindResult{resultParts=[bindings installed, bindings failure: Failed to bind module UNSET#my-sip-example-feature#trunk;1.0.0-DEV6-davidf in Rhino.
  [oc:bind]     |      Cause: com.opencloud.sleedeployer.binder.BindingFailedException: Unable to apply bindings to service
  [oc:bind]     |      	at com.opencloud.sleedeployer.binder.InlineModuleBinder.applyBindings(InlineModuleBinder.java:478)
  [oc:bind]     |      	at com.opencloud.sleedeployer.binder.InlineModuleBinder.bindModule(InlineModuleBinder.java:118)
  [oc:bind]     |      	at com.opencloud.sleedeployer.binder.BindingModuleVisitor.applyBindingsToService(BindingModuleVisitor.java:93)
  [oc:bind]     |      	at com.opencloud.sleedeployer.binder.BindingModuleVisitor.preVisitModule(BindingModuleVisitor.java:70)
  ... pruned for verbosity
  [oc:bind]     |      	at org.apache.tools.ant.launch.Launcher.main(Launcher.java:109)
  [oc:bind]     |      Caused by: com.opencloud.rhino.management.BindingVerificationException: Verification error(s) in one or more components:
  [oc:bind]     |        Verification error(s) in binding component BindingDescriptorID[name=my-sip-example-feature-bindings,vendor=UNSET,version=1.0.0-DEV6-davidf]:
  [oc:bind]     |          Referenced SBB part not installed: SbbPartID[name=my-sip-example-feature,vendor=UNSET,version=1.0]
  ... pruned for verbosity
Error messages that are not yet in the doc:
-
No appropriate services installed in Rhino SLEE
-
Component does not participate in Service
Output files when running the Binder
The binder generates Rhino bindings descriptors, and installs them into the Rhino SLEE. These can be located in the target/binder-work/bindings subdirectory.
These files can be viewed in a text editor.
Rhino generated Component copies
When the binder applies bindings in Rhino, Rhino will create copies of components as necessary. If a service is inactive when bindings are about to be applied then Rhino can create the necessary bindings.
An example is shown below. In this example a sip example feature is bound into Sentinel’s SIP Service. The service was inactive at the time bindings ran.
  [oc:bind] Finished processing root modules.
  [oc:bind] Bind Result:
  [oc:bind]     ---------------------------------------------------------------------
  [oc:bind]     |  Bind result:
  [oc:bind]     ---------------------------------------------------------------------
  [oc:bind]     |  Successfully processed modules:
  [oc:bind]     |  UNSET#my-sip-example-feature#trunk;1.0.0-DEV6-davidf
  [oc:bind]     |  |__ ModuleBindResult{resultParts=[bindings installed, bindings applied for service ServiceID[name=sentinel.sip,vendor=OpenCloud,version=2.3], service copied copy source 'ServiceID[name=sentinel.sip,vendor=OpenCloud,version=2.3]', new copy 'ServiceID[name=sentinel.sip,vendor=OpenCloud,version=2.3-copy#1]']}
  [oc:bind]     ---------------------------------------------------------------------
  [oc:bind]     ---------------------------------------------------------------------
  [oc:bind]     |  Created service copies:
  [oc:bind]     |  ServiceID[name=sentinel.sip,vendor=OpenCloud,version=2.3-copy#1]
  [oc:bind]     |  |__ copied from ServiceID[name=sentinel.sip,vendor=OpenCloud,version=2.3]
  [oc:bind]     ---------------------------------------------------------------------
  [oc:bind] All modules bound successfully.
If the service is active at the time bindings are attempted to be applied, Rhino will fail to apply the bindings. The Binder will report an error like the following:
  [oc:bind] Bind Result:
  [oc:bind]     ---------------------------------------------------------------------
  [oc:bind]     |  Bind result:
  [oc:bind]     ---------------------------------------------------------------------
  [oc:bind]     |  Failed modules:
  [oc:bind]     |  UNSET#my-sip-example-feature#trunk;1.0.0-DEV6-davidf
  [oc:bind]     |  |__ ModuleBindResult{resultParts=[bindings failure: Failed to bind module UNSET#my-sip-example-feature#trunk;1.0.0-DEV6-davidf in Rhino.
  [oc:bind]     |      Cause: com.opencloud.sleedeployer.binder.BindingFailedException: Failed to process module UNSET#my-sip-example-feature#trunk;1.0.0-DEV6-davidf, because the fail_if_active strategy was chosen, and the target service ServiceID[name=sentinel.sip,vendor=OpenCloud,version=2.3] was active. Try using the copy_if_active or upgrade_if_active strategies, by setting the Ant property slee.binder.service-strategy. E.g. add this line to your build properties to use the copy_if_active strategy:
  [oc:bind]     |        slee.binder.service-strategy=copy_if_active
The binder has two strategies that it can apply, these are copy_if_active and upgrade_if_active.
-
The copy_if_active strategy creates a copy of the active service, and applies bindings to the copy.
The new service copy remains inactive, and the active version remains active. -
The upgrade_if_active strategy creates a copy of the active service, and applies bindings to the copy.
It then atomically deactivates the active version and actives the new copy.
In order to pass a strategy from the command line use the following command:
ant -Dslee.binder.service-strategy=copy_if_active bind-with-deps
Binder Dry Run
The binder supports a dry-run option that output a list of potential changes the bind commands would have if run without dry-run enabled. This option will have no effect on the state of Rhino.
In order to run the binder with dry-run enabled from the command line use the following command:
ant -Dslee.binder.dry-run=true bind-with-deps
The following message is output by the binder:
  [oc:bind] Finished processing root modules.
  [oc:bind] Bind Result:
  [oc:bind]     ---------------------------------------------------------------------
  [oc:bind]     |  Bind result (dry run mode):
  [oc:bind]     ---------------------------------------------------------------------
  [oc:bind]     |  Successfully processed modules:
  [oc:bind]     |  UNSET#my-sip-example-feature#trunk;1.0.0-DEV6-davidf
  [oc:bind]     |  |__ ModuleBindResult{resultParts=[bindings installed, bindings applied for service ServiceID[name=sentinel.sip,vendor=OpenCloud,version=2.3.2]]}
  [oc:bind]     ---------------------------------------------------------------------
  [oc:bind]     ---------------------------------------------------------------------
  [oc:bind] All modules bound successfully.
Viewing bindings inside Rhino
Once bindings have been successfully applied, the rhino-console program can be used to inspect bindings.
In order to see service copies, use the 'listservices' command. The following output is generated when binding a feature to the "sentinel.sip" service:
[Rhino@localhost (#0)] listservices
ServiceID[name=sentinel.sip,vendor=OpenCloud,version=2.3-copy#1]
ServiceID[name=sentinel.sip,vendor=OpenCloud,version=2.3]
ServiceID[name=sentinel.subscription,vendor=OpenCloud,version=2.3]
| |
There is a service with -copy#1 present. This service copy was created by Rhino when applying bindings. If there have been multiple passes by the binder, there may be many copies present, e.g. 'copy-#2', '-copy#3' and so on. |
The 'getdescriptor' command has been added to enable inspection of components, whether they have bindings applied or not. Rhino terms components that were installed and have not had any bindings applied as "Original components".
Comparing an "Original" service vs a copy is shown below:
[Rhino@localhost (#1)] getdescriptor service name=sentinel.sip,vendor=OpenCloud,version=2.3
For component ServiceID[name=sentinel.sip,vendor=OpenCloud,version=2.3]:
 Deployable unit: DeployableUnitID[url=file:modules/opencloud/sentinel-sip-service-build-2.3.0-TRUNK.0-M2-SNAPSHOT.r87525.jar]
 Component source: service.xml
 Defined using SLEE version: 1.1
 Checksum: 0xc20ac4279fa2c78d3ba1c7fd8a1c72c66a118b11
 Install level: DEPLOYED
 Copies made from this component:
  ServiceID[name=sentinel.sip,vendor=OpenCloud,version=2.3-copy#1]
 Root sbb: SbbID[name=sentinel.sip,vendor=OpenCloud,version=2.3]
 Address profile table: none

 This component is a dependent of: none

[Rhino@localhost (#2)] getdescriptor service name=sentinel.sip,vendor=OpenCloud,version=2.3-copy#1
For component ServiceID[name=sentinel.sip,vendor=OpenCloud,version=2.3-copy#1]:
 Copied from: ServiceID[name=sentinel.sip,vendor=OpenCloud,version=2.3]
 Copy date: Fri Nov 07 14:47:41 NZDT 2014
 Original component: ServiceID[name=sentinel.sip,vendor=OpenCloud,version=2.3]
 Copies made from this component: none
 Install level: VERIFIED
 Root sbb: SbbID[name=sentinel.sip,vendor=OpenCloud,version=2.3-copy#1]
 Address profile table: none

 This component is a dependent of: none
| |
The service with suffix -copy#1 has been copied from the original. The copied service has a different Root SBB than the original. |
The 'getdescriptor' command can again be used to view the descriptors of the original vs copied root SBB.
When inspecting a Sentinel Root SBB,
| |
When POJO features are bound, the new Root SBB has an additional SBB part reference. Each POJO feature has one SBB part reference. When SBB features are bound, each new SBB feature will cause the new Root SBB to have: |
-
a new Child SBB and SBB alias reference, and
-
a new SBB Part reference to the generated 'Feature SBB instantiator'.
The 'Feature SBB instantiator' is a component that is generated by the build system. The reason for its existence is to avoid any reflection during runtime.
Unbinding components
Component binding can be undone. This is referred to as 'unbinding'.
There are two targets to unbind modules, these are unbind and unbind-all.
The unbind target functions on a single module, based on the current working directory.
cd module-dir
ant unbind
Its behaviour is to unapply the bindings from any Services, and then to undeploy the bindings descriptor from Rhino.
The unbind-all target functions on a directory structure of modules, looking for all modules that are located in subdirectories of the current working directory. It then invokes unbind on each. It is often used in conjunction with bind-with-deps for group modules that a user has defined themselves.
cd module-dir
ant unbind-all
Changes in Major Release
3.1.0
Use Extended Tracer in features
Updated Sentinel to use of Extended Tracer Interface (instead of Tracer) in features (VOLTE-8308).
3.0.0
Improved support for multiple home PLMN IDs
Add support for multiple home PLMN IDs spanning multiple MCCs, using the PLMN ID Analyser (VOLTE-7379). The configuration of home MCCs and MNCs has been removed from SipSentinelConfiguration, see the PLMN ID Analyser documentation for more details.
2.9.0
Support for Ro and Rf Failover
Add support for Ro and Rf failover to Sentinel SIP (PRD-1070). This includes:
-
Arming of various charging timers in redundant mode, if the session is replicated. This includes updates to the B2BUA SCUR features.
-
Arming of Session Refresh timers in redundant mode, if the session is replicated.
-
A new SIP Leg Manager API for proxying of requests inside the cluster
-
Updates to the ExternalSessionTracking feature so that it is capable of tracking Ro Dialogs in addition to SIP dialogs, as part of Ro session replication support.
-
Updates to the ExternalSessionTracking feature so that tracked dialogs are linked to the Sentinel Session’s Convergence Name.
-
Updates to the Interim CDR feature to allow Diameter Rf Accounting Requests to continue on the same Rf session after a failover.
Replacement of Sh Cache RA by Sh Cache Microservice
The Sh Cache RA has been removed, and the Sentinel products now use the Sh Cache Microservice 1.0.0.x series.
2.8.0
Removed APIs, Classes, Features, and Configuration
The following session state fields have been deprecated in Sentinel SIP:
-
EarlyMediaAnnouncementQueueinSipPlayAnnouncementFeature.-
Use
EarlyMediaAnnouncementInfoQueueinstead to play early media announcements. -
Use
EarlyMediaAnnouncementInProgressto check whether an early media announcement is in progress.
-
-
MidCallAnnouncementID,MidCallAnnouncementQueue,PAShouldEndSessionWhenFinished, andMidCallAnnouncementPlayedPartyinMidCallPlayAnnouncementFeature.-
Use
MidCallAnnouncementInfoQueueandMidCallEndSessionWithAnnouncementto play mid-call announcements. -
Use
MidCallAnnouncementInProgressto check whether a mid-call announcement is in progress.
-
The following have been removed from Sentinel IPSMGW:
-
ChargingMode enum in ipsmgw-common-session-state, and all uses of it.
-
IpsmgwLegacyCdr feature and ipsmgw-legacy-cdr-format
Comparison: JSLEE Deployment Descriptor References and Rhino Bindings
| |
This page compares JSLEE deployment descriptor references and Rhino bindings. For information on how to use Rhino bindings, refer to Binding components in Rhino. |
Deployment descriptors
Deployment descriptors are generated when components are published. Outward component references in deployment descriptors (e.g. library-ref, profile-spec-ref etc) are fixed at component publish time.
Deployment descriptors (DDs) were originally thought to provide ‘ability for their values to be changed’ but unfortunately the following reasons mean their utility is marginalised:
-
the mechanism used (putting them inside a jar … sometimes jar files are signed)
-
the markup language (XML): Even though many tools exist, XML is not an easy mark-up language to work with
-
the JSLEE specification mandated validation of references as components are deployed
-
This means all bindings are effectively declared at publication time
-
-
the DD file was not the Java source file
-
This is softened originally by XDoclet, and done better through slee-annotations
-
Rhino bindings
Rhino’s bindings capability provides the loose binding capability that DDs never provided.
They can be thought of as like the ‘outwards component references in a DD’ but:
-
they only specify relationships between components
-
are outside the components that are bound together, rather than inside the jar
-
the Rhino SLEE provides additional and enhanced semantics above the JSLEE standard to support bindings
-
are derived from SLEE annotations — so they come from the Java source file
-
use JSON not XML as the markup language
Rhino binding files can provide parity with external references in DDs but they can be:
-
generated or handwritten after a component is published
-
applied inside the SLEE after all relevant components are deployed
In the Sentinel SDK, modules publish binding meta-data:
-
This meta-data includes the same information as the DDP
-
i.e. Component versions are fixed at component publish time in the meta-data
-
-
However, at the time of module binding into Rhino, exact component versions can be changed
Rhino bindings are optional. They are often used in conjunction with JSLEE deployment descriptors.
Configuring Components in Rhino
| |
This section explains the Configurer — what it consists of and how to use it |
What is the Configurer ?
The Configurer is a tool supplied with the Sentinel SDK.
It is able to configure various aspects of the SLEE, including profiles, RA entities, trace levels, etc.
It reads configuration information published by modules and applies it to the SLEE.
Writing configuration
Any module may contain configuration, either for itself or for any other module that it depends on.
Configuration is written in files stored in the ‘config’ subdirectory of a module.
When running publish-local with a default build.xml, the config directory is zipped into a config artifact.
Types of configuration files
There are two types of configuration files:
The ‘config’ directory can contain any number of configuration files/scripts, alongside any number of YAML files.
YAML files
YAML configuration files:
-
have filenames that end in “.yaml”.
-
are written in the YAML language.
-
can state:
-
profile tables to be created
-
profiles to be created
-
profile exports can be referenced from a YAML file (the configurer will import them)
-
RA Entities to be created
-
RA Entity configuration properties
-
services to activate
-
trace levels to set
-
Ant XML files
Ant build files can be used to perform tasks that the YAML configuration is unable to represent.
For example, Ant build files can be used to ‘call out’ some particularly complex configuration to particular programs.
Any Ant build file can be placed in the config directory, or any subdirectory, if it:
-
has a target named "configure", and
-
has a filename that ends in ".ant.xml"
Ordering of configuration
There are cases where configuration needs to be applied in a certain order. For example, a service may specify that it needs certain RA type link names.
Before the service can be activated, suitable RA entities need to be created, configured and have link names bound.
There is an ordering requirement for the following configuration steps:
-
RA entities need to be created.
-
RA entities need to be configured and their link names bound.
-
The service can then be successfully activated.
| |
By default, the configurer will process configuration files in the order they appear on the file system, descending into directories as it encounters them. If a specific order is required (such as in the above case), an order.txt file can be placed in the config directory. Names of files and directories can be listed in this file, one name per line, and the configurer will process them in top to bottom order. |
Ordering of dependencies
When invoked with the ‘configure-with-deps’ target, the configurer traverses each module’s dependencies of each module in a predictable order. By default, the configurer will configure all of a module’s dependencies first. The dependencies are ordered according to their organisations, names, branches and revisions. The configurer will then configure the module itself.
This order can be controlled for a module by setting the ‘e:configureorder’ Ivy attribute in a module’s Ivy descriptor. The ‘e:configureorder’ Ivy attribute contains a comma separated list of module names. Each of the module names corresponds to one of the module’s dependencies, or to the module itself.
In the following example, module my-module declares that my-dependency-1 should be configured first, followed by my-dependency-2, followed by itself.
<ivy-module ...>
    <info module="my-module"
          e:configureorder="my-dependency-1,my-dependency-2,my-module" ...>
          ...
    </info>
    ...
</ivy-module>
Note that specifying the value ‘a,b’ in the ‘e:configureorder’ Ivy attribute of module m does not guarantee that a will be configured before b. For example module b could reached when traversing the graph before module m was visited. The ‘e:configureorder’ attribute only controls the order in which the configurer iterates over `m’s dependencies.
If any of the named modules do not refer to the dependencies of the module or to the module itself, the configurer will log a warning and continue rather than failing.
The ‘e:configureorder’ attribute also affects the traversal order used when generating an ‘order.txt’ file. This affects the ‘create-deployment-module’ and ‘copy-config-dependencies’ sdkadm commands.
Configuration properties
Values in the configuration files can be externalized to a properties file ‘config.properties’ in the ‘config’ directory. When running publish-local with a default build.xml, this properties file is copied into the artifacts directory. It should be published separately from the configuration zip artifact.
Most configure-time properties should be defined in the ‘config.properties’ file. Properties can either be specified with default values (overridable by properties passed to the configurer at configuration time) or with blank values (in which case the configurer will fail unless they are passed in at configuration time).
For more information on how this properties file is used refer to variable substitution
Examples
Resource Adaptor — using YAML
This example shows the syntax for:
-
creating an RA entity (if it does not already exist)
-
setting various RA properties (if they are not already set to the specified values)
-
creating link names (if they do not already exist)
-
activating or de-activating the Resource Adaptor as needed
-
specifying trace levels for the RA entity
!resourceadaptors
sh-cache-ra: # The RA entity name to create or update
    id: # ID (optional) - only required if we're creating a new entity rather than updating an existing one
        name: "sh-cache-ra"
        vendor: "OpenCloud"
        version: "2.0"
    properties: # RA config props to use when creating the RA entity or for updating the existing RA entity with
        DestinationHost: ShHSS
        DestinationRealm: ${domain}
        ConnectTimeout: !long 3000
        ForceReconnectAfterDPR: true
        ReconnectDelay: !long 3000
    links: ["sh-cache-ra"] # array of link names to create for this RA entity if they don't already exist
    state: ACTIVE # optionally specify desired state for this RA entity (ACTIVE|INACTIVE)
    tracers: # optionally specify trace levels for RA entity tracers
        '': Info
In this example the '${domain}' is a variable. For more information on variables refer to variable substitution
Profile — using YAML
This example illustrates syntax for creation of a profile table, with several profiles. A profile export is also imported.
!profiles
${platform.operator.name}_FeatureExecutionScriptTable: # profile table name to create or update
    id: # ID (optional) - only required if we're creating a new profile table rather than just updating profiles in an existing one
        name: "FeatureExecutionScript"
        vendor: "OpenCloud"
        version: "5.0"
    action: null # actions to update or replace the table. Default value "update" will be used if it is "null".
                 #"update": Create table if it doesn't exist, otherwise update/add entries to existing table.
                 #"replace": Create table after first removing existing table if it exists.
    profiles: # profiles specified purely in YAML to create or update
        default_SipAccess_NetworkPreCreditCheck:
            FeatureScriptSrc: featurescript OnNetworkPreCreditCheck { if session.Reoriginated { run DoNotChargeSession } run DetermineCallType run DetermineInitialLegNames }
        default_SipAccess_SubscriberPreCreditCheck:
            FeatureScriptSrc: featurescript OnSubscriberPreCreditCheck { run SubscriberDataLookupFromHss if not feature.endSession { run MMTelCDIV }}
        default_SipAccess_PartyResponse:
            FeatureScriptSrc: featurescript PartyResponse { run MMTelCDIV }
    imports: ["my-feature-scripts.xml", "more-feature-scripts.xml"] # array of profile export files to import into this table
Service and SBB — using YAML
This example shows:
-
setting of a trace level for an SBB within a service
-
setting the desired state of the service to ‘ACTIVE’
!services
? name: sentinel.diameter
    vendor: OpenCloud
    version: '2.3'
:   sbbs:
        ? name: sentinel.diameter
            vendor: OpenCloud
            version: '2.3'
        :   tracers:
                '': Info
    state: ACTIVE
Variable substitution
It’s common to have variables that are part of the configuration. An example is a host name. A module can be configured with a real host name when the system is configured.
Variables are supported by a particular syntax in the YAML configuration files, and are substituted for real values at:
-
build/publication time - any variable able to be resolved to a value at publication time is resolved to a value,
and is published as a constant. I.e. at configuration time it is not a variable.
In order to see whether or not a variable is substituted at publication time, check the target/generated/config directory. -
configuration time - any variable remaining at the time of configuration is substituted when the configurer runs. The configurer fails with an error message if a variable is un-substitutable.
An example of a variable named ‘myvariable’ is as follows:
${myvariable}
A variable can have any valid Java property name.
Variables are defined in:
-
the SDK’s sdk.properties file (located in the root of a Sentinel SDK). This is best used for variables used by multiple modules in a project.
Any variable defined in this file is never substituted at publication time.
-
the module’s own module.properties file (located in the module’s base directory). This is most appropriate for variables for a particular module.
This is only read at publication time.
-
component ID’s of modules that this module depends on - these are visible in the target/generated/module.properties file.
This is only read at publication time.
-
an optional config.properties file published by the module - these are used as default values and as a way of documenting the configuration properties used/required by the module.
This is only read at configuration time.
The variables themselves are also Ant properties. Therefore any Ant property passed into the configurer using Ant’s -D mechanism is available for substitution.
E.g. in the following configurer invocation the ‘db.type’ property is passed in, with the value ‘postgres’.
ant -Ddb.type=postgres configure-with-deps
The following table summarises configuration variable substitution:
| File name | Substituted at build/publication or configuration time |
|---|---|
module.properties, in the module |
build/publication time |
target/generated/module.properties, in the module |
build/publication time |
config.properties, published by the module |
configuration time |
sdk.properties, in the root of the SDK |
configuration time |
Ant variables passed into the configurer |
configuration time |
Types
Components in the SLEE have attributes that are configured. These attributes are typed in the Java language.
When an attribute is specified in a YAML file, the configurer does a ‘best guess’ at which Java type the attribute has. If this is incorrect, then the configurer will fail to apply the configuration into the SLEE — the SLEE will complain about an ‘Attribute type mismatch’.
When this occurs, the YAML file needs altering, so that the specific Java type is explicitly defined.
The configurer supports the following types:
| Java type | Syntax in YAML file |
|---|---|
primitive long, or java.lang.Long |
attributeName: !long 1234567890 |
primitive int, or java.lang.Integer |
attributeName: 42 |
primitive byte, or java.lang.Byte |
the decimal, hexadecimal (prefixed with 0x, 0X, or #), or octal (prefixed with 0) value of the byte |
primitive short, or java.lang.Short |
the decimal, hexadecimal (prefixed with 0x, 0X, or #), or octal (prefixed with 0) value of the short |
String |
attributeName: "Hello World" |
javax.slee.profile.ProfileID |
A reference to a profile |
For attribute values in profiles, you can also just leave the value as a plain string and an attempt will be made to convert it to the type specified for that attribute in the profile table.
If you do need to construct other Java types, you can specify the full class name before the value as long as the class has an appropriate constructor.
For any Java class that has a String constructor, you can use !!com.package.ClassName "string value" to construct the type.
For a Java class that has a multi-value constructor, like SomeClass(String arg1, String arg2, int arg3), you can use !!com.package.SomeClass ["value1", "value2", 1].
Array types
Various SLEE components may include arrays as their configuration data. E.g. a Resource Adaptor may represent the list of IP addresses to listen on as an array of type String. Therefore the YAML format for configuration supports some array types.
# to represent a Java String[]
!array { type: 'java.lang.String', values: ['stringVal1', 'stringVal2'] }

# to represent a Java int[]
!array { type: 'int', values: [1, 2, 3] }

# to represent a Java ProfileID[]
!array { type: 'javax.slee.profile.ProfileID', values: ['table1/profileA', 'table2/profileB'] }
Applying configuration
Configuration commands
The configurer tool has two commands to install configuration:
-
configure — applies configuration in the single module’s config.zip publication
-
configure-with-deps — walks the Ivy dependencies of the module, applying their configuration first, then applying the module’s configuration.
Configuration and Ivy dependencies
| |
The configure-with-deps command always configures ‘top down’ from a dependency hierarchy perspective. That is, it walks to a module that has no config dependencies, and considers this a root module. It applies configuration in that root module then moves down one level in the hierarchy. Once all ‘parents’ of a module have had their configuration applied, the module itself has its configuration applied. Each time the configure-with-deps command runs it keeps a list of visited modules to avoid looping over a cycle in a dependency graph. |
An example dependency hierarchy is shown:
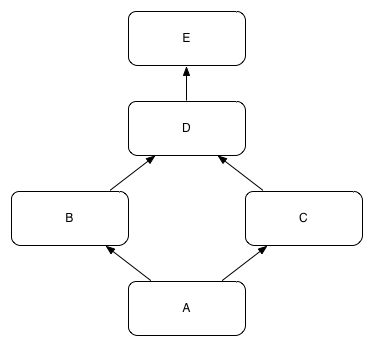
In this example there are five modules; A, B, C, D and E. Module A depends on module B and C. Modules B and C depend on module D. Module D depends on module E.
All dependencies are on the ‘config’ Ivy configuration.
An excerpt from module A’s ivy.xml file would look like this:
<info organisation="example"
          module="A"/>
<publications>
        <artifact name="${ivy.module}-config"         type="config"         ext="zip"     conf="config"/>
        <artifact name="${ivy.module}-config"         type="properties"                   conf="config"/>
</publications>
<dependencies>
    <dependency org="example"  name="B"   rev="latest.${ivy.status}" conf="config" />
    <dependency org="example"  name="C"   rev="latest.${ivy.status}" conf="config"/>
</dependencies>
Note the ‘conf="config"’ portion of each dependency. This declares that module A depends on the ‘config’ Ivy configuration (conf) for modules B and C. Similarly the dependencies throughout the tree are on “config”.
Module E is a root module, as it has no “config” dependencies on other modules. This could mean either:
-
it has no dependencies at all, or
-
it has dependencies on other modules, however it does not have dependencies on their "config" conf’s
When configure-with-deps runs, configuration is applied in one of two orders:
-
E
-
D
-
either B or C
-
either C or B (the one that was not chosen in step 3 is chosen for step 4)
-
A
Other Ivy dependency details
In order to traverse from A to E, dependencies on the “config” conf must be declared through the dependency hierarchy. If they do not, then the configurer will not be able to traverse the entire hierarchy. This is because a module that does not have a dependency on the “config” conf of another module is considered a root module from the perspective of the configurer.
Modules may have a “config” dependency on another module, even if they do not publish any configuration themselves.
Configuration tips and tricks
It is good practice to include a valid configuration in any Profile or RA module. Typically this is intended as an example.
If it is desirable to re-use a particular module (e.g. a particular feature or profile is useful) but its configuration is not useful, then:
-
do not put a 'config' dependency on that module from the module in question
-
its config artifacts can be copied into another module’s config directory — and then modified as suitable using the sdkadm copy-config command
Overriding a dependency
Consider the following dependency hierarchy:
Imagine that the following publications exist:
| Module Name | Published Revision | Dependency Module and Revision | Dependency Module and Revision |
|---|---|---|---|
E |
1.0 |
N/A |
N/A |
E |
1.1 |
N/A |
N/A |
D |
1.0 |
E revision 1.0 |
N/A |
C |
1.0 |
D revision 1.0 |
N/A |
B |
1.0 |
D revision 1.0 |
N/A |
A |
1.0 |
B revision 1.0 |
C revision 1.0 |
There are two published revisions of Module E, 1.0 and 1.1. When configuring module A, using configure-with-deps, configuration from revision 1.0 of module E will be applied. This is because the published dependencies from module A through to E were published depending on E revision 1.0.
Assume that there are some enhancements to Module E’s configuration (in revision 1.1), and that it is desirable to configure a system with those changes.
Either, all modules that directly and indirectly (transitively) depend on E need to be re-published, with updated version numbers, or an Ivy override used. It is more common to re-publish than use Ivy override during development. However sometimes an override is desirable.
To override module E version 1.0 so that it is 1.1 there are two mechanisms that can be used:
-
create a new module that depends on module A and includes the config dependency, and an override
-
alter the ivy.xml file in module A, and include an override
Using the second approach, the ivy.xml file for module A might look like:
<info organisation="example"
          module="A"/>
<publications>
        <artifact name="${ivy.module}-config"         type="config"         ext="zip"     conf="config"/>
</publications>
<dependencies>
    <dependency org="example"  name="B"   rev="latest.${ivy.status}" conf="config"/>
    <dependency org="example"  name="C"   rev="latest.${ivy.status}" conf="config"/>
    <override   org="example"  module=E"  rev="1.1" />
</dependencies>
Deploying Components in Rhino
| |
This section explains the Deployer — what it consists of and how to use it |
What is the Deployer?
The Deployer is a tool supplied with the Sentinel SDK.
It is able to deploy artifacts stored in a repository into the Rhino SLEE. The SLEE deployer is an Ivy-based tool for deploying SLEE components into a Rhino SDK or Rhino cluster.
It takes a set of modules to deploy as input, and deploys the module and its dependencies into Rhino.
It expects Ivy modules to publish SLEE components, related artifacts and dependencies according to a convention, detailed further below.
Ivy module conventions
The SLEE deployer expects Ivy modules which follow a convention.
Seven module structures
There are seven module structures supported by the SLEE deployer.
1. SLEE component jar module
The module must publish exactly one SLEE component jar artifact (e.g. my-events.jar) in the ‘slee-component’ Ivy configuration.
The SLEE component jar must contain exactly one SLEE component, with the exception of event type jars which can contain multiple event types.
It may also publish an optional ‘component-ids.xml’ artifact in the ‘slee-component’ Ivy configuration. This makes some cases more efficient.
| |
It must not publish any other artifacts in the ‘slee-component’ Ivy configuration, and must publish no artifacts in the ‘deploy’ configuration. |
2. SLEE service module
The module must publish exactly one ‘service.xml’ artifact in the 'slee-component' Ivy configuration.
It may also include an optional ‘oc-service.xml’ artifact in the ‘slee-component’ Ivy configuration.
It may also publish an optional 'component-ids.xml' artifact in the 'slee-component' Ivy configuration.
| |
It must not publish any other artifacts in the ‘slee-component’ Ivy configuration, and must publish no artifacts in the ‘deploy’ configuration. |
3. Deploy script module
This option exists for modules which need to deploy SLEE artifacts, but which don’t fit the ‘SLEE component jar module’ or ‘SLEE service module’ structures.
The module must publish one ‘component-ids.xml’ file in the ‘deploy’ Ivy configuration.
The module must publish one ‘deploy.xml’ file in the ‘deploy’ Ivy configuration. This must be an Ant file which defines a ‘deploy’ target and an ‘undeploy’ target. The Ant file must be structured in such a way that it can run when invoked inside an arbitrary directory alongside the other artifacts in the ‘deploy’ Ivy configuration. See Deployment scripts for an example.
The module must publish any other required artifacts in the ‘deploy’ configuration, e.g. ‘my-complex-application.zip’. These artifacts will be placed in the same directory as the 'deploy.xml' file prior to invoking the 'deploy' or 'undeploy' targets.
| |
It must not publish any artifacts in the ‘slee-component’ Ivy configuration. |
4. Group module
A group module publishes no artifacts in either the ‘slee-component’ Ivy configuration or the ‘deploy’ Ivy configuration, but has dependencies in at least one of those configurations.
5. Deployment module
A deployment module is a special case of a group module. It has dependencies on all of the modules that together constitute a complete product, and also contains configuration that was copied from the dependencies at deployment module creation time. This configuration can be used to override the default configuration from the dependencies. Deploying such a deployment module will result in a ready-to-use product installation.
Note that the distinction between a group module and a deployment module is purely based on the way it is used, as they are functionally equivalent. A deployment module is simply a top-level group module that is meant for deploying and configuring a complete product.
File format for the ‘component-ids.xml’ file
This is an XML file with a top level ‘component-ids’ element. It contains multiple component ID entries, based on the same format used in the deployment descriptor XML files associated with each component type.
An example is as follows:
    <component-ids>
        ...
        <event-definition>
            <event-type-name>org.acme.RocketLaunched</event-type-name>
            <event-type-vendor>acme.org</event-type-vendor>
            <event-type-version>1.0</event-type-version>
        </event-definition>
        ...
    </component-ids>
Deployment scripts
Deployment scripts are Ant build files with the specific name of deploy.xml and two required targets, deploy and undeploy. They allow arbitrarily complex deployment actions to be performed.
An example is as follows, from the CDR RA deployment module:
    <?xml version="1.0" encoding="UTF-8"?>

    <project name="Sentinel CDR RA deployment" default="deploy">
        <import file="${client.home}/etc/common.xml"/>

        <target name="deploy" description="Deploy CDR resource adaptor" depends="login">
            <slee-management>
                <install srcfile="${basedir}/cdr-ra.du.jar" url="file:@basename.slee-component.cdr-ra.du.jar@"/>
            </slee-management>
        </target>

        <target name="undeploy" description="Undeploy CDR resource adaptor" depends="login">
            <slee-management>
                <cascadeuninstall url="file:@basename.slee-component.cdr-ra.du.jar@"/>
            </slee-management>
        </target>

    </project>
Dependencies between module types
This section describes Ivy dependencies between different types of modules, such that the deployer can follow all suitable dependencies. The Ivy configuration in a dependency (the ‘conf=’ portion) is important to the deployer.
| |
These are the minimum Ivy configurations so that the module can compile and be deployed. Additional Ivy configurations than those mentioned here are almost certainly used in a project. For example, the Binder and Configurer use additional Ivy configurations. |
SLEE component jar module dependencies
SLEE component jar modules are the most common type of module, and are the recommended type of module for any new development.
The most important part of the dependencies shown is the ‘conf=’ portion.
From SLEE component jar module to SLEE component jar module
    <dependencies>
        <dependency org="rocket"  name="slee-component-module-B"   rev="latest.${ivy.status}" conf="self -> api; slee-component;"/>
        <dependency org="rocket"  name="slee-component-module-C"   rev="latest.${ivy.status}" conf="self -> api; slee-component;"/>
    </dependencies>
From SLEE component jar module to deployable unit jar module
    <dependencies>
        <dependency org="rocket"  name="deployable-unit-module-A"   rev="latest.${ivy.status}" conf="self -> api; slee-component -> du;"/>
        <dependency org="rocket"  name="deployable-unit-module-B"   rev="latest.${ivy.status}" conf="self -> api; slee-component -> du;"/>
    </dependencies>
From SLEE component jar module to deploy script module
    <dependencies>
        <dependency org="rocket"  name="deploy-script-module"   rev="latest.${ivy.status}" conf="self -> api; slee-component;"/>
    </dependencies>
From SLEE component jar module to Group module
    <dependencies>
        <dependency org="rocket"  name="group-module-A"   rev="latest.${ivy.status}" conf="self -> api; slee-component;"/>
        <dependency org="rocket"  name="group-module-B"   rev="latest.${ivy.status}" conf="self -> api; slee-component;"/>
    </dependencies>
Group module dependencies
Group modules are often created to group together logically related modules.
Group modules depend on the related modules. Group modules often have no source code, and so do not need to compile anything. Therefore the “api” conf is not used.
From group module to slee-component module
    <dependencies>
        <dependency org="rocket"  name="slee-component-module-B"   rev="latest.${ivy.status}" conf="slee-component;"/>
        <dependency org="rocket"  name="slee-component-module-C"   rev="latest.${ivy.status}" conf="slee-component;"/>
    </dependencies>
From group module to deployable unit module
    <dependencies>
        <dependency org="rocket"  name="deployable-unit-module-A"   rev="latest.${ivy.status}" conf="slee-component -> du;"/>
        <dependency org="rocket"  name="deployable-unit-module-B"   rev="latest.${ivy.status}" conf="slee-component -> du;"/>
    </dependencies>
From group module to deployment script module
    <dependencies>
        <dependency org="rocket"  name="deploy-script-module"   rev="latest.${ivy.status}" conf="slee-component;"/>
    </dependencies>
Deployable unit module dependencies
Deployable unit modules are sometimes used, due to the restriction of 1 slee-component being allowed in a slee-component module.
The most important part of the dependencies shown is the "conf=" portion.
From deployable unit module to slee-component module
    <dependencies>
        <dependency org="rocket"  name="slee-component-module-B"   rev="latest.${ivy.status}" conf="self -> api; du -> slee-component;"/>
        <dependency org="rocket"  name="slee-component-module-C"   rev="latest.${ivy.status}" conf="self -> api; du -> slee-component;"/>
    </dependencies>
From deployable unit module to deployable unit module
    <dependencies>
        <dependency org="rocket"  name="deployable-unit-module-A"   rev="latest.${ivy.status}" conf="self -> api; du;"/>
        <dependency org="rocket"  name="deployable-unit-module-B"   rev="latest.${ivy.status}" conf="self -> api; du;"/>
    </dependencies>
From deployable unit module to deploy script module
    <dependencies>
        <dependency org="rocket"  name="deployscript-module"   rev="latest.${ivy.status}" conf="du -> slee-component;"/>
    </dependencies>
Using the deployer
The deployer is able to deploy a single module, or an entire dependency tree of modules.
Deploying a single module
When the deployer is invoked with the ‘deploy’ target, it attempts to deploy just that one module into the Rhino SLEE. The module is based on the current working directory.
cd module-dir
ant deploy
Any properties needed by a module can be passed in using the -Dpropertyname=propertyvalue syntax of Ant.
ant -Dsomeproperty=value deploy
Prior to deploying the module it:
-
analyzes the publications of the module, to attempt to classify the module
-
downloads any necessary artifacts from the module into the target/deployer-work directory, based on the module’s classification.
-
analyses the downloaded artifacts
-
checks whether or not the module has been deployed into the Rhino SLEE
-
if the module has not already been deployed it attempts to deploy it
-
prints a summary
Deploying many modules
When the deployer is invoked with the ‘deploy-with-deps’ target, it attempts to deploy all modules in the Ivy dependency tree that are not yet installed in the Rhino SLEE. The Ivy dependency tree begins from the module in the current working directory.
cd module-dir
ant deploy-with-deps
Any properties needed by any module in the dependency tree can be passed in using the -Dpropertyname=propertyvalue syntax of Ant.
ant -Dsomeproperty=value deploy-with-deps
This is achieved through the use of the Ivy dependencies between modules.
The deployer first checks the immediate dependencies of a module, and selects dependencies that have suitable Ivy configurations. For each of those immediate dependencies (let’s call each dependency a parent module), it:
-
analyzes the publications of the parent module, to attempt to classify the module
-
downloads any necessary artifacts from the module into the target/deployer-work directory, based on the parent module’s classification.
-
analyses the downloaded artifacts
-
checks whether or not the parent module has been deployed into the Rhino SLEE
-
if the parent module has not been installed in the SLEE it applies the same process to that parent modules dependencies (if there are any)
-
if all parent modules either do not have any dependencies, or have nothing to install, or are installed then the 'child' module is analyzed for install purposes.
In this manner the deployer is able to be invoked multiple times, only deploying modules that need deployment.
Ordering of dependencies
When invoked with the ‘deploy-with-deps’ target, the deployer traverses each module’s dependencies of each module in a predictable order. By default, the deployer will deploy all of a module’s dependencies first. The dependencies are ordered according to their organisations, names, branches and revisions. The deployer will then deploy the module itself.
This order can be controlled for a module by setting the ‘e:deployorder’ Ivy attribute in a module’s Ivy descriptor. The ‘e:deployorder’ Ivy attribute contains a comma separated list of module names. Each of the module names corresponds to one of the module’s dependencies, or to the module itself.
In the following example, module my-module declares that my-dependency-1 should be deployed first, followed by my-dependency-2, followed by itself.
<ivy-module ...>
    <info module="my-module"
          e:deployorder="my-dependency-1,my-dependency-2,my-module" ...>
          ...
    </info>
    ...
</ivy-module>
Note that specifying the value ‘a,b’ in the ‘e:deployorder’ Ivy attribute of module m does not guarantee that a will be deployed before b. For example module b could reached when traversing the graph before module m was visited. The ‘e:deployorder’ attribute only controls the order in which the deployer iterates over `m’s dependencies.
If any of the named modules do not refer to the dependencies of the module or to the module itself, the deployer will log a warning and continue rather than failing.
Temporary work directory
The deployer creates a directory named target/deployer-work for all temporary work. This directory is used for downloading artifacts needed for analysis and deployment.
The directory is deleted after a successful deploy. If the deploy fails, then the remainder is left on disk for diagnostic purposes.
Versioning checking during deployment
When a module is published, its dependencies are published along with it.
Assume that there are the following modules:
-
a group module
-
a feature module
-
a mapper module
-
a profile module
The group module depends on the feature module. The feature module depends on both the mapper and profile modules.
When all modules are built, the ‘publish-local-branch’ target is used.
The first time ‘publish-local-branch’ target is used, the following is published
| Module | Published revision | Dependency A name and revision | Dependency B name and revision |
|---|---|---|---|
group |
1.0.0-DEV0 |
feature revision 1.0.0-DEV0 |
N/A |
profile |
1.0.0-DEV0 |
N/A |
N/A |
mapper |
1.0.0-DEV0 |
N/A |
N/A |
feature |
1.0.0-DEV0 |
profile revision 1.0.0-DEV0 |
mapper revision 1.0.0-DEV0 |
When the deployer reads the published group module or feature module it will retrieve revision 1.0.0-DEV0, and follow the dependencies to published revision 1.0.0-DEV0 of the appropriate module.
Then, if all modules are rebuilt, again using the publish-local-branch target, the following is published (previous publications still exist too):
| Module | Published revision | Dependency A name and revision | Dependency B name and revision |
|---|---|---|---|
group |
1.0.0-DEV1 |
feature revision 1.0.0-DEV1 |
N/A |
profile |
1.0.0-DEV1 |
N/A |
N/A |
mapper |
1.0.0-DEV1 |
N/A |
N/A |
feature |
1.0.0-DEV1 |
profile revision 1.0.0-DEV1 |
mapper revision 1.0.0-DEV1 |
Next, if some logic is changed in the profile module, then only the profile module is built via publish-local in the profile module, the new revisions would be:
| Module | Published revision | Dependency A name and revision | Dependency B name and revision |
|---|---|---|---|
group |
1.0.0-DEV1 |
feature revision 1.0.0-DEV1 |
N/A |
profile |
1.0.0-DEV2 |
N/A |
N/A |
mapper |
1.0.0-DEV1 |
N/A |
N/A |
feature |
1.0.0-DEV1 |
profile revision 1.0.0-DEV1 |
mapper revision 1.0.0-DEV1 |
When the deployer reads the latest integration of the feature publication, it will see that it depends on profile revision 1.0.0-DEV1, not profile revision 1.0.0-DEV2. So it would have to deploy profile revision 1.0.0-DEV1. This would likely cause confusion, as the changes to the profile would have not taken effect!
This is almost certainly not the desired result (after publishing some changes to the profile).
To avoid this situation, by default the deployer checks that the dependent revision of a module is also the most recently published revision of that module. If those two revisions are not equal, it will not deploy anything into Rhino.
Here’s what the error message looks like:
[oc:deploy] Deployment Result:
[oc:deploy]     ---------------------------------------------------------------------
[oc:deploy]     |  Deploy result:
[oc:deploy]     ---------------------------------------------------------------------
[oc:deploy]     |  Failed Modules:
[oc:deploy]     |  rocket#my-sip-example-profile#trunk;1.0.0-DEV1-testuser
[oc:deploy]     |  |__ Module has a newer revision available in 'latest.integration': '1.0.0-DEV2-testuser'.
[oc:deploy]     ---------------------------------------------------------------------
To override this behaviour, add the -Ddeployer.latest-revision-checks.enabled=false to the ‘deploy’ or ‘deploy-with-deps’ target:
ant -Ddeployer.latest-revision-checks.enabled=false deploy-with-deps
Undeploying modules
In order to undeploy a module, the ‘undeploy’ target is used. This task uninstalls components in Rhino which were deployed from the module in the current working directory. It sorts the components by their dependencies in Rhino, in order to uninstall downstream components before upstream components. E.g. if a profile depends on a library, it will uninstall the profile first. It will fail if there are any downstream dependencies, e.g. if attempting to uninstall a library which another component depends on. It prompts the user for verification before it uninstalls any components.
cd module-dir
ant undeploy
In order to undeploy a group of modules, rooted from the current directory, the ‘undeploy-all’ task is used. This task finds all Ivy modules on disk, in the current directory and all sub-directories. It then undeploys all of those modules, after sorting the components by their dependencies inside Rhino. This is often used in conjunction to the ‘deploy-with-deps’ target.
cd module-dir
ant undeploy-all
Interaction with the binder
The undeploy and undeploy-all targets will not remove components if there are other components which depend on them. Therefore, if a Service or SBB depends on a feature, then an attempt to undeploy the feature will fail.
It is recommended to unbind (either through unbind or unbind-all) prior to undeploying.
Feature Provisioning
| |
This section explains how feature provisioning works in the Sentinel IP-SM-GW SDK. |
Introduction to feature provisioning in the Sentinel IP-SM-GW SDK
Features with standard profile-based data can be configured (provisioned) using the Sentinel IP-SM-GW REST API or web UI. These are provided by the Sentinel IP-SM-GW Element Manager REM plugin. This includes any custom configuration or address lists the features may use.
See Provisioning in the Sentinel IP-SM-GW Administration Guide.
Dynamic discovery of feature provisioning
Java annotations on the feature source are used to define exactly what can be configured for each feature. When modules are built, the provisioning annotations are processed by the sentinel-feature-annotation-processor.
The provisioning metadata is registered with Sentinel IP-SM-GW when the service in which the feature is bound gets activated. This metadata is then queried dynamically at runtime by the provisioning system to produce the REST API and web interface.
So, for a feature to have a REST API and web interface made available it must:
-
have been built with the appropriate provisioning annotations on its feature class
-
have been deployed into Rhino and bound into one of the main Sentinel services
-
have had that service activated
Legacy feature provisioning
In previous versions of Sentinel IP-SM-GW, each feature with provisionable configuration had to publish a provisioning.xml file. That file was then used at built time of the Sentinel IP-SM-GW Element Manager to generate the REST API and web UI for that feature. This approach required a rebuild and reinstall of the Sentinel IP-SM-GW Element Manager REM plugin every time the provisioning metadata was changed. The provisioning.xml approach is still supported for backward compatibility, but the new annotation-based approach is to be preferred.
Converting features with legacy provisioning to annotations
A tool has been provided to automatically convert any existing features using the old provisioning.xml files to use the new annotation-based approach. To install the tool, run the Ant build target install-provisioning-annotations-converter under the ipsmgw-sdk/tools directory and follow the printed instructions.
| |
For more about feature annotations, see: Also, the Creating a feature section includes inline source code for several modules. These include provisioning annotations. |
| |
This section explains the Java annotations used when developing with the Sentinel IP-SM-GW SDK. |
Background on annotations in the Sentinel IP-SM-GW SDK
Java annotations are used to define component metadata. When modules are built, the annotations are processed by the slee-annotation-processor. All OpenCloud annotations are scoped to the class file, that is, they exist in both the source file and the Java compiler-generated class files. Therefore, they can be inspected by various tools that operate on class files.
In the Sentinel IP-SM-GW SDK Java annotations are used to produce
-
JSLEE standard deployment descriptor files
-
OpenCloud extended deployment descriptor files
-
OpenCloud Sentinel JSON bindings metadata files
-
OpenCloud Sentinel provisioning metadata
-
OpenCloud Sentinel metadata files.
All of the above files are produced by the default build.xml when a module is compiled.
Variables in annotation source code
The annotation processor supports the use of variables in Java annotations. The variables are substituted to values at build time. The source code for the annotation includes the variable; whereas the class file contains the variable translated into a constant. Annotation variables are always quoted, and begin and end with the @ character.
Here’s an example of a variable, the VariableVersion:
@LibraryReference(library = @ComponentId(name = "ExampleLibrary", vendor = "ExampleVendor", version ="@VariableVersion@"))
If variables cannot be substituted, the annotation processor fails at compile time, noting the name of the unsubstituted variable.
SLEE annotations
SLEE annotations provide functionality for developing SLEE components, covering the JSLEE 1.1 specification, and OpenCloud extensions.
See the SLEE Annotations Javadoc.
Sentinel annotations
Sentinel annotations provide functionality for developing Sentinel components. Sentinel components are also SLEE components, so the SLEE Annotations Javadoc is a useful source (see above).
See the Sentinel Annotations Javadoc.
Setting up your IDE to view annotations
The most productive way to view the content of annotations is to view them inside an IDE that supports Java annotations.
If you are an Eclipse user, type ant eclipse-setup in the root of your SDK. Then, each time you add a module, type ant eclipse-setup in the root again. Dependency discovery for the generated Eclipse project requires the SDK to have been fully built with ant publish-local in the root of the SDK.
If you are an Idea user, type ant idea-setup in the root of your SDK. Then, each time you add a module, type ant idea-setup in the root again.
To view annotation content without using an IDE, please refer to the Javadoc.
Examples of annotations in real modules
The Sentinel IP-SM-GW SDK includes several features, libraries, profiles, and so one throughout its module packs. To view available module packs, use the sdkadm command, and type
list-modules +module-pack
You can create modules from different module packs using the create-module command within sdkadm; and then look at the contents of the various src directories.
| |
For more about modules, see Modules in the Sentinel IP-SM-GW SDK Also, the Creating a feature section includes inline source code for several modules. These include annotations. |
| |
This section explains Modules Packs — what they are and how to create them. |
What is a Module Pack
A module pack is a package that contains one or more modules, that can be used as a template for creating new modules with the create-module command.
Module packs are built to support renaming of their components both at the ivy module level and the Sentinel component level (i.e. feature/mapper names). They also support Java package renamespacing. In simple cases support for this is automatic, however in specialised cases a special transformation plugin will be required to create the module pack.
Module Pack Structure
Module packs are simply zip files containing ordinary Sentinel SDK modules. The top level directory within a module pack may or may not contain an SDK module, and can include any number of nested sub-folders that themselves have SDK modules within.
These are some examples of what can be in a module pack:
 my-module-pack.zip
  ├─ src/
  │  └─ ...
  ├─ ivy.xml
  ├─ build.xml
  └─ module.properties
 my-module-pack.zip
  ├─ feature1
  │  ├─ src/
  │  │  └─ ...
  │  ├─ ivy.xml
  │  ├─ build.xml
  │  └─ module.properties
  └─ feature2
     ├─ src/
     │  └─ ...
     ├─ ivy.xml
     ├─ build.xml
     └─ module.properties
 my-module-pack.zip
  ├─ src/
  │  └─ ...
  ├─ ivy.xml
  ├─ build.xml
  ├─ module.properties
  ├─ profile
  │  ├─ src/
  │  │  └─ ...
  │  ├─ ivy.xml
  │  ├─ build.xml
  │  └─ module.properties
  └─ library
     ├─ src/
     │  └─ ...
     ├─ ivy.xml
     ├─ build.xml
     └─ module.properties
Using Module Packs
Viewing Available Module Packs
A list of available module packs can be viewed in sdkadm by using the list-modules command, specifying the module-pack tag:
> list-modules +module-pack
This will show all of the currently indexed module packs.
Creating Modules from Module Packs
Creating new modules from module packs is done with the create-module command in the sdkadm, specifying a directory to place the new modules in, and the ID of the module pack to use:
> create-module new-module-dir opencloud#sentinel-sip-example#sentinel-sip/{majorversion};{majorversion}.{minorversion}
Alternatively you can specify a module pack file instead of a module ID:
> create-module new-module-dir /path/to/module-pack.zip
This is useful if you have module pack file that you want to use, but it is not indexed.
For more details on how to use the create-module command, see: Creating a new module.
Creating a Module Pack
The number of steps required to create a module pack increases with the complexity of the module pack. This section will outline how to set up a basic module pack, and then move on to cover additional steps required for various cases.
Special Requirements for Module Packs
Due to the way module packs are handled in sdkadm, there can be special requirements for any source code that is to be included in a module pack. These requirements are enforced when the module pack is built, if the module pack fails to meet them, then the build will fail. It is possible to disable to build-time enforcement of requirements by setting the following Ant property when building the module pack:
module.pack.verify.disabled=true
Currently there is only one enforced requirement, outlined below.
Wildcard Imports
Currently the only requirement on module pack source is that wild-card import statements be avoided (i.e. import statements ending with a *). This is necessary as wildcard imports creates ambiguities that can interfere with module pack renamespacing.
So avoid statements like this:
import com.mysdk.feature.*;Instead, use explicit imports:
import com.mysdk.feature.FeatureClass;
import com.mysdk.feature.FeatureConfig;
import com.mysdk.feature.FeatureStats;
Publishing the Module Pack
In the most basic case, creating a module pack from a module requires only a few modifications to the original module in order to get it to publish a module pack file:
1. Add a new artifact to the publications in the module’s ivy.xml
The new artifact is required to have have type="module-pack", ext="zip", and conf="module-pack"; and conventionally should have name="${ivy.module}-module-pack".
So the new publication should look like this:
<artifact name="${ivy.module}-module-pack" type="module-pack" ext="zip" conf="module-pack"/>
2. Ensure that <default-package-module-pack/> is included in the build.xml for the module
It should be placed within the do-build target. It is often included in the build.xml for a module regardless of whether the module actually publishes a module pack, so it may already be present.
An example of a typical do-build target with module pack support:
<target name="do-build">
    <init-extensions/>
    <sentinel-annotation-processing/>

    <default-module-build/>
    <default-module-create-artifacts/>
    <default-package-module-pack/>
</target>
These two steps are enough to create a module pack with a module in the top level directory of the module pack. The resulting module pack will also contain any sub-modules within the top level module, however an additional step is required to allow dependencies between these modules to function correctly.
Dependencies Within Module Packs
Modules in a module pack need to be built to be portable across different SDKs. This means they require more rigorously defined module dependencies than normal. For this reason it is important to check over the dependencies defined in the ivy.xml file for each of the modules in the module pack. There are three categories of module dependencies that you might encounter:
-
Dependencies on modules from outside your SDK.
-
Dependencies on modules within your SDK that will not be included in the module-pack.
-
Dependencies on modules within your SDK that will be included in the module-pack.
Dependencies on modules outside your SDK
This includes things such as third-party libraries and module from any other SDK or product that you might produce. Generally these dependencies won’t require any changes as they are always external to the SDK that the module that depends on them is in.
Dependencies on modules in your SDK but outside of the module pack
Normally when defining a dependency on a module that is in the same SDK as the module that depends on it, there are a few things that can be taken for granted. The first being that the module and its dependency will always be built and released together, so using latest.integration or latest.${ivy.status} for the dependency revision is reasonable. The second being that both modules are on the same branch so the branch name can be omitted from the dependency. Both of these assumptions can cause problems when a module pack is used to a create new module in a different SDK.
The best practice solution to this is to define properties in your SDK’s deps.properties file for each and every module that is depended on by another module. This allows the dependency to have different values for branch and revision depending on properties set at the SDK level.
So for example, say you have this dependency on another module in your SDK:
<dependencies>
    <dependency    org="my-org"    name="my-sdk-support"    rev="latest.integration"    conf="self -> api"/>
</dependencies>
You would go through the following steps:
1. Add/modify the branch property to the dependency using a new property as the value:
<dependencies>
    <dependency    org="my-org"    name="my-sdk-support"    rev="latest.integration"    branch="${my-sdk-support.ivy.branch}"    conf="self -> api"/>
</dependencies>
2. Modify the rev property for the dependency to use a new property as the value:
<dependencies>
    <dependency    org="my-org"    name="my-sdk-support"    rev="${my-sdk-support.ivy.revision}"    branch="${my-sdk-support.ivy.branch}"    conf="self -> api"/>
</dependencies>
3. Define values for the new properties in your SDK’s deps.properties file
It is a good idea to go a step further and define these per-module properties in terms of broader per-SDK properties (this makes if far simpler to change the branch and revision across a product if the need arises):
my-sdk.ivy.branch=${branch.name}
my-sdk.ivy.revision=latest.${ivy.status}

my-sdk-support.ivy.branch=${my-sdk.ivy.branch}
my-sdk-support.ivy.revision=${my-sdk.ivy.revision}
| |
Defining the properties as [module-name].ivy.branch and [module-name].ivy.revision has an added benefit in that if your product is correctly indexed then these properties will automatically be added to release.properties in your product’s published SDK. |
Dependencies on modules in your SDK and in the module pack
If a module pack contains multiple modules, it is likely that at least some of those modules will depend on each other. In these cases it is necessary to modify the dependencies in the affected modules' Ivy files to ensure that new modules created from the module pack depend on each other, rather than the original modules that the module pack was created from.
So for example, say you had a module pack that contained a feature module and a profile module, and the feature module depended on the profile:
<dependencies>
    <dependency    org="my-org"    name="my-profile"    rev="latest.${ivy.status}"    conf="self -> api"/>
</dependencies>
You would go through the following steps:
1. Replace the value of org for the dependency with ${sdk.ivy.org}
<dependencies>
    <dependency    org="${sdk.ivy.org}"    name="my-profile"    rev="latest.${ivy.status}"    conf="self -> api"/>
</dependencies>
2. Add/modify the branch property for the dependency with the value ${branch.name}
<dependencies>
    <dependency    org="${sdk.ivy.org}"    name="my-profile"    rev="latest.${ivy.status}"    branch="${branch.name}"    conf="self -> api"/>
</dependencies>| |
sdk.ivy.org and branch.name are by default set in the sdk.properties file at the root of an SDK. |
Controlling Module Pack Contents
By default a module pack will contain the module that publishes it, and any sub-modules within that module’s directory tree. It is possible to tweak this with a series of properties that can be added to the module.properties file in the root directory of the module that publishes the pack.
The available properties are:
| Property | Description |
|---|---|
|
Comma separated list of files/directories to include in the module pack (in addition to the contents of the base directory. |
|
Comma separated list of files/directories to exclude from the module pack. |
|
Root directory of the module pack, all subdirectories of this directory will be included in the module pack unless otherwise excluded. |
| |
All file/directory paths used in these properties should be made relative to the base directory of the module that publishes the module pack. |
Custom Transformations
Sometimes a module pack may have an unusually complex structure or code that means that the default systems used to create new modules from a module pack cannot create working modules on their own. For this case, module packs support inclusion of transformers. Transformers are essentially custom pieces of java code that can be included in a module pack that will be automatically run when the module pack is used to create new modules. They are useful for doing things such as moving files and modifying source code and configuration files.
Transformers must implement the com.opencloud.modulepack.transformer.SimpleModulePackTransformer interface and source files must be placed inside a directory called module-pack-transformer in the top level directory of the module pack. The complied transformer code will be packaged in a jar file named transformer.jar in the top level of the module pack archive. The custom code will be invoked as part of the SDK’s create-module command. There is support for querying the user for additional configuration information.
SimpleModulePackTransformer Interface
Implementors of the SimpleModulePackTransformer require two methods: getConfigurationOptions which is used to query for configuration information from the user, and transform which does the actual transformation.
getConfigurationOptions Method
List<SimpleConfigurationOption> getConfigurationOptions(File modulePackDir)This method is used by the create-module command to retrieve a list of configuration options that need to be queried from the user. The sole parameter modulePackDir is the directory that the modules are being created in, and corresponds to the top-level directory in the module-pack itself. An implementation of this method simple needs to return a list of com.opencloud.modulepack.transformer.SimpleConfigurationOption. One SimpleConfigurationOption object is required for each value that is needed from the user. They are created using this constructor:
public SimpleConfigurationOption(String configKey, String description, String defaultValue)The parameters should be used as follows:
| Parameter | Description |
|---|---|
|
Unique key to be used to access the configuration value from the configuration map. |
|
Message to be used to prompt the user for the required value. |
|
Default value to be used if the user enters nothing, or if the user chooses to use all default values. |
transform Method
void transform(File modulePackDir, Map<String, String> configuration) throws TransformerExceptionThis method is used to do the actual transformation steps required by the module pack. The details of the implementation will depend entirely on the particular requirements of the module pack. If there is a fatal error during the transformation, the method should throw a TransformerException.
The method takes two parameters:
| Parameter | Description |
|---|---|
|
The directory that the modules are being created in, and corresponds to the top-level directory in the module-pack itself. |
|
A String to String Map of configuration keys and their associated values. |
Testing a New Module Pack
After creating a module pack it is a good idea to test it in a clean SDK instance to ensure that it is genuinely self-contained. This can be done by starting sdkadm in the SDK and using the following command:
create-module my-module-pack-test path/to/my-module-pack.zip
It is a good idea to use non-default values for all of the configuration values that are prompted for (especially when it comes to renamespacing the package!) as this will reveal any issues cause by hardcoded values or that might require a custom transformation.
After creating the new module(s), change to the directory that contains them (my-module-pack-test in the example above) and run the following command on the command line (not in sdkadm):
ant publish-local-branch
If this builds successfully then your new module pack works!
| |
This section explains Modules — what they are and how to use them. |
What is a module in the Sentinel IP-SM-GW SDK?
The word “module” is used to describe both an on-disk directory and an Ivy module. Each module on disk has a one-to-one relationship with an Ivy module.
Modules on disk hold source code and documentation source. The build system that is part of the Sentinel IP-SM-GW SDK publishes them as Ivy modules.
Modules depend on other modules, as specified in the dependencies section of their ivy.xml file.
Common types of modules
Below are some common types of modules.
| |
These are representative of a standard set of modules a developer will encounter, but the list is not exhaustive. |
| Type of module | What it contains | ||
|---|---|---|---|
JSLEE library |
The source code for a single JSLEE library component. Publishes a single JSLEE library jar component into the May contain documentation. |
||
Profile |
The source code for a single profile component. Publishes a single profile specification jar component into the May contain documentation. |
||
POJO feature |
The source code for a single Sentinel POJO feature. Publishes a single SBB part component jar into the Typically POJO feature modules depend on one or more library and profile modules. |
||
SBB feature |
The source code for a single Sentinel SBB feature. Publishes a single deployable unit jar into the The deployable unit jar contains both the SBB itself and a build-generated SBB part component jar. |
||
Group |
May not contain any source code. Used to group together related modules, through Ivy dependencies on the related modules. Its on-disk structure often includes sub-directories that are themselves modules. Many feature modules are also group modules. This is typical for features that have a single configuration profile. In such a case, the module is referred to as both a feature module and a group module, where the feature is the group. Group modules from OpenCloud are tagged with |
||
Deployment |
Typically exists to deploy and configure other modules; a specialisation of a group module. A deployment module generally includes configuration source, so that particular configuration can be applied by the configurer. Deployment modules from OpenCloud are tagged with |
||
Deployable unit |
Modules that publish a single deployable unit. Typically, they contain source code. SBB feature modules are deployable unit modules. |
||
Deployment script |
Includes Ant script files that the deployer invokes. Often used for deploying resource adaptors or other modules that do not conform to the deployer’s publication conventions.
|
Module on disk
Modules are directories under the ipsmgw-sdk directory. At minimum, a module contains the following files:
| File | What it’s for |
|---|---|
|
contains build targets |
|
contains Ivy module definition, dependencies, and publications |
|
points to the location of the build infrastructure; required for the module to build |
|
contains various build variables, and per-module constants used in the module build |
| |
Modules can be placed as subdirectories of other modules. This means you can use a “tree” of directories if you want. It is often convenient to group related modules into a particular directory structure. |
Any source code for a module is in the src subdirectory of the module directory.
Unit testing code for a module is in the test subdirectory of the module directory.
Modules that are part of your SDK (as opposed to those made available by OpenCloud) can be listed using the list-sdk-modules command in the sdkadm tool:
> help list-sdk-modules
"list-sdk-modules": Lists all modules contained within this SDK.
    Usage: list-sdk-modules
    Example: list-sdk-modules
Building and publishing modules
Here are procedures for building and publishing modules:
| To… | Do this: |
|---|---|
|
build and publish a single module |
use the cd module-directory ant publish-local |
|
build and publish all modules in the current directory and all if its subdirectories |
use the cd directory ant publish-local-branch |
|
remove any build artifacts and generated files |
use the
|
|
view all available targets |
use the cd module-dir ant -p (Targets differ depending on the current working directory.) |
Default build
The SDK includes default build behaviour, which will build most module types without requiring any modification to the build.xml file.
Module types that require changes to the default build.xml file include:
-
SBB feature modules
-
deployable unit modules
-
deployment script modules.
When creating a module from a module pack (using the sdkadm create-module command), a suitable build.xml file is placed into the created module’s directory.
When creating an SBB feature, use an existing module-pack SBB feature as the input to create-module.
Artifact snapshots, milestones, and releases
There are three "`grades" of artifact:
| Artifact grade | Commands that produce them | What they’re used for |
|---|---|---|
|
snapshot |
|
Typical every day builds. In many continuous integration environments, snapshot artifacts are deleted after a period of time to reclaim disk use. |
|
milestone |
|
Often aligned with end-of-sprint builds, or other milestone points in a project. |
|
release |
|
Typically used for more major milestones in a project, such as Early Access, Release Candidate, and General Availability builds. |
Dependencies in ivy.xml files may use a latest keyword, which specifies what to check and then resolve the most recent artifact revisions.
| Use this keyword | To check… |
|---|---|
|
snapshots, milestones, and releases |
|
milestones and releases |
|
releases only |
It often considered good practice to have milestone builds only depending on other modules milestone or releases, and release builds only depending on other module releases.
Users may also want to "pin" particular revisions in place. This is often done through use of variables in a deps.properties file.
Multi-threaded builds
The SDK supports building modules in parallel using multiple threads. This can reduce build time by as much as half in projects with a large number of modules.
This feature must be explicitly enabled by either:
-
passing
-Dbuild.multithreaded=trueto an Ant command. For example:
ant clean publish-local -Dbuild.multithreaded=true
-
or, setting
build.multithreaded=trueinsdk.local.properties(applies to a single SDK project) or in~/.build.properties(applies globally).
By default, the build will use as many threads as available cores on your machine. To override this, you can set the build.maxthreads property to the maximum number of threads the build should use.
For example:
ant clean publish-local -Dbuild.multithreaded=true -Dbuild.maxthreads=6
When enabled, the multi-threaded builder will sort the Ivy modules in dependency order and start assigning them to be built as sub-projects to a pool of executors. Module build jobs will only be submitted when all local modules they depend on have finished building.
If running in a terminal, the default Ant console output will be suppressed and replaced by a status view of the currently building modules. The per-module Ant output will instead be written to build.log in each module. If a module build fails, all unstarted module builds will be cancelled and any modules currently building in other threads will be terminated. When running without a terminal (in Jenkins for instance) the build output of modules will be written to standard out, interleaved on a per-line basis.
Some caveats:
-
multi-threaded builds are incompatible with Ivy symlinks (
ivy.symlinks=true) – the SDK will enforce that these options are not used together. Multi-threaded builds require file locking of the local repository cache, but symlinks bypass the locks, causing the builds to fail unpredictably. -
projects that have multiple modules binding to the same port or otherwise using some unshareable system resource in their unit tests can’t be built using the multi-threaded builder – these must first be updated to use unique ports/resources.
-
the CPU and memory requirements of builds using multiple threads are higher. If the CPU use is high enough to render your machine unusable, you can limit the threads using the
build.maxthreadsproperty. For the memory use, you may need to increase the max memory arguments set for Ant.
Modules in Ivy
After a module that is part of an SDK has been published, its artifacts are stored in the local filesystem-based repository. This repository is located under the ~/.ivy2/opencloud-local directory.
OpenCloud-provided modules are served from an online repository.
For more information, see Using Ivy with the SDK.
| |
Before artifacts get published in Ivy, they are created in the module’s target/artifacts directory. It can often be useful to view the content of this directory during development. |
Module packs
There is a special type of publication called a “module pack”. Module packs from OpenCloud are tagged with module-pack in Artifact indexes.
A module pack is a zip file that contains files in one or more modules.
Module packs are used as a mechanism for distributing example source and as a template for creating new modules, in concert with the sdkadm create-module command.
For more detailed information about module packs see: Module Packs.
Module indexes
Module indexes are a listing of available modules in the OpenCloud repository. You can view the index content with the list-modules command in the sdkadm tool:
> help list-modules
"list-modules": Lists available modules of the specified type.
    Usage: list-modules [-v|--verbose] [--show-all-versions] [[+tag1] -tag2,
        ...] [pagination#]
    Example: list-modules +sip +feature - 15
Module tags
Different types of modules in the index are tagged with attributes, so that they are searchable when using the list-modules command.
| |
Tags are merely text strings. Modules may have multiple tags. |
Below is a current list of frequently used tags. As OpenCloud updates its product repositories, the index gets updated.
| Tag | Used by |
|---|---|
|
Sentinel Service deployment modules |
|
modules that publish a module pack |
|
modules that contain SIP protocol behaviour |
|
modules that contain SS7 protocol behaviour |
|
modules that contain Diameter protocol behaviour |
|
modules that contain a feature |
|
modules that publish an SBB |
|
modules that publish an SBB part |
|
modules that publish a library |
|
modules that publish a profile |
|
modules that are part of Sentinel IPSMGW |
Creating and deleting modules
Below are procedures to create a module, create a deployment module, and delete a module.
Creating a module
Modules can be created in the SDK either manually or with the sdkadm tool’s create-module command.
create-module works by downloading a module-pack and extracting it, substituting various parameters. Substitutions can be passed into the command; otherwise the command prompts for parameters.
This command offers tab completion for module packs that are available in the index. Here’s its command-line help:
> help create-module
"create-module": Creates a module or set of modules at the specified location.
        During the module creation process, values which need to be renamed
        will be prompted for interactively. These values can alternatively be
        supplied as arguments in the form <oldvalue:newvalue> as additional
        args. If the optional "defaults" argument is supplied, values that do
        not have an explicit rename argument will use their default values
        without prompting.
    Usage: create-module <directory> <module-pack> [defaults]
        [<oldvalue1:newvalue1> [<oldname2:newname2> [...]]]
    Example: create-module my-features-modules/new-feature
        opencloud#sentinel-template-feature#sentinel-core/trunk;latest.integr-
        ation
Once a module has been created in the SDK, the module name will be included in the output of the list-sdk-modules command.
Creating a deployment module
Deployment modules can be created in the SDK either manually or with the sdkadm tool create-deployment-module command.
The create-deployment-module command works by creating a module that depends on the specified module.
The configuration from the specified module is copied into the newly created module, so that all configuration is available to the user in a single module. Here’s its command-line help:
> help create-deployment-module
"create-deployment-module": Creates a deployment module suitable for deploying
        slee-components contained in other modules.
    Usage: create-deployment-module <directory> <module-name>
        (<dependency-name> [...])
    Example: create-deployment-module my/target/directory deploy-module-name
        opencloud#sentinel-sip-example;latest.integration
        opencloud#sentinel-sip-service;1.0
        opencloud#sentinel-ss7-service#1.0.0;1.0
Once a deployment module has been created in the SDK, the module name will be included in the output of the list-sdk-modules command.
Deleting a module
Modules can be deleted manually. The process is the same regardless of the type of module:
1 |
If the module is bound, unbind it in Rhino. |
|---|---|
2 |
If the module is deployed, undeploy it in Rhino. |
3 |
Delete the module directory on disk. |
4 |
If the module is under source control, remove it from source control. |
5 |
Delete the artifacts from the local disk-based repository. |
6 |
Clean the Ivy cache, using |
7 |
Remove all references to the module from the |
8 |
Remove all references to the module from the SDK’s |
Running the SDK offline
| |
This section explains how to use the Sentinel IP-SM-GW SDK in offline mode |
What is offline mode?
Offline mode is a way to use the SDK without any internet access. It allows the SDK user to download necessary artifacts from OpenCloud’s online repository and push them into the user’s own local repository. The term 'local repository' is used to refer to a repository in the SDK user’s filesystem.
This document covers all of the steps required to create a local repository so that no internet connection is required. This can be useful for production environments or even in developer environments where internet access is limited or not available.
What is online mode?
When the SDK is not in offline mode, it is in online mode. In online mode, the SDK will connect to OpenCloud’s online repository to fetch required OpenCloud artifacts, rather than fetching from a local repository on the local machine.
The go-offline script
The go-offline script will create an offline repository and copy all artifacts to it. Note that this can take half an hour or more depending on connection speed.
The repository created by this script will be placed in the repositories directory in the root of the SDK.
Run the go-offline script:
testuser@machine$ build/bin/go-offline
$ ./build/bin/go-offline
Buildfile: /home/testuser/ipsmgw-sdkbuild.xml

init-build-extensions:

pre-init-ivy-common:

init-ivy-common:

Determining Ivy settings.

Checking ivy-defaults.properties for ivy settings.
 artifactory.host=repo.opencloud.com                             (from ivy-defaults.properties)
 artifactory.url=https://${artifactory.host}/artifactory         (from ivy-defaults.properties)
 ivy.cache.root=${sdk.root}/build/target/ivy-caches/online-resolvers.cache(from ivy-defaults.properties)
 ivy.checksums=sha1                                              (from ivy-defaults.properties)
 ivy.dir=${basedir}                                              (from ivy-defaults.properties)
 ivy.libs=${target}/libs                                         (from ivy-defaults.properties)
 ivy.local.root=${ivy.default.ivy.user.dir}/opencloud-local      (from ivy-defaults.properties)
 ivy.offline.root=${sdk.root}/repositories/opencloud-offline-mirror(from ivy-defaults.properties)
 ivy.publication.root=${ivy.local.root}                          (from ivy-defaults.properties)
 ivy.resolve.refresh=false                                       (from ivy-defaults.properties)
 ivy.sdk-resolvers.file=resolvers-remote.xml       (from ivy-defaults.properties)
 ivy.sdk-resolvers.file.internal=resolvers-remote.xml(from ivy-defaults.properties)
 ivy.sdk-resolvers.path=${ivy.settings.dir}/${ivy.sdk-resolvers.file}(from ivy-defaults.properties)
 ivy.symlinks=false                                              (from ivy-defaults.properties)
 artifactory.host=repo.opencloud.com                             (from ant environment)
 artifactory.password=********************************           (from ant environment)
 artifactory.url=https://repo.opencloud.com/artifactory          (from ant environment)
 artifactory.username=testuser                                       (from ant environment)
 ivy.symlinks=true                                               (from ant environment)

Writing Ivy configuration to: /home/testuser/ipsmgw-sdkivy.properties

     [echo] Ivy Resolvers: /home/testuser/ipsmgw-sdkbuild/ivy/resolvers-remote.xml
     [echo] Configuring Ivy with settings: /home/testuser/ipsmgw-sdkbuild/ivy/ivysettings.xml
  [ivy:var] :: Apache Ivy 2.3.0 - 20130110142753 :: http://ant.apache.org/ivy/ ::
  [ivy:var] :: loading settings :: file = /home/testuser/ipsmgw-sdkbuild/ivy/ivysettings.xml

ivy-authentication-check:
[ivy:resolve] :: loading settings :: file = /home/testuser/ipsmgw-sdkbuild/ivy/ivysettings.xml
     [echo] Build infrastructure lib/ directory is missing or out of date.
     [echo] Populating lib/ from ivy...
    [mkdir] Created dir: /home/testuser/ipsmgw-sdkbuild/target/lib
    [touch] Creating /home/testuser/ipsmgw-sdkbuild/target/lib/.lib.uptodate

update-index-properties:
[oc:index-properties] Resolving: opencloud#ipsmgw-index#sentinel-ipsmgw/3.1.0;latest.integration
[oc:index-properties] Copying /home/testuser/ipsmgw-sdkbuild/target/ivy-caches/online-resolvers.cache/opencloud/ipsmgw-index/sentinel-ipsmgw/3.1.0/jsons/ipsmgw-index-3.1.0.0.json to /home/testuser/ipsmgw-sdkbuild/target/lib/index/ipsmgw-index-3.1.0.0.json
[oc:index-properties] Reading Module metadata from index: /home/testuser/ipsmgw-sdkbuild/target/lib/index/ipsmgw-index-3.1.0.0.json
[oc:index-properties] Writing dependency properties to: /home/testuser/ipsmgw-sdkrelease.properties

init:

init-branch:

BUILD SUCCESSFUL
Total time: 26 seconds
:: loading settings :: file = /home/testuser/ipsmgw-sdkbuild/ivy/ivysettings.xml
This SDK is configured against internal OpenCloud resolvers: resolvers-remote.xml


Mirroring OpenCloud dependencies to repositories/opencloud-offline-mirror

Copying SDK index to offline repository...
Copying SDK infrastructure dependencies to offline repository...
Copying modules to offline repository...

Installing module 483/483

Finished copying repository artifacts.

Updating 'ivy.properties' to use offline resolvers:
 ivy.sdk-resolvers.file=offline-resolvers.xml
 ivy.cache.root=${sdk.root}/build/target/ivy-caches/offline-resolvers.cache

Configuration complete. SDK is now in 'offline' mode. Use 'go-online' to return to online mode.
The script will also have switched the SDK to offline mode now, so the next time the user starts the sdkadm tool it will use the new local repository.
After switching the SDK to offline mode, it is recommended to exit the sdkadm program before further use. Just type 'quit' and press enter.
The go-online script
The go-online script will switch the SDK to online mode.
Run the go-online script:
testuser@machine$ build/bin/go-online
$ ./build/bin/go-online
:: loading settings :: file = /home/testuser/ipsmgw-sdkbuild/ivy/ivysettings.xml
downloading /home/testuser/ipsmgw-sdkrepositories/opencloud-offline-mirror/opencloud/sentinel-ipsmgw/3.1.0/ipsmgw-index/3.1.0.0/ipsmgw-index-3.1.0.0.json ...
........... (624kB)
.. (0kB)
	[SUCCESSFUL ] opencloud#ipsmgw-index#sentinel-ipsmgw/3.1.0;3.1.0.0!ipsmgw-index.json (34ms)

Updating 'ivy.properties' to use online resolvers:
 ivy.sdk-resolvers.file=resolvers-remote.xml
 ivy.cache.root=${sdk.root}/build/target/ivy-caches/online-resolvers.cache

Configuration complete. SDK is now in 'online' mode. Use 'go-offline' to return to offline mode.
The script will also have switched the SDK to online mode now, so the next time the user starts the sdkadm tool it will use OpenCloud’s online repository.
After switching the SDK to online mode, it is recommended to exit the sdkadm program before further use. Just type 'quit' and press enter.
Source control with the Sentinel IP-SM-GW SDK
Parts of the Sentinel IP-SM-GW SDK environment should be added to a source control system such as Git or Subversion.
For a developer using the SDK for familiarisation with Sentinel development, the SDK should be initialised as a local git repository.
| Name | Include in source control? |
|---|---|
Sentinel IP-SM-GW SDK root directory |
yes |
Sentinel IP-SM-GW SDK build directory |
no |
Sentinel IP-SM-GW SDK rhino-sdk directory |
no |
Any module created by a developer |
yes |
Preparing the SDK for source control
Prior to applying source control using Subversion, Git or another source control system it is necessary to exclude any files and directories such as those created during building and publishing modules, or used for configuration of an IDE.
In the following two sections instructions are provided for configuring Subversion and Git to exclude the working files and directories.
To get a clear set of files and directories to add without excluding certain paths, the following command can be used from the root of the SDK:
ant clean-branch
Running this command removes the files and directories (retrieved jar files, compiled classes etc.) that are created when a module is built. None of the files and directories created as part of the module build process should be committed into a source control system. The target subdirectory of the module is used to contain most of these files and directories. However, other files and directories may be added by the IDE or by the developer outside of the target directory.
Subversion
In Subversion the files and directories to be ignored are included in a property called svn:ignore. From the root directory of the SDK module run the following command:
svn propset svn:ignore "/build
/rhino-sdk
/ivy.properties
/repositories
/.classpath
/.project
/.settings
/ivy-eclipse.properties" .
After creating new modules run the following command:
svn propset svn:ignore ".classpath
.settings
.project
target" <new module directory>
Git
When using git the files and directories to ignore are listed in a file called .gitignore. The following example shows a typical .gitignore file for an SDK module:
/.settings
/target
/.classpath
/.ivy-eclipse.properties
/.project
In modules created from OpenCloud provided module packs, the .gitignore file will already be present. If for any reason it is not present, create it based on the example above. The .gitignore file must be added and committed.
Initialising a Repository in the SDK root directory
When evaluating, or learning the Sentinel IP-SM-GW SDK it is advisable to perform local source control. Git is the ideal system to use.
Once the SDK environment has been set up initialise the SDK as a local repository:
$ git init
Initialized empty Git repository in /home/testuser/ipsmgw-sdk/.git/
For each module add a .gitignore file to exclude working files and directories from source control. See the example above.
In the root of the SDK check that the .gitignore file with the following contents exists and create it if it does not:
/build
/rhino-sdk
/ivy.properties
/repositories
/.classpath
/.project
/.settings
/ivy-eclipse.properties
Once the .gitignore files are set up, start tracking the SDK from the initial state using git add. For example:
$ git add .
The following files are now staged as shown by git status:
$ git status
On branch master

Initial commit

Changes to be committed:
  (use "git rm --cached <file>..." to unstage)

	new file:   .build
	new file:   .gitignore
	new file:   .sdk.root
	new file:   README.txt
	new file:   build.xml
	new file:   deps.properties
	new file:   sdk.properties
Commit the initial state of the SDK:
$ git commit -m "Initial Sentinel IP-SM-GW SDK state."
[master (root-commit) d029da5] Initial Sentinel IP-SM-GW SDK state.
 7 files changed, 159 insertions(+)
 create mode 100644 .build
 create mode 100644 .gitignore
 create mode 100644 .sdk.root
 create mode 100644 README.txt
 create mode 100644 build.xml
 create mode 100644 deps.properties
 create mode 100644 sdk.properties
Adding a module
Create a new module in the SDK using sdkadm. Once it is created, check that the module root directory contains a .gitignore file. If not, add one following the instructions and template above.
Add the module and commit to the local repository. In the example below sdkadm has been used to create a new feature in the new-feature directory:
$ git add new-feature
$ git commit -m "Adding new-feature."
[master (root-commit) ff6408f] Adding new-feature
 7 files changed, 213 insertions(+)
 create mode 100644 new-feature/.gitignore
 create mode 100644 new-feature/.sdk.root
 create mode 100644 new-feature/build.xml
 create mode 100644 new-feature/doc/ivy.xml
 create mode 100644 new-feature/ivy.xml
 create mode 100644 new-feature/module.properties
 create mode 100644 new-feature/src/com/opencloud/sentinel/feature/common/NewFeature.java
| |
This section explains Standalone Packages — what they are and how to create them. |
What is a Standalone Package
A standalone package is a flattened version of one or more modules, containing the deployable units and required configuration in a simple format. It can be used to deploy modules into Rhino without relying on Ivy or the creating SDK.
Standalone Package Structure
Standalone packages are simply zip files that contain the same artifacts and configuration as ordinary Sentinel SDK modules, just in a different format. This is an example of what can be in a standalone package:
standalone-package.zip ├── config/├── environment.properties
└── set-tracers.commands
| Module-specific configuration files | |
| The artifacts to be deployed | |
| Contains directories used to deploy some products using Ant scripts | |
| The main Ant build file, whose default build target installs the whole product | |
| Properties to be set locally, including the location of the Rhino client directory | |
Rhino console script to set SBB tracers in Rhino, which gets called from the build.xml file |
Each module in the dependency hierarchy of the parent module that the package gets created from will result in four targets in the build.xml file:
-
deploy-<module-name>-with-deps -
deploy-<module-name> -
configure-<module-name>-with-deps -
configure-<module-name>
The original Ivy dependency hierarchy will be reflected in the dependencies of these Ant targets. In addition a few top-level targets will be generated that depend on the deploy, bind and configure targets of the root module.
Creating a Standalone Package from an SDK Module
In this section, we assume the we have an existing module called my-module, and we want to create a standalone package for my-module and its dependencies. For more details on how to create a module see Creating a new module.
Note that the module needs to have been published by running ant publish-local before a package can be created from it. A standalone package is always created based on the published version found in Ivy, rather than the module as it exists in source. So any local changes to the module will only be reflected in the generated package after running ant publish-local.
The SDK provides two methods for creating a standalone package from a module:
Using the create-package sdkadm command
First run sdkadm
/path/to/sentinel-sdk/build/bin/sdkadm
Then run:
> create-package my-org#my-module#trunk;latest.integration standalone-package
The following is an example of output from create-package
Initialising Ivy.
Invoking Ivy to resolve module 'my-org#my-module#trunk;latest.integration' and its dependencies.

[...]

Writing package to disk at /path/to/sentinel-sdk/standalone-package ...
Assembling Ant project element...
Writing build.xml file...
Writing environment.properties file...
Finished writing package to /path/to/sentinel-sdk/standalone-package
The result of the above steps is a standalone-package directory located under sentinel-sdk with the structure described above.
The package can also be written to a ZIP file instead of a directory by specifying a path that ends in .zip.
Using Ant
First, cd to the my-module directory:
cd /path/to/sentinel-sdk/my-module
If the module has not yet been published in Ivy, or has been changed after the last publishing, run:
ant publish-local
Then run:
ant create-package
The following is an example of the output from create-package:
Buildfile: /path/to/sentinel-sdk/my-module/build.xml

clean-module:
     [echo] Cleaning module build artifacts.
   [delete] Deleting directory /path/to/sentinel-sdk/my-module/target

[...]

create-package:
     [echo] Creating standalone installer package for module.

[...]

[oc:create-package] Writing package to disk at /path/to/sentinel-sdk/my-module/target/standalone-package ...
[oc:create-package] Assembling Ant project element...
[oc:create-package] Writing build.xml file...
[oc:create-package] Writing environment.properties file...
[oc:create-package] Finished writing package to /path/to/sentinel-sdk/my-module/my-module-package.zip
The result of the above steps is an archive named my-module-package.zip located under my-module with the structure described above.
| |
Properties that end up in the Example: ant -Dpackager.platform.operator.name=my-org create-package |
Deploying a Standalone Package
The build.xml included in the base of the generated package is an Ant script that uses Rhino’s SLEE Management Ant tasks to install the module and its dependencies into Rhino.
| |
Standalone packages can be edited post-creation and those edits will be applied when deploying without requiring republication of the module in Ivy. |
Once a standalone package has been created it can be deployed into a Rhino.
| |
Before deploying ensure the values in standalone-package/environment.properties are correct for the target environment. |
If not deploying to the Rhino included with the SDK, ensure that rhino.home and client.home in environment.properties are set correctly for the target Rhino.
| |
The target Rhino needs to be manually started prior to deployment of the standalone package. |
Once the environment is correctly configured then deployment of the standalone package into Rhino simply requires running ant in the root of the standalone-package directory:
cd /path/to/standalone-package
Then simply run,
ant
| |
The build.xml file expects to be run from the top level of the package against a fresh install of Rhino. |
The following is an example of the output when deploying a standalone-package:
Buildfile: /path/to/standalone-package/build.xml

check-environment:

management-init:
     [echo] Open Cloud Rhino SLEE Management tasks defined

login:
[slee-management] Establishing new connection to localhost:1199
[slee-management] Connected to localhost:1199 (101) [Rhino-SDK (version='2.4', release='0.19', build='201610031603', revision='2f48084')]
[...]

deploy-my-module-with-deps:
[...]

deploy-my-module:
[...]

bind-my-module-with-deps
[...]

bind-my-module
[...]

configure-my-module-with-deps
[...]

configure-my-module
[...]

BUILD SUCCESSFUL
The deploy, bind and configure steps can also be initiated individually by calling the respective targets:
ant deploy-root-module-with-deps
ant bind-root-module-with-deps
ant configure-root-module-with-deps
The end result of this process will be a deployment of the module in Rhino that is identical to a deployment done using the normal SDK tooling.
Known limitations with standalone packages
-
Undeploying, redeploying or upgrading installations is not currently supported.
-
Expected service copy versions are calculated ahead of time when creating a package, so a package must be installed into a clean Rhino or the versions will not match.
-
As mentioned above the static nature of standalone packages means that they are not as flexible as deployments from a Sentinel SDK.
Upgrading an SDK project
Prerequisites
To follow these instructions you will need access to an SDK of the release you want to upgrade to. Unzip the SDK somewhere so you can copy the necessary resources from the new SDK to your current SDK project directory structure.
If you used the Sentinel Installer with your current SDK then it will have created an install.properties file. Make sure this file is present in the current SDK in that case to simplify configuring the new deployment module.
If you have used the build/bin/go-offline script to take your SDK offline then you will have to take it online again by running one of the following commands depending on your current SDK version, as upgrading offline repositories is not supported:
| SDK version | Command to run |
|---|---|
|
2.3.1.x |
|
|
2.4.0.x and later |
|
If your SDK is not under version control it is recommended to create a backup of the SDK before starting the upgrade process in case something important gets inadvertently deleted. A backup will also allow recreating a deployment module in order to facilitate comparing it with a configured module as explained in Upgrading deployment module configuration.
Upgrading the build infrastructure
The build infrastructure consists of the build directory and the build.xml file in the SDK root directory. Replace both of these with the versions from the new SDK.
Upgrading sdk.properties
The sdk.properties file contains fundamental properties of an SDK and there may be important changes between SDK releases. Since it also contains user-specific properties it cannot simply be replaced outright. However, depending on your situation the process should still be relatively straightforward.
The simplest case is that you have not added any custom properties to the file and are planning to use the installer. In that case the file can simply be replaced with the version from the new SDK as all the user-specific properties will be configured by the installer. The only exception to this is the branch.name property which you will have to copy over from the current file in case you changed it.
If you have added custom properties but are still planning to use the installer then copy those properties to the new file and then use that file to replace the current one. As above, you may also have to copy the branch.name property.
If you do not want to use the installer then you will have to copy a few properties to the new file before you can replace the current one, in addition to any custom properties you added. These properties are:
-
branch.name -
sdk.ivy.org -
sdk.ivy.publish.revision -
sdk.component.version -
sdk.component.vendor -
sdk.platform.operator.name -
rhino.home -
client.home
Handling SIS and CGIN upgrades
The new SDK may contain new releases of SIS and CGIN. Unless you are using a custom version of these that you want to continue using, you should remove the current versions so they can be upgraded. This involves two actions:
-
Remove the
sisandcgindirectories from the root of the SDK. -
Remove the
sis.homeandcgin.homeproperties from thesdk.local.propertiesfile.
Dependency changes
See Sentinel IPSMGW Changelog and Sentinel Common Changelog for specific product dependency versions to update.
Removing out-of-date dynamic content
The release.properties and ivy.properties files are automatically generated and have to be deleted so they can be regenerated with the correct values for the new SDK.
If you are upgrading from a 2.3.1 release and you have used the installer then you will have a directory called installer in the root of your SDK. This directory can be safely deleted. Similarly, the log directory in the SDK root can be deleted unless you want to preserve the old logs. In the 2.4.0 SDK the logs have moved to build/target/log.
The deps.properties file may contain old properties. You should remove all properties in that file that you did not add yourself.
Upgrading deployment module configuration
At this point all of the SDK infrastructure has been upgraded so that tools run from now on will use their upgraded versions, and only the deployment module is left to be upgraded. This is potentially the most involved step, depending on the extent of customization of the current module. You will need to be able to re-apply the changes you made to the current deployment module to a new one created with the upgraded SDK.
If the only configuration you have done of the deployment module outside of adding dependencies on custom modules was with the installer then upgrading will be easy. In such a case you can simply move the deployment module out of the way, create a new deployment module with the installer, and re-add your custom dependencies as explained in Adding the feature to the deployment module.
If you have made changes to the deployment module beyond those made by the installer then you will have to manually re-apply them to the new deployment module. This will be easiest if your SDK is under version control and you can do a diff between a revision with a pristine (or only installer-configured) deployment module and one with the changes since then. Otherwise you should switch to your SDK backup, move the current deployment module out of the way, recreate it, and then use the diff program to determine the changes between the recreated one and the configured one. Once you have created a diff using one of these two methods use either the installer or the sdkadm tool to create a new deployment module and then apply the changes from the diff in whatever way works best for them.
Don’t forget to re-add your custom dependencies to the new deployment module as mentioned above.
Your SDK should now be fully upgraded and can be used to deploy a new Sentinel installation.
Using Ivy with the SDK
| |
This section explains Apache Ivy and how to use it with the Sentinel IP-SM-GW SDK. |
What is Apache Ivy ?
The Sentinel IP-SM-GW SDK uses Apache Ivy as its “dependency manager”. Ivy is used to describe what modules publish, and depend on. This allows repeatable builds to be made and maintained.
For more about Ivy itself, please see http://ant.apache.org/ivy/.
Use of Ivy in the Sentinel IP-SM-GW SDK
Here are some details of how Ivy works with the the Sentinel IP-SM-GW SDK:
-
Modules are built and published into a local filesystem-based repository, inside the user’s SDK install directory. The supplied
build.xmlfiles in a module provide default behaviour. -
The supplied Ivy repository information, for publication and resolution, is located in the
build/ivydirectory. -
The OpenCloud-supplied tools all read from one or more Ivy repositories and then read/write state in the Rhino SLEE. Once modules have been built and published, the various tools in the SDK can operate on the modules.
-
The organization of an SDK determines which repositories should be used. Artifacts with an Ivy organization of ‘opencloud’ are resolved from OpenCloud repositories.
-
The SDK organization is not ‘opencloud’; so when artifacts are published or resolved, they are published to (or resolved) from a repository stored in the user’s own local filesystem.
-
This local filesystem-based repository is stored under the user’s
~/.ivy2/opencloud-local/directory. Artifacts that are published locally (using thepublish-local, orpublish-local-branchbuild targets) live in subdirectories under that directory, based on the Ivy organization of the publisher.For example, if the SDK organization is “rocket” then artifacts published will reside under the
~/.ivy2/opencloud-local/rocketdirectory.
Cache settings
Ivy uses an artifact cache to speed up builds. This is useful to stop large artifacts being downloaded multiple times during a build, as well as store them for some time across builds.
The Ivy cache is located in the ~/.ivy2/cache directory.
The cache settings can be found in the SDK’s build/ivy/ivysettings.xml file.
All OpenCloud supplied artifacts use the “release-cache” settings, and as such are valid for one day within a user’s build environment. This means that the cached artifact can be used for one day. After that, it will be re-downloaded.
Useful Ivy commands
Here are a couple of Ivy commands that are useful with the Sentinel IP-SM-GW SDK:
| Command | What it does | When you might use it |
|---|---|---|
|
removes all artifacts from the cache |
when a build is not working for unknown reasons, to reset the cache and try again |
|
produces an HTML report of all dependencies |
when something is not retrieving or is being evicted, for some unknown reason |
Repositories
OpenCloud serves repositories for various products from some web sites, using a product called Artifactory. OpenCloud’s Artifactory server is configured to let authorised users (with validated name and password) access various repositories. For the Sentinel IP-SM-GW product, these include:
| Repository URL | Purpose |
|---|---|
https://repo.opencloud.com/artifactory/opencloud-sentinel-ipsmgw-3.1.0/ |
serves OpenCloud artifacts for the Sentinel IP-SM-GW SDK |
https://repo.opencloud.com/artifactory/opencloud-sentinel-ipsmgw-3.1.0-third-party/ |
serves third party artifacts for the Sentinel IP-SM-GW SDK |
| |
Using proxies and local servers
Advanced users may want to consider:
|
Using SIP Leg Manager
A SIP leg describes both the dialog that creates a SIP transaction and a SIP dialog. The SIP Leg Manager provides a complete, fully functional interface for SIP feature development in Sentinel SIP.
How do you use the SIP Leg Manager?
The SIP Leg Manager can control multiple UAS, UAC, and B2BUA legs in the same SIP Sentinel Instance. This means you can use it to provide complex services, such as a conferencing service.
Without user-feature intervention, the default Sentinel SIP configuration acts as a B2BUA for a two-party Sentinel SIP instance. In this case, the Sentinel SIP instance has two legs that are linked: callingParty and calledParty. Sentinel SIP is capable of handling multiple legs for a Sentinel SIP instance.
Features can use the SIP Leg Manager API to interact with calling and called parties, as well as any other legs that features create.
| |
The Leg Manager API gives features control of all legs associated with a Sentinel SIP instance. |
What can you do with SIP legs?
Independent legs let Sentinel SIP serve as a UAC and/or UAS. However, for complete UAC or UAS behaviour, some feature logic is required — for which you can use the LegManager interface. With LegManager, multiple independent legs can be controlled in one Sentinel SIP instance.
In particular, wo SIP legs can be linked. By linking legs, features can use the linking information to simplify the implementation of a B2BUA feature. Linking is used by the default Sentinel B2BUA system feature for this purpose. A leg may only be linked to one leg at a time.
You can use the SIP Leg Manager for all interactions of SIP requests and responses. A Sentinel SIP instance has a LegManager instance that is used to control all Leg instances for the instance.
| |
The Leg Manager API is only applicable to the SIP service. |
Features can use the Leg instructions in the API to:
-
send, remove, or modify a set of requests or responses being sent on a leg
-
instruct Sentinel SIP that two legs are no longer linked; subsequently, the B2BUA system feature will no longer act as a B2BUA between the two legs
-
instruct Sentinel SIP to link two legs; the B2BUA system feature will then act as a B2BUA between these legs
-
instruct Sentinel SIP to create a new leg
-
instruct Sentinel SIP to release a leg according to the leg’s current state
-
interact with forking — parallel and downstream
-
handle multiple legs in a Sentinel SIP instance (such as conferencing and announcements)
-
suspend and resume sending messages on a leg
-
set a proxy and do-not-record route on a leg
-
perform session refresh
-
end a subscription or subscriptions on a leg
-
end the leg’s session.
The SIP Leg Manager API
The LegManager and Leg API can be found in the the “multileg” section (com.opencloud.sentinel.multileg) of the Sentinel API Javadoc.
The Leg Manager Usage Examples show how to use this API to write features.
Accessing Leg Manager
Sentinel SIP controls a Sentinel SIP Instance using the Leg Manager. Features use the Leg Manager to control the legs and the SIP messages sent on the legs in a Sentinel SIP Instance. They can access the Leg Manager using the SentinelSipMultiLegFeatureEndpoint (or a subtype). For example:
    public MyFeature(SentinelSipMultiLegFeatureEndpoint caller, Facilities facilities, MyFeatureSessionState sessionState) {
        this.caller = caller;
        this.facilities = facilities;
        this.sessionState = sessionState;
        this.legManager = caller.getLegManager();
}| |
Features access SIP Requests/Responses using the LegManager and Leg interfaces of the Leg Manager. |
Guidelines for using the API
Here are some guidelines on using the Leg Manager API within features.
Use unique leg names
The name that Sentinel SIP or the feature assigns to the leg should be unique for the Sentinel SIP instance (the LegManager instance). For SIP sessions initiated via SIP, Sentinel SIP will create a leg called callingParty for the originating calling party leg name.
| |
To avoid any conflicts and negative interactions with legs amongst features, when a feature creates a new leg, the recommended naming convention is <feature>-<featureFriendlyLegName> for example, |
Leg names are case sensitive.
Control SIP message handling
It isn’t always possible to let Sentinel SIP act as a B2BUA, so a feature may need to manage the messaging between two legs. For example, in Mid Call Play Announcement, the active party and the MRF cannot be linked since they are in different call phases (Active party in Mid session and the MRF in CallSetup). So the feature will need to send the appropriate message on a leg in response to receiving a message on the other leg.
Each leg has a org.jainslee.resources.sip.SipSession activity object instance associated with it. This is the activity the Sentinel SIP attaches to in order to receive SIP messages; it roughly corresponds to a SIP dialog.
The Leg Manager API is used to interact with a leg’s associated SipSession, to ensure the Sentinel SIP is aware of the state of each dialog.
| |
It is possible for features to interact with the For example, if a |
Manage legs to termination
A Sentinel SIP instance will only terminate once all legs have ended and when any other EventManagers (such as the Charging Manager) indicate that termination is possible. Therefore, any features managing the legs must ensure that all legs are managed to termination, to make sure that a call ends successfully.
Leg Manager Usage Examples
Before these example features are executed, two legs are in the Leg Manager instance — callingParty linked to calledParty:
Call Diversion on Busy
The feature diverts the call to a divertedCalledParty if the calledParty leg is busy.
| Feature Execution Trigger | Feature Action Required | |
|---|---|---|
1 |
|
Send 181 to After these feature instructions have been executed, the Leg Manager instance will contain two legs — 
|
Early Media Announcements
The feature plays an announcement to the callingParty leg, and sends the invite to the calledParty leg once the announcement has been played.
| Feature Execution Trigger | Feature Action Required | |
|---|---|---|
1 |
Need to play announcement to |
Send Invite to
After these feature instructions have been executed, the Leg Manager instance will contain three unlinked legs — 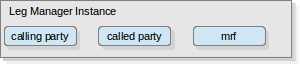
|
2 |
|
Send reliable provisional 183 response to |
3 |
|
Send ACK to
|
4 |
|
Resume and link After these feature instructions have been executed, the Leg Manager instance will contain two legs —
|
Mid Call Announcement
The feature plays an announcement to the callingParty leg, and then reconnects it back to the calledParty leg once the announcement has been played.
| Feature Execution Trigger | Feature Action Required | |
|---|---|---|
1 |
Need to play announcement to |
Put After these feature instructions have been executed, the Leg Manager instance will contain two unlinked legs — 
|
2 |
|
Send reinvite to |
3 |
|
Create
After this feature instruction have been executed, the Leg Manager instance will contain three unlinked legs —
|
4 |
|
Send ACK to
|
5 |
|
Send bye success to After these feature instructions have been executed, the Leg Manager instance will contain two unlinked legs —
|
6 |
|
Send reinvite to |
7 |
|
Send ack to both parties and relink them once both in same state
After these feature instructions have been executed, the Leg Manager instance will contain two legs —
|
Downstream Forking
The feature handles a SIP call forked downstream by the S-CSCF, an application, or other UAS.
| Feature Execution Trigger | Feature Action Required | |
|---|---|---|
1 |
|
Using the After these feature instructions have been executed, the Leg Manager instance will contain four legs — 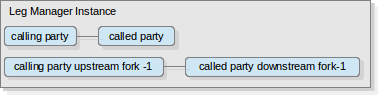
|
2 |
|
Detach all other downstream forked sessions and their upstream linked legs After these feature instructions have been executed, the Leg Manager instance will contain two legs — 
|
Using the SIP Charging Manager
Features use the Charging Manager component to create one or more charging instances during a session. Each charging instance represents a charging conversation with an Online Charging System (OCS).
| |
See Sentinel Charging Manager for an overview of the Charging Manager. |
Accessing a Charging Manager
A feature gets a reference to a ChargingManager from the feature endpoint. For example:
final ChargingManager chargingManager = getCaller().getChargingManager();
// use the charging manager ...| |
It is safe for a feature to store a reference to the ChargingManager in a Java attribute. |
Using the Charging Manager
The Charging Manager interface defines operations for creating two types of ChargingInstance:
-
ReservationChargingInstance createReservationInstance(String name)— creates a charging instance suitable for scenarios where unit reservation is appropriate, such as SCUR and ECUR. -
ImmediateChargingInstance createImmediateChargingInstance(String name)— creates a charging instance suitable for scenarios where immediate charging is appropriate, such as IEC.
Each ChargingInstance has a unique name that is provided at the time the instance is created. The ChargingManager interface also defines operations for accessing a charging instance by name and for getting a collection of all charging instances known by the ChargingManager.
| |
The Charging Manager throws a DuplicateNameException if you try to create a new charging instance with the same name as an existing charging instance. |
For example:
package com.opencloud.sentinel.charging;

import java.util.Collection;

public interface ChargingManager {

    /** ChargingManager component type value, used in {@link FailedInstruction}. */
    String COMPONENT_TYPE_NAME = "ChargingManager";

    /** ChargingManager component name key, used in {@link FailedInstruction}. */
    String COMPONENT_NAME_KEY = "ChargingInstance";

    /** Request Type key, used in {@link FailedInstruction}. */
    String REQUEST_TYPE_KEY = "requestType";

    /** * Create a new ReservationChargingInstance in the ChargingManager. This instance can be * used for Session Charging with Unit Reservation, and Event Charging with Unit Reservation. * @param name the name must be unique for this Sentinel session. Names are case sensitive. * @return created event charging instance. * @throws DuplicateNameException If charging instance already exists with the supplied name. */
   ReservationChargingInstance createReservationInstance(String name)
            throws DuplicateNameException;

    /** * Create a new Immediate Charging Instance in the ChargingManager. * @param name the name must be unique for this Sentinel session. Names are case sensitive. * @return created immediate charging instance. * @throws DuplicateNameException If charging instance already exists with the supplied name. */
   ImmediateChargingInstance createImmediateChargingInstance(String name)
            throws DuplicateNameException;

   /** * Determine the charging instance which the ChargingManager holds for a name for this session * or null if there is no such instance. * @param name Unique name associated with the {@link ChargingInstance}. * @return ChargingInstance associated with given name or null if no such instance. */
   ChargingInstance getChargingInstance(String name);

   /** * Returns Collection of managed Charging Instances for this Sentinel Session. * @return Collection of {@link ChargingInstance}s. */
   Collection<ChargingInstance> getChargingInstances();
}| |
The first release implementation of the Charging Manager supports one charging instance per session. This limitation will be removed in a subsequent release of Sentinel, so all possible approaches to charging a session will be supported. |
Charging instances
There are two types of charging instance:
-
ReservationChargingInstance — used for scenarios where unit reservation is appropriate, such as SCUR and ECUR
-
ImmediateChargingInstance — used for scenarios where immediate charging is appropriate, such as IEC.
Behaviour common to both types is defined by the ChargingInstance interface.
Charging instance interface
The charging instance interface defines behaviour that is common to ReservationChargingInstance and ImmediateChargingInstance.
| Operations | Purpose | ||
|---|---|---|---|
getName() |
Each charging instance has a name that is unique within the scope of the |
||
getChargingType() |
Each charging instance has a type (defined by: |
||
getChargingState() |
A charging instance is in a state that corresponds to a step in the charging process (defined by: |
||
getSessionCounters() |
A charging instance has an associated
|
||
getPendingChargingInstruction() clearInstruction() |
Determine if there are any pending charging instructions for the charging instance (defined by: |
||
getPendingReportingReason() |
Determine if this charging instance has any pending reporting reason. |
||
suspend() resume() isSuspended() |
Charging may be suspended and is later resumed. |
||
isCreditCheckInProgress() |
Determine if a credit check is in progress in the charging session managed by the charging instance. |
For example:
package com.opencloud.sentinel.charging;

import com.opencloud.sentinel.charging.sessioncounters.SessionCounters;
import org.jainslee.resources.diameter.ro.types.vcb0.ReportingReason;

public interface ChargingInstance {

    enum Instruction { None, CreditReservation, CreditFinalisation, DirectDebit, Refund }
    enum ChargingType { Reservation, Immediate }

    /** * Represents the current state of a ChargingInstance, an instance is in the * Initial state prior to processing CCA-I, Mid state after processing CCA-I * and Final state after credit finalisation is instructed. */
    enum State { Initial, Mid, Final }

    /** * Returns the name assigned to the charging instance, must be unique for the Charging * manager instance. * @return Unique name for this charging instance. */
    String getName();

    /** * The type of charging instance * @return ChargingType for this charging instance. */
    ChargingType getChargingType();

    /** * The current state of charging instance * @return State for this charging instance. */
    State getChargingState();

    /** * SessionCounters for the charging instance. * @return SessionCounters for this charging instance. */
    SessionCounters getSessionCounters();

    /** * Determine if this charging instance has any pending charging instruction. * @returns pending instruction. */
    Instruction getPendingChargingInstruction();

    /** * Determine if this charging instance has any pending reporting reason. * @returns reporting reason. */
    ReportingReason getPendingReportingReason();

    /** * Clears any pending charging instruction */
    void clearInstruction();

    /** * The SuspensionStartTime field for all counters in this instance will be set to the * current time. */
    void suspend();

    /** * On calling resume all session counters associated with this charging instance will * have the cumulativeSuspendedDuration field updated if autoUpdateCounters is true. * * @param autoUpdateCounters false if intending to manually update * cumulativeSuspendedDuration, true for automatic updating of * cumulativeSuspendedDuration in all associated session counters */
    void resume(boolean autoUpdateCounters);

    /** * Returns true iff this ChargingInstance is currently suspended. * @return true iff this ChargingInstance is currently suspended. */
    boolean isSuspended();

    /** * Indicates whether or not there is a credit check currently in progress. This * generally means that a CCA is pending. * @return true iff there is a credit check currently in progress. */
    boolean isCreditCheckInProgress();
}
ReservationChargingInstance interface
The ReservationChargingInstance interface extends ChargingInstance and adds operations for charging with unit reservation (SCUR and ECUR).
| Operations | Purpose |
|---|---|
doCreditReservation |
Initiate a credit reservation, send an update, or perform a re-authorisation. |
doCreditFinalisation |
Finalise the current charging session if a session is active. |
For example:
package com.opencloud.sentinel.charging;

import org.jainslee.resources.diameter.ro.types.vcb0.ReportingReason;

public interface ReservationChargingInstance extends ChargingInstance {

    public enum CreditResultExecutionPhase { Initial, Mid }

    /** * Instructs the charging instance to initiate a credit reservation, send an update or * perform a reauthorisation * @param reason Reason for credit reservation. * @param phase The phase in which the Post CC execution point should be raised * @throws InstructionAlreadyPendingException if there is already an instruction pending * @throws ChargingInstanceAlreadyFinalisedException if the charging instance is already * finalised. * @throws CreditCheckAlreadyInProgressException if there is already a credit check in * progress */
    void doCreditReservation(ReportingReason reason, CreditResultExecutionPhase phase)
                            throws InstructionAlreadyPendingException,
                                   ChargingInstanceAlreadyFinalisedException,
                                   CreditCheckAlreadyInProgressException;

    /** * Instructs the charging instance to initiate a credit reservation, send an update or * perform a reauthorisation * @param phase The phase in which the Post CC execution point should be raised * @throws InstructionAlreadyPendingException if there is already an instruction pending * @throws ChargingInstanceAlreadyFinalisedException if the charging instance is already * finalised. * @throws CreditCheckAlreadyInProgressException if there is already a credit check in * progress */
    void doCreditReservation(CreditResultExecutionPhase phase)
                            throws InstructionAlreadyPendingException,
                                   ChargingInstanceAlreadyFinalisedException,
                                   CreditCheckAlreadyInProgressException;

    /** * Instructs the core to finalise the current charging session if a session is active, * and call the feature if response-CCA arrives. * @param reason Reason for credit finalisation. * @throws InstructionAlreadyPendingException if there is already an instruction pending * @throws ChargingInstanceAlreadyFinalisedException if the charging instance is already * finalised. * @throws CreditCheckAlreadyInProgressException if there is already a credit check in * progress. */
    void doCreditFinalisation(ReportingReason reason)
                            throws InstructionAlreadyPendingException,
                                   ChargingInstanceAlreadyFinalisedException,
                                   CreditCheckAlreadyInProgressException;
}| |
For examples of system features that use a ReservationChargingInstance see Sentinel B2BUA ECUR Featuresand Sentinel B2BUA SCUR Features. |
ImmediateChargingInstance interface
The ImmediateChargingInstance interface extends ChargingInstance and adds operations for immediate charging (IEC).
| Operations | Purpose |
|---|---|
doDirectDebit() |
Perform a direct debit. |
doRefund() |
Perform a refund. |
For example:
package com.opencloud.sentinel.charging;

import com.opencloud.sentinel.charging.ReservationChargingInstance.CreditResultExecutionPhase;

public interface ImmediateChargingInstance extends ChargingInstance {

    /** * Instructs the core to perform a direct debit and deliver the response CCA to the * feature on arrival. * @throws InstructionAlreadyPendingException * @throws CreditCheckAlreadyInProgressException */
    void doDirectDebit(CreditResultExecutionPhase phase)
                        throws InstructionAlreadyPendingException,
                               CreditCheckAlreadyInProgressException;

    /** * Instructs the core to perform a refund and call the feature if response-CCA arrives * @throws InstructionAlreadyPendingException * @throws CreditCheckAlreadyInProgressException */
    void doRefund(CreditResultExecutionPhase phase)
                        throws InstructionAlreadyPendingException,
                               CreditCheckAlreadyInProgressException;
}| |
For examples of system features that use an ImmediateChargingInstance see Sentinel B2BUA IEC Features. |
Using the TCAP Leg Manager
This section includes the following topics:
| Topic | Explains… |
|---|---|
how the TCAP Leg Manager is used with a MAP Proxy example. |
|
how features get a reference to the TCAP Leg Manager. |
|
how features use the operations in the TCAP Leg API. |
|
how features can create and remove TCAP Legs. |
|
how to use |
For an overview of the TCAP Leg Manager see Overview of the TCAP Leg Manager in the architecture guide.
TCAP Leg Manager Scenario
The following diagram explains how a feature (the Map Proxy) uses the TCAP leg manager. The sequence of steps shown are related to the receipt of a new Open Request for a new Dialog that is received by the IPSMGW.
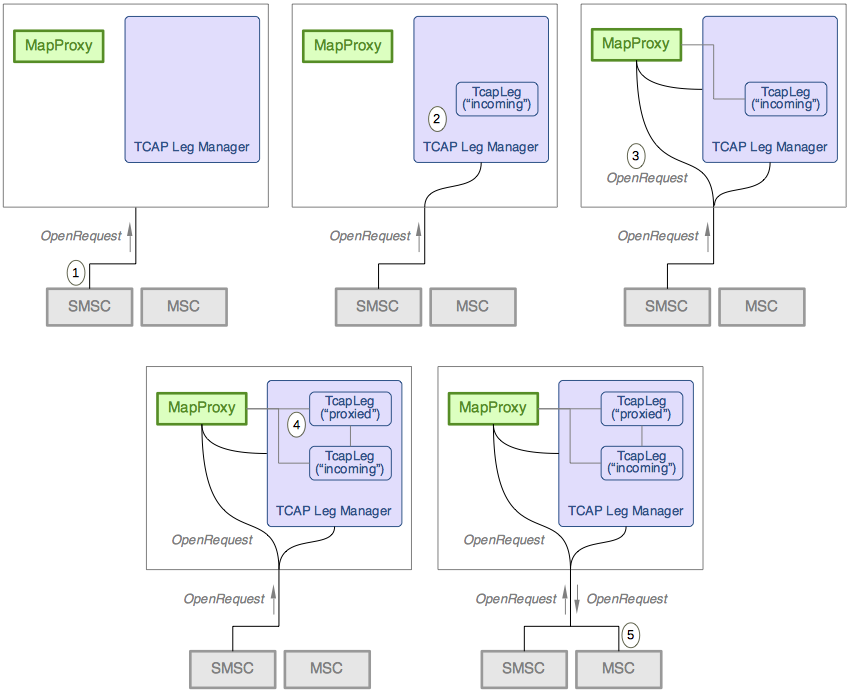
1 |
The IPSMGW is triggered by a |
|---|---|
2 |
The TCAP leg manager is registered to process
|
3 |
The IPSMGW starts running feature script execution points. One of the scripts runs the |
4 |
The
|
5 |
Once all feature script execution points have finished, the TCAP Leg Manager processes any outstanding instructions. At this point a new Dialog is created, and the |
Accessing the TCAP Leg Manager
This section explains how a feature gets a reference to the TCAP Leg Manager and how IPSMGW MAP features are triggered.
Obtaining a Reference to the TCAP Leg Manager
Features access the TCAP Leg Manager as a provider object. The first step is to add the TCAP Leg Manager provider jndi name to the raProviderJndiNames attribute of the SentinelFeature annotation. For example, the MAP Proxy features does:
/** * Sentinel feature that acts as a proxy between two MAP Dialogs. */
@SentinelFeature(
    featureName = IPSMGWMapProxyFeature.NAME,
    // ...
    raProviderJndiNames = { "sentinel/tcaplegmanagerprovider" },
    // ...
)
The TCAP Leg Manager is injected as a provider object using the name "sentinel/tcaplegmanagerprovider" |
The second step is to implement the InjectResourceAdaptorProvider interface in your feature. The IPSMGW will call injectResourceAdaptorProvider() when the feature is created. For example, the MAP Proxy feature does:
@BinderTargets(services = "ipsmgw")
public class IPSMGWMapProxyFeature extends BaseFeature<SentinelSessionState, FeatureEndpoint>
                                implements InjectResourceAdaptorProvider,
                                           // ...
{
    // ...

    @Override
    public void injectResourceAdaptorProvider(Object provider) {
        this.tcapLegManager = (TcapLegManager)provider;
    }

    // ...

    private TcapLegManager tcapLegManager;

    // ...
}
The feature must implement the InjectResourceAdaptorProvider interface … |
|
… by implementing the injectResourceAdaptorProvider(Object) operation |
|
It is safe for a feature to hold a reference to the TcapLegManager in a java attribute |
Triggering IPSMGW MAP Features
IPSMGW MAP Features are triggered with a trigger event object that corresponds to a class in the TCAP Messages hierachy. The triggering ActivityContextInterface is for the Dialog activity that corresponds to the triggering event object. For example the MAP Proxy does:
@Override
public void startFeature(Object trigger, Object activity,
ActivityContextInterface aci,
Map<String, ParameterValue> featureParameters)
{
final Tracer tracer = getTracer();
if (! (trigger instanceof DialogTcapMessage)) {
getCaller().featureFailedToExecute(
new FeatureError(FeatureError.Cause.unclassified,
"Feature not triggered on a DialogTcapMessage. Trigger = " + trigger));
getCaller().featureHasFinished();
return;
}
final SentinelActivityContextInterface triggerAci
= tcapLegManager.asSentinelActivityContextInterface(aci);
final TcapLeg triggerLeg = tcapLegManager.getLeg(triggerAci);
final DialogTcapMessage message = (DialogTcapMessage) trigger;
final TcapLeg proxyLeg;
switch (message.getType()) {
case DialogOpenRequest:
final DialogOpenRequestTcapMessage dialogOpen = message.asDialogOpenRequest();
// ...
// create the new outgoing leg
try {
proxyLeg = tcapLegManager.createLeg(dialogOpen.getApplicationContext(),
proxyLegName);  }
catch (DuplicateLegException dle) {
// ...
return;
}
catch(ProtocolException pe) {
// ...
return;
}
// ...
break;
case DialogOpenAccept:
}
catch (DuplicateLegException dle) {
// ...
return;
}
catch(ProtocolException pe) {
// ...
return;
}
// ...
break;
case DialogOpenAccept:  proxyLeg = triggerLeg.getLinkedLeg();
  // ...
break;
// ...
break;MAP features expect trigger objects that implement DialogTcapMessage |
|
A useful utility method on the TCAP Leg Manager to get a SentinelActivityContext for the trigering ACI |
|
| Use the TCAP Leg Manager to get the TCAP Leg for the triggering ACI | |
| The MAP proxy takes actions that depend on the type of the trigger | |
On a DialogOpenRequest the MAP Proxy feature creates a new outgoing leg to proxy to |
|
| Use the TCAP Leg Manager to create the new proxy leg | |
The MAP proxy will process an OpenAccept to the proxy leg |
|
| Get the proxy leg by following the link from the triggering leg |
Managing TCAP Legs
This section explains how to create, link and end TCAP legs.
Creating a new TCAP Leg
Two methods of creating TCAP legs are available:
Create a new leg that has no associated Dialog
A feature establishes a new relation with an external network element by creating a new TCAP leg and calling issueOpenRequest() on the newly created leg.
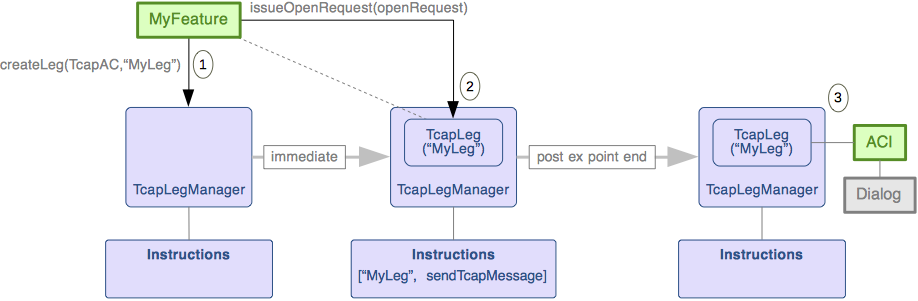
-
MyFeaturecallscreateLeg()on the TCAP Leg Manager. A new TCAP leg is immediately created (MyLeg). Newly created legs don’t have aDialogorACIassociated with them yet. -
MyFeaturecreates a newDialogOpenRequestobject and callsissueOpenRequest(openRequest)on the newly created TCAP leg. The TCAP Leg manager registers an instructionsendTcapMessageand the open request is set as the pending message on the newly created leg. Features that execute afterMyFeaturecan make any changes to the pending message before thesendTcapMessageinstruction is processed. -
Once the currently executing feature script execution point is finished, the TCAP Leg Manager processes any instructions for all legs. In this case the TCAP Leg Manager will process
sendTcapMessagefor the open request by:-
creating a new
Dialogand sending the open request -
getting the associated
ActivityContextInterface(ACI) for the newly created Dialog -
attaching to the ACI so all responses from the external network element will be receiv qed by the IPSMGW
-
| |
The TCAP Leg Manager also provides a second, overloaded, variant of The TCAP Leg Manager will set the See: Feature Extension Events to learn more about Extension events. |
| |
See Operating on a TCAP Leg for more information about sending messages on TCAP legs. |
Create a new leg based on an existing Dialog
A feature may create a TCAP leg from an ActivityContextInterface that corresponds to an existing relation with an external network element.
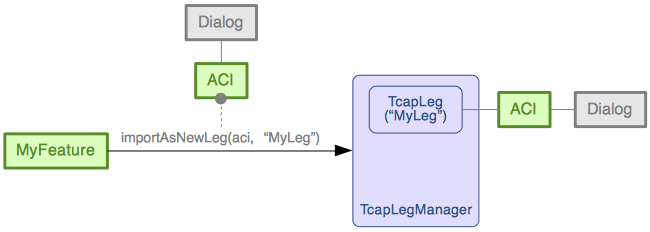
Feature MyFeature calls importAsNewLeg(aci, "MyLeg") on the TCAP Leg Manager to create a new TCAP leg called MyLeg that is associated with the ACI aci.
Linking and unlinking TCAP Legs
In some cases it is convenient to be able to navigate from one TCAP leg to a related TCAP leg. A concrete example is the MAP proxy feature, which proxies messages between two related TCAP legs. You create a relation between two TCAP legs by linking them with the linkLeg(TcapLeg) operation.

A link between two legs is bi-directional. Calling getLinkedLeg() on MyLeg will return OtherLeg and calling getLinkedLeg() on OtherLeg will return MyLeg. You can break the link between two legs by calling unlinkLeg() on either TCAP leg involved in a link.
Detaching from a TCAP Leg
Features detach from a TCAP leg when the leg is not needed anymore and the IPSMGW should not take any responsibility for further actions on the associated Dialog.
Detaching a TCAP leg removes the association between the TCAP leg manager and the TCAP leg. It is an action that takes place immediately. This means the leg cannot be used by any features that subsequently execute. The TCAP leg manager takes no action on the associated Dialog or ACI (if they exist).
Two methods for detaching a TCAP leg are available:
Detach from a particular leg
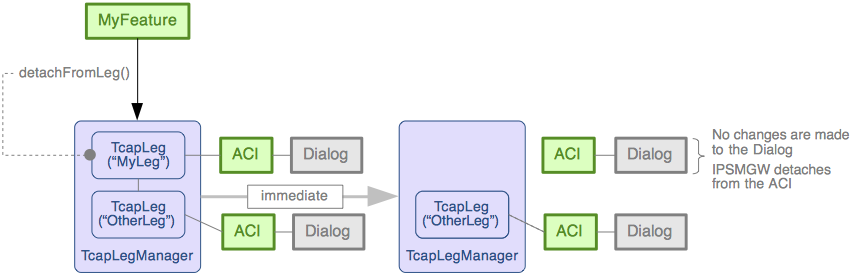
MyFeature calls detachFromLeg(myLeg) on the TCAP Leg Manager. The TCAP leg MyLeg is immediately removed. The IPSMGW detaches from the associated ActivityContextInterface (if there is one). No pending instructions will be processed for the detached leg. The detached Leg cannot be accessed by any subsequent features that execute.
No actions are taken on the associated Dialog so it is important that either the feature ensures the dialog ends properly before detaching, or that an alternate service with the Rhino TAS will take responsibility for any further actions on the Dialog.
Detach from all known legs
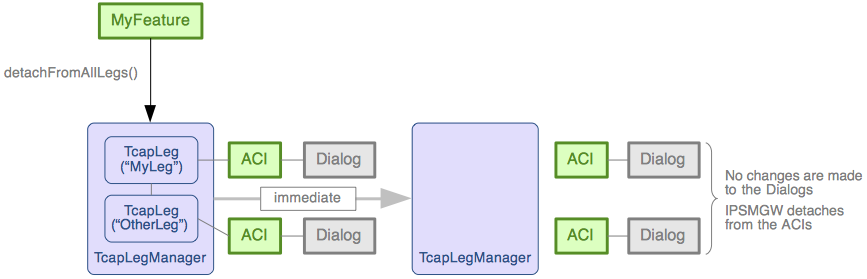
MyFeature calls detachAllLegs() on the TCAP Leg Manager. Each leg known by the leg manager is detached as described in section: Detach from a particular leg.
Releasing a TCAP Leg
Features release a TCAP leg when the leg is not needed anymore and the IPSMGW should also make sure the associated Dialog is ended correctly.
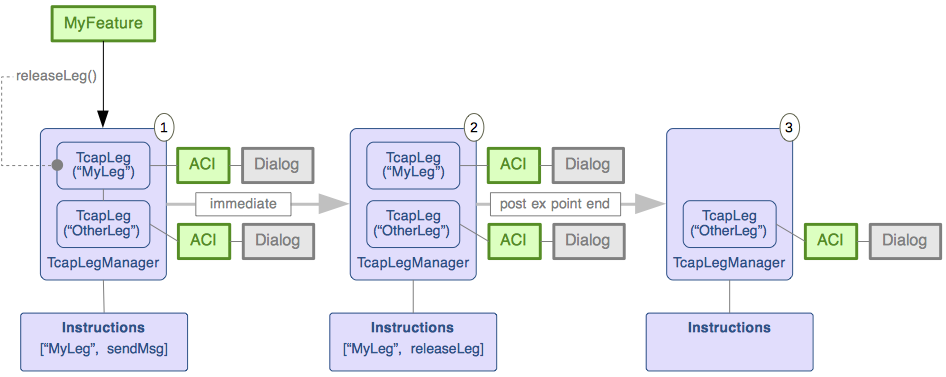
-
MyFeaturecallsreleaseLeg(myLeg)on the TCAP Leg Manager. -
The leg
MyLegis immediately unlinked (if it is linked). Any pending instructions are removed and a new instruction (releaseLeg) is created. In this example asendTcapMessageinstruction is replaced with areleaseLeginstruction. Any pending message on the leg is preserved and may be used while processing thereleaseLeginstruction. The leg can still be accessed by other features before thereleaseLeginstruction is processed. -
Once the current feature script execution point finishes, the TCAP Leg Manager processes all pending instructions for all known legs. In this example the associated Dialog is ended, and then the TCAP leg
MyLegis removed.
The method used to end the Dialog depends on the Dialog State.
| Dialog State | Action … |
|---|---|
|
Send a |
|
If there is no pending message on the leg, then send a |
|
If there is a pending message that is a |
Features which need a more fine-grained control over the release process should use a combination of TcapLeg.sendClose(boolean), TcapLeg.sendUserAbort(DialogUserAbortTcapMessage) and TcapLegManager#detachFromLeg(TcapLeg).
Ending the Session
Feature end a session (endSession) when all existing TCAP legs are not needed anymore and the IPSMGW should also make sure all Dialogs associated with the existing legs are ended correctly.
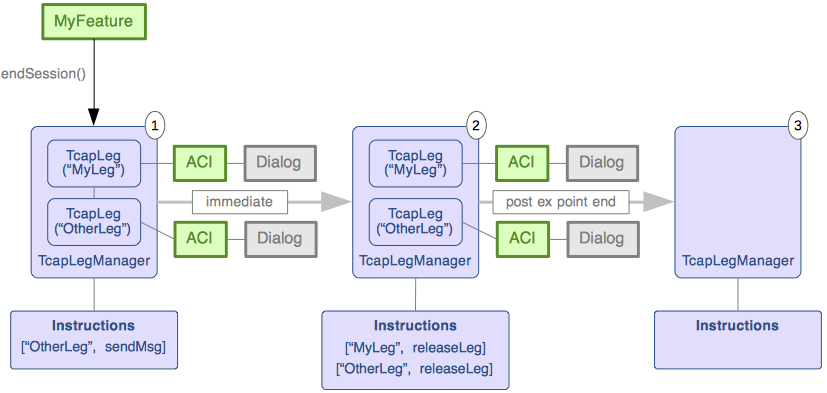
-
MyFeaturecallsendSession()on the TCAP Leg Manager. -
All existing legs are released by unlinking them, removing any pending instructions and creating a
releaseLeginstruction for each leg. -
Once the current feature script execution point finishes, the TCAP Leg Manager processes all pending instructions for all known legs. In this example the Dialogs associated with
MyLegandOtherLegare ended (as described in Releasing a TCAP Leg) and both TCAP legs are removed.
Operating on a TCAP Leg
This section explains each operation in the TCAPLeg API.
Latest Incoming, Pending and Latest Outgoing Messages
There are three DialogTcapMessage messages that may be associated with a TCAP leg.
-
LatestIncomingmessage — set on the leg by the IPSMGW when a message is received on the TCAP leg. This message corresponds to the most recent message received on the TCAP leg -
PendingTCAPMessage— set and updated by features during an execution cycle of the TCAP leg manager. The pending message is processed after all feature execution scripts have finished -
LatestOutgoingmessage — set on the leg by the IPSMGW when a message is sent on the TCAP leg during instruction processing. This message corresponds to the last message that was sent on the TCAP leg. This field will initially be empty
The following operations operate on the LatestIncoming, Pending and LatestOutgoing messages.
| Operation … | Explanation |
|---|---|
|
Return true if there is a pending TCAP message associated with this leg |
|
Return the pending TCAP message associated with this leg |
|
Clear the pending TCAP message if a feature wishes to abort sending the pending message, without a replacement. |
|
Return The latest Incoming TCAP message received on this leg’s dialog. |
|
Return The latest Outgoing TCAP message sent on this leg’s dialog. |
Sending Messages
Sending messages on a TCAP leg updates the PendingTCAPMessage on the TCAPLeg.
| Operation … | Explanation |
|---|---|
|
Request that a new dialog, associated with this leg, should be initiated. The pending TCAP message is set to the open request. Any existing pending TCAP message will be replaced by the open request. |
|
Issue an operation invoke on the dialog associated with this leg. The invoke is scheduled to be sent by updating the pending TCAP message. If no pending TCAP message exists, a new pending TCAP message is created. |
|
Issue a result to an operation on the dialog associated with this leg. The result is scheduled to be sent by updating the pending TCAP message. If no pending TCAP message exists, a new pending TCAP message is created. |
|
Issue a user error response for an invoked operation on the dialog associated with this leg. The error is scheduled to be sent by updating the pending TCAP message. If no pending TCAP message exists, a new pending TCAP message is created. |
|
Close the dialog associated with this leg. Closing a dialog with |
|
Abort the dialog associated with this leg. Any pending TCAP message is discard and replaced with the abort. |
|
Accept the dialog associated with this leg. The pending TCAP message is set to the open accept. Any existing pending TCAP message will be replaced by the open accept. |
|
Accept the dialog associated with the leg. The pending TCAP message is set with a new open accept. Any existing pending TCAP message will be replaced by the new open accept. |
|
Refuse an open dialog request for the dialog associated with this leg. The response is sent to the remote Provider and the dialog is torn down. The pending TCAP message is set to the open refuse. Any existing pending TCAP message will be replaced by the open refuse. |
|
Refuse an open dialog request. The response is sent to the remote Provider and the dialog is torn down. The pending TCAP message is set to a new open refuse. Any existing pending TCAP message will be replaced by the open refuse. |
|
Send a TCAP message on the dialog associated with this leg. Typically such a message is a TC-Continue or a TC-End. Any existing pending TCAP message will be replaced by the TCAP message. |
Linking and Unlinking TCAP Legs
TCAP Legs can be associated with each by linking them.
| Operation … | Explanation |
|---|---|
|
Immediately link this leg to the leg provided as an argument. If the legs are already linked to each other, then the legs will remain linked. If either of the legs is linked to another leg then |
|
Immediately unlink this leg from the leg linked to it, if any. If the leg is not actually linked, there is no effect. |
|
Return the leg linked to this leg |
|
Return true if this leg is linked to another leg. |
Other Useful Operations
| Operation … | Explanation |
|---|---|
|
Return the |
|
Return the Dialog associated with this leg |
|
Check if the dialog can be accepted. Return |
Using TCAP Leg Manager Predicates
A TCAP leg manager predicate is an assertion related to the status if the TCAP leg manager that can be tested. The TCAP leg manager predicates can be used within conditions in feature execution scripts. For example, a script that runs at the session start feature execution point could be:
featurescript IPSMGWSessionStart {
    run IPSMGWSCCPWhitelist
    if not TcapLegManager.currentLeg.releaseLeg {
        run IPSMGWMapProxy
    }
}
Only run the IPSMGWMapProxy feature if the IPSMGWSCCPWhitelist did not release the current leg. |
TCAP Leg Manager predicates
The following predicates are available.
| Predicate name | True when… |
|---|---|
TcapLegManager.endSession |
a feature has requested endSession in this execution point |
TcapLegManager.currentLeg |
there is a leg active at the current execution point |
TcapLegManager.currentLinkedLeg |
the current execution point has an active leg linked to a second leg |
TcapLegManager.currentLeg.releaseLeg |
there is a pending releaseLeg on the specified leg |
TcapLegManager.currentLeg.pendingMessage |
there is a pending message on the specified leg |
TcapLegManager.detachAll |
detachAll has been requested |
TcapLegManager.currentLeg.detachFromLeg |
there is a pending detachFromLeg on the specified leg |
TcapLegManager.currentLeg.hasEndingInstruction |
any of detachAll, detachFromLeg, endSession, or releaseLeg are true |