About the Sentinel Authentication Gateway
The Sentinel Authentication Gateway provides 3GPP Generic Authentication Architecture (GAA) support for OpenCloud’s Sentinel products. This release allows IMS devices to authenticate with their home network and securely login to Sentinel’s XCAP server.
The Sentinel Authentication Gateway consists of two main components:
- BSF Server
-
The Bootstrapping Security Function (BSF) server receives "bootstrap" authentication requests from UEs. These requests ask the BSF to initiate a bootstrap process between the UE and the HSS, which results in a secret key shared by the BSF and the UE. This shared key can then be used to authenticate with a Network Application Function (NAF), or application server. The Sentinel XCAP server is an example of a NAF.
- NAF Authentication Filter
-
The NAF Authentication Filter is deployed with the Sentinel VoLTE XCAP servlet application. It implements the NAF authentication processes for the application, using the shared key generated by the bootstrapping process.
Together these components allow a UE to transparently authenticate with Sentinel VoLTE XCAP and securely perform configuration updates.
Topics
|
the main roles, interfaces, and procedures in 3GPP GAA. |
|
|
the components of the Sentinel Authentication Gateway and how they implement 3GPP GAA. |
|
|
how to install the Sentinel Authentication Gateway BSF Server and NAF Authentication Filter. |
|
|
how to configure the Sentinel Authentication Gateway BSF Server and NAF Authentication Filter. |
|
|
how the Sentinel Authentication Gateway uses a Cassandra database for sharing bootstrapped security association details between the BSF and XCAP servers. |
|
|
the tools provided by Sentinel Authentication Gateway for generating and verifying keys during testing. |
|
|
any known issues with this release |
Other documentation for the Sentinel Authentication Gateway can be found on the Sentinel Authentication Gateway product page.
Introduction to 3GPP GAA
This section describes the main roles, interfaces, and procedures in 3GPP GAA.
What is GAA?
The 3GPP Generic Authentication Architecture allows IMS devices (User Equipment or UEs) to authenticate with the network and securely access application servers, without the need for user interaction.
The authentication mechanism relies on secret key material (K) stored on the UE’s tamper-proof USIM. The same key material K is also known by the UE’s Home Subscriber Server or Authentication Centre (HSS/AuC).
When the UE needs to access an application server (Network Application Function or NAF), the UE performs a "bootstrapping" procedure with its HSS. This procedure sets up a security association for the UE, and calculates a new NAF-specific shared key.
The NAF is also able to calculate the same shared key, and uses this to authenticate requests from the UE. The NAF-specific shared key never has to traverse the network, because it can be calculated independently by the UE and NAF, based on the shared secret K.
3GPP GAA specifies how this is achieved.
GAA Roles and Interfaces
The diagram below shows a simplified view of the main roles and their interfaces involved in GAA.
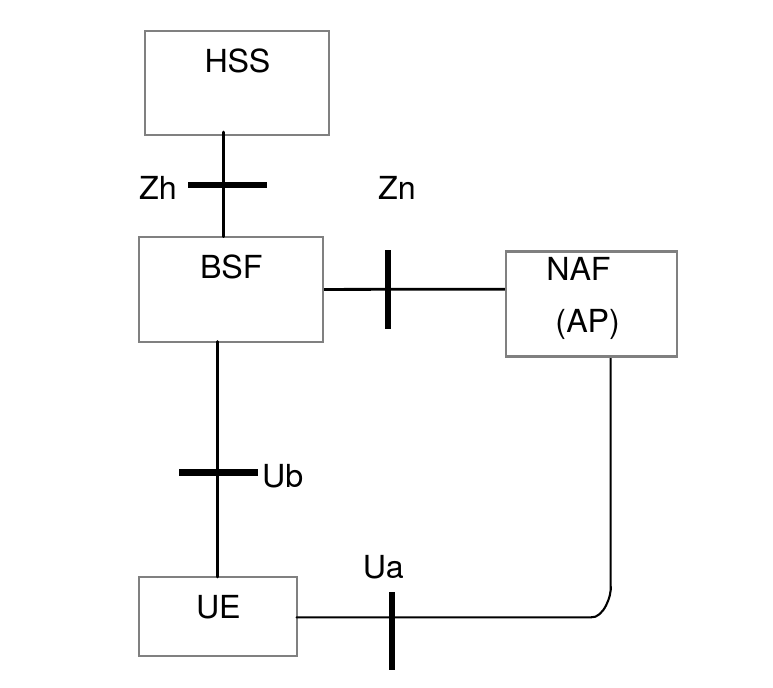
| Role name | Meaning | Description |
|---|---|---|
UE |
User Equipment |
The device that needs to securely access an application in the network. |
NAF |
Networked Application Function |
An application server. The NAF may also be an AP (Authentication Proxy), a proxy that performs the authentication on behalf of other application servers. |
BSF |
Bootstrapping Security Function |
The BSF communicates with the UE and its HSS to create a security association based on the shared secret K. |
HSS |
Home Subscriber Server |
The HSS knows the UE’s shared secret K, and uses this to generate new authentication vectors (AVs) when requested by the BSF. The HSS also stores the subscriber’s GBA bootstrap security settings (GUSS), an XML document describing how the shared keys may be used with various service types. |
| Interface name | Description |
|---|---|
Ua |
Specifies how the UE authenticates with the NAF. Authentication is based on HTTP Digest authentication over HTTPS. Other application-specific interfaces may be defined on top of Ua. For example, Ut defines the interface between the UE and its XCAP server. |
Ub |
Specifies how the UE communicates with the BSF to create a NAF-specific shared key that the UE will use to authenticate over Ua. Based on AKA (Authentication and Key Agreement, RFC 3310) over HTTP. |
Zh |
A Diameter (RFC 6733) interface between the BSF and the HSS. The BSF uses Zh to request a new authentication vector (AV) from the HSS. The AV contains values that will be used to generate the NAF-specific shared key. The BSF also uses Zh to obtain the subscriber’s GUSS document. |
Zn |
The NAF uses Zn to obtain the NAF-specific shared key from the BSF, to authenticate the UE. This interface may be realized using Diameter or SOAP/HTTP. |
GAA Procedures
This section gives a high-level description of the procedures used when a UE attempts to access a NAF that is protected by GAA.
Not every scenario is covered, just the common case. For further information, see the references.
| |
In the descriptions below, assume the NAF and BSF have the fully-qualified domain names naf.home1.net and bsf.home1.net respectively. The home1.net domain is the network operator’s domain. |
1.1. UE accesses NAF for the first time
The UE sends a request to the NAF naf.home1.net over HTTPS. No credentials are present in the request.
The NAF sees that the request is unauthorized, and sends back an HTTP 401 Unauthorized response. The response contains a WWW-Authenticate header, with the directive realm=3GPP-bootstrapping@naf.home1.net. This tells the UE that it needs to initiate bootstrapping procedure with the BSF, to create a new security association. The response also contains a nonce value which will be used when the UE contacts the NAF in step 3.
The UE indicates the authentication mechanism to use in all requests to access the NAF through the addition of a product token to the User-Agent header:
-
If the UE wishes to use
GBA_MEauthentication then it must include the product token3gpp-gbain theUser-Agentheader -
If the UE wishes to use
GBA_Digestauthentication then it must include the product token3gpp-gba-digestin theUser-Agentheader on all requests to access the NAF. -
If neither tokens are present in the
User-Agentheader the request is rejected without a challenge
The server responds with a WWW-Authenticate header if it supports the authentication mechanism requested by the client:
-
for
GBA_MEtheWWW-Authenticateheader includes the directiverealm=3GPP-bootstrapping@naf.home1.net -
for
GBA_DigesttheWWW-Authenticateheader includes the directiverealm=3GPP-bootstrapping-digest@naf.home1.net.
1.2. UE initiates GBA bootstrap
Here the UE must contact the BSF to create a new security association. This process is known as "bootstrapping" and is specified by the Generic Bootstrapping Architecture (GBA) from 3GPP TS 33.220.
1.2.1. UE sends bootstrapping request to BSF
The UE sends an HTTP GET request to the BSF. The request’s Authorization header will have the subscriber’s private identity (IMPI) in the username directive. If the UE has previously created a temporary private identity (TMPI), this will be used instead of the IMPI. The nonce and response directives in the Authorization header are empty.
1.2.2. BSF sends Zh request to HSS
Next, the BSF sends a Zh request to the HSS using the Diameter protocol. If successful, the Zh response will contain an authentication vector (AV). This contains a 128-bit random number (RAND) and secrets derived from the shared key K.
The AV also includes the expected response (XRES). This is a large number derived from RAND that only the UE should be able to calculate, because of its knowledge of K.
The Zh response may also contain the subscriber’s GBA User Security Settings (GUSS), which, among other things, defines the lifetime of the security association.
1.2.3. BSF sends challenge
The BSF sends an HTTP 401 Unauthorized response back to the UE, containing the WWW-Authenticate header. This header contains the "challenge" in the form of the random value RAND, in the nonce directive.
1.2.4. UE sends challenge-response
The UE performs two calculations. Firstly, the K and RAND values are used to determine the response, known as RES. Secondly, the RES value is then used as the password for calculating the HTTP digest. The UE then sends a new HTTP GET request to the BSF, containing the Authorization header. The digest from the second calculation is sent in the Authorization header’s response directive.
1.2.5. BSF validates challenge-response
The BSF calculates the expected HTTP digest using XRES, and compares this with the value received in the response directive. If the values match, the bootstrapping was successful and the BSF creates and stores a new security association. This contains:
-
the Bootstrapping Transaction Identifier (B-TID) — this becomes the user ID used by the UE to access the NAF
-
the IMPI
-
a new shared key Ks, valid for the lifetime of the security association, used to generate a NAF-specific key.
The BSF sends an HTTP 200 OK response, containing an XML body specifying the new B-TID and the lifetime of the security association.
The GBA bootstrap process is now complete.
1.3. UE sends authorized request to the NAF
The UE can now proceed with the original request to the NAF. It calculates the NAF-specific key, known as Ks_NAF.
The new authorized request will contain an Authorization header using the HTTP Digest (RFC 2617) authentication scheme. The B-TID and Ks_NAF values are used as the username and password when calculating the message digest.
The UE calculates the request’s message digest, and sends this in the response directive of the Authorization header.
1.4. NAF checks the message digest
When the NAF receives the new request it contacts the BSF using the Zn interface to lookup the B-TID and calculate Ks_NAF.
The NAF performs the same digest calculation as the UE, and should arrive at the same value if the shared key is correct. Assuming the digests match, the request is considered authorized and the NAF can now process it securely.
Subsequent requests
Subsequent requests from the UE to the NAF do not need to go though all the previous steps. Once the UE knows the B-TID and Ks_NAF, it can reuse these values in subsequent requests for the lifetime of the security association. Each new request would just involve steps 3 and 4 above.
Bootstrapping does not need to be performed again until either the security association expires, or the NAF determines it is necessary based on local policy.
Architecture Overview
This section explains the components of the Sentinel Authentication Gateway and how they implement 3GPP GAA.
The 3GPP Generic Authentication Architecture provides a standard way for User Equipment (UEs) to securely access Network Application Functions (NAFs) or application servers.
| |
This section assumes some familiarity with GAA roles. See Introduction to 3GPP GAA for background information. |
Sentinel Authentication Gateway's 3GPP GAA implementation
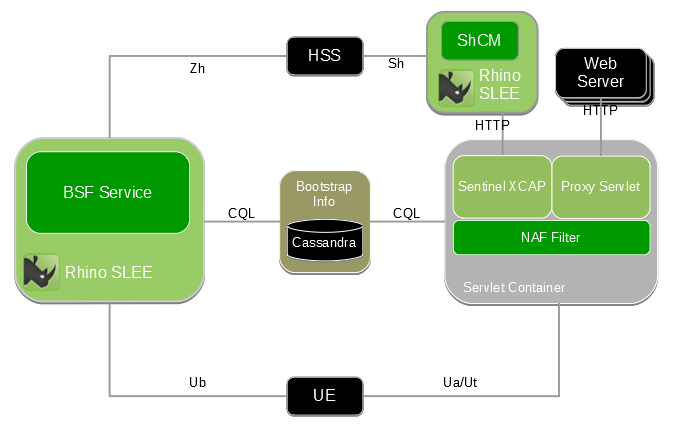
Sentinel Authentication Gateway implements the BSF and NAF roles in 3GPP GAA. The UE talks to these components over the Ub and Ua interfaces, as shown in the network model below, reproduced from 3GPP TS 33.220:
In Sentinel Authentication Gateway, the BSF Server component implements the BSF role, and is implemented as a SLEE service deployed on OpenCloud Rhino. The UE communicates with the BSF using the Ub (bootstrapping) interface over HTTP on port 80.
The NAF role is implemented by the NAF Authentication Filter, which is deployed as a servlet filter layer in front of the Sentinel VoLTE XCAP web application, and a Proxy Servlet which is able to forward requests on to other external web applications. The UE communicates with Sentinel VoLTE XCAP or the Proxy Servlet using the Ut interface over HTTP or HTTPS. The NAF Authentication Filter intercepts these requests to authenticate the user (Ua interface), before passing them to the XCAP server or other web application.
Both components share state using a Cassandra database. This is functionally equivalent to the Zn interface in the model above. Sharing state in a database allows the BSF and NAF nodes to be stateless, and to easily scale out horizontally.
The diagram below shows the relationship between Sentinel Authentication Gateway components, the UE, the Sh Cache Microservice and the HSS.
The following sections explain the architecture of the BSF Server and NAF Authentication Filter by following a typical authentication and bootstrapping process as a client attempts to access a NAF resource.
Compliance Notes
Zn interface
Sentinel Authentication Gateway currently does not support third-party BSFs or NAFs, because it uses a database to implement NAF to BSF communication instead of the Diameter or HTTP-based Zn interface (3GPP TS 29.109). A future Sentinel Authentication Gateway release may remove this limitation.
Authentication schemes
The BSF Server supports the Digest-AKAv1-MD5 and GBA_Digest authentication schemes.
The NAF Authentication Filter supports the MD5 and SHA256 digest algorithms.
Additional variants may be supported in future Sentinel Authentication Gateway releases.
Bootstrapping procedures
The BSF Server currently supports the GBA (or GBA_ME), and GBA_Digest bootstrapping procedures. A future release will support GBA_U, UICC enhancements to Generic Bootstrapping Architecture (3GPP TS 33.220 §5).
NAF Authentication Filter
The NAF Authentication Filter is a servlet filter that intercepts requests to the Sentinel VoLTE XCAP and Authentication Proxy servlets.
The filter performs the role of the NAF, authenticating the requests using GAA procedures. If successful, the authenticated requests and credentials are passed on to the XCAP or Authentication Proxy servlet.
NAF Authentication Filter operation
To illustrate how the filter works, we can walk through how the NAF Authentication Filter handles a typical request to the Sentinel VoLTE XCAP server.
An overview of the authentication process, from the filter’s point of view, is shown below.
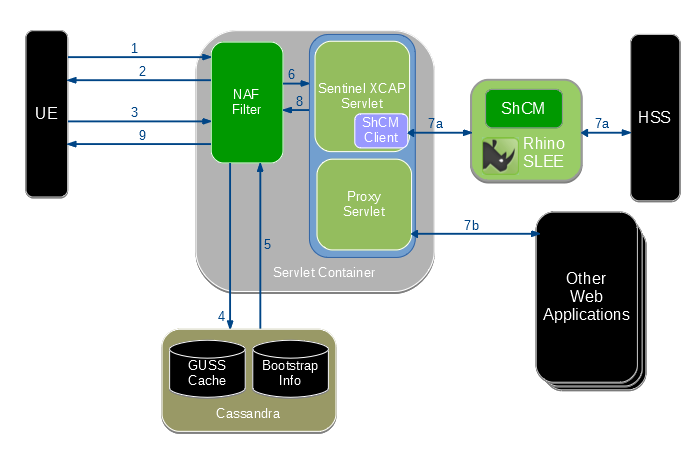
The steps shown in the diagram are explained in the following sections.
1. UE makes a request
The UE needs to retrieve an XCAP resource, for example to discover configuration settings for an MMTEL service.
The UE selects the authentication mechanism to use through addition of a product token to the User-Agent header:
-
if the UE wishes to use the
GBA_Digestmechanism, then it must include the product token3gpp-gba-digestin itsUser-Agentheader (not shown in this example). -
if the UE wishes to use the
GBA_MEmechanism, then it must include the product token3gpp-gbain itsUser-Agentheader -
if the UE includes neither, then the NAF rejects the request without a challenge
Here we assume the UE knows its XCAP server’s address, xcap.home1.net. This address may be preconfigured in the UE, or the UE may derive it from the subscriber’s private identity as per 3GPP TS 23.003 §13.9.
The UE constructs the XCAP selector for the resource and sends an HTTP GET request to the XCAP server. In this example, the UE wants to retrieve the communication diversion (CDIV) configuration for their public identity sip:user@home1.net.
GET /rem/sentinel/xcap/simservs.ngn.etsi.org/users/sip:user@home1.net/simservs/~~/communication-diversion HTTP/1.1
Host: xcap.home1.net
User-Agent: vendorstring/2.0 3gbb-gba
The XCAP server will need to confirm that the request is being made by a device associated with the public identity sip:user@home1.net.
2. NAF filter rejects with challenge
The web container (such as Apache Tomcat) sees that the URL is for a resource protected by the filter, so passes the request to the filter.
The filter sees that the request has not been authenticated, because there is no Authorization header. The filter generates a 401 unauthorized response, containing a challenge.
HTTP/1.1 401 Unauthorized
WWW-Authenticate: Digest algorithm=MD5 realm="3GPP-bootstrapping@xcap.home1.net" qop="auth-int",
  nonce="8982ac96f06922330de40902183fa099",
  opaque="00fffde7845cc67534bdc78f3a9e233"
The realm value 3GPP-bootstrapping@xcap.home1.net tells the UE that bootstrapping is required, and that GBA_ME is to be used.
At this point the UE must perform the GBA bootstrapping procedure with the BSF. This process is covered separately in the BSF Server section.
Assuming bootstrapping is successful, the authentication process carries on.
When using GBA_Digest the WWW-Authenticate header includes the realm value 3GPP-bootstrapping-digest@xcap.home1.net. The same applies to subsequent requests sent by the UE.
3. UE sends challenge response using bootstrapped security association
After completing bootstrapping, the UE can retry the request using its bootstrapped security association.
The UE should now know the Bootstrapping Transaction Identifier (B-TID), which is used as the username for the HTTP Digest authentication scheme.
The password used is derived from shared secrets generated in the bootstrapping process, and information about the connection to the NAF. This password is known as the NAF-specific shared key, or Ks_NAF.
The UE generates a challenge response using the standard HTTP Digest (RFC 2617) scheme. The username, password, nonce, opaque, and other values from the challenge are combined to calculate the response value:
GET /rem/sentinel/xcap/simservs.ngn.etsi.org/users/sip:user@home1.net/simservs/~~/communication-diversion HTTP/1.1
Host: xcap.home1.net
Authorization: Digest username="CH8Bm4AA/38BADV/f4DBAQ==@bsf.home1.net",
  realm="3GPP-bootstrapping@xcap.home1.net",
  algorithm=MD5, qop=auth-int,
  uri="/rem/sentinel/xcap/simservs.ngn.etsi.org/users/sip:user@home1.net/simservs/~~/communication-diversion"
  nonce="8982ac96f06922330de40902183fa099",
  opaque="00fffde7845cc67534bdc78f3a9e233",
  nc=00000001,
  cnonce="9856f65d8925a"
  response="43ef1da9e534fb321476a1679ff8256"
4. NAF filter retrieves bootstrap information
The filter receives the challenge response over HTTP, and must now verify that it is correct.
To do this, the filter queries the bootstrap_info Cassandra table to find an entry for the username (B-TID). If an entry exists, it will contain the user’s private identity (IMPI) and also the shared secrets that will be used to calculate Ks_NAF, the password.
The filter also looks up the user’s GBA User Security Settings (GUSS) in the GUSS cache, populated by the BSF. If no bootstrap information or GUSS is found, the filter must reject the request as it does not have enough information to continue.
5. NAF filter validates the bootstrapped user information
Now the filter calculates Ks_NAF, and uses this value as the password in its HTTP Digest calculation. If everything is correct, the filter will calculate the same value that the UE sent in the challenge response. This means the request has been successfully authenticated — the filter can now pass the request to the XCAP servlet.
Before doing so, the filter must also determine which IMS public identities (IMPUs) are associated with the request. This is determined by the ussList element from the user’s GUSS, and also the filter’s settings for service ID, service type and NAF group. See GUSS usage in the NAF Authentication Filter for details.
6. Filter passes request and credentials to XCAP servlet
The user is now authenticated, and the filter knows the public identities associated with the request. The filter adds the X-3GPP-Asserted-Identity header to the request, with the known public identities.
The servlet container knows that the request should to be routed to the XCAP servlet, based on the /rem/sentinel/xcap URL path prefix.
The request header seen by the XCAP servlet looks like this:
GET /rem/sentinel/xcap/simservs.ngn.etsi.org/users/sip:user@home1.net/simservs/~~/communication-diversion HTTP/1.1
Host: xcap.home1.net
X-3GPP-Asserted-Identity: "tel:358504836551", "sip:user@home1.net"
Authorization: Digest username="CH8Bm4AA/38BADV/f4DBAQ==@bsf.home1.net",
  realm="3GPP-bootstrapping@xcap.home1.net",
  algorithm=MD5, qop=auth-int,
  uri="/rem/sentinel/xcap/simservs.ngn.etsi.org/users/sip:user@home1.net/simservs/~~/communication-diversion"
  nonce="8982ac96f06922330de40902183fa099",
  opaque="00fffde7845cc67534bdc78f3a9e233",
  nc=00000001,
  cnonce="9856f65d8925a"
  response="43ef1da9e534fb321476a1679ff8256"
7a. XCAP servlet requests user data over Sh
The XCAP servlet sees that one of the asserted identities ("sip:user@home.net") matches the XCAP User Identity (XUI) in the Request-URI, so allows the request to proceed. If the XUI did not match an asserted identity, the request would be rejected immediately.
The XCAP servlet uses the Sh Cache Microservice to retrieve the supplementary services transparent data for this identity from the HSS. Assuming the data is found, it applies the XCAP selector to extract the requested portion of the XML document, in this case the communication-diversion element.
The XCAP servlet generates a 200 OK response with the communication-diversion element, and returns from its service() method. At this point control returns to the filter.
8. Servlet returns response to filter
If the requested qop (Quality of Protection) parameter was auth-int, the filter must calculate a response digest so that the UE can verify the integrity of the response. The filter calculates the digest over the response body, and adds the Authentication-Info header to the response.
9. Response sent back to UE
Finally the HTTP response is transmitted back to the UE. The response seen at the UE will be something like this:
HTTP/1.1 200 OK
Authentication-Info: qop=auth-int, cnonce="9856f65d8925a", nc=00000001
  rspauth="a8478cea0d1f23ba975af498954c62d"
Content-Type: application/vnd.etsi.simservs+xml
Content-Length: 123

<communication-diversion>
  ...
</communication-diversion>
Authentication Proxy operation
The NAF Authentication Filter also applies authentication processing to requests to the Authentication Proxy, which are intended to be passed to other web applications, rather than XCAP. This is signalled by the URL path starting with /rem/authproxy/ rather than /rem/sentinel/xcap.
In this case, the processing is almost identical to the XCAP case described above, except that the request is now routed to the Proxy Servlet, and step 7a is replaced by the following.
7b. Proxy Servlet forwards the request
DNS "A" records have been set up for new externally-visible hostnames of the back-end web servers which will serve the request, resolving to the externally-visible IP address of the NAF Authentication Filter. This causes requests to those web servers to arrive at the NAF Authentication Filter.
The Proxy Servlet inspects the Host: HTTP header on the incoming request, to determine the service that the request was intended for. It looks up that hostname in its configuration, to see which back-end server it needs to proxy the request to. At this point, if the Proxy Servlet does not recognise the hostname, then it returns a 404 Not found response.
The servlet strips the leading /rem/authproxy from the URL path, and combines it with the mapped hostname to calculate the final URL that will be requested. It strips the Authorization, Host and X-3GPP-Intended-Identity headers from the request, if present, then makes the request.
When the response comes back, the Proxy Servlet passes it back to the filter, and processing continues with step 8 as above.
| |
Ordinarily the Proxy Servlet will use the status code from the back end server in its own response to the filter layer, but if an error occurs sending the request, then the Proxy Servlet may return a 502 Bad gateway response. |
BSF Server
The BSF Server is a SLEE service that handles the GBA bootstrapping procedures (3GPP TS 33.220).
It receives bootstrapping requests from UEs (Ub interface), and contacts the HSS to generate authentication information (Zh interface). If bootstrapping for the UE is successful, the BSF writes an entry to a database, with an expiry time. When the UE later attempts to access the NAF, the NAF reads this database entry as part of its authentication procedure.
BSF Server operation
An overview of the bootstrapping process is shown below.
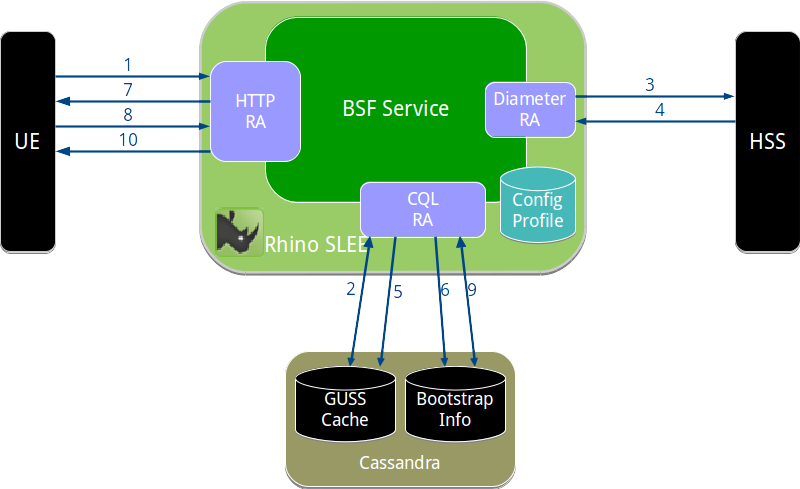
As in NAF Authentication Filter operation, we will describe the BSF by walking through a typical bootstrapping transaction.
1. UE sends bootstrapping request
A NAF has instructed the UE to initiate the bootstrapping process (see NAF filter rejects with challenge).
The UE derives its BSF server’s address, which will be bsf.home1.net for this example. The address is derived from the subscriber’s private identity as per 3GPP TS 23.003 §16.2.
The UE sends an initial bootstrap request to its BSF. This request contains an empty Authorization header containing the private identity and realm, but empty nonce and response parameters. The empty parameters indicate to the BSF that this is a new bootstrapping request.
GET / HTTP/1.1
Host: bsf.home1.net
User-Agent: Some-user-agent/1.0 3gpp-gba-tmpi
Authorization: Digest username="user@home1.net", realm="bsf.home1.net",
  nonce="", uri="/", response=""
If the UE wishes to use the GBA_Digest mechanism for its authentication, then it must include the text 3gpp-gba-digest in its User-Agent header (not shown in this example).
| |
UEs may also use a TMPI (temporary private identity) instead of their actual private identity. This is supported, but not shown in this example. TMPI to IMPI mappings are stored in the impi_by_tmpi Cassandra table. |
The BSF service uses OpenCloud’s HTTP resource adaptor to receive HTTP requests and send responses.
2. BSF checks GUSS cache
The BSF needs to contact the HSS to request authentication information, but first it checks its GUSS cache to obtain the GBA User Security Settings for the subscriber.
If a cached GUSS entry is present, the BSF will send the GUSS timestamp to the HSS in the Zh request, to check if it is still up to date. If there is no GUSS entry, or it does not have a timestamp, the HSS will return its latest GUSS in the Zh response.
The BSF uses OpenCloud’s Cassandra-CQL resource adaptor to perform Cassandra queries.
3. BSF sends Zh request to HSS
The BSF sends a Zh request (see 3GPP TS 29.109 §4.2) using the Diameter Base resource adaptor. The Diameter Base RA can be configured to support many Diameter applications. In a Sentinel Authentication Gateway installation it is automatically configured to support the Zh Diameter application and AVPs.
The exact Zh request parameters will depend on which authentication method was requested by the UE: GBA_ME (which requires an AKA auth vector) or GBA_Digest (which requires a SIP-Digest auth vector).
Multimedia-Auth-Request (Command-Id 303, Application-Id 16777221 (Zh))
  Session-Id: "12345@bsf.home1.net"
  Vendor-Specific-Application-Id: (grouped)
    Vendor-Id: 10415 (3GPP)
    Auth-Application-Id: 16777221 (Zh)
  Auth-Session-State: NO_STATE_MAINTAINED
  Origin-Host: "bsf.home1.net"
  Origin-Realm: "home1.net"
  Destination-Realm: "home1.net"
  Destination-Host: "hss.home1.net"
  User-Name: "user@home1.net"
GUSS-Timestamp: <timestamp>Multimedia-Auth-Request (Command-Id 303, Application-Id 16777221 (Zh))
Session-Id: "12345@bsf.home1.net"
Vendor-Specific-Application-Id: (grouped)
Vendor-Id: 10415 (3GPP)
Auth-Application-Id: 16777221 (Zh)
Auth-Session-State: NO_STATE_MAINTAINED
Origin-Host: "bsf.home1.net"
Origin-Realm: "home1.net"
Destination-Realm: "home1.net"
Destination-Host: "hss.home1.net"
User-Name: "user@home1.net"
GUSS-Timestamp: <timestamp>
SIP-Auth-Data-Item: (grouped)
3GPP-SIP-Authentication-Scheme: "SIP Digest"4. HSS returns Zh response
The HSS generates a new authentication vector (AV) and sends this in the Zh response. If the GUSS has been updated since the GUSS timestamp sent in the Zh request, the new GUSS is included in the response.
4a. GBA_ME Zh response
The returned AKA AV is made up of these values:
-
RAND— a randomly generated 16-byte value -
AUTN— the authentication token, contains a sequence number that the UE can verify -
CK— the confidentiality key -
IK— the integrity key -
XRES— the expected response from the UE.
Multimedia-Auth-Answer (Command-Id 303, Application-Id 16777221 (Zh))
  Session-Id: "12345@bsf.home1.net"
  Vendor-Specific-Application-Id: (grouped)
    Vendor-Id: 10415 (3GPP)
    Application-Id: 16777221 (Zh)
  Auth-Session-State: NO_STATE_MAINTAINED
  Origin-Host: "hss.home1.net"
  Origin-Realm: "home1.net"
  Result-Code: 2000
  SIP-Auth-Data-Item: (grouped)
    SIP-Authenticate: RAND || AUTN
    Confidentiality-Key: CK
    Integrity-Key: IK
    SIP-Authorization: XRES
  GBA-UserSecSettings: <guss id="user@home1.net">...</guss>
4b. GBA_Digest Zh response
The returned SIP-Digest AV is made up of these values:
-
HA1— a hashed value derived from the username and password -
Realm— the authentication realm for the user
Multimedia-Auth-Answer (Command-Id 303, Application-Id 16777221 (Zh))
  Session-Id: "12345@bsf.home1.net"
  Vendor-Specific-Application-Id: (grouped)
    Vendor-Id: 10415 (3GPP)
    Application-Id: 16777221 (Zh)
  Auth-Session-State: NO_STATE_MAINTAINED
  Origin-Host: "hss.home1.net"
  Origin-Realm: "home1.net"
  Result-Code: 2000
  SIP-Digest-Authenticate: (grouped)
    Digest-Realm: Realm
    Digest-HA1: HA1
  GBA-UserSecSettings: <guss id="user@home1.net">...</guss>
5. BSF stores new GUSS
If the Zh response included a new GUSS document, this is stored in the BSF’s GUSS cache.
6. BSF stores authentication vector
The BSF stores the AV values in the auth_vector Cassandra table, with an expiry time (default 60s). When the challenge response arrives, any BSF node in the cluster can process it using the stored authentication vector details.
7. BSF sends challenge
The BSF uses the HTTP RA to send the UE a challenge, using values from the authentication vector.
HTTP/1.1 401 Unauthorized
Server: sentinel-gaa-bsf/1.0.0 3gpp-gba-tmpi
Date: Thu, 08 Jan 2004 10:13:17 GMT
WWW-Authenticate: Digest realm="bsf.home1.net",
  nonce=base64(RAND || AUTN),
  algorithm=AKAv1-MD5,
  qop="auth-int",
  opaque="37a63ff9d543ca979f467b05632670d1"
8. UE sends challenge response
The UE extracts the RAND and AUTN values from the nonce parameter. Because the UE shares the secret K with the HSS, it can independently calculate CK, IK, and RES.
The UE sends a challenge response in its next HTTP GET request.
GET / HTTP/1.1
Host: bsf.home1.net
User-Agent: Some-user-agent/1.0 3gpp-gba-tmpi
Authorization: Digest username="user@home1.net", realm="bsf.home1.net",
  nonce=base64(RAND || AUTN), uri="/",
  nc=00000001, cnonce="6e47229c626bb136c135"
  response=(digest calculated using RES value)
9. BSF checks response, generates B-TID
The BSF receives the challenge response over HTTP, and checks that the digest value in the response directive matches the value calculated by the BSF using XRES. If the digest values match, this means the UE has successfully authenticated. This value could have only been computed with knowledge of shared secret K, stored on the HSS and the UE’s tamper-proof SIM.
The BSF creates a Bootstrap Transaction Identifier (B-TID), which is used as the UE’s user name in subsequent NAF requests. The B-TID identifies a security association between the UE and the BSF. The lifetime of this security association is determined by the user’s GUSS, configured on the HSS.
The B-TID, RAND, CK and IK values are written to a record in the bootstrap_info Cassandra table. The record is expired automatically according to the security association’s lifetime. The NAF Authentication Filter will read this record when authenticating requests to the NAF; see NAF filter retrieves bootstrap information.
10. BSF sends success response to UE
Finally the BSF sends an HTTP 200 OK response to the UE. This response contains the bootstrapped security association info in XML form, as per 3GPP TS 24.109 Annex C.
HTTP/1.1 200 OK
Server: sentinel-gaa-bsf/1.0.0 3gpp-gba-tmpi
Authentication-Info: rspauth="eb52a0caba3df288aff385925c1d05f9"
  nc=00000001, cnonce="6e47229c626bb136c135"
Content-Type: application/vnd.3gpp.bsf+xml
Content-Length: 123

<?xml version="1.0" encoding="UTF-8"?>
<BootstrappingInfo xmlns="uri:3gpp-gba">
  <btid>CH8Bm4AA/38BADV/f4DBAQ==@bsf.home1.net</btid>
  <lifetime>2016-02-14T13:20:00Z</lifetime>
</BootstrappingInfo>
Now the UE has enough information to authenticate with a NAF; see UE sends challenge response using bootstrapped security association.
GUSS Usage
GUSS stands for "GBA (Generic Bootstrapping Architecture) User Security Settings."
These settings are provisioned for each subscriber in the HSS. This section covers how the Sentinel Authentication Gateway components access and use the GUSS.
What is the GUSS?
The GUSS for a particular subscriber determines what applications (NAFs) they can access, and may also define custom network- or application-specific parameters. It also specifies the lifetime of a bootstrapped security association, sometimes referred to as the "key lifetime."
The authoritative source for GUSS is the HSS. Consult your HSS documentation for details on provisioning GUSS.
The external representation of the GUSS is an XML document using the schema defined in 3GPP TS 29.109 Annex A. Here is an example:
<guss id="358500004836551@home1.net" xmlns="urn:3gpp:gba:GBAGUSSSchema-R9:2010-02">
<bsfInfo>
<lifeTime>86400</lifeTime>  </bsfInfo>
<Extension>
<timestamp>2008-09-10T11:12:13Z</timestamp>
</bsfInfo>
<Extension>
<timestamp>2008-09-10T11:12:13Z</timestamp>  </Extension>
<ussList>
<uss id="0" type="0" nafGroup="A">
</Extension>
<ussList>
<uss id="0" type="0" nafGroup="A">  <uids>
<uid>tel:+358504836551</uid>
<uid>sip:user@home1.net</uid>
</uids>
</uss>
<uss id="1" type="1" nafGroup="B">
<uids>
<uid>tel:+358504836551</uid>
<uid>sip:user@home1.net</uid>
</uids>
</uss>
<uss id="1" type="1" nafGroup="B">  <uids>
<uid>sip:other@home1.net</uid>
</uids>
<flags>
<flag>1</flag>
<uids>
<uid>sip:other@home1.net</uid>
</uids>
<flags>
<flag>1</flag>  </flags>
</uss>
</ussList>
</guss>
</flags>
</uss>
</ussList>
</guss>| The lifetime of a security association created for this subscriber, in seconds. | |
| The timestamp showing when the GUSS was last updated. | |
| A USS entry containing two public identities. | |
| A USS entry containing another public identity. | |
| Flags that apply to the service type. |
The GUSS cache
The BSF Server maintains a cache of GUSS documents for subscribers that it has authenticated. This cache is implemented as a Cassandra table, by default called guss_by_impi [1]. As the name implies, this table is indexed by the IMPI, the subscriber’s IMS private identity.
The GUSS cache serves two purposes:
-
When querying the HSS over Zh, the BSF can use the GUSS timestamp mechanism so that the HSS only returns the GUSS if it has changed since the last timestamp. Otherwise the cached GUSS can be used.
-
When any NAF Authentication Filter node needs the GUSS, it can be obtained from the replicated Cassandra database without the involvement of the BSF or HSS.
GUSS usage in the BSF Server
| |
Refer to the listing above to see the elements discussed here. |
The BSF Server uses these parts of the GUSS:
- Lifetime
-
The
/guss/bsfInfo/lifeTimeelement specifies how long a bootstrapped security association is valid for, in seconds. If a UE attempts to authenticate with a NAF, using a security association that has expired, the NAF must instruct the UE to repeat the bootstrapping process over the Ub interface. While the security association is valid, the UE can authenticate with NAFs without needing to contact the BSF again. - Timestamp
-
The optional
/guss/Extension/timestampelement specifies when the HSS last updated the GUSS. This is used to implement the simple caching mechanism specified in 3GPP TS 29.109 §4.2. If present, the BSF sends the last timestamp to the HSS in theGUSS-TimestampAVP in the Diameter Zh request. If the HSS supports this mechanism, and the GUSS has not been modified since the timestamp, then the Zh response just includes a flag to say the cached GUSS is still valid. Otherwise the Zh response will include the latest GUSS from the HSS.
If the cached GUSS does not have the timestamp element, the BSF omits the GUSS-Timestamp AVP from the Diameter Zh request. This forces the HSS to return the current GUSS in the Zh response. Upon receiving the GUSS in the Zh response, the BSF will store it in the GUSS cache table.
If the GUSS for a subscriber cannot be found, or the lifeTime element is missing, the BSF uses a default lifetime of 86400s (24 hours).
GUSS usage in the NAF Authentication Filter
| |
Refer to the listing above to see the elements discussed here. |
The NAF Authentication Filter retrieves the GUSS from the GUSS cache table, and looks at the /guss/ussList element. This may contain zero or more uss element for different types of service or NAF groups.
The filter selects the uss element(s) that match its configured service ID, type and NAF group. The uid elements inside the uss element specify the public identities for the subscriber that apply to the particular NAF.
If no matching uss elements were selected, then the filter cannot determine a public identity for its NAF (XCAP in our case), so it must reject the request. If one or more uss elements matched, all of the public identities are added to the X-3GPP-Asserted-Identity header, which will be used by XCAP to authorize the request.
If the filter could not retrieve the GUSS for this subscriber, then it rejects the request. The GUSS is essential because it specifies the public identities that are accessing the NAF.
Getting Started
This section explains how to install the Sentinel Authentication Gateway BSF Server and NAF Authentication Filter.
It includes procedures for:
Preparing to install the Sentinel Authentication Gateway
Before you install the Sentinel Authentication Gateway, you need to download the SDK package.
There are three possible installation methods for Sentinel Authentication Gateway:
-
Install the Sentinel Authentication Gateway in the same Rhino as an existing Sentinel-VoLTE installation.
-
Use the Sentinel Authentication Gateway SDK package to download and install Rhino and the Sentinel Authentication Gateway.
-
Install and configure Rhino and the JVM manually, then use the SDK package to deploy the Sentinel Authentication Gateway into your Rhino.
Existing Sentinel-VoLTE installation
Check the Sentinel Authentication Gateway Compatibility Guide to make sure your existing Sentinel-VoLTE installation meets the product dependencies for Sentinel Authentication Gateway.
For this option, your existing Sentinel-VoLTE license in Rhino can be used.
Standalone Sentinel Authentication Gateway installations
For options 2 and 3, you need to download the required software and get a license.
Using the SDK package to install both the Rhino SDK and Sentinel Authentication Gateway software is recommended for functional testing or experimentation with Sentinel Authentication Gateway. For production installs and/or load testing it is recommended to manually install and configure Rhino and the JVM.
Cassandra Database
A Cassandra Database is required for a Sentinel Authentication Gateway installation. Cassandra needs to be Installed and Configured with the opencloud_gaa_bootstrap_info keyspace.
Download the Sentinel Authentication Gateway SDK package
To get the latest Sentinel Authentication Gateway SDK package go to https://repo.opencloud.com/artifactory/opencloud-sentinel-gaa-2.9.0/opencloud/sentinel-gaa/2.9.0/sentinel-gaa-sdk/. Choose the version with the highest release number. The current version is sentinel-gaa-sdk-2.9.0.5.zip.
| |
You will need OpenCloud-supplied credentials to download the package. |
Get required software
| |
Check the Sentinel Authentication Gateway Compatibility Guide for supported versions before installing any software. |
You’ll need the following software to run Sentinel Authentication Gateway:
| Software | Download from… |
|---|---|
|
Optional - to be used when installing and configuring Rhino manually |
|
Install and configure Rhino and the JVM
Optionally you can install and configure Rhino and the JVM for use with Sentinel Authentication Gateway. This is recommended for production deployments, and clustered setups.
Alternatively for Proof of Concept and lab functional testing it is recommended to use the SDK as described in Installing the BSF Server
Install Rhino
1 |
Start by choosing a location to extract the contents of the Rhino package. We’ll refer to this directory as |
|---|---|
2 |
Rhino must be started at least once to generate the necessary configuration files. To start Rhino, in the start-rhino.sh (or |
3 |
Wait until Rhino is ready. It prints the following message in its log when ready: SLEE successfully started on node(s) [101] |
4 |
Stop Rhino by executing in the stop-rhino.sh --nice |
| |
For more about installing and configuring the Rhino TAS, please see the Rhino Documentation. |
Configure Rhino and the JVM
Configure the Java Garbage Collector for improved performance
To improve the performance of the Java GC, add -XX:+ParallelRefProcEnabled to the GCOPTIONS variable in $RHINO_HOME/etc/defaults/read-config-variables.
For example:
GCOPTIONS="\
    -XX:+UseParNewGC \
    -XX:MaxNewSize=${MAX_NEW_SIZE} -XX:NewSize=${NEW_SIZE} \
    -XX:MaxPermSize=256m -XX:PermSize=256m \
    -Xms${HEAP_SIZE} -Xmx${HEAP_SIZE} \
    -XX:SurvivorRatio=128 \
    -XX:MaxTenuringThreshold=0 \
    -Dsun.rmi.dgc.server.gcInterval=0x7FFFFFFFFFFFFFFE \
    -Dsun.rmi.dgc.client.gcInterval=0x7FFFFFFFFFFFFFFE \
    -XX:+UseTLAB \
    -XX:+DisableExplicitGC \
    -XX:+ParallelRefProcEnabled \
    ${VERBOSEGC} \
    ${CMSOPTIONS}"
Deploying Sentinel Authentication Gateway from a different host
If you want to install Sentinel Authentication Gateway in top of an already running Rhino, and you are deploying Sentinel Authentication Gateway from a different host to your Rhino host, then you’ll need to set the socket permissions.
You do this by adding the host’s address to Rhino’s mlet configuration file — which is RHINO_HOME/config/mlet.conf for RhinoSDK or RHINO_HOME/node-xxx/config/permachine-mlet.conf for Rhino Production, where xxx is the Rhino node ID.
In the configuration file, look for the XML tag <security-permission-spec> and add the following entry, replacing IP_ADDRESS with your installer’s IP address:
<mlets>
    <mlet enabled="true">
        <classpath>
            <jar-url>$${rhino.dir.base.url}/lib/jmxr-adaptor.jar</jar-url>
            <security-permission-spec>
        .... other entries

        permission java.net.SocketPermission "IP_ADDRESS", "accept,resolve";

        .... other entries
        </security-permission-spec>
        </classpath>
    </mlet>
</mlets>| |
Start Rhino to load the new configuration
To start Rhino, in the This applies the Rhino and JVM configuration. |
Get a license
| |
To install the Sentinel Authentication Gateway you need a license to run Sentinel Authentication Gateway from OpenCloud. |
To install your license file:
1 |
Make sure Rhino is started and running. |
|---|---|
2 |
Go to the |
3 |
In this directory, start the Rhino Console with the |
4 |
In the Rhino Console, execute this command: installlicense [PATH_TO_LICENSE_FILE] ( |
Ports
If you’re using the standard configuration, the following ports need to be open on the Sentinel Authentication Gateway TAS host’s firewall.
| Port | Purpose |
|---|---|
80 |
BSF HTTP traffic (Ub interface) |
8001 |
BSF HTTPS traffic (Ub interface) |
8080 |
REM GUI |
8443 |
NAF HTTPS traffic (Ua interface) |
1199-1203 |
Java RMI access |
If you’re using another configuration, the firewall should be configured for the non-standard ports. Other ports may be opened as needed. For example, if ssh is used to administer a node, then port 22 would be opened.
Installing the BSF Server
This section explains how to install the BSF Server on the OpenCloud Rhino TAS.
The Sentinel Authentication Gateway BSF Server is a SLEE service deployed on OpenCloud Rhino. It is installed using the Sentinel SDK infrastructure, which takes care of downloading any dependent SLEE components and automatically deploying them on Rhino.
To install the Sentinel Authentication Gateway BSF Server:
| |
Use Ant from the SDK or configure your own
The Ant build tool is required during installation. The Sentinel Authentication Gateway SDK includes a copy of Ant that is preconfigured with the necessary libraries for retrieving SDK dependencies. To use the SDK’s Ant, run You can use your own Ant installation (version 1.9 or later) by copying the bundled libraries to your $ cd ~/sentinel-gaa/sentinel-gaa-sdk/build/ant $ cp ivy.jar ant-build-support.jar ~/.ant/lib In the following examples, we assume the
Install with or without Sentinel VoLTE
The BSF Server may be installed with or without Sentinel VoLTE (see the Sentinel VoLTE dependency section). The following instructions are the same whether Sentinel VoLTE is installed or not. |
1.1. Unzip sentinel-gaa-sdk-2.9.0.x.zip
To unzip sentinel-gaa-sdk-2.9.0.x.zip:
1 |
Copy the downloaded install zip file to a machine where Rhino and the BSF Server will run.
$ mkdir ~/sentinel-gaa |
||
|---|---|---|---|
2 |
Unzip. This creates the directory |
1.2. Install Rhino SDK (optional)
This step is not required if you have already installed a Rhino instance for Sentinel Authentication Gateway or if you are using an existing Sentinel VoLTE installation.
For testing and evaluation purposes, you can have the Sentinel Authentication Gateway SDK download and start a Rhino SDK instance. Sentinel Authentication Gateway can then be deployed into this instance.
To install Rhino using the SDK:
1 |
Run the $ cd ~/sentinel-gaa/sentinel-gaa-sdk/rhino-sdk $ ant install-rhino The |
|---|---|
2 |
Start the Rhino SDK. $ ant start-rhino |
1.3. Modify SDK Properties
If you installed your own Rhino, you need to modify the rhino.home property in the sdk.properties file.
$ cd ~/sentinel-gaa/sentinel-gaa-sdk
edit the sdk.properties file. Replace this line with the location of your rhino installation. e.g.
rhino.home=/home/ubuntu/rhino
1.4. Go Offline (optional)
Before installing you can take the SDK offline if required. This will create and populate an offline repository with the artifacts needed for installation.
If you go offline, internet access will not be needed for the installation, the offline repo will be used instead.
You can skip this step, in which case the install will use the internet to download the installation artifacts.
To go offline:
$ cd ~/sentinel-gaa/sentinel-gaa-sdk
$ ./build/bin/go-offline

Mirroring OpenCloud dependencies to repositories/opencloud-offline-mirror

Copying SDK index to offline repository...
Copying SDK infrastructure dependencies to offline repository...
Copying modules to offline repository...

Installing module 681/681

Finished copying repository artifacts.

Updating 'ivy.properties' to use offline resolvers:
 ivy.sdk-resolvers.file=offline-resolvers.xml
 ivy.cache.root=${sdk.root}/build/target/ivy-caches/offline-resolvers.cache

Configuration complete. SDK is now in 'offline' mode. Use 'go-online' to return to online mode.
1.5. Create a BSF deployment module
1 |
Run the $ cd ~/sentinel-gaa/sentinel-gaa-sdk $ ./build/bin/sdkadm This starts the interactive |
|---|---|
2 |
Run the |
The deployment module is created in the deploy-bsf directory. This describes the configuration and dependencies that will be deployed into Rhino.
1.6. Edit the default configuration
The default configuration properties for the BSF are in the file deploy-bsf/config/config.properties, as shown below:
zh-server.realm=zh-realm
zh-server.hostname=zh-server.fqdn
zh-server.address=zh-server.fqdn
zh-server.uri=aaa\://zh-server.fqdn\:3868

zh-client.realm=zh-realm
zh-client.hostname=zh-client

http-ra.address=0.0.0.0
http-ra.port=8001

cassandra-cql-ra.host=localhost
cassandra-cql-ra.port=9042

bsf.tracelevel=Info
platform.operator.name=
diameterbase.tracelevel=Info
These should be updated as appropriate for your environment. In particular the zh-* properties specify how the BSF contacts its HSS:
| Property | Description | Example |
|---|---|---|
zh-server.realm |
The HSS Diameter realm. This will be used in Destination-Realm AVPs. |
|
zh-server.hostname |
The FQDN of the HSS. This will be used in Destination-Host AVPs. |
|
zh-server.uri |
The |
|
zh-server.address |
May be used to connect to an address different from the HSS address specified above. This can be useful during testing to connect to a simulator while leaving the other HSS properties unchanged. If not needed, just set this to the same value as |
|
zh-client.realm |
The BSF’s Diameter realm. This will be used in Origin-Realm AVPs. |
|
zh-client.hostname |
The FQDN of the BSF. This will be used in Origin-Host AVPs. |
|
These properties can be updated after deployment. For more information see Updating the configuration below, and also BSF Configuration.
1.7. Publish the BSF deployment module
Before deploying, it is necessary to "publish" our BSF deployment module. This creates the required deployment artifacts that the SDK tools will use to deploy the module and its dependencies. The default Ant target in the deploy-bsf module performs this publishing step.
$ cd deploy-bsf
$ ant
1.8. Run the deploy, bind, and configure scripts
The following Ant targets will deploy the BSF service (and its dependencies), and apply the default configuration.
$ ant deploy-with-deps
$ ant bind-with-deps
$ ant configure-with-deps
The BSF service will now be active.
1.9. Create the Sentinel configuration profiles
| |
If you installed Sentinel Authentication Gateway on top of an existing Sentinel-VoLTE installation, you can skip this step. |
If you installed Sentinel Authentication Gateway in Rhino without an existing Sentinel-VoLTE installation, some configuration needs to be copied from Sentinel-VoLTE. This can be done using REM (preferred) or using the Rhino console.
1.9.1. Using REM
First, connect REM to the node running Sentinel-VoLTE. Go to Management → Profiles. Using the green and white arrows next to the profile tables, export the following three profile tables:
-
SentinelConfigurationTable, -
NormalizationFeatureConfigProfileTable, and -
MMTelCDIVConfigProfileTable.
Now connect REM to the node running the BSF. Go to Management → Profiles. Create the following three profile tables:
-
Profile spec
SentinelConfigurationProfile, table nameSentinelConfigurationTable. -
Profile spec
sentinel-core-normalizer-config-profile, table nameNormalizationFeatureConfigProfileTable. -
Profile spec
mmtel-cdiv-profile, table nameMMTelCDIVConfigProfileTable.
Finally, import the three exported profile tables into the BSF node.
1.9.2. Using the Rhino console.
Alternatively, if using the Rhino console to copy the configuration manually, the following commands must be run (replacing the examples below with the right configuration):
cd ~/RhinoSDK/client/bin

./rhino-console createprofiletable name=SentinelConfigurationProfile,vendor=OpenCloud,version=2.7.1 SentinelConfigurationTable
./rhino-console createprofiletable name=sentinel-core-normalizer-config-profile,vendor=OpenCloud,version=2.7.1 NormalizationFeatureConfigProfileTable
./rhino-console createprofiletable name=mmtel-cdiv-profile,vendor=OpenCloud,version=2.7.1 MMTelCDIVConfigProfileTable

./rhino-console createprofile SentinelConfigurationTable SentinelConfiguration PlatformOperator OpenCloud DefaultNetworkOperator OpenCloud HttpParameterForHttpDetermineNetworkOperator ImsiMccMnc DefaultOcsEntityId DiameterRoOcs
./rhino-console createprofile NormalizationFeatureConfigProfileTable OpenCloud:::: CountryCode 64 InternationalEscapeCode 00 MinNormalizableLength 0 NationalPrefix 0 NetworkDialingCode 6 NormalizeTo international ProfileVersion 1
./rhino-console createprofile MMTelCDIVConfigProfileTable OpenCloud:::: NonProvisionableRetargetURIs [sip:111,tel:111,111] MaxDiversionAction REJECT
Updating the configuration
You can update the configuration after deployment by editing the config/config.properties file and running the configure target from your deploy-bsf directory:
$ vi config/config.properties
$ ant publish-local configure
| |
When applying a new configuration, the Sentinel SDK’s See BSF Configuration for detailed information on how the BSF is configured, to plan changes with minimal disruption. |
Installing the NAF Filter
This section explains how to install the NAF Authentication Filter in the Sentinel VoLTE XCAP server.
The NAF Authentication Filter is deployed with the Sentinel VoLTE XCAP web application to provide GAA authentication for XCAP requests.
There are three options for installing the NAF Filter:
NAF Filter on an Existing Sentinel VoLTE Installation
| |
This page assumes that you already have Tomcat running, with REM deployed and the Sentinel VoLTE Provisioning module installed, as described in Installing the Sentinel VoLTE Provisioning Module. |
To install the NAF Authentication Filter module:
1 |
Copy |
|---|---|
2 |
Edit the filter configuration for your environment. |
3 |
Edit the NAF Authentication Filter logging if you want debug logging. |
4 |
Restart Tomcat: cd $TOMCAT_HOME ./bin/catalina.sh stop ./bin/catalina.sh start |
Standalone Installation of the NAF Filter
The installation process for the filter is very similar to Installing the Sentinel VoLTE Provisioning Module, with some changes for the Sentinel Authentication Gateway.
For completeness, the entire process is described here.
| |
The Sentinel VoLTE Provisioning module is part of Sentinel VoLTE and includes the Sentinel VoLTE XCAP server. Check the Sentinel Authentication Gateway Compatibility Guide for the required version of REM, installed with Apache Tomcat. |
Prerequisites
You’ll need these files to install the Sentinel VoLTE Provisioning module:
apache-tomcat-<version>.zip
rhino-element-manager-<version>.zip
sentinel-volte-element-manager-<version>.jar
sentinel-gaa-em-<version>.em.jar
Below are steps to:
Set up Tomcat
See Running REM on Apache Tomcat in the REM Guide.
| |
See the Tomcat 8 - SSL How-To docs for help setting up SSL in Apache Tomcat. |
Install the REM plugins
To install the REM plugins for the Sentinel VoLTE Provisioning and NAF Authentication Filter modules:
1 |
Copy |
|---|---|
2 |
Edit the Filter Configuration if necessary. |
Customize plugin logging
1 |
Edit rootLogger.level=INFO
rootLogger.appenderRef.console.ref=CONSOLE
rootLogger.appenderRef.file.ref=FILE
appender.CONSOLE.type = Console
appender.CONSOLE.name = CONSOLE
appender.CONSOLE.layout.type = PatternLayout
appender.CONSOLE.layout.pattern = %d{ABSOLUTE} %-5p <%t> [%c] %m%n
appender.FILE.type = RollingFile
appender.FILE.Name= FILE
appender.FILE.filename = ${rem.home}/rem.log
appender.FILE.layout.type = PatternLayout
appender.FILE.layout.pattern = %d{yyyy-MM-dd HH:mm:ss,SSS} %-5p <%t> [%c] %m%n
logger.rem.name=rem
logger.rem.level=INFO
logger.openjpa.name=openjpa
logger.openjpa.level=INFO
logger.wink.name=org.apache.wink
logger.wink.level=INFO
# Logging from NAF authentication filter
logger.gaa.name=sentinel.gaa
logger.gaa.level=INFO
# Uncomment for subscriberdata cache eviction logging
#logger.subscriberdatacache.name = rem.server.sentinel.subscriberdata.cache
#logger.subscriberdatacache.level = TRACE
logger.audit.name=sentinel.audit
logger.audit.level=INFO
logger.audit.additivity=false
logger.audit.appenderRef.audit.ref=AUDIT
appender.AUDIT.type = RollingFile
appender.AUDIT.name = AUDIT
appender.AUDIT.fileName = ${rem.home}/sentinel-audit.log
appender.AUDIT.layout.type = PatternLayout
appender.AUDIT.layout.Pattern = "%d{yyyy-MM-dd HH:mm:ss,SSS}", "%c{1}", %m%n
|
|---|
Multiple Installations of the NAF Filter
It is possible to have multiple NAF filters connect to the same BSF server.
Depending on your load profile it may be necessary to balance NAF traffic across multiple NAFs. For example:
-
If you configure a short
sentinel.gaa.nonce-lifetime, then you will likely receive a similar number of requests to the BSF and NAF. -
If you configure a long
sentinel.gaa.nonce-lifetime, then you may receive more requests to the NAF than the BSF. -
If you have multiple NAF groups configured in your HSS, you will need to install a separate NAF Authentication Filter for each NAF group.
| |
This page explains how to install a second NAF Authentication Filter on a separate server. |
Prerequisites
You need these files to install a second NAF Authentication Filter:
apache-tomcat-<version>.zip
You need to copy these files from your existing Sentinel Authentication Gateway installation:
$TOMCAT_HOME/webapps/rem.war
$TOMCAT_HOME/bin/setenv.sh
$TOMCAT_HOME/bin/rem-rmi.jar
$TOMCAT_HOME/rem_home
You also need to install the Java JDK on the new server.
Below are procedures to set up tomcat, copy files from the original install, connect to the remote BSF, and restart Tomcat.
Set up Tomcat
To set up Apache Tomcat for the new Sentinel Authentication Gateway installation:
1 |
Unzip unzip ~/Downloads/apache-tomcat.zip cd apache-tomcat* export TOMCAT_HOME=`pwd` |
||
|---|---|---|---|
2 |
Enable SSL for Apache Tomcat.
|
Copy files from the original install
To copy the required files:
1 |
Copy the file mv ~/Downloads/setenv.sh $TOMCAT_HOME/bin/setenv.sh |
||
|---|---|---|---|
2 |
Copy the file mv ~/Downloads/rem-rmi.jar $TOMCAT_HOME/bin/rem-rmi.jar |
||
3 |
Copy the file mv ~/Downloads/rem.war $TOMCAT_HOME/webapps/ |
||
4 |
Copy the mv ~/Downloads/rem_home $TOMCAT_HOME/
|
||
4 |
Edit the Filter Configuration if necessary. |
Connect to the remote BSF
1 |
Start Tomcat: cd $TOMCAT_HOME ./bin/catalina.sh start
|
||
|---|---|---|---|
2 |
Connect to your remote BSF server:
|
||
3 |
Populate the XCAP host mappings for the new NAF Authentication Filter installation:
|

Now you can send NAF requests to either naf.home1.net or naf2.home1.net
Post-installation Tasks
After installing the BSF server and NAF filter, you’ll need to update the XCAP server, configure HTTP port mapping and optionally create init.d scripts
Update the XCAP server
To configure the XCAP Server for the Sentinel Authentication Gateway, you need to populate XCAP server settings and MMTel service data.
Populate XCAP server settings and MMTel service data
There are several configuration pages in REM for XCAP connectivity and MMTel service data mappings that must be populated, including the required settings to connect to the Sh Cache Microservice. his can be done using the script sentinel-volte-mappings-config. This file is located in the build/bin directory of the Sentinel Authentication Gateway SDK.
This can be executed from your Sentinel Authentication Gateway’s command line, provided the Java Runtime Environment (v 7+) is installed. The command must be given these arguments:
| Argument | What it specifies |
|---|---|
-u (--username) |
Your Rhino Element Manager (REM) username. |
-pw (--password) |
Your Rhino Element Manager (REM) password. |
-h (--hostname) |
The hostname or IP address of your Rhino Element Manager (REM). |
-p (--port) |
The port of your Rhino Element Manager (REM). |
-n (--network-operator) |
The network operator name. |
-r (--rhino-instance-id) |
The Rhino Instance ID. |
-s (--serverurl-shcm) |
The URL for the Sh Cache Microservice (required) |
-sph (--shcm-proxy-host) |
The proxy host used to connect to the Sh Cache Microservice (optional) |
-sph (--shcm-proxy-port) |
The proxy port used to connect to the Sh Cache Microservice (optional) |
| |
The hostname value must match your NAF server, e.g. naf.home1.net. |
| |
The rhino-instance-id value equates to the Rhino instance where your BSF is deployed, e.g. Local if you have Rhino and REM on the same host. |
Here is an example command:
cd ~/sentinel-gaa/sentinel-gaa-sdk
./build/bin/sentinel-volte-mappings-config -u emadm -pw password -h naf.home1.net -p 8080 -r Local -n OpenCloud -s http://localhost:8088/shcache/v1
| |
To see a listing of the required arguments, from the command line, execute the script without any arguments. |
Configure HTTP port mapping
The BSF Server receives HTTP requests via the HTTP Resource Adaptor (HTTP RA) running on Rhino. In the default BSF configuration, the HTTP RA listens on port 8001; however for a production deployment it needs to receive requests on port 80, the standard HTTP port.
On Unix systems, only processes running as the super user (root) can listen on ports below 1024. Rhino is a multi-purpose platform, running potentially many different kinds of services, so running it as root is not recommended. Instead, we can use the operating system’s port translation features to redirect traffic on port 80 to a different port where the HTTP RA is listening.
Use iptables to redirect port 80
Most Linux distributions have iptables preinstalled. This is a program for configuring the Linux kernel’s firewall, including port translation.
Below are the iptables commands for redirecting port 80 traffic to port 8001. These include procedures to:
Add rules to redirect port 80 traffic
$ sudo iptables -t nat -A PREROUTING -p tcp --dport 80 -j REDIRECT --to-port 8001
| Redirects connections to port 80 from external hosts. | |
| Redirects connections to port 80 from processes on the same host. |
To delete these rules, simply replace -A with -D in the above commands.
Remove redirection rules
$ sudo iptables -t nat -D PREROUTING -p tcp --dport 80 -j REDIRECT --to-port 8001
$ sudo iptables -t nat -D OUTPUT -p tcp -d 127.0.0.0/8 --dport 80 -j REDIRECT --to-port 8001
The Linux firewall’s nat (network address translation) tables can be viewed with the iptables -L command. With the HTTP port translation applied as above, you should see something like the example below.
View the nat tables
$ sudo iptables -t nat -L -n
The -n parameter disables name service lookups. |
Create init.d scripts
There are two init.d scripts for Ubuntu Linux which make starting and stopping Rhino and REM easier:
Note: These are illustrative and useful for Proof of concept rather than production environments.
To set these up:
1 |
Copy the script to the host server’s sudo cp rhino /etc/init.d sudo cp rem /etc/init.d |
|---|---|
2 |
Make the script executable: |
3 |
Refresh, with the sudo update-rc.d rhino defaults 99 sudo update-rc.d rem defaults 99 |
Sample initd Scripts
| |
These sample scripts are illustrative init.d scripts for Rhino and REM |
For production installations use production Rhino’s own init.d scripts rather than these.
Sample Rhino script
#!/bin/bash
#
# Manage the Rhino SLEE.
# Put this file in /etc/init.d and symlink that in /etc/rc?.d

RHINO_HOME=/home/ubuntu/sentinel-gaa-sdk/rhino-sdk/RhinoSDK
RHINO_USER=ubuntu

case "$1" in
start)
    # This command will fail nicely if that file is not there, so
    #  checking for that file's existence is not necessary.
        echo "Starting the Rhino SLEE"
    sudo su - ${RHINO_USER} -c ${RHINO_HOME}/start-rhino.sh > /dev/null 2>&1 &
        # logs will be in ${RHINO_HOME}/work/log
    ;;

stop)
        echo "Stopping the Rhino SLEE"
        [ -d ${RHINO_HOME} ] && [ -x ${RHINO_HOME}/stop-rhino.sh ] \
        && ${RHINO_HOME}/stop-rhino.sh --nice
    ;;

*)
    echo "Usage: $0 { start | stop }"
    exit 1
    ;;
esac
exit 0
Sample REM script
#!/bin/sh
#
# Rhino Element Manager start/stop script.
#
#

# Location of the Rhino Element Manager
REM_HOME=/home/ubuntu/sentinel-gaa-sdk/rhino-sdk/RhinoSDK/apache-tomcat-*
RHINO_USER=ubuntu

usage()
{
    echo "Usage: $0 {start|stop}"
    exit 1
}

#
# Main
#

# Parameter check

[ $# -gt 0 ] || usage

case "$1" in
  start)
        # Start REM
        sudo su - "$RHINO_USER" -c "$REM_HOME/bin/catalina.sh start"
        echo "REM Starting"

        ;;

  stop)
        # Stop REM
        sudo su - "$RHINO_USER" -c "$REM_HOME/bin/catalina.sh stop"
        echo "REM Stopping"
        ;;

  *)
        usage
        exit 2
        ;;

esac

exit 0
Configuring the Sentinel Authentication Gateway
This section explains how to configure the Sentinel Authentication Gateway BSF Server and NAF Authentication Filter.
It includes:
BSF Configuration
This section explains how to configure the BSF Service and the resource adaptors it uses.
Below are instructions for configuring BSF SLEE profile attributes and the HTTP, Cassandra-CQL, and Diameter Base resource adaptors.
BSF SLEE profile
The BSF Server uses a SLEE profile for most of its configuration. The profile ID is bsf-config/default. It may be updated using Rhino Element Manager or rhino-console commands.
Below are descriptions and defaults for the available profile attributes, followed by instructions for viewing and updating the current configuration.
| Attribute name | Description | Default value |
|---|---|---|
HSSDestinationRealm |
The Diameter |
zh-realm |
HSSDestinationHost |
The Diameter |
zh-server |
CassandraQueryTimeoutMS |
The Cassandra query timeout in ms. |
5000 |
GUSSLookupCQL |
The CQL statement for retrieving a user’s GBA User Security Settings (GUSS) from Cassandra. |
SELECT guss_data FROM guss_by_impi WHERE impi = ? |
GUSSUpdateCQL |
The CQL statement for updating a user’s GBA User Security Settings (GUSS) in Cassandra. GUSS updates occur when the HSS returns a new GUSS in a Zh response. |
UPDATE guss_by_impi USING TTL 86400 SET guss_data = ? WHERE impi = ? |
BootstrapInfoLookupCQL |
The CQL statement for retrieving a user’s bootstrapped authentication info from Cassandra. |
SELECT impi,ck,ik FROM bootstrap_info WHERE btid = ? |
BootstrapInfoUpdateCQL |
The CQL statement for updating a user’s bootstrapped authentication info in Cassandra. Bootstrap info updates occur after the UE has successfully completed the bootstrap procedure with a valid challenge response. |
UPDATE bootstrap_info USING TTL ? SET impi = ?, ck = ?, ik = ? WHERE btid = ? |
TMPILookupCQL |
The CQL statement for looking up a user’s IMPI by TMPI (temporary private identifier) from Cassandra. |
SELECT impi FROM impi_by_tmpi WHERE tmpi = ? |
TMPIUpdateCQL |
The CQL statement for updating a user’s TMPI in Cassandra. TMPI updates occur after the UE has successfully completed the bootstrap procedure with a valid challenge response. |
UPDATE impi_by_tmpi USING TTL ? SET impi = ? WHERE tmpi = ? |
AVLookupCQL |
The CQL statement for retrieving an authentication vector from Cassandra. |
SELECT impi,tmpi,realm,rand,autn,ck,ik,xres,key_lifetime,used FROM auth_vector WHERE id = ? |
AVUpdateCQL |
The CQL statement for saving an authentication vector in Cassandra. AVs are stored when the BSF has retrieved an AV from the HSS, and sent the challenge to the UE. A subsequent challenge response from the UE will cause the AV to retrieved to validate the parameters in the challenge response. |
UPDATE auth_vector USING TTL 60 SET impi = ?, tmpi = ?, realm = ?, rand = ?, autn = ?, ck = ?, ik = ?, xres = ?, key_lifetime = ?, used = false WHERE id = ? |
AVUpdateUsageCQL |
The CQL statement for marking an authentication vector as used in Cassandra. |
UPDATE auth_vector USING TTL 60 SET used = true WHERE id = ? ---- |
Viewing the current configuration
To view the current BSF configuration, use the listprofileattributes command in rhino-console. For example:
> listprofileattributes bsf-config default
AVLookupCQL=SELECT impi,tmpi,realm,rand,autn,ck,ik,xres,key_lifetime,used FROM auth_vector WHERE id = ?
AVUpdateCQL=UPDATE auth_vector USING TTL 60   SET impi = ?, tmpi = ?, realm = ?, rand = ?, autn = ?, ck = ?, ik = ?, xres = ?, key_lifetime = ?, used = false WHERE id = ?
AVUpdateUsageCQL=UPDATE auth_vector USING TTL 60  SET used = true WHERE id = ?
BootstrapInfoLookupCQL=SELECT impi,ck,ik FROM bootstrap_info WHERE btid = ?
BootstrapInfoUpdateCQL=UPDATE bootstrap_info USING TTL ?   SET impi = ?, ck = ?, ik = ?, rand = ? WHERE btid = ?
CassandraQueryTimeoutMS=5000
GUSSLookupCQL=SELECT guss_data FROM guss_by_impi WHERE impi = ?
GUSSUpdateCQL=UPDATE guss_by_impi USING TTL 86400   SET guss_data = ? WHERE impi = ?
HSSDestinationHost=zh-server
HSSDestinationRealm=zh-realm
TMPILookupCQL=SELECT impi FROM impi_by_tmpi WHERE tmpi = ?
TMPIUpdateCQL=UPDATE impi_by_tmpi USING TTL ?   SET impi = ? WHERE tmpi = ?
Updating profile attributes
To update one or more profile attributes, use the setprofileattributes command in rhino-console. For example:
> setprofileattributes bsf-config default HSSDestinationRealm home1.net HSSDestinationHost hss.home1.net
Set 2 attributes in profile bsf-config/default| |
Changes to BSF profile attributes take effect immediately. No service restart is required. |
HTTP RA
The HTTP RA is used to receive HTTP requests from UEs and to send HTTP responses. The name of the HTTP RA entity created by default is bsf-http-ra.
Below are the HTTP RA configuration properties that are relevant to the BSF Server .
| Property name | Description | Default value |
|---|---|---|
BindAddresses |
A set of node IDs together with the IP and port that the HTTP RA will bind to on those nodes. If using this property, do not specify The format is
|
Not set. |
ListenAddress |
The hostname or IP address that the HTTP RA will bind to. If |
|
ListenPort |
The TCP port number that the HTTP RA will listen on. See also Configure HTTP port mapping. If |
|
SecureListenPort |
The TCP port number that the HTTP RA will listen on for HTTPS requests. If this is set, then See also Configure HTTP port mapping. |
Not set. |
KeyStore |
The path to a keystore file containing the server certificates for HTTPS connections. This must be set to a location that the BSF Server has Java permissions to access - a good choice is |
Not set. |
KeyStorePassword |
The password required to access the key store. |
Not set. |
Reactivating the RA
Changing any of the above properties will require the RA to be reactivated. To reactivate in rhino-console, use the updateraentityconfigurationproperties command. For example:
> updateraentityconfigurationproperties bsf-http-ra ListenPort 9000
> deactivateraentity bsf-http-ra
> activateraentity bsf-http-ra| |
See the HTTP Resource Adaptor Guide for more information. |
Cassandra-CQL RA
The Cassandra-CQL RA is used to perform queries against the Cassandra database. The name of the Cassandra-CQL RA entity created by default is cassandra-cql-ra.
Below are the Cassandra-CQL RA configuration properties that are relevant to the BSF Server.
| Property name | Description | Default value |
|---|---|---|
keyspace |
The Cassandra keyspace that will be used for all queries. |
opencloud_gaa_bootstrap_info |
cassandraContactPoints |
Comma separated list of hostname/ip addresses of cassandra nodes used to discover the cluster topology. |
localhost |
policy.protocol.port |
The TCP port used to connect to a Cassandra node. |
9042 |
Reactivating the RA
Changing any of the above properties will require the RA to be reactivated. To reactivate in rhino-console, use the updateraentityconfigurationproperties command. For example:
> updateraentityconfigurationproperties cassandra-cql-ra cassandraContactPoints 10.0.0.1,10.0.0.2
> deactivateraentity cassandra-cql-ra
> activateraentity cassandra-cql-ra| |
See the Cassandra CQL Resource Adaptor Guide for more information. |
Diameter Base RA
The Diameter Base RA is used to communicate with the HSS using the Zh Diameter application (3GPP TS 29.109). The name of the Diameter Base RA entity created by default is diameterbase.
Most of the Diameter Base RA’s configuration is defined in XML strings stored in a SLEE profile. The default profile ID used for configuration is DiameterConfig/DiameterZhConfig.
Below are the profile attributes that affect the BSF Server operation.
| Profile attribute | Description | Default value |
|---|---|---|
PeerTable |
Describes the Diameter peers that the RA can connect to. Typically this will be the primary and secondary HSS hosts. |
|
RealmTable |
Describes how different applications are routed to Diameter peers. In the BSF’s case we just want everything to go to the HSS. |
|
| |
The ${zh-server.address} and similar properties in the XML above are obtained from the config.properties file of the deployment module, as described in Installing the BSF Server. After deployment in the SLEE, these profiles will contain the substituted values. |
Updating profile attributes
The profile values can be edited manually in Rhino Element Manager or rhino-console. Alternatively update config.properties in your deployment module.
| |
See the Diameter Resource Adaptors Guide for more information. |
Filter Configuration
The NAF Authentication Filter is configured using the properties file ${rem.home}/sentinel-gaa-zn-config.properties.
The default location for ${rem.home} is the rem_home directory in your Apache Tomcat installation, see Set up Tomcat.
For example, if Tomcat is installed in /home/user/RhinoSDK/apache-tomcat-8.0.30, the filter will load the file /home/user/RhinoSDK/apache-tomcat-8.0.30/rem_home/sentinel-gaa-zn-config.properties.
If the sentinel-gaa-zn-config.properties file is not found, the filter will use default values for its properties. Otherwise, properties found in the file (described below) will override the defaults.
Filter properties
| Property Name | Description | Default Value |
|---|---|---|
sentinel.gaa.zn-cassandra-contact-points |
Comma-separated list of Cassandra node addresses to connect to initially. |
127.0.0.1 |
sentinel.gaa.zn-cassandra-port |
The port to use to connect to Cassandra nodes. |
9042 |
sentinel.gaa.zn-cassandra-keyspace |
The name of the Cassandra keyspace that stores GAA bootstrap information. |
opencloud_gaa_bootstrap_info |
sentinel.gaa.naf-service-type |
The GAA Service Type for this NAF. Defaults to service type |
0 |
sentinel.gaa.naf-service-id |
The GAA Service Identifier for this NAF. This value is operator-specific. Uniquely identifies a service (such as XCAP) within the operator’s network. This value has to match the service-id returned by the HSS in the subscriber’s GUSS. Note that some HSS automatically populate the GUSS service-id with the same value as the GUSS service-type. Must be an integer value. |
0 |
sentinel.gaa.naf-group |
The optional NAF Group this NAF belongs to. NAF groups are operator specific. Default is the empty string (no NAF group). |
"" |
sentinel.gaa.zn-reconnection-policy |
The two policies available for connection/re-connection (
|
constant |
sentinel.gaa.zn-cassandra-reconnection-constant-delay-sec |
How long (s) between attempts to connect to the Cassandra DB (constant). Acceptable values are 5s to 60s. |
10 |
sentinel.gaa.zn-cassandra-reconnection-exponential-initial-delay-sec |
The first delay (s) before attempting to connect to the Cassandra DB (exponential). Acceptable values are 1s to 24s. |
1 |
sentinel.gaa.zn-cassandra-reconnection-exponential-max-delay-sec |
Subsequent delay (s) = 2 x previous delay, capped by max delay (s) (exponential). Acceptable values are 16s to 128s. |
32 |
sentinel.gaa.zn-cassandra-socket-connect-timeout |
How long (ms) to establish a new connection to a Cassandra node before giving up. |
4000 |
sentinel.gaa.zn-cassandra-socket-read-timeout |
How long (ms) for a given Cassandra node to answer a query. |
4000 |
sentinel.gaa.zn-cassandra-socket-keepalive |
True/False/not-set. Whether to enable TCP keepalive. The default, (not-set), means the value used is the default from the underlying Netty transport. |
not-set |
sentinel.gaa.zn-cassandra-socket-reuseaddress |
True/False/not-set. Whether reuse-address is enabled. The default, (not-set), means the value used is the default from the underlying Netty transport. |
not-set |
sentinel.gaa.zn-cassandra-socket-solinger |
The linger-on-close timeout. The default, (-1 == not set), means the value used is the default from the underlying Netty transport. |
-1 |
sentinel.gaa.zn-cassandra-socket-tcpnodelay |
Whether to disable Nagle’s algorithm. |
True |
sentinel.gaa.zn-cassandra-socket-receivebuffersize |
Sets a hint to the size of the underlying buffers for incoming network I/O. The default, (-1 == not set), means the value used is the default from the underlying Netty transport. |
-1 |
sentinel.gaa.zn-cassandra-socket-sendbuffersize |
Sets a hint to the size of the underlying buffers for outgoing network I/O. The default, (-1 == not set), means the value used is the default from the underlying Netty transport. |
-1 |
sentinel.gaa.zn-cassandra-lb-recipe |
Select the load-balancing approach to use. Allowed values include: round-robin, dc-aware-round-robin, latency-aware-round-robin, latency-aware-dc-aware-round-robin. A value of use-default uses the driver default. |
use-default |
sentinel.gaa.zn-cassandra-lb-latencyaware-exclusionthreshold |
How much worse the average latency of a node must be compared to the fastest performing node for it to be penalized. Must be greater than 1.0. A value of 0 means use the driver default. |
0.0 |
sentinel.gaa.zn-cassandra-lb-latencyaware-scale |
Dictates the weight of a latency measurement to previous measurements in average latency. The value must be greater than 0. A value of 0 means use the driver default. |
0 |
sentinel.gaa.zn-cassandra-policy-protocol-usessl-jdk |
If SSL should be used (using jdk built-in engine). |
false |
sentinel.gaa.zn-cassandra-policy-protocol-usessl-netty |
If SSL should be used (defer to the Netty layer). |
false |
sentinel.gaa.max-nonce-count |
The number of times the same nonce can be used. Must be greater than |
100 |
sentinel.gaa.nonce-lifetime |
The lifetime of a nonce, in milliseconds. |
180000 |
sentinel.gaa.nonce-cache-capacity |
The maximum number of nonce records to keep in memory. Must be greater than |
100000 |
sentinel.gaa.nonce-storage |
The storage mechanism used for nonces. Can be |
local |
sentinel.gaa.nonce-cassandra-keyspace |
The name of the cassandra keyspace used to store nonces when |
opencloud_nonce_info |
sentinel.gaa.trusted-ips |
The comma-separated list of IP addresses which represent the trusted network interface(s) of the NAF Authentication Filter. Requests received on any of these IP addresses will not be required to supply valid authentication credentials. This allows the NAF Authentication Filter to handle requests from internal clients that do not support the authentication protocols. |
"" |
sentinel.gaa.force-auth-on-paths |
The comma-separated list of URL path prefixes for which authentication should always be enforced. This has precedence over the |
/rem/auth-check |
Modifying filter properties
To modify one or more properties, create the ${rem.home}/sentinel-gaa-zn-config.properties file if it does not already exist. Then edit the file and specify properties using the usual Java property syntax. Below is an example sentinel-gaa-zn-config.properties file:
sentinel.gaa.zn-cassandra-contact-points = cassandra-1.home.net, cassandra-2.home.net,
sentinel.gaa.naf-service-id = 42
sentinel.gaa.naf-group = XCAP_1| |
Changes to this file take effect when Tomcat is restarted. |
Proxied Host Mapping Configuration
The NAF Authentication Filter will proxy incoming requests to URLs under the path /rem/authproxy/ to a defined set of external NAF hosts. The choice of which hosts to map to is configured using the properties file ${rem.home}/sentinel.gaa.proxy-host-mapping.properties.
The default location for ${rem.home} is the rem_home directory in your Apache Tomcat installation, see Set up Tomcat.
For example, if Tomcat is installed in /home/user/RhinoSDK/apache-tomcat-8.0.30, the filter will load the file /home/user/RhinoSDK/apache-tomcat-8.0.30/rem_home/sentinel.gaa.proxy-host-mapping.properties.
If the sentinel.gaa.proxy-host-mapping.properties file is not found, no mapping to external NAF hosts will be performed, and a 404 Not Found response will be returned to requests received under /rem/authproxy/.
Configuration Format
# Map incoming requests to "gas.proxy" on port 8443 to internal "gas"
# host on port 443.
gas.proxy.opencloud.co.nz = gas.opencloud.co.nz:443
gas.proxy.opencloud.co.nz\:8443 = gas.opencloud.co.nz:443
Entries in the host mapping file are configured in the format incoming host name = destination host name. Port numbers may be specified, but if they appear before the = sign, they must be escaped with a \ character, as shown in the example. Lines beginning with # character denote comments, and are ignored.
Request Processing
The NAF Authentication Filter looks at incoming proxying requests, and examines the Host HTTP header. It then looks for a matching value on the left hand side of the = symbol of each configuration line. If it finds one, then it will proxy the request to the value found on the right hand side.
If no match is found, the NAF Authentication Filter will return a 404 Not found response to the client.
| |
Some clients will supply a port number in their Host header, and some will not. It’s advisable to supply both variants in the mapping configuration file, as shown in the example. |
Tracing
This section explains how to configure tracing in the BSF Server and NAF Authentication Filter.
Configuring BSF Server tracing
The BSF Server is a SLEE service which uses the standard SLEE tracing features. When setting tracer levels in rhino-console, you must specify the service and SBB IDs that you want to trace. The BSF’s service ID is:
name=sentinel-gaa-bsf,vendor=OpenCloud,version=2.9.0Its SBB IDs are:
name=sentinel-gaa-bootstrap-sbb,vendor=OpenCloud,version=2.9.0
name=sentinel-gaa-zh-sbb,vendor=OpenCloud,version=2.9.0
Fortunately you do not need to enter the entire service or SBB IDs when setting tracer levels. The settracerlevel command in rhino-console supports tab-completion and can match simple patterns. For example, to enable "Finest" tracing for all SBBs in the BSF service in rhino-console, you could use:
settracerlevel sbb service=ServiceID[name=sentinel-gaa-bsf,*],sbb=* root Finest
Configuring NAF Authentication Filter logging
The NAF Authentication Filter uses Log4j for logging, which is included in the Sentinel VoLTE XCAP web application. To enable debug logging in the filter, you must edit the log4j2.properties file deployed with the web application. This is found in $TOMCAT_HOME/webapps/rem/WEB-INF/classes/log4j2.properties.
To enable the majority of debug logs from the filter, add these lines to log4j2.properties, and restart Tomcat:
logger.rem.name=rem.server.sentinel.gaa
logger.rem.level=DEBUG
logger.gaa.name=sentinel.gaa
logger.gaa.level=DEBUG
logger.naf.name=sentinel.gaa.naf.digest
logger.naf.level=INFO
| |
It is recommended that you do not normally enable DEBUG logging for sentinel.gaa.naf.digest, as the parameters logged during cryptography calculations could be used to compromise password security. These logs are not normally relevant except when debugging new development. |
The available log keys in the NAF Authentication Filter are:
rem.server.sentinel.gaa
sentinel.gaa.naf.digest
sentinel.gaa.naf.filter
sentinel.gaa.zn.cassandra
sentinel.gaa.zn.session
sentinel.gaa.zn.stack
sentinel.gaa.cassandra
To enable debugging for a particular log key, use the following in log4j2.properties:
logger.<any log-key name>.name=<log-key>
logger.<any log-key name>.level=DEBUG
For example, to enable "DEBUG" tracing for the NAF filter:
logger.filter.name=sentinel.gaa.naf.filter
logger.filter.level=DEBUG
Cassandra Storage
This page describes how the Sentinel Authentication Gateway uses a Cassandra database for sharing bootstrapped security association details between the BSF and XCAP servers.
Below are details of the database configuration, performance recommendations, and schema.
Cassandra database configuration
An administrator is required to download and set up a Cassandra Database.
| |
Check the Sentinel Authentication Gateway Compatibility Guide for supported versions of Cassandra. |
| |
Before installation, read Cassandra’s Getting Started page. |
For a test system, a single Cassandra database instance may be sufficient if redundancy is not a requirement.
Minimal production recommendations
For a minimal production system, in order to tolerate a single failure in the Cassandra database there should be at least three nodes configured per site. The Cassandra replication factor should be 3.
Higher replication factors can be used on larger clusters. The recommended consistency level for this storage system is the LOCAL_QUORUM consistency level. All read and write queries are programmed to use LOCAL_QUORUM as the consistency level.
It is assumed that in a multi-site deployment, an appropriate Snitch and topology strategy are used. As a basis, we suggest use of the NetworkTopologyStrategy and GossipingPropertyFileSnitch, then reading the relevant links below to review this selection.
Performance recommendations
OpenCloud recommend that Cassandra’s data commit log directories are on different physical devices (different disks). If this is not possible, then different partitions on the same device is acceptable.
(OpenCloud performance testing shows that there are benefits to using different partitions on the same device when there are 1000 or more Cassandra DB transactions per second.)
Data schema
Cassandra’s tables exist in a 'keyspace', which for illustrative purposes can be thought of as a 'database' in SQL implementations.
Creating the keyspace
Creating a keyspace is simple, but note the following:
-
The keyspace must be named
keyspace-name. -
For a production environment, the keyspace can be created such that it is replicated. A sample CQL command for creating such a keyspace is:
CREATE KEYSPACE opencloud_gaa_bootstrap_info WITH REPLICATION={'class' : 'SimpleStrategy', 'replication_factor' : 3 }; -
For testing purposes, replication may not be necessary. A sample CQL command for creating such a keyspace is:
CREATE KEYSPACE opencloud_gaa_bootstrap_info WITH REPLICATION={'class' : 'SimpleStrategy', 'replication_factor' : 1 };
Creating the tables
Once a keyspace has been created, the required tables can be created. The following CQL statements provide both the structure and insight into the tables that are required:
USE opencloud_gaa_bootstrap_info;

CREATE TABLE impi_by_tmpi (
    tmpi text,
    impi text,
    PRIMARY KEY (tmpi)
);

CREATE TABLE guss_by_impi (
    impi text,
    guss_data blob,
    PRIMARY KEY (impi)
);

CREATE TABLE auth_vector (
    id blob,
    impi text,
    tmpi text,
    realm text,
    rand blob,
    autn blob,
    xres blob,
    ck blob,
    ik blob,
    ha1 blob,
    key_lifetime int,
    used boolean,
    PRIMARY KEY (id)
);

CREATE TABLE bootstrap_info (
    btid text,
    impi text,
    ck blob,
    ik blob,
    rand blob,
    PRIMARY KEY (btid)
);
Tools
This section describes the tools provided by Sentinel Authentication Gateway for generating and verifying keys during testing.
All of these are command-line Java-based tools, in the build directory of the SDK:
build/bin/sentinel-gaa-tools
| |
The tools will need execute permissions added (for example, 'chmod 755 naf-key') |
NAF Key
The naf-key tool generates a NAF-specific shared key for a bootstrapping session. You use this key as the password input for the NAF Digest tool.
Example usage
Here is typical naf-key output:
./naf-key -ciphersuite TLS_RSA_PSK_WITH_AES_256_CBC_SHA -algorithm milenage -k 01230123012301230123012301230123 -op 01230123012301230123012301230123 -nonce d34d35d36d37d38d39d3ad3bd3cd3dd1 -impi foo -naf localhost -d

Used 'milenage' to calculate:
 RAND[d35db7d35db7d35db7d35db7d35db7d3]
 XRES[9e36e4504d6c1642]
 CK[54db12b604c37068d5de7002ad73d549]
 IK[f48eaf850176834c9f17771b43951a6e]

14:26:31,522 DEBUG <main> [sentinel.gaa.keydata] generateKsNAF:
14:26:31,522 DEBUG <main> [sentinel.gaa.keydata]   ck:                           CK[5f12bf48d85e711bec89ebe7d2ce23be]
14:26:31,522 DEBUG <main> [sentinel.gaa.keydata]   ik:                           IK[142c4a118862568e3e58488ae96fc5e9]
14:26:31,522 DEBUG <main> [sentinel.gaa.keydata]   ks:                           Ks[5f12bf48d85e711bec89ebe7d2ce23be142c4a118862568e3e58488ae96fc5e9]
14:26:31,522 DEBUG <main> [sentinel.gaa.keydata]   rand:                         RAND[d34d35d36d37d38d39d3ad3bd3cd3dd1]
14:26:31,522 DEBUG <main> [sentinel.gaa.keydata]   impi:                         foo
14:26:31,523 DEBUG <main> [sentinel.gaa.keydata]   nafAddress:                   localhost
14:26:31,523 DEBUG <main> [sentinel.gaa.keydata] => KsNAF:                       [fd6843b2e9b2580141821dfbe37cd16cb099f0d897fb4be68f80948d2d8ce1d3]

fd6843b2e9b2580141821dfbe37cd16cb099f0d897fb4be68f80948d2d8ce1d3
Available flags
Here is the help output showing the tool options:
Usage: naf-key [options]
  Options:
    -algorithm
       The HSS algorithm
       Default: milenage
    -ciphersuite
       The TLS ciphersuite name used for the UE<->NAF HTTPS connection
    -d
       Show debugging output
       Default: false
    -gbadigest
       Process as GBA_Digest
       Default: false
    -h, -help
       Display this usage message
       Default: false
  * -impi
       The IMPI (private identity) for this security association
    -k
       The 128-bit subscriber key
    -k2
       The 256-bit Ks key for GBA_Digest
    -list-ciphersuites
       List supported cipher suite names
       Default: false
  * -naf
       The NAF address used by the UE (Host header)
  * -nonce
       The NONCE value (base64)
    -o
       Output format for shared key (base64 or hex)
       Default: base64
    -op
       The 128-bit Operator Variant Algorithm Configuration Field
There are two main modes of operation:
| |
At the moment, for calculations not using the GBA_Digest algorithm, only the milenage algorithm is supported. |
NAF Digest Calculation
The naf-digest calculation tool creates an HTTP message digest response.
Example usage
Here is typical naf-digest output:
./naf-digest -method GET -body bodyOfMessage -realm foo -qop auth-int -username btid -uri / -password kSny510OWEdJfE64NaObkys/wh2cJ4+M+qSjTsJ2GjI= -nc 1 -cnonce foo -nonce bar -d

14:31:55,631 DEBUG <main> [sentinel.gaa.naf.digest] calculateMessageDigest:
14:31:55,631 DEBUG <main> [sentinel.gaa.naf.digest]   hashFunc:Hashing.md5()
14:31:55,631 DEBUG <main> [sentinel.gaa.naf.digest]   username: btid
14:31:55,631 DEBUG <main> [sentinel.gaa.naf.digest]   password: "kSny510OWEdJfE64NaObkys/wh2cJ4+M+qSjTsJ2GjI=" (0x6b536e793531304f5745644a664536344e614f626b79732f776832634a342b4d2b71536a54734a32476a493d)
14:31:55,631 DEBUG <main> [sentinel.gaa.naf.digest]   realm:    foo
14:31:55,631 DEBUG <main> [sentinel.gaa.naf.digest]   method:   GET
14:31:55,631 DEBUG <main> [sentinel.gaa.naf.digest]   uri:      /
14:31:55,631 DEBUG <main> [sentinel.gaa.naf.digest]   qop:      auth-int
14:31:55,631 DEBUG <main> [sentinel.gaa.naf.digest]   nonce:    bar
14:31:55,631 DEBUG <main> [sentinel.gaa.naf.digest]   nc:       1
14:31:55,631 DEBUG <main> [sentinel.gaa.naf.digest]   cnonce:   foo
14:31:55,631 DEBUG <main> [sentinel.gaa.naf.digest]   body:     [626f64794f664d657373616765]
14:31:55,631 DEBUG <main> [sentinel.gaa.naf.digest]   HA1:      [cc6a87adf243559f903fc0007be77083]
14:31:55,631 DEBUG <main> [sentinel.gaa.naf.digest]   HA2:      [27bf6af15f6e290f34330a07b896e363]
14:31:55,631 DEBUG <main> [sentinel.gaa.naf.digest] => DIGEST:  [4a5ca659f406b6625d143adbd4124f3c]

4a5ca659f406b6625d143adbd4124f3c
Available flags
Here is the help output showing the tool options:
Usage: naf-digest [options]
  Options:
    -body
       The entity-body of the challenge response
       Default: <empty string>
  * -cnonce
       Client nonce string in challenge response
    -d
       Show debugging output
       Default: false
    -gbadigest
       Use GBA_Digest values and algorithms
       Default: false
    -h, -help
       Display this usage message
       Default: false
    -hexpassword
       The password in hex encoding (commonly the output from the 'naf-key'
       tool). Cannot be used with '-password'.
    -method
       The HTTP method (For example GET or PUT)
  * -nc
       Nonce count string from challenge
  * -nonce
       Nonce string from challenge
    -o
       Output format for digest value (base64 or hex)
       Default: hex
    -password
       The password string. Cannot be used with '-hexpassword'.
    -qop
       Quality of protection
       Default: auth-int
  * -realm
       The authentication realm
  * -uri
       The Request-URI
  * -username
       B-TID value from the challenge response
| |
The password used in the digest calculation is specified using either |
GBA_Digest passwd Calculation
The gbad-passwd calculation tool calculates the passwd value required for GBA_Digest calculations. This will usually be used as input to the gbad-shared-key tool (see later).
Example usage
Here is typical gbad-passwd output:
./gbad-passwd -username testIMPI -realm test.realm -password 65666768696a

Base64: n2fgl9BvBytQI4zc/SbHYknQ8stFWNtDFP4yGCNzapU=
Hex:    9f67e097d06f072b50238cdcfd26c76249d0f2cb4558db4314fe321823736a95
Available flags
Here is the help output showing the tool options:
Usage: gbad-passwd [options]
  Options:
    -d
       Show debugging output
       Default: false
    -h, -help
       Display this usage message
       Default: false
  * -password
       The user's password, as a hex string
  * -realm
       The authentication realm
  * -username
       The username
GBA_Digest Shared Key Calculation
The gbad-ks calculation tool calculates the Ks value required for GBA_Digest calculations. This will usually be used as input to the naf-key tool described earlier.
Example usage
Here is typical gbad-ks output:
./gbad-ks -username testIMPI -realm test.realm -passwd 9f67e097d06f072b50238cdcfd26c76249d0f2cb4558db4314fe321823736a95 -resp 8995645af39863494658aa3204b5fce309037621e1188d460b8cc846410ade89

Base64: 2FIpxB30hQVbXuU6zzFr7AUlTq1uA/ZxwIKq1r7+3ns=
Hex:    d85229c41df485055b5ee53acf316bec05254ead6e03f671c082aad6befede7b
Available flags
Here is the help output showing the tool options:
Usage: gbad-ks [options]
  Options:
    -d
       Show debugging output
       Default: false
    -h, -help
       Display this usage message
       Default: false
  * -passwd
       The calculated passwd (as a hex string)
  * -realm
       The authentication realm
  * -resp
       The 256-bit RFC7616 resp value.  Quotes will be added automatically.
  * -username
       The username
Known issues
This section explains known issues — what they are and how to work around them.
During an export of Rhino with the Sentinel Authentication Gateway, the order of the Diameter Extension profile tables may be incorrect
What happens |
During the Rhino export, the Diameter Extension profile tables may be exported in the wrong order. This leads to an issue where the import will fail due to dependencies between the tables. |
|---|---|
Workaround |
Edit the Rhino Export to change the order of the Diameter profile tables. Specifically, the To fix this, edit the build.xml in the export. Change the |