This document describes how to use the Scenario Simulator to simulate network traffic.
The document includes information on
-
defining test cases as scenarios of network traffic
-
managing the scenario simulator application in order to execute test cases
Topics
defines terms and concepts used with the Scenario Simulator; a diagram showing the relationship between roles, endpoints, and network elements; and a description of scenario behaviour (message recognition and generation, multiple scenario simulation in parallel, and deferred message selection). |
|
explains how to model a test case as a scenario definition. |
|
provides a high-level overview running and managing the Scenario Simulator |
|
describes what a scenario pack is, and how to install them |
Other documentation for the Scenario Simulator, including the changelog and links to downloads, can be found on the Scenario Simulator product page.
About the Scenario Simulator
| |
What is the Scenario Simulator?
The Scenario Simulator is a testing tool which simulates network traffic — for testing network elements and services. It simplifies the implementation of test cases, by using a simple declarative model. You define test cases as Scenario Definitions, which describe the end-to-end message flows for the Scenario Simulator to simulate. |
Below are terms and concepts used with the Scenario Simulator, a diagram showing the relationship between roles, endpoints, and network elements in the Scenario Simulator, and a description of scenario simulator behaviour (message recognition and generation, parallel scenario simulation, and deferred scenario selection)
Scenario Simulator terms and concepts
Note the following terms as they apply to the Scenario Simulator
| Term | Definition |
|---|---|
scenario definition |
A description of a flow of messages in the network. |
role |
A representation of a network endpoint within a scenario definition. Messages are always sent from one role to another role. A scenario definition defines 2 or more roles. |
dialog |
A representation of a network dialog between two roles. A scenario definition defines 1 or more dialogs. |
endpoint |
A representation of a network endpoint within the Scenario Simulator. Each endpoint requires an address, which is the network address of the underlying network element. |
local endpoint |
The endpoint that the Scenario Simulator simulates. The local endpoint requires some form of network stack, which the Scenario Simulator manages as a protocol adaptor. The IN scenario pack contains a protocol adaptor which provides access to a TCAP Simulator (which uses the SUA protocol), and to the Signalware TCAP stack. The SIP scenario pack contains a protocol adaptor which uses a SIP stack. |
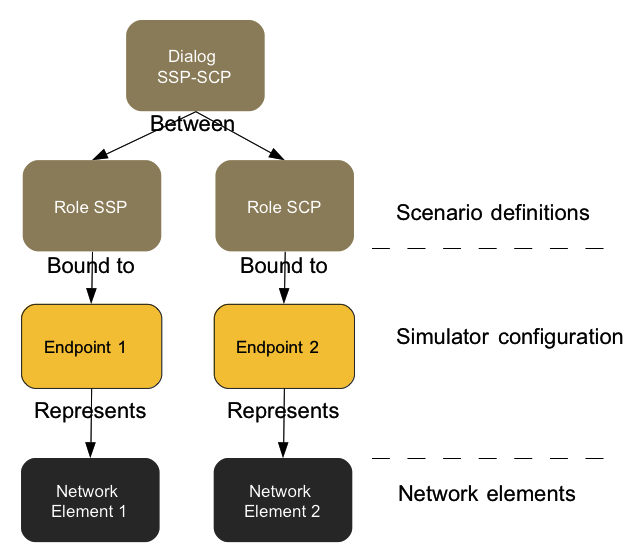
Roles, endpoints, and network elements
You associate roles with endpoints through endpoint bindings, using console commands. The following diagram illustrates the relationship between roles, endpoints, and network elements.
Scenario Simulator behaviour
Scenario definitions describe both message recognition and generation:
-
how the simulator should generate a message, and
-
which messages should be considered a match.
This way, you write the scenario definition once — then you tell the Scenario Simulator which of its roles to simulate.
The Scenario Simulator can also simulate multiple scenario definitions in parallel, many of which may differ only by messages towards the end of the message flow. The simulator defers scenario selection — waiting as long as possible before selecting which scenario to run.
If the traffic sent and received matches two different scenario definitions, then the Scenario Simulator considers both as possibilities, until a message — sent or received — eliminates one of them by failing to match.
Example: simulating with two definitions
Imagine a case where two scenario definitions are loaded: "CallForwarding" and "CallBarring". Both define the same initial message, and the simulator is playing the role which sends the first message:
-
You start an instance of the "CallForwarding" scenario by running
run-session CallForwarding -
The simulator must consider both scenario definitions as possibilities until a message (sent or received) only matches one of the two.
-
If, for example, the call is blocked by another network node, and the traffic only matches the "CallBarring" scenario definition, then the Simulator will eliminate the "CallForwarding" scenario and continue the session by simulating the "CallBarring" scenario.
Scenario Definitions
Scenario definitions describe the end-to-end message flows for the Scenario Simulator to simulate. They represent network elements as roles that pass messages to one another. Displayed in the Scenario Editor User Guide, scenario definitions resemble sequence diagrams.
| |
You can edit scenario definitions visually using the Scenario Editor User Guide (or manually, in text form). |
Scenario definitions use a domain-specific language.
Scenario Definition Syntax
Below is a description of the scenario definition syntax, which includes elements, attributes, and metadata — followed by a formal syntax definition (for reference).
Elements
The most basic form in a scenario definition is an element. You write a scenario definition as a tree of elements. An element starts with an optional name. Below is an example with a name but no value:
myEmptyElement;
Values or child elements
The element can either take an optional value, which is expressed like this:
myElement "some value";
…or it can take a list of child elements, expressed like this:
myElement {
  child1 "some value";
  child2 "some value";
}
Example
Below is simplified example of how this looks in practice:
callBarringScenario {
  InitialDP {
    callingPartyNumber "123456";
  }
}
Attributes
A number of different instructions can affect the behaviour of the scenario. These are expressed as attributes of the element. For example:
callingPartyNumber (COUNT 0..1, ALIAS caller) "123456";
COUNT and ALIAS are attribute names. Both these attributes take values, but not all do. For example, the DISABLED attribute takes no value:
callingPartyNumber (DISABLED) "123456";
If necessary, an attribute value may quoted:
callingPartyNumber (ALIAS "some long name") "123456";
| |
Each attribute may occur at most once in an element. For example, the following element is not valid because it defines the callingPartyNumber
(ALIAS name1, ALIAS name2) // Invalid
"123456";
|
| |
See also Miscellaneous Attributes. |
Metadata
Some elements may also contain metadata, commonly used by the graphical editor to store display data in the scenario file. Metadata doesn’t affect the runtime behaviour of the scenario, and can be ignored by a scenario author. Below is an example element containing both attributes and metadata:
callingPartyNumber
    [ui_node_collapsed true, ui_selected false]
    (COUNT 0..1, ALIAS caller) "123456";
Formal syntax definition
While it’s not necessary to understand the formal definition of the DSL to read and write scenario definitions, you can use the following ANTLR grammar file as reference.
grammar ScenarioDefinition;

// Parser rules ...

element : header QUOTED_STRING? ';'
    | header '{' element* '}'
    ;

header  : NAME? attributes_and_metadata
    ;

attributes_and_metadata
    // Allow for either order
    : attributes metadata
    | metadata attributes
    | attributes
    | metadata
    |
    ;

attributes
    : '(' (attribute (',' attribute)*)? ')'
    ;

metadata
    : '[' (attribute (',' attribute)*)? ']'
    ;

attribute
    : key=NAME QUOTED_STRING?
    | key=NAME val=NAME
    ;

// Lexer rules ...

NAME: ('a'..'z'|'A'..'Z'|'0'..'9')
    | ('a'..'z'|'A'..'Z'|'0'..'9') ('a'..'z'|'A'..'Z'|'0'..'9'|'.'|'_'|'-')* ('a'..'z'|'A'..'Z'|'0'..'9')
    ;

QUOTED_STRING
    : '"' ( ESCAPE_SEQUENCE | ~( '"' | '\\' ) )* '"'
    ;

    ESCAPE_SEQUENCE
    : '\\' ('t'|'n'|'r'|'\\'|'\"')
    ;

COMMENT	: '//' ~('\n'|'\r')* ('\n'|'\r'|'\r\n')	 { skip(); }
    | '//' ~('\n'|'\r')*                     { skip(); }
    ;

WS	: (' '|'\t'|'\n'|'\r')+ { skip(); }
    ;
Scenario Definitions, Roles, and Dialogs
The scenario definition language defines scenario definitions, which describe message flows between a number of network nodes. "Roles" represent the network nodes, and "dialogs" represent the network dialogs between roles.
Scenario definitions look like this:
callBarringScenario (FORMAT 1.0) {
  (ROLES)   { alice; bob; }
  (DIALOGS) { alice-bob (ROLE_A alice, ROLE_B bob, SCHEMA callControl, VERSION 1.1); }

  InitialDP (DIALOG alice-bob, DIRECTION A_TO_B) {
    callingPartyNumber "123456";
  }
}
This includes:
-
the top-level element — the scenario itself, which names the scenario, and must specify the format of the scenario definition (currently, the only option is
(FORMAT 1.0)) -
roles — defined as children of a
(ROLES)element under the scenario -
dialogs — defined as children of a
(DIALOGS)element. TheDIALOGSelement requires four attributes:
ROLE_A,ROLE_B,SCHEMA, andVERSION.-
The order of the roles is significant if the schema is non-symmetric.
-
The
SCHEMAattribute must name a known scenario schema. The Scenario Simulator uses the schema to validate and give meaning to the messages and fields the scenario defines. -
The
VERSIONspecifies the version of the protocol schema.
-
-
remaining child elements — define the messages.
Messages
Messages take DIALOG and DIRECTION attributes, which identify the dialog on which the message should be sent, and the direction in which it should be sent. The given name identifies the message type, as defined in the schema. (The example shown in Scenario Definitions, Roles, and Dialogs uses the name InitialDP, and presumes that the callControl schema defines message type InitialDP.)
When the definition specifies a DIRECTION, the value must be A_TO_B or B_TO_A. When not set, it defaults to A_TO_B. Some messages may only be sent in a particular direction. For example, the OpenRequest message in all CGIN schemas may only be sent in direction A_TO_B.
Local messages
Some messages types are only sent or received locally, rather than sent across the network. For example in IN services, a provider abort is sent from the protocol stack to the application locally. These types of messages are supported using the LOCAL_TO_A and LOCAL_TO_B attributes. Below are two examples. The first defines a close message, sent by role B to the local stack; the second defines a provider abort message generated and delivered by role B’s local stack:
| Close message | Provider abort message |
|---|---|
Close
(DIALOG SSP-SCP, LOCAL_TO_B, DIRECTION B_TO_A)
{
  prearrangedEnd "true";
  }
|
ProviderAbort
  (DIALOG SSP-SCP, LOCAL_TO_A, DIRECTION B_TO_A) ;{noformat}
|
Delays and timeouts
Message timing can be affected by specifying the following attributes on a message element:
-
DELAY— indicates the number of milliseconds to delay before sending the message; applies only to messages sent by the simulator -
TIMEOUT— indicates the number of milliseconds which can pass before timing out when waiting to receive the message; attribute applies only to messages received by the simulator.
| |
The simulator calculates the delay or timeout from the last message it received or sent within the scenario |
| |
You can specify a default delay or timeout on a dialog, or scenario definition, or globally. |
Fields
The message element contains field elements, which describe the expected fields of the network message. These may in turn contain sub-fields, when used to present a composite data type. The name of the field element corresponds to the field name in the protocol schema. (The example shown in Scenario Definitions, Roles, and Dialogs presumes that the InitialDP message type may take a callingPartyNumber field.)
Message Ordering
The importance of the order messages are sent and received may be configured. See information on ignored ordering for more details.
Ignored Ordering
| |
These use cases can be mixed for greater flexibility. |
Ignored order groups
The IGNORED_ORDER_GROUP attribute allows you to ignore the order of a sequence of incoming messages. Set the IGNORED_ORDER_GROUP attribute to some shared value for all of the messages that you want to receive in any order.
Use case |
The order of two or more adjacent incoming messages on a single dialog is undefined or random. |
||||||||
|---|---|---|---|---|---|---|---|---|---|
Rules and constraints |
|
||||||||
Examples |
For a group of adjacent messages (M1, M2, M3) on a single dialog linked with a common
|
Message ordering with multiple dialogs
The simulator is flexible about matching the order of consecutive incoming messages from multiple dialogs. The order within each dialog is enforced, but the total order of the messages across the dialogs is not. This allows scenarios to match more reliably when waiting for responses from multiple network elements.
Use case |
The order of adjacent incoming messages received on different dialogs is undefined or random |
||||||||||||||
|---|---|---|---|---|---|---|---|---|---|---|---|---|---|---|---|
Rules and Constraints |
|
||||||||||||||
Examples |
For a scenario is defined with two dialogs (d1 and d2) having adjacent incoming messages (M1, M2 on d1) and (M3, M4 on d2):
|
| |
Some constraints may be removed in future versions of the Scenario Simulator. |
Miscellaneous Attributes
Miscellaneous scenario definition attributes include:
-
COUNT— to define the cardinality of a message or field -
ALIAS— to track a value across messages -
AUTO— to auto-generate the value of a field -
EXCLUSIVE— to match only specified child elements. -
IGNORE_ORDER— to ignore order of child elements.
COUNT
The COUNT attribute defines the cardinality of a field — how many times it can exist. The default value is 1.
SomeMessage {
  field1 (COUNT 1..*) "a value"; // One or more times
  field2 (COUNT 0..*) "a value"; // Any number of times
  field3 (COUNT 0..1) "a value"; // At most one time
  field4 (COUNT 0) "a value";    // Must be absent
  field5 (COUNT 1) "a value";    // Must be present exactly once (the default)
}
ALIAS
A scenario commonly needs to track a certain value across messages, where a field in a new message takes the value of a field in a previous message. This is expressed using the ALIAS attribute.
InitialDP {
  callingPartyNumber (ALIAS caller) "123456";
}
SomeLaterMessage {
  someCallerField (ALIAS caller);
}
In the above example, the value of the someCallerField field must be the same value as the callingPartyNumber field which preceded it.
| |
Aliases are globally scoped with respect to the scenario. In the above example, all elements with (ALIAS caller) must have the same value as each other, regardless of where they are defined in the scenario. |
AUTO
Some fields support auto-generation, which you can use by adding the AUTO attribute to the element. An example of a field supporting auto-generation is the invokeId field of many operations in CAPv3, INAP and MAP; below is a sample usage.
InitialDPRequest
...
{
  invokeId
  (AUTO);
  ...
}
In the above example, the value of the invokeId is auto-generated.
Re-using a generated value
The generated value can still be aliased and used later in the scenario definition. In the example below, the invokeId value is auto-generated for a request, and reused in the invokeId field of the result message.
SendRoutingInfoForSMRequest
(DIALOG d1, DIRECTION A_TO_B)
{
  invokeId
  (AUTO, ALIAS SendRountingInfoForSMInvokeID) ;
  argument
  ..
}
...
SendRoutingInfoForSMResult
(DIALOG d1, DIRECTION B_TO_A)
{
  invokeId
  (ALIAS SendRountingInfoForSMInvokeID) ;
EXCLUSIVE
You use the EXCLUSIVE attribute on a structured field or message element, to specify matching only listed child elements (so that received elements not in the given child list cause a failed match).
When the simulator sees a sub-field that is not specified in the scenario definition, and the EXCLUSIVE attribute is set on the parent field, this will cause a failed match. If the EXCLUSIVE attribute is not set, the field will be ignored.
| |
To define particular sub-fields as absent, set the COUNT attribute to "0" (zero ) for these sub-fields. |
IGNORE_ORDER
You use the IGNORE_ORDER attribute on a structure field, to ignore the order of child elements when matching messages.
Currently this attribute is only applicable to array types, such as ASN.1 "SEQUENCE OF" types.
Table Elements
Sometimes a scenario may want to simulate one of a number of test cases, each of which has its own values. These values can be expressed using a TABLE element, and can be referenced in the scenario using a SELECT element.
Below are descriptions of defining data sets and selecting values in tables, followed by two examples: using test data and multiple tables.
Defining data sets
The data contained in a table is called a data set. Data sets can either be specified inline (inside the scenario), or in an external CSV file (loaded using simulator commands).
Defining a data set inline
When defining a data set inline, you declare the table columns and data values like this:
(TABLES) {
  tableName {
    { "column1"; "column2"; ... "columnN"; }
    { "value";   "value";   ... "value"; }
    { "value";   "value";   ... "value"; }
  }
}
The first row declares the column names, and the remaining rows define the data values.
Defining a data set externally
When loading a data set from an external CSV file, you declare the table columns like this:
(TABLES) {
  tableName {
    { "column1"; "column2"; ... "columnN"; }
  }
}
Loading data set files
In order to load external (cvs) data set files, you need to use the load-data-set command.
Selecting values
You select a table value like this:
fieldName (SELECT "tableName[columnName]");
The Simulator randomly selects an initial row using SELECT "tableName[columnName]". So when it generates a message, it chooses a row and columnName value from the defined tableName.
The SELECT narrows the set of matching table rows. If a message includes a SELECT from column 1 of a table for a given message field, and the field’s value matches in exactly two table rows, then the set of matching rows narrows to just those two rows. Any further SELECTs in the scenario definition must match values from the remaining set of possible rows (and may narrow the set further).
| |
The same name cannot be used for both a TABLE and an ALIAS. Table names have the same restrictions as ALIAS names (for example, they cannot contain square brackets or commas) |
Example: test data
Below is an example of table containing test data. It specifies that whenever the value of the callingPartyNumber field is “`021111111`”, the value of the destinationNumber field must be “`021222222`”.
...

(TABLES) {
  testData {
    { "caller";     "dest";}       // header row
    { "21111111";   "021222222"; } // first value row
    { "021333333";  "021444444"; } // next value row
  }
}
...
initialDP {
  callingPartyNumber (SELECT "testData[caller]");
  destinationNumber  (SELECT "testData[dest]");
}
...
Example: multiple tables
The following example shows multiple tables. Tables destinationNumber and terminatingParty are independently referenced as there is no concept or syntax for joining data sets.
This example specifies that whenever the value of the destinationNumber field in the initialDP message is “`9990`”, the same field in the laterMessage message must be “`6588777123`” (since both values must come from the same row in the terminatingParty table).
MyScenario {
  (TABLES) {
    originatingParty {
      { "msisdn"; "shortcode"; "imsi"; }
      { "641234567; "1001"; "802222224344"; }
      { "641234444; "1005"; "802222445644"; }
    }

    terminatingParty {
      { "msisdn'; "shortcode"; "imsi"; }
      { "6588777123"; "9990"; "802234872"; }
      { "6388443782"; "9991"; "983052034"; }
    }
  }
  ...
  initialDP {
    callingPartyNumber (SELECT "originatingParty[msisdn]");
    destinationNumber  (SELECT "terminatingParty[shortcode]");
  }
  ...
  laterMessage {
    destinationNumber (SELECT "terminatingParty[msisdn]");
  }
  ...
}
Managing the Scenario Simulator
This section presents file paths in a UNIX environment, relative to the Scenario Simulator home directory.
It also shows shell commands following the shell prompt ($), and Simulator console commands following the console prompt (>). For example:
| Command | What it means |
|---|---|
$ ./scenario-simulator.sh |
Type |
> help |
Type |
| |
For a quick working configuration, set up one of the examples in the in-examples, sip-examples, or rhino-sip-examples directory. |
Starting and Stopping the Simulator
Starting the simulator
To start the simulator, invoke the start script from the command-line:
$ ./scenario-simulator.sh
Starting JVM...
Ready to start

Please type commands... (type "help" <ENTER> for command help)
>
(This takes us to the command prompt.)
You can also pass in command scripts on the command line:
$ ./scenario-simulator.sh -f in-examples/3sims/config/loopback/setup-sim1.commands -f in-examples/3sims/config/setup-examples-sim1.commands
(Control returns to the command console once the scripts have completed.)
By default, logging will be written to logs/simulator.log. Use the -l <filename> option to write to another file in the logs directory. This is useful when running multiple simulator instances, to avoid writing to the same log file. For example, to start 2 simulators which write to logs/sim1.log and logs/sim2.log:
$ ./scenario-simulator.sh -l sim1.log
$ ./scenario-simulator.sh -l sim2.log
See the Logging section of the Simulator Commands page for details about logging configuration.
Stopping the simulator
To stop the simulator, use the quit command or the force-quit command:
"quit": Quits the simulator process (after cleaning up, or the given timeout)
    Usage: quit [<timeout-ms>]
    Example: quit 10000
"force-quit": Quits the simulator process immediately, without finishing calls
        or cleaning up resources
    Usage: force-quit (no args)
Help with Simulator Commands
For information about all available commands, enter help at the console:
> help
See Appendix A: Full Command Listing for the output of this command.
For help with a particular command, enter help and the name of a command. For example:
> help load-scenario
"load-scenario": Loads a scenario definition from a given file
    Usage: load-scenario <scenario-file> [-config <config-name>]
        -config - The named configuration to use
    Example: load-scenario path/to/some-scenario.scen
TAB-completion
The Scenario Simulator supports tab-completion for command names and command arguments (such as scenario names). For example, to quickly see all available commands, press the TAB key at the console prompt:
> <TAB>

bind-role                bind-table               create-local-endpoint    force-quit               help
history                  list-protocols           list-scenarios           load-data-set            load-scenario
print-config             print-scenario           print-status             quit                     ramp-up
remove-scenario          run-session              set-endpoint-address     set-preferred-scenario   set-session-rate
sleep                    start-generating         stop-generating          wait-until-operational
Simulator Commands
| |
Command-line arguments
The simulator takes the following command-line arguments: Available command line format:
-f <argument> : Path to file containing commands to
execute on startup (e.g. -f file1 -f file2).
-e <argument> : String of commands to execute on startup
(e.g. -e "start").
-l <argument> : File name of log file to write to (default
is "simulator.log")
-h : Prints help on available command line
options, then exits.
All arguments are optional.
Commands specified by -f and -e arguments are run in the order given.
|
Below are commands for setting up endpoints, loading scenario definitions, running a session manually, managing load generation, configuring logging, viewing simulator status, and bxref:#loading-data-sets-and-binding-tables-to-themdata sets and tables[loading data sets and binding tables to them].
Setting up endpoints
| |
All endpoints, both local and remote, require endpoint addresses. |
Configure endpoint addresses
To configure endpoint addresses, use the set-endpoint-address command:
"set-endpoint-address": Sets a remote address for a given schema and role
    Usage: set-endpoint-address <endpoint-name> <address-string>
    Example: set-endpoint-address hlr_endpoint theAddress
Create local endpoints
To create local endpoints, use the create-local-endpoint command.
The -schemas option is useful when some of the available schemas associated with the protocol adaptor type are incompatible, for example if two CGIN schemas have clashing activity contexts. When -schemas is not specified, all the available schemas for the protocol adaptor type are loaded.
"create-local-endpoint": Creates (or re-creates) a local endpoint using the
        address of the given endpoint
    Usage: create-local-endpoint <endpoint-name> <protocol-adaptor-type>
        [-propsfile properties-file]
         -propsfile - Configuration properties for the endpoint
        [-schemas schema-a,schema-b,...,schema-n]
         -schemas - Comma separated list of schemas to enable for the endpoint
    Example: create-local-endpoint theSwitch cgin -propsfile
        config/cgin.properties
Pause console to wait for local endpoints
| |
Protocol adaptors often take some time before all connections become available. |
Use the wait-until-operational command to pause the command console until all local endpoints become available:
"wait-until-operational": Pauses the command reading thread until the
        simulator is operational, i.e. until all required connections are
        established. Use this in scripts before invoking the start-generating
        or run-session commands
    Usage: wait-until-operational [<timeout-ms>]
    Example: wait-until-operational 30000
Loading scenario definitions
Loading scenario definitions involves creating role bindings, loading the scenario definition file, and setting a preferred scenario definition.
Create role bindings
| |
Before a scenario definition can be successfully loaded, the scenario’s roles must be bound to endpoints which are already configured in the simulator. |
To create the bindings, use the bind-role command:
"bind-role": Binds a role name to an endpoint
    Usage: bind-role <role-name> <endpoint-name> [-dialog <dialog>] [-config
        <config-name>]
        -dialog - Dialog in which the binding should take effect
        -config - Named configuration in which the binding should take
        effect
    Example: bind-role hlr_role hlr_endpoint
| |
The bindings can optionally be stored under a named configuration, which can be referenced by the load-scenario command. (When no configuration name is specified, the simulator uses global configuration. |
Load the scenario definition file
To load scenarios, use the load-scenario command, which takes the path to the scenario definition file:
"load-scenario": Loads a scenario definition from a given file
    Usage: load-scenario <scenario-file> [-config <config-name>]
            -config - The named configuration to use
    Example: load-scenario path/to/some-scenario.scen
| |
When a scenario is loaded, the simulator resolves which roles are local (usually 1 role) and which roles are remote, and resolves which messages are outgoing and incoming. If the first message is outgoing, the scenario definition is initiating. If the first message is incoming, the scenario definition is receiving. |
Set a preferred scenario definition
When testing a specific scenario definition, when multiple scenario definitions are loaded, to set a preferred scenario definition, use the set-preferred-scenario command:
"set-preferred-scenario": Sets the preferred scenario definition to use when
        matching incoming dialogs and when generating load, or sets a probability
        distribution to use for generating load. Probability functions are defined
        as a comma seperated list of scenario-name:probability pairs.
        Probabilities must sum to 1.
    Usage: set-preferred-scenario [<scenario-name>[:<probability>,]] - The scenario definition
        name, optionally followed by a probability. If no argument is given, the scenario preference is cleared
    Example: set-preferred-scenario MyScenario
             set-preferred-scenario MyScenario:0.6,OtherScenario:0.4
| |
Some caveats exist with the probability function mode.
|
Running a session manually
To run a single session, use the run-session command:
"run-session": Runs a single session, without affecting the rate of sessions
               made by the load generator
    Usage: run-session <scenario-name> - The scenario definition name
    Example: run-session MyScenario
(Control returns to the console once the session is ended.)
| |
If multiple scenario definitions are loaded, and the network traffic does not match the given scenario definition, then the simulator will try to simulate and match the other loaded scenario definitions. In other words, invoking run-session scenario-A may end up matching scenario-B. |
Managing load generation
| |
If an initiating scenario has been set using the set-preferred-scenario command, the load generator will generate sessions using that scenario. Otherwise it will round robin amongst all the loaded initiating scenario definitions. |
| |
As with the run-session command, if multiple scenario definitions are loaded and the network traffic does not match the chosen scenario definition, then the simulator will try to simulate and match the other loaded scenario definitions. |
Below are commands for controlling session rate and starting and stopping load generation.
Control session rate
To control the session rate, use the set-session-rate and ramp-up commands:
"set-session-rate": Sets the rate in sessions per second. Defaults to 1.
    Usage: set-session-rate <sessions-per-second>
        sessions-per-second - a positive number. (Note: can't be '0'. Use the
        'stop' command to stop generating sessions)
    Example: set-session-rate 33.3
"ramp-up": Ramps up the session rate from a given rate to another given rate,
        in a given period
    Usage: ramp-up <initial-sessions-per-second> <target-sessions-per-second>
        <ramp-period-seconds>
        (Session rates must be positive numbers, and ramp-period-seconds must
        be a positive integer)
    Example: ramp-up 33.3 45 120
Start and stop load generation
To toggle the load generator on and off, use the start-generating and stop-generating commands:
"start-generating": Starts generating sessions
    Usage: start-generating (no args)
"stop-generating": Stops generating sessions
    Usage: stop-generating (no args)
Configuring logging
| |
The Scenario Simulator handles logging using log4j. The log4j configuration file, log4j.properties, by default writes logging to logs/simulator.log. |
| |
With the default configuration, if two scenario instances are running from the same directory, they will both write to the same log file. When running multiple instances of the simulator, use the -l <logfile> command line option to write to different log files. See the Starting and Stopping the Simulator page for details. |
| |
The default configuration writes logging at INFO level or above. Setting the logging level to DEBUG can help troubleshoot problems. |
Viewing simulator status
| |
The simulator does not write output to the console for each session, except for user-initiated sessions started using the run-session command. |
To view the status of the simulator, either immediately or periodically, use the print-status command:
"print-status": Prints the current status of the simulator
    Usage: print-status [<interval-seconds>]
        interval-seconds - The number of seconds between each printing, or '0'
        to stop printing
        (If no args, prints the status once)
    Example: print-status 5
Resetting simulator statistics
To reset the simulator statistics, use the reset-stats command:
"reset-stats": Resets current simulator statistics
    Usage: reset-stats (no args)
Loading data sets and binding tables to them
To load external data sets (specified as CSV files) into the simulator, use the load-data-set command:
"load-data-set": Loads a data set in CSV format from the given file
    Usage: load-data-set <data-set-name> <csv-file-path>
    Example: load-data-set my-data-set path/to/my-data-set.csv
To bind tables in scenario definitions to data sets (similar to how roles bind to endpoints), use the bind-table command:
"bind-table": Binds a table name to a data set
    Usage: bind-table <table-name> <data-set-name> [- -config <config-name>]
        -config - Named configuration in which the binding should take
        effect
    Example: bind-table my-table my-data-set
Scenario Packs
About Scenario Packs
Scenario Simulator Scenario Packs add protocol support to the Scenario Simulator.
Scenario Packs are bundled with the Scenario Simulator download package, but can also be downloaded independently — so you won’t have to re-install the Scenario Simulator when you want to update a Scenario Pack.
Each Scenario Pack has it’s own documentation, containing a changelog and information on any included examples, available from the Scenario Simulator documentation homepage.
Downloading and installing a new Scenario Pack
Scenario Packs may be downloaded from the DevPortal Download Space.
A Scenario Pack download consists of a zip archive containing a Scenario Pack jar (or the jar file not zipped) along with example configuration files and scenarios.
The Scenario Pack jar contains one or more protocol schemas along with artifacts required to support those protocols.
To install an updated Scenario Pack, first remove the previous version of the Scenario Pack from the protocols/ directory. Then install the new pack:
-
If your new Scenario Pack is a zip file, unzip it directly into the Scenario Simulator directory.
-
If your new Scenario Pack is a jar file, move it to the
protocols/subdirectory |
The Scenario Simulator and Scenario Editor will detect the new schemas the next time they are started.
Appendix A: Full Command Listing
To see all available commands for your version of the simulator, enter help at the console. Below is a full listing of simulator commands.
> help
--- Help on available commands ---
Commands ...

"help": Prints general help, or specific help for the listed commands
    Usage: help <command1> [<command2> [...]]
    Example: help printstatus

"history": Prints recent command history
    Usage: history (no args)

"sleep": Sleeps the command reading thread (not the simulator).
        Used to place pauses in command scripts
    Usage: sleep <millis>
    Example: sleep 500

"wait-until-operational": Pauses the command reading thread until the
        simulator is operational, i.e. until all required connections are
        established. Use this in scripts before invoking the start-generating
        or run-session commands
    Usage: wait-until-operational [<timeout-ms>]
    Example: wait-until-operational 30000

"quit": Quits the simulator process (after cleaning up, or the given timeout)
    Usage: quit [<timeout-ms>]
    Example: quit 10000

"force-quit": Quits the simulator process immediately, without finishing calls
        or cleaning up resources
    Usage: force-quit (no args)

"list-protocols": Lists loaded protocol schemas and protocol adaptor types
    Usage: list-protocols (no args)

"set-endpoint-address": Sets a remote address for a given schema and role
    Usage: set-endpoint-address <endpoint-name> <address-string>
    Example: set-endpoint-address hlr_endpoint theAddress

"create-local-endpoint": Creates (or re-creates) a local endpoint using the
        address of the given endpoint
    Usage: create-local-endpoint <endpoint-name> <protocol-adaptor-type>
        [-propsfile properties-file]
        -propsfile - Configuration properties for the endpoint
        [-schemas schema-a,schema-b,...,schema-n]
        -schemas - Comma separated list of schemas to enable for the endpoint
    Example: create-local-endpoint theSwitch cgin -propsfile
        config/cgin.properties

"bind-role": Binds a role name to an endpoint
    Usage: bind-role <role-name> <endpoint-name> [-dialog <dialog>] [-config
        <config-name>]
        -dialog - Dialog in which the binding should take effect
        -config - Named configuration in which the binding should take effect
    Example: bind-role hlr_role hlr_endpoint

"run-session": Runs a single session, without affecting the rate of sessions
        made by the load generator
    Usage: run-session <scenario-name> - The scenario definition name
    Example: run-session MyScenario

"list-scenarios": Lists the scenario definitions currently loaded
    Usage: list-scenarios (no args)

"print-scenario": Prints a description of the given scenario definition
    Usage: print-scenario <scenario-name>
    Example: print-scenario MyScenario

"print-config": Prints details of the current configuration to the console
    Usage: print-config (no args)

"set-preferred-scenario": Sets the preferred scenario definition to use when
        matching incoming dialogs and when generating load, or sets a probability
        distribution to use for generating load. Probability functions are defined
        as a comma seperated list of scenario-name:probability pairs.
        Probabilities must sum to 1.
    Usage: set-preferred-scenario [<scenario-name>[:<probability>,]] - The scenario definition
        name. If no argument is given, the scenario preference is cleared
    Example: set-preferred-scenario MyScenario
        set-preferred-scenario MyScenario:0.6,OtherScenario:0.4

"print-status": Prints the current status of the simulator
    Usage: print-status [<interval-seconds>]
        interval-seconds - The number of seconds between each printing, or '0'
        to stop printing
        (If no args, prints the status once)
    Example: print-status 5

"start-generating": Starts generating sessions
    Usage: start-generating (no args)

"stop-generating": Stops generating sessions
    Usage: stop-generating (no args)

"set-session-rate": Sets the rate in sessions per second. Defaults to 1.
    Usage: set-session-rate <sessions-per-second>
        sessions-per-second - a positive number. (Note: can't be '0'. Use the
        'stop' command to stop generating sessions)
    Example: set-session-rate 33.3

"ramp-up": Ramps up the session rate from a given rate to another given rate,
        in a given period
    Usage: ramp-up <initial-sessions-per-second> <target-sessions-per-second>
        <ramp-period-seconds>
        (Session rates must be positive numbers, and ramp-period-seconds must
          be a positive integer)
      Example: ramp-up 33.3 45 120

"load-scenario": Loads a scenario definition from a given file
      Usage: load-scenario <scenario-file> [-config <config-name>]
          -config - The named configuration to use
      Example: load-scenario path/to/some-scenario.scen

"remove-scenario": Removes a given scenario definition
      Usage: remove-scenario <scenario-name>
      Example: remove-scenario MyScenario

"load-data-set": Loads a data set in CSV format from the given file
      Usage: load-data-set <data-set-name> <csv-file-path>
      Example: load-data-set my-data-set path/to/my-data-set.csv

"bind-table": Binds a table name to a data set
      Usage: bind-table <table-name> <data-set-name> [ -config <config-name>]
          -config - Named configuration in which the binding should take effect
      Example: bind-table my-table my-data-set


Hints:
- Detailed tracing is written to the simulator's log file, not the console
- Tab-completion on command names and arguments is supported (e.g. "he" <TAB> becomes "help")
- All file names are relative to the simulator's installation directory
- For help on load testing, type:   help set-session-rate start-generating print-status <ENTER>
- For help on manual testing, type: help list-scenarios run-session <ENTER>