The REM Plugin SDK is a framework for developing custom plugins for REM. It provides a template for creating new plugins, templates for generating new management panels and monitoring extensions, and also some documented examples with provided code.

Note Developing REM plugins requires a working knowledge of Google Web Toolkit (GWT).

The REM Plugin SDK does not include the GWT SDK. You must download GWT 2.7.0 (direct link), extract it, then run script copy-gwt-libraries.sh from the REM Plugin SDK package.

Topics

Creating a new REM plugin

create new REM plugins from the provided prototype

Adding management panels

generate management panels for a REM plugin from provided templates

Adding monitoring extensions

generate monitoring extensions for a REM plugin from provided templates

Running your plugin

run your plugin in GWT developer mode

Building and packaging

build and package your REM plugin for distribution

Installing your plugin

install your plugin into REM

Advanced development topics

advanced development topics for REM SDK

Other documentation for the Rhino Element Manager, including the changelog, links to downloads, and the API documentation can be found on the REM product page.

Tip The REM Plugin SDK is distributed as a separate package:
rhino-element-manager-sdk-<version>.zip

= Creating a New REM Plugin :sortorder: 2

To create a new REM plugin:

1

Open a terminal, and cd into your rhino-element-manager-sdk-<version> directory.

2

Run ./create-plugin.sh, specifying the plugin name and class prefix.

For example:

./create-plugin.sh -m foo -c Foo

The REM Plugin SDK creates a new REM plugin (in the example, foo-em).

You can then add management panels and monitoring extensions to your plugin.

= Adding a Management Panel :sortorder: 3

To add a management panel to a REM plugin:

1

Open a terminal, and cd into your REM plugin directory (for example, foo-em).

2

Run ./create-management-panel.sh, optionally specifying the function, class prefix, and package (otherwise the SDK prompts you for them).

For example:

./create-management-panel.sh -f bar -c Bar -p bar

The SDK generates a new management panel from the template into your plugin’s src directory.

3

Configure Google Guice and Gin bindings:

  • Edit your Guice module (such as com/opencloud/rem/foo/server/FooModule.java):

    • Add a binding from your new service interface to your new service implementation. For example:

bind(BarService.class).to(BarServiceImpl.class);
  • Edit your Gin module (such as com/opencloud/rem/foo/client/FooGinModule.java):

    • Add a binding from your new presenter interface to your new presenter implementation.

    • Add a binding from your new view interface to your new panel. For example:

bind(BarPresenter.class).to(BarPresenterImpl.class);
bind(BarView.class).to(BarPanel.class);

4

Hook up your panel to the menus and deck:

  • Edit your main presenter (such as com/opencloud/rem/foo/client/MainPresenterImpl.java):

    • Add a constructor arg for your new presenter (the interface, not the implementation).

    • Add it to the main deck. For example:

@Inject
public MainPresenterImpl(@ExtensionLogHandler Handler logHandler, ExtensionDeckView.Presenter deck, BarPresenter barPresenter) {
    this.deck = deck;
    deck.addPanel(barPresenter.getView().getName(), barPresenter);

    Logger.getLogger("").addHandler(logHandler);
}
  • Edit your extension info (such as com/opencloud/rem/foo/client/FooExtensionInfo.java).

    • Add a new entry in the MENU_EXTENSIONS array for your panel. The third argument should match the string returned from the getName() method of your new panel. For example:

public static final ExtensionMenuInfo[] MENU_EXTENSIONS = {
    new ExtensionMenuInfo("Foo", "Bar Configuration", "bar")
};

5

You can repeat this process using different values to create several management panels within your plugin.

You can then run your plugin to see what it looks like.

  • Google Guice is a dependency injection framework.

  • Google Gin is a layer on top of Guice that provides Guice binding and injection to client-side GWT code.

For details, please see the Google Guice Project.

= Adding a Monitoring Extension :sortorder: 4

To add a monitoring extension to a REM plugin:

1

Open a terminal, and cd into your REM plugin directory (such foo-em).

2

Run ./create-monitoring-extension.sh, optionally specifying the function and class prefix (otherwise the SDK will prompt you for them).

For example:

./create-monitoring-extension.sh -f bar -c Bar

The SDK generates a new monitoring extension from the template into your plugin’s src directory.

3

Fill in the monitoring request handler implementation:

  • Edit the generated monitoring request handler class (such as com/opencloud/rem/foo/server/monitoring/BarMonitoringRequestHandler.java).

    • Fetch the data you want to be displayed.

    • Construct the TableData object to be returned.

4

You can repeat this process using different values to create several monitoring extensions within your plugin.

You can then run your plugin to see what it looks like.

= Running your plugin :indexpage: :sortorder: 5

To run your plugin (in dev-mode):

1

Open a terminal, and cd into your REM plugin module directory (such as foo-em).

2

Run ant dev-mode.

The SDK compiles your code, and starts GWT Dev Mode.
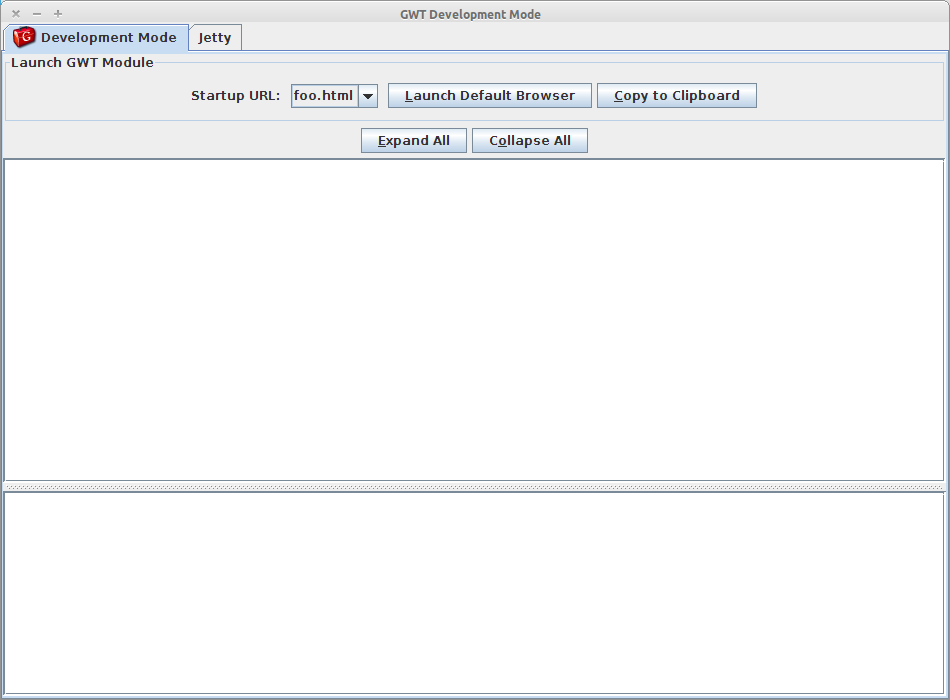
GWTDevMode

3

Click the Launch Default Browser button to load the REM plugin into your default browser + (or click the Copy To Clipboard button, and paste the link into any browser).
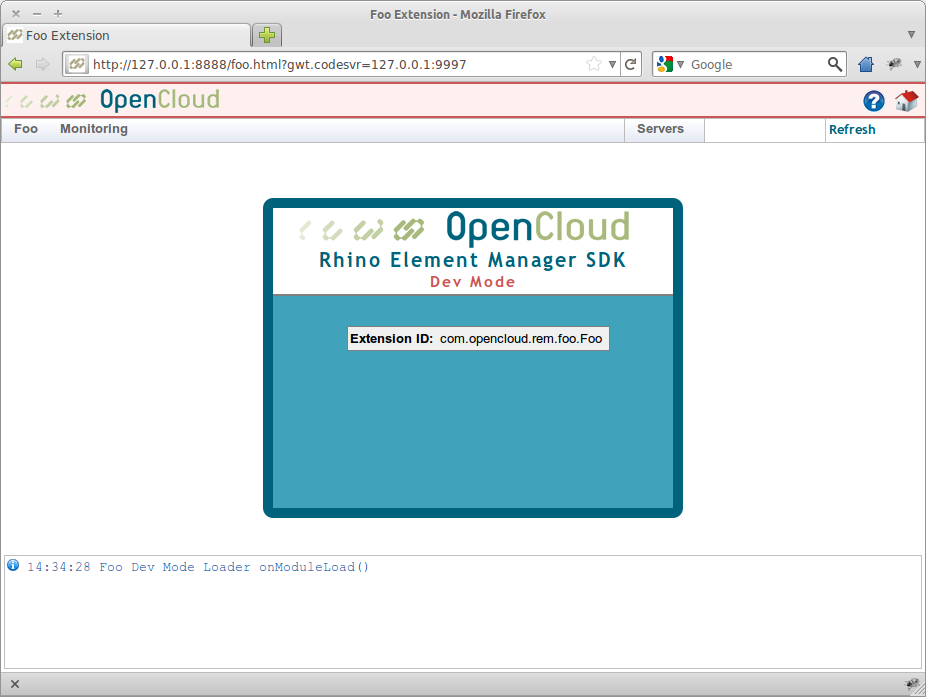
FooExtensionFirefox
Tip While dev mode is running, GWT compiles your client-side code on the fly; so you can make changes to your panels, and view the changes, just by refreshing your browser.
Warning You’ll need to restart dev mode to effect any changes to server-side code.

4

Connect to a Rhino instance using the Servers menu.

ConnectToRhino
Warning If this is the first time you have run dev mode, you will need to upload a trust certificate for your local Rhino instance before you can connect to it.

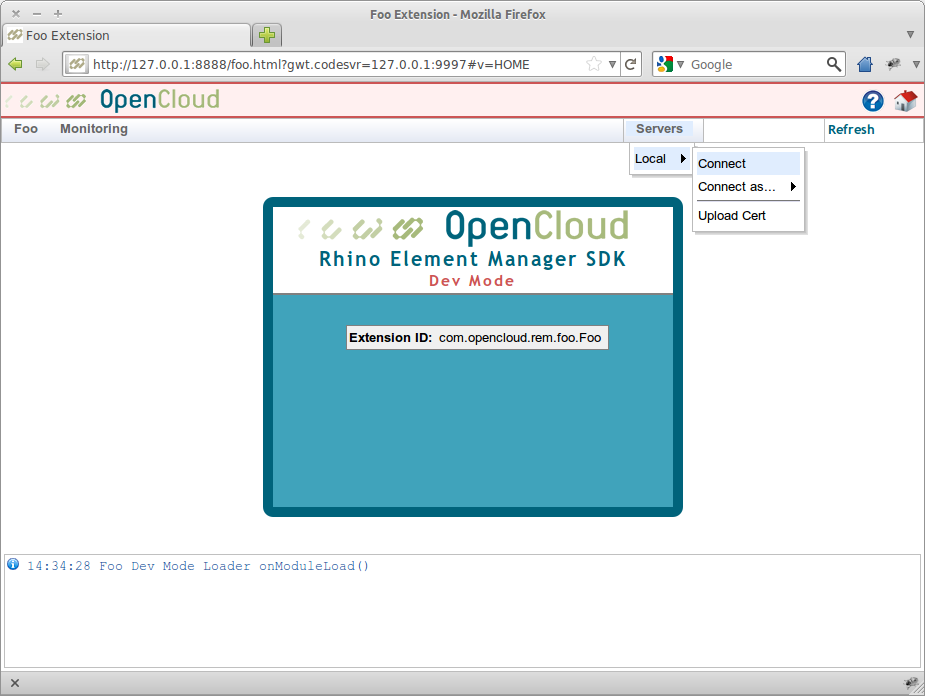
The main instance manager in REM is not available for plugins in dev-mode.

Instead, there is a csv file (servers.csv) that contains all the Rhino server configurations. The first time you run dev-mode, REM creates servers.csv in your module directory, pre-populated with the default local Rhino connection. After that, you can edit the servers.csv file by hand to add Rhino instances. REM will pick up the changes the next time you refresh your browser (without having to restart dev-mode).

The SDK also supports uploading Rhino trust certificates, under each entry in the Servers menu.

If it all looks good, next you can build and package your plugin for installation into REM.

= Uploading a trust certificate

To upload a trust certificate for a Rhino instance in plugin dev-mode:

1

Find the Rhino instance in the Servers menu, and select the Upload Cert option.

UploadCertMenu

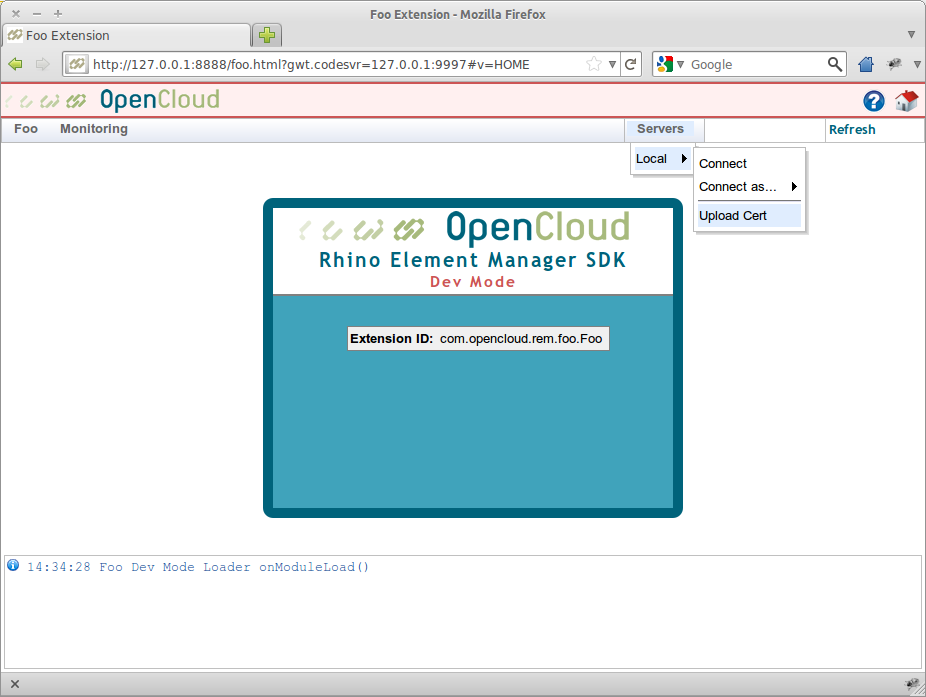
A dialog box displays for uploading the certificate file.

2

Click the Browse button; then find and select the rhino-trust.cert file for the corresponding Rhino instance.

UploadCertDialog

The SDK uploads the certificate file, and adds it to the dev-mode keystore for your plugin module.

= Building your Plugin :sortorder: 6

To build and package your plugin:

1

Open a terminal, and cd into your REM plugin directory (such as foo-em).

2

Run ant.

The SDK compiles your plugin, and bundles it in a jar under target/artifacts.

You can now install your plugin into REM.

= Installing Plugins :sortorder: 7

See Installing REM Plugins in the REM Guide.

= Advanced Topics :indexpage: :sortorder: 8

Here are some advanced development topics for the REM SDK.

linking to REM screens

link to REM screens from within your plugin

including third-party libraries

include third-party libraries with your plugin

using the plugin-first class loader

use the plugin-first class loader to override third-party libraries

converting a REM extension into a plugin

convert an existing REM extension into a REM plugin

= Linking to REM :sortorder: 1

To create a link to a page in REM from within your plugin:

1

Add a rem-ext xmlns attribute to you UiBinder file.

For example:

<ui:UiBinder xmlns:rem-ext="urn:import:com.opencloud.rem.ext.client.ui">

2

Add a REMLink widget to your UiBinder template wherever you want the link to appear.

For example:

<rem-ext:REMLink ui:field="manageRAEntitiesLink">manage RA entities</rem-ext:REMLink>

3

Add an import for REM and REMLink to your corresponding panel implementation; and add a @UiField entry for your link.

import com.opencloud.rem.ext.client.ui.REMLink;
import com.opencloud.rem.ext.client.REM;
@UiField REMLink manageRAEntitiesLink;

4

Add an import for HistoryManager to your panel implementation; add it as a constructor arg; and assign it to a field.

import com.opencloud.rem.client.place.HistoryManager;
    @Inject
    public YourPanelImpl(/* existing constuctor args */, HistoryManager historyManager) {
        this.historyManager = historyManager;
        // existing constructor logic
    }
    private HistoryManager historyManager;

5

Add code to your presenter implementation when refresh is called to update the links in the view.

For example:

    public void refresh() {
        prepare();
        if(viewPopulated) return;

        final HistoryToken currentToken = historyManager.currentToken();
        view.updateLinks(currentToken.getConnectionId(), currentToken.getInstanceId());

        // existing logic

        viewPopulated = true;
    }

6

Add code to your panel implementation to update the link.

For example:

    @Override
    public void updateLinks(String connectionId, String instanceId) {
        manageRAEntitiesLink.setHref(REM.getHostPageBaseURL()
            + "#v=EMS&c=" + connectionId
            + "&i=" + URL.encodeQueryString(instanceId)
            + "&p=Management&b=resources&rv=LIST");
    }

When running your plugin in dev-mode, the link will show as a title tooltip; and clicking will display an error popup. When deployed in REM, it will target the link to REM itself.

= Including Third-party Libraries :sortorder: 2

To include third-party libraries with your plugin:

1

Copy your additional third-party libraries into the libs/war folder located in the root of your REM SDK.

2

Edit build/compile.xml in your plugin; add a new zipfileset in the jar packaging step; and add an include for each of the jars you want bundled with your plugin.

For example:

    <target name="package" depends="gwtc,compile">
        <jar destfile="${jars}/prototype-em-server.jar">
            <fileset dir="${classes}">
                <exclude name="com/opencloud/rem/prototype/dev/**"/>
            </fileset>
        </jar>
        <jar destfile="${artifacts}/prototype-em.em.jar">
            <fileset dir="${target}/war" includes="prototype/**"/>
            <fileset dir="${basedir}/war" includes="prototype.html"/>
            <zipfileset prefix="WEB-INF/lib" file="${jars}/prototype-em-server.jar"/>
            <!-- Include additional third-party libraries -->
            <zipfileset prefix="WEB-INF/lib" dir="${libs}/war">
                <include name="name-of-third-party-library.jar"/>
            </zipfileset>
            <manifest>
                <attribute name="Short-Name" value="prototype"/>
                <attribute name="Version" value="${plugin.version}"/>
                <attribute name="Description" value="${plugin.description}"/>
            </manifest>
        </jar>
    </target>

If your plugin needs a different version of a library already provided by REM, you will need to use the plugin-first class loader in addition to the above.

= Using the Plugin-First ClassLoader :sortorder: 3

Each REM plugin has its server-side classes loaded in a child ClassLoader with REM’s main ClassLoader as its parent. By default, this is a simple URLClassLoader which delegates to REM’s class loader first before attempting to load a class from the plugin itself.

If your plugin needs to use a different version of a third-party library that is bundled with REM, it must specify that it requires the plugin-first class loader. This reverses the delegation order so that your plugin’s class loader will be checked first before delegating to REM’s class loader.

Note It is not possible to override the guice library that is bundled with REM as this is critical to the operation of REM.

1

Open your plugin’s build/compile.xml Ant build script in an editor and add an entry to the jar’s manifest.

For example:

            <manifest>
                <attribute name="Short-Name" value="example"/>
                <attribute name="Version" value="${plugin.version}"/>
                <attribute name="Description" value="${plugin.description}"/>
                <attribute name="Plugin-First-Class-Loader" value="true"/>
            </manifest>

2

Rebuild your plugin and install it into REM.

Your plugin’s classes will now take precedence over those bundled with REM.

= Converting a REM Extension into a Plugin :sortorder: 4

Previous versions of REM supported extensions by generating *-em.war extension archives and installing them directly into the main rem.war file. If you have developed one of these types of extensions, it is still supported, but it is also quite straight forward to convert it into a plugin.

To convert your extension into a plugin:

1

Open your extension’s build.properties and add:

plugin.version=<Version of your plugin>
plugin.description=<Short description of your plugin>

For example:

plugin.version=1.0
plugin.description=Example Element Manager Plugin

2

Open your extension’s build/compile.xml Ant build script in an editor and make the following changes.

- <zip destfile="${artifacts}/example-em.zip">
+ <jar destfile="${artifacts}/example-em.em.jar">
             <fileset dir="${target}/war" includes="example/**"/>
             <fileset dir="${basedir}/war" includes="example.html"/>
             <zipfileset prefix="WEB-INF/lib" file="${jars}/example-em-server.jar"/>
- </zip>
+ <manifest>
+ <attribute name="Short-Name" value="example"/>
+ <attribute name="Version" value="${plugin.version}"/>
+ <attribute name="Description" value="${plugin.description}"/>
+ </manifest>
+ </jar>

The Short-Name attribute value should match the name of your extension without the -em suffix.

3

Open your extension’s main ServletModule (for example, src/com/opencloud/rem/example/server/ExampleServletModule.java) and remove these lines:

        // Guice-enabled RemoteServiceServlet
        serve("/example/GWT.rpc").with(GuiceRemoteServiceServlet.class);

4

Open your extension’s DevModeGuiceServletConfig (for example, src/com/opencloud/rem/example/dev/server/ExampleDevModeGuiceServletConfig.java) and add an inline ServletModule like this:

        return Guice.createInjector(new ServletModule() {
            @Override
            protected void configureServlets() {
                serve("/example/GWT.rpc").with(GuiceRemoteServiceServlet.class);
            }
        }, /* other modules as before */);

Your extension is now a REM Plugin.

5

(Optional)

If your main ServletModule doesn’t have any serve() or filter() calls left in it, then it can be changed into a simple Module.

  • rename it from *ServletModule.java to *Module.java.

  • instead of extending com.google.inject.servlet.ServletModule, change it to extend com.google.inject.AbstractModule.

  • change the configureServlets() method to configure().

  • edit your extension class (for example, src/com/opencloud/rem/example/server/ExampleExtension.java) and move your module from getServletModule() to getOtherModules().

For example:

     public ServletModule getServletModule() {
- return new ExampleServletModule();
+ return null;
     }

     public Module[] getOtherModules() {
- return new Module[] { };
+ return new Module[] { new ExampleModule() };
     }