This guide describes how to deploy, manage and maintain OCSS7 - Metaswitch’s SS7 Stack.
This document assumes a working knowledge of SS7 and SIGTRAN, as well as some familiarity with the administration of Linux systems and Java applications.
Topics
This document includes the following topics:
An overview of OCSS7, including features and architecture |
|
A step-by-step setup guide from packages through a test dialog, ignoring production-grade details |
|
SGC installation in detail, including production-grade features and tuning |
|
Configuration options for startup and runtime operations |
|
Monitoring OCC7’s operational state |
|
Driving OCCS7 from the command line |
|
Use of OCSS7 with Metaswitch’s CGIN Connectivity Pack |
|
Upgrading the SGC and the CGIN TCAP stack |
|
Appendix describing the configuration properties that may be set in the |
|
Gathering information for support requests |
|
The SGC versions that support online upgrade |
|
Glossary of acronyms |
Other documentation for OCSS7 can be found on the OCSS7 product page.
About OCSS7
What is OCSS7?
OCSS7 provides SS7 network connectivity to Metaswitch products, including the Rhino CGIN RA and the Metaswitch Scenario Simulator. It does this by implementing a set of SS7 and related SIGTRAN protocols. The current version supports M3UA, ITU-T SCCP, ANSI SCCP, ITU-T TCAP and ANSI TCAP, and can act as an M3UA Application Server connected either to an M3UA Signalling Gateway or to another Application Server as an IP Server Process.
Main features
OCSS7 offers the following main features:
-
Provides IN network connectivity to Metaswitch’s CGIN and Scenario Simulator
-
SIGTRAN M3UA communication with Signalling Gateways and/or IPSP peers
-
Cluster deployment — SGC may be deployed in a cluster where multiple SGC instances cooperate and represent a single Signalling Point Code.
Supported specifications
| Specification | Comment |
|---|---|
RFC 4666 |
M3UA (ASP and IPSP functionality) |
ITU-T Q.711-Q.714 |
ITU-T SCCP (excluding LUDT) |
ATIS-1000112 (previously ANSI T1.112) |
ANSI SCCP (excluding LUDT, INS and ISNI) |
ITU-T Q.771-Q.774 |
TCAP (constrained to features supported by the TCAP SPI interface provided by the CGIN RA) |
ANSI T1.114-2000 and T1.114-1988 |
ANSI TCAP (constrained to features supported by the TCAP SPI interface provided by the CGIN RA) |
More details on supported RFCs, see the OCSS7 Compliance Matrix.
Architecture
OCSS7 is composed of two main user-visible components:
-
the Signalling Gateway Client (SGC) TCAP Stack (frontend), automatically deployed as part of the Rhino CGIN RA, and
-
the SGC (backend), deployed as one or more separate processes.
After initialization, the TCAP Stack (frontend) registers with a preconfigured SSN at the SGC instance, and allows the CGIN RA to accept and initiate TCAP dialogs. Multiple TCAP Stack (frontend) instances representing the same SSN can be connected to the SGC instance (backend); in this case all incoming traffic will be load balanced among them.
The SGC provides IN connectivity for exactly one Point Code. Typically, the SGC is deployed as a cluster of at least two instances to meet standard carrier-grade, high-availability requirements. This manual primarily concerns itself with the OCSS7 SGC, as the TCAP stack component within CGIN RA is managed as part of CGIN.
Below is a high-level diagram followed by descriptions of the main components of the OCSS7 stack. The OCSS7 stack components are yellow. Components that are provided by the Rhino platform, CGIN, or the operating system environment are blue.
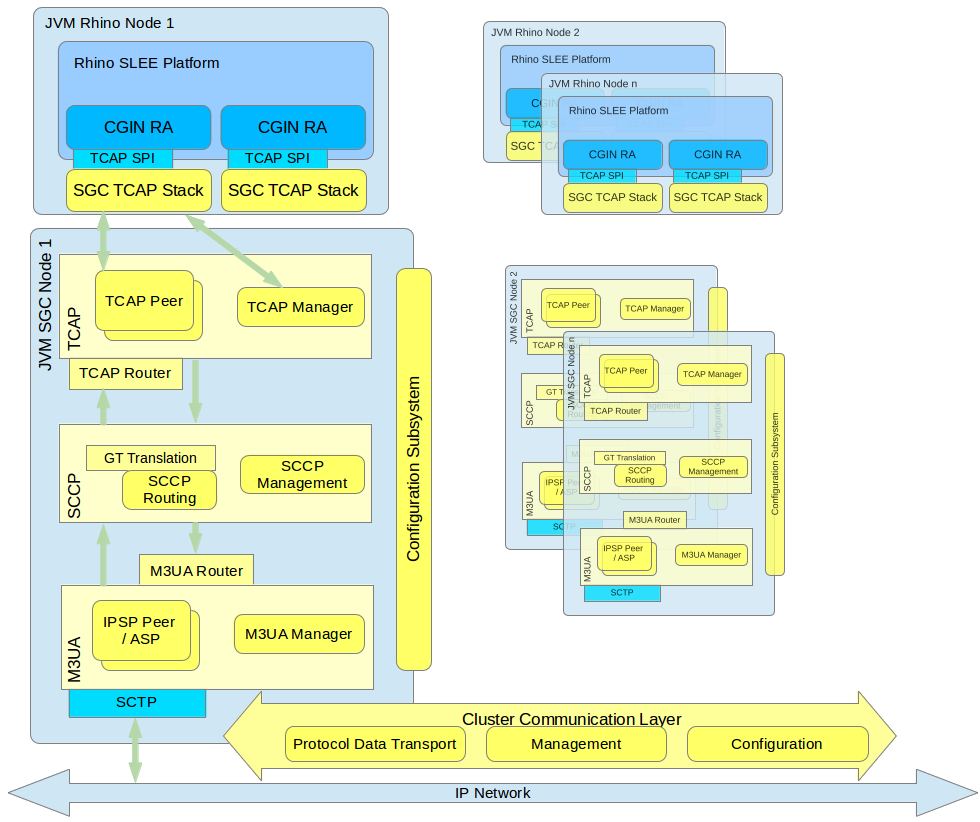
SGC Subsystems overview
All SGC nodes in the cluster represent a single logical system with a single PC (SS7 Point Code). Each SGC cluster node instantiates all stack layers and subsystems, which coordinate with each other to provide a single logical view of the cluster.
The major SS7 SGC subsystems are:
-
Configuration Subsystem — plays a central role in managing the life cycle of all processing objects in the SGC Stack. The Configuration Subsystem is distributed, so an object on any cluster node may be managed from every other cluster node. Configuration is exposed through a set of JMX MBeans which allow manipulation of the underlying configuration objects
-
TCAP Layer — manages routing and load balancing of TCAP messages to appropriate Rhino CGIN RAs (through registered TCAP Stacks)
-
SCCP Layer — responsible for routing SCCP messages, GT translation, and managing internal and external subsystem availability states
-
M3UA Layer — establishes and manages the SG, IPSP connectivity, and AS state.
Internally, all layers use Cluster Communication subsystems to distribute management state and configuration data, to provide a single logical view of the entire cluster. Irrespective of which cluster node receives or originates an SS7 message, that message is transported to the appropriate cluster node for processing (by the Rhino CGIN RA) or for further sending using one of the nodes' established SCTP associations.
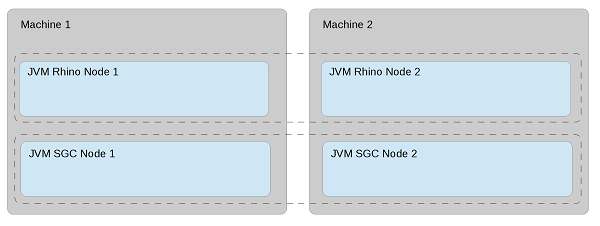
SGC Deployment model
The SGC cluster physical deployment model is independent from Rhino cluster deployment. That is, SGC nodes can be deployed on separate hosts than Rhino nodes OR share the same machines.
| |
See also
Installing the SGC |
Management tools
The SGC installation package provides a CLI management console that exposes a set of CRUD commands that are used to configure the SGC cluster and observe its runtime state. SGC cluster configuration and runtime state can be managed from each and every node; there is no need to connect separately to each node. As the SGC exposes a standard Java JMX management interface, users are in no way constrained to provided tools and are free to create custom management clients to serve their particular needs.
The SGC also provides an SNMP agent, exposing SGC-gathered statistics and Alarm notifications (Traps) through the SNMP protocol.
The TCAP stack component installed as part of the Rhino CGIN RA is managed using the usual Rhino and CGIN RA management facilities.
Quick Start
This section provides a step-by-step walk through basic OCSS7 setup from unpacking software packages through running test traffic. The end result is a functional OCSS7 network suitable for basic testing. For production installations and installation reference material please see Installing the SGC.
Introduction
In this walk-through we will be:
-
setting up two OCSS7 clusters, each with a single SGC node, and
-
running one of the example IN scenarios through the network using the Metaswitch Scenario Simulator.
To complete this walk-through you will need the:
-
OCSS7 package,
-
IN Scenario Pack 2.0.0 or higher for the Scenario Simulator, and
These instructions should be followed on a test system which:
-
runs Linux,
-
has SCTP support, and
-
is unlikely to be hampered by local firewall or other security restrictions.
Finally, you will need to make sure that the JAVA_HOME environment variable is set to the location of your Oracle Java JDK installation.
The Plan
We will set up two clusters, each with a single node, both running on our single test system. At the M3UA level:
-
cluster 1 will use Point Code 1
-
cluster 2 will use Point Code 2
-
there will be one Application Server (AS) with routing context 2
-
there will be one SCTP association between the two nodes
We will test the network using two Metaswitch Scenario Simulators:
-
Simulator 1 will:
-
connect to cluster 1
-
use SSN 101
-
use GT 1234
-
-
Simulator 2 will:
-
connect to cluster 2
-
use SSN 102
-
use GT 4321
-
Routing between the two simulators will be via Global Title translation.
Once we think that the network is operational we will test it by running one of the example scenarios shipped with the IN Scenario Pack for the Scenario Simulator.
SGC installation
Naming Conventions
The cluster naming convention in this example uses PC followed by the point code. For example, a cluster whose point code is 1 will have a name of PC1.
The node naming convention lists the cluster name first, and then a hyphen, followed by the node number within that SGC cluster. For example, PC1-1 or PC2-1. During this walk-through the number after the hyphen will always be 1, but this convention provides space to expand if you wish to add additional nodes after completing the walk through.
Installation
We will now install two SGC clusters, each containing one node.
1 |
Create the root installation directory for the PC1 cluster and PC1-1 node:
mkdir PC1/PC1-1
|
||
|---|---|---|---|
2 |
Unpack the SGC archive file in the
PC1/PC1-1 directory
unzip ocss7-package-VERSION.zip (replacing This creates the distribution directory, Example: $ unzip ocss7-package-3.0.0.0.zip Archive: ocss7-package-3.0.0.0.zip creating: ocss7-3.0.0.0/ inflating: ocss7-3.0.0.0/CHANGELOG inflating: ocss7-3.0.0.0/README creating: ocss7-3.0.0.0/config/ creating: ocss7-3.0.0.0/doc/ creating: ocss7-3.0.0.0/license/ creating: ocss7-3.0.0.0/logs/ creating: ocss7-3.0.0.0/var/ inflating: ocss7-3.0.0.0/config/SGC.properties inflating: ocss7-3.0.0.0/config/SGC_bundle.properties.sample inflating: ocss7-3.0.0.0/config/log4j.dtd inflating: ocss7-3.0.0.0/config/log4j.test.xml inflating: ocss7-3.0.0.0/config/log4j.xml inflating: ocss7-3.0.0.0/config/sgcenv inflating: ocss7-3.0.0.0/license/LICENSE.apache-log4j-extras.txt inflating: ocss7-3.0.0.0/license/LICENSE.commons-cli.txt inflating: ocss7-3.0.0.0/license/LICENSE.commons-collections.txt inflating: ocss7-3.0.0.0/license/LICENSE.commons-lang.txt inflating: ocss7-3.0.0.0/license/LICENSE.guava.txt inflating: ocss7-3.0.0.0/license/LICENSE.hazelcast.txt inflating: ocss7-3.0.0.0/license/LICENSE.jline.txt inflating: ocss7-3.0.0.0/license/LICENSE.jsr305.txt inflating: ocss7-3.0.0.0/license/LICENSE.log4j.txt inflating: ocss7-3.0.0.0/license/LICENSE.netty.txt inflating: ocss7-3.0.0.0/license/LICENSE.protobuf.txt inflating: ocss7-3.0.0.0/license/LICENSE.slf4j.txt inflating: ocss7-3.0.0.0/license/LICENSE.snmp4j.txt inflating: ocss7-3.0.0.0/license/LICENSE.velocity.txt creating: ocss7-3.0.0.0/bin/ inflating: ocss7-3.0.0.0/bin/generate-report.sh inflating: ocss7-3.0.0.0/bin/sgc inflating: ocss7-3.0.0.0/bin/sgcd inflating: ocss7-3.0.0.0/bin/sgckeygen inflating: ocss7-3.0.0.0/sgc.jar creating: ocss7-3.0.0.0/lib/ inflating: ocss7-3.0.0.0/lib/apache-log4j-extras-1.2.17.jar inflating: ocss7-3.0.0.0/lib/guava-14.0.1.jar inflating: ocss7-3.0.0.0/lib/hazelcast-3.7.jar inflating: ocss7-3.0.0.0/lib/jsr305-1.3.9.jar inflating: ocss7-3.0.0.0/lib/log4j-1.2.17.jar inflating: ocss7-3.0.0.0/lib/netty-buffer-4.0.28.jar inflating: ocss7-3.0.0.0/lib/netty-codec-4.0.28.jar inflating: ocss7-3.0.0.0/lib/netty-codec-http-4.0.28.jar inflating: ocss7-3.0.0.0/lib/netty-common-4.0.28.jar inflating: ocss7-3.0.0.0/lib/netty-handler-4.0.28.jar inflating: ocss7-3.0.0.0/lib/netty-transport-4.0.28.jar inflating: ocss7-3.0.0.0/lib/protobuf-java-2.3.0.jar inflating: ocss7-3.0.0.0/lib/protobuf-library-2.3.0.1.jar inflating: ocss7-3.0.0.0/lib/slf4j-api-1.7.25.jar inflating: ocss7-3.0.0.0/lib/slf4j-log4j12-1.7.25.jar inflating: ocss7-3.0.0.0/lib/snmp4j-2.2.2.jar inflating: ocss7-3.0.0.0/lib/snmp4j-agent-2.0.10a.jar creating: ocss7-3.0.0.0/lib/upgrade-packs/ inflating: ocss7-3.0.0.0/lib/upgrade-packs/ocss7-upgrade-pack-3.0.0.0.jar creating: ocss7-3.0.0.0/cli/ inflating: ocss7-3.0.0.0/cli/sgc-cli.sh creating: ocss7-3.0.0.0/cli/conf/ creating: ocss7-3.0.0.0/cli/lib/ inflating: ocss7-3.0.0.0/cli/conf/cli.properties inflating: ocss7-3.0.0.0/cli/conf/log4j.xml inflating: ocss7-3.0.0.0/cli/lib/commons-cli-1.2.jar inflating: ocss7-3.0.0.0/cli/lib/commons-collections-3.2.1.jar inflating: ocss7-3.0.0.0/cli/lib/commons-lang-2.6.jar inflating: ocss7-3.0.0.0/cli/lib/jline-1.0.jar inflating: ocss7-3.0.0.0/cli/lib/log4j-1.2.17.jar inflating: ocss7-3.0.0.0/cli/lib/ocss7-cli.jar inflating: ocss7-3.0.0.0/cli/lib/ocss7-remote-3.0.0.0.jar inflating: ocss7-3.0.0.0/cli/lib/slf4j-api-1.7.25.jar inflating: ocss7-3.0.0.0/cli/lib/slf4j-log4j12-1.7.25.jar inflating: ocss7-3.0.0.0/cli/lib/velocity-1.7.jar inflating: ocss7-3.0.0.0/cli/sgc-cli.bat creating: ocss7-3.0.0.0/doc/mibs/ inflating: ocss7-3.0.0.0/doc/mibs/COMPUTARIS-MIB.txt inflating: ocss7-3.0.0.0/doc/mibs/CTS-SGC-MIB.txt inflating: ocss7-3.0.0.0/doc/mibs/OPENCLOUD-OCSS7-MIB.txt inflating: ocss7-3.0.0.0/config/hazelcast.xml.sample |
||
3 |
Create the root installation directory for the PC2 cluster and PC2-1 node:
mkdir PC2/PC2-1 |
||
4 |
Unpack the SGC archive file in the
PC2/PC2-1 directory
unzip ocss7-package-VERSION.zip (replacing This creates the distribution directory, |
We now have two SGC nodes with no configuration. The next step is to set up their cluster configuration.
SGC cluster membership configuration
We will now do the cluster membership configuration for our two SGC nodes/clusters:
-
The node name is specified by the
ss7.instanceparameter -
And the cluster name is specified by the
hazelcast.groupparameter
Later on, during SS7 configuration, the ss7.instance value is used to specify which node in the cluster certain configuration elements (such as SCTP endpoints) are associated with.
1 |
Give node PC1-1 its identity
Edit the file # SGC instance node name ss7.instance=PC1-1 # Path to the Hazelcast config file hazelcast.config.file=config/hazelcast.xml # Default Hazelcast group name hazelcast.group=PC1 #path where sgc data file should be stored sgc.data.dir=var |
|---|---|
2 |
Give node PC2-1 its identity
Edit the file # SGC instance node name ss7.instance=PC2-1 # Path to the Hazelcast config file hazelcast.config.file=config/hazelcast.xml # Default Hazelcast group name hazelcast.group=PC2 #path where sgc data file should be stored sgc.data.dir=var |
| |
For clusters with multiple nodes the |
Starting the clusters
We will now start the two SGC clusters.
1 |
Check
JAVA_HOME
Make sure your $ echo $JAVA_HOME /opt/jdk1.8.0_60 |
||
|---|---|---|---|
2 |
Change the management port for node PC1-1
Edit the file The
|
||
3 |
Start node PC1-1
./PC1/PC1-1/ocss7-3.0.0.0/bin/sgc start If all is well, you should see: SGC starting - daemonizing ... SGC started successfully |
||
4 |
Change the management port for node PC2-1
Edit the file The |
||
5 |
Start node PC2-1
./PC2/PC2-1/ocss7-3.0.0.0/bin/sgc start If all is well, you should see: SGC starting - daemonizing ... SGC started successfully |
If the SGC start command reported any errors please double check your JAVA_HOME environment variable and make sure that nothing has already bound the management ports 10111 and 10121. If these ports are already in use on your system you may simply change them to something else and make a note of the values for later use.
Connect the management console
We now have two running OCSS7 clusters with blank configuration. The configuration we have done so far was done on a per-node basis using configuration files, but this does no more than give a node the minimal configuration it needs to boot and become a cluster member. The rest of our SGC configuration will now be done using the Command-Line Management Console. Configuration done in this manner becomes cluster-wide configuration which is automatically propagated to and saved by every other cluster node, although for our single-node clusters that detail will not be particularly relevant.
It is recommended that you start one management console per node for this walk-through, however, if your system is low on RAM you may wish to start and stop these consoles as required.
1 |
Start the mangement console for PC1-1
./PC1/PC1-1/ocss7-3.0.0.0/cli/sgc-cli.sh Example: $ ./PC1/PC1-1/ocss7-3.0.0.0/cli/sgc-cli.sh Preparing to start SGC CLI ... Checking environment variables [JAVA_HOME]=[/opt/jdk1.8.0_60] [CLI_HOME]=[/home/ocss7/quick-start/PC1/PC1-1/ocss7-3.0.0.0/cli] Environment is OK! Determining SGC home and JMX configuration [SGC_HOME]=/home/ocss7/quick-start/PC1/PC1-1/ocss7-3.0.0.0 [JMX_HOST]=127.0.0.1 [JMX_PORT]=10111 Done +---------------------------Environment--------------------------------+ CLI_HOME: /home/ocss7/quick-start/PC1/PC1-1/ocss7-3.0.0.0/cli JAVA: /opt/jdk1.8.0_60 JAVA_OPTS: -Dlog4j.configuration=file:/home/ocss7/quick-start/PC1/PC1-1/ocss7-3.0.0.0/cli/conf/log4j.xml -Dsgc.home=/home/ocss7/quick-start/PC1/PC1-1/ocss7-3.0.0.0/cli +----------------------------------------------------------------------+ 127.0.0.1:10111 PC1-1> Here we can see the management console’s prompt, which identifies the node to which it is connected by host and port.
|
||
|---|---|---|---|
2 |
Start the management console for PC2-1
./PC2/PC2-1/ocss7-3.0.0.0/cli/sgc-cli.sh Example: $ ./PC2/PC2-1/ocss7-3.0.0.0/cli/sgc-cli.sh Preparing to start SGC CLI ... Checking environment variables [JAVA_HOME]=[/opt/jdk1.8.0_60/] [CLI_HOME]=[/home/ocss7/quick-start/PC2/PC2-1/ocss7-3.0.0.0/cli] Environment is OK! Determining SGC home and JMX configuration [SGC_HOME]=/home/ocss7/quick-start/PC2/PC2-1/ocss7-3.0.0.0 [JMX_HOST]=127.0.0.1 [JMX_PORT]=10121 Done +---------------------------Environment--------------------------------+ CLI_HOME: /home/ocss7/quick-start/PC2/PC2-1/ocss7-3.0.0.0/cli JAVA: /opt/jdk1.8.0_60/ JAVA_OPTS: -Dlog4j.configuration=file:/home/ocss7/quick-start/PC2/PC2-1/ocss7-3.0.0.0/cli/conf/log4j.xml -Dsgc.home=/home/ocss7/quick-start/PC2/PC2-1/ocss7-3.0.0.0/cli +----------------------------------------------------------------------+ 127.0.0.1:10121 PC2-1> |
| |
The management console supports tab completion and suggestions. If you hit tab while in the console it will complete the command, parameter, or value as best it can. If the console is unable to complete the command, parameter, or value entirely because there are multiple completion choices then it will display the available choices. |
| |
You can exit the management console either by hitting ctrl-d or entering the quit command. |
General configuration
General Configuration is that which is fundamental to the cluster and the nodes within it. For our purposes this means:
-
setting the local Point Codes for the clusters,
-
setting the basic communication attributes of each node.
The basic communication attributes of each node are used to control:
-
payload message transfer between SGCs within the cluster; and
-
communication with client TCAP stacks running in Rhino or the Scenario Simulator.
| |
The distinction between clusters and nodes is about to become apparent because each cluster has exactly one local Point Code for which it provides services and which is set once for the entire cluster. In contrast, each node must be defined and given its own basic communication configuration. |
1a |
Set the Point Code for PC1-1’s cluster to 1
Within the management console for PC1-1 run: modify-parameters: sp=1 Example: 127.0.0.1:10111 PC1-1> modify-parameters: sp=1 OK parameters updated. |
||||
|---|---|---|---|---|---|
1b |
Set the Point Code for PC2-1’s cluster to 2
Within the management console for PC2-1 run: modify-parameters: sp=2 Example: 127.0.0.1:10121 PC2-1> modify-parameters: sp=2 OK parameters updated. |
||||
2a |
Configure node PC1-1’s basic communication attributes
Within the management console for PC1-1 run: create-node: oname=PC1-1, switch-local-address=127.0.0.1, switch-port=11011, stack-data-port=12011, stack-http-port=13011, enabled=true Example: 127.0.0.1:10111 PC1-1> create-node: oname=PC1-1, switch-local-address=127.0.0.1, switch-port=11011, stack-data-port=12011, stack-http-port=13011, enabled=true OK node created.
This command configures network communication for:
|
||||
2b |
Configure node PC2-1’s basic communication attributes
Within the management console for PC2-1 run: create-node: oname=PC2-1, switch-local-address=127.0.0.1, switch-port=11021, stack-data-port=12021, stack-http-port=13021, enabled=true
Example: 127.0.0.1:10121 PC1-1> create-node: oname=PC2-1, switch-local-address=127.0.0.1, switch-port=11021, stack-data-port=12021, stack-http-port=13021, enabled=true OK node created.
|
Of the attributes we set above only the switch-local-address and stack-data-port settings are required for future configuration; we’ll use them when we get to the Scenario Simulator configuration section.
| |
The create-node command is discussed above in the context of configuring the basic communication attributes to be used, but it also creates a node configuration object which can be enabled or disabled and for which the current state can be seen when using the display-node command. It has been discussed this way because some configuration must be provided, no matter what your configuration. If it was not necessary to provide some configuration then the SGC could simply automatically detect and add cluster nodes as they come online. |
M3UA configuration
We will now begin configuring the M3UA layer of our network. There are a number of ways this can be done, but for the purposes of this walk-through we will use:
-
a single Application Server (AS) between the two instances,
-
the cluster for Point Code 1 as a client (in IPSP mode),
-
the cluster for Point Code 2 as a server (in IPSP mode), and
-
one SCTP association between the two nodes.
At a high level the procedure we’re about to follow will:
-
define the Application Server (AS) on each cluster,
-
define routes to our destination Point Codes through the defined AS,
-
define the SCTP connection on each node, and
-
associate the SCTP connection with the Application Server.
All the steps below are in two parts, the part "a" commands must be run on the management console connected to node PC1-1 and the part "b" commands must be run on the management console connected to node PC2-1. If this becomes confusing please check the examples given, which will indicate the correct management console by the port number in the prompt.
| |
Those familiar with M3UA will note that Single Exchange is used. The SGC does not support double exchange. |
1a |
Define the Application Server for PC1-1
Create the AS with create-as: oname=PC2, traffic-maintenance-role=ACTIVE, rc=2, enabled=true Example: 127.0.0.1:10111 PC1-1> create-as: oname=PC2, traffic-maintenance-role=ACTIVE, rc=2, enabled=true OK as created. |
||
|---|---|---|---|
1b |
Define the Application Server for PC2-1
On PC2-1 note that create-as: oname=PC2, traffic-maintenance-role=PASSIVE, rc=2, enabled=true Example: 127.0.0.1:10121 PC1-1> create-as: oname=PC2, traffic-maintenance-role=PASSIVE, rc=2, enabled=true OK as created. |
||
2a |
Define the local SCTP association’s endpoint for PC1-1
create-local-endpoint: oname=PC1-1-PC2-1, node=PC1-1, port=21121 Example: 127.0.0.1:10111 PC1-1> create-local-endpoint: oname=PC1-1-PC2-1, node=PC1-1, port=21121 OK local-endpoint created. This defines a local endpoint which will be bound to SCTP port
|
||
2b |
Define the local SCTP association’s endpoint for PC2-1
create-local-endpoint: oname=PC2-1, node=PC2-1, port=22100 This defines a local endpoint which will be bound to SCTP port Example: 127.0.0.1:10121 PC1-1> create-local-endpoint: oname=PC2-1, node=PC2-1, port=22100 OK local-endpoint created.
|
||
3a |
Define the local SCTP endpoint IP addresses for PC1-1
We will now define the IP address to be used by our SCTP association. create-local-endpoint-ip: oname=PC1-1-PC2-1, ip=127.0.0.1, local-endpoint-name=PC1-1-PC2-1 Example: 127.0.0.1:10111 PC1-1> create-local-endpoint-ip: oname=PC1-1-PC2-1, ip=127.0.0.1, local-endpoint-name=PC1-1-PC2-1 OK local-endpoint-ip created. As you can see above, a |
||
3b |
Define the local SCTP endpoint IP addresses for PC2-1
Similar to 3a, above: create-local-endpoint-ip: oname=PC2-1, ip=127.0.0.1, local-endpoint-name=PC2-1 Example: 127.0.0.1:10121 PC1-1> create-local-endpoint-ip: oname=PC2-1, ip=127.0.0.1, local-endpoint-name=PC2-1 OK local-endpoint-ip created. |
||
4a |
Enable the local endpoint for PC1-1
The local endpoint was created in its default enable-local-endpoint: oname=PC1-1-PC2-1 Example: 127.0.0.1:10111 PC1-1> enable-local-endpoint: oname=PC1-1-PC2-1 OK local-endpoint enabled. |
||
4b |
Enable the local endpoint for PC2-1
enable-local-endpoint: oname=PC2-1 Example: 127.0.0.1:10121 PC1-1> enable-local-endpoint: oname=PC2-1 OK local-endpoint enabled. |
||
5a |
Define the client connection for PC1-1 to PC2-1
We will now define the SCTP association used by PC1-1, as well as some M3UA settings for the connection: create-connection: oname=PC1-1-PC2-1, port=22100, local-endpoint-name=PC1-1-PC2-1, conn-type=CLIENT, state-maintenance-role=ACTIVE, is-ipsp=true, enabled=true Example: 127.0.0.1:10111 PC1-1> create-connection: oname=PC1-1-PC2-1, port=22100, local-endpoint-name=PC1-1-PC2-1, conn-type=CLIENT, state-maintenance-role=ACTIVE, is-ipsp=true, enabled=true OK connection created. The |
||
5b |
Define the server connection for PC2-1 from PC1-1
Similar to the above, this defines a client connection to the node, which is acting as a server: create-connection: oname=PC1-1-PC2-1, port=21121, local-endpoint-name=PC2-1, conn-type=SERVER, state-maintenance-role=PASSIVE, is-ipsp=true, enabled=true Example: 127.0.0.1:10121 PC1-1> create-connection: oname=PC1-1-PC2-1, port=21121, local-endpoint-name=PC2-1, conn-type=SERVER, state-maintenance-role=PASSIVE, is-ipsp=true, enabled=true OK connection created. the port in this command is the remote port from which the connection will be initiated. It must match the configuration in node PC1-1 or the connection will not be accepted. |
||
6a |
Define the connection IP addresses for PC1-1 to PC2-1
Just as we had to define local endpoint IP addresses earlier, we must now define the remote connection IP addresses to which the node should connect: create-conn-ip: oname=PC1-1-PC2-1, ip=127.0.0.1, conn-name=PC1-1-PC2-1 Example: 127.0.0.1:10111 PC1-1> create-conn-ip: oname=PC1-1-PC2-1, ip=127.0.0.1, conn-name=PC1-1-PC2-1 OK conn-ip created. Again, this extra step is because SCTP supports multi-homing. |
||
6b |
Define the connection IP addresses for PC2-1 from PC1-1
The compliment of step 6a, above, PC2-1 needs to know which IP addresses to expect a connection from: create-conn-ip: oname=PC1-1-PC2-1, ip=127.0.0.1, conn-name=PC1-1-PC2-1 Example: 127.0.0.1:10121 PC1-1> create-conn-ip: oname=PC1-1-PC2-1, ip=127.0.0.1, conn-name=PC1-1-PC2-1 OK conn-ip created. The IP address here must match the |
||
7a |
Connect the AS to the connection on PC1-1
We must now tell the SGC that our AS should use the connection we have defined: create-as-connection: oname=PC1-1-PC2-1, as-name=PC2, conn-name=PC1-1-PC2-1 Example: 127.0.0.1:10111 PC1-1> create-as-connection: oname=PC1-1-PC2-1, as-name=PC2, conn-name=PC1-1-PC2-1 OK as-connection created. This |
||
7b |
Connect the AS to the connection on PC2-1
create-as-connection: oname=PC1-1-PC2-1, as-name=PC2, conn-name=PC1-1-PC2-1 Example: 127.0.0.1:10121 PC1-1> create-as-connection: oname=PC1-1-PC2-1, as-name=PC2, conn-name=PC1-1-PC2-1 OK as-connection created. |
||
8a |
Define the route on PC1-1 to Point Code 2
The final step, we must now define which Destination Point Codes can be reached via our Application Server. Define a Destination Point Code for PC=2 and a route to it via our AS with the following commands: create-dpc: oname=PC2, dpc=2 create-route: oname=PC2, as-name=PC2, dpc-name=PC2 Example: 127.0.0.1:10111 PC1-1> create-dpc: oname=PC2, dpc=2 OK dpc created. 127.0.0.1:10111 PC1-1> create-route: oname=PC2, as-name=PC2, dpc-name=PC2 OK route created. |
||
8b |
Define the route on PC2-1 to Point Code 1
Define a Destination Point Code for PC=1 and a route to it via our AS with the following commands: create-dpc: oname=PC1, dpc=1 create-route: oname=PC1, as-name=PC2, dpc-name=PC1 Example: 127.0.0.1:10121 PC1-1> create-dpc: oname=PC1, dpc=1 OK dpc created. 127.0.0.1:10121 PC1-1> create-route: oname=PC1, as-name=PC2, dpc-name=PC1 OK route created. |
General and M3UA configuration is now complete. In the next section we will check that everything is working correctly.
M3UA state inspection
You should now have two SGCs which are connected to each other at the M3UA layer. Before we move on to the upper layers of configuration we should check that everything is working as expected up to this point. If you are confident of your setup and in a hurry you can skip this section.
Please note that it is not normally necessary to check state in this exhaustive a manner, we are doing it in this step-by-step fashion to provide some familiarization with the SGC state inspection facilities and assist with troubleshooting.
| |
Most of the commands shown below show both the definition and the state of the various configuration objects they examine, and are intended for those modifying or considering modifying the configuration of the SGC. If you are interested strictly in state rather than configuration, there is a related family of commands which start with display-info- which will show extended state information without any configuration details. |
1 |
Check the
display-active-alarms command for problems
The PC1-1 127.0.0.1:10111 PC1-1> display-active-alarm: Found 0 objects. PC2-1 127.0.0.1:10121 PC1-1> display-active-alarm: Found 0 objects. If, instead, you see one or more alarms, don’t worry, we’ll step through the diagnostics one by one. |
||
|---|---|---|---|
2 |
Check the node state
If something is wrong with the node state or configuration than nothing will work. Run display-node on both nodes. Both nodes should say that the
|
||
3 |
Check the local endpoint state
The local endpoint must be enabled and active before the connection between the nodes will work. Run: display-local-endpoint on both nodes. Both nodes should say that the
|
||
4 |
Check the connection state
The next thing to check, working up the stack, is the SCTP association. Run display-connection on both nodes. Both nodes should say that the
It is often helpful to consult either the active alarms list or the logs when diagnosing connection issues, but that is outside the scope of this walk-through. |
||
5 |
Check the AS state
The AS should be active on both nodes. Run: display-as on both nodes to check. The state should be listed as
|
||
6 |
Check the SCCP state
SCCP is the next layer up, and we have not yet configured it, but it should be able to activate and communicate with its peer at this point. Run this command on both nodes to check: display-info-remotessninfo This should show the following output on both nodes: 127.0.0.1:10111 PC1-1> display-info-remotessninfo Found 2 object(s): +----------+----------+---------------+ |dpc |ssn |status | +----------+----------+---------------+ |1 |1 |ALLOWED | +----------+----------+---------------+ |2 |1 |ALLOWED | +----------+----------+---------------+ This output shows that the SCCP layers on each node are communicating with each other.
If the status shown above is
|
SCCP configuration
In The Plan we can see that the two Scenario Simulators expect to refer to each other by their global titles as follows:
-
1234: PC=1,SSN=101
-
4321: PC=2,SSN=102
Several inbound and outbound global title translation (GTT) rules are required to allow this to happen, which we will create now.
Also, while not technically necessary, we will configure Concerned Point Codes for each of the two nodes, so that they will inform each other about changes to the state of interesting SSNs.
All the steps below are in two parts, the part "a" commands must be run on the management console connected to node PC1-1 and the part "b" commands must be run on the management console connected to node PC2-1. If this becomes confusing please check the examples given, which will indicate the correct management console by the port number in the prompt.
1a |
Outbound GTT setup on PC1-1
Run the following commands to setup outbound global title translation on PC1-1: create-outbound-gt: oname=4321, addrinfo=4321 create-outbound-gtt: oname=4321, gt=4321, dpc=2, priority=5 Example: 127.0.0.1:10111 PC1-1> create-outbound-gt: oname=4321, addrinfo=4321 OK outbound-gt created. 127.0.0.1:10111 PC1-1> create-outbound-gtt: oname=4321, gt=4321, dpc=2, priority=5 OK outbound-gtt created. This defines a Global Title and then creates a translation rule which will cause messages with that GT in the Called Party Address to be routed to our peer at PC=2. |
|---|---|
1b |
Outbound GTT setup on PC2-1
Run the following commands to setup outbound global title translation on PC2-1: create-outbound-gt: oname=1234, addrinfo=1234 create-outbound-gtt: oname=1234, gt=1234, dpc=1, priority=5 Example: 127.0.0.1:10121 PC1-1> create-outbound-gt: oname=1234, addrinfo=1234 OK outbound-gt created. 127.0.0.1:10121 PC1-1> create-outbound-gtt: oname=1234, gt=1234, dpc=1, priority=5 OK outbound-gtt created. This defines a Global Title and then creates a translation rule which will cause messages with that GT in the Called Party Address to be routed to our peer at PC=1. |
2a |
Inbound GTT setup on PC1-1
Run the following to setup inbound GTT on PC1-1: create-inbound-gtt: oname=1234, addrinfo=1234, ssn=101 create-outbound-gt: oname=1234, addrinfo=1234 create-outbound-gtt: oname=1234, gt=1234, dpc=1, priority=5 Example 127.0.0.1:10111 PC1-1> create-inbound-gtt: oname=1234, addrinfo=1234, ssn=101 OK inbound-gtt created. 127.0.0.1:10111 PC1-1> create-outbound-gt: oname=1234, addrinfo=1234 OK outbound-gt created. 127.0.0.1:10111 PC1-1> create-outbound-gtt: oname=1234, gt=1234, dpc=1, priority=5 OK outbound-gtt created. The first command creates an inbound GTT rule for the Global Title we expect to be accepted traffic on. The second and third commands may look somewhat surprising, as they create an outbound GTT rule. This is the correct configuration for our network, as SCCP’s service messages (UDTS and XUDTS) may be generated locally in response to traffic we are attempting to send, and these service messages are routed as outbound messages. |
2b |
Inbound GTT setup on PC2-1
Run the following to setup inbound GTT on PC2-1: create-inbound-gtt: oname=4321, addrinfo=4321, ssn=102 create-outbound-gt: oname=4321, addrinfo=4321 create-outbound-gtt: oname=4321, gt=4321, dpc=2, priority=5 Example: GC[127.0.0.1:10121]> create-inbound-gtt: oname=4321, addrinfo=4321, ssn=102 OK inbound-gtt created. 127.0.0.1:10121 PC1-1> create-outbound-gt: oname=4321, addrinfo=4321 OK outbound-gt created. 127.0.0.1:10121 PC1-1> create-outbound-gtt: oname=4321, gt=4321, dpc=2, priority=5 OK outbound-gtt created. |
3a |
Create the Concerned Point Code on PC1-1
Run the following to configure PC1-1 to announce SSN changes for SSN=101 to the PC2 cluster: create-cpc: oname=PC2-101, dpc=2, ssn=101 Example: 127.0.0.1:10111 PC1-1> create-cpc: oname=PC2-101, dpc=2, ssn=101 OK cpc created. |
3b |
Create the Concerned Point Code on PC2-1
Run the following to configure PC2-1 to announce SSN changes for SSN=102 to the PC1 cluster: create-cpc: oname=PC1-102, dpc=1, ssn=102 Example: 127.0.0.1:10121 PC1-1> create-cpc: oname=PC1-102, dpc=1, ssn=102 OK cpc created. |
This completes our SCCP configuration, which we will check in the next section.
SCCP state inspection
We now have two fully configured SCCP layers. We will now check their state to make sure they will work as expected.
1 |
Check the outbound GTT state on PC1-1
The following command will show the current state of configured outbound GTT rules: display-info-ogtinfo: column=addrInfo, column=connId, column=rc, column=dpc Example on PC1-1 127.0.0.1:10111 PC1-1> display-info-ogtinfo: column=addrInfo, column=connId, column=rc, column=dpc Found 2 object(s): +---------------+---------------+----------+----------+ |addrInfo |connId |rc |dpc | +---------------+---------------+----------+----------+ |1234 | |-1 |1 | +---------------+---------------+----------+----------+ |4321 |PC1-1-PC2-1 |2 |2 | +---------------+---------------+----------+----------+ For GT 1234 we can see that:
This GT will be routed to the local SGC. For GT 4321 we can see that:
This GT will be routed to PC2-1 using the specified connection and Routing Context. Example on PC2-1 127.0.0.1:10121 PC1-1> display-info-ogtinfo: column=addrInfo, column=connId, column=rc, column=dpc Found 2 object(s): +---------------+---------------+----------+----------+ |addrInfo |connId |rc |dpc | +---------------+---------------+----------+----------+ |1234 |PC1-1-PC2-1 |2 |1 | +---------------+---------------+----------+----------+ |4321 | |-1 |2 | +---------------+---------------+----------+----------+
|
||
|---|---|---|---|
2 |
Check the local SSN state
The command: display-info-localssninfo will list the state of all SSNs which are either:
Example on PC1-1 GC[127.0.0.1:10111]> display-info-localssninfo: column=ssn, column=status Found 2 object(s): +----------+---------------+ |ssn |status | +----------+---------------+ |1 |ALLOWED | +----------+---------------+ |101 |PROHIBITED | +----------+---------------+ Example on PC2-1 127.0.0.1:10121 PC1-1> display-info-localssninfo: column=ssn, column=status Found 2 object(s): +----------+---------------+ |ssn |status | +----------+---------------+ |1 |ALLOWED | +----------+---------------+ |102 |PROHIBITED | +----------+---------------+ |
Scenario Simulator installation
This quick start walk-through will use the OC Scenario Simulator to test the network, rather than Rhino with CGIN, for simplicity.
For this quick start we will be assuming that your Scenario Simulator package is shipped with an IN Scenario Pack which does not support OCSS7 (which is true for Scenario Simulator 2.2.0.x), or with an obsolete version of the IN Scenario Pack. If you know that your Scenario Simulator contains a suitable IN Scenario Pack you may skip this section after completing it through step 2.
1 |
Unpack the Scenario Simulator archive file
unzip scenario-simulator-package-VERSION.zip (replacing This creates the distribution directory, Example: $ unzip scenario-simulator-package-2.3.0.6.zip Archive: scenario-simulator-package-2.3.0.6.zip creating: scenario-simulator-2.3.0.6/ creating: scenario-simulator-2.3.0.6/licenses/ inflating: scenario-simulator-2.3.0.6/licenses/LICENSE-XPathOverSchema.txt inflating: scenario-simulator-2.3.0.6/licenses/LICENSE-antlr.txt [...] |
|---|---|
2 |
Change directory into the Scenario Simulator directory
cd scenario-simulator-VERSION (replacing Example: $ cd scenario-simulator-2.3.0.6/ |
3 |
Install the new IN Scenario Pack
We want to replace the old IN Scenario Pack with the new, which can be done with the following commands. Please ensure that you are in the Scenario Simulator’s installation directory before running these commands. rm -r in-examples/ protocols/in-scenario-pack-* unzip -o ../in-scenario-pack-VERSION.zip (replacing Example: $ rm -r in-examples/ protocols/in-scenario-pack-* $ unzip -o ../in-scenario-pack-2.0.0.0.zip Archive: ../in-scenario-pack-2.0.0.0.zip inflating: protocols/in-scenario-pack-1.5.3.jar creating: in-examples/ creating: in-examples/2sims/ creating: in-examples/2sims/config/ creating: in-examples/2sims/config/loopback/ creating: in-examples/2sims/config/mach7/ creating: in-examples/2sims/config/ocss7/ creating: in-examples/2sims/config/signalware/ creating: in-examples/2sims/scenarios/ creating: in-examples/3sims/ creating: in-examples/3sims/config/ creating: in-examples/3sims/config/loopback/ creating: in-examples/3sims/config/mach7/ creating: in-examples/3sims/config/ocss7/ creating: in-examples/3sims/config/signalware/ creating: in-examples/3sims/scenarios/ inflating: CHANGELOGS/CHANGELOG-in.txt inflating: README/README-in.txt inflating: in-examples/2sims/config/loopback/cgin-tcapsim-endpoint1.properties inflating: in-examples/2sims/config/loopback/cgin-tcapsim-endpoint2.properties inflating: in-examples/2sims/config/loopback/setup-sim1.commands inflating: in-examples/2sims/config/loopback/setup-sim2.commands inflating: in-examples/2sims/config/loopback/tcapsim-gt-table.txt inflating: in-examples/2sims/config/mach7/mach7-endpoint1.properties inflating: in-examples/2sims/config/mach7/mach7-endpoint2.properties inflating: in-examples/2sims/config/mach7/setup-mach7-endpoint1.commands inflating: in-examples/2sims/config/mach7/setup-mach7-endpoint2.commands inflating: in-examples/2sims/config/ocss7/ocss7-endpoint1.properties inflating: in-examples/2sims/config/ocss7/ocss7-endpoint2.properties inflating: in-examples/2sims/config/ocss7/setup-sim-endpoint1.commands inflating: in-examples/2sims/config/ocss7/setup-sim-endpoint2.commands inflating: in-examples/2sims/config/setup-examples-sim1.commands inflating: in-examples/2sims/config/setup-examples-sim2.commands inflating: in-examples/2sims/config/signalware/setup-signalware-endpoint1.commands inflating: in-examples/2sims/config/signalware/setup-signalware-endpoint2.commands inflating: in-examples/2sims/config/signalware/signalware-endpoint1.properties inflating: in-examples/2sims/config/signalware/signalware-endpoint2.properties inflating: in-examples/2sims/scenarios/CAPv3-Demo-ContinueRequest.scen inflating: in-examples/2sims/scenarios/CAPv3-Demo-ReleaseCallRequest.scen inflating: in-examples/2sims/scenarios/INAP-SSP-SCP.scen inflating: in-examples/3sims/config/loopback/cgin-tcapsim-endpoint1.properties inflating: in-examples/3sims/config/loopback/cgin-tcapsim-endpoint2.properties inflating: in-examples/3sims/config/loopback/cgin-tcapsim-endpoint3.properties inflating: in-examples/3sims/config/loopback/setup-sim1.commands inflating: in-examples/3sims/config/loopback/setup-sim2.commands inflating: in-examples/3sims/config/loopback/setup-sim3.commands inflating: in-examples/3sims/config/loopback/tcapsim-gt-table.txt inflating: in-examples/3sims/config/mach7/mach7-endpoint1.properties inflating: in-examples/3sims/config/mach7/mach7-endpoint2.properties inflating: in-examples/3sims/config/mach7/mach7-endpoint3.properties inflating: in-examples/3sims/config/mach7/setup-mach7-endpoint1.commands inflating: in-examples/3sims/config/mach7/setup-mach7-endpoint2.commands inflating: in-examples/3sims/config/mach7/setup-mach7-endpoint3.commands inflating: in-examples/3sims/config/ocss7/ocss7-endpoint1.properties inflating: in-examples/3sims/config/ocss7/ocss7-endpoint2.properties inflating: in-examples/3sims/config/ocss7/ocss7-endpoint3.properties inflating: in-examples/3sims/config/ocss7/setup-sim-endpoint1.commands inflating: in-examples/3sims/config/ocss7/setup-sim-endpoint2.commands inflating: in-examples/3sims/config/ocss7/setup-sim-endpoint3.commands inflating: in-examples/3sims/config/setup-examples-sim1.commands inflating: in-examples/3sims/config/setup-examples-sim2.commands inflating: in-examples/3sims/config/setup-examples-sim3.commands inflating: in-examples/3sims/config/signalware/setup-signalware-endpoint1.commands inflating: in-examples/3sims/config/signalware/setup-signalware-endpoint2.commands inflating: in-examples/3sims/config/signalware/setup-signalware-endpoint3.commands inflating: in-examples/3sims/config/signalware/signalware-endpoint1.properties inflating: in-examples/3sims/config/signalware/signalware-endpoint2.properties inflating: in-examples/3sims/config/signalware/signalware-endpoint3.properties inflating: in-examples/3sims/scenarios/CAPv2-Relay.scen inflating: in-examples/3sims/scenarios/INAP-SSP-SCP-HLR.scen inflating: in-examples/3sims/scenarios/MAP-MT-SMS-DeliveryAbsentSubscriber.scen inflating: in-examples/3sims/scenarios/MAP-MT-SMS-DeliveryPresentSubscriber.scen inflating: in-examples/README-in-examples.txt inflating: licenses/LICENSE-netty.txt inflating: licenses/LICENSE-slf4j.txt inflating: licenses/README-LICENSES-in-scenario-pack.txt |
Scenario Simulator configuration
We will now configure two Scenario Simulator instances and connect them to the cluster. This work should be done in the Scenario Simulator installation directory, which is where the steps from the previous section left us.
| |
The Scenario Simulator and CGIN use identical configuration properties and values when using OCSS7, the only difference between the two is the procedure used for setup and configuration. |
1 |
Set the OCSS7 connection properties for Simulator 1
Edit the file local-sccp-address = type=C7,ri=gt,ssn=101,digits=1234,national=true and ocss7.sgcs = 127.0.0.1:12011 The port in the |
||
|---|---|---|---|
2 |
Set the OCSS7 connection properties for Simulator 2
Edit the file local-sccp-address = type=C7,ri=gt,ssn=102,digits=4321,national=true and ocss7.sgcs = 127.0.0.1:12021 The port in the |
||
3 |
Set the Scenario Simulator endpoint addresses
Edit the following files:
and replace the two lines beginning: set-endpoint-address endpoint1 set-endpoint-address endpoint2 with set-endpoint-address endpoint1 type=c7,ri=gt,pc=1,ssn=101,digits=1234,national=true set-endpoint-address endpoint2 type=c7,ri=gt,pc=2,ssn=102,digits=4321,national=true
|
The Scenario Simulators are now fully configured and ready to test our network.
Test the network
We will now test the network using the Metaswitch Scenario Simulator and one of the example IN scenarios included with it.
1 |
Start the scenario simulators
We need two Scenario Simulator instances for this test, one to initiate our test traffic, and one to respond. Start them with these two commands: ./scenario-simulator.sh -f in-examples/2sims/config/ocss7/setup-sim-endpoint1.commands -f in-examples/2sims/config/setup-examples-sim1.commands and ./scenario-simulator.sh -f in-examples/2sims/config/ocss7/setup-sim-endpoint2.commands -f in-examples/2sims/config/setup-examples-sim2.commands Example for Simulator 1: $ ./scenario-simulator.sh -f in-examples/2sims/config/ocss7/setup-sim-endpoint1.commands -f in-examples/2sims/config/setup-examples-sim1.commands Starting JVM... Processing commands from file at in-examples/2sims/config/ocss7/setup-sim-endpoint1.commands Processing command: set-endpoint-address endpoint1 type=C7,ri=gt,digits=1234 Processing command: set-endpoint-address endpoint2 type=C7,ri=gt,digits=4321 Processing command: create-local-endpoint endpoint1 cgin -propsfile in-examples/2sims/config/ocss7/ocss7-endpoint1.properties Initializing local endpoint "endpoint1" ... Local endpoint initialized. Finished reading commands from file Processing commands from file at in-examples/2sims/config/setup-examples-sim1.commands Processing command: bind-role SSP-Loadgen endpoint1 Processing command: bind-role SCP-Rhino endpoint2 Processing command: wait-until-operational 60000 Simulator is operational Processing command: load-scenario in-examples/2sims/scenarios/INAP-SSP-SCP.scen Playing role "SSP-Loadgen" in initiating scenario "INAP-SSP-SCP" with dialogs [SSP-SCP] Processing command: load-scenario in-examples/2sims/scenarios/CAPv3-Demo-ContinueRequest.scen Playing role "SSP-Loadgen" in initiating scenario "CAPv3-Demo-ContinueRequest" with dialogs [SSP-SCP] Processing command: load-scenario in-examples/2sims/scenarios/CAPv3-Demo-ReleaseCallRequest.scen Playing role "SSP-Loadgen" in initiating scenario "CAPv3-Demo-ReleaseCallRequest" with dialogs [SSP-SCP] Finished reading commands from file Ready to start Please type commands... (type "help" <ENTER> for command help) > Example for Simulator 2: $ ./scenario-simulator.sh -f in-examples/2sims/config/ocss7/setup-sim-endpoint2.commands -f in-examples/2sims/config/setup-examples-sim2.commands Starting JVM... Processing commands from file at in-examples/2sims/config/ocss7/setup-sim-endpoint2.commands Processing command: set-endpoint-address endpoint1 type=C7,ri=gt,digits=1234 Processing command: set-endpoint-address endpoint2 type=C7,ri=gt,digits=4321 Processing command: create-local-endpoint endpoint2 cgin -propsfile in-examples/2sims/config/ocss7/ocss7-endpoint2.properties Initializing local endpoint "endpoint2" ... Local endpoint initialized. Finished reading commands from file Processing commands from file at in-examples/2sims/config/setup-examples-sim2.commands Processing command: bind-role SSP-Loadgen endpoint1 Processing command: bind-role SCP-Rhino endpoint2 Processing command: wait-until-operational 60000 Simulator is operational Processing command: load-scenario in-examples/2sims/scenarios/INAP-SSP-SCP.scen Playing role "SCP-Rhino" in receiving scenario "INAP-SSP-SCP" with dialogs [SSP-SCP] Processing command: load-scenario in-examples/2sims/scenarios/CAPv3-Demo-ContinueRequest.scen Playing role "SCP-Rhino" in receiving scenario "CAPv3-Demo-ContinueRequest" with dialogs [SSP-SCP] Processing command: load-scenario in-examples/2sims/scenarios/CAPv3-Demo-ReleaseCallRequest.scen Playing role "SCP-Rhino" in receiving scenario "CAPv3-Demo-ReleaseCallRequest" with dialogs [SSP-SCP] Finished reading commands from file Ready to start Please type commands... (type "help" <ENTER> for command help) > |
||
|---|---|---|---|
2 |
Check the remote SSN information
Before running a test session let’s pause to check the display-info-remotessninfo command, which should now show the following on both nodes: 127.0.0.1:10111 PC1-1> display-info-remotessninfo Found 4 object(s): +----------+----------+---------------+ |dpc |ssn |status | +----------+----------+---------------+ |1 |1 |ALLOWED | +----------+----------+---------------+ |1 |101 |ALLOWED | +----------+----------+---------------+ |2 |1 |ALLOWED | +----------+----------+---------------+ |2 |102 |ALLOWED | +----------+----------+---------------+ From this we can see that both SGCs have registered the connected simulators and informed the Concerned Point Codes about the state change for the SSN used by the simulator. |
||
3 |
Run a test session
On Simulator 1 run: run-session CAPv3-Demo-ContinueRequest This will run the test scenario, which is a basic CAPv3 IDP / CON scenario. Example: > run-session CAPv3-Demo-ContinueRequest Send --> OpenRequest to endpoint2 Send --> InitialDP (Request) to endpoint2 Send --> Delimiter to endpoint2 Recv <-- OpenAccept from endpoint2 Recv <-- Continue (Request) from endpoint2 Recv <-- Close from endpoint2 Outcome of "CAPv3-Demo-ContinueRequest" session: Matched scenario definition "CAPv3-Demo-ContinueRequest"
|
Installing the SGC
This section of the manual covers the installation, basic configuration, and control of the SGC component of OCSS7.
| |
The Rhino-side component of OCSS7, the TCAP stack, is automatically installed with CGIN and has no special installation procedure or requirements beyond those of Rhino and CGIN. Information on configuring the TCAP stack component can be found in TCAP Stack configuration. |
Checking prerequisites
Before installing OCSS7, make sure you have the required:
-
operating system, with
lksctp-toolsinstalled, and
Before attempting a production installation please also see Network Architecture Planning.
Configuring network features
| |
Before installing OCSS7, please configure the following network features:
| Feature | What to configure |
|---|---|
IP address |
Make sure the system has an IPv4 or IPv6 address and is visible on the network. |
Host names |
Make sure that the system can resolve |
Firewall |
Ensure that any firewall installed is configured to permit OCSS7 related traffic. The rules required will depend on the Hazelcast network configuration chosen. See the OCSS7 manual section Hazelcast cluster configuration and the Hazelcast 3.7 Reference Manual section Setting Up Clusters for more details on Hazelcast network configurations. In its default configuration the SGC uses multicast UDP to discover other cluster members:
Additionally, Hazelcast uses TCP to form connections between cluster members. By default it listens on all available network interfaces for incoming TCP connections. This uses ports in the range TCP is also used for intra-node communication (comm switch) and SGC to TCAP stack communication. The ports and addresses for these are user configurable and described in General Configuration. SCTP is used by M3UA assocations. See M3UA Configuration. |
| |
IPv6 considerations
When using IPv6 addressing, remember to configure the PREFER_IPV4 property in the SGC_HOME/config/sgcenv file. For details, please see Configuring SGC_HOME/config/sgcenv. |
User process tuning
Ensure that the user that OCSS7 will be running under has a soft limit of no less than 4096 user processes.
| |
The number of permitted user processes may be determined at runtime using the ulimit command; for example
ulimit -Su
This value may be changed by editing
It may also be necessary to increase the hard limit:
|
SCTP tuning
For optimal performance, tune these kernel parameters:
| Parameter | Recommended value | What it specifies |
|---|---|---|
|
|
Default receive buffer size (in bytes) |
|
|
Default send buffer size (in bytes) |
|
|
Maximum receive buffer size (in bytes) This value limits the |
|
|
Maximum send buffer size (in bytes) This value limits the |
|
|
Minimum retransmission timeout (in ms) This should be greater than the |
|
|
Delayed acknowledgement (SACK) timeout (in ms) Should be lower than the retransmission timeout of the remote SCTP endpoints. |
|
|
SCTP heartbeat interval (in ms) |
| |
Kernel parameters can be changed
|
SGC Installation
To install OCSS7: unpack and configure then create additional nodes.
Recommended Installation Structure
In order to upgrade the SGC cluster in the future using the automated upgrade tool the SGC should be installed following a certain file structure.
The SGC package should be unpacked in the location corresponding to:
$BASE_DIR/cluster_name/node_name/
This results in the following structure:
$BASE_DIR/cluster_name/node_name/ocss7-3.0.0.0/...
A symbolic link current should be created such that:
$BASE_DIR/cluster_name/node_name/current -> ocss7-3.0.0.0
$BASE_DIR may be any location. For example, /home/sentinel/ocss7/
All customizable configuration file locations (sgcenv, SGC.properties, hazelcast.xml, sgc.dat) must meet the following requirements:
-
Must be specified using a relative path, not an absolute path.
-
The path provided must be wholly located within the SGC installation directory or a sub-directory thereof.
-
Symbolic links are not permitted.
-
Paths that step outside of the SGC installation directory are not permitted.
Examples:
-
config/SGC.properties— OK, a relative path -
../ocss7-3.0.0.0/config/SGC.properties— not permitted, leaves the installation directory -
obfuscated/path/config/SGC.propertieswherepathis a symbolic link — not permitted -
/home/ocss7/cluster/node/ocss7-3.0.0.0/config/SGC.properties— absolute paths are not permitted
The default location for the named configuration files meets these requirements.
Orca does not support customization of the location of any other configuration files, including config/log4j.xml. Log files themselves may be located anywhere on the filesystem.
| |
If the SGC installation structure does not meet these requirements it may not be possible to perform an automated online upgrade. In this case a manual online upgrade may be performed instead. |
Unpack and configure
| |
SGC_HOME
The following instructions use |
To begin the SGC installation and create the first node:
1 |
Unpack the SGC archive file
Run: unzip ocss7-package-VERSION.zip (replacing This creates the distribution directory, |
|---|---|
2 |
Make sure that the |
3 |
Configure basic cluster / node information
If your installation will use more than a single node in a SGC cluster, then:
If you are planning to use more than one SGC cluster in the same local network then:
|
Creating additional nodes
After installing the first SGC node in a cluster, you can add more nodes by either:
-
copying the installation directory of an existing node, and changing the
ss7.instanceproperty inSGC_HOME/config/SGC.propertiesto a value unique among all the other nodes in the cluster.
or
-
repeating the installation steps for another node,
-
setting the
ss7.instanceproperty inSGC_HOME/config/SGC.propertiesto a value unique among all other nodes in the cluster, -
setting the
hazelcast.groupinSGC_HOME/config/SGC.propertiesto the value chosen as cluster name, and -
repeating any other installation customization steps.
Layout of the SGC installation
A typical SGC installation contains these subdirectories:
| Directory | Contents |
|---|---|
|
(SGC installation directory)
|
|
SGC management scripts |
|
command line interface installation, including start scripts, configuration, and logs |
|
configuration files which may be edited by the user as required |
|
supplementary documentation included as a convenience, such as SNMP MIB files |
|
Java libraries used by the SGC |
|
third-party software licenses |
|
log output from the SGC |
|
persisted cluster configuration ( |
Running the SGC
SGC operations
| |
JAVA_HOME
The SGC script expects the |
The SGC is started and stopped using the SGC_HOME/bin/sgc script.
The sgc script runs SGC under a watchdog: if the SGC process exits for an unrecognized reason it is automatically restarted. Output from the SGC and from the watchdog script is redirected into a startup log file. The startup log files are in SGC_HOME/logs directory and are named startup.<startup-time>. If startup fails for any reason, details about the failure should be available in the startup file.
The sgc script is configured in SGC_HOME/config/sgcenv. The sgcenv file contains JVM parameters which cannot be provided in the SGC.properties file.
The sgc script can be run with the following arguments:
| Command argument | Optional arguments | Description |
|---|---|---|
|
|
Starts the SGC using the configuration from
|
|
|
Stops the SGC. Without the |
|
|
Equivalent of |
|
|
Runs the SGC in test mode. In test mode, SGC runs in the foreground; and logging is configured in |
|
|
Runs the SGC in foreground mode. SGC is not demonized. |
|
Prints the status of SGC and returns one of these LSB-compatible exit codes:
|
For example:
Start SGC |
|
|---|---|
Stop SGC |
|
Check SGC status |
|
Configuring SGC_HOME/config/sgcenv
The SGC_HOME/config/sgcenv file contains configuration parameters for the sgc script. The following settings are supported:
| Variable name | Descriptions | Valid Values | Default |
|---|---|---|---|
|
Location of the JVM home directory. |
||
|
Host that SGC should bind to in order to listen for incoming JMX connections. |
IPv4 or IPv6 address |
|
|
Port where SGC binds for incoming JMX connections. It is not recommended to use a port in the emphemeral range as these are used for short-lived TCP connections and may result in the SGC failing to start if the port is in use by another application. The emphemeral port range may be queried with |
|
|
|
Whether or not the JMX connection should be secured with SSL/TLS. For details, please see Securing the SGC JMX management connection with SSL/TLS. |
|
|
|
Whether or not the SGC should require a trusted client certificate for an SSL/TLS-secured JMX connection. For details, please see Securing the SGC JMX management connection with SSL/TLS. |
||
|
Path to the configuration file with properties used to secure the JMX management connection. For details, please see Securing the SGC JMX management connection with SSL/TLS. |
||
|
Password used during generation of the key store and trust store used to secure the JMX management connection. For details, please see Securing the SGC JMX management connection with SSL/TLS. |
|
|
|
Maximum size of the JVM heap space. For details, please see Configuring the Java Heap. |
||
|
Initial size of the JVM heap space. |
||
|
Maximum size of the JVM permgen space. |
||
|
Full override of default garbage collections settings. |
||
|
Additional JVM parameters. Modifications should add to the existing |
||
|
The log4j configuration file to be used in normal mode (start/restart/foreground). |
||
|
The log4j configuration file to be used in test mode. |
||
|
Location of the SGC properties file. |
||
|
Whether or not the watchdog is enabled. Disabling the watchdog may be required if the SGC is run under the control of some other HA systems. |
|
|
|
Enables additional script information. |
|
|
|
Prefers using IPv4 protocol. Set value to |
|
|
|
On NUMA architecture machines, this parameter allows selecting specific CPU and memory bindings for SGC. |
||
|
On non-NUMA architecture machines, this parameter may be used to set SGC affinity to specific CPUs. |
| |
JMX Connector configuration variables
|
Configuring the Java Heap
The Java Virtual Machine’s MAX_HEAP_SIZE must be appropriately configured for the SGC. If insufficient heap is configured, then the result may be:
-
Frequent and/or prolonged garbage collections, which may have a negative impact on the SGC’s performance.
-
SGC restarts caused by the JVM throwing
OutOfMemoryError.
The main factors affecting the selection of an appropriate value are:
-
The base SGC requires a certain amount of heap.
-
The size of the configuration MML.
-
The configured maximum concurrent TCAP transactions (
sgc.tcap.maxTransactions)
MAX_HEAP_SIZE is no longer dependent on the number of connected TCAP peers or migrated prefixes.
Recommendations
| Factor | Recommendation |
|---|---|
Base SGC |
1024MB This value allows for an SGC configured for 1 million The amount required is platform and JVM dependent. An estimation of the base SGC requirements may be obtained by loading a minimal MML configuration into a test SGC, and then using the |
Configuration MML Size |
Variable Each As each configuration differs substantially it is not possible to provide generic guidelines. An estimation of a configuration’s minimum requirements may be obtained by loading the full MML configuration into a test SGC, and then using the |
Maximum concurrent TCAP transactions |
1 million transactions requires no additional heap allowance as this is included in the base SGC figure above. 10 million transactions requires approximately 250MB additional heap. 100 million transactions requires approximately 2.5GB additional heap. The maximum number of concurrent TCAP transactions is configured in |
Installing SGC as a service
To install SGC as a service, perform the following operations as user root:
1 |
Copy # copy $SGC_HOME/bin/sgcd /etc/init.d |
|---|---|
2 |
Grant execute permissions to # chmod a+x /etc/init.d/sgcd |
3 |
Create the file SGC=/opt/sgc/PC1-1/PC1/current/bin/sgc SGCUSER=sgc |
4 |
Activate the service using the standard RedHat command: # chkconfig --add sgcd |
Network Architecture Planning
| |
Ensure you are familiar with the with the OCSS7 architecture before going further. In particular, ensure you have read the following: |
Network planning
When planning an OCSS7 deployment, Metaswitch recommends preparing IP subnets that logically separate different kinds of traffic:
| Subnet | Description |
|---|---|
SS7 network |
dedicated for incoming/outgoing SIGTRAN traffic; should provide access to the operator’s SS7 network |
SGC interconnect network |
internal SGC cluster network with failover support (provided by interface bonding mechanism); used by Hazelcast and communication switch |
Rhino traffic network |
used for traffic exchanged between SGC and Rhino nodes |
Management network |
dedicated for managing tools and interfaces (JMX, HTTP) |
SGC Stack network communication overview
The SS7 SGC uses multiple logical communication channels that can be separated into two broad categories:
-
SGC directly managed connections — connections established directly by SGC subsystems, configured as part of the SGC cluster-managed configuration
-
Hazelcast managed connections — connections established by Hazelcast, configured as part of static SGC instance configuration.
SGC directly managed connections
The following table describes network connections managed directly by the SGC configuration.
| Protocol | Subsystem | Subnet | Defined by | Usage | |
|---|---|---|---|---|---|
|
TCP |
Rhino traffic network |
|
Used in the first phase of communication establishment between the TCAP Stack (CGIN RA) and the SGC cluster. The communication channel is established during startup of the TCAP Stack (CGIN RA activation), and closed after a single HTTP request / response. |
||
|
|
Used in the second phase of communication establishment between the TCAP Stack (CGIN RA) and the SGC cluster. The communication channel is established and kept open until either the SGC Node or the TCAP Stack (CGIN RA) is shutdown (deactivated). This connection is used to exchange TCAP messages between the SGC Node and the TCAP Stack using a custom protocol. The level of expected traffic is directly related to the number of expected SCCP messages originated and destined for the SSN represented by the connected TCAP Stack.
|
||||
|
SGC interconnect network |
|
Used by the communication switch (inter-node message transfer module) to exchange message traffic between nodes of the SGC cluster. The communication channel is established between nodes of the SGC cluster during startup, and kept open until the node is shut down. During startup, the node establishes connections to all other nodes that are already part of the SGC cluster. The level of expected traffic depends on the deployment model, and can vary anywhere between none and all traffic destined and originated by the SGC cluster.
|
|||
|
SCTP |
M3UA |
SS7 Network |
|
Used by SGC nodes to exchange M3UA traffic with Signalling Gateways and/or Application Servers. The communication channel lifecycle depends directly on the SGC cluster configuration; that is, the enabled attribute of the connection configuration object and the state of the remote system with which SGC is to communicate. The level of traffic should be assessed based on business requirements. |
|
|
JMX over TCP |
Configuration |
Management network |
Used for managing the SGC cluster. Established by the management client Command-Line Management Console, for the duration of the management session. The level of traffic is negligible. |
Hazelcast managed connections
Hazelcast uses a two-phase cluster-join procedure:
-
Discover other nodes that are part of the same cluster.
-
Establish one-to-one communication with each node found.
Depending on the configuration, the first step of the cluster-join procedure can be based either on UDP multicast or direct TCP connections. In the latter case, the Hazelcast configuration must contain the IP address of at least one other node in the cluster. Connections established in the second phase always use direct TCP connections established between all the nodes in the Hazelcast cluster.
Traffic exchanged over SGC interconnect network by Hazelcast connections is mainly related to:
-
SGC runtime state changes
-
SGC configuration state changes
-
Hazelcast heartbeat messages.
During normal SGC cluster operation, the amount of traffic is negligible and consists mainly of messages distributing SGC statistics updates.
Inter-node message transfer
The communication switch (inter-node message transfer module) is responsible for transferring data traffic messages between nodes of the SGC cluster. After the initial handshake message exchange, the communication switch does not originate any network communication by itself. It is driven by requests of the TCAP or M3UA layers.
Usage of the communication switch involves additional message-processing overhead, consisting of:
-
CPU processing time to encode and later decode the message — this overhead is negligible
-
network latency to transfer the message between nodes of the SGC cluster — overhead depends on the type and layout of the physical network between communicating SGC nodes.
This overhead is unnecessary in normal SGC cluster operation, and can be avoided during deployment-model planning.
Below are outlines of scenarios involving communication switch usage: Outgoing message inter-node transfer and Incoming message inter-node transfer; followed by tips for Avoiding communication switch overhead.
Outgoing message inter-node transfer
A message that is originated by the TCAP stack (CGIN RA) is sent over the TCP-based data-transfer connection to the SGC node (node A). It is processed within that node up to the moment when actual bytes should be written to the SCTP connection, through which the required DPC is reachable. If the SCTP connection over which the DPC is reachable is established on a different SGC node (node B), then the communication switch is used. The outgoing message is transferred, using the communication switch, to the node where the SCTP connection is established (transferred from node A to node B). After the message is received on the destination node (node B) it is transferred over the locally established SCTP connection.
Incoming message inter-node transfer
A message received by an M3UA connection, with a remote Signalling Gateway or other Application Server, is processed within the SGC node where the connection is established (node A). If the processed message is a TCAP message addressed to a SSN available within the SGC cluster, the processing node is responsible for selection of a TCAP Stack (CGIN RA) corresponding to that SSN. The TCAP Stack (CGIN RA) selection process gives preference to TCAP Stacks (CGIN RAs) that are directly connected to the SGC node which is processing the incoming message. If a suitable locally connected TCAP Stack (CGIN RA) is not available, then a TCAP stack connected to another SGC node (node B) in the SGC cluster is selected. After the selection process is finished, the incoming TCAP message is sent either directly to the TCAP Stack (locally connected TCAP Stack), or first transferred through the communication switch to the appropriate SGC node (transferred from node A to node B) and later sent by the receiving node (node B) to the TCAP Stack.
| |
TCAP Stack (CGIN RA) selection
TCAP Stack selection is invoked for messages that start a new transaction ( TCAP Stack selection is described by following algorithm:
|
Avoiding communication switch overhead
A review of the preceding communication-switch usage scenarios suggests a set of rules for deployment, to help avoid communication-switch overhead during normal SGC cluster operation.
| Scenario | Avoidance Rule | Configuration Recommendation | ||
|---|---|---|---|---|
|
If an SSN is available within the SGC cluster, at least one TCAP Stack serving that particular SSN must be connected to each SGC node in the cluster. |
The number of TCAP Stacks (CGIN RAs) serving a particular SSN should be at least the number of SGC nodes in the cluster.
|
|||
|
If the SGC Stack is to communicate with a remote PC (another node in the SS7 network), that PC must be reachable through an M3UA connection established locally on each node in the SGC cluster. |
When configuring remote PC availability within the SGC Cluster, the PC must be reachable through at least one connection on each SGC node. |
SGC cluster membership and split-brain scenario
The SS7 SGC Stack is a distributed system. It is designed to run across multiple computers connected across an IP network. The set of connected computers running SGC is known as a cluster. The SS7 SGC Stack cluster is managed as a single system image. SGC Stack clustering uses an n-way, active-cluster architecture, where all the nodes are fully active (as opposed to an active-standby design, which employs a live but inactive node that takes over if needed).
SGC cluster membership state is determined by Hazelcast based on network reachability of nodes in the cluster. Nodes can become isolated from each other if some networking failure causes a network segmentation. This carries the risk of a "split brain" scenario, where nodes on both sides of the segment act independently, assuming nodes on the other segment have failed. The responsibility of avoiding a split-brain scenario depends on the availability of a redundant network connection. For this reason, network interface bonding MUST be employed to serve connections established by Hazelcast.
Usage of a communication switch subsystem within the SGC cluster depends on the cluster membership state, which is managed by Hazelcast. Network connectivity as seen by the communication switch subsystem MUST be consistent with the cluster membership state managed by Hazelcast. To fulfil this requirement, the communication switch subsystem MUST be configured to use the same redundant network connection as Hazelcast.
| |
Network connection redundancy delivery method
Both Hazelcast and the communication switch currently do not support network interface failover. This results in a requirement to use OS-level network interface bonding to provide a single logical network interface delivering redundant network connectivity. |
| |
Network Path Redundancy
The entire network path between nodes in the cluster must be redundant (including routers and switches). |
Recommended physical deployment model
In order to take full advantage of the fault-tolerant and high-availability modes supported by the OC SS7 stack, Metaswitch recommends using at least two dedicated machines with multicore CPUs and two or more Network Interface Cards.
Each SGC node should be deployed on one dedicated machine. However hardware resources can be also shared with nodes of Rhino Application Server.
| |
The OC SS7 stack also supports less complex deployment modes which can also satisfy high-availability requirements. |
| |
To avoid single points of failure at network and hardware levels, provide redundant connections for each kind of traffic.The SCTP protocol that SS7 traffic uses itself provides a mechanism for IP multi-homing. For other kinds of traffic, an interface-bounding mechanism should be provided. Below is an example assignment of different kinds of traffic among network interface cards on one physical machine. |
| Network Interface Card 1 | Network Interface Card 2 | |
|---|---|---|
port 1 |
SS7 IP addr 1 |
SS7 IP addr 2 |
port 2 |
SGC Interconnect IP addr (bonded) |
SGC Interconnect IP addr (bonded) |
port 3 |
Rhino IP addr |
|
port 4 |
Management IP addr |
| |
While not required, bonding Management and Rhino traffic connections can provide better reliability. |
Securing the SGC JMX management connection with SSL/TLS
Default configuration of the JMX management connection
The default JMX configuration allows for unsecured JMX management connections from the local machine only. That is, the SGC SS7 stack by default listens for management connections on a local loopback interface. This allows for any JMX management client running on the same machine as the SGC stack instance to connect and manage that instance with no additional configuration.
Securing the JMX management connection with SSL/TLS
| |
SGC_HOME
SGC_HOME in the following instructions represents the path to the SGC Stack installation directory. |
SGC stack secure configuration
The SGC SS7 stack can be configured to secure JMX management connections using the SSL/TLS protocol. The default installation package provides a helper shell script (SGC_HOME/bin/sgckeygen) that generates:
-
SGC_HOME/config/sgc-server.keystore— a JKS repository of security certificates containing two entries: an SGC JMX server private key and a trust entry for the SGC JMX client certificate -
SGC_HOME/config/sgc-client.keystore— a JKS repository of security certificates containing two entries: an SGC JMX client private key and a trust entry for the SGC JMX server certificate -
SGC_HOME/config/netssl.properties— a Java properties file containing the configuration the SGC Stack uses during start-up (properties in this file point to the generatedsgc-server.keystore) -
SGC_HOME/config/sgc-trust.cert— the SGC JMX server certificate, which can be imported to any pre-existing KeyStore to establish a trust relation.
To enable a secure JMX management connection:
-
Generate appropriate server / client private keys and certificates: run the
SGC_HOME/bin/sgckeygenscript. -
Change the SGC stack configuration to enable the secure connection: edit the configuration file
SGC_HOME/config/sgcenv, changing theJMX_SECUREvariable value to true.
| |
By default, the SGC stack is configured to require client authorization with a trusted client certificate. The straightforward approach is to use the generated SGC_HOME/config/sgc-client.keystore as part of the JMX management client configuration. |
| |
|
Example client configuration for a JMX management secure connection
You can configure the JMX management connection from the command line or using a JDK tool.
Configuring from the command line
To configure a secure JMX connection for the SGC Stack using a command-line management console, please see Command-Line Management Console.
Configuring with a generic JMX management tool
The Command-Line Management Console is a dedicated tool for operating and configuring the SGC stack; but there are many tools that support the JMX standard. Below are tips for letting them communicate with the SGC stack.
The SGC stack is equipped with scripts that enable JMX connector and provide a simple way to prepare all the necessary keys and certificates used during the SSL/TLS authentication process.
| |
In order to connect to the SGC stack with an external tool, follow the tool’s SGC stack secure configuration instructions. |
For example, for Java VisualVM (part of the Sun/Oracle JDK) :
-
Generate the appropriate server / client private keys and certificates.
-
Copy the
SGC_HOME/config/sgc-client.keystoreto the machine where you want to start the Java VisualVM. -
Start the Java VisualVM with parameters pointing to the relevant KeyStore file. For example:
jvisualvm -J-Djavax.net.ssl.keyStore=sgc-client.keystore -J-Djavax.net.ssl.keyStorePassword=changeit -J-Djavax.net.ssl.trustStore=sgc-client.keystore -J-Djavax.net.ssl.trustStorePassword=changeit
| |
The connection is secured only when using a remote/local JMX connector. Java VisualVM uses the "Attach API" to connect to locally running Java Virtual Machines, in effect bypassing the secure connection. In this case, client setup of a secure JMX connection is not required. |
SGC stack JMX configuration properties
During SGC Stack instance startup, Java system properties are interrogated to derive configuration of the JMX RMI connector. Values of relevant properties can be configured using variables in the SGC_HOME/config/sgcenv configuration file.
Properties configurable using the sgcenv configuration file
The following JMX connector settings are supported in the SGC_HOME/config/sgcenv configuration file:
| Variable | What it specifies | Values | Default |
|---|---|---|---|
|
whether to secure the JMX connection with SSL/TLS |
|
|
|
whether the SGC Stack requires a trusted client certificate for an SSL/TLS-secured JMX connection |
|
|
|
path to the configuration file with properties used to secure the JMX management connection |
|
|
|
password used to secure the KeyStore and TrustStore when generating them using the |
|
The file specified by JMX_SECURE_CFG_FILE should be in the Java properties file format (as described in Javadoc for Properties class). Properties configurable using JMX_SECURE_CFG_FILE are related to the location and security of Java KeyStores containing the SGC stack private key, certificate, and trusted client certificate. Here are the properties configurable using JMX_SECURE_CFG_FILE:
| Key | What it specifies |
|---|---|
|
path to the Java KeyStore file containing the SGC Stack private key |
|
password protecting the KeyStore denoted by the |
|
path to the Java KeyStore file containing the trusted client certificate |
|
password protecting the KeyStore denoted by the |
Example JMX_SECURE_CFG_FILE properties file
The JMX_SECURE_CFG_FILE generated by the SGC_HOME/bin/sgckeygen script looks like this:
#This is a SSL configuration file.
#A properties file that can be used to supply the KeyStore
#and truststore location and password settings thus avoiding
#to pass them as cleartext in the command-line.

javax.net.ssl.keyStore=./config/sgc-server.keystore
javax.net.ssl.keyStorePassword=changeit

javax.net.ssl.trustStore=./config/sgc-server.keystore
javax.net.ssl.trustStorePassword=changeit
SGC stack JMX connector configuration details
The details presented above should be sufficient to secure the SGC JMX management connection. However, for a customized solution (for example, using other start-up scripts), see the following JMX connector parameters supported by SGC stack.
| |
Usually there is no need to customize the operation of the SGC stack JMX RMI connector, as relevant configuration is exposed through SGC start-up scripts. |
Here are the Java system properties used to configure the SGC stack JMX RMI connector:
| Key | What it specifies |
|---|---|
Values |
|
|
|
host that SGC should bind to in order to listen for incoming JMX connections |
|
resolvable host name or IP address |
|
|
|
port where SGC binds for incoming JMX connections |
|
Valid port value |
|
|
|
whether to enable secure monitoring using SSL (if false, then SSL is not used) |
|
|
|
|
|
a comma-delimited list of SSL/TLS cipher suites to enable; used in conjunction with |
|
default SSL/TLS cipher suites |
|
|
|
a comma-delimited list of SSL/TLS protocol versions to enable; used in conjunction with |
|
default SSL/TLS protocol version |
|
|
|
whether to perform client-based certificate authentication, if both this property and |
|
|
|
|
|
path to the configuration file with properties used to secure the JMX management connection (should be in Java properties file format) |
|
no default path |
|
|
|
KeyStore location * |
|
no default path |
|
|
|
KeyStore password * |
|
no default path |
|
|
|
truststore location * |
|
no default path |
|
|
|
truststore password * |
|
no default path |
* Can be defined in the com.cts.ss7.management.jmxremote.ssl.config.file configuration file
SGC Backups
Backup Requirements
Selecting and applying an appropriate backup strategy (software, number of backups, frequency, etc) is outside of the scope of this guide.
However, the chosen strategy must be able to preserve the SGC’s critical files. Provided that a version of these files are available from before any event causing catastrophic failure it should be possible to restore the failed SGC node or nodes.
Possible options include:
| |
Backing up of an entire VM from the VM host is not recommended due to the likelihood of significant whole VM pauses. Such a pause can cause Hazelcast to detect cluster failure which may result in node restarts. |
Backup Critical Files Only
This option involves taking a backup of the critical files and, where file locations have been customized, noting which have changed and where they should be located.
Restoration of the SGC component requires:
-
Installing the SGC from the original
ocss7-${version}.zippackage -
Copying the configuration files from the backup to the new installation, honouring any original custom locations
| |
Restoration following a whole-OS failure also requires reinstatement of any SCTP tuning parameters, user process tuning and network interfaces as originally described in Installing the SGC. |
Backup Whole SGC Installation
This option involves taking a backup of the entire SGC installation directory. Note that if any file locations have been customized to live outside of the SGC installation directory these will also need including.
Restoration of the SGC component requires:
-
Extracting the entire SGC installation from the backup
| |
Restoration following a whole-OS failure also requires reinstatement of any SCTP tuning parameters, user process tuning and network interfaces as originally described in Installing the SGC. |
Critical Files
The following files contain installation-specific configuration and must be included in any backup regimen. The following are the default paths of these files, specified relative to the OCSS7 installation root:
-
config/sgcenv -
config/SGC.properties -
config/log4j.xml -
config/hazelcast.xml— if it exists -
var/sgc.dat
In addition, the files in the following locations must be preserved for at least 30 days, preferably longer:
-
logs/ -
cli/log/
This is to ensure that logging remains available in the event that a support request is required for an event that occurred just prior to catastrophic failure of an SGC host.
Configuring the SS7 SGC Stack
Configuration data
Configuration data can be separated into two main groups:
-
static — configuration properties loaded from a file during SGC instance start-up, influencing the behaviour of that single instance
-
managed — dynamic runtime configuration managed by and distributed within the SGC cluster.
| |
SGC_HOME
In the following instructions, |
Static SGC configuration
Static configuration is loaded during SGC instance startup; any configuration changes take effect after SGC Stack instance restart. Static configuration consists of:
Static SGC instance configuration
During SGC instance start-up, the SGC_HOME/config/SGC.properties configuration file is loaded.
The SGC.properties file may be modified using any standard text editor. This is a standard Java properties file containing one or more key-value pairs.
A full description of all of the configuration properties that may be set in SGC.properties may be found in Appendix A: SGC Properties.
An SGC restart is required if any of these properties are changed on a running SGC.
Configuration Properties of Particular Note
The majority of the configuration properties have default values that should not require changing. However, there are some whose values should be considered for each installation:
ss7.instance |
mandatory | The name of the SGC instance. Must be unique amongst instances in the cluster. |
|---|---|---|
mandatory for 2+ node cluster |
The name of the SGC cluster. |
|
optional |
The default value is sufficient for most installation, but those installations expecting close to or greater than one million concurrent transactions may need to increase this value. |
Hazelcast cluster configuration
Hazelcast is a opensource In-Memory Data Grid. Hazelcast provides a set of distributed abstractions (such as data collections, locks, and task execution) that are used by subsystems of the SS7 SGC Stack to provide a single logical view of the entire cluster. SGC cluster membership state is directly based on Hazelcast cluster and node lifecycle.
The SGC stack deployment package uses a custom Hazelcast configuration, which is available in SGC_HOME/config/hazelcast.xml.sample.
The official Hazelcast documentation covering setting up clusters can be found in the Hazelcast 3.7 Reference Manual section Setting Up Clusters.
Hazelcast configuration can be customized by providing a hazelcast.xml configuration file in the config subdirectory of the SGC Stack distribution (for example, by renaming config/hazelcast.xml.sample to config/hazelcast.xml). For a description of possible configuration options, and the format of the hazelcast.xml configuration file, please see the Hazelcast 3.7 Reference Manual section Understanding Configuration.
The default Hazelcast configuration used by the SGC includes customisation of some hazelcast default values to support rapid cluster member failure detection and faster cluster merges following failure recovery. This configuration can be further refined as necessary.
| Property | What it specifies | Default |
|---|---|---|
|
|
How frequently the hazelcast heartbeat algorithm is run. |
|
|
|
How long to wait before considering a remote hazelcast peer unreachable. If this value is set too small, then there is an increased risk of very short network outages or extended Java garbage collection triggering heartbeat failure detection. If this value is set too large, then there is an increased risk of SGC features becoming temporarily unresponsive due to blocking on necessary cluster-wide operations. It is important to balance the need to rapidly detect genuinely failed nodes with the need to protect against unnecessarily splitting and reforming the cluster as the split and merge operation is not instant and some SGC features may be temporarily unavailable during this process. |
|
|
|
How long hazelcast will wait to attempt a cluster merge immediately following a node failure. |
|
|
|
How long hazelcast will wait to attempt a cluster merge following a node failure after the first merge attempt. |
|
The hazelcast heartbeat mechanism is used to detect cluster member failures; either network failures between members or actual process failures.
The default Hazelcast configuration used by the SGC is optimized for two cluster members. In the case where a larger cluster is required the backup-count parameter must be configured to the total number of cluster members, minus one. This provides maximum resiliency in the case where more than one node may fail or be split from the cluster simultaneously.
| |
If the backup-count is too low the cluster may suffer catastrophic data loss. This can lead to undefined behaviours up to and including total loss of service. |
There are multiple locations within hazelcast.xml where this parameter must be configured: under <queue name="default">, <map name="default">, <multimap name="default">, <list name="default">, <set name="default">, <semaphore name="default"> and <ring-buffer name="default">. Each of these must be configured for correct behaviour.
For example, in a three node cluster:
<queue name="default">
    <max-size>10000</max-size>
    <backup-count>2</backup-count>
...

<map name="default">
    <in-memory-format>BINARY</in-memory-format>
    <backup-count>2</backup-count>
...

<multimap name="default">
    <backup-count>2</backup-count>
...

<list name="default">
    <backup-count>2</backup-count>
...

<set name="default">
    <backup-count>2</backup-count>
...

<semaphore name="default">
    <initial-permits>0</initial-permits>
    <backup-count>2</backup-count>
...

<ring-buffer name="default">
    <capacity>10000</capacity>
    <backup-count>2</backup-count>
...
On a host with multiple network interfaces it is necessary to manually specify the network interface(s) to bind to in the network/interfaces section of hazelcast.xml.
If this is not manually specified then Hazelcast will select an arbitrary interface at boot. This may result in the node starting up as a singleton — unable to communicate with the other cluster members.
For example:
<network>
  <interfaces enabled="true">
    <interface>192.168.1.*</interface>
  </interfaces>
<network>
Logging configuration
| |
For a description of the logging subsystem, please see Logging. |
Managed SGC cluster configuration
The SS7 SGC Stack is built around a configuration subsystem that plays a central role in managing the lifecycle of all configuration objects in SGC. This is called "managed configuration" (when the configuration subsystem manages the configuration data). During normal cluster operation, configuration data and management state is shared between all cluster nodes. Each cluster node persists configuration data in the local file system (as an XML file).
Managed configuration can be divided based on its cluster or node-level applicability:
-
per node — this configuration is stored cluster-wide but relevant only for a given node (it references just the particular node for which it is relevant; for example, different SCTP associations may be created on specific nodes).
-
cluster wide — this configuration is relevant and the same for each node (general configuration parameters, SCCP configuration, parts of M3UA)
Configuration is represented as a set of configuration objects. These configuration objects are managed through a set of CRUD commands exposed by the Command-Line Management Console distributed with the SGC SS7 Stack.
| |
See also
Command-Line Management Console |
Configuration objects
Each configuration object within the SS7 SGC Stack is an instance of a particular configuration object type. The type of configuration object defines a set of attributes. For example, configuration objects of type connection are defined by attributes such as port, conn-type, and others. A particular configuration object is identified by its oname attribute, which must be unique among all other configuration objects of that type.
Common configuration object attributes
These attributes are common to some or all configuration objects.
oname |
Every configuration object has an oname attribute that specifies its Object Name. It is an identifier that must be unique among all other objects of that particular type. Whenever an attribute is a reference to a configuration object, its value must be equal to the |
|---|---|
dependencies |
A configuration object depends on another configuration object when any of its attributes reference that other configuration object. That is, the attribute value is equal to the If the dependencies value is greater than |
enabled |
Some configuration objects must be enabled before the configuration layer changes the related runtime state. All such objects expose the enabled attribute with values of |
active |
Some configuration objects with the enabled attribute also expose the active attribute, which tells if this object was successfully instantiated and is used in processing (for example if a connection is established). Possible values are |
General Configuration
Below are attributes for configuring an SGC Stack instance and the entire cluster.
| |
Atribute modification restrictions
|
node
The node configuration object is for configuring an SGC Stack instance. Every SGC instance that is to be a part of cluster must be represented by a node configuration object. During startup, the SGC instance property ss7.instance is matched against the oname of existing nodes. If a match is found, the SGC instance will connect to the cluster, acting as that matching node.
| Attribute name | Attribute description | Default |
|---|---|---|
|
|
object name |
|
|
|
number of items which depend on this object |
|
|
|
is object enabled |
|
|
|
is object active |
|
|
local address for CommSwitch to bind to |
||
|
local port for CommSwitch to bind to |
|
|
|
|
interface where stack can connect for data connection The TCAP Stack that is bundled with CGIN RA will use this connection to originate and receive TCAP messages. |
value of |
|
|
port where stack can connect for data connection The TCAP Stack that is bundled with CGIN RA will use this connection to originate and receive TCAP messages. |
|
|
|
interface where stack can get balancing information The TCAP Stack that is bundled with CGIN RA will use this connection to to register with the SGC node. |
value of |
|
|
port where stack can get balancing information The TCAP Stack that is bundled with CGIN RA will use this connection to to register with the SGC node. |
|
|
|
node configuration Specifies values of properties that can be defined in the SGC.properties file. |
| |
The JMX Object name for node is SGC:type=general,category=node |
parameters
The parameters category specifies cluster-wide configuration (for a single cluster).
| Attribute name | Attribute description | Default |
|---|---|---|
|
|
SCCP variant to be used: The following conditions must be met in order to reconfigure this property:
|
|
|
|
delay (in milliseconds) before a class1 message is re-sent when route failure is detected |
|
|
|
local signalling pointcode; format dependent on sccp-variant configuration
|
|
|
|
local signalling point state ( |
|
|
|
network indicator used in M3UA messages sent by this node ( |
|
|
|
the national indicator bit in the address indicator octet of SCCP management messages sent by this node ( The meaning of
|
|
|
|
interval (in milliseconds) between sent SST messages |
|
|
|
decay timer (in milliseconds) for SCCP congestion procedure |
|
|
|
attack timer (in milliseconds) for SCCP congestion procedure |
|
|
|
maximum restriction sublevel per restriction level (Q.714 section 5.2.8 SCCP management congestion reports procedure) |
|
|
|
maximum restriction level for each affected SP |
|
|
|
timer (in milliseconds) for congestion abatement |
|
|
|
time interval (in seconds) between successive notifications sent |
|
|
|
time interval (in seconds) between successive notifications sent |
|
|
|
time interval (in seconds) between successive notifications sent |
|
|
|
reassembly timeout for SCCP reassembly procedure in milliseconds |
|
|
|
maximum number of concurrent SCCP reassembly processes that may be active. |
|
|
|
ANSI TCAP version to assume where this cannot be derived from the the dialog’s initial Query or Uni message. See also the OCSS7 TCAP stack configuration property: |
|
| |
The JMX Object name for parameters is SGC:type=general,category=parameters. |
M3UA Configuration
The SS7 SGC Stack acts as one or more Application Servers when connected to the Signalling Gateway or another Application Server (in IPSP mode). M3UA configuration can be separated into two related domains:
| |
Attribute modification restrictions
Only attributes that are "Reconfigurable" can be modified after a configuration object is created. Attributes that do not support "Active Reconfiguration" can be changed only when the configuration object is disabled (the value of its |
Application Server and routes
After an SCTP association with SG is established, the as-connection that maps connections to Application Servers is checked. This allows for the SGC to inform SG which routing contexts should be active for that SCTP association. Also, with mapping internally, SGC decides which Point Codes are reachable through the SCTP association (the chain of dependencies is: connection - as-connection - as - route - pc).
as
Represents an Application Server — a logical entity serving a specific Routing Key. Defines the Application Server that the SGC Stack will represent after the connection to SG/IPSP peer is established.
| Attribute name |
Attribute description | Default | Modification |
|---|---|---|---|
|
|
object name |
||
|
|
number of items which depend on this object |
Read-only |
|
|
|
is object enabled |
|
Reconfigurable using active reconfiguration |
|
|
what kind of AS this is; whether it should handle |
|
|
|
routing context NOTE: This attribute is optional, but only one |
|||
|
|
state of the AS ( |
Read-only |
|
|
|
maximum number of pending messages, per node Applicable only to |
|
Reconfigurable |
|
|
maximum pending time (in milliseconds) Applicable only to AS mode. |
|
Reconfigurable |
| |
The JMX Object name for as is SGC:type=m3ua,category=as. |
route
| Attribute name | Attribute description | Default | Modification |
|---|---|---|---|
|
|
object name |
||
|
|
number of items which depend on this object |
Read-only |
|
|
|
reference to DPC |
||
|
|
reference to AS |
||
|
|
priority of the route (larger value is higher priority) |
|
| |
The JMX Object name for route is SGC:type=m3ua,category=route. |
dpc
A DPC defines a remote point code which is accessible from this SGC cluster. DPCs are used to define routes (route) which bind DPCs to specific Applications Server (as) definitions and SCTP associations (connections).
| Attribute name | Attribute description | Default | Modification |
|---|---|---|---|
|
|
object name |
||
|
|
number of items which depend on this object |
Read-only |
|
|
|
destination point code; format dependent on
|
Reconfigurable |
|
|
|
network appearance Attribute is optional |
Reconfigurable |
|
|
|
maximum user data length per segment to send to this destination, supported values are
|
|
Reconfigurable |
|
|
maximum unsegmented SCCP message size to send to this destination as a single unsegmented message, supported values are
|
|
Reconfigurable |
|
|
SCCP message type that this destination prefers to receive when there is a choice available, supported values: UDT, XUDT |
|
Reconfigurable |
|
|
ANSI SCCP only: the time in milliseconds for which a congestion notification from M3UA should be considered valid. Supported values: 0+ (0=disable) |
|
Reconfigurable |
| |
The JMX Object name for dpc is SGC:type=m3ua,category=dpc. |
as-precond
Before the Application Server (as) becomes active, the SGC Stack may require certain TCAP Stacks representing some SSN (CGIN RAs) to register with SGC. The Application Server will be activated after ALL defined preconditions (as-precond) are satisfied.
| Attribute name | Attribute description | Default | Modification |
|---|---|---|---|
|
|
object name |
||
|
|
number of items which depend on this object |
Read-only |
|
|
|
affected AS name |
||
|
|
subsystem number which must be connected |
| |
The JMX Object name for as-precond is SGC:type=m3ua,category=as-precond. |
as-connection
Mapping of Application Server (as) to SCTP association (connection), defining which Application Servers should be active on a particular connection.
| Attribute name | Attribute description | Default | Modification |
|---|---|---|---|
|
|
object name |
||
|
|
number of items which depend on this object |
Read-only |
|
|
|
reference to AS |
||
|
|
reference to SGConnection |
||
|
|
sending DAUD on |
|
Reconfigurable |
| |
The JMX Object name for as-connection is SGC:type=m3ua,category=as-connection. |
Listening for and establishing SCTP associations
Below are attributes for configuration directly related to establishing SCTP associations to M3UA peers.
local-endpoint
local-endpoint, together with local-endpoint-ip, defines the IP address where the SGC Node should listen for incoming SCTP associations.local-endpoint configuration is also used as the source address for outgoing SCTP associations. local-endpoint by itself defines the port and M3UA configuration for all connections that are associated with it.
| |
Each SGC Node can use multiple local endpoints. |
| Attribute name | Attribute description | Default | Modification |
|---|---|---|---|
|
|
object name |
||
|
|
number of items which depend on this object |
Read-only |
|
|
|
is object enabled |
|
Reconfigurable using active reconfiguration |
|
|
is object active |
Read-only |
|
|
|
SGC Node where the object is used |
||
|
|
local SCTP port |
Reconfigurable |
|
|
|
maximum number of input streams requested by the local endpoint |
OS default |
Reconfigurable |
|
|
maximum number of output streams requested by the local endpoint |
OS default |
Reconfigurable |
|
|
size of the socket send buffer |
OS default |
Reconfigurable |
|
|
size of the socket receive buffer |
OS default |
Reconfigurable |
|
|
maximum |
|
Reconfigurable |
|
|
maximum |
|
Reconfigurable |
|
|
maximum |
|
Reconfigurable |
|
|
maximum |
|
Reconfigurable |
|
|
enables or disables a Nagle-like algorithm |
|
Reconfigurable |
|
|
linger on close if data is present |
OS default |
Reconfigurable |
| |
The JMX Object name for local-endpoint is SGC:type=m3ua,category=local-endpoint. |
local-endpoint-ip
Configuration of IPs for local-endpoint, to make use of SCTP multi-homed, feature-defined, multiple IPs for a single local endpoint.
| Attribute name | Attribute description | Default | Modification |
|---|---|---|---|
|
|
object name |
||
|
|
number of items which depend on this object |
Read-only |
|
|
|
IPv4 or IPv6 address |
||
|
|
name of the referenced local endpoint |
| |
The JMX Object name for local-endpoint-ip is SGC:type=m3ua,category=local-endpoint-ip. |
| |
IPv6 considerations
When using IPv6 addressing, remember to configure the |
connection
connection, together with conn-ip, defines the remote IP address of the SCTP association. The SGC Node will either try to establish that association (CLIENT mode) or expect a connection attempt from a remote peer (SERVER mode).
| Attribute name | Attribute description | Default | Modification |
|---|---|---|---|
|
|
object name |
||
|
|
number of items which depend on this object |
Read-only |
|
|
|
is object enabled |
|
Reconfigurable using active reconfiguration |
|
|
is object active |
Read-only |
|
|
|
remote SCTP port |
Reconfigurable |
|
|
|
reference name to local endpoint |
||
|
|
specifies if acts as server for SCTP connect ( |
Reconfigurable |
|
|
|
specifies how often ASP attempts to send |
|
Reconfigurable using active reconfiguration |
|
|
specifies how often ASP attempts to send |
|
Reconfigurable using active reconfiguration |
|
|
specifies time interval (in seconds) between connection attempts |
|
Reconfigurable using active reconfiguration |
|
|
specifies whether the SGC will send |
|
Reconfigurable |
|
|
asp identifier Attribute is optional |
Reconfigurable |
|
|
|
specifies whether connection works in IPSP mode |
|
|
|
maximum number of messages waiting to be written into the SCTP association |
|
Reconfigurable |
| |
The JMX Object name for connection is SGC:type=m3ua,category=connection. |
conn-ip
Configuration of IPs for connection, to make use of SCTP multi-homed, feature-defined,multiple IPs for a single connection.
| Attribute name | Attribute description | Default | Modification |
|---|---|---|---|
|
|
object name |
||
|
|
number of items which depend on this object |
Read-only |
|
|
|
IPv4 or IPv6 address |
||
|
|
name of the referenced connection |
| |
The JMX Object name for conn-ip is SGC:type=m3ua,category=conn-ip. |
| |
IPv6 considerations
When using IPv6 addressing, remember to configure the |
SCCP Configuration
Global title translation
| |
Any number of attributes ( To create a rule matching all GTs, also set |
To configure GT translation, see the following sections:
| |
Atribute modification restrictions
|
Incoming GT translation
Use the following attributes to configure GT translation for incoming SCCP messages. Whenever the incoming called address for an SCCP message is a GT, it is matched against this configuration to determine whether it should be accepted and, optionally, which SSN should receive it.
inbound-gtt
| Attribute name | Attribute description | Default | Modification |
|---|---|---|---|
|
|
object name |
||
|
|
number of items which depend on this object |
Read-only |
|
|
|
translation type Attribute optional; when unspecified matches ANY value |
Reconfigurable |
|
|
|
numbering plan Attribute optional; when unspecified matches ANY value |
Reconfigurable |
|
|
|
nature of address Attribute optional; when unspecified matches ANY value |
Reconfigurable |
|
|
|
address string Attribute optional; when unspecified and |
Reconfigurable |
|
|
|
specifies if address string contains prefix |
|
Reconfigurable |
|
|
local SSN that handles the traffic Attribute optional; when unspecified the SSN from the Called Party Address will be used |
Reconfigurable |
| |
The JMX Object name for inbound-gtt is SGC:type=sccp,category=inbound-gtt. |
Outgoing GT translation
GT translation configuration used for outgoing SCCP messages. Whenever the outgoing SCCP message called address is a GT, it is matched against this configuration to derive the destination PC and optionally SSN. After translation SCCP message called address may be modified according to the replace-gt configuration.
outbound-gt
Use the following attributes to configure GT translation in an outgoing direction. An outgoing SCCP message that contains a GT in the called address parameter will be matched against the outbound-gt definitions.
| Attribute name | Attribute description | Default | Modification |
|---|---|---|---|
|
|
object name |
||
|
|
number of items which depend on this object |
Read-only |
|
|
|
translation type Attribute optional; when unspecified matches ANY value |
Reconfigurable |
|
|
|
numbering plan Attribute optional; when unspecified matches ANY value |
Reconfigurable |
|
|
|
nature of address Attribute optional; when unspecified matches ANY value |
Reconfigurable |
|
|
|
address string Attribute optional; when unspecified and |
Reconfigurable |
|
|
|
specifies if the address string contains a prefix |
|
Reconfigurable |
| |
The JMX Object name for outbound-gt is SGC:type=sccp,category=outbound-gt. |
outbound-gtt
Use these attributes to represent a Destination Point Code where the SCCP message with a matching GT (referenced through the gt attribute) will be sent.
| |
Multiple outbound-gt definitions can reference a single outbound GT. In such cases, a load-balancing procedure is invoked. |
| Attribute name | Attribute description | Default | Modification |
|---|---|---|---|
|
|
object name |
||
|
|
number of items which depend on this object |
Read-only |
|
|
|
reference to |
Reconfigurable |
|
|
|
destination point code; supported format is
|
Reconfigurable |
|
|
|
reference to |
Reconfigurable |
|
|
|
priority of this translation (larger value is higher priority) |
Reconfigurable |
| |
The JMX Object name for outbound-gtt is SGC:type=sccp,category=outbound-gtt. |
replace-gt
These attributes may be used to modify the SCCP message’s called address parameter, after a matching GT is found through the use of outbound-gt and outbound-gtt.
| Attribute name | Attribute description | Default | Modification |
|---|---|---|---|
|
|
object name |
||
|
|
number of items which depend on this object |
Read-only |
|
|
|
what will be inserted in the SCCP called address; allowed values are:
|
|
Reconfigurable |
|
|
new encoding of the address Attribute optional |
Reconfigurable |
|
|
|
new translation type Attribute optional |
Reconfigurable |
|
|
|
new numbering plan Attribute optional |
Reconfigurable |
|
|
|
new nature of address Attribute optional |
Reconfigurable |
|
|
|
new address string in hex/bcd format Attribute optional |
Reconfigurable |
|
|
|
specify new SSN to add to GT Attribute optional |
Reconfigurable |
|
|
|
new global title indicator; allowed values are: Attribute optional |
Reconfigurable |
| |
The JMX Object name for replace-gt is SGC:type=sccp,category=replace-gt. |
Concerned Point Codes
cpc
CPC configuration stores information about remote SCCP nodes that should be informed about the local subsystem availability state.
| Attribute name | Attribute description | Default | Modification |
|---|---|---|---|
|
|
object name |
||
|
|
number of items which depend on this object |
Read-only |
|
|
|
concerned point code which is notified about status changes; format depends on
|
| |
The JMX Object name for cpc is SGC:type=sccp,category=cpc. |
Load balancing
Global Title translation may be used to provide load balancing and high availability functions. If there is more than one outbound-gtt referencing a single outbound-gt, the SCCP layer is responsible for routing the message to one of the vailable SCCP nodes (destination point codes). If the SCCP message is a subsequent message in stream class 1 (sequenced connectionless) and the previously selected SCCP node (PC) is still reachable, then that previously used PC is selected. If there is any other message for which GT translation results in multiple reachable point codes, messages are load balanced among the available PCs with highest priority.
The pseudo-algorithm is:
-
outbound-gtts referencing the same GT (outbound-gt) are grouped according to their priority (larger value is higher priority). -
Unreachable PCs are filtered out.
-
Unreachable destination subsystems (for which SSP has been received) are filtered out.
-
If there is more than one PC of highest priority, then messages are load balanced using a round robin algorithm between those PCs.
Whenever the prefer-local attribute of outbound-gtt is set to value true, routes local to the node are used in that algorithm (if such routes are currently available; otherwise prefer-local is ignored). Routes local to the node are those that are available through an SCTP association that was established by that particular node.
SNMP Configuration
Interoperability with SNMP-aware management clients
The SS7 SGC stack includes an SNMP agent, for interoperability with external SNMP-aware management clients. The SGC SNMP agent provides a read-only view of SGC statistics and alarms (through SNMP polling), and supports sending SNMP notifications related to SGC alarms and notifications to an external monitoring system.
In a clustered environment, individual SGC nodes may run their own instances of the SNMP agent, so that statistics and notifications can still be accessed in the event of node failure. Each node is capable of running multiple SNMP agents with different user-defined configuration.
| |
For detailed information about SGC exposed statistics, please see Statistics. For details about SGC alarms and notifications, please see Alarms and Notifications. |
| |
Attribute modification restrictions
|
SNMP configuration
Each snmp-node configuration object represents an SNMP agent running as part of a particular SGC node. Exposed configuration allows a single SNMP agent to support a single version of the SNMP protocol. Currently supported SNMP versions are 2c and 3. Multiple snmp-nodes (SNMP agents) can run within a single SGC node. In a clustered environment, each newly created snmp-node is automatically connected to the existing target-address and usm-user.
snmp-node
snmp-node represents an SNMP agent running as part of a particular SGC node.
| Attribute name | Attribute description | Default | Modification |
|---|---|---|---|
|
|
object name |
||
|
|
number of items which depend on this object |
Read-only |
|
|
|
is object enabled |
|
Reconfigurable using active reconfiguration |
|
|
is object active |
Read-only |
|
|
|
SGC node where the object is used |
||
|
|
Comma separated list of SNMP address type(s) to configure this node for (supported values: |
|
Reconfigurable |
|
|
local SNMP listening port |
Reconfigurable |
|
|
|
local SNMP listening bind address |
|
Reconfigurable |
|
|
community for read operations |
|
Reconfigurable |
|
|
SNMP version (supported values: |
|
Reconfigurable |
|
|
whether extended traps (and informs) should be generated by this node. Extended traps/informs include a longer |
|
Reconfigurable |
| |
The JMX Object name for snmp-node is SGC:type=snmp,category=snmp-node. |
target-address
target-address is cluster wide and represents an SNMP notification target (defines where SNMP notifications will be sent and which protocol version is used).
| Attribute name | Attribute description | Default | Modification |
|---|---|---|---|
|
|
object name |
||
|
|
number of items which depend on this object |
Read-only |
|
|
|
SNMP transport domain (SNMP transport protocol supported values: In order for notifications to be emitted, the chosen transport domain must be compatible with one of the the selected |
|
Reconfigurable |
|
|
target host address |
Reconfigurable |
|
|
|
target port |
|
Reconfigurable |
|
|
timeout value (in units of 0.01 seconds) after which unacknowledged SNMP notifications (type |
|
Reconfigurable |
|
|
number of retransmissions of unacknowledged SNMP notifications (type |
|
Reconfigurable |
|
|
community name definition |
|
Reconfigurable |
|
|
SNMP notification mechanism (supported values: |
|
Reconfigurable |
|
|
SNMP version (supported values: |
|
Reconfigurable |
| |
The JMX Object name for target-address is SGC:type=snmp,category=target-address. |
| |
target-address can be created, deleted, and its attributes reconfigured, only when all referenced snmp-nodes are disabled. |
usm-user
usm-user is cluster wide and represents the SNMP v3 USM user and authentication details.
| Attribute name | Attribute description | Default | Modification |
|---|---|---|---|
|
|
object name |
||
|
|
number of items which depend on this object |
Read-only |
|
|
|
authentication protocol (supported values: |
|
Reconfigurable |
|
|
authentication protocol pass phrase |
Reconfigurable |
|
|
|
privacy protocol (supported values: |
|
Reconfigurable |
|
|
privacy protocol pass phrase |
Reconfigurable |
|
|
|
specifies community |
|
Reconfigurable |
| |
The JMX Object name for usm-user is SGC:type=snmp,category=usm-user. |
| |
usm-user can be created, deleted, and its attributes reconfigured only when all referenced snmp-nodes are disabled. |
SGC Stack MIB definitions
MIB definitions for the SGC stack are separated into three files:
-
COMPUTARIS-MIB — basic OID definitions used by the SGC stack
-
OPENCLOUD-OCSS7-MIB — the Metaswitch enterprise MIB definition and OCSS7 System OIDs
-
CTS-SGC-MIB — SNMP managed objects and SNMP notifications used by the SGC stack.
| |
MIB definitions are also included in the SGC Stack release package under ./doc/mibs/ |
SNMP managed objects
Managed objects defined in CTS-SGC-MIB can be separated in two groups:
Statistics managed objects
Here are the managed objects representing SGC statistics:
| Symbolic OID | Numerical OID | Equivalent Statistics attribute |
|---|---|---|
|
|
|
|
|
|
|
|
|
|
|
|
|
|
|
|
|
|
|
|
|
|
|
|
|
|
|
|
|
|
|
|
|
|
|
|
|
|
|
|
|
|
|
|
|
|
|
|
|
|
|
Alarms managed objects
Here are the managed objects representing SGC alarms:
| Symbolic OID | Numerical OID | Equivalent Alarms MBean |
|---|---|---|
|
|
|
|
|
|
|
SNMP notifications
The MIB defined in CTS-SGC-MIB specifies two notification types that can be emitted by SGC:
-
SGC Alarm — emitted whenever an SGC Alarm is raised
-
SGC Notification — emitted whenever an SGC Notification is emitted.
Notifications can be raised in either basic format or extended format.
Here are the notification types emitted by SGC:
| Symbolic OID | Numerical OID |
|---|---|
|
|
|
|
|
|
Here is the content of SGC-emitted SNMP notifications:
| Symbolic OID | Numerical OID | Details |
|---|---|---|
|
|
|
unique SGC notification / alarm identifier |
|
|
|
time the of SGC alarm / notification |
|
|
|
name of the SGC alarm / notification type |
|
|
|
SGC alarm / notification severity |
|
|
|
comma-separated list of SGC Alarm / Notification type specific |
|
|
|
short decription of the alarm or notification |
|
|
|
(extended format only) |
|
|
|
(alarms only) |
|
|
|
(alarms only) |
|
|
|
(alarms only) |
Configuration Procedure
This is a high-level description of the usual SGC configuration procedure listing the commands involved for each of the three layers:
It is up to the user to provide the details required by the commands; links to the configuration reference material for each command have been provided to make this easier.
General configuration
Step |
Operation |
|
|---|---|---|
|
1 |
Set the cluster-wide SCCP variant. Configure the SCCP variant to the required value. Supported variants are:
|
|
|
2 |
Set the cluster-wide local SS7 Point Code address. Modify the sp attribute to the desired point code. The format depends on the value of the sccp-variant configuration parameter.
|
|
|
3 |
Create two new nodes for the cluster. The |
|
SCCP configuration
Below are the steps for configuring outgoing and incoming GTs to be translated, and CPCs.
| |
Configuring SCCP GT Translation and Concerned Point Codes is optional. |
Outgoing GT
For each outgoing GT to be translated, repeat these steps:
Step |
Operation |
|
|---|---|---|
|
1 |
Create the GT definition for outbound use. |
|
|
2 |
Create the address definition that should be the result of matching the previously defined GT. Be sure that the |
|
|
3 |
Optionally, as a result of matching a particular GT, modify the called address before sending. After creating the |
|
Incoming GT
For each incoming GT to be translated, repeat this step:
| Step | Operation | |
|---|---|---|
1 |
Create a GT and address definition (SSN) that should be the result of translation. |
|
2 |
Create the GT definition for outbound use, making sure it matches the inbound GTT correctly. |
|
3 |
Create the address definition that should be the result of matching the previously defined GT. Be sure that the |
|
| |
The second and third commands may look somewhat surprising, as they create an outbound GTT rule. SCCP’s service messages (UDTS and XUDTS) may be generated locally in response to traffic we are attempting to send, and these service messages are routed as outbound messages. It is safest to create outbound GTT rules mirroring your inbound GTT rules in case they are needed by your network configuration. |
M3UA configuration
Below are instructions for configuring M3UA in AS, IPSP Client, and IPSP Server modes.
| Step | Operation | |
|---|---|---|
|
1 |
If not done previously, define a |
|
|
2 |
Define IPs for the |
|
|
3 |
If you are:
|
|
|
4 |
Define one or more IP addresses for connection. |
|
|
5 |
Define one or more Application Server (Routing Contexts). Set the |
|
|
6 |
Define one or more Destination Point Codes that will be available for the AS. |
|
|
7 |
Define one or more routes that associate previously created DPC(s) and AS(s). |
|
|
8 |
Define one or more associations for AS(s) that are available through particular connection(s). |
|
|
9 |
Enable the |
|
Configuration Subsystem Details
Stack configuration and cluster joining
The main functions of the configuration subsystem are:
-
managing, distributing, and persisting SGC Stack configuration
-
performing the cluster-join procedure.
Below are details of the cluster-join procedure (which is part of SGC Node initialization) and a basic description of the JMX MBeans exposed by the configuration subsystem that may be of use when developing custom management tools.
| |
SGC_HOME
In the following instructions, |
Cluster-join procedure
During startup, if the SGC cluster already exists, a node instance initiates a cluster-join procedure. The configuration system loads a locally persisted configuration and compares its version vector against the current cluster configuration.
| IF | THEN |
|---|---|
|
Versions are equal, or the local version is stale. |
The SGC node uses the cluster configuration state. It joins the cluster and instantiates a cluster-wide and per-node state. |
|
The local version is greater. |
The local instance first instantiates all configuration objects which are not present in the cluster. Then it updates all configuration objects which are defined both in the cluster and in the local configuration. Finally, it deletes all configuration objects which are not present in the local configuration. |
|
There is a version conflict. |
The node aborts the cluster-join procedure, outputs a failure log message, and aborts start up. |
Version conflict reconciliation
The local node stores a copy of the configuration in the SGC_HOME/var/sgc.dat file in the SS7 SGC node working directory. This is an XML file containing the entire cluster configuration as last known by that node. The usual approach to configuration reconciliation is for the node to join the cluster and use the current cluster configuration to initialize (dropping its local state).
| |
To force this behaviour, remove or rename the SGC_HOME/var/sgc.dat file containing persisted configuration. |
| |
Configuration backup
After each configuration change a new version of |
Factory MBeans for configuration objects
The SS7 SGC Stack is built around a configuration subsystem that plays a central role in managing the lifecycle of all configuration objects in SGC. SS7 SGC configuration is exposed through a set of JMX MBeans on each node. The configuration subsystem exposes a set of "factory" MBeans that are responsible for creating configuration objects of a certain type.
Each factory MBean exposes either one or two create- operations used to create new configuration objects (a create operation that accepts more parameters allows for defining optional configuration object attributes during creation). The creation of a configuration object results in the creation of an MBean representing the state of that configuration object. Attributes can be modified directly through that MBean, which also exposes a remove operation that allows removal of the configuration object (and associated MBeans).
| |
Command-Line Management Console
These processes are abstracted away by the Command-Line Management Console and exposed as a set of CRUD commands. |
Configuration MBean naming
SGC Configuration MBean names use the common domain SGC and a set of properties:
-
type— represents a subsystem / layer (general,m3ua,sccp, orsnmp) -
category— represents the name of the factory in the subsystem -
id— represents that instance of the processing object.
For example, the cluster node factory MBean has the name SGC:type=general,category=node, which exposes the create-node operation. Invoking the create-node operation creates a processing object representing a node in the cluster with the object name SGC:type=general,category=node,id=NODE_NAME. The id property is set based on the oname (object name) parameter of the create-node operation.
Most GUI-based JMX-Management tools represent the naming space as a tree of MBean objects, like this:
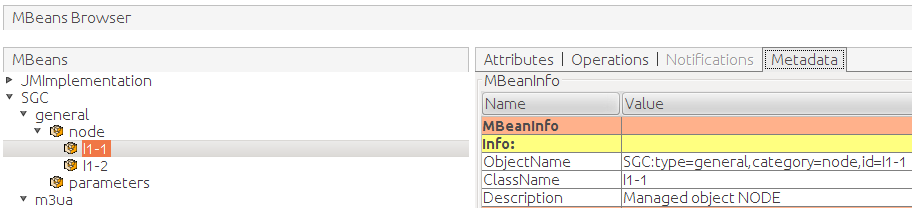
| |
There is a single special MBean object named SGC:type=general,category=parameters that is neither a factory MBean nor a processing object. This MBean stores cluster-wide system parameters. |
Operational State and Instance Management
Operational state
SS7 SGC Stack operational state information is exposed cluster wide. That is, the same operational state information is exposed on each cluster node, independent of the particular source of information (particular node). It is enough to connect to a single cluster node to observe the operational state of all other nodes in the cluster.
The same operational state is exposed through:
-
commands exposed by the Command-Line Management Console that is distributed with the SGC SS7 Stack
-
the SNMP protocol when an SNMP agent is configured to run within a particular SGC node.
| |
Notification propagation
An important distinction related to SS7 SGC Stack notification support is that notifications (both through JMX and SNMP) are sent only through the node that actually observes a related event (for example when a connection goes down). |
Operational state is exposed through Alarms, Notifications, and Statistics. Operating details of the SS7 SGC stack can be observed using the Logging subsystem.
Alarms
What are SS7 SGC alarms?
Alarms in the SS7 SGC stack alert the administrator to exceptional conditions. Subsystems in the SS7 SGC stack raise them upon detecting an error condition or an event of high importance. The SS7 SGC stack clears alarms automatically when the error conditions are resolved; an administrator can clear any alarm at any time. When an alarm is raised or cleared, the SS7 SGC stack generates a notification that is sent as a JMX Notification and an SNMP trap/notification.
The SS7 SGC stack defines multiple alarm types. Each alarm type corresponds to a type of error condition or important event (such as "SCTP association down"). The SGC stack can raise multiple alarms of any type (for example, multiple "SCTP association down" alarms, one for each disconnected association).
Alarms are inspected and managed through a set of commands exposed by the Command-Line Management Console, which is distributed with SGC SS7 Stack.
| |
See also
|
Below are details of Active Alarms and Event History, Generic Alarm Attributes, and Alarm Types.
Active alarms and event history
The SS7 SGC Stack stores and exposes two types of alarm-related information:
-
active alarms — a list of alarms currently active
-
event history — a list of alarms and notifications that where raised or emitted in the last 24 hours (this is default value — see Configuring the SS7 SGC Stack).
At any time, an administrator can clear all or selected alarms.
Generic alarm attributes
Alarm attributes represent information about events that result in an alarm being raised. Each alarm type has the following generic attributes, plus a group of attributes specific to that alarm type (described in the following sections).
There are two types of generic attribute; basic and extended.
Basic attributes:
-
Are displayed by default in the SGC’s CLI.
-
They are always included in full in SNMP traps.
-
And they are returned in full by SNMP queries.
Extended attributes:
-
Are not displayed by default in the SGC’s CLI. This behaviour may be overridden by specifiying additional columns using the
columnattribute in thedisplay-active-alarmordisplay-event-historyCLI commands. -
Will be included in an SNMP trap or inform if the SNMP agent is configured for
extended-traps, otherwise these will be omitted. -
Are returned in full by SNMP queries.
The full set of attributes is described in the following table:
| Attribute | Type | Description |
|---|---|---|
|
|
|
A unique alarm instance identifier, presented as a number. This identifier can be used to track alarms, for example by using it to identify the raise and clear event entries for an alarm in the event history, or to refer to a specific alarm in the commands which can be used to manipulate alarms. |
|
|
|
The name of the alarm type. A catalogue of alarm types is given below. |
|
|
|
The alarm severity:
|
|
|
|
The date and time at which the event occurred. |
|
|
|
A comma-separated list of |
|
|
|
A short description of the alarm. |
|
|
|
A longer description of the alarm. |
|
|
|
A guide to some possible causes of the alarm. The described causes should not be considered exhaustive. |
|
|
|
The possible consequences of the condition that caused the alarm to be raised. |
|
|
|
Actions that can be taken to remedy the alarm. Note that not all remedies can be described within the constraints of an alarm text. Refer back to this guide or contact support for more assistance. |
Alarm types
This section describes all alarm types that can be raised in an SGC cluster.
General Alarms
This section describes alarms raised concerning the general operational state of the SGC or SGC cluster.
commswitchbindfailure
The CommSwitch is unable to bind to the configured switch-local-address and switch-port. This alarm is cleared when the CommSwitch is able to successfully bind the configured address and port.
The following table shows the basic attributes raised as part of this alarm.
| Attribute | Description | Values of constants |
|---|---|---|
|
unique alarm identifier |
|
|
name of alarm type |
|
|
alarm severity |
|
|
timestamp when the event occurred |
|
|
short alarm description |
|
Additionally, the parameters attribute is a basic attribute consisting of a comma-separated list of key=value pairs containing the following alarm-specific parameters:
| Attribute | Description |
|---|---|
|
affected node |
|
the cause of the bind failure |
This alarm’s extended attributes have the following fixed values:
| Attribute | Description | Value |
|---|---|---|
|
long alarm description |
The CommSwitch is unable to bind to the configured switch-local-address and switch-port. This alarm is cleared when the CommSwitch is able to successfully bind the configured address and port. |
|
possible alarm causes |
Typically misconfigured; the administrator must ensure that the CommSwitch is configured to use a host and port pair which is always available for the SGC’s exclusive use. |
|
potential consequences |
SGC nodes in the same cluster are unable to route messages to each other. |
|
summary of remedial action |
Correct the SGC’s CommSwitch configuration or locate and terminate the process that is bound to the SGC’s CommSwitch address and port. |
configSaveFailed
This alarm is raised when the SGC is unable to save its configuration. This alarm is cleared when the configuration file is next successfully saved.
The following table shows the basic attributes raised as part of this alarm.
| Attribute | Description | Values of constants |
|---|---|---|
|
unique alarm identifier |
|
|
name of alarm type |
|
|
alarm severity |
|
|
timestamp when the event occurred |
|
|
short alarm description |
|
Additionally, the parameters attribute is a basic attribute consisting of a comma-separated list of key=value pairs containing the following alarm-specific parameters:
| Attribute | Description |
|---|---|
|
affected node |
This alarm’s extended attributes have the following fixed values:
| Attribute | Description | Value |
|---|---|---|
|
long alarm description |
This alarm is raised when the SGC is unable to save its configuration. This alarm is cleared when the configuration file is next successfully saved. |
|
possible alarm causes |
Insufficient storage space, or changes to the read/write permissions of any previously saved configuration files. |
|
potential consequences |
The SGC configuration may be out of date or not saved at all. |
|
summary of remedial action |
Examine SGC logs to determine cause of save failure and rectify. |
distributedDataInconsistency
This alarm is raised when a distributed data inconsistency is detected. This alarm must be cleared manually since it indicates a problem that may result in undefined behaviour within the SGC, and requires a restart of the SGC cluster to correct. When restarting the cluster it is necessary to fully stop all SGC nodes and only then begin restarting them to properly correct the problem detected by this alarm.
The following table shows the basic attributes raised as part of this alarm.
| Attribute | Description | Values of constants |
|---|---|---|
|
unique alarm identifier |
|
|
name of alarm type |
|
|
alarm severity |
|
|
timestamp when the event occurred |
|
|
short alarm description |
|
Additionally, the parameters attribute is a basic attribute consisting of a comma-separated list of key=value pairs containing the following alarm-specific parameters:
| Attribute | Description |
|---|---|
|
affected node |
|
the location where the data inconsistency was detected |
This alarm’s extended attributes have the following fixed values:
| Attribute | Description | Value |
|---|---|---|
|
long alarm description |
This alarm is raised when a distributed data inconsistency is detected. This alarm must be cleared manually since it indicates a problem that may result in undefined behaviour within the SGC, and requires a restart of the SGC cluster to correct. When restarting the cluster it is necessary to fully stop all SGC nodes and only then begin restarting them to properly correct the problem detected by this alarm. |
|
possible alarm causes |
A distributed data inconsistency has been detected; the most likely cause of this is a misconfigured |
|
potential consequences |
Undefined behaviour from the SGC is possible at any time |
|
summary of remedial action |
Fully terminate the cluster, correct the underlying issue, then restart the whole cluster |
illegalClusterEntry
This alarm is raised when a node that doesn’t support the current cluster version enters the cluster. This alarm must be cleared manually.
The following table shows the basic attributes raised as part of this alarm.
| Attribute | Description | Values of constants |
|---|---|---|
|
unique alarm identifier |
|
|
name of alarm type |
|
|
alarm severity |
|
|
timestamp when the event occurred |
|
|
short alarm description |
|
Additionally, the parameters attribute is a basic attribute consisting of a comma-separated list of key=value pairs containing the following alarm-specific parameters:
| Attribute | Description |
|---|---|
|
information about the illegally entering node |
|
current cluster mode |
|
current cluster version |
|
target cluster version |
This alarm’s extended attributes have the following fixed values:
| Attribute | Description | Value |
|---|---|---|
|
long alarm description |
This alarm is raised when a node that doesn’t support the current cluster version enters the cluster. This alarm must be cleared manually. |
|
possible alarm causes |
A node that doesn’t support the current cluster version entered the cluster. |
|
potential consequences |
Potential for cluster data corruption and instability. |
|
summary of remedial action |
Terminate the node that doesn’t support the current cluster version. Evaluate cluster status. |
mapdatalosspossible
This alarm is raised when the number of SGC nodes present in the cluster exceeds 1 plus the backup-count configured for Hazelcast map data structures. See Hazelcast cluster configuration for information on how to fix this. This alarm must be cleared manually since it indicates a configuration error requiring correction and a restart of the SGC.
The following table shows the basic attributes raised as part of this alarm.
| Attribute | Description | Values of constants |
|---|---|---|
|
unique alarm identifier |
|
|
name of alarm type |
|
|
alarm severity |
|
|
timestamp when the event occurred |
|
|
short alarm description |
|
Additionally, the parameters attribute is a basic attribute consisting of a comma-separated list of key=value pairs containing the following alarm-specific parameters:
| Attribute | Description |
|---|---|
|
the currently configured backup count |
|
the number of nodes in the cluster when at its largest |
This alarm’s extended attributes have the following fixed values:
| Attribute | Description | Value |
|---|---|---|
|
long alarm description |
This alarm is raised when the number of SGC nodes present in the cluster exceeds 1 plus the |
|
possible alarm causes |
Misconfiguration of cluster nodes or unexpected nodes have entered the cluster. |
|
potential consequences |
Potential for distributed data loss. |
|
summary of remedial action |
See Hazelcast cluster configuration for information on how to correct this. |
migrationErrors
This alarm is raised when errors are encountered during the data migration phase of an SGC cluster upgrade or revert. This alarm must be cleared manually since it indicates a potentially critical error during the cluster upgrade which may have an impact on cluster stability.
The following table shows the basic attributes raised as part of this alarm.
| Attribute | Description | Values of constants |
|---|---|---|
|
unique alarm identifier |
|
|
name of alarm type |
|
|
alarm severity |
|
|
timestamp when the event occurred |
|
|
short alarm description |
|
Additionally, the parameters attribute is a basic attribute consisting of a comma-separated list of key=value pairs containing the following alarm-specific parameters:
| Attribute | Description |
|---|---|
|
data version before migration |
|
data version being migrated to |
|
detailed information about the migration errors |
This alarm’s extended attributes have the following fixed values:
| Attribute | Description | Value |
|---|---|---|
|
long alarm description |
This alarm is raised when errors are encountered during the data migration phase of an SGC cluster upgrade or revert. This alarm must be cleared manually since it indicates a potentially critical error during the cluster upgrade which may have an impact on cluster stability. |
|
possible alarm causes |
One or more errors were encountered during the data migration phase of an SGC cluster upgrade or revert. |
|
potential consequences |
The SGC cluster’s behaviour may be undefined, either now or in the future. |
|
summary of remedial action |
Run bin/generate-report.sh on each cluster member, then terminate the whole cluster. Reinstate the previous cluster version from backups and start the old cluster. Submit a support request. |
nodeManagerBindFailure
This alarm is raised when the legacy node manager is unable to bind to the configured stack-http-address and stack-http-port for any reason. This is typically caused by misconfiguration; the administrator must ensure that the node manager is configured to use a host and port pair which is always available for the SGC’s exclusive use. This alarm is cleared when the node manager is able to successfully bind the configured socket.
The following table shows the basic attributes raised as part of this alarm.
| Attribute | Description | Values of constants |
|---|---|---|
|
unique alarm identifier |
|
|
name of alarm type |
|
|
alarm severity |
|
|
timestamp when the event occurred |
|
|
short alarm description |
|
Additionally, the parameters attribute is a basic attribute consisting of a comma-separated list of key=value pairs containing the following alarm-specific parameters:
| Attribute | Description |
|---|---|
|
affected node |
|
additional information about the failure |
This alarm’s extended attributes have the following fixed values:
| Attribute | Description | Value |
|---|---|---|
|
long alarm description |
This alarm is raised when the legacy node manager is unable to bind to the configured stack-http-address and stack-http-port for any reason. This is typically caused by misconfiguration; the administrator must ensure that the node manager is configured to use a host and port pair which is always available for the SGC’s exclusive use. This alarm is cleared when the node manager is able to successfully bind the configured socket. |
|
possible alarm causes |
The configured stack-http-address and stack-http-port cannot be bound. |
|
potential consequences |
Legacy TCAP stacks (those using the urlList method) will not be able to connect to the affected SGC. |
|
summary of remedial action |
Ensure that stack-http-address and stack-http-port are correctly configured and that no other applications have bound the configured address and port. |
nodefailure
This alarm is raised whenever a node configured in the cluster is down. It is cleared when an SGC instance acting as that particular node becomes active.
The following table shows the basic attributes raised as part of this alarm.
| Attribute | Description | Values of constants |
|---|---|---|
|
unique alarm identifier |
|
|
name of alarm type |
|
|
alarm severity |
|
|
timestamp when the event occurred |
|
|
short alarm description |
|
Additionally, the parameters attribute is a basic attribute consisting of a comma-separated list of key=value pairs containing the following alarm-specific parameters:
| Attribute | Description |
|---|---|
|
affected node |
|
additional information about the node failure |
This alarm’s extended attributes have the following fixed values:
| Attribute | Description | Value |
|---|---|---|
|
long alarm description |
This alarm is raised whenever a node configured in the cluster is down. It is cleared when an SGC instance acting as that particular node becomes active. |
|
possible alarm causes |
A configured node is not running. This may be due to administrative action, or the node may have exited abnormally. |
|
potential consequences |
Any remaining cluster nodes will continue to provide service. |
|
summary of remedial action |
Determine why the node is not running, resolve any issues and restart the stopped node. |
poolCongestion
This alarm is raised whenever over 80% of a pool’s pooled objects are in use. This is typically caused by misconfiguration, see Static SGC instance configuration. It is cleared when less than 50% of pooled objects are in use.
| |
What is a task pool?
A task pool is a pool of objects used during message processing, where each allocated object represents a message that may be processing or waiting to be processed. Each SGC node uses separate task pools for outgoing and incoming messages. |
The following table shows the basic attributes raised as part of this alarm.
| Attribute | Description | Values of constants |
|---|---|---|
|
unique alarm identifier |
|
|
name of alarm type |
|
|
alarm severity |
|
|
timestamp when the event occurred |
|
|
short alarm description |
|
Additionally, the parameters attribute is a basic attribute consisting of a comma-separated list of key=value pairs containing the following alarm-specific parameters:
| Attribute | Description |
|---|---|
|
affected node |
|
name of the affected task pool |
This alarm’s extended attributes have the following fixed values:
| Attribute | Description | Value |
|---|---|---|
|
long alarm description |
This alarm is raised whenever over 80% of a pool’s pooled objects are in use. This is typically caused by misconfiguration, see Static SGC instance configuration. It is cleared when less than 50% of pooled objects are in use. |
|
possible alarm causes |
Misconfiguration |
|
potential consequences |
None unless |
|
summary of remedial action |
Examine the SGC’s sizing requirements |
poolExhaustion
This alarm is raised whenever a task allocation request is made on a pool whose objects are all already allocated. This is typically caused by misconfiguration, see Static SGC instance configuration. This alarm must be cleared manually.
The following table shows the basic attributes raised as part of this alarm.
| Attribute | Description | Values of constants |
|---|---|---|
|
unique alarm identifier |
|
|
name of alarm type |
|
|
alarm severity |
|
|
timestamp when the event occurred |
|
|
short alarm description |
|
Additionally, the parameters attribute is a basic attribute consisting of a comma-separated list of key=value pairs containing the following alarm-specific parameters:
| Attribute | Description |
|---|---|
|
affected node |
|
name of the affected task pool |
This alarm’s extended attributes have the following fixed values:
| Attribute | Description | Value |
|---|---|---|
|
long alarm description |
This alarm is raised whenever a task allocation request is made on a pool whose objects are all already allocated. This is typically caused by misconfiguration, see Static SGC instance configuration. This alarm must be cleared manually. |
|
possible alarm causes |
A task allocation request is made on a task pool whose members are all in use |
|
potential consequences |
Delays processing messages and/or messages being dropped |
|
summary of remedial action |
Examine the SGC’s sizing requirements. |
workgroupCongestion
This alarm is raised when the worker work queue is over 80% occupied. It is cleared when the worker work queue is less than 50% occupied.
| |
What is a worker group?
A worker group is a group of workers (threads) that are responsible for processing tasks (incoming/outgoing messages). Each worker has a separate work queue. |
The following table shows the basic attributes raised as part of this alarm.
| Attribute | Description | Values of constants |
|---|---|---|
|
unique alarm identifier |
|
|
name of alarm type |
|
|
alarm severity |
|
|
timestamp when the event occurred |
|
|
short alarm description |
|
Additionally, the parameters attribute is a basic attribute consisting of a comma-separated list of key=value pairs containing the following alarm-specific parameters:
| Attribute | Description |
|---|---|
|
affected node |
|
affected worker index |
This alarm’s extended attributes have the following fixed values:
| Attribute | Description | Value |
|---|---|---|
|
long alarm description |
This alarm is raised when the worker work queue is over 80% occupied. It is cleared when the worker work queue is less than 50% occupied. |
|
possible alarm causes |
The queue of tasks waiting to be processed is larger than 80% of the configured maximum worker queue size |
|
potential consequences |
Tasks may fail to be queued if the workgroup congestion hits 100% |
|
summary of remedial action |
Examine the SGC’s sizing requirements. |
M3UA
This section describes alarms raised concerning the M3UA layer of the SGC cluster.
asConnDown
This alarm is raised when an AS connection which was active becomes inactive. This alarm can be caused either by misconfiguration at one or both ends of the M3UA association used, such as by a disagreement on the routing context to be used, or by network failure. It is cleared when the Application Server becomes active on the connection.
The following table shows the basic attributes raised as part of this alarm.
| Attribute | Description | Values of constants |
|---|---|---|
|
unique alarm identifier |
|
|
name of alarm type |
|
|
alarm severity |
|
|
timestamp when the event occurred |
|
|
short alarm description |
|
Additionally, the parameters attribute is a basic attribute consisting of a comma-separated list of key=value pairs containing the following alarm-specific parameters:
| Attribute | Description |
|---|---|
|
the affected AS |
|
name of affected connection |
This alarm’s extended attributes have the following fixed values:
| Attribute | Description | Value |
|---|---|---|
|
long alarm description |
This alarm is raised when an AS connection which was active becomes inactive. This alarm can be caused either by misconfiguration at one or both ends of the M3UA association used, such as by a disagreement on the routing context to be used, or by network failure. It is cleared when the Application Server becomes active on the connection. |
|
possible alarm causes |
Misconfiguration of one or both ends of the M3UA association or network failure. |
|
potential consequences |
The affected AS connection cannot be used for message send or receive. |
|
summary of remedial action |
Correct configuration or resolve network failure. |
asDown
This alarm is raised whenever a configured M3UA Application Server is not active. This alarm is typically caused by either a misconfiguration at one or both ends of an M3UA association or by network failure. It is cleared when the Application Server becomes active again.
The following table shows the basic attributes raised as part of this alarm.
| Attribute | Description | Values of constants |
|---|---|---|
|
unique alarm identifier |
|
|
name of alarm type |
|
|
alarm severity |
|
|
timestamp when the event occurred |
|
|
short alarm description |
|
Additionally, the parameters attribute is a basic attribute consisting of a comma-separated list of key=value pairs containing the following alarm-specific parameters:
| Attribute | Description |
|---|---|
|
the affected AS |
This alarm’s extended attributes have the following fixed values:
| Attribute | Description | Value |
|---|---|---|
|
long alarm description |
This alarm is raised whenever a configured M3UA Application Server is not active. This alarm is typically caused by either a misconfiguration at one or both ends of an M3UA association or by network failure. It is cleared when the Application Server becomes active again. |
|
possible alarm causes |
Misconfiguration of one or both ends of the M3UA association or network failure. |
|
potential consequences |
The Application Server is down and messages cannot be sent or received on that AS |
|
summary of remedial action |
Correct configuration or resolve network failure. |
associationCongested
This alarm is raised whenever an SCTP association becomes congested. An association is considered congested if the outbound queue size grows to more than 80% of the configured out-queue-size for the connection. This alarm is cleared when the outbound queue size drops below 50% of the configured out-queue-size.
The following table shows the basic attributes raised as part of this alarm.
| Attribute | Description | Values of constants |
|---|---|---|
|
unique alarm identifier |
|
|
name of alarm type |
|
|
alarm severity |
|
|
timestamp when the event occurred |
|
|
short alarm description |
|
Additionally, the parameters attribute is a basic attribute consisting of a comma-separated list of key=value pairs containing the following alarm-specific parameters:
| Attribute | Description |
|---|---|
|
name of affected connection |
This alarm’s extended attributes have the following fixed values:
| Attribute | Description | Value |
|---|---|---|
|
long alarm description |
This alarm is raised whenever an SCTP association becomes congested. An association is considered congested if the outbound queue size grows to more than 80% of the configured |
|
possible alarm causes |
The association’s outbound queue size has grown to more than 80% of the configured out-queue-size. |
|
potential consequences |
Possible higher latency sending M3UA messages and if the queue becomes full, message send failure. |
|
summary of remedial action |
Examine the SGC’s sizing requirements |
associationDown
This alarm is raised whenever a configured connection is not active. This alarm is typically caused either by a misconfiguration at one or both ends of the M3UA association or by network failure. It is cleared when an association becomes active again.
The following table shows the basic attributes raised as part of this alarm.
| Attribute | Description | Values of constants |
|---|---|---|
|
unique alarm identifier |
|
|
name of alarm type |
|
|
alarm severity |
|
|
timestamp when the event occurred |
|
|
short alarm description |
|
Additionally, the parameters attribute is a basic attribute consisting of a comma-separated list of key=value pairs containing the following alarm-specific parameters:
| Attribute | Description |
|---|---|
|
name of affected connection |
This alarm’s extended attributes have the following fixed values:
| Attribute | Description | Value |
|---|---|---|
|
long alarm description |
This alarm is raised whenever a configured connection is not active. This alarm is typically caused either by a misconfiguration at one or both ends of the M3UA association or by network failure. It is cleared when an association becomes active again. |
|
possible alarm causes |
Misconfiguration at one or both ends of the M3UA association or network failure. |
|
potential consequences |
The SCTP association will not be used. |
|
summary of remedial action |
Correct configuration or resolve network failure. |
associationPathDown
This alarm is raised whenever a network path within an association becomes unreachable but the association as a whole remains functional because at least one other path remains available. This alarm is only raised for assocations using SCTP’s multi-homing feature (i.e. having multiple connection IP addresses assigned to a single connection). Association path failure is typically caused by either misconfiguration at one or both ends or by network failure. This alarm will be cleared when SCTP signals that the path is available again, or when all paths have failed, in which case a single associationDown alarm will be raised to replace all the former associationPathDown alarms.
| |
This alarm will also always be raised briefly during association establishment for all paths within the association which SCTP does not consider primary while SCTP is testing the alternative paths. |
The following table shows the basic attributes raised as part of this alarm.
| Attribute | Description | Values of constants |
|---|---|---|
|
unique alarm identifier |
|
|
name of alarm type |
|
|
alarm severity |
|
|
timestamp when the event occurred |
|
|
short alarm description |
|
Additionally, the parameters attribute is a basic attribute consisting of a comma-separated list of key=value pairs containing the following alarm-specific parameters:
| Attribute | Description |
|---|---|
|
name of affected connection |
|
the peer address which has become unreachable |
This alarm’s extended attributes have the following fixed values:
| Attribute | Description | Value |
|---|---|---|
|
long alarm description |
This alarm is raised whenever a network path within an association becomes unreachable but the association as a whole remains functional because at least one other path remains available. This alarm is only raised for assocations using SCTP’s multi-homing feature (i.e. having multiple connection IP addresses assigned to a single connection). Association path failure is typically caused by either misconfiguration at one or both ends or by network failure. This alarm will be cleared when SCTP signals that the path is available again, or when all paths have failed, in which case a single associationDown alarm will be raised to replace all the former |
|
possible alarm causes |
A network path within the SCTP association has become unreachable. |
|
potential consequences |
Other path(s) within the association will be used. |
|
summary of remedial action |
Correct configuration or resolve network failure. |
associationUnresolvable
This alarm is raised whenever an association is detected to be configured with an unresolvable remote address. This alarm will be cleared whenever a connect attempt is made using any address on the association and the unresolvable address has since become resolvable. It may also be cleared if the connection is disabled and the address has become unresolvable.
Since automatic clearing of the alarm is dependent upon association activity (reconnect attempts or disabling) this may not happen for some time - for example if there are alternate addresses and one of those was used for a successful connect. In this case the user may prefer to clear the alarm manually.
The following table shows the basic attributes raised as part of this alarm.
| Attribute | Description | Values of constants |
|---|---|---|
|
unique alarm identifier |
|
|
name of alarm type |
|
|
alarm severity |
|
|
timestamp when the event occurred |
|
|
short alarm description |
|
Additionally, the parameters attribute is a basic attribute consisting of a comma-separated list of key=value pairs containing the following alarm-specific parameters:
| Attribute | Description |
|---|---|
|
name of affected connection |
|
the peer address which could not be resolved |
This alarm’s extended attributes have the following fixed values:
| Attribute | Description | Value |
|---|---|---|
|
long alarm description |
This alarm is raised whenever an association is detected to be configured with an unresolvable remote address. This alarm will be cleared whenever a connect attempt is made using any address on the association and the unresolvable address has since become resolvable. It may also be cleared if the connection is disabled and the address has become unresolvable. |
|
possible alarm causes |
An association has been configured with an unresolvable remote address. |
|
potential consequences |
If this is the only address on the association, then the association will be DOWN. If other resolvable addresses exist, one of these will be used to establish the association. |
|
summary of remedial action |
Correct configuration or resolve network failure (e.g. DNS lookup). |
dpcRestricted
This alarm is raised when the SGC receives a Destination Restricted message from its remote SGP or IPSP peer for a remote destination point code. It is cleared when the DPC restricted state abates on a particular SCTP association.
The following table shows the basic attributes raised as part of this alarm.
| Attribute | Description | Values of constants |
|---|---|---|
|
unique alarm identifier |
|
|
name of alarm type |
|
|
alarm severity |
|
|
timestamp when the event occurred |
|
|
short alarm description |
|
Additionally, the parameters attribute is a basic attribute consisting of a comma-separated list of key=value pairs containing the following alarm-specific parameters:
| Attribute | Description |
|---|---|
|
the affected AS |
|
the affected DPC |
|
name of affected connection |
This alarm’s extended attributes have the following fixed values:
| Attribute | Description | Value |
|---|---|---|
|
long alarm description |
This alarm is raised when the SGC receives a Destination Restricted message from its remote SGP or IPSP peer for a remote destination point code. It is cleared when the DPC restricted state abates on a particular SCTP association. |
|
possible alarm causes |
The remote SGP or IPSP peer has sent a Destination Restricted message to the SGC. |
|
potential consequences |
The SGC will route traffic to the affected DPC via an alternate route if possible. |
|
summary of remedial action |
None at the SGC. |
dpcUnavailable
This alarm is raised when a configured DPC is unreachable through a particular SCTP association. It is cleared when a DPC becomes reachable again through the particular SCTP association.
The following table shows the basic attributes raised as part of this alarm.
| Attribute | Description | Values of constants |
|---|---|---|
|
unique alarm identifier |
|
|
name of alarm type |
|
|
alarm severity |
|
|
timestamp when the event occurred |
|
|
short alarm description |
|
Additionally, the parameters attribute is a basic attribute consisting of a comma-separated list of key=value pairs containing the following alarm-specific parameters:
| Attribute | Description |
|---|---|
|
the affected AS |
|
the affected DPC |
|
name of affected connection |
This alarm’s extended attributes have the following fixed values:
| Attribute | Description | Value |
|---|---|---|
|
long alarm description |
This alarm is raised when a configured DPC is unreachable through a particular SCTP association. It is cleared when a DPC becomes reachable again through the particular SCTP association. |
|
possible alarm causes |
Network failure or misconfiguration. |
|
potential consequences |
The DPC cannot be reached through the affected connection and affected AS. |
|
summary of remedial action |
Correct configuration or resolve network failure. |
mtpCongestion
This alarm is raised whenever a remote MTP reports congestion for an association and a specific destination point code normally reachable through that association. It is cleared when the remote MTP reports that congestion has abated.
The following table shows the basic attributes raised as part of this alarm.
| Attribute | Description | Values of constants |
|---|---|---|
|
unique alarm identifier |
|
|
name of alarm type |
|
|
alarm severity |
|
|
timestamp when the event occurred |
|
|
short alarm description |
|
Additionally, the parameters attribute is a basic attribute consisting of a comma-separated list of key=value pairs containing the following alarm-specific parameters:
| Attribute | Description |
|---|---|
|
name of affected connection |
|
the affected DPC |
|
the reported MTP congestion level (ANSI only) |
This alarm’s extended attributes have the following fixed values:
| Attribute | Description | Value |
|---|---|---|
|
long alarm description |
This alarm is raised whenever a remote MTP reports congestion for an association and a specific destination point code normally reachable through that association. It is cleared when the remote MTP reports that congestion has abated. |
|
possible alarm causes |
The remote MTP has reported congestion. |
|
potential consequences |
Standard MTP congestion procedures are followed. |
|
summary of remedial action |
None; the alarm is automatically cleared when the remote MTP reports abatement. |
SCCP
This section describes Alarms raised by the SCCP subsystem.
sccpLocalSsnProhibited
This alarm is raised whenever all previously connected TCAP stacks (with the CGIN RA) using a particular SSN become disconnected. This is typically caused by either network failure or administrative action (such as deactivating an RA entity in Rhino). It is cleared when at least one TCAP stack configured for the affected SSN connects.
The following table shows the basic attributes raised as part of this alarm.
| Attribute | Description | Values of constants |
|---|---|---|
|
unique alarm identifier |
|
|
name of alarm type |
|
|
alarm severity |
|
|
timestamp when the event occurred |
|
|
short alarm description |
|
Additionally, the parameters attribute is a basic attribute consisting of a comma-separated list of key=value pairs containing the following alarm-specific parameters:
| Attribute | Description |
|---|---|
|
affected SubSystem |
This alarm’s extended attributes have the following fixed values:
| Attribute | Description | Value |
|---|---|---|
|
long alarm description |
This alarm is raised whenever all previously connected TCAP stacks (with the CGIN RA) using a particular SSN become disconnected. This is typically caused by either network failure or administrative action (such as deactivating an RA entity in Rhino). It is cleared when at least one TCAP stack configured for the affected SSN connects. |
|
possible alarm causes |
All TCAP stacks registered for the affected SSN have disconnected. |
|
potential consequences |
Messages received for the affected SSN will follow SCCP return procedures. |
|
summary of remedial action |
Correct network failure or resolve administrative action. |
sccpRemoteNodeCongestion
This alarm is raised whenever a remote SCCP node reports congestion. It is cleared when the congestion abates. This alarm will only be emitted when the sccp-variant in General Configuration is configured for ITU. See mtpCongestion for information on MTP-level congestion notification (SCON/MTP-STATUS) alarms.
The following table shows the basic attributes raised as part of this alarm.
| Attribute | Description | Values of constants |
|---|---|---|
|
unique alarm identifier |
|
|
name of alarm type |
|
|
alarm severity |
|
|
timestamp when the event occurred |
|
|
short alarm description |
|
Additionally, the parameters attribute is a basic attribute consisting of a comma-separated list of key=value pairs containing the following alarm-specific parameters:
| Attribute | Description |
|---|---|
|
affected PointCode |
This alarm’s extended attributes have the following fixed values:
| Attribute | Description | Value |
|---|---|---|
|
long alarm description |
This alarm is raised whenever a remote SCCP node reports congestion. It is cleared when the congestion abates. This alarm will only be emitted when the |
|
possible alarm causes |
The remote SCCP has reported congestion. |
|
potential consequences |
ITU-T SCCP congestion algorithms will be applied to the specified DPC. |
|
summary of remedial action |
None; this alarm is automatically cleared when congestion abates. |
sccpRemoteNodeNotAvailable
This alarm is raised whenever a remote SCCP node becomes unavailable. It is cleared when the remote node becomes available.
The following table shows the basic attributes raised as part of this alarm.
| Attribute | Description | Values of constants |
|---|---|---|
|
unique alarm identifier |
|
|
name of alarm type |
|
|
alarm severity |
|
|
timestamp when the event occurred |
|
|
short alarm description |
|
Additionally, the parameters attribute is a basic attribute consisting of a comma-separated list of key=value pairs containing the following alarm-specific parameters:
| Attribute | Description |
|---|---|
|
affected PointCode |
This alarm’s extended attributes have the following fixed values:
| Attribute | Description | Value |
|---|---|---|
|
long alarm description |
This alarm is raised whenever a remote SCCP node becomes unavailable. It is cleared when the remote node becomes available. |
|
possible alarm causes |
The remote SCCP node has become unavailable. |
|
potential consequences |
The remote SCCP will not have messages sent to it. |
|
summary of remedial action |
None; this alarm is cleared when the remote SCCP becomes available. |
sccpRemoteSsnProhibited
This alarm is raised whenever a remote SCCP node reports that a particular SSN is prohibited. It is cleared when the remote SCCP node reports that the affected SSN is available.
The following table shows the basic attributes raised as part of this alarm.
| Attribute | Description | Values of constants |
|---|---|---|
|
unique alarm identifier |
|
|
name of alarm type |
|
|
alarm severity |
|
|
timestamp when the event occurred |
|
|
short alarm description |
|
Additionally, the parameters attribute is a basic attribute consisting of a comma-separated list of key=value pairs containing the following alarm-specific parameters:
| Attribute | Description |
|---|---|
|
affected PointCode |
|
affected SubSystem |
This alarm’s extended attributes have the following fixed values:
| Attribute | Description | Value |
|---|---|---|
|
long alarm description |
This alarm is raised whenever a remote SCCP node reports that a particular SSN is prohibited. It is cleared when the remote SCCP node reports that the affected SSN is available. |
|
possible alarm causes |
The remote SCCP has reported the affected SSN to be prohibited. |
|
potential consequences |
The affected SSN at the affected point code will not have messages sent to it. |
|
summary of remedial action |
None; this alarm is cleared when the remote SCCP reports that the affected SSN is available. |
Notifications
What are SS7 SGC notifications?
Notifications in the SS7 SGC stack alert the administrator about infrequent major events. Subsystems in the SS7 SGC stack emit notifications upon detecting an error condition or an event of high importance.
Management clients may use either Java JMX MBean or SNMP trap/notifications to receive notifications emitted by the SS7 SGC stack.
Below are descriptions of:
You can review the history of emitted notifications using commands exposed by the Command-Line Management Console, which is distributed with the SGC SS7 stack.
How are notifications different from alarms?
Notifications are very similar to Alarms in the SGC stack:
-
Notifications have attributes (general and notification type-specific attributes).
-
The SGC stack stores a history of emitted notifications.
| |
The difference is that notifications are emitted (sent) whenever a particular event occurs; and there is no notion of active notifications or a notification being cleared. |
Generic notification attributes
Notification attributes represent information about events that result in a notification being emitted. Each notification type has the following generic attributes, plus a group of attributes specific to that notification type (described in the following sections).
| Attribute | Description |
|---|---|
|
|
unique notification identifier |
|
|
name of notification type |
|
|
notification severity:
|
|
|
timestamp when the event occurred |
|
|
comma-separated list of |
|
|
short description of the notification |
|
|
longer description of the notification. |
Notification types
This section describes all notification types that can be emitted by the SGC cluster:
mtpDecodeErrors
This notification contains information about the number of badly formatted messages at the MTP layer and the number of messages directed to an unsupported MTP user. This notification is emitted periodically, with a summary of the number of errors in that period. It is not emitted if there are no errors.
The following table shows the basic attributes emitted with this notification:
| Attribute | Description | Values of constants |
|---|---|---|
|
unique notification identifier |
|
|
name of notification type |
|
|
notification severity |
|
|
timestamp when the event occurred |
|
|
short description of the notification |
|
Additionally, the parameters attribute is a basic attribute consisting of a comma-separated list of key=value pairs containing the following notification-specific parameters:
| Attribute | Description |
|---|---|
|
the affected node |
|
name of affected connection |
|
number of message decode failures during report interval |
|
number of messages with unsupported user part during report interval |
This notification’s extended parameters have the following fixed values:
| Attribute | Description | Value |
|---|---|---|
|
long description of the notification |
This notification contains information about the number of badly formatted messages at the MTP layer and the number of messages directed to an unsupported MTP user. This notification is emitted periodically, with a summary of the number of errors in that period. It is not emitted if there are no errors. |
sccpDecodeErrors
This notification contains information about the number of badly formatted messages at the SCCP layer and the number of messages directed to a prohibited SSN. This notification is emitted periodically, with a summary of the number of errors in that period. It is not emitted if there are no errors.
The following table shows the basic attributes emitted with this notification:
| Attribute | Description | Values of constants |
|---|---|---|
|
unique notification identifier |
|
|
name of notification type |
|
|
notification severity |
|
|
timestamp when the event occurred |
|
|
short description of the notification |
|
Additionally, the parameters attribute is a basic attribute consisting of a comma-separated list of key=value pairs containing the following notification-specific parameters:
| Attribute | Description |
|---|---|
|
affected node |
|
number of message decode failures during report interval |
|
number of messages directed to prohibited SSN during report interval |
This notification’s extended parameters have the following fixed values:
| Attribute | Description | Value |
|---|---|---|
|
long description of the notification |
This notification contains information about the number of badly formatted messages at the SCCP layer and the number of messages directed to a prohibited SSN. This notification is emitted periodically, with a summary of the number of errors in that period. It is not emitted if there are no errors. |
tcapDecodeErrors
This notification contains information about the number of badly formatted TCAP messages and the number of messages that the SGC is unable to forward to a TCAP stack (CGIN RA). This notification is emitted periodically, with a summary of the number of errors in that period. It is not emitted if there are no errors.
The following table shows the basic attributes emitted with this notification:
| Attribute | Description | Values of constants |
|---|---|---|
|
unique notification identifier |
|
|
name of notification type |
|
|
notification severity |
|
|
timestamp when the event occurred |
|
|
short description of the notification |
|
Additionally, the parameters attribute is a basic attribute consisting of a comma-separated list of key=value pairs containing the following notification-specific parameters:
| Attribute | Description |
|---|---|
|
affected node |
|
number of message decode failures during report interval |
|
number of messages that the SGC was unable to forward to a TCAP stack |
This notification’s extended parameters have the following fixed values:
| Attribute | Description | Value |
|---|---|---|
|
long description of the notification |
This notification contains information about the number of badly formatted TCAP messages and the number of messages that the SGC is unable to forward to a TCAP stack (CGIN RA). This notification is emitted periodically, with a summary of the number of errors in that period. It is not emitted if there are no errors. |
tcapStackRegister
This notification is emitted whenever a TCAP stack registers with the SGC.
The following table shows the basic attributes emitted with this notification:
| Attribute | Description | Values of constants |
|---|---|---|
|
unique notification identifier |
|
|
name of notification type |
|
|
notification severity |
|
|
timestamp when the event occurred |
|
|
short description of the notification |
|
Additionally, the parameters attribute is a basic attribute consisting of a comma-separated list of key=value pairs containing the following notification-specific parameters:
| Attribute | Description |
|---|---|
|
registered SSN |
|
affected node |
|
IP address of the stack |
|
allocated transaction prefix |
This notification’s extended parameters have the following fixed values:
| Attribute | Description | Value |
|---|---|---|
|
long description of the notification |
This notification is emitted whenever a TCAP stack registers with the SGC. |
tcapStackUnregister
This notification is emitted whenever a TCAP stack deregisters from the SGC.
The following table shows the basic attributes emitted with this notification:
| Attribute | Description | Values of constants |
|---|---|---|
|
unique notification identifier |
|
|
name of notification type |
|
|
notification severity |
|
|
timestamp when the event occurred |
|
|
short description of the notification |
|
Additionally, the parameters attribute is a basic attribute consisting of a comma-separated list of key=value pairs containing the following notification-specific parameters:
| Attribute | Description |
|---|---|
|
registered SSN |
|
affected node |
|
IP address of the stack |
|
allocated transaction prefix |
This notification’s extended parameters have the following fixed values:
| Attribute | Description | Value |
|---|---|---|
|
long description of the notification |
This notification is emitted whenever a TCAP stack deregisters from the SGC. |
Statistics
What are SS7 SGC statistics?
Statistics are usage, status, and health information exposed by the SS7 SGC stack. Each layer of the SS7 SGC stack exposes a set of statistics that provide insight into the current operational state of the cluster. The statistics data is available cluster-wide, independent of which particular node happens to be responsible for gathering a particular set of statistics.
| |
Statistics update interval
To maximize performance, statistics exposed by SGC cluster nodes are updated periodically (every 1 second). So any management tools polling SGC statistics should use a polling interval that is |
The SGC statistics subsystem collects multiple types of statistical data, which can be separated in two broad categories:
-
frequently updated statistic data types:
-
counter — monotonically increasing integer values; for example the number of received messages
-
gauge — the amount of a particular object or item, which can increase and decrease within some arbitrary bound, typically between
0and some positive number; for example, the number of processing threads in a worker group.
-
-
character values that can change infrequently or not at all; these include:
-
identifying information — usually a name of an object for which a set of statistics is gathered; for example, the name of a node
-
status information — information about the state of a given configuration object; for example, the SCTP association state
ESTABLISHED.
-
The SGC statistics subsystem is queried using commands exposed by the Command-Line Management Console, which is distributed with SGC SS7 Stack.
Statistics
Below are details of the exposed subsystem-specific statistics:
M3UA
The M3UA layer exposes statistical data about AS, Association, and DPC.
| |
The JMX Object name for M3UA statistics is SGC:module=m3ua,type=info |
AsInfo
The set of configured Application Servers currently associated with connections.
| Statistic | Description |
|---|---|
|
|
number of received messages directed to this AS through a particular connection |
|
|
number of sent messages originating from this AS through a particular connection |
|
|
name of the AS |
|
|
name of the connection |
|
|
name of the node |
|
|
status of this AS as seen through a particular connection |
| |
This information is also exposed through multiple MBeans named SGC:type=info,module=m3ua,elem=AsInfo,id=CONNECTION_NAME&AS_NAME, where id is a concatenation of the relevant connection and AS names. |
AssociationInfo
The set of SCTP associations defined within the cluster.
| Statistic | Description |
|---|---|
|
|
number of received M3UA Payload Data Messages |
|
|
number of received M3UA Management Error Messages |
|
|
number of received M3UA Messages |
|
|
number of transmitted M3UA Payload Data Messages |
|
|
number of transmitted M3UA Management Error Messages |
|
|
number of transmitted M3UA Messages |
|
|
name of connection |
|
|
name of node |
|
|
number of input streams |
|
|
number of output streams |
|
|
number of messages waiting to be written into SCTP association |
|
|
peer IP addresses |
|
|
socket options associated with an SCTP channel |
|
|
status of this connection |
| |
This information is also exposed through multiple MBeans named SGC:type=info,module=m3ua,associationInfo,id=CONNECTION_NAME, where id is the name of the relevant connection. |
DpcInfo
The set of Destination Point Codes that are associated with connections at this point in time.
| Statistic | Description |
|---|---|
|
|
name of connection |
|
|
destination point code |
|
|
name of DPC |
|
|
status of this DPC |
|
|
ANSI SCCP only: the MTP congestion level (possible values: |
| |
This information is also exposed through multiple MBeans named SGC:type=info,module=m3ua,dpcInfo,id=CONNECTION_NAME&DPC, where id is a concatenation of the relevant connection name and DPC. |
SCCP
The SCCP layer exposes statistic data about the local SSN, GT translation rules (outgoing), PC routing, remote SSN, SCCP messages and SCCP errors.
| |
The JMX Object name for SCCP statistics is SGC:module=sccp,type=info |
LocalSsnInfo
The set of local SSN; that is, TCAP Stacks (CGIN RAs, scenario simulators) connected to the cluster representing particular SSNs.
| Statistic | Description |
|---|---|
|
|
number of messages received by the SSN |
|
|
number of messages originated by the SSN |
|
|
local SSN |
|
|
status of this SSN |
|
|
number of N-UNITDATA req primitives received by the SSN |
|
|
number of segmentation failures at this SSN |
|
|
number of N-UNITDATA ind primitives received by this SSN |
|
|
number of reassembled N-UNITDATA ind primitives received by this SSN |
|
|
number of reassembly failures at this SSN |
| |
This information is also exposed through multiple MBeans named SGC:type=info,module=sccp,elem=LocalSsnInfo,ssn=SSN_NUMBER, where ssn is the value of the relevant local SSN. |
OgtInfo
The set of Global Title translation rules currently used for outgoing messages. Different translation rules might be in effect at the same time on different nodes, depending on the prefer-local attribute of the outgoing-gtt configuration object.
The set of currently used translation rules depends on:
-
the priority attribute of the
outgoing-gttconfiguration object -
the priority attribute of the
routeconfiguration object -
DPC reachability status (GT translations that result in unreachable DPC are ignored).
| |
Local cluster PC
Entries with an empty |
| |
See also
|
| Statistic | Description |
|---|---|
|
|
address string |
|
|
values of attributes |
|
|
name of connection on which messages with matching GT will be transmitted |
|
|
destination point code to which messages with matching GT will be transmitted |
|
|
name of the node on which translation rule is used |
|
|
routing context which will be used when transmitting messages with matching GT |
|
|
name of node where SCTP connection is established |
PcInfo
The set of associations and RCs across which traffic for a given DPC are currently load balanced by each node.
| |
Local cluster PC
Entries with an empty |
| Statistic | Description |
|---|---|
|
|
name of DPC |
|
|
name of connection on which messages with matching DPC will be transmitted |
|
|
destination point code |
|
|
name of node where connection is established |
|
|
routing context which will be used when transmitting messages with matching DPC |
|
|
(ANSI SCCP only) MTP congestion level |
RemoteSsnInfo
The set of remote SSNs for which their status is known.
| Statistic | Description |
|---|---|
|
|
destination point code |
|
|
remote SSN |
|
|
status of this SSN |
SccpStats
Statistics for SCCP messages received and sent by local SSN.
| Statistic | Description |
|---|---|
|
|
local SSN |
|
|
number of UDT messages sent by this SSN |
|
|
number of UDT messages received by this SSN |
|
|
number of XUDT messages sent by this SSN |
|
|
number of XUDT messages received by this SSN |
|
|
number of LUDT messages received by this SSN |
|
|
number of UDTS messages sent by this SSN |
|
|
number of UDTS messages received by this SSN |
|
|
number of XUDTS messages sent by this SSN |
|
|
number of XUDTS messages received by this SSN |
|
|
number of LUDTS messages sent by this SSN |
|
|
number of LUDTS messages received by this SSN |
|
|
number of XUDT messages sent by this SSN with a segmentation parameter |
|
|
number of XUDT messages received by this SSN with a segmentation parameter |
|
|
number of XUDT messages sent by this SSN without a segmentation parameter |
|
|
number of XUDT messages received by this SSN without a segmentation parameter |
SccpErrorStats
Statistics for SCCP ReturnCauses received and sent by local SSN.
| Statistic | Description |
|---|---|
|
|
local SSN |
|
|
number of NO_TRANSLATION_FOR_ADDR_OF_SUCH_NATURE SCCP return causes sent by this SSN |
|
|
number of NO_TRANSLATION_FOR_SPECIFIC_ADDR SCCP return causes sent by this SSN |
|
|
number of SUBSYSTEM_CONGESTION SCCP return causes sent by this SSN |
|
|
number of SUBSYSTEM_FAILURE SCCP return causes sent by this SSN |
|
|
number of UNEQUIPPED_USER SCCP return causes sent by this SSN |
|
|
number of MTP_FAILURE SCCP return causes sent by this SSN |
|
|
number of NETWORK_CONGESTION SCCP return causes sent by this SSN |
|
|
number of UNQUALIFIED SCCP return causes sent by this SSN |
|
|
number of ERROR_IN_MESSAGE_TRANSPORT SCCP return causes sent by this SSN |
|
|
number of DESTINATION_CANNOT_PERFORM_REASSEMBLY SCCP return causes sent by this SSN |
|
|
number of SCCP_FAILURE SCCP return causes sent by this SSN |
|
|
number of HOP_COUNTER_VIOLATION SCCP return causes sent by this SSN |
|
|
number of SEGMENTATION_NOT_SUPPORTED SCCP return causes sent by this SSN |
|
|
number of SEGMENTATION_FAILURE SCCP return causes sent by this SSN |
|
|
number of other SCCP return causes sent by this SSN |
|
|
number of NO_TRANSLATION_FOR_ADDR_OF_SUCH_NATURE SCCP return causes received by this SSN |
|
|
number of NO_TRANSLATION_FOR_SPECIFIC_ADDR SCCP return causes received by this SSN |
|
|
number of SUBSYSTEM_CONGESTION SCCP return causes received by this SSN |
|
|
number of SUBSYSTEM_FAILURE SCCP return causes received by this SSN |
|
|
number of UNEQUIPPED_USER SCCP return causes received by this SSN |
|
|
number of MTP_FAILURE SCCP return causes received by this SSN |
|
|
number of NETWORK_CONGESTION SCCP return causes received by this SSN |
|
|
number of UNQUALIFIED SCCP return causes received by this SSN |
|
|
number of ERROR_IN_MESSAGE_TRANSPORT SCCP return causes received by this SSN |
|
|
number of DESTINATION_CANNOT_PERFORM_REASSEMBLY SCCP return causes received by this SSN |
|
|
number of SCCP_FAILURE SCCP return causes received by this SSN |
|
|
number of HOP_COUNTER_VIOLATION SCCP return causes received by this SSN |
|
|
number of SEGMENTATION_NOT_SUPPORTED SCCP return causes received by this SSN |
|
|
number of SEGMENTATION_FAILURE SCCP return causes received by this SSN |
|
|
number of other SCCP return causes received by this SSN |
TCAP
The TCAP layer exposes statistics data about connected TCAP Stacks.
| |
The JMX Object name for TCAP statistics is SGC:module=tcap,type=info |
TcapConnInfo
The set of connected TCAP stacks (such as the CGIN RA).
| Statistic | Description |
|---|---|
|
|
number of messages waiting to be written into the TCP connection |
|
|
number of messages directed from SGC to TCAP stack |
|
|
number of messages directed from TCAP stack to SGC |
|
|
time and date when connection was established |
|
|
local SGC IP used by connection |
|
|
local SGC port used by connection |
|
|
transaction prefix assigned to TCAP stack |
|
|
IP from which TCAP stack originated connection to SGC |
|
|
port from which TCAP stack originated connection to SGC |
|
|
node name to which TCAP stack is connected |
|
|
SSN that TCAP stack is representing |
|
|
current connection status: |
|
|
the identity of the connected TCAP stack |
|
|
the migrated prefixes that this stack is handling in addition to its own |
| |
This information is also exposed through multiple MBeans named SGC:type=info,module=tcap,elem=TcapConnInfo,ssn=SSN_NUMBER,prefix=ASSIGNED_PREFIX, where ssn is the SSN represented by the connected TCAP stack, and prefix is the transaction-ID prefix assigned to the connected TCAP stack. |
ITUTcapStats
Statistics for ITU-T (Q.77x) TCAP messages sent and received by the local SSN.
| Statistic | Description |
|---|---|
|
|
local SSN |
|
|
number of TC-BEGIN messages sent by the SSN |
|
|
number of TC-BEGIN messages received by the SSN |
|
|
number of TC-CONTINUE messages sent by the SSN |
|
|
number of TC-CONTINUE messages received by the SSN |
|
|
number of TC-END messages sent by the SSN |
|
|
number of TC-END messages received by the SSN |
|
|
number of TC-ABORT messages sent by the SSN |
|
|
number of TC-ABORT messages received by the SSN |
|
|
number of TC-UNI messages sent by the SSN |
|
|
number of TC-UNI messages received by the SSN |
ANSITcapStats
Statistics for ANSI (T1.114) TCAP messages sent and received by the local SSN.
| Statistic | Description |
|---|---|
|
|
local SSN |
|
|
number of QueryWithPermission messages sent by the SSN |
|
|
number of QueryWithPermission messages received by the SSN |
|
|
number of QueryWithoutPermission messages sent by the SSN |
|
|
number of QueryWithoutPermission messages received by the SSN |
|
|
number of ConversationWithPermission messages sent by the SSN |
|
|
number of ConversationWithPermission messages received by the SSN |
|
|
number of ConversationWithoutPermission messages sent by the SSN |
|
|
number of ConversationWithoutPermission messages received by the SSN |
|
|
number of Response messages sent by the SSN |
|
|
number of Response messages received by the SSN |
|
|
number of Abort messages sent by the SSN |
|
|
number of Abort messages received by the SSN |
|
|
number of Uni messages sent by the SSN |
|
|
number of Uni messages received by the SSN |
TcapErrorStats
Statistics for TCAP (ITU-T Q.77x and ANSI T1.114) processing errors by SSN.
| Statistic | Description |
|---|---|
|
|
local SSN |
|
|
number of UNRECOGNIZED_TRANSACTION_ID errors generated within the SGC’s TCAP stack for this SSN |
|
|
number of SSN_NOT_FOUND errors generated within the SGC’s TCAP stack for this SSN |
|
|
number of RESOURCE_LIMITATION errors generated within the SGC’s TCAP stack for this SSN |
|
|
number of DECODE_FAILURE errors generated within the SGC`s TCAP stack for this SSN |
|
|
number of DESTINATION_TRANSACTION_ID_DECODE_FAILURE errors generated within the SGC’s TCAP stack for this SSN |
TOP
The SGC node processing-load statistics information.
| |
The JMX Object name for TOP statistics is SGC:module=top,type=info |
HealthInfo
The set of current load-processing statistics for nodes in the cluster.
| Statistic | Description |
|---|---|
|
|
number of allocated task objects, each of which represents an incoming message that may be processing or waiting to be processed |
|
|
number of allocated task objects, each of which represents an outgoing message that may be processing or waiting to be processed |
|
|
cumulative number of tasks representing incoming or outgoing messages that have finished processing |
|
|
cumulative wall-clock time in milliseconds that tasks representing incoming or outgoing messages were in the allocated state |
|
|
number of background tasks mainly related to the SCCP management state, queued for execution nodeId name of node |
|
|
cumulative number of tasks (for incoming or outgoing messages) processed by worker threads |
|
|
cumulative wall-clock time in miliseconds spent by worker threads processing tasks (for incoming or outgoing messages) |
|
|
number of worker threads used to process tasks (for incoming or outgoing messages) |
|
|
cumulative number of task objects that had to be force allocated (i.e. not from the task pool) in order to process incoming messages |
|
|
cumulative number of task objects that had to be forced allocated (i.e. not from the task pool) in order to process outgoing messages |
ClusterVersionInfo
The statistics showing the current cluster version and state.
| Statistic | Description |
|---|---|
|
|
the name of the SGC cluster |
|
|
the current cluster mode: |
|
|
the current cluster data format |
|
|
the target cluster format, relevant only in |
|
|
the original cluster format, relevant only when not in |
NodeVersionInfo
The statistics showing each node’s version.
| Statistic | Description |
|---|---|
|
|
the name of the SGC node |
|
|
the SGC’s UUID |
|
|
the SGC version running on the node |
|
|
the SGC’s native distributed data format |
|
|
the distributed data formats supported by the SGC |
Logging
About the Logging subsystem
The Logging subsystem in the SGC Stack is based on the Simple Logging Facade for Java (SLF4J), which serves as a simple facade or abstraction for various logging frameworks, such as java.util.logging, logback, and log4j. SLF4J allows the end user to plug in the desired logging framework at deployment time. That said, the standard SGC Stack distribution uses SLF4J backed with the Apache Log4J logging architecture (version 1.x).
By default, the SGC stack outputs a minimal set of information, which will be used before the logging subsystem has been properly initialized, or when a severe error includes a logging subsystem malfunction. The default start-up script for the SGC stack redirects the standard output to SGC_HOME/logs/startup.<timestamp>, where <timestamp> denotes the SGC start time. This file is rolled over after reaching a size of 100 MB, with at most 10 backups.
| |
SGC_HOME
SGC_HOME here represents the path to the SGC Stack installation directory. |
Logger names, levels and appenders
Log4J logging architecture includes logger names, log levels, and log appenders.
Logger names
Subsystems within the SGC stack send log messages to specific loggers. For example, the alarming.log logger receives messages about alarms being raised.
Examples of logger names include:
-
root— the root logger, from which all loggers are derived (can be used to change the log level for all loggers at once) -
com.cts.ss7.SGCShutdownHook— for log messages related to the SGC shutdown process -
com.cts.ss7.sccp.layer.scmg.SccpManagement— for log messages related to incoming SCCP management messages.
Log levels
Log levels can be assigned to individual loggers to filter how much information the SGC produces:
| Log level | Information sent |
|---|---|
|
|
no messages sent to logs (not recommended) |
|
|
error messages for unrecoverable errors only (not recommended) |
|
|
error messages (not recommended) |
|
|
warning messages |
|
|
informational messages (the default) |
|
|
messages containing useful debugging information |
|
|
messages containing verbose debugging information |
Each log level will log all messages for that log level and above. For example, if a logger is set to the WARN level, all of the log messages logged at the WARN, ERROR, and FATAL levels will be logged as well.
If a logger is not assigned a log level, it inherits its parent’s. For example, if the com.cts.ss7.SGCShutdownHook logger has not been assigned a log level, it will have the same effective log level as the com.cts.ss7 logger.
The root logger is a special logger which is considered the parent of all other loggers. By default, the root logger is configured with the DEBUG log level, but the com logger parent of all loggers used by SGC overwrites it to the WARN log level. In this way, all other SGC loggers will output log messages at the WARN log level or above unless explicitly configured otherwise.
Log appenders
Log appenders append log messages to destinations such as the console, a log file, socket, or Unix syslog daemon. At runtime, when SGC logs a message (as permitted by the log level of the associated logger), SGC sends the message to the log appender for writing. Types of log appenders include:
-
file appenders — which append messages to files (and may be rolling file appenders)
-
console appenders — which send messages to the standard out
-
custom appenders — which you configure to receive only messages for particular loggers.
Rolling file appenders
Typically, to manage disk usage, administrators are interested in sending log messages to a set of rolling files. They do this by setting up rolling file appenders which:
-
create new log files based on file size / daily / hourly
-
rename old log files as numbered backups
-
delete old logs when a certain number of them have been archived
| |
You can configure the size and number of rolled-over log files. |
Default logging configuration
The default SGC Stack logging configuration is an XML file, in a format supported by Log4J, loaded during SGC startup. The default configuration is stored in SGC_HOME/config/log4j.xml. The related DTD file is stored in SGC_HOME/config/log4j.dtd.
| |
For more information on Log4J and Log4J XML-based configuration, please see: |
Default appenders
The SGC Stack comes configured with the following appenders:
| Appender | Where it sends messages | Logger name | Type of appender | ||
|---|---|---|---|---|---|
|
|
the SGC logs directory ( |
|
a rolling file appender |
||
|
|
the SGC console where a node is running (to standard output stream)
|
|
a console appender |
JMX MBean Naming Structure
| |
MBeans exposing operational state
SS7 SGC Stack operational state is exposed through a set of JMX MBeans. Description of these MBeans and their naming conventions might be of interest to a user wishing to create a custom management tool for the SGC stack. |
Instance Management MBean
Each instance (node) of the SS7 SGC Stack exposes information that can be used to check the current instance configuration properties.
| |
The JMX Object name for the MBean exposing this information is SGC:type=local. |
This bean exposes following attribute and operations.
Properties attribute
The properties attribute is a collection of records. Each such record represents runtime properties of the currently connected SGC Stack instance (that is, the instance to which the JMX management client is connected). For more about instance configuration, please see Configuring the SS7 SGC Stack. Below are properties record fields:
| Name | Description |
|---|---|
|
|
property key |
|
|
property description |
|
|
value used if |
Operations
The results of JMX MBean operations invoked on the instance-management bean are local to the currently connected SGC Stack instance (that is, the instance to which the JMX management client is connected).
| Name | Description | ||
|---|---|---|---|
|
|
tests if the JMX RMI connector of the currently connected SGC Stack responds to the invocation of a JMX MBean operation |
||
|
|
attempts to shutdown the currently connected SGC Stack instance
|
Alarm MBean naming structure
Every type of alarm used by the SS7 SGC stack is represented by a separate MBean. The names of MBeans for SGC alarms use the common domain SGC and this set of properties: type, subtype, name. The values of type and subtype are the same for all alarm MBeans; the value of the name property represents a type of alarm. Whenever an actual alarm of a given type is raised, a new MBean representing that instance of the alarm is created. The name of that MBean has an additional property, id, which uniquely identifies that alarm instance in the SGC cluster.
For example, an alarm type representing information about an SCTP association (connection) going down has the MBean name SGC:type=alarming,subtype=alarm,name=associationDown. Whenever a particular association is down, the MBean representing the error condition for that particular association is created with a name such as SGC:type=alarming,subtype=alarm,name=associationDown,id=302, where the id property value is unique among all alarms in the cluster.
Most GUI-based JMX Management tools represent the naming space as a tree of MBean objects, like this:
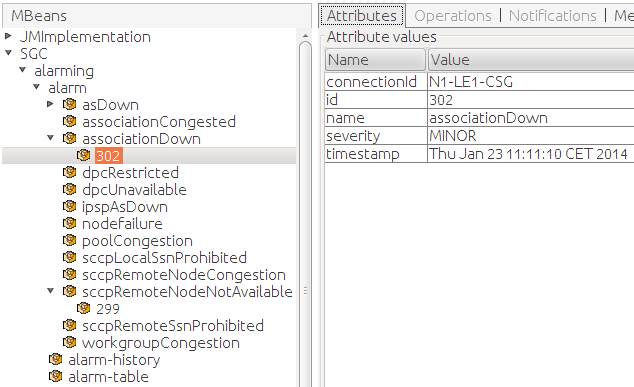
Alarm raised and cleared notifications
Whenever SGC raises or clears an alarm, a JMX notification is emitted. To be notified of such events, each MBean representing an alarm type supports alarm.onset and alarm.clear notifications. An administrator can use a JMX management tool and subscribe to such events for each alarm type.
Here’s an example view of a JMX Management tool reporting received notifications:
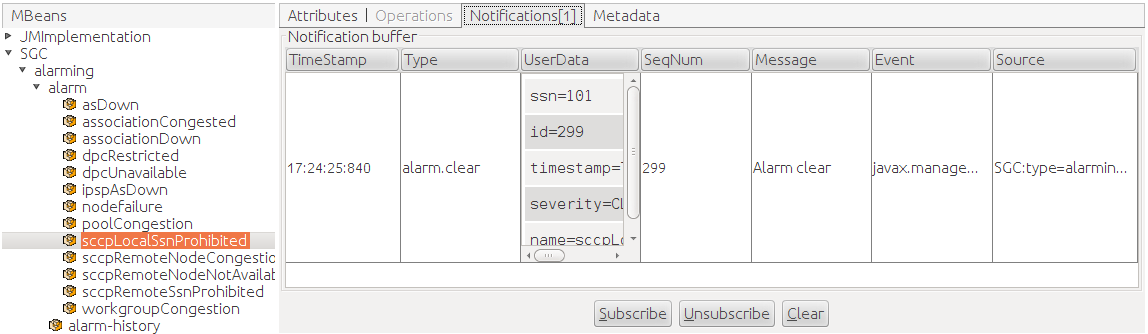
Active alarms and alarm history
Besides alarm type-specific MBeans, the SS7 SGC stack exposes two generic MBeans that enable review of active alarms and history of alarms that where raised and subsequently cleared during cluster operation:
-
SGC:type=alarming,subtype=alarm-table— currently active alarms -
SGC:type=alarming,subtype=alarm-history— history of alarms
Alarm Table
The Alarm Table MBean contains a single attribute, EventList, which is a list of records representing attributes of currently active alarms. Alarm type-specific attributes are represented within a single parameters column.
Here’s an example view of Alarm Table MBean attributes in a JMX management tool:
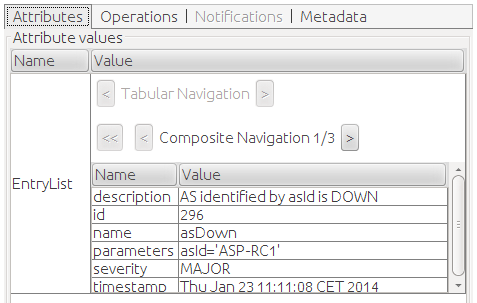
The Alarm Table MBean exposes a clearAlarm operation that can be used to clear any raised alarm based on its id.
Alarm History
The Alarm History MBean contains a single attribute, AlarmHistory, which is a list of records representing attributes of raised and optionally cleared alarms within the last 24 hours (This period is customizable, as described in Configuring the SS7 SGC Stack). Alarm type-specific attributes are represented within a single parameters column. For each alarm that was raised and subsequently cleared, there are two records available in the list: one is generated when the alarm is raised (with a severity value other than CLEARED); the second record is generated when the alarm is cleared (with a severity value of CLEARED).
Information concerning notifications is also recorded in the Alarm History MBean.
The Alarm History MBean exposes a clear operation that can be used to clear all entries stored in the alarm history.
Notification MBean naming structure
Every type of notification used by the SS7 SGC stack is emitted by a separate MBean. SGC-alarm MBean names use the common domain SGC, and this set of properties: type, subtype, name. Values of type and subtype are the same for all notification MBeans; the value of the name property represents a type of notification.
For example, the MBean type emitting notifications about incoming SCCP-message decoding errors is represented by this MBean name: SGC:type=alarming,subtype=notif,name=sccpDecodeErrors. Whenever there is an error during decoding of an SCCP message, a JMX notification is emitted by this MBean. (Actually, for this specific notification, a single notification summarizes multiple errors over a specific time interval.)
Most GUI-based JMX Management tools represent the notification naming space as a tree of MBean objects, like this:
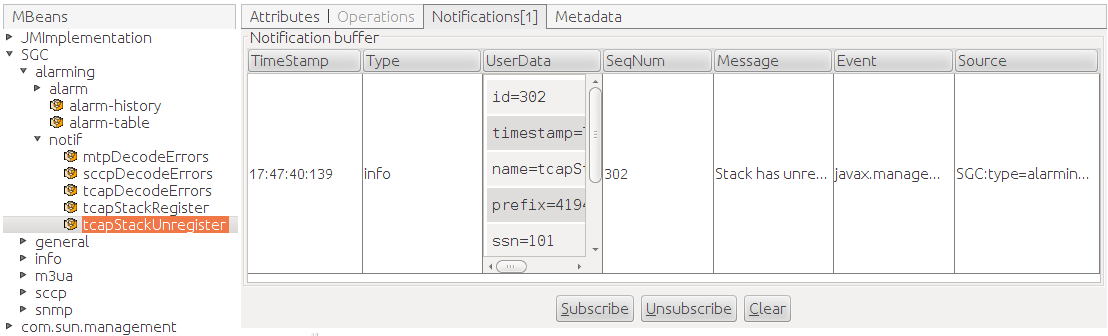
Statistics MBean naming structure
SGC statistics are exposed through a set of JMX Management MBeans. This section describes the MBean naming structure of subsystem statistics and processing object-specific statistics.
Subsystem statistics
SGC stack subsystems expose multiple JMX MBeans containing statistical information. SGC statistics MBeans names use the common domain SGC and this set of properties: module, type. The value of type is the same for all statistics MBeans; the value of the module property represents a subsystem. Attributes of these beans are arrays of records; each record contains statistical information related to a processing object configured within the SGC cluster (such as a particular SCTP association).
For example, the statistics MBean representing information about the M3UA subsystem (layer) is represented by the MBean named SGC:module=m3ua,type=info. This MBean has (among others) the attribute DpcInfo, which contains information about DPC (destination point code) reachability through a particular connection; for example:
| Attribute | Value |
|---|---|
|
|
|
|
|
|
|
|
|
|
|
|
Most GUI-based JMX Management tools represent the naming space as a tree of MBean objects, like this:
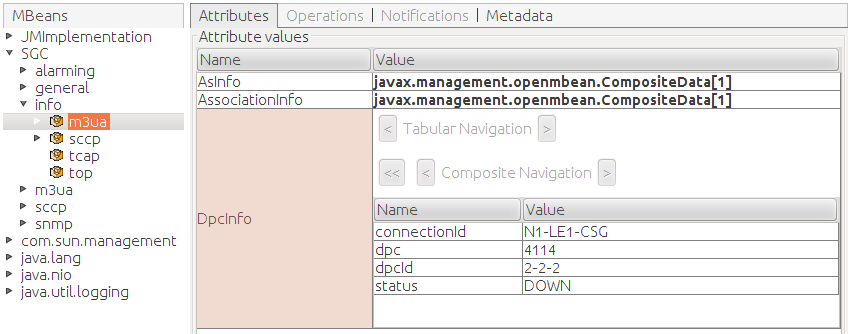
Processing object-specific statistics
The SGC stack also exposes processing object-specific MBeans, such as an MBean containing statistics created for each connection. Information exposed through such MBeans is exactly equivalent to that exposed through subsystem statistic MBeans. SGC processing object-specific MBean names use the common domain SGC and this set of properties: module, type, element, id.
-
The value of
typeis the same for all statistics MBeans. -
The value of
modulerepresents a subsystem. -
The value of
elemidentifies a group of processing objects of the same type (such as connections or nodes). -
The value of
ididentifies a particular processing object (such as a particular connection or particular node).
For example, the statistics MBean representing information about network reachability for a particular DPC through a particular connection in the M3UA subsystem (layer) is represented the MBean named SGC:type=info,module=m3ua,elem=dpcInfo,id=N1-LE1-CSG&4114. Information exposed through this MBean is exactly the same in the example above:
| Attribute | Value |
|---|---|
|
|
|
|
|
|
|
|
|
|
|
|
Most GUI-based JMX Management tools represent the naming space as a tree of MBean objects, like this:
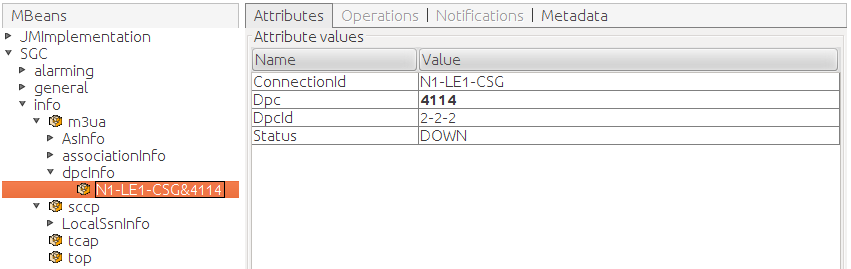
Command-Line Management Console
What is the SGC Stack Command-Line Console?
The SGC Stack Command-Line Management Console is a CLI tool working in interactive and non-interactive mode to manage and configure the SGC Stack cluster. The Command-Line Console uses JMX Beans exposed by the SGC Stack to manage cluster configuration. The command syntax is based on ITU-T MML Recommendations Z.315 and Z.316.
Installation and requirements
Command-Line Console installation requires unpacking the tar.gz archive file in any location. Unpacked, the folder structure is:
| File/Directory | Description |
|---|---|
|
|
SGC CLI installation directory |
|
|
logging configuration and CLI settings file |
|
|
Java libraries used by SGC CLI. |
|
|
log file |
|
|
CLI start-up script |
| |
JAVA_HOME
The SGC CLI start-up script expects the |
Working with the SGC CLI
The SGC CLI should be started by executing the sgc-cli.sh script. Default connection settings point to the SGC JMX Server exposed at:
host: 127.0.0.1
port: 10111
Here is an example of starting the CLI with the default IP and port:
./sgc-cli.sh
Here is an example of starting the CLI with an alternative IP and port setup:
./sgc-cli.sh -h 192.168.1.100 -p 10700
The SGC CLI supports other configuration parameters, which you can display by executing the startup script with the -? or --help options:
usage: sgc-cli.sh [-?] [-b <FILE>] [-h <HOST>] [-P <PASSWORD>] [-p <PORT>]
       [-ssl <true/false>] [-stopOnError <true/false>] [-U <USER>] [-x
       <FILE>]
+-----------------------------Options list-----------------------------+
 -?,--help                                 Displays usage
 -b,--batch <FILE>                         Batch file
 -h,--host <HOST>                          JMX server user
 -P,--pass <PASSWORD>                      JMX password
 -p,--port <PORT>                          JMX server port
 -ssl,--ssl <true/false>                   JMX connection SSL enabled
 -stopOnError,--stopOnError <true/false>   Stop when any error occurs in
                                           batch command
 -U,--user <USER>                          JMX user
 -x,--export <FILE>                        File where the configuration
                                           dump will be saved
+----------------------------------------------------------------------+
Enabling secured JMX server connection
CLI supports secured JMX server connection through the SSL protocol (SSL). It can be enabled in two ways:
-
by specifying the
ssl=trueproperty inconf/cli.properties, -
by adding the configuration parameter
-ssl trueto the start script.
| |
The configuration parameter value takes precedence over the value defined in conf/cli.properties. |
The SSL connection (in both cases) also requires specifying additional properties in the conf/cli.properties file, for the trustStore, keyStore password and location. Below is a sample configuration:
#######################
###SSL configuration###
#######################

#File location relative to conf folder
javax.net.ssl.keyStore=sgc-client.keystore
javax.net.ssl.keyStorePassword=changeit

#File location relative to conf folder
javax.net.ssl.trustStore=sgc-client.keystore
javax.net.ssl.trustStorePassword=changeit
Basic command format
The command syntax is based on ITU-T MML Recommendations Z.315 and Z.316:
command: [parameter-name1=parameter-value1][,parameter-name2=value2]…;
Where:
-
commandis the name of the command to be executed -
parameter-nameis the name of command parameter -
parameter-valueis the value of the command parameter.
| |
Command parameters are separated by commas ( When specifying a command with no parameters, the colon ( The ending semicolon ( |
MML syntax auto-completing
The CLI supports MML syntax auto-completing on the command name and command parameters level. Pressing the <TAB> key after the prompt will display all available command names:
127.0.0.1:10111 I1><TAB_PRESSED>
Display all 111 possibilities? (y or n)
abort-revert                      abort-upgrade                     batch
clear-active-alarm                clear-all-alarms                  complete-revert
complete-upgrade                  create-as                         create-as-connection
create-as-precond                 create-conn-ip                    create-connection
create-cpc                        create-dpc                        create-inbound-gtt
create-local-endpoint             create-local-endpoint-ip          create-node
create-outbound-gt                create-outbound-gtt               create-replace-gt
create-route                      create-snmp-node                  create-target-address
create-usm-user                   disable-as                        disable-connection
disable-local-endpoint            disable-node                      disable-snmp-node
display-active-alarm              display-as                        display-as-connection
display-as-precond                display-conn-ip                   display-connection
display-cpc                       display-dpc                       display-event-history
display-inbound-gtt               display-info-ansitcapstats        display-info-asinfo
display-info-associationinfo      display-info-clusterversioninfo   display-info-dpcinfo
display-info-healthinfo           display-info-itutcapstats         display-info-localssninfo
display-info-nodeversioninfo      display-info-ogtinfo              display-info-pcinfo
display-info-remotessninfo        display-info-sccperrorstats       display-info-sccpstats
display-info-tcapconninfo         display-info-tcaperrorstats       display-local
display-local-endpoint            display-local-endpoint-ip         display-node
display-outbound-gt               display-outbound-gtt              display-parameters
display-replace-gt                display-route                     display-snmp-node
display-target-address            display-usm-user                  enable-as
enable-connection                 enable-local-endpoint             enable-node
enable-snmp-node                  export                            help
modify-as                         modify-as-connection              modify-connection
modify-dpc                        modify-inbound-gtt                modify-local-endpoint
modify-node                       modify-outbound-gt                modify-outbound-gtt
modify-parameters                 modify-replace-gt                 modify-snmp-node
modify-target-address             modify-usm-user                   quit
remove-as                         remove-as-connection              remove-as-precond
remove-conn-ip                    remove-connection                 remove-cpc
remove-dpc                        remove-inbound-gtt                remove-local-endpoint
remove-local-endpoint-ip          remove-node                       remove-outbound-gt
remove-outbound-gtt               remove-replace-gt                 remove-route
remove-snmp-node                  remove-target-address             remove-usm-user
sleep                             start-revert                      start-upgrade
127.0.0.1:10111 I1>
When you press the <TAB> key after providing a command name, the CLI displays all available parameters for that command.
Pressing <TAB> after providing command parameters displays legal values (for enumeration, reference, and boolean parameters). For example:
127.0.0.1:10111 I1> modify-connection: <TAB_PRESSED>
oname=A-CONN-1        oname=B-CONN-1
127.0.0.1:10111 I1> modify-connection: oname=
Help mode
You can access the SGC CLI’s built in help system by either:
-
executing the command
help: topic=topicName -
switching to help mode, by executing the manual
helpcommand (with no parameters).
Help mode displays topics that you can access. (Alternatively, you can press the <TAB> to display available values of a topic command parameter. The list of available topics in manual help mode looks like this:
127.0.0.1:10111 I1> help
Executing help manual...
Use <TAB> to show topic list. Write 'topic name' to see its description. Use exit command if you want to quit the manual.
Hint: 'create-, display-, remove-, modify-, enable-, disable-' operations are described by single topic for given MBean name.
Available topics:

abort-revert                      abort-upgrade                     as
as-connection                     as-precond                        batch
clear-active-alarm                clear-all-alarms                  complete-revert
complete-upgrade                  conn-ip                           connection
cpc                               disable-local                     display-active-alarm
display-event-history             display-info-ansitcapstats        display-info-asinfo
display-info-associationinfo      display-info-clusterversioninfo   display-info-dpcinfo
display-info-healthinfo           display-info-itutcapstats         display-info-localssninfo
display-info-nodeversioninfo      display-info-ogtinfo              display-info-pcinfo
display-info-remotessninfo        display-info-sccperrorstats       display-info-sccpstats
display-info-tcapconninfo         display-info-tcaperrorstats       dpc
exit                              export                            help
inbound-gtt                       local-endpoint                    local-endpoint-ip
node                              outbound-gt                       outbound-gtt
parameters                        replace-gt                        route
sleep                             snmp-node                         start-revert
start-upgrade                     target-address                    usm-user
help>
The result of executing a help topic command looks like this:
127.0.0.1:10111 I1> help: topic=<TAB_PRESSED>
topic=abort-revert                      topic=abort-upgrade                     topic=as
topic=as-connection                     topic=as-precond                        topic=batch
topic=clear-active-alarm                topic=clear-all-alarms                  topic=complete-revert
topic=complete-upgrade                  topic=conn-ip                           topic=connection
topic=cpc                               topic=disable-local                     topic=display-active-alarm
topic=display-event-history             topic=display-info-ansitcapstats        topic=display-info-asinfo
topic=display-info-associationinfo      topic=display-info-clusterversioninfo   topic=display-info-dpcinfo
topic=display-info-healthinfo           topic=display-info-itutcapstats         topic=display-info-localssninfo
topic=display-info-nodeversioninfo      topic=display-info-ogtinfo              topic=display-info-pcinfo
topic=display-info-remotessninfo        topic=display-info-sccperrorstats       topic=display-info-sccpstats
topic=display-info-tcapconninfo         topic=display-info-tcaperrorstats       topic=dpc
topic=exit                              topic=export                            topic=help
topic=inbound-gtt                       topic=local-endpoint                    topic=local-endpoint-ip
topic=node                              topic=outbound-gt                       topic=outbound-gtt
topic=parameters                        topic=replace-gt                        topic=route
topic=sleep                             topic=snmp-node                         topic=start-revert
topic=start-upgrade                     topic=target-address                    topic=usm-user
127.0.0.1:10111 I1> help: topic=conn-ip;
Configuration of IPs for "connection", to make use of SCTP multi-homed feature define multiple IPs for single "connection".
Object conn-ip is defined by the following parameters:
        oname: object name
        ip: IP address
        conn-name: Name of the referenced connection
Supported operations on conn-ip are listed below ({param=x} - mandatory parameter, [param=x] - optional parameter):
        display-conn-ip: [oname=x],[column=x];
        create-conn-ip: {oname=x}, {ip=x}, {conn-name=x};
        remove-conn-ip: {oname=x};
127.0.0.1:10111 I1>
Interactive mode
By default, the CLI starts in interactive mode, which lets the System Administrator execute commands and observe their results through the system terminal. For example, here’s a successfully executed command:
127.0.0.1:10111 I1> display-info-healthinfo: ;
Found 1 object(s):
+---------------+----------+----------+---------------+---------------+---------------+---------------+----------+---------------+---------------+----------+
|nodeId         |allocatedI|allocatedR|forceAllocatedI|forceAllocatedR|workerExecution|workerExecution|workerGrou|contextExecutio|contextExecutio|executorQu|
|               |ndTasks   |eqTasks   |ndTasks        |eqTasks        |Count          |Time           |pSize     |nCount         |nTime          |eueSize   |
+---------------+----------+----------+---------------+---------------+---------------+---------------+----------+---------------+---------------+----------+
|PC1-1          |0         |0         |0              |0              |0              |0              |0         |0              |0              |18        |
+---------------+----------+----------+---------------+---------------+---------------+---------------+----------+---------------+---------------+----------+
127.0.0.1:10111 I1>
Here’s an example of a command that failed:
127.0.0.1:10111 I1> remove-conn-ip: oname=invalidName;
ERROR REMOVE_OBJECT_FAILED: Instance 'SGC:category=conn-ip,type=m3ua,id=invalidName' doesn't exist.
127.0.0.1:10111 I1>
Command result truncation
CLI supports the truncation of command result (cell data) to make the output more convenient (In case of large cell data). This configuration property is defined in the conf/cli.properties file. Following is the property:
table.format.maxCellContentLength=40
| |
See also
Supported CLI Operations |
Supported CLI Operations
SGC CLI commands
SGC CLI commands can be grouped into five sets of commands:
| |
Most CLI operations are executed on the SGC Cluster using JMX management beans. Therefore the CLI requires successful establishment of a JMX connection to the SGC Cluster. |
Management of SGC Stack processing objects
Most processing objects that can be managed within the SGC cluster support a set of CRUD commands. Some processing objects can also be enabled or disabled. Command names are a concatenation of the operation name and processing object name; for example: create-node, display-as, or remove-conn-ip. Generic commands are described below. For a detailed description of operations available for a particular processing object type, please see the SGC CLI built-in help system. The commands for managing processing objects are:
Operation |
What it’s for |
||
|---|---|---|---|
Sample use case |
|||
Examples |
|||
|
|
Creating a new instance of a processing object within the SGC cluster.
|
||
|
Creating a new connection object, which together with conn-ip defines remote the IP address of an SCTP association. |
|||
127.0.0.1:10111 I1> create-connection: ; ERROR VALIDATION_FAILED: Mandatory parameter 'oname' was not set. ERROR VALIDATION_FAILED: Mandatory parameter 'port' was not set. ERROR VALIDATION_FAILED: Mandatory parameter 'local-endpoint-name' was not set. ERROR VALIDATION_FAILED: Mandatory parameter 'conn-type' was not set. |
|||
|
|
Removes an instance of a processing object within the SGC Cluster. |
||
|
Removing the |
|||
127.0.0.1:10111 I1> remove-conn-ip: oname=ip1ForConnectionA; OK conn-ip removed. |
|||
|
|
Updates the state of a processing object within the SGC Cluster.
|
||
|
Updating the application server configuration ( |
|||
|
Execution of Modify operation on and active application server (as) processing object resulting in a validation error: 127.0.0.1:10111 I1> modify-as: oname=AS-RC-1, pending-size=1000; ERROR MODIFY_OBJECT_FAILED: com.cts.ss7.common.SGCException: Parameter pending-size cannot be modified when bean AS-RC-1 is enabled or active |
|||
|
|
Display the configuration of SGC Cluster processing objects.
|
||
|
Displaying the attribute values of connection-processing objects. |
|||
|
Successfully executed 127.0.0.1:10111 I1> display-connection:; Found 2 object(s): +---------------+----------+--------+--------+----------+---------------+---------------+----------+----------+----------+---------------+----------+--------+----------+ |oname |dependenci|enabled |active |port |local-endpoint-|conn-type |t-ack |t-daud |t-reconnec|state-maintenan|asp-id |is-ipsp |out-queue-| | |es | | | |name | | | |t |ce-role | | |size | +---------------+----------+--------+--------+----------+---------------+---------------+----------+----------+----------+---------------+----------+--------+----------+ |C-CL2-N1 |0 |true |false |30115 |N1-E |SERVER |2 |60 |6 |ACTIVE |null |true |1000 | +---------------+----------+--------+--------+----------+---------------+---------------+----------+----------+----------+---------------+----------+--------+----------+ |C-CL2-N2 |1 |true |false |30105 |N1-E |CLIENT |10 |60 |5 |ACTIVE |1 |true |1000 | +---------------+----------+--------+--------+----------+---------------+---------------+----------+----------+----------+---------------+----------+--------+----------+ Successfully executed 127.0.0.1:10111 I1> display-connection: oname=C-CL2-N2; Found 1 object(s): +---------------+----------+--------+--------+----------+---------------+---------------+----------+----------+----------+---------------+----------+--------+----------+ |oname |dependenci|enabled |active |port |local-endpoint-|conn-type |t-ack |t-daud |t-reconnec|state-maintenan|asp-id |is-ipsp |out-queue-| | |es | | | |name | | | |t |ce-role | | |size | +---------------+----------+--------+--------+----------+---------------+---------------+----------+----------+----------+---------------+----------+--------+----------+ |C-CL2-N2 |1 |true |false |30105 |N1-E |CLIENT |10 |60 |5 |ACTIVE |1 |true |1000 | +---------------+----------+--------+--------+----------+---------------+---------------+----------+----------+----------+---------------+----------+--------+----------+ Successfully executed 127.0.0.1:10111 I1> display-connection: oname=C-CL2-N2,column=oname, column=enabled, column=conn-type; Found 1 object(s): +---------------+--------+---------------+ |oname |enabled |conn-type | +---------------+--------+---------------+ |C-CL2-N2 |true |CLIENT | +---------------+--------+---------------+ |
|||
|
|
Change the "enabled" state of:
|
||
|
Enabling and disabling a connection: 127.0.0.1:10111 I1> enable-<TAB_PRESSED> enable-as enable-connection enable-local-endpoint enable-node enable-snmp-node 127.0.0.1:10111 I1> enable-connection: oname= oname=A-CONN oname=B-CONN 127.0.0.1:10111 I1> enable-connection: oname=A-CONN; OK connection enabled. 127.0.0.1:10111 I1> disable-connection: oname=A-CONN; OK connection disabled. |
Alarms and event history
The SGC CLI provides commands for displaying and clearing alarms generated by the SGC Cluster. Alarms raised and subsequently cleared, or notifications emitted, can be reviewed using a separate operation: display-event-history. Display operations for alarms let filter expressions be specified for id, name, and severity. Filter expressions can include % wildcard characters at the start, middle, or end of the expression. Also, the column parameter can be specified multiple times to restrict presented columns. Below are some examples:
Displaying all active alarms (no filtering criteria specified):
127.0.0.1:10111 I1> display-active-alarm:;
Found 2 object(s):
+---------------+----------+---------------+---------------+---------------+--------------------+
|description    |id        |name           |parameters     |severity       |timestamp           |
+---------------+----------+---------------+---------------+---------------+--------------------+
|The node in the|36        |nodefailure    |nodeId='Node101|MAJOR          |2014-02-10 10:47:35 |
| cluster disapp|          |               |',failureDescri|               |                    |
|eared          |          |               |ption='Mis...  |               |                    |
+---------------+----------+---------------+---------------+---------------+--------------------+
|The node in the|37        |nodefailure    |nodeId='Node102|MAJOR          |2014-02-10 10:47:37 |
| cluster disapp|          |               |',failureDescri|               |                    |
|eared          |          |               |ption='Mis...  |               |                    |
+---------------+----------+---------------+---------------+---------------+--------------------+
Displaying all active alarms with filters:
127.0.0.1:10111 I1> display-active-alarm: id=36, severity=M%, name=%failure;
Found 2 object(s):
+---------------+----------+---------------+---------------+---------------+--------------------+
|description    |id        |name           |parameters     |severity       |timestamp           |
+---------------+----------+---------------+---------------+---------------+--------------------+
|The node in the|36        |nodefailure    |nodeId='Node101|MAJOR          |2014-02-10 10:47:35 |
| cluster disapp|          |               |',failureDescri|               |                    |
|eared          |          |               |ption='Mis...  |               |                    |
+---------------+----------+---------------+---------------+---------------+--------------------+
Displaying all active alarms with filters and column parameters:
127.0.0.1:10111 I1> display-active-alarm: severity=M%, name=%failure, column=id, column=description, column=timestamp;
Found 1 object(s):
+----------+---------------+--------------------+
|id        |description    |timestamp           |
+----------+---------------+--------------------+
|36        |The node in the|2014-02-10 10:47:35 |
|          | cluster disapp|                    |
|          |eared          |                    |
+----------+---------------+--------------------+
Clearing an active alarm:
| |
Clearing alarms
Any alarm can be cleared by the System Administrator. There are two
|
127.0.0.1:10111 I1> clear-active-alarm: id=36;
OK alarm cleared.
Displaying all registered alarms:
| |
Displaying event history
The |
127.0.0.1:10111 I1> display-event-history: ;
Found 1 object(s):
+---------------+----------+---------------+---------------+---------------+--------------------+
|description    |id        |name           |parameters     |severity       |timestamp           |
+---------------+----------+---------------+---------------+---------------+--------------------+
|The node in the|36        |nodefailure    |nodeId='Node102|MAJOR          |2014-02-10 10:47:35 |
| cluster disapp|          |               |',failureDescri|               |                    |
|eared          |          |               |ption='Mis...  |               |                    |
+---------------+----------+---------------+---------------+---------------+--------------------+
Statistics (Info)
A set of commands allow interrogation of statistics exposed by the SGC Stack. For details, please see Statistics. The available statistics are:
| Module | Statistic |
|---|---|
|
M3UA |
|
|
|
|
|
|
|
|
SCCP |
|
|
|
|
|
|
|
|
|
|
|
|
|
|
|
|
|
TCAP |
|
|
|
|
|
|
|
|
|
|
|
TOP |
|
|
|
|
|
|
| |
Filtering statistical information
Commands displaying statistical information support filtering. Filtering of statistics is based on the equality between the filter value and statistic column value. Also, the |
Below are some examples.
Displaying statistic without filters:
127.0.0.1:10111 I1> display-info-asinfo:;
Found 1 object(s):
+---------------+---------------+---------------+---------------+---------------+---------------+
|connectionId   |asId           |TXCount        |RXCount        |status         |nodeId         |
+---------------+---------------+---------------+---------------+---------------+---------------+
|C-CL2-N1       |AS-RC-1        |0              |0              |INACTIVE       |CL1-N1         |
+---------------+---------------+---------------+---------------+---------------+---------------+
Displaying asinfo statistics with filters on the nodeId:
127.0.0.1:10111 I1> display-info-asinfo:<TAB_PRESSED>

RXCount        TXCount        asId           column         connectionId   nodeId         status
127.0.0.1:10111 I1> display-info-asinfo: nodeId=CL1-N1;
Found 1 object(s):
+---------------+---------------+---------------+---------------+---------------+---------------+
|connectionId   |asId           |TXCount        |RXCount        |status         |nodeId         |
+---------------+---------------+---------------+---------------+---------------+---------------+
|C-CL2-N1       |AS-RC-1        |0              |0              |INACTIVE       |CL1-N1         |
+---------------+---------------+---------------+---------------+---------------+---------------+
Export / Import
The following commands allowing exporting and importing the SGC Stack configuration to or from a text file.
Operation |
What it’s for |
||||
|---|---|---|---|---|---|
|
Examples |
|||||
|
|
Produces a dump of the current configuration in a format that is directly usable by the batch command.
|
||||
|
Non-interactive mode: ./sgc-cli.sh -x config-backup.mml Interactive mode: 127.0.0.1:10111 I1> export: file=config-backup.mml OK configuration exported. |
|||||
|
|
Loads a text file containing a set of MML commands, and executes them after connecting to the SGC Cluster (in a format that is produced by the
|
||||
|
Non-interactive mode: ./sgc-cli.sh -b config-backup.mml -stopOnError false Interactive mode: 127.0.0.1:10111 I1> batch: file=set-of-displays.mml display-conn-ip: oname=conn-ip1; Found 1 object(s): +---------------+----------+---------------+---------------+ |oname |dependenci|ip |conn-name | | |es | | | +---------------+----------+---------------+---------------+ |conn-ip1 |0 |192.168.1.101 |C-CL2-N1 | +---------------+----------+---------------+---------------+ display-conn-ip: oname=conn-ip2; Found 1 object(s): +---------------+----------+---------------+---------------+ |oname |dependenci|ip |conn-name | | |es | | | +---------------+----------+---------------+---------------+ |conn-ip2 |0 |192.168.1.192 |C-CL2-N1 | +---------------+----------+---------------+---------------+ |
Upgrading the SGC
The following commands are used to manage the SGC cluster during the upgrade and reversion processes:
-
start-upgrade -
complete-upgrade -
abort-upgrade -
start-revert -
complete-revert -
abort-revert -
display-info-nodeversioninfo -
display-info-clusterversioninfo
For more information on how to perform an upgrade (or reversion) of the SGC cluster please refer to Automated Upgrade of the SGC.
Miscellaneous
The following commands are miscellaneous commands that don’t fall into the previous categories.
Operation |
What it’s for |
|---|---|
|
Examples |
|
|
|
Sleeps the CLI for the specified number of milliseconds. |
127.0.0.1:10111 I1> sleep: millis=1134 OK requested=1134 start=1554155345880 end=1554155347014 actual=1134 |
SGC TCAP Stack
What is the SGC TCAP Stack ?
The SGC TCAP Stack is a Java component that is embedded in the CGIN Unified RA and the IN Scenario Pack to provide OCSS7 support. The TCAP stack communicates with the SGC via a proprietary protocol.
| |
For a general description of the TCAP Stack Interface defined by the CGIN Unified RA, please see Inside the CGIN Connectivity Pack. |
TCAP Stack and SGC Stack Connectivity
After the CGIN Unified RA is activated the SGC TCAP stack uses one of two procedures to establish communication with the SGC stack:
-
The newer, and recommended,
ocss7.sgcsregistration process, introduced in release 1.1.0. -
The legacy
ocss7.urlListregistration process, supported by releases up to and including 3.0.0.
ocss7.sgcs Connection Method
This connection method:
-
Automatically load balances all traffic between all available SGCs; and
-
Provides dialog failover when an SGC becomes unavailable for any reason.
When correctly configured, all TCAP stacks in the Rhino cluster will be connected to all available SGCs in the OCSS7 cluster simultaneously, with every connection servicing traffic. This is sometimes referred to as the Meshed Connection Manager because of the fully meshed network topology it uses.
Load Balancing
Dialogs are load balanced across all active connections between the SGCs and the TCAP stacks. An SGC that receives traffic from the SS7 network will round-robin new dialogs between all TCAP stacks that have an active connection to it. Similarly, each TCAP stack will round-robin new outgoing dialogs between the SGCs it is connected to.
If a configured connection is down for any reason the TCAP stack will attempt to re-establish it at regular intervals until successful.
In some OA&M or failure situations an SGC may have no TCAP stack connections. When this happens the SGC will route traffic to the other SGCs in the cluster for forwarding to the TCAP stacks. Traffic will remain balanced across the TCAP stacks.
If a new SGC needs to be added to the cluster with a new connection address then the TCAP stack configuration will need to be adjusted. This adjustment can be done either before or after the SGC is installed and configured, and the cluster will behave as described above. Updates to the TCAP stack ocss7.sgcs list can be done while the system is active and processing traffic — existing connections will not be affected unless they are removed from the list, and the TCAP stack will attempt to establish any newly configured connections.
Dialog Failover
Dialog failover occurs for in-progress dialogs when an SGC becomes unavailable to a TCAP stack.
| |
This feature does not provide failover between Rhino nodes when a Rhino node becomes unavailable. Failover between Rhino nodes is not available in CGIN 2.0.0 with any TCAP stack because CGIN itself does not provide replication facilities. |
Under normal operating conditions a TCAP dialog continues to use the same connection between the TCAP stack and the SGC for the lifetime of that dialog. If that connection becomes unavailable (i.e. the SGC is unreachable or down) then the Dialog Failover feature is used to migrate the dialogs associated with that connection (and by extension, the SGC) to an alternative SGC in the same cluster. In this way it is possible to continue sending and receiving messages on those dialogs.
For example, TCAP stack A is connected to SGCs 1 and 2 with connections C1 and C2 respectively. If SGC 2 terminates unexpectedly, all dialogs associated with connection C2 will begin to use connection C1 instead. All traffic received by the SGCs for those dialogs will now be sent to the TCAP stack via connection C1, hosted on SGC 1.
It is important to note that dialogs failover between SGCs, not TCAP stacks. For dialog failover to work there must be an existing connection between the original TCAP stack and at least one substitute SGC which is capable of accepting a failed over dialog. Dialogs which cannot be failed over to a replacement SGC will be dropepd and any in-flight messages lost.
| |
Failure recovery can never be perfect — network messages currently being processed at the time of failure will be lost — so some dialogue failure must be expected. |
Legacy ocss7.urlList Connection Method
| |
This connection method is deprecated and should not be used for new installations. Existing installations are strongly recommended to migrate to the ocss7.sgcs connection method. |
In this method the TCAP stack:
-
Is configured with the
ocss7.urlListproperty populated with the address of each SGC’s node manager (stack-http-address:stack-http-port). -
When activated:
-
The TCAP stack connects to the first SGC node manager in that list.
-
On successful connection to a node manager the node manager responds with the address of an SGC’s data socket.
-
The TCAP stack then connects to the indicated data socket.
-
On failure to either connect to a node manager, the indicated data socket, or later failure of that established connection the process is repeated with the next node manager.
-
This connection method is not recommended because:
-
It does not provide dialog failover capability.
-
It only has a partial load-balancing implementation: in the event that one SGC fails the TCAP nodes will reconnect to another SGC in the cluster. Over time this can result in all TCAP stacks being connected to a single SGC. Should this occur manual rebalancing of the TCAP stack connections will be required.
Rebalancing TCAP Stack Data Transfer Connections
| |
The need to rebalance TCAP stack connections can be completely avoided by using the recommended ocss7.sgcs connection method. |
When an SGC node joins a running SGC cluster (for example, after a planned outage or failure), the existing TCAP stack connections are not affected. That is, the TCAP stack connections remain connected to whichever SGCs they were previously connected to. The newly joined SGC will have no TCAP stack connections until the next time a TCAP stack reconnects.
In the worst case scenario this can result in a single SGC servicing all of the TCAP stacks whilst the other SGCs service none.
This can be mitigated by performing a rebalancing procedure as described next.
Example rebalancing procedure
| |
This example uses a basic production deployment of an SGC Cluster, composed of two SGC Nodes cooperating with the CGIN Unified RA, deployed within a two-node Rhino cluster (as depicted above). |
Imagine the following scenario:
-
Due to hardware failure, SGC Stack Node 2 was not operational. This resulted in both instances of the CGIN Unified RA being connected to SGC Stack Node 1.
-
That hardware failure is removed, and SGC Stack Node 2 is again fully operational and part of the cluster.
-
To rebalance the data transfer connections of the CGIN Unified RA entity running within Rhino cluster, that entity must be deactivated and activated again on one of the Rhino nodes. (Deactivation is a graceful procedure where the CGIN Unified RA waits until all dialogs that it services are finished; at the same time all new dialogs are directed to the CGIN Unified RA running within the other node.)
You would do the following:
-
Make sure that the current traffic level is low enough so that it can be handled by a CGIN Unified RA on a single Rhino node.
-
Deactivate the CGIN Unified RA entity on one of the Rhino nodes.
-
Wait for the deactivated CGIN Unified RA entity to become
STOPPED. -
Activate the previously deactivated CGIN Unified RA entity,
| |
Per-node activation state
For details of managing per-node activation state in a Rhino Cluster, please see Per-Node Activation State in the Rhino Administration and Deployment Guide. |
TCAP Stack configuration
General description and configuration of the CGIN RA is detailed in the CGIN RA Installation and Administration Guide. Below are configuration properties specific to the SGC TCAP Stack.
Parameter |
Usage and description |
Active |
|---|---|---|
Values |
||
Default |
||
|
|
Short name of the TCAP stack to use. |
✘ |
|
for the SGC TCAP Stack, this value must be |
||
|
|
TCAP variant to use. |
✘ |
|
|
||
|
|
||
|
|
The TCAP version to use where this has not been specified (outbound dialogs) or cannot be automatically derived from the ProtocolVersion field of the DialoguePortion (inbound dialogs). This affects some encoding choices, such as use of ParamSet when encoding Reject components, bounds on private operation and error codes, and whether to use a Response or an Abort package when a dialog must be aborted. |
✘ |
|
|
||
|
|
||
|
|
Maximum number of threads used by the scheduler. Number of threads used to trigger timeout events. |
✘ |
|
in the range |
||
|
|
||
|
|
Number of events that may be scheduled on a single scheduler thread. |
✘ |
|
in the range
If this value is set too low, then some invoke and activity timers may not fire, potentially leading to hung dialogs. The higher this value is, the higher the memory requirements of the TCAP stack. |
||
|
|
||
|
|
Maximum number of inbound messages and timeout events that may be waiting to be processed. |
✘ |
|
in the range
|
||
|
|
||
|
|
Maximum number of opened transactions (dialogs). |
✘ |
|
in the range |
||
|
|
||
|
|
Number of threads used by the worker group to process timeout events and inbound messages. |
✘ |
|
in the range |
||
|
|
||
|
|
Maximum number of tasks in one worker queue. |
✘ |
|
in the range
|
||
|
|
||
|
|
Maximum number of outbound messages in the sender queue. |
✘ |
|
in the range (if less than default value the default value is silently used)
|
||
|
|
||
|
|
Comma-separated list of SGCs to connect to. Only one of If both |
✔ * |
|
comma-separated list in the format |
||
|
unset |
||
|
|
Comma-separated list of URLs used to connect to legacy TCAP Manager(s). Only one of |
✔ * |
|
comma-separated list in the format |
||
|
unset |
||
|
|
Wait interval in milliseconds between subsequent connection attempts for the |
✔ |
|
in the range not related to single URLs on the list (but the whole list) |
||
|
|
||
|
|
SSN number used when the |
✘ |
|
in the range |
||
|
|
v1.0.0 protocol variant only - Enables or disables the OCSS7 to SGC connection heartbeat. N.B. if the heartbeat is enabled on the SGC it must also be enabled here. v2.0.0 protocol variant - heartbeat is always enabled. |
✘ |
|
|
||
|
|
||
|
|
The period between heartbeat sends in seconds. Heartbeat timeout is also a function of this value, as described in Stack Originated Heartbeat Configuration. The value configured here must be smaller than the value of |
✘ |
|
|
||
|
|
* If a TCAP data transfer connection is established, changing this property has no effect until the data transfer connection fails and the TCAP Stack repeats the registration process.
ANSI TCAP
Starting with SGC version 2.2.0 and CGIN version 2.0.0, the SGC and OCSS7 TCAP stack support ANSI TCAP (T1.114-2000, T1.114-1988).
Requirements for use of ANSI TCAP:
-
The TCAP stack must be configured to use the
ocss7.sgcsconnectivity method. -
The SGC must be at least version 2.2.0.0. Older SGCs do not support ANSI TCAP.
The SGC does not require any specific configuration to use ANSI TCAP; it is able to support both ITU TCAP and ANSI TCAP clients simultaneously.
To configure the TCAP stack to use ANSI TCAP:
-
Set the CGIN configuration property
tcap-variant. A value ofITUindicates ITU TCAP, and a value ofANSIindicates ANSI TCAP. -
Set the CGIN configuration property
default-tcap-version. This specifies the TCAP version to use where CGIN is unable to determine this from the ProtocolVersion field of the DialoguePortion (inbound dialogs), or where it has not been specified for outbound dialogs.
See Configuring the TCAP stack for further information.
ANSI SCCP
From SGC version 2.1.0.x and CGIN version 1.5.4.3, the SGC and OCSS7 TCAP stack support both ITU and ANSI SCCP.
SCCP Variant
The TCAP stack’s choice of SCCP variant is configured via the local-sccp-address CGIN configuration property. A value of C7 indicates ITU SCCP, and a value of A7 indicates ANSI SCCP.
To configure the SGC, please see SCCP variant configuration.
The TCAP stack and the SGC must be configured for the same SCCP variant. Furthermore, use of ANSI SCCP also requires use of the ocss7.sgcs connectivity method as the legacy ocss7.urlList method does not support the advanced feature negotiation required to successfully configure for ANSI SCCP.
The table below shows the supported configurations:
SGC sccp-variant |
TCAP Stack local-sccp-address Type |
|
|---|---|---|
|
|
|
|
|
✘ |
|
✘ |
|
ANSI Point Codes
| |
ANSI SCCP point code configuration recommendations
Care must be taken when configuring ANSI SCCP point codes via the simple integer format supported by CGIN and the SGC as CGIN parses this value according to ANSI SCCP encoding standards. The SGC parses this value according to ANSI MTP/M3UA standards. The two standards differ in the order in which they process the network, cluster and member fields. Both CGIN and the SGC support specification of ANSI SCCP point codes in |
Connection Heartbeat
The data connection between the TCAP stack and the SGC supports a configurable heartbeat consisting of:
-
A heartbeat request/response message pair
-
TCAP stack side timeout detection
-
SGC side timeout detection
The heartbeat configuration method and behaviour depends on the combination of the CGIN and SGC version. The table below summarizes how the heartbeat must be configured according to these:
| CGIN 1.5.2.x | CGIN 1.5.3.x and newer | |
|---|---|---|
SGC 1.0.1.x |
legacy |
legacy |
SGC 1.1.0.x and newer |
legacy |
stack |
stack
This heartbeat configuration method requires CGIN 1.5.3 or newer, plus SGC 1.1.0 or newer.
The heartbeat period is configured in the TCAP stack by setting the TCAP stack ocss7.heartbeatPeriod to the desired value (in ms). This value is automatically communicated to the SGC. As a result the heartbeat is configured per RA entity and may be different for different entities.
The TCAP stack sends a heartbeat ping message at the configured interval. On receipt of a ping the SGC will respond with a pong.
If the SGC does not receive the ping within 2 * ocss7.heartbeatPeriod ms of the previous ping or connection establishment it will mark the connection as failed and close it.
If the TCAP stack does not receive a pong before sending its next ping (i.e. within ocss7.heartbeatPeriod ms) it will mark the connection as failed and close it.
legacy
This heartbeat configuration method must be used if either of CGIN 1.5.2 or SGC 1.0.1 is being used.
The heartbeat request/response message pair is enabled by setting the TCAP stack ocss7.heartbeatEnabled property to true. This configures the TCAP stack to send a heartbeat request. The SGC will respond to any heartbeat request with a heartbeat response message, regardless of SGC configuration. The frequency with which the heartbeat request message is sent (and therefore also the heartbeat response) is configured with the TCAP stack’s ocss7.heartbeatPeriod configuration parameter.
If heartbeats are enabled in the TCAP stack, then the TCAP stack will automatically perform timeout detection. If a heartbeat response message hasn’t been seen within a period of time equal to twice the heartbeat period (2 * ocss7.heartbeatPeriod) the connection will be marked as defective and closed, allowing the TCAP stack to select a new SGC data connection.
The SGC stack may also perform timeout detection; this is controlled by the SGC properties com.cts.ss7.commsp.heartbeatEnabled and com.cts.ss7.commsp.server.recvTimeout. When the heartbeatEnabled property is set to true the SGC will close a connection if a heartbeat request hasn’t been received from that TCAP stack in the last recvTimeout seconds.
| |
If the SGC stack is configured to perform timeout detection then every TCAP stack connecting to it must also be configured to generate heartbeats. If a heartbeat-disabled TCAP stack connects to a heartbeat-enabled SGC the SGC will close the connection after recvTimeout seconds, resulting in an unstable TCAP stack to SGC connection. |
Upgrading the SGC and TCAP Stack
This section of the manual covers upgrading the SGC and the TCAP stack.
Upgrading the SGC
Up to four upgrade options are available depending on the SGC releases being upgraded from and to. The options provide differing levels of automation, service continuity and implementation complexity.
-
Automated Online Upgrade — automated upgrade using a single point code
-
Manual Online Upgrade — manually upgrade using a single point code
-
STP Redirection — manual upgrade method requiring two point codes and support from the network
-
Offline Upgrade — manual upgrade method requiring a single point code plus either an alternate site that traffic may be routed to, or a tolerance of complete loss of service during the upgrade window
Upgrading from OCSS7 2.2.0.x to OCSS7 3.0.0.x
Notable Changes
-
Support for manual and automated online upgrades from OCSS7 3.0.0.x to a newer version has been added.
-
The SGC’s MAX_HEAP_SIZE requirements are significantly lower.
-
Significant changes have been made to the CTS-SGC-MIB, see OCSS7 MIB Changes for details.
Upgrading from OCSS7 2.1.0.x to OCSS7 2.2.0.x
Notable Changes
Support for ANSI T1.114 TCAP has been added:
-
Existing configurations will continue to work as previously.
-
No configuration changes are required to the SGC to use ANSI TCAP.
-
The TCAP stack must be reconfigured if ANSI TCAP is required. See ANSI TCAP for further information.
Upgrading from OCSS7 2.0.0.x to OCSS7 2.1.0.x
Notable Changes
Support for ATIS 1000112 (formerly ANSI T1.112) SCCP has been added:
-
Existing configurations will continue to work as previously.
-
Added
sccp-variantandnationalconfiguration parameters to 'General Configuration'. -
Default values for
mssandmussin thecreate-dpcMML command have changed. See DPC configuration for details.
The TCAP stack may be configured to use ANSI SCCP by configuring an SCCP address of type A7 instead of C7. Both the SGC and the TCAP stack must be configured for the same SCCP variant. See ANSI SCCP for further information.
Upgrading from OCSS7 1.1.0.x to OCSS7 2.0.0.x
Notable Changes
Hazelcast has been upgraded from version 2.6.5 to version 3.7. This fixes a number of cluster stability issues. Members of a Hazelcast 3.7 cluster are unable to communicate with members of a Hazelcast 2.6.x cluster, therefore it is necessary to ensure that all cluster members are running either SGC 2.0.0.x or 1.1.0.x, not a mix of the two.
The configuration file hazelcast.xml has changed substantially. The configuration should be reviewed, particularly for clusters with more than two members - see Hazelcast cluster configuration for details.
New SCCP and TCAP message statistics are available. Some statistics from the LocalSsnInfo JMX MBean (and associated display-info-localssninfo command line client command and SNMP counters) have been moved to the new SccpStats JMX MBean. See Statistics for details.
Automated Online Upgrade
This section of the documentation describes how to use Orca to perform upgrades and reversions of the SGC.
The documentation is broken down into several parts, as follows:
General requirements for performing cluster upgrade or reversion |
|
An introduction to the SGC upgrade bundle |
|
How to view the state of the SGC cluster(s) installed on one or more hosts |
|
How to perform an online upgrade of the SGC cluster |
|
How to perform an online revert of the SGC cluster |
|
The command reference for SGC related Orca operations |
|
The command argument reference for SGC related Orca operations |
General Upgrade and Reversion Requirements
The following are general requirements for both online upgrade and online reversion of the SGC.
-
The cluster must consist of at least two nodes.

Single node clusters can still be upgraded or reverted via the online upgrade method, but there will be a period of service loss during the process. -
Each cluster member must be configured such that it can operate as the only cluster member in the event of failure or administrative shutdown of all other cluster members. This is a standard SGC clustering requirement and is not specific to the upgrade or reversion process.
-
The
backup-countmust be correctly configured in the existing cluster’shazelcast.xmlconfiguration files. If this is not correctly specified, then the risk of catastrophic cluster failure exists. This risk is not specific to the upgrade or reversion process, but must be corrected before an online upgrade or reversion is attempted.
In addition, the following general requirements apply:
-
The newest (highest) SGC version must support online upgrade from the oldest (lowest) SGC version. This applies regardless of whether upgrade or revert is being performed. i.e. If it’s possible to online upgrade from 3.0.0.0 to 3.0.0.1 it will also be possible to perform an online revert from 3.0.0.1 to 3.0.0.0. See the Online Upgrade Support Matrix for information on which SGC release combinations support this process.
-
The old and new installations must comply with the Recommended Installation Structure as documented in the OCSS7 Installation and Administration Guide.
-
Configuration files (such as
sgcenv,SGC.properties) must be contained within the OCSS7 installation directory or sub-directory, not located elsewhere on the filesystem. The default SGC installation structure meets this requirement. The SGC’s log files, configured via the LOG_BASEproperty insgcenv, may be located anywhere on the filesystem, including outside of the OCSS7 installation directory.
Introduction to the SGC Upgrade Bundle
The SGC upgrade bundle contains the components required to perform an upgrade of the OCSS7 SGC:
-
orca — the upgrade tool
-
packages/* — the packages required to upgrade the SGC
The upgrade bundle must be extracted prior to use.
Extracting the SGC Upgrade Bundle
The upgrade bundle must be extracted prior to first use:
$ unzip sgc-upgrade-bundle-3.0.0.1.zip
Archive:sgc-upgrade-bundle-3.0.0.1.zip
 extracting: sgc-upgrade-bundle-3.0.0.1/README
 extracting: sgc-upgrade-bundle-3.0.0.1/core/__init__.py
 extracting: sgc-upgrade-bundle-3.0.0.1/core/command.py
 extracting: sgc-upgrade-bundle-3.0.0.1/core/constants.py
 extracting: sgc-upgrade-bundle-3.0.0.1/core/exceptions.py
 extracting: sgc-upgrade-bundle-3.0.0.1/core/host.py
 extracting: sgc-upgrade-bundle-3.0.0.1/core/logger.py
 extracting: sgc-upgrade-bundle-3.0.0.1/core/terminal.py
 extracting: sgc-upgrade-bundle-3.0.0.1/core/upgrade_info.py
 extracting: sgc-upgrade-bundle-3.0.0.1/core/utils.py
 extracting: sgc-upgrade-bundle-3.0.0.1/helpers/__init__.py
 extracting: sgc-upgrade-bundle-3.0.0.1/helpers/common.py
 extracting: sgc-upgrade-bundle-3.0.0.1/helpers/feature_script_diff.py
 extracting: sgc-upgrade-bundle-3.0.0.1/helpers/orca_migrate_helper.py
 extracting: sgc-upgrade-bundle-3.0.0.1/helpers/rem_helper.py
 extracting: sgc-upgrade-bundle-3.0.0.1/helpers/sgc/__init__.py
 extracting: sgc-upgrade-bundle-3.0.0.1/helpers/sgc/sgc_api.py
 extracting: sgc-upgrade-bundle-3.0.0.1/helpers/sgc/sgc_backup.py
 extracting: sgc-upgrade-bundle-3.0.0.1/helpers/sgc/sgc_common.py
 extracting: sgc-upgrade-bundle-3.0.0.1/helpers/sgc/sgc_config.py
 extracting: sgc-upgrade-bundle-3.0.0.1/helpers/sgc/sgc_hazelcast_xml.py
 extracting: sgc-upgrade-bundle-3.0.0.1/helpers/sgc/sgc_node.py
 extracting: sgc-upgrade-bundle-3.0.0.1/helpers/sgc/sgc_package.py
 extracting: sgc-upgrade-bundle-3.0.0.1/helpers/sgc/sgc_views.py
 extracting: sgc-upgrade-bundle-3.0.0.1/helpers/slee-data-migration-package.zip
 extracting: sgc-upgrade-bundle-3.0.0.1/helpers/slee-data-transformation-standalone.jar
 extracting: sgc-upgrade-bundle-3.0.0.1/helpers/standardize_paths.py
 extracting: sgc-upgrade-bundle-3.0.0.1/licenses/third-party-licenses.txt
 extracting: sgc-upgrade-bundle-3.0.0.1/orca
 extracting: sgc-upgrade-bundle-3.0.0.1/packages/ocss7-3.0.0.1.zip
 extracting: sgc-upgrade-bundle-3.0.0.1/packages/packages.cfg
 extracting: sgc-upgrade-bundle-3.0.0.1/resources/orca-version.properties
 extracting: sgc-upgrade-bundle-3.0.0.1/workflows/__init__.py
 extracting: sgc-upgrade-bundle-3.0.0.1/workflows/apply_patch.py
 extracting: sgc-upgrade-bundle-3.0.0.1/workflows/cleanup.py
 extracting: sgc-upgrade-bundle-3.0.0.1/workflows/cleanup_rem.py
 extracting: sgc-upgrade-bundle-3.0.0.1/workflows/import_feature_scripts.py
 extracting: sgc-upgrade-bundle-3.0.0.1/workflows/major_upgrade.py
 extracting: sgc-upgrade-bundle-3.0.0.1/workflows/migrate.py
 extracting: sgc-upgrade-bundle-3.0.0.1/workflows/minor_upgrade.py
 extracting: sgc-upgrade-bundle-3.0.0.1/workflows/multi_stage_operation.py
 extracting: sgc-upgrade-bundle-3.0.0.1/workflows/orca_workflow.py
 extracting: sgc-upgrade-bundle-3.0.0.1/workflows/patch_common.py
 extracting: sgc-upgrade-bundle-3.0.0.1/workflows/prepare.py
 extracting: sgc-upgrade-bundle-3.0.0.1/workflows/prepare_new_rhino.py
 extracting: sgc-upgrade-bundle-3.0.0.1/workflows/revert_patch.py
 extracting: sgc-upgrade-bundle-3.0.0.1/workflows/rhino_only_upgrade.py
 extracting: sgc-upgrade-bundle-3.0.0.1/workflows/rollback.py
 extracting: sgc-upgrade-bundle-3.0.0.1/workflows/rollback_rem.py
 extracting: sgc-upgrade-bundle-3.0.0.1/workflows/run.py
 extracting: sgc-upgrade-bundle-3.0.0.1/workflows/sentinel_upgrade.py
 extracting: sgc-upgrade-bundle-3.0.0.1/workflows/sgc/__init__.py
 extracting: sgc-upgrade-bundle-3.0.0.1/workflows/sgc/sgc_abort_revert.py
 extracting: sgc-upgrade-bundle-3.0.0.1/workflows/sgc/sgc_abort_upgrade.py
 extracting: sgc-upgrade-bundle-3.0.0.1/workflows/sgc/sgc_backup.py
 extracting: sgc-upgrade-bundle-3.0.0.1/workflows/sgc/sgc_commands.py
 extracting: sgc-upgrade-bundle-3.0.0.1/workflows/sgc/sgc_complete_revert.py
 extracting: sgc-upgrade-bundle-3.0.0.1/workflows/sgc/sgc_complete_upgrade.py
 extracting: sgc-upgrade-bundle-3.0.0.1/workflows/sgc/sgc_constants.py
 extracting: sgc-upgrade-bundle-3.0.0.1/workflows/sgc/sgc_install.py
 extracting: sgc-upgrade-bundle-3.0.0.1/workflows/sgc/sgc_prepare.py
 extracting: sgc-upgrade-bundle-3.0.0.1/workflows/sgc/sgc_prune_backups.py
 extracting: sgc-upgrade-bundle-3.0.0.1/workflows/sgc/sgc_revert_cluster.py
 extracting: sgc-upgrade-bundle-3.0.0.1/workflows/sgc/sgc_revert_node.py
 extracting: sgc-upgrade-bundle-3.0.0.1/workflows/sgc/sgc_rollback_revert.py
 extracting: sgc-upgrade-bundle-3.0.0.1/workflows/sgc/sgc_rollback_upgrade.py
 extracting: sgc-upgrade-bundle-3.0.0.1/workflows/sgc/sgc_start_node.py
 extracting: sgc-upgrade-bundle-3.0.0.1/workflows/sgc/sgc_start_revert.py
 extracting: sgc-upgrade-bundle-3.0.0.1/workflows/sgc/sgc_start_upgrade.py
 extracting: sgc-upgrade-bundle-3.0.0.1/workflows/sgc/sgc_status.py
 extracting: sgc-upgrade-bundle-3.0.0.1/workflows/sgc/sgc_stop_node.py
 extracting: sgc-upgrade-bundle-3.0.0.1/workflows/sgc/sgc_upgrade_cluster.py
 extracting: sgc-upgrade-bundle-3.0.0.1/workflows/sgc/sgc_upgrade_node.py
 extracting: sgc-upgrade-bundle-3.0.0.1/workflows/sgc/sgc_utils.py
 extracting: sgc-upgrade-bundle-3.0.0.1/workflows/sgc/sgc_validators.py
 extracting: sgc-upgrade-bundle-3.0.0.1/workflows/sgc/sgc_workflow.py
 extracting: sgc-upgrade-bundle-3.0.0.1/workflows/standardize_paths.py
 extracting: sgc-upgrade-bundle-3.0.0.1/workflows/status.py
 extracting: sgc-upgrade-bundle-3.0.0.1/workflows/upgrade_common.py
 extracting: sgc-upgrade-bundle-3.0.0.1/workflows/upgrade_rem.py
 extracting: sgc-upgrade-bundle-3.0.0.1/workflows/workflow_decorator.py
Following extraction, change to the extracted directory:
$ cd sgc-upgrade-bundle-3.0.0.1/Orca Basics
The basic pattern that all orca commands follow is:
$ ./orca --hosts <host_list> <subcommand> <subcommand_arguments>The <host_list> argument is a mandatory comma-separated list of hosts containing SGC nodes. --hosts can also be replaced with the short form -H.
The <subcommand> argument is the SGC specific sub command to execute.
<subcommand_arguments> are zero or more arguments specific to the sub command being executed.
Viewing the SGC Cluster State
The sgc-status sub-command may be used to display a summary of the SGC installations on one or more hosts. For example, to view the SGC installations on hosts vm1, vm2 and vm3:
$ ./orca -H vm1,vm2,vm3 sgc-statusExample output:
Host vm1
SGC Clusters:
  Cluster PC1
    mode=NORMAL format=30000
    Node PC1-1
        [Stopped] PC1-1 3.0.0.0 [/home/sentinel/ocss7/PC1/PC1-1/ocss7-3.0.0.0]
      * [Running] PC1-1 3.0.0.1 [/home/sentinel/ocss7/PC1/PC1-1/ocss7-3.0.0.1]

Host vm2
SGC Clusters:
  Cluster PC1
    mode=NORMAL format=30000
    Node PC1-2
        [Stopped] PC1-2 3.0.0.0 [/home/sentinel/ocss7/PC1/PC1-2/ocss7-3.0.0.0]
      * [Running] PC1-2 3.0.0.1 [/home/sentinel/ocss7/PC1/PC1-2/ocss7-3.0.0.1]

Host vm3
SGC Clusters:
  Cluster PC1
    mode=NORMAL format=30000
    Node PC1-3
        [Stopped] PC1-3 3.0.0.0 [/home/sentinel/ocss7/PC1/PC1-3/ocss7-3.0.0.0]
      * [Running] PC1-3 3.0.0.1 [/home/sentinel/ocss7/PC1/PC1-3/ocss7-3.0.0.1]
The above example shows an installation containing one cluster, PC1, consisting of three nodes, PC1-1, PC1-2 and PC1-3. Each node has two SGC versions installed: 3.0.0.0 and 3.0.0.1. The asterisk next to version 3.0.0.1 indicates that this is the active installation.
Upgrading the SGC Cluster
Orca supports online upgrade of the SGC from version 3.0.0.x to select newer versions.
The OCSS7 installation to be upgraded must meet the documented general requirements.
The sgc-upgrade-cluster command is used to upgrade the SGC cluster.
There are two basic options for an upgrade:
-
Install a new SGC version from an installation package and copy the configuration files from the existing installation to the new. The installation package may either be a standalone installation package, or the package provided as part of the Orca SGC upgrade bundle.
-
Upgrade to a pre-installed and pre-configured SGC installation.
The automated upgrade process performs the following steps:
-
It makes a backup of the current running installation’s critical configuration files.
-
It places the cluster into
UPGRADE_MULTI_VERSIONmode. -
(New SGC installation only) Installs the new SGC version on each node.
-
(New SGC installation only) Copies key configuration files from the old SGC to the new on each node.
-
Shuts down the old SGC and starts the new SGC. This is performed one node at a time, with a wait period between nodes in order to allow the cluster to perform the operations required to maintain cluster integrity.
-
Marks the upgrade as completed and places the cluster into
NORMALmode.
Upgrading to a New SGC Installation
To perform an upgrade where the new SGC is installed and configured as part of the upgrade requires either the --package-directory or --sgc-package command line argument.
For example, to use the Orca SGC upgrade bundle supplied installation packages:
$ ./orca -H vm1,vm2,vm3 sgc-upgrade-cluster --package-directory packages/This process installs the new SGC following the recommended installation structure and copies configuration files from the currently running SGC to the new. Then, a single node at a time, it stops the currently running node, updates the current symbolic link to point to the new SGC and starts the new node.
Alternatively, the user may use a standalone OCSS7 installation package:
$ ./orca -H vm1,vm2,vm3 sgc-upgrade-cluster --sgc-package /path/to/ocss7-3.0.0.1.zip| |
If more than one cluster is installed on the target hosts it will be necessary to specify the cluster to upgrade using the --cluster
argument. |
Upgrading to a Pre-Existing SGC Installation
To perform an upgrade that uses a pre-existing SGC installation the --target-version command line argument is required.
The pre-existing SGC installation must be fully configured as configuration files are not copied from the old installation to the new during this process.
For example:
$ ./orca -H vm1,vm2,vm3 sgc-upgrade-cluster --target-version 3.0.0.1This process skips all installation and configuration steps. One by one, each node is stopped, has its current symbolic link updated to point to the target version and restarted.
Example Upgrade Using the Orca SGC Upgrade Bundle
This example is for a 3-node SGC cluster (PC1) consisting of:
-
Host
vm1:PC1-1 -
Host
vm2:PC1-2 -
Host
vm3:PC1-3
Before starting, check the current status of the SGC cluster:
$ ./orca -H vm1,vm3,vm2 sgc-status
Host vm1
SGC Clusters:
  Cluster PC1
    mode=NORMAL format=30000
    Node PC1-1
      * [Running] PC1-1 3.0.0.0 [/home/sentinel/ocss7/PC1/PC1-1/ocss7-3.0.0.0]

Host vm3
SGC Clusters:
  Cluster PC1
    mode=NORMAL format=30000
    Node PC1-3
      * [Running] PC1-3 3.0.0.0 [/home/sentinel/ocss7/PC1/PC1-3/ocss7-3.0.0.0]

Host vm2
SGC Clusters:
  Cluster PC1
    mode=NORMAL format=30000
    Node PC1-2
      * [Running] PC1-2 3.0.0.0 [/home/sentinel/ocss7/PC1/PC1-2/ocss7-3.0.0.0]
If satisfied with the current cluster state, issue the upgrade command:
$ ./orca -H vm3,vm1,vm2 sgc-upgrade-cluster --package-directory packages/
Getting status for cluster PC1 from hosts [vm3, vm1, vm2]
No nodes specified with --nodes <nodes>, using auto-detected nodes: [u'PC1-3', u'PC1-1', u'PC1-2']
Backing up SGC cluster on nodes [u'PC1-3', u'PC1-1', u'PC1-2']
Running command on host vm3: orca_migrate_helper.py tmpzcmRnu=>{"function": "sgc_backup", "target_version": null, "sgc_package": "ocss7-3.0.0.1.zip", "node_name": "PC1-3", "cluster_name": "PC1", "host": "vm3", "remote_home": "/home/sentinel", "overwrite": false}
Done on vm3

Running command on host vm1: orca_migrate_helper.py tmpQ5lQ39=>{"function": "sgc_backup", "target_version": null, "sgc_package": "ocss7-3.0.0.1.zip", "node_name": "PC1-1", "cluster_name": "PC1", "host": "vm1", "remote_home": "/home/sentinel", "overwrite": false}
Done on vm1

Running command on host vm2: orca_migrate_helper.py tmp13Xs3g=>{"function": "sgc_backup", "target_version": null, "sgc_package": "ocss7-3.0.0.1.zip", "node_name": "PC1-2", "cluster_name": "PC1", "host": "vm2", "remote_home": "/home/sentinel", "overwrite": false}
Done on vm2

Starting SGC upgrade process on host PC1-3
Running command on host vm3: orca_migrate_helper.py tmpJDOH4d=>{"function": "sgc_start_upgrade", "target_version": null, "sgc_package": "ocss7-3.0.0.1.zip", "node_name": "PC1-3", "cluster_name": "PC1", "host": "vm3", "remote_home": "/home/sentinel", "overwrite": false}
Done on vm3

Refreshing cluster view post-operation
Getting status for cluster PC1 from hosts [vm3, vm1, vm2]
Preparing new SGC cluster on nodes [u'PC1-3', u'PC1-1', u'PC1-2']
Running command on host vm3: orca_migrate_helper.py tmpmKVEid=>{"function": "sgc_prepare", "target_version": null, "sgc_package": "ocss7-3.0.0.1.zip", "node_name": "PC1-3", "cluster_name": "PC1", "host": "vm3", "remote_home": "/home/sentinel", "overwrite": false}
Done on vm3

Running command on host vm1: orca_migrate_helper.py tmpVBwfZS=>{"function": "sgc_prepare", "target_version": null, "sgc_package": "ocss7-3.0.0.1.zip", "node_name": "PC1-1", "cluster_name": "PC1", "host": "vm1", "remote_home": "/home/sentinel", "overwrite": false}
Done on vm1

Running command on host vm2: orca_migrate_helper.py tmpfAjL3n=>{"function": "sgc_prepare", "target_version": null, "sgc_package": "ocss7-3.0.0.1.zip", "node_name": "PC1-2", "cluster_name": "PC1", "host": "vm2", "remote_home": "/home/sentinel", "overwrite": false}
Done on vm2

Refreshing cluster view post-operation
Getting status for cluster PC1 from hosts [vm3, vm1, vm2]
Upgrading SGC nodes in turn
Upgrading SGC node PC1-3.  This may take a couple of minutes.
Running command on host vm3: orca_migrate_helper.py tmpdmdejS=>{"function": "sgc_upgrade_node", "target_version": null, "sgc_package": "ocss7-3.0.0.1.zip", "node_name": "PC1-3", "cluster_name": "PC1", "host": "vm3", "remote_home": "/home/sentinel", "overwrite": false}
Done on vm3

Waiting 60 seconds for SGC cluster to redistribute data before upgrading the next node
Upgrading SGC node PC1-1.  This may take a couple of minutes.
Running command on host vm1: orca_migrate_helper.py tmp4ZuKGY=>{"function": "sgc_upgrade_node", "target_version": null, "sgc_package": "ocss7-3.0.0.1.zip", "node_name": "PC1-1", "cluster_name": "PC1", "host": "vm1", "remote_home": "/home/sentinel", "overwrite": false}
Done on vm1

Waiting 60 seconds for SGC cluster to redistribute data before upgrading the next node
Upgrading SGC node PC1-2.  This may take a couple of minutes.
Running command on host vm2: orca_migrate_helper.py tmpKDmSkk=>{"function": "sgc_upgrade_node", "target_version": null, "sgc_package": "ocss7-3.0.0.1.zip", "node_name": "PC1-2", "cluster_name": "PC1", "host": "vm2", "remote_home": "/home/sentinel", "overwrite": false}
Done on vm2

Refreshing cluster view post-operation
Getting status for cluster PC1 from hosts [vm3, vm1, vm2]
Completing SGC upgrade process on node PC1-3
Running command on host vm3: orca_migrate_helper.py tmpKpeaK7=>{"function": "sgc_complete_upgrade", "target_version": null, "sgc_package": "ocss7-3.0.0.1.zip", "node_name": "PC1-3", "cluster_name": "PC1", "host": "vm3", "remote_home": "/home/sentinel", "overwrite": false}
Done on vm3

Refreshing cluster view post-operation
Getting status for cluster PC1 from hosts [vm3, vm1, vm2]
Available actions:
  - sgc-backup
  - sgc-backup-prune
  - sgc-upgrade-start
  - sgc-upgrade-cluster
  - sgc-revert-start
  - sgc-revert-cluster
  - sgc-install
  - sgc-node-start
  - sgc-node-stop
  - sgc-status
And finally, re-check the cluster status:
$ ./orca -H vm1,vm3,vm2 sgc-status
Host vm1
SGC Clusters:
  Cluster PC1
    mode=NORMAL format=30000
    Node PC1-1
        [Stopped] PC1-1 3.0.0.0 [/home/sentinel/ocss7/PC1/PC1-1/ocss7-3.0.0.0]
      * [Running] PC1-1 3.0.0.1 [/home/sentinel/ocss7/PC1/PC1-1/ocss7-3.0.0.1]

Host vm3
SGC Clusters:
  Cluster PC1
    mode=NORMAL format=30000
    Node PC1-3
        [Stopped] PC1-3 3.0.0.0 [/home/sentinel/ocss7/PC1/PC1-3/ocss7-3.0.0.0]
      * [Running] PC1-3 3.0.0.1 [/home/sentinel/ocss7/PC1/PC1-3/ocss7-3.0.0.1]

Host vm2
SGC Clusters:
  Cluster PC1
    mode=NORMAL format=30000
    Node PC1-2
        [Stopped] PC1-2 3.0.0.0 [/home/sentinel/ocss7/PC1/PC1-2/ocss7-3.0.0.0]
      * [Running] PC1-2 3.0.0.1 [/home/sentinel/ocss7/PC1/PC1-2/ocss7-3.0.0.1]
Reverting the SGC Cluster
Orca supports online reversion of the SGC to version 3.0.0.x from select newer versions.
The OCSS7 installation to be reverted must meet the documented general requirements.
The sgc-revert-cluster command is used to revert the SGC cluster.
There are two options for a reversion:
-
Install the replacement SGC version from an installation package and copy the configuration files from the existing installation to the replacement. The installation package may either be a standalone installation package, or the package provided as part of the Orca SGC upgrade bundle.
-
Revert to a pre-installed and pre-configured SGC installation.
The reversion process performs some pre-checks to ensure that the cluster is in an appropriate state and then reverts the cluster. This process includes:
-
Making a backup of the current running installation.
-
Placing the cluster into
REVERT_MULTI_VERSIONmode. -
Optionally, installing the replacement SGC version on each node.
-
Optionally, copying key configuration files from the existing SGC to the replacement node.
-
Shutting down the current SGC and starting the replacement SGC. This is performed one node at a time, with a wait period between nodes in order to allow the cluster perform operations required to maintain normal operation.
-
Marking the reversion as completed and placing the cluster into
NORMALmode.
The reversion process takes several minutes per node to complete.
Reverting to a New SGC Installation
To perform a reversion where the replacement SGC is installed and configured as part of the reversion requires either the --package-directory or --sgc-package command line argument.
For example, to use the Orca SGC upgrade bundle supplied installation packages:
$ ./orca -H vm1,vm2,vm3 sgc-revert-cluster --package-directory packages/This process installs the replacement SGC following the recommended installation structure and copies configuration files from the currently running SGC to the replacement. Then, a single node at a time, it stops the currently running node, updates the current symbolic link to point to the replacement SGC and starts the replacement node.
Alternatively, the user may use a standalone OCSS7 installation package:
$ ./orca -H vm1,vm2,vm3 sgc-revert-cluster --sgc-package ocss7-3.0.0.0.zip| |
If there is more than one SGC cluster installed on the target hosts it will be necessary to specify the cluster name using --cluster
argument. |
Reverting to a Pre-Existing SGC Installation
To perform a reversion that uses a pre-existing SGC installation the --target-version command line argument is required.
The pre-existing SGC installation must be fully configured as configuration files are not copied from the old installation to the replacement during this process.
For example:
$ ./orca -H vm1,vm2,vm3 sgc-revert-cluster --target-version 3.0.0.1This process skips all installation and configuration steps. One by one, each node is stopped, has its current symbolic link updated to point to the target version and restarted.
Example Reversion
This example is for a 3-node SGC cluster (PC1) consisting of:
-
Host
vm1:PC1-1 -
Host
vm2:PC1-2 -
Host
vm3:PC1-3
Before starting, check the current status of the SGC cluster:
$ ./orca -H vm1,vm3,vm2 sgc-status
Host vm1
SGC Clusters:
  Cluster PC1
    mode=NORMAL format=30000
    Node PC1-1
        [Stopped] PC1-1 3.0.0.0 [/home/sentinel/ocss7/PC1/PC1-1/ocss7-3.0.0.0]
      * [Running] PC1-1 3.0.0.1 [/home/sentinel/ocss7/PC1/PC1-1/ocss7-3.0.0.1]

Host vm3
SGC Clusters:
  Cluster PC1
    mode=NORMAL format=30000
    Node PC1-3
        [Stopped] PC1-3 3.0.0.0 [/home/sentinel/ocss7/PC1/PC1-3/ocss7-3.0.0.0]
      * [Running] PC1-3 3.0.0.1 [/home/sentinel/ocss7/PC1/PC1-3/ocss7-3.0.0.1]

Host vm2
SGC Clusters:
  Cluster PC1
    mode=NORMAL format=30000
    Node PC1-2
        [Stopped] PC1-2 3.0.0.0 [/home/sentinel/ocss7/PC1/PC1-2/ocss7-3.0.0.0]
      * [Running] PC1-2 3.0.0.1 [/home/sentinel/ocss7/PC1/PC1-2/ocss7-3.0.0.1]
If satisfied with the current cluster state, issue the revert command:
$ ./orca -Hvm1,vm2,vm3 sgc-revert-cluster --target-version 3.0.0.0
Getting status for cluster PC1 from hosts [vm1, vm2, vm3]
No nodes specified with --nodes <nodes>, using auto-detected nodes: [u'PC1-1', u'PC1-2', u'PC1-3']
Backing up SGC cluster on nodes [u'PC1-1', u'PC1-2', u'PC1-3']
Running command on host vm1: orca_migrate_helper.py tmpT_chqd=>{"function": "sgc_backup", "target_version": "3.0.0.0", "sgc_package": null, "node_name": "PC1-1", "cluster_name": "PC1", "host": "vm1", "remote_home": "/home/sentinel", "overwrite": false}
Done on vm1

Running command on host vm2: orca_migrate_helper.py tmpi_qCVS=>{"function": "sgc_backup", "target_version": "3.0.0.0", "sgc_package": null, "node_name": "PC1-2", "cluster_name": "PC1", "host": "vm2", "remote_home": "/home/sentinel", "overwrite": false}
Done on vm2

Running command on host vm3: orca_migrate_helper.py tmpyvwQKT=>{"function": "sgc_backup", "target_version": "3.0.0.0", "sgc_package": null, "node_name": "PC1-3", "cluster_name": "PC1", "host": "vm3", "remote_home": "/home/sentinel", "overwrite": false}
Done on vm3

Starting SGC revert process on node PC1-1
Running command on host vm1: orca_migrate_helper.py tmpyAbsSv=>{"function": "sgc_start_revert", "target_version": "3.0.0.0", "sgc_package": null, "node_name": "PC1-1", "cluster_name": "PC1", "host": "vm1", "remote_home": "/home/sentinel", "overwrite": false}
Done on vm1

Refreshing cluster view post-operation
Getting status for cluster PC1 from hosts [vm1, vm2, vm3]
Using existing SGC installation version 3.0.0.0
Reverting SGC nodes in turn
Reverting SGC node PC1-1.  This may take a couple of minutes.
Running command on host vm1: orca_migrate_helper.py tmpClz8rt=>{"function": "sgc_revert_node", "target_version": "3.0.0.0", "sgc_package": null, "node_name": "PC1-1", "cluster_name": "PC1", "host": "vm1", "remote_home": "/home/sentinel", "overwrite": false}
Done on vm1

Waiting 60 seconds for SGC cluster to redistribute data before reverting the next node
Reverting SGC node PC1-2.  This may take a couple of minutes.
Running command on host vm2: orca_migrate_helper.py tmpxOS3vv=>{"function": "sgc_revert_node", "target_version": "3.0.0.0", "sgc_package": null, "node_name": "PC1-2", "cluster_name": "PC1", "host": "vm2", "remote_home": "/home/sentinel", "overwrite": false}
Done on vm2

Waiting 60 seconds for SGC cluster to redistribute data before reverting the next node
Reverting SGC node PC1-3.  This may take a couple of minutes.
Running command on host vm3: orca_migrate_helper.py tmpnslp63=>{"function": "sgc_revert_node", "target_version": "3.0.0.0", "sgc_package": null, "node_name": "PC1-3", "cluster_name": "PC1", "host": "vm3", "remote_home": "/home/sentinel", "overwrite": false}
Done on vm3

Refreshing cluster view post-operation
Getting status for cluster PC1 from hosts [vm1, vm2, vm3]
Completing SGC reversion process on node PC1-1
Running command on host vm1: orca_migrate_helper.py tmpERJGq2=>{"function": "sgc_complete_revert", "target_version": "3.0.0.0", "sgc_package": null, "node_name": "PC1-1", "cluster_name": "PC1", "host": "vm1", "remote_home": "/home/sentinel", "overwrite": false}
Done on vm1

Refreshing cluster view post-operation
Getting status for cluster PC1 from hosts [vm1, vm2, vm3]
Available actions:
  - sgc-backup
  - sgc-backup-prune
  - sgc-upgrade-start
  - sgc-upgrade-cluster
  - sgc-revert-start
  - sgc-revert-cluster
  - sgc-install
  - sgc-node-start
  - sgc-node-stop
  - sgc-status
And finally, re-check the cluster status:
$ ./orca -H vm1,vm3,vm2 sgc-status
Host vm1
SGC Clusters:
  Cluster PC1
    mode=NORMAL format=30000
    Node PC1-1
      * [Running] PC1-1 3.0.0.0 [/home/sentinel/ocss7/PC1/PC1-1/ocss7-3.0.0.0]
        [Stopped] PC1-1 3.0.0.1 [/home/sentinel/ocss7/PC1/PC1-1/ocss7-3.0.0.1]

Host vm3
SGC Clusters:
  Cluster PC1
    mode=NORMAL format=30000
    Node PC1-3
      * [Running] PC1-3 3.0.0.0 [/home/sentinel/ocss7/PC1/PC1-3/ocss7-3.0.0.0]
        [Stopped] PC1-3 3.0.0.1 [/home/sentinel/ocss7/PC1/PC1-3/ocss7-3.0.0.1]

Host vm2
SGC Clusters:
  Cluster PC1
    mode=NORMAL format=30000
    Node PC1-2
      * [Running] PC1-2 3.0.0.0 [/home/sentinel/ocss7/PC1/PC1-2/ocss7-3.0.0.0]
        [Stopped] PC1-2 3.0.0.1 [/home/sentinel/ocss7/PC1/PC1-2/ocss7-3.0.0.1]
SGC Command Reference
Upgrade related commands:
-
sgc-upgrade-cluster— performs a complete cluster upgrade in a single command -
sgc-upgrade-start— starts the upgrade process -
sgc-upgrade-node— upgrades the specified node(s) -
sgc-upgrade-complete— completes the upgrade process -
sgc-upgrade-abort— aborts the upgrade process -
sgc-upgrade-rollback— rolls back an in-progress upgrade
Reversion related commands:
-
sgc-revert-cluster— performs a complete cluster reversion in a single command -
sgc-revert-start— starts the reversion process -
sgc-revert-node— reverts the specified node(s) -
sgc-revert-complete— completes the reversion process -
sgc-revert-abort— aborts the reversion process -
sgc-revert-rollback— rolls back an in-progress reversion
Maintenance:
-
sgc-install— installs an SGC node or nodes from a given OCSS7 installation package -
sgc-prepare— prepares an SGC node or nodes for upgrade or reversion -
sgc-backup— creates a backup of an SGC node or nodes essential configuration data -
sgc-backup-prune— prunes the number of SGC backups on a host -
sgc-node-start— starts an SGC node or nodes -
sgc-node-stop— stops an SGC node or nodes -
sgc-status— displays a summary of the status of SGC clusters and nodes on the given hosts
sgc-backup
Create a backup of an SGC installation’s critical configuration files. This is not a full backup and should not replace a rigorous backup regime.
Example Usage
To backup the entire example cluster:
$ ./orca -H vm1,vm2,vm3 sgc-backup --cluster PC1 --nodes PC1-1,PC1-2,PC1-3
To create a backup of just PC1-1 and its version 3.0.0.0 installation:
$ ./orca -H vm1 sgc-backup --cluster PC1 --nodes PC1-1 --version 3.0.0.0
To backup all nodes belonging to only cluster installed on vm2:
$ ./orca -H vm2 sgc-backup
sgc-backup-prune
Remove all but the most recent x backups from the specified cluster, node(s) and version.
Example Usage
To leave just the default number of backups for each node in the example cluster:
$ ./orca -H vm1,vm2,vm3 sgc-backup-prune --cluster PC1 --nodes PC1-1,PC1-2,PC1-3
To remove all backups from nodes PC1-1 and PC1-3 in the example cluster:
$ ./orca -H vm1,vm3 sgc-backup-prune --cluster PC1 --nodes PC1-1,PC1-3 --retain 0
sgc-install
Creates a new SGC installation with a minimal configuration.
The installation has the following parameters set in SGC.properties:
-
hazelcast.group -
ss7.instance
The default hazelcast.xml is installed, with backup-count set to the value provided by the --backup-count parameter.
All other parameters and configuration files are set to the default values.
| |
sgc-install is only used to create a completely new SGC installation. To prepare an upgraded SGC instance for an online upgrade see sgc-prepare. |
Mandatory Parameters
-
--cluster— the name of the cluster that the new node(s) belong to -
--nodes— the name of the new nodes -
One of the following parameters must be supplied:
-
--package-directory— the path to thepackagesdirectory from an Orca SGC upgrade bundle containing apackages.cfgfile. -
--sgc-package— the local path to the SGC installation package
-
Optional Parameters
-
--backup-count— the value to be used forbackup-countinhazelcast.xml. If unspecifiedbackup-countwill be set to one less than the number of nodes provided in the--nodesargument, or to one if only one node is provided. -
--overwrite— overwrite any existing SGC installation at the target location. Default behaviour is to return an error if an installation already exists with this cluster, node and version.
| |
The default value of backup-count should only be used if the entire cluster is installed in a single sgc-install operation. In all other cases this value should be manually specified to be one less than the final cluster size. |
Example Usage
To install the entire example cluster (cluster=PC1, nodes=PC1-1,PC1-2 and PC1-3) from scratch using OCSS7 3.0.0.1:
$ ./orca -H vm1,vm2,vm3 sgc-install --cluster PC1 --nodes PC1-1,PC1-2,PC1-3 --sgc-package /path/to/ocss7-3.0.0.1.zip
Or to install just node PC1-1 into cluster PC1 that will eventually contain 3 nodes:
$ ./orca -H vm1,vm2,vm3 sgc-install --cluster PC1 --nodes PC1-1 --sgc-package /path/to/ocss7-3.0.0.1-zip --backup-count 2
| |
The backup-count in hazelcast.xml can be altered manually later if required. Doing so requires a cluster restart if the cluster is running. |
sgc-node-start
Starts one or more SGC nodes.
This command pauses for 120s after starting each node to allow the node to join the SGC cluster and complete data redistribution.
Optional Parameters
-
--cluster— the cluster containing the node(s) to start -
--nodes— the nodes in the cluster to apply this operation to. If unspecified the nodes will be auto-detected. -
--ignore-state— do not perform the pre-checks associated with this operation
sgc-node-stop
Stops one or more SGC nodes.
Optional Parameters
-
--cluster— the cluster containing the node(s) to stop -
--nodes— the nodes in the cluster to apply this operation to. If unspecified the nodes will be auto-detected. -
--ignore-state— do not perform the pre-checks associated with this operation
sgc-prepare
Creates one or more new SGC installations and copies configuration from the existing active SGC instance(s) of the same nodes and cluster to the new installation.
sgc-prepare is typically used over sgc-install when performing an online upgrade from an older to a newer SGC version.
Mandatory Parameters
-
--package-directory— the path to thepackagesdirectory from an Orca SGC upgrade bundle containing apackages.cfgfile. -
--sgc-package— the local path to the SGC installation package
Optional Parameters
-
--cluster— the name of the cluster that the new node(s) belong to -
One of the following parameters must be supplied:
-
--nodes— the nodes in the cluster to apply this operation to. If unspecified the nodes will be auto-detected. -
--overwrite— overwrite any existing SGC installation at the target location. Default behaviour is to return an error if an installation already exists with this cluster, node and version.
Example Usage
To prepare OCSS7 3.0.0.1 for the entire example cluster:
$ ./orca -H vm1,vm2,vm3 sgc-prepare --cluster PC1 --nodes PC1-1,PC1-2,PC1-3 --sgc-package /path/to/ocss7-3.0.0.1.zip
To re-run the prepare operation for just node PC1-3 in the example cluster:
$ ./orca -H vm3 sgc-prepare --cluster PC1 --nodes PC1-3 --sgc-package /path/to/ocss7-3.0.0.1.zip --overwrite
sgc-revert-abort
Aborts an in-progress SGC reversion.
Pre-requisites:
-
The cluster must be in
REVERT_MULTI_VERSIONmode. -
All cluster members must be running the version of the SGC that was running prior to
sgc-revert-startcommand being issued. -
At least one cluster member must be running.
Once complete the SGC cluster will be in NORMAL mode.
sgc-revert-cluster
Performs a complete SGC revert from the current version to the specified older version in a single command.
This command performs the operations of the following commands:
-
sgc-prepare— if the--sgc-packageargument is given
Pre-requisites:
-
The cluster must be in
NORMALmode. -
All cluster members must be specified using the
--nodesparameter. -
All cluster members must be running.
-
(Optional) If
--target-versionis specified, the target installation must exist on all nodes.
The reversion process takes several minutes per node.
Once completed, the cluster will be running the version specified with either --sgc-package or --target-version and be in NORMAL mode.
Mandatory Parameters
-
One of the following parameters must be specified:
-
--package-directory— the path to thepackagesdirectory from an Orca SGC upgrade bundle containing apackages.cfgfile. -
--sgc-package— the local path to the SGC installation package. -
--target-version— the pre-installed target version to upgrade to.
-
Optional Parameters
-
--nodes— the nodes in the cluster to apply this operation to. If unspecified the nodes will be auto-detected. -
--overwrite— overwrite any existing installation when the--sgc-packageargument is provided.
Example Usage
To revert the cluster from version 3.0.0.1 to a pre-installed 3.0.0.0 version:
orca -Hvm1,vm3,vm2 sgc-revert-cluster --cluster PC1 --target-version 3.0.0.0
Or to revert the cluster from version 3.0.0.1 to a non-existent 3.0.0.0 version:
orca -Hvm1,vm2,vm3 sgc-revert-cluster --cluster PC1 --sgc-package /path/to/ocss7-3.0.0.0.zip
sgc-revert-complete
Completes the reversion process on the specified cluster and nodes, placing the cluster into NORMAL mode.
Pre-requisites:
-
The cluster must be in
REVERT_MULTI_VERSIONmode. -
All nodes must be running the target version.
-
All cluster members must be running.
sgc-revert-node
Stops the specified nodes, replaces them with the older SGC installation, and starts the replacement node(s).
Pre-requisites:
-
The cluster must be in
REVERT_MULTI_VERSIONmode. -
The nodes to be reverted must have a pre-prepared installation of the target version available.
-
The target version must be older than the current version.
-
All cluster members must be running.
If multiple nodes are to be reverted these will be processed one at a time, with a pause in between reversions. This wait period is necessary to allow time for the reverted node to rejoin the cluster and for the cluster to repartition itself.
Mandatory Parameters
-
--target-version— the target version to revert to
Example Usage
To revert the whole example cluster from OCSS7 3.0.0.1 to OCSS7 3.0.0.0:
$ ./orca -H vm1,vm2,vm3 sgc-revert-node --cluster PC1 --target-version 3.0.0.0
To revert just node PC1-2 in the example cluster:
$ ./orca -H vm2 sgc-revert-node --cluster PC1 --nodes PC1-2 --target-version 3.0.0.0
sgc-revert-rollback
Rolls back an in-progress SGC reversion, reinstating the specified SGC version.
| |
The user must take care to ensure that the specified version is the original version prior to the revert. The revert process does not 'remember' the previous version. |
By default the rollback process is performed one node at a time to minimise the chance of service loss. If the --hard parameter is specified the entire cluster will be stopped, rolled back, and then restarted. This will result in a service outage.
Once complete the SGC cluster will be running the specified SGC version and be operating in NORMAL mode.
Mandatory Parameters
-
--target-version— the original SGC version to rollback to
sgc-revert-start
Starts the SGC reversion process.
Once completed the cluster will be in REVERT_MULTI_VERSION mode.
Mandatory Parameters
-
--target-version— the target SGC version to revert to. This SGC version must already be installed and configured.
sgc-status
Display a summary of the SGC installations and current status on the hosts provided in the orca primary -H (--hosts) parameter.
sgc-upgrade-abort
Aborts an in-progress SGC upgrade.
Pre-requisites:
-
The cluster must be in
UPGRADE_MULTI_VERSIONmode. -
All cluster members must be running a version of the SGC whose native data format is equal to the current native format of the cluster.
-
At least one cluster member must be running.
Once complete the SGC cluster will be in NORMAL mode.
sgc-upgrade-cluster
Performs a complete SGC upgrade from the current version to the specified target version in a single command.
This command performs the operations of the following commands:
-
sgc-prepare— if the--sgc-packageargument is given
Pre-requisites:
-
The cluster must be in
NORMALmode. -
All cluster members must be specified using the
--nodesparameter. -
All cluster members must be running.
-
(Optional) If
--target-versionis specified, the target installation must exist on all nodes.
The upgrade process takes several minutes per node.
Once completed, the cluster will be running the version specified with either --sgc-package or --target-version and be in NORMAL mode.
Mandatory Parameters
-
--ignore-state— do not perform the sanity checks associated with the node stopping and starting parts of this operation -
One of the following parameters must be specified:
-
--package-directory— the path to thepackagesdirectory from an Orca SGC upgrade bundle containing apackages.cfgfile. -
--sgc-package— the local path to the SGC installation package. -
--target-version— the pre-installed target version to upgrade to.
-
Optional Parameters
-
--cluster— the cluster to start the upgrade on -
--nodes— the nodes in the cluster to apply this operation to. If unspecified the nodes will be auto-detected. -
--overwrite— overwrite any existing installation when the--sgc-packageargument is provided.
Example Usage
To upgrade the cluster PC1 from current version 3.0.0.0 to 3.0.0.1 using the Orca SGC upgrade package. This will install the new 3.0.0.1 nodes and copy the configuration from the existing nodes:
orca -Hvm1,vm3,vm2 sgc-upgrade-cluster --cluster PC1 --package-directory packages/
To upgrade the cluster PC1 from version 3.0.0.0 to 3.0.0.1 using the standalone OCSS7 installation ZIP file. This will install the new 3.0.0.1 nodes and copy the configuration from the existing nodes.
orca -Hvm3,vm2,vm1 sgc-upgrade-cluster --cluster PC1 --sgc-package /path/to/ocss7-3.0.0.1.zip
Alternatively, to upgrade the cluster PC1 from version 3.0.0.0 to a pre-installed and pre-configured version 3.0.0.1:
orca -Hvm1,vm2,vm3 sgc-upgrade-cluster --cluster PC1 --target-version 3.0.0.1
sgc-upgrade-complete
Marks the SGC upgrade as completed.
Pre-requisites:
-
The cluster must be in
UPGRADE_MULTI_VERSIONmode. -
All nodes must be running the same SGC version.
-
All cluster members must be running.
Once completed the SGC cluster will be in NORMAL mode.
sgc-upgrade-node
Stops the specified nodes, replaces them with the pre-prepared upgraded SGC installation, and starts the replacement node(s).
Pre-requisites:
-
The cluster must be in
UPGRADE_MULTI_VERSIONmode. -
The nodes to be upgraded must have a pre-prepared installation of the target version available.
-
The target version must be newer than the current version.
-
All cluster members must be running.
If multiple nodes are to be upgraded these will be processed one at a time, with a wait in between upgrades. This wait period is necessary to allow time for the upgraded node to rejoin the cluster and for the cluster to repartition itself.
Mandatory Parameters
-
--target-version— the target version to upgrade to
Example Usage
To upgrade the whole example cluster from OCSS7 3.0.0.0 to OCSS7 3.0.0.1:
$ ./orca -H vm1,vm2,vm3 sgc-upgrade-node --cluster PC1 --target-version 3.0.0.1
To upgrade just node PC1-2 in the example cluster:
$ ./orca -H vm2 sgc-upgrade-node --cluster PC1 --nodes PC1-2 --target-version 3.0.0.1
sgc-upgrade-rollback
Rolls back an in-progress SGC upgrade, reinstating the specified SGC version.
| |
The user must take care to ensure that the specified version is the original version prior to the upgrade. The upgrade process does not 'remember' the previous version. |
By default the rollback process is performed one node at a time to minimise the chance of service loss. If the --hard parameter is specified the entire cluster will be stopped, rolled back, and then restarted. This will result in a service outage.
Once complete the SGC cluster will be running the specified SGC version and be operating in NORMAL mode.
Mandatory Parameters
-
--target-version— the original SGC version to rollback to
sgc-upgrade-start
Begin the SGC upgrade process.
Pre-requisites:
-
The cluster must be in
NORMALmode. -
All cluster members must be specified using the
--nodesparameter. -
At least one cluster member must be running.
-
One backup matching the current SGC configuration must have been taken using the
sgc-backupcommand.
Once complete the SGC cluster will be in UPGRADE_MULTI_VERSION mode.
SGC Command Argument Reference
--backup-count <count>
Use a backup-count of <count> instead of the automatically calculated value. <count> count must be an integer value between 1 and 6. For example:
--backup-count 2
--cluster <name>
Specifies the cluster that the operation should be carried out on.
For commands that consider this parameter to be optional the meaning is auto-detected if it is not supplied. This means:
-
sgc-status: all clusters -
Other commands: the only installed cluster. If there is more than one installed cluster the
--clusterparameter must be included.
For example, to get the status of the cluster named test:
./orca -H vm1,vm2,vm3 sgc-status --cluster test
Or to stop the node(s) on the cluster test on host vm1:
./orca -H vm1 sgc-node-stop --cluster test
And to start all nodes belonging to the only cluster installed on host vm2:
./orca -H vm2 sgc-node-start
--hard
By default the sgc-upgrade-rollback and sgc-revert-rollback commands perform an online rollback. Supplying the --hard option to either of these commands will result in the entire cluster being stopped, rolled back, and then restarted. Service will be lost during this process.
Use of the --hard option is only recommended where the cluster is unstable following the upgrade or rollback and a complete cluster restart is required.
--nodes <nodes>
Specifies the nodes that the operation should be carried out on. For some commands this parameter is optional, and when not supplied by the user is taken to mean all nodes belonging to the specified cluster on the hosts specified by the accompanying -H (--hosts) parameter.
This is a comma-separated list of SGC node names, in the same order as the hosts (-H or --hosts) list. If multiple nodes exist on a single host, this can be specified as a quoted nested comma-separated list of node names.
For example, a configuration with:
-
Host
vm1has nodePC1-1 -
Host
vm2has nodePC1-2 -
Host
vm3has nodePC1-3
Wil specify both the -H (--hosts) and --nodes parameters as:
-H vm1,vm2,vm3 --nodes PC1-1,PC1-2,PC1-3
Supposing that host vm3 gains a second node, PC1-4, such that the cluster now looks like:
-
Host
vm1has nodePC1-1 -
Host
vm2has nodePC1-2 -
Host
vm3has nodesPC1-3andPC1-4
Then the both the -H (--hosts) and --nodes parameters are specified as:
-H vm1,vm2,vm3 --nodes PC1-1,PC1-2,"PC1-3,PC1-4"
Note the quotation marks (") around the nodes specified for vm3.
--overwrite
If provided to the sgc-install, sgc-prepare, sgc-upgrade-cluster and sgc-revert-cluster commands will allow any existing installation to be overwritten.
--package-directory <directory>
The local path to the packages directory from the Orca SGC upgrade pack. This directory must contain the Orca supplied packages.cfg file and the OCSS7 installation ZIP. For example:
--package-directory packages/
--retain <count>
Used only by the sgc-backup-prune command. Specifies the number of backups to retain following the prune operation. <count> must be an integer greater than or equal to 0. For example:
--retain 3
--sgc-package <package>
The local path to the package containing the SGC installation to use as the target installation for a revert, upgrade or install action. For example:
--sgc-package /path/to/ocss7-3.0.0.1.zip
--target-version <version>
The pre-installed SGC version to upgrade or revert to. For example:
--target-version 3.0.0.1
This SGC must have been installed following the recommended installation structure.
--version <version>
The SGC version to apply an operation to, such as sgc-backup or sgc-backup-purge. For example:
--version 3.0.0.0
Manual Online Upgrade
| |
This document applies to upgrading from SGC 3.0.0.x to a newer SGC. It cannot be used to upgrade to SGC 3.0.0.x from either the 1.x or 2.x series of SGCs. See the Online Upgrade Support Matrix for the exact release combinations that support online upgrade. |
This section describes the process required to perform an online manual upgrade. During this process the cluster remains in service and provided that the connected TCAP stacks are using the ocss7.sgcs connection method, calls will fail over from one SGC to another as required.
| |
Failover cannot be guaranteed to be 100% successful as failover for any given dialog or message is highly dependent on timing. For example, a message queued in an SGC at the SCTP layer will be lost if that SGC is terminated prior to transmission. |
Manual Upgrade Procedure
-
Prepare the replacement nodes:
-
Install each replacement cluster member following the recommended installation structure.
-
Do not copy configuration files from the existing to the new installation yet.
-
-
Issue the CLI command:
start-upgrade. This checks pre-requisites and places the cluster intoUPGRADEmode. In this mode:-
Calls continue to be processed.
-
Newer SGC versions may join the cluster, provided they are backwards compatible with the current cluster version.
-
Configuration changes will be rejected.
-
-
Copy configuration (
config/*andvar/*) from the original cluster members to the replacement cluster members. This step must be carried out after executingstart-upgradeto provide full resilience during the upgrade procedure. -
Upgrade the first cluster member:
-
Stop the original node:
$ORIGINAL_SGC_HOME/bin/sgc stop -
Verify that the original node has come to a complete stop by checking its logs and the process list.
-
Start the replacement node:
$REPLACEMENT_SGC_HOME/bin/sgc start -
Verify that the replacement node has started and successfully joined the cluster. The CLI command
display-info-nodeversioninfocan be used to view the current cluster members. -
Wait for 2-3 minutes to allow the cluster to redistribute shared data amongst all of the members.
-
-
Repeat the previous step for each of the remaining cluster members. This must be performed one node at a time.
-
Issue the CLI command:
complete-upgrade. This checks pre-requisites, then performs the actions required to leaveUPGRADEmode. -
Verify that the cluster has completed the upgrade. The CLI commands
display-info-nodeversioninfoanddisplay-info-clusterversioninfomay be used to verify this.
Rolling Back An In-Progress Manual Upgrade
-
Before
start-upgradewas issued:-
(Optional) Delete the installation directories for the (unused) replacement cluster members.
-
-
After
complete-upgrade:-
This is a
revertoperation, not a rollback.
-
-
After
start-upgradeand beforecomplete-upgrade:-
For every cluster member that is running the replacement SGC version, ONE AT A TIME:
-
Stop the SGC:
$REPLACEMENT_SGC_HOME/bin/sgc stop -
Verify that the node has come to a complete halt by checking its logs and the process list.
-
Start the original SGC:
$ORIGINAL_SGC_HOME/bin/sgc start -
Verify that the original SGC has started and successfully joined the cluster. The CLI command
display-info-nodeversioninfocan be used to view the current cluster members. -
Wait for 2-3 minutes to allow the cluster to redistribute shared data before proceeding to the next node.
-
-
Once all nodes are running the original pre-upgrade version, complete the rollback by issuing the
abort-upgradeCLI command.
-
Manual Online Revert of the Cluster
| |
This document applies to reverting from SGC 3.0.0.x to an older SGC 3.0.0.x release. It cannot be used to revert to a release prior to SGC 3.0.0.0. |
This section describes the process required to perform an online manual revert. During this process the cluster remains in service and provided that the connected TCAP stacks are using the ocss7.sgcs connection method, calls will fail over from one SGC to another as required.
| |
Failover cannot be guaranteed to be 100% successful as failover for any given dialog or message is highly dependent on timing. For example, a message queued in an SGC at the SCTP layer will be lost if that SGC is terminated prior to transmission. |
Manual Revert Procedure
-
Prepare the replacement nodes. Note that each node must conform to the recommended installation structure. Either:
-
Use the previous installation of the SGC version being reverted to.
-
Restore a backup of the previous installation of the SGC version being reverted to.
-
Create a fresh installation of the SGC version being reverted to.
-
Ensure that the current installation supports the version being reverted to. This can be verified by running the CLI command
display-info-nodeversioninfoand verifying that the target version is listed in thesupportedFormatscolumn. -
Do not copy configuration files yet.
-
-
Issue the CLI command:
start-revert: target-format=$TARGET_CLUSTER_FORMAT. This command:-
Checks pre-requisites and places the cluster into
REVERTmode. -
Converts live cluster data to the specified target data format.
-
Saves SGC configuration in the target data format (
sgc.dat).While in this mode:
-
Calls continue to be processed.
-
Older SGC versions may join the cluster, provided that they are compatible with the target cluster version.
-
Configuration changes will be rejected.
-
-
Ensure that the current cluster format is set to the target format. This can be verified by running the CLI command
display-info-clusterversioninfoand ensuring that thecurrentClusterFormatcolumn is set to the target version. -
Copy configuration (
config/*andvar/*) from the original cluster members to the replacement cluster members. This ensures that in the event of cluster failure the first node to restart initializes the correct configuration and not an empty configuration. This step may only be carried after once the cluster is inREVERTmode as prior to this time the configuration files may be saved in a new format not understood by the target nodes. -
Revert the first cluster member:
-
Stop the original node:
$ORIGINAL_SGC_HOME/bin/sgc stop -
Verify that the original node has come to a complete stop by checking its logs and the process list.
-
Start the replacement node:
$REPLACEMENT_SGC_HOME/bin/sgc start -
Verify that the replacement node has started and successfully joined the cluster. The CLI command
display-info-nodeversioninfocan be used to view the current cluster members. -
Wait for 2-3 minutes to allow the cluster to redistribute shared data amongst all of the members.
-
-
Repeat the previous step for each of the remaining cluster members. This must be performed one node at a time.
-
Issue the CLI command:
complete-revert. This checks pre-requisites, then performs the actions required to leaveREVERTmode. -
Verify that the cluster has completed the revert. The CLI commands
display-info-nodeversioninfoanddisplay-info-clusterversioninfomay be used to verify this.
Rolling Back An In-Progress Manual Revert
-
Before
start-revertwas issued:-
(Optional) Delete the installation directories for the (unused) replacement cluster members.
-
-
After
complete-revert:-
This is an
upgradeoperation, not a rollback.
-
-
After
start-revertand beforecomplete-revert:-
For every cluster member that is running the replacement SGC version, ONE AT A TIME:
-
Stop the SGC:
$REPLACEMENT_SGC_HOME/bin/sgc stop -
Verify that the node has come to a complete halt by checking its logs and the process list.
-
Start the original SGC:
$ORIGINAL_SGC_HOME/bin/sgc start -
Verify that the original SGC has started and successfully joined the cluster. The CLI command
display-info-nodeversioninfocan be used to view the current cluster members. -
Wait for 2-3 minutes to allow the cluster to redistribute shared data before proceeding to the next node.
-
-
Once all nodes are running the original pre-revert version, complete the rollback by issuing the
abort-revertCLI command.
-
STP Redirection
This approach manages the upgrade externally to Rhino and OCSS7, and requires support from the STP and surrounding network, and in some configurations, support in the existing service. It can be used for all types of upgrade.
Prerequisites
Before upgrading using STP redirection, make sure that:
-
Inbound
TC-BEGINsare addressed to a "logical" GT. The STP translates this GT to one-of-N "physical" addresses using a load-balancing mechanism. These "physical" addresses route to a particular cluster. -
Optionally, the STP may rewrite the "logical" called party address in the
TC-BEGINto the "physical" address. -
The STP needs the ability to reconfigure the translation addresses in use at runtime.
-
The old and new clusters are assigned different "physical" addresses.
-
If the STP did not rewrite the "logical" called party address in the
TC-BEGINto the "physical" address, then the service must ensure that the initial respondingTC-CONTINUEprovides an SCCP Calling Party Address that is the "physical" address for the cluster that is responding. -
Subsequent traffic uses the "physical" address using normal TCAP procedures.
Upgrade process
To upgrade using STP redirection:
-
Set up the new clusters (Rhino and SGC) with a new "physical" address. Ensure that the new Rhino cluster has a different clusterID to the existing Rhino cluster. Similarly, the new SGC cluster must have a different Hazelcast cluster ID to the existing SGC cluster.
-
Configure and activate the new clusters.
-
Reconfigure the STP to include the new cluster’s physical address when translating the logical GT.
-
Verify that traffic is processed by the new cluster correctly.
-
Reconfigure the STP to exclude the old cluster’s physical address when translating the logical GT.
-
Wait for all existing dialogs to drain from the old clusters.
-
Halt the old clusters.
Offline Upgrade
| |
The offline upgrade process involves a period of complete outage for the cluster being upgraded. |
The offline upgrade process allows for the upgrade of a cluster without the use of STP redirection or a second point code. This process involves terminating the existing cluster and replacing it with a new cluster.
Consequences of this approach include:
-
A complete service outage at the site being upgraded during the upgrade window.
-
In progress dialogs will be terminated unless the operator is able to switch new traffic to an alternate site and configure calls to drain prior to starting the upgrade.
This upgrade involves two phases which are carried out sequentially. These are preparation and execution.
Preparation
The preparatory phase of the upgrade may carried out in advance of the upgrade window provided that no further configuration changes are expected or permitted to the existing cluster between the preparation phase starting and the execution phase of the upgrade being performed.
| |
Any configuration changes applied to the SGC after preparation has started will not be migrated to the upgraded cluster. |
The following operations should be carried out in the listed order:
1. Backup the Existing Cluster
Create a backup of the existing cluster. This ensures that it will be possible to reinstate the original cluster in the event that files from the original cluster are inadvertently modified or removed and it becomes necessary to revert or abort the upgrade.
2. Install the Replacement Cluster
The following requirements apply to the installation of the replacement cluster:
-
The installation should follow the recommended installation structure.
-
The nodes in the new cluster must have the same name as the original nodes.
-
It is strongly recommended that the new cluster has a different name to the old cluster.
| |
Failure to follow the recommended installation structure will result in a cluster that cannot be upgraded in future using the automated online upgrade method. |
| |
Failure to keep the node names the same in both clusters will result in the replacement cluster having one or more unconfigured nodes. |
| |
If the new and replacement clusters have the same name and both clusters are allowed to run at the same time there is a very high chance of node instability and data corruption. |
3. Copy Configuration from the Existing Cluster to the Replacement Cluster
| |
This guide assumes that the locations of the SGC’s configuration files have not been customized. If any locations have been customized these customizations must be honoured when copying the files. |
For each node in the cluster:
-
Copy
config/sgcenvfrom the existing installion to the new:cp $EXISTING_SGC_HOME/config/sgcenv $OCSS7_ROOT/CLUSTER_NAME/NODE_NAME/ocss7-3.0.0.0/config/
-
Copy
config/SGC.propertiesfrom the existing installation to the new:cp $EXISTING_SGC_HOME/config/SGC.properties $OCSS7_ROOT/CLUSTER_NAME/NODE_NAME/ocss7-3.0.0.0/config/
-
Copy
config/log4j.xmlfrom the existing installation to the new:cp $EXISTING_SGC_HOME/config/log4j.xml $OCSS7_ROOT/CLUSTER_NAME/NODE_NAME/ocss7-3.0.0.0/config/
-
If present, copy
config/hazelcast.xmlfrom the existing installation to the new:cp $EXISTING_SGC_HOME/config/hazelcast.xml $OCSS7_ROOT/CLUSTER_NAME/NODE_NAME/ocss7-3.0.0.0/config/
-
Copy
var/sgc.datfrom the existing installation to the new:cp $EXISTING_SGC_HOME/var/sgc.dat $OCSS7_ROOT/CLUSTER_NAME/NODE_NAME/ocss7-3.0.0.0/var/
4. Verify the Configuration of the Replacement Cluster
a) Check that the Configuration Files Copied Correctly
| |
If automated upgrade is required in the future certain requirements must be met in relation to the locations of sgc.dat, log4j.xml, hazelcast.xml, sgcenv and SGC.properties. If necessary, the locations of these files can be modified to meet these requirements now. |
Ensure that the destination SGC installation contains the correct version of the copied files. This is best performed by examining the contents of each file via less:
$ less $OCSS7_ROOT/CLUSTER_NAME/NODE_NAME/ocss7-3.0.0.0/var/sgc.datAlternatively if the copied files have not been manually adjusted, md5sum can be used to verify that the destination file has the same checksum as the source file:
$ md5sum $EXISTING_SGC_HOME/var/sgc.dat
2f765f325db744986958ce20ccd9f162  $EXISTING_HOME/var/sgc.dat
$ md5sum $OCSS7_ROOT/CLUSTER_NAME/NODE_NAME/ocss7-3.0.0.0/var/sgc.dat
2f765f325db744986958ce20ccd9f162  $OCSS7_ROOT/CLUSTER_NAME/NODE_NAME/ocss7-3.0.0.0/var/sgc.dat
b) Verify hazelcast.xml and backup-count
If $OCSS7_ROOT/CLUSTER_NAME/NODE_NAME/ocss7-3.0.0.0/config/hazelcast.xml did not exist it should be installed and customized according to Hazelcast cluster configuration.
| |
Hazelcast’s backup-count property must be correctly set for the size of the cluster. Failure to adhere to this requirement may result in cluster failure. |
c) Update SGC.properties
The sgc.tcap.maxPeers and sgc.tcap.maxMigratedPrefixes configuration properties have been removed. These should be removed from the replacement node’s SGC.properties file.
A new configuration property, sgc.tcap.maxTransactions, is available to configure the maximum number of concurrent transactions that may be handled by a single SGC. The default value should be reviewed and changed if necessary.
5. Backup the Replacement Cluster
Create a backup of the replacement cluster prior to starting the execution phase.
Execution
The execution phase should be carried out during a scheduled upgrade window. The preparation phase must have been completed prior to starting this phase.
| |
The execution phase involves a period of complete outage for the cluster being upgraded. |
The execution phase is comprised of the following actions:
1. (Optional) Switch Traffic to an Alternate Site
Optionally, traffic may be switched to an alternate site.
How to do this is site specific and out of the scope of this guide.
2. Terminate the Existing Cluster
For each node in the existing cluster execute sgc stop:
$OCSS7_HOME/bin/sgc stop
Stopping processes:
    SGC:7989
    DAEMON:7974
Initiating graceful shutdown for [7989] ...
Sleeping for max 32 sec waiting for graceful shutdown to complete.
Graceful shutdown successful
Shutdown complete (graceful)
| |
If the node has active calls the graceful shutdown may become a forced shutdown, resulting in active calls being terminated. This is a normal and expected consequence of an offline upgrade when calls have not been redirected and/or drained from the site to be upgraded. |
And validate the state of the node using sgc status:
$OCSS7_HOME/bin/sgc status
SGC is down
3. Start the Replacement Cluster
Start each node in the replacement cluster using sgc start:
$OCSS7_ROOT/CLUSTER_NAME/NODE_NAME/ocss7-3.0.0.0/bin/sgc start
SGC starting - daemonizing ...
SGC started successfully
And validate the state of the node using sgc status:
$OCSS7_ROOT/CLUSTER_NAME/NODE_NAME/ocss7-3.0.0.0/bin/sgc status
SGC is alive
The CLI’s display-info-nodeversioninfo and display-info-clusterversioninfo commands may also be used to view the node and cluster status respectively. Also, display-node may be used to view configured nodes that are in the active state.
| |
display-info-nodeversioninfo and display-info-clusterversioninfo are OCSS7 3.0.0.0+ only commands. |
4. Verify Cluster Operation
It is strongly recommended that correct cluster operation is verified with either test calls or a very small number of live calls prior to resuming full operation.
The process of generating test calls or sending a small number of live calls to the cluster is unique to the site and therefore out of the scope of this guide.
Appendix A: SGC Properties
The following table contains a description of the configuration properties that may be set in SGC.properties:
| Property | What it specifies | Default |
|---|---|---|
|
|
enables or disables the heartbeat timeout mechanism in the SGC. If this is enabled in the SGC then the TCAP stack must also be configured to send heartbeats, otherwise the connection between the TCAP stack and SGC will be marked as timed out after |
|
|
|
timeout (in seconds) waiting for a handshake between the SGC and TCAP stack |
|
|
|
how many seconds to wait before the Peer closes the connection after not receiving anything Value must be greater than the heartbeat period configured in the TCAP stack, see Data Connection Heartbeat Mechanism for details. |
|
|
|
capacity of the Peer sending queue |
|
|
|
whether to disable the Nagle algorithm for the connection between the SGC and TCAP stack |
|
|
|
whether to ignore the configured switch-local-address when establishing a client intra-cluster-communication (comm switch module) connection; if
|
|
|
|
whether to disable the Nagle algorithm in intra-cluster communication client mode (comm switch module) |
|
|
|
number of threads serving connections (client mode) from other SGC nodes; for intra-cluster communication (comm switch module) Each thread requires three File Descriptors. The recommended value should be one less than number of nodes in the cluster. |
|
|
|
number of threads accepting connections from other SGC nodes; for intra-cluster communication (comm switch module) Each thread requires three File Descriptors. |
|
|
|
whether to disable the Nagle algorithm in intra-cluster communication server mode (comm switch module) |
|
|
|
number of threads serving connections (server mode) from other SGC nodes; for intra-cluster communication (comm switch module) Each thread requires three File Descriptors. The recommended value should be one less than number of nodes in the cluster. |
|
|
|
size of the socket receive buffer (in bytes) used by intra-cluster communication (comm switch module) Use a value <= |
|
|
|
size of the socket send buffer (in bytes) used by intra-cluster communication (comm switch module) Use a value <= |
|
|
|
how long to wait, in milliseconds, after a configuration update has been made before the updated config is saved. This delay improves the speed of batched config imports. A value of |
|
|
|
number of threads accepting data connections from TCAP stack instances Each thread requires three File Descriptors. |
|
|
|
number of threads serving data connections from TCAP stack instances Each thread requires three File Descriptors. The recommended value should be equal to the number of TCAP stack instances served by the cluster. |
|
|
|
number of threads accepting connections from TCAP stack instances requesting balancing information |
|
|
|
number of threads serving accepted connections from TCAP stack instances requesting balancing information |
|
|
|
whether to try a graceful shutdown first (value true) when shutting down because of a uncaught exception |
|
|
|
how long to wait (in milliseconds) during graceful shutdown, before forcing a shutdown |
|
|
|
whether an uncaught exception should result in instance shutdown (value Severe errors ( |
|
|
|
optional path to the Hazelcast config file |
none, but the default |
|
cluster group to which this instance belongs |
|
|
|
|
implementation of the alarming factory |
|
|
|
maximum alarming history age (in minutes) |
|
|
|
property name used to get the path where the SGC data file should be stored |
current working directory at the time of startup |
|
|
property name used to get the actual SGC data file name |
|
|
|
whether the SGC should ignore validation of the MD5 signature of the XML configuration file |
|
|
|
maximum number of inbound messages that may be processing or waiting to be processed |
|
|
|
how long (in seconds) the SGC should consider a connection pending after peer node allocation, but before actual connection (after this time, the SGC assumes that the connection will not happen) This value is used only by the Legacy 'ocss7.urlList' Connection Method to assist with balancing TCAP stacks amongst SGCs. If it is set too small then under certain failure conditions it may result in a TCAP stack continually trying to reconnect to an SGC data port that it cannot reach. The suggested value for this property is The default value allows for 13 TCAP stacks and 2 SGCs under worst case failure conditions with a 4 second safety factor. The safety factor allows for network latency and timer precision. |
|
|
|
maximum number of outbound messages that may be processing or waiting to be processed |
|
|
maximum number of concurrent transactions that this SGC may process The |
|
|
|
|
The path where the SGC upgrade packs are stored. If the provided path is relative, then this is relative to |
|
|
|
maximum number of tasks (messages to be processed) in one worker queue |
|
|
|
number of threads used by the worker group to process inbound and outbound messages |
|
|
|
counter file name for snmp4j |
|
|
|
file name for snmp4j persistent storage |
|
|
|
whether TCAP manager uses a Nagle algorithm for incoming connections |
|
|
name of the SGC instance within the cluster |
|
Appendix B: Support Requests
This document provides guidance on material to include with OCSS7 support requests.
Gathering Support Data
OCSS7 support requests should contain the following information:
-
An SGC Report for each SGC node in the SGC cluster
-
OCSS7 TCAP Stack Logging for each Rhino node in the Rhino cluster
Gathering Support Data from the SGC
The SGC installation includes a convenience script $SGC_HOME/bin/generate-report.sh that should be used to gather information for a support request. The information gathered by this script includes:
-
Information about the SGC version being used.
-
General system information, such as network interfaces, running processes, mounted filesystems.
-
The SGC’s general configuration files:
$SGC_HOME/config/* -
The SGC startup scripts:
$SGC_HOME/bin/* -
The SGC’s log files:
$SGC_HOME/logs/* -
The current state of the SGC as indicated by the various
display-*command line client commands, if the SGC is running. -
A thread dump from the SGC process, if the SGC is running.
-
The current saved MML configuration:
$SGC_HOME/var/sgc.dat
This is the preferred method of gathering information for a support request, and this script is considered safe to use on a live SGC.
Configuring the generate-report.sh script
The generate-report.sh script is configured with some default values that may require changing for non-standard installations.
These values may be changed by opening the script in your preferred text editor and following the instructions in that script.
| |
Do not edit anything after the section marked "End of user-configurable section". |
| Property | What it specifies | Default |
|---|---|---|
|
|
The level of logging that the 0 = silent, 1 = basic information (default), 2 = debug, 3 = more debug |
1 |
|
|
Where the SGC is installed. |
The parent directory of the |
|
|
Where the SGC’s ss7.log and startup.log are saved. |
|
|
|
The JMX hostname to use to connect to the SGC to gather runtime status information. |
Auto-detected from |
|
|
The JMX port to use to connect to the SGC to gather runtime status information. |
Auto-detected from |
|
|
How many days of SGC logging to retrieve.
The script is conservative and will always ensure that there is at least 1GB or 10% (whichever is the larger) disk space remaining after gathering logs. |
|
|
|
The tar command to use to package up the generated report. By default |
|
Executing the generate-report.sh script
One node at a time, for each node in the cluster, execute the script (this may take a few minutes):
cd $SGC_HOME
./bin/generate-report.sh
Example output where LOGLEVEL is set to 1 (default) and the SGC is running looks like:
ocss7@badak:~/testing/PC2-1$ ./bin/generate-report.sh
    Initializing...
      - Using SGC_HOME /home/ocss7/testing/PC2-1 (if this is not correct, override in generate-report.sh)
    Generating report...
      - Getting general system information
      - Getting info from /proc subsystem for SGC pid 28229
      - Getting configuration files
      - Getting SGC scripts
      - Getting SGC logs
    tar: Removing leading `/' from member names
      - Getting runtime state from JMX
      - Getting thread dump from SGC PC2-1 (pid=28229)
      - Getting runtime SGC configuration
    Cleaning up...

    Report written to /home/ocss7/testing/PC2-1/ocss7-report-PC2-1-2017-12-18_103720.tar
    *** Note that this report is not compressed.  You may compress it with bzip2 or xz if you wish. ***
If the SGC is not running, the output may look like this:
ocss7@badak:~/testing/PC1-1$ ./bin/generate-report.sh
Initializing...
  - Using SGC_HOME /home/ocss7/testing/PC1-1 (if this is not correct, override in generate-report.sh)
[WARN]: The SGC is not running, limited reports will be generated.
Generating report...
  - Getting general system information
  - Not getting /proc/ info for process (SGC is not running)
  - Getting configuration files
  - Getting SGC scripts
  - Getting SGC logs
tar: Removing leading `/' from member names
  - Not getting runtime state from JMX (SGC is not running)
  - Not getting thread dump (SGC is not running)
  - Getting runtime SGC configuration
Cleaning up...

Report written to /home/ocss7/testing/PC1-1/ocss7-report-PC1-1-2017-12-18_090911.tar
*** Note that this report is not compressed.  You may compress it with bzip2 or xz if you wish. ***
| |
As indicated by the script, it may be desirable to compress the resulting tar file. We recommend using nice if performing this on the SGC host so as not to compromise node performance. |
Please verify the contents of this file before uploading, especially if SGC components are in non-standard locations. In particular, ensure that ss7.log- and startup.log- files are present.
Gathering Support Data from the OCSS7 TCAP Stack
The OCSS7 TCAP stack is an integral component of the CGIN RA. Please refer to Appendix C. Support Requests in the CGIN documentation for further details.
Appendix C: Online Upgrade Support Matrix
This appendix details the SGC versions that online upgrade and reversion may be applied to.
Online upgrade and reversion are symmetric operations. If it is possible to upgrade from release A to release B it will also be possible to revert from release B to release A.
Source Version |
Target Version |
||
|
|
|
|
|
Unsupported |
Unsupported |
Unsupported |
|
Unsupported |
Unsupported |
Unsupported |
|
Unsupported |
Unsupported |
Supported |
Appendix D: Glossary of Acronyms
- AS
-
Application Server
- CLI
-
Command Line Interface
- CPC
-
Concerned Point Code
- CRUD
-
Create Remove Update Display
- DPC
-
Destination Point Code
- GT
-
Global Title
- IPSP
-
IP Server Process
- JDK
-
Java Development Kit
- JKS
-
Java KeyStore
- MML
-
Man Machine Language
- SNMP
-
Simple Network Management Protocol
- SG
-
Signalling Gateway
- SPC
-
Signalling Point Code
- SS7 SGC
-
Signalling System No. 7 Signalling Gateway Client
- SSL
-
Secure Socket Layer
- SSN
-
SubSystem Number
- USM
-
User Security Model